Fellowes Callisto 95, Callisto 125 User Manual

Small Of ce Laminator
5
4
3
5
4
3
EPlease read these instructions before use.
FVeuillez lire ces instructions avant l’utilisation.
SLea estas instrucciones antes del usarlo.

INDEX
LAMINATOR CONTROLS / QUICK START GUIDE |
3 |
ENGLISH |
4-5 |
FRANCAIS |
6-7 |
ESPAÑOL |
8-9 |

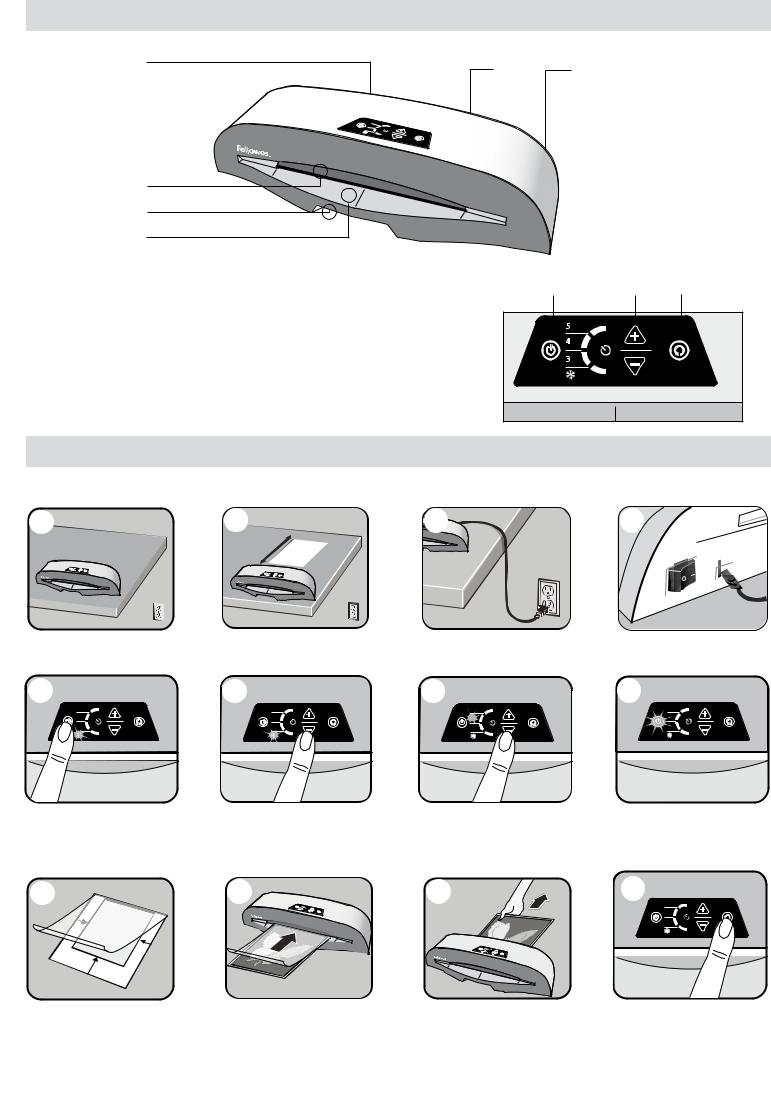
LAMINATOR CONTROLS
I |
H |
A |
|
||
|
5 |
|
|
4 |
|
|
3 |
|
F
E
G
B |
C |
D |
QUICK START GUIDE
1 |
2 |
3 |
4 |
|
|
20” |
|
5 |
6 |
7 |
8 |
5 |
5 |
|
5 |
4 |
4 |
4 |
3 |
3 |
3 |
9 |
10 |
11 |
12 |
5
4
3
3

ENGLISH |
E |
|
|
|
|
|
|
||
LAMINATOR CONTROLS |
|
|
||
A |
On / off switch |
|
F |
Pouch / document entry slot |
B |
Standby button |
|
G |
Entry support shelf |
C |
Pouch selection buttons ( , 3 Mil, 4 Mil, 5 Mil) |
H |
Pouch / document exit |
|
D |
Reverse button ( |
) |
I |
Cooling system vents |
ECarry handle
CAPABILITIES
Performance |
|
Technical Data |
|
|
Entry width |
125 = 12.5” / 318mm |
Voltage / Frequency / Current(Amps) |
125 = 110-120V AC, 60Hz, 4.2A |
|
|
95 = 9.5” / 240mm |
|
95 = 110-120V AC, 60Hz, 3.5A |
|
Pouch thickness (min) |
3 Mil (per side) |
Wattage |
125 = 480 Watts |
|
Pouch thickness (max) |
5 Mil (per side) |
|
95 = 430 Watts |
|
Dimensions (HxWxD) |
125 = 4.3” x 22.4” x 6.1” |
|||
Warm up time (estimate) |
5 minutes |
|||
|
95 = 4.3” x 17.7” x 5.7” |
|||
Cool down time |
60-90 minutes |
|
||
Net weight |
125 = 4.6lb |
|||
Lamination speed (+/- 5%) |
approx. 12-16”/min (fixed speed) |
|||
|
95 = 4lb |
|||
Number of rollers |
2 |
Max document thickness |
|
|
Ready indication |
Light & beep |
(laminating capacity) |
.040” / 1 mm |
|
Reverse |
Yes |
|
|
|
Clear Path / Anti-jam engine |
Yes |
|
|
|
Cold lamination |
Yes |
|
|


 IMPORTANT SAFETY INSTRUCTIONS - KEEP FOR FUTURE USE
-The machine is for indoor use only. Plug the machine into an easily accessible socket.
-To prevent electrical shock - do not use the appliance close to water, do not spill water on to the appliance, power cord or wall socket.
DO ensure the machine is on a stable surface.
DO test laminate scrap sheets and set the machine before final laminations. DO remove staples and other metal articles prior to laminating.
DO keep the machine away from heat and water sources. DO turn off the machine after each use.
DO unplug the machine when not in use for an extended period. DO use pouches designed for use at the appropriate settings. DO keep away from pets, while in use.
DO ensure self-adhesive pouches are only used with the cold setting.
DO NOT leave the power cord in contact with hot surfaces. DO NOT leave power cord hanging from cupboards or shelves. DO NOT use appliance if the power cord is damaged.
DO NOT attempt to open or otherwise repair the machine. DO NOT exceed the machines quoted performance.
DO NOT allow children to use this machine without adult supervision. DO NOT laminate sharp or metal objects (eg: staples, paper clips).
DO NOT laminate heat-sensitive documents (eg: tickets, ultrasounds etc) on hot settings.
DO NOT laminate with self-adhesive pouches on hot settings. DO NOT laminate an empty pouch.
FEATURES & TIPS
‘Safe Start’ function
When switched on, the machine has a default ‘Safe Start’ function which is set to the cold pouch setting. You may select other hot temperature settings if required. The machine will warm-up and alert the user when it is ready.
‘Reverse’ function
To remove or re-align a pouch during lamination, press and hold the reverse button until the pouch is ejected from the entry slot.
‘Hot Swap’ function
The Hot Swap function enables the user to instantly switch between thick and thin pouch settings without any processing delays.
•For best results, use Fellowes ® brand pouches: 3 Mil, 4 Mil, 5 Mil and 5 Mil Cold Pouches.
4
•For self-adhesive (cold pouches) only use the cold setting.
•This machine does not need a carrier to laminate. It is a carrier-free mechanism.
•Always put the item to be laminated into the appropriate sized pouch.
•Always test laminate with a similar size and thickness before final process.
•Prepare pouch and item for lamination. Place item within pouch centered and touching the leading sealed edge. Ensure the pouch is not too large for the item.
•If required, trim excess material from around the item after lamination and cooling.
•When working with different pouch thickness’ (temperature settings) it is recommended to first start with the thinnest pouches.
 Loading...