


 Loading...
WARNING
POTENTIAL HAZARD
♦This product is a piece of power equipment.
WHAT CAN HAPPEN
♦Failure to follow safe operating practices can result in serious operator injury or even death.
HOW TO AVOID THE HAZARD
♦Keep all shields, guards and safety devices (especially the grass discharge system) in place and in proper working condition.
♦Stop engine and wait for all moving parts to stop. Remove spark plug wire(s) or remove key before adjusting, servicing, or performing maintenance.
♦If mower deck becomes clogged, stop engine and wait for all moving parts to stop. Remove spark plug wire(s) or remove key before cleaning blockage.
♦Keep hands, feet and clothing away from power driven parts.
♦Keep off mower unless seat platform is provided.
♦Keep others off mower.
Exmark reserves the right to make changes or add improvements to its products at any time without incurring any obligation to make such changes to products manufactured previously. Exmark, or its distributors and dealers, accept no responsibility for variations which may be evident in the actual specifications of its products and the statements and descriptions contained in this publication.
2
EXMARK PARTS PLUS PROGRAM
EFFECTIVE DATE: September 1, 1995
Program
If your Exmark dealer does not have the Exmark part in stock, Exmark will get the parts to the dealer the next business day or the part will be FREE* Guaranteed!!
How the Program Works
1.If dealer does not have part in stock for a "down" unit at the time of request by customer, the dealer contacts his
distributor by 1:00 p.m., local time, and requests Exmark Parts Plus shipment of six (6) line items or less.
2.Distributor ships part(s) to dealer or customer, as requested by dealer, same day, overnight UPS Distributor bills dealer for part and freight charges where applicable.
3.If distributor does not have the part(s) in stock to satisfy Exmark Parts Plus order, he contacts Exmark by 3:00 p.m., central time, with an Exmark Parts Plus order of six
(6) line items or less.
4.If order is received by 3:00 p.m. central time, Exmark ships part(s) direct to dealer or customer, as requested by
distributor, same day, overnight UPS Exmark bills the distributor for parts and shipping charges, where applicable.
5.The customer pays for the part and freight if it is shipped under the Exmark Parts Plus and if it arrives in accordance to the program.
6.Who pays for the part and freight if it fails to arrive overnight in accordance to the program?
A.Under any circumstance the customer does not pay.
B.If the part does not arrive overnight due to:
1. The dealer not submitting the Exmark Parts Plus order to his Exmark distributor by 1:00 p.m., the dealer pays for the part and freight.
2.The Distributor being unable to ship the part the same day or not submitting the Exmark Parts Plus order to Exmark by 3:00 p.m., central time, the Distributor pays for the part and freight.
3.Exmark being unable to ship the part and the Exmark parts order is received by 3:00 p.m., central time, Exmark pays for the part and freight.
4.If the part does not arrive overnight due to the shipper (UPS), the shipper pays for the freight and Exmark pays for the part.
The following restrictions apply -- The Exmark Parts Plus Program is available only through participating Exmark Dealers and applies only to orders submitted on this program Monday through Thursday. Parts Plus service is available only in the 48 contiguous United States. UPS has initiated a Saturday delivery program to many areas of the continental United States and can be requested for an overnight shipment on Friday to be delivered Saturday. The next day air charge, plus the Saturday delivery fee will be the responsibility of the purchaser. Exmark Mfg. will assume no responsibility for Saturday delivery shipments. To qualify, all Exmark Parts Plus orders must be received by Exmark by 3:00 p.m., central time. Orders must be six (6) line items or less. Exclusions from the Exmark Parts Plus Program are: Any wholegood or accessory in its entirety, engines and engine replacement parts, 5-speed Peerless transmissions and 5-speed transaxles, hydraulic or hydrostatic wheel motors, cutter decks and engine decks or any item exceeding United Parcel Service size and weight restrictions.
Due to UPS restrictions, aerosol spray paint is considered a hazardous material and cannot be shipped via UPS next day or Second Day Air.
Exmark Manufacturing stocks a limited supply of parts for transaxles, pumps and wheel motors. These parts can be ordered for Next Day Air shipment but will not be guaranteed per the Parts Plus Program.
3
OPERATOR'S MANUAL
This manual contains assembly, operating, maintenance, adjustment and safety instructions for your Exmark Ultra Vac.
BEFORE OPERATING YOUR ULTRA VAC, CAREFULLY READ AND UNDERSTAND THIS MANUAL AND THE OPERATOR’S MANUAL FOR YOUR MOWER IN THEIR ENTIRETY.
By following the operating, maintenance and safety instructions, you will prolong the life of your Ultra Vac, maintain its maximum efficiency and promote safe operation.
If additional information is needed, or should you require trained mechanic service, contact your authorized Exmark equipment dealer or distributor.
All Exmark equipment dealers and distributors are kept informed of the latest methods of servicing and are equipped to provide prompt and efficient service in the field or at their service stations. They carry ample stock of service parts or can secure them promptly for you from the factory.
All Exmark parts are thoroughly tested and inspected before leaving the factory, however, attention is required on your part if you are to obtain the fullest measure of satisfaction and performance.
4
TABLE OF CONTENTS
Description |
Page |
||
1. |
Safety |
|
|
|
1.1 |
Safety Alert Symbol............................................................................... |
6 |
|
1.2 |
Training................................................................................................. |
6 |
|
1.3 |
Preparation ........................................................................................ |
6-7 |
|
1.4 |
Safety Signs.......................................................................................... |
7 |
2. |
Specifications |
|
|
|
2.1 |
Model Number....................................................................................... |
8 |
|
2.2 |
Dimensions ........................................................................................... |
8 |
|
2.3 |
Bagging System.................................................................................... |
8 |
3. Assembly Instructions – Lazer Z HP |
|
||
|
3.1 |
Assembly Diagram ................................................................................ |
9 |
|
3.2 |
Install Drive Kit .................................................................................... |
10 |
|
3.3 |
Install Hood Assembly and Bags......................................................... |
10 |
|
3.4 |
Assemble Tubes ................................................................................. |
10 |
|
3.5 |
Install Blower Assembly ................................................................. |
10-12 |
4. Assembly Instructions – Lazer Z and Lazer Z XP |
|
||
|
4.1 |
Assembly Diagram ......................................................................... |
12-13 |
|
4.2 |
Install Hood Assembly and Bags.................................................... |
14-15 |
|
4.3 |
Install Blower Assembly ................................................................. |
15-18 |
|
4.4 |
Assemble Tubes ................................................................................. |
18 |
|
4.5 |
Install Weight Plates ...................................................................... |
18-19 |
|
4.6 |
Install Removable Weights.................................................................. |
19 |
|
4.7 |
Run In – 52” Units Only....................................................................... |
20 |
5. |
Operation |
|
|
|
5.1 |
Pre-Start ........................................................................................ |
20-21 |
|
5.2 |
Mowing................................................................................................ |
21 |
|
5.3 |
Bagger Removal for Side Discharge .............................................. |
21-22 |
|
5.4 |
Transporting................................................................................... |
22-23 |
6. |
Maintenance |
|
|
|
6.1 |
Periodic Maintenance..................................................................... |
23-24 |
7. |
Parts Lists |
|
|
|
7.1 |
Decals................................................................................................. |
25 |
|
7.2 |
Blower Assembly – Lazer Z HP 44,48,52 & Lazer Z 52.................. |
26-27 |
|
7.3 |
Hood and Bag Assembly – Lazer Z HP 44,48,52 & Lazer Z 52 ...... |
28-29 |
|
7.4 |
Blower Assembly – Lazer Z 60, 72 & Lazer Z XP 60,72 ................. |
30-31 |
|
7.5 |
Hood and Bag Assembly – Lazer Z 60, 72 & Lazer Z XP 60,72 ..... |
32-33 |
7.6Completing Kit Assembly – Lazer Z 52,60,72 & Lazer Z XP 60,72.34-35
7.7 |
Drive Kit Assembly – Lazer Z HP 44,48,52 |
......................................... 36 |
7.4 |
Adapter Kit – 103-0328 ....................................................................... |
36 |
7.5 |
Adapter Kit – 103-1369 ....................................................................... |
36 |
8. Warranty ......................................................................................... |
37 -38 |
|
5

1.SAFETY
1.1SAFETY ALERT SYMBOL
This SAFETY ALERT SYMBOL  is used both in this manual and on the machine to identify important safety messages which must be followed to avoid accidents. This symbol means:
ATTENTION! BECOME ALERT!
YOUR SAFETY IS INVOLVED!
The safety alert symbol appears above information which alerts you to unsafe actions or situations and will be followed by the word DANGER, WARNING, or CAUTION.
DANGER: Indicates an imminently hazardous situation which, if not avoided, WILL result in death or serious injury.
WARNING: Indicates a potentially hazardous situation which, if not avoided, COULD result in death or serious injury.
CAUTION: Indicates a potentially hazardous situation which, if not avoided, MAY result in minor or moderate injury.
1.2TRAINING
1.2.1Regard the Exmark Ultra Vac as a piece of power equipment and teach this regard to all who operate this unit.
1.2.2Before operating your Ultra Vac, carefully read and understand this manual and the operator’s manual for your mower in their entirety. Familiarize yourself with the controls and the proper use of the equipment. If the operator(s) or mechanic(s) can not read English, it is the owner’s responsibility to explain this material to them.
1.2.3Do not allow operation of this machine by untrained personnel. Never allow children, teenagers, or people unfamiliar with these instructions to use the mower. Local regulations may restrict the age of the operator.
1.2.4Avoid mowing while people, especially children, or pets, are nearby. Keep in mind that the operator or user is responsible for accidents or hazards occurring to other people or their property.
1.3PREPARATION
1.3.1Evaluate the terrain to determine what accessories and attachments are needed to properly and safely perform the job. Only use accessories and attachments approved by Exmark.
1.3.2The use of personal protective equipment, such as (but not limited to) protection for the eyes, ears, feet, and head is recommended.
CAUTION
POTENTIAL HAZARD
♦This machine produces sound levels in excess of 85 dBA at the operator’s ear when in operation.
WHAT CAN HAPPEN
♦Exposure to sound levels of 85 dBA or above for extended periods of time can cause hearing loss.
HOW TO AVOID THE HAZARD
♦Wear hearing protection when operating this machine.
6
1.3.3While mowing, always wear substantial footwear and long trousers. Do not operate equipment when barefoot or when wearing open sandals.
1.3.4Thoroughly inspect the area where the equipment is to be used and remove all stones, sticks, wires, bones, and other foreign objects which may damage the equipment or cause personal injury to the operator or bystanders.
1.4SAFETY SIGNS
1.4.1Keep all safety signs legible. Remove all grease, dirt and debris from safety signs and instructional labels.
1.4.2Safety signs must be replaced if they are missing or illegible.
1.4.3When new components are installed, be sure that current safety signs are affixed to the replaced components.
1.4.4New safety signs may be obtained from your authorized Exmark equipment dealer or distributor or from Exmark Mfg. Co. Inc.
1.4.5Safety signs may be affixed by peeling off the backing to expose the adhesive surface. Apply only to a clean, dry surface. Smooth to remove any air bubbles.
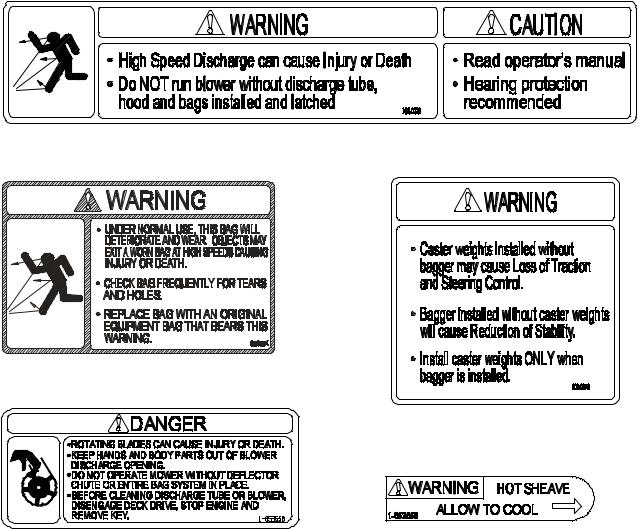
1.4.6Familiarize yourself with the following safety signs and instruction labels. They are critical to the safe operation of your Exmark Ultra Vac.
PART NO. 103-0220
LOCATION: Top of Blower
PART NO. 1-653554
LOCATION: Rear of Bags
PART NO. 103-0878
LOCATION: Top of Weights
Top of Blower
PART NO. 1-653556 |
PART NO. 1-653558 |
LOCATION: Side of Blower Housing (2 Places) |
LOCATION: Top of Idler Arm |
7

2.SPECIFICATIONS
2.1MODEL NUMBER:
LHPUV4448
Use with drive kit: 44” deck – 103-1315
48” deck – 103-1313 (Lazer Z HP Serial Nos. below 203,376) 48” deck – 103-1314 (Lazer Z HP Serial Nos. 203,376 & higher)
Note: Lazer Z HP model LHP4818KC Serial Nos. below 176621 will also require adapter kit 130-0328
LHPUV52
Use with drive kit: 52” deck – 103-1317
LZUV52
Use with drive kit: 52” deck – 103-1076
Note: Lazer Z models with serial numbers below 260,000 will also require adapter kit 103-1369.
Lazer Z with 60” deck – 103-0466
Lazer Z XP with 60” deck – 103-1112
Lazer Z with 72” deck – 103-0903 Lazer Z XP with 72” deck – 103-1113
Note: Lazer Z models with serial numbers below 260,000 will also require adapter kit 103-0538.
2.2DIMENSIONS
2.2.1Overall unit length w/ Ultra Vac
Lazer Z HP
44" Deck |
91.76" |
(233.1 cm) |
48" Deck |
91.76" |
(233.1 cm) |
52" Deck |
93.00" |
(236.2 cm) |
Lazer Z XP
60" Deck 107.90" (274.1 cm)
72" Deck 112.00" (284.5 cm)
Lazer Z - Air Cooled |
|
Lazer Z - Liquid Cooled |
|||||||
52" Deck |
105.70" |
|
(268.5 cm) |
|
52" Deck |
106.00" |
|
(269.1 cm) |
|
60" Deck |
106.65" |
|
(270.9 cm) |
|
60" Deck |
106.90" |
|
(271.5 cm) |
|
72" Deck |
110.75" |
|
(281.3 cm) |
|
72" Deck |
111.00" |
|
(281.9 cm) |
|
2.2.2 Overall unit width w/ Ultra Vac |
|
|
|
|
|||||
|
Lazer Z HP |
|
Lazer Z and Lazer Z XP |
||||||
44" Deck |
58.47" |
(148.5 cm) |
|
52" Deck |
66.85" |
(169.8 cm) |
|||
48" Deck |
61.73" |
(159.8 cm) |
|
60" Deck |
74.44" |
(189.1 cm) |
|||
52" Deck |
66.47" |
(168.8 cm) |
|
72" Deck |
86.49" |
(219.7 cm) |
|||
2.3BAGGING SYSTEM
2.3.1Weight: Lazer Z HP -110 lbs. (50 kg)
Lazer Z and Lazer Z XP – 52” Deck – 220 lbs. (100 kg) includes weight kit
60” Deck – 290 lbs. (132 kg) includes weight kit 72” Deck – 237 lbs. (108 kg) includes weight kit
2.3.2 Collections bins: Commercial grade, cloth mesh bags with reinforced bottoms. Capacity: All Lazer Z HPs and Lazer Z 52” - 8 bushels (2 bags and hood)
All 60 and 72” decks – 13.4 bushels (3 bags and hood)
2.3.3Dump Mechanism: Manual lift off
2.3.4Blower tube: fixed, abrasion resistant molded polyethylene
2.3.5Impeller: 5-bladed, 0.25” thick abrasion resistant steel, with vertical axis. Impeller bearings: 1” (2.54 cm) sealed “non-greaseable bearings”
8
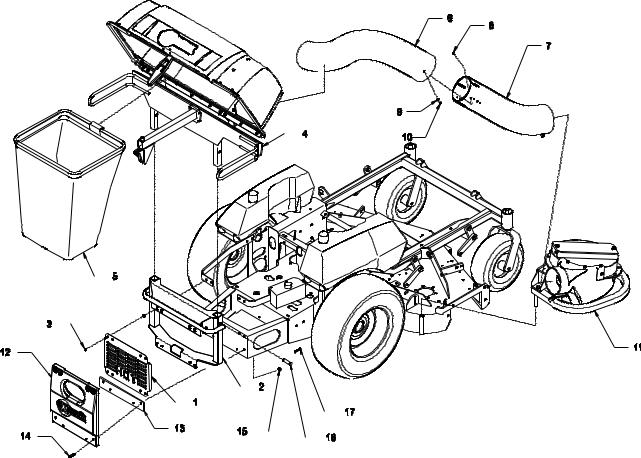
3. ASSEMBLY INSTRUCTIONS – LAZER Z HP
(See Section 4 for Lazer Z and Lazer Z XP) 3.1 ASSEMBLY DIAGRAM
Ref. No. |
Qty |
Description |
|
|
|
|||||||||||||||||||
1 |
|
|
Ref |
Engine Guard 44,48 only |
|
|
|
|||||||||||||||||
2 |
|
|
1 |
|
Bagger Mount Weldment |
|
|
|
||||||||||||||||
3 |
|
|
8 |
|
5/16 – 18 X 1.00 Hex Head Screw |
|
|
|
||||||||||||||||
4 |
|
|
1 |
|
Hood Assembly |
|
|
|
||||||||||||||||
5 |
|
|
2 |
|
Bag Assembly |
|
|
|
||||||||||||||||
6 |
|
|
1 |
|
Upper Tube |
|
|
|
||||||||||||||||
7 |
|
|
1 |
|
Lower Tube Assembly |
|
|
|
||||||||||||||||
8 |
|
|
3 |
|
#10 – 24 X .75 Truss Head Screw |
|
|
|
||||||||||||||||
9 |
|
|
3 |
|
#10 Flat Washer |
|
|
|
||||||||||||||||
10 |
|
|
3 |
|
#10 – 24 Nyloc Nut |
|
|
|
||||||||||||||||
11 |
|
|
1 |
|
Blower Assembly |
|
|
|
||||||||||||||||
12 |
|
|
Ref |
Rear Weight 52 only |
|
|
|
|||||||||||||||||
13 |
|
|
Ref |
Spacer 52 only |
|
|
|
|||||||||||||||||
14 |
|
|
8 |
|
5/16 – 18 X 1.75 Hex Head Screw |
|
|
|
||||||||||||||||
15 |
|
|
4 |
|
5/16-18 x 18 Whizlock Nut |
|
|
|
||||||||||||||||
16 |
|
|
2 |
|
Clevis Pin |
|
|
|
||||||||||||||||
17 |
|
|
2 |
|
Hair Pin |
|
|
|
||||||||||||||||
|
|
|
|
|
|
|
|
|
|
|
|
|
|
|
|
|
|
|
|
|
|
|
|
|
|
|
|
|
|
|
|
|
|
|
|
|
|
|
|
|
|
|
|
|
|
|
|
|
|
|
|
|
|
|
|
|
|
|
|
|
|
|
|
|
|
|
|
|
|
|
|
|
|
|
|
|
|
|
|
|
|
|
|
|
|
|
|
|
|
|
|
|
|
|
|
|
|
|
|
|
|
|
|
|
|
|
|
|
|
|
|
|
|
|
|
|
|
|
|
|
|
|
|
|
|
|
|
|
|
|
|
|
|
|
|
|
|
|
|
|
|
|
|
|
|
|
|
|
|
|
|
|
|
|
|
|
|
|
|
|
|
|
|
|
|
|
|
|
|
|
|
|
|
|
|
|
|
|
|
|
|
|
|
|
|
|
|
|
|
|
|
|
|
|
|
|
|
|
|
|
|
|
|
|
|
|
|
|
|
|
|
|
|
|
|
|
|
|
|
|
|
|
|
|
|
|
|
|
|
|
|
|
|
|
|
|
|
|
|
|
|
|
|
|
|
|
|
|
|
|
|
|
|
|
|
|
|
|
|
|
|
|
|
|
|
|
|
|
|
|
|
|
|
|
|
|
|
|
|
|
|
|
|
|
|
|
|
|
|
|
|
|
|
|
|
|
|
|
|
|
|
|
|
|
|
|
|
|
|
|
|
|
|
|
|
|
|
|
|
|
|
|
|
|
9
3.2 INSTALL DRIVE KIT
1. Install drive kit (PN 103-1313, 103-1314, 103-1315, or 103-1317 depending on deck size) per the instructions included in the kit.
NOTE: The original belt shield stud must be removed for belt clearance.
3.3INSTALL HOOD ASSEMBLY AND BAGS
44and 48 inch units (52 inch units skip to step 3)
Note: When installing Ultra Vac on Lazer Z HP model LHP4818KC with serial numbers below 176621, refer to additional necessary instructions included in adapter kit 103-0328.
1.Remove and discard the (8) bolts that retain the “HOT” engine guard shield (Item 1). Keep the nuts for use in Step 2.
2.Install the Bagger Mount Weldment (Item 2) and engine guard shield using the 5/16-18 x 1 Screws provided (Item 3) and whizlock nuts removed in step 1. Continue at step 6.
52 inch units
3.Remove and discard the (8) bolts that retain the rear weight (Item 12). Keep the whizlock nuts for use in step 5.
4.Install the Bagger Mount Weldment (Item 2) to the rear of the frame using (4) 5/16 – 18 X1.00 screws (Item 3) and (4) 5/16 – 18 whizlock nuts (Item 15). Use only the bottom four holes on the Bagger Mount Weldment
5.Install the Rear Weight (Item 12) and spacer (Item 13) from the drive kit using the (8) 5/16
– 18 X1.75 screws (Item 14) and whizlock nuts removed in step 3.
All units
6.Slide tube ends of Hood Assembly (Item 4) into the tubes of the mount weldment. Install
(2) clevis pins (Item 16) through holes in tubes. Retain with (2) Hair Pins (Item 17).
7.Hang the (2) Bag Assemblies (Item 5) from the slots in the Bagger Upright. Close and latch hood.
3.4ASSEMBLE TUBES
Note: When installing Ultra Vac on Lazer Z HP model LHP4818KC with serial number below 176621, refer to additional necessary instructions included in adapter kit 103-0328.
1.Assemble the Upper (Item 6) and Lower (Item 7) Tubes using the (3) #10-24 x .75 Truss head Screws (Item 8), (3) #10 washers (Item 9), and (3) #10-24 Nyloc Nuts (Item 10). Screw head should be installed to the inside of the tube to provide minimum obstruction to flow. Make sure the hole with the arrow on the Upper Tube aligns with the dimple in the Lower Tube to place the turnout on the Upper Tube in the correct position.
For units with a 44” deck: Slide Upper Tube over Lower Tube until edge of Upper Tube matches up with dimple in Lower Tube labeled 44.
For units with a 48” & 52” deck: Slide Upper Tube over Lower Tube until edge of Upper Tube matches up with dimple in Lower Tube labeled 48, 52.
3.5INSTALL BLOWER ASSEMBLY
1.Remove the belt guide on the blower (Item 11). (See Figure 1)
2.Install the belt (from the Drive Kit) onto the Blower Assembly (Item 11) as shown.
10
FIGURE 1
BELT ROUTING
3.Reinstall the belt guide removed in Step 1.
4.Remove Discharge chute by pulling the hairpin and chute pivot pin (from the Drive Kit installed in section 3.2).
5.Remove the Belt Cover on the right side of the deck. Install the Blower by inserting the mounting pin into the tube welded to the rear corner of the deck. Pivot the blower until the front pin engages the slot in the deck. Adjust the position of the front pin if necessary to engage the slot. Use the latch to lock the blower in this position. Adjust tension on latch to draw blower up to deck, yet allow release by hand.
6.Pull the idler release handle and install the belt in the upper groove of the deck sheave.
7.Install the Belt Cover using the two knobs. Install the discharge tube assembly by slipping the upper end into the hood, then sliding the lower end over the blower discharge opening. Use the latch to retain the lower end to the blower.
8.Follow the operation instructions in Section 5 to run the unit. Run the unit with the blades and blower engaged for 2 minutes. Disengage the blades, shut off the motor, and remove the key.
9.Remove the belt cover and check to make sure that the belt is riding near the center of the flat idler on the idler arm. If the belt is not riding near the center of the idler, remove the blower, and bend the idler arm slightly. Reinstall the blower and belt cover and perform steps 8 and 9 again to verify belt position.
DANGER
POTENTIAL HAZARD
♦There are rotating blades in the blower and under the mower deck.
WHAT CAN HAPPEN
♦Blade contact can cause serious operator or bystander injury or even death.
HOW TO AVOID THE HAZARD
♦Keep hands and feet out of blower openings and out from under the mower or mower deck.
♦Shut off the deck drive, stop engine and wait for all moving parts to stop. Remove spark plug wire(s) or remove key before performing any work around blower or deck.
11

WARNING
POTENTIAL HAZARD
♦An uncovered discharge opening will allow objects to be thrown in operator’s or bystander’s direction. Also, contact with blade could occur.
WHAT CAN HAPPEN
♦Thrown objects or blade contact can cause serious injury or kill you or bystanders.
HOW TO AVOID THE HAZARD
♦Never operate mower unless discharge chute or entire grass collection system is installed.
4.ASSEMBLY INSTRUCTIONS – LAZER Z & LAZER Z XP
4.1ASSEMBLY DIAGRAM
Ref . No. |
Description |
Qty (52 LZ) |
Qty (60 & 72 LZ) |
Qty (60 & 72 XP) |
1 |
Bag Assembly |
2 |
3 |
3 |
2 |
Upper Tube |
1 |
1 |
1 |
3 |
Lower Tube |
1 |
1 |
1 |
4 |
#10-24 X .62 CRPH Screw |
3 |
6 |
6 |
5 |
#10-24 Nyloc Nut |
3 |
6 |
6 |
6 |
#10 Flat Washer |
3 |
6 |
6 |
7 |
Hood Assembly |
1 |
1 |
1 |
8 |
Blower Assembly |
1 |
1 |
1 |
9 |
Bagger Mount Weldment |
1 |
1 |
1 |
10 |
Belt Cover |
1 |
1 |
1 |
11 |
Removable Weight |
2 |
2 |
2 |
12 |
Jackshaft |
1 |
1 |
1 |
13 |
Blower Drive Belt |
1 |
1 |
1 |
14 |
Frame Bracket RH |
1 |
1 |
|
15 |
Frame Bracket LH |
1 |
1 |
|
16 |
Frame Bracket XP |
|
|
2 |
17 |
XP Mount Spacer |
|
|
2 |
18 |
Mount Pin Weldment |
|
1 |
1 |
19 |
Clevis Pin |
4 |
4 |
4 |
20 |
Hair Pin (large) |
4 |
4 |
4 |
21 |
Chute Pivot Pin |
1 |
1 |
1 |
22 |
Hair Pin (small) |
1 |
1 |
1 |
23 |
3/8-16 x 1.00 Hex Screw |
8 |
8 |
10 |
24 |
3/8 Whizlock Nut |
8 |
11 |
13 |
25 |
3/8 Spring Disk Washer |
12 |
12 |
14 |
26 |
Filler Plate (small) |
1 |
|
|
27 |
Belt Shield Stud |
|
1 |
1 |
28 |
3/8-16 x .75 Hex Screw |
|
3 |
3 |
29 |
Belt Cover Spacer |
|
1 |
|
30 |
7/16 Spring Disk Washer |
|
2 |
|
31 |
Washer – ¼ thick |
2 |
2 – 60 only |
|
32 |
3/8-16x3.25 Tap Bolt |
2 |
2 – 60 only |
|
33 |
Weight Bracket |
2 |
2 |
2 |
34 |
3/8-16 Square Head Bolt |
4 |
4 |
4 |
35 |
Weight Plate |
4 |
4 |
4 |
36 |
5/16-18 x 1.50 Hex Screw |
4 |
4 |
4 |
37 |
5/16 Flat Washer |
4 |
4 |
4 |
38 |
5/16-18 Whizlock nut |
6 |
4 |
4 |
39 |
Belt Cover Support |
2 |
|
|
40 |
Knob |
1 |
|
|
41 |
5/16-18 x .75 Hex Screw |
2 |
|
|
42 |
Plug |
1 |
1 |
1 |
12
Loading...