


Instruction Manual
pH 5/6 & Ion 5/6
pH/mV & Ion/pH Meter Series
Technology Made Easy ...
68X243601
Rev 7 04/04
Preface
This instruction manual serves to explain the use of the pH 5/6 and Ion 5/6 meters.
It functions in two ways: first as a step by step guide to help you operate the meter; second, it serves as a handy reference guide.
This manual is written to cover as many anticipated applications of the pH 5/6 and Ion 5/6 meters as possible. If there are doubts in the use of this meter, please do not hesitate to contact the nearest Eutech Instruments/ Oakton Instruments Authorized Distributor.
Eutech Instruments/ Oakton Instruments will not accept any responsibility for damage or malfunction to the meter caused by improper use of the instrument.
The information presented in this manual is subjected to change without notice as improvements are made, and does not represent a commitment on the part of Eutech Instruments Pte Ltd/ Oakton Instruments.
Copyright © 1999
Eutech Instruments Pte Ltd/ Oakton Instruments
Rev. 7 04/04.
Table of Contents
1. |
INTRODUCTION |
1 |
|
2. |
getting started |
2 |
|
2.1 |
|
Description of Keypad Functions |
2 |
2.2 |
|
Description of LCD Annunciators |
3 |
2.3 |
|
Inserting & Removing the Rubber Boot |
3 |
2.4 |
|
Inserting New Batteries |
4 |
2.5 |
|
Battery Replacement |
4 |
2.6 |
|
Connecting the Electrode and Temperature Sensor |
4 |
2.7 |
|
Condition the pH Electrode |
5 |
2.8 |
|
Switching the Meter On |
5 |
3. |
Calibration |
6 |
|
3.1 |
|
pH Calibration |
6 |
3.2 |
|
Selection of pH buffer standards |
7 |
3.2.1 |
Resetting the User Calibrated Values |
7 |
|
3.2.2 |
pH Calibration using USA standard buffers |
8 |
|
3.2.3 |
pH Calibration using NIST standard buffers |
9 |
|
3.2.4 |
pH Calibration using Pb standard buffers |
10 |
|
3.3 |
|
Ion Calibration (Ion 5 and 6) |
11 |
3.3.1 |
Multi-point Ion Calibration |
12 |
|
3.4 |
|
Millivolt (mV) Calibration (for pH 6 only) |
14 |
3.5 |
|
Temperature Calibration |
15 |
3.5.1 |
With Temperature probe |
15 |
|
3.5.2 |
Without Temperature probe (no ATC) |
16 |
|
4. |
Measurement |
17 |
|
4.1 |
|
Taking Measurements |
17 |
4.2 |
|
Millivolt (mV) Reference Check (for Ion 5/6 only) |
17 |
4.3 |
|
Holding a Reading |
17 |
4.4 |
|
Releasing a Held Reading |
17 |
5. |
ELECTRODE Care and Maintenance |
18 |
|
6. |
TROUBLESHOOTING |
18 |
|
7. |
Specifications |
19 |
|
8. |
Accessories |
20 |
|
9. |
warranty |
22 |
|
10. |
RETURN OF ITEMS |
23 |
|

Instruction Manual |
pH 5/6 & Ion 5/6 |
1. INTRODUCTION
Thank you for purchasing pH 5/6 or Ion 5/6 meter series. These microprocessor-based handheld meters are economical and easy to use. It has a large custom LCD (Liquid Crystal Display) for clear and easy reading.
The pH 5 measures pH and temperature (oC) while the pH 6 measures pH, mV (ORP) and temperature.
Ion 5/6 allows Ion concentration measurement of various ions (mono and di valence) and mV. Besides Ion/mV modes, Ion 6 has pH and temperature (oC) measurement modes. The mV mode is used for diagnosis of ion selective electrode (ISE).
Included with your meter are a robust rubber boot, 4 alkaline “AAA” batteries, temperature sensor, instruction manual and a warranty card. To order other accessories and buffer calibration or standard solutions, please refer to Section 8 on Accessories for more information.
- 1 -
Instruction Manual pH 5/6 & Ion 5/6
2. GETTING STARTED
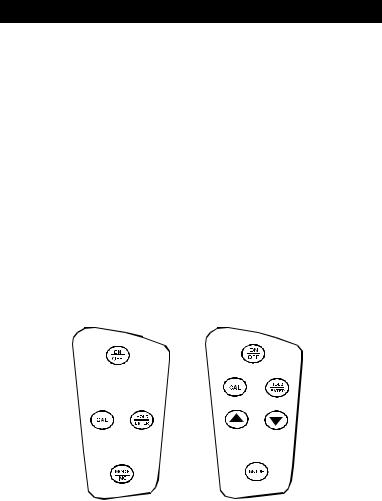
2.1 Description of Keypad Functions
pH 5/6 has four keys and Ion 6 meter has six keys on its splash-proof keypad with tactile feedback. The common keys include ON/OFF, HOLD/ENTER, CAL and MODE keys. Ion 5/6 meter has additional and keys.
ON/OFF: Powers meter on and off. Meter starts up in the mode that you last switched off from.
MODE: Selects measurement mode for Ion, mV, pH and Temperature.
CAL: Allows calibration for Ion, pH, mV or Temperature, or to abort calibration without confirming any set value.
(available only on Ion 5/6): Allows you to increment values during calibration mode.
(available only on Ion 5/6): Allows you to decrement values during calibration mode.
HOLD: Freezes the measured reading for easy viewing.
ENTER: Confirms calibration value.
Keypad of pH 5/6 |
Keypad of Ion 5/6 |
- 2 -
Instruction Manual |
pH 5/6 & Ion 5/6 |
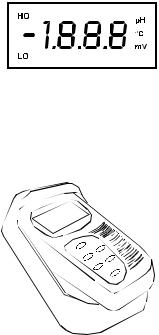
2.2 Description of LCD Annunciators
The meter has a large custom LCD that consists of 3½-digit segments and operation annunciators for pH, mV or oC (Temperature). Note that there is no annunciator shown in Ion mode. Other annunciators include “HO” (when the HOLD function is activated) and “LO” (low battery condition).
2.3 Inserting & Removing the Rubber Boot
1.To remove meter from rubber boot, push out from the bottom edges of meter until it is completely out of boot. Ensure that cables of ISE/pH electrode or temperature probe are not connected.
2.To insert meter into rubber boot, slide in from the top of meter before pushing the bottom edges of meter down to set it into position. Lift up the stand at the back of meter for bench top applications if necessary.
-3 -
Instruction Manual |
pH 5/6 & Ion 5/6 |
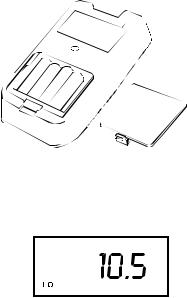
2.4 Inserting New Batteries
The battery compartment is found at the back of instrument. To open the battery compartment, push in the direction of arrow and lift up the cover. Note the polarity of battery before inserting into position. After replacement, place cover back and press down until it locks tight.
2.5 Battery Replacement
A “LO” annunciator in the LCD alerts you when battery power is running low. Replace with the same type as recommended by the manufacturer.
Caution: Power off the meter when changing battery.
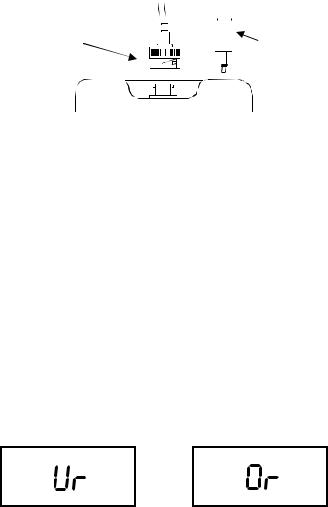
2.6 Connecting the Electrode and Temperature Sensor
To connect the electrode into meter, align the connector slots with the posts of meter’s socket and rotate connector clockwise until it locks. Do not force when connecting. To remove, simply rotate the connector in anti-clockwise direction until it unlocks, and slide the connector off the socket.
- 4 -
Instruction Manual pH 5/6 & Ion 5/6
BNC of pH/ORP |
|
|
|
|
Phono jack of |
|
|
|
|
|
|||
electrode or ISE |
|
|
|
|
Temperature probe |
|
|
|
|
|
|
|
|
|
|
|
|
|
|
|
|
|
|
|
|
|
|
|
|
|
|
|
|
|
|
|
|
|
|
|
|
Insert the mini phono jack of temperature sensor into the socket on the meter. Unplug the phono jack when not in use or you measure pH without any temperature compensation.
2.7 Condition the pH Electrode
Condition the pH electrode before use or if it has not been in use for a long time by soaking it into a container filled with pH 4 buffer solution for at least 1 hour. Rinse with tap water before proceed to calibrate the electrode with meter.
2.8 Switching the Meter On
1.Press ON/OFF key to power up your meter. All LCD segments display momentarily as the meter performs a self-diagnostic test, as per shown in section 2.2. For Ion 5/6, the LCD switches into Ion measurement mode with “- - -“ display if the meter has not been calibrated or meter has been reset.
2.Press MODE key to choose your desired mode of measurement with its corresponding annunciator displays in the LCD.
In temperature mode, the measured reading can be 25.0oC (factory default) or last calibrated temperature value if there is no temperature probe, or current measured value if a temperature probe is connected.
3.The LCD displays “Or” if the meter reading exceeds the maximum or “Ur” if under minimum measurement range (refer to Section 7 on Specifications).
-5 -

Instruction Manual |
pH 5/6 & Ion 5/6 |
3. CALIBRATION
3.1 pH Calibration
The meter is capable of calibrating up to 3 points using USA or NIST (nSt) pH buffer standards or 2 points with Low Ionic (Pb) pH buffer standard. All new calibration values will automatically override existing data.
USA |
pH 4.01, 7.00 and 10.01 |
NIST |
pH 4.01, 6.86 and 9.18 |
|
|
Pb |
pH 4.10 and 6.97 |
|
|
It is recommended that you perform at least 2-point calibration at room temperature (25 oC) using standard buffers, starting with first buffer at pH 7.00 (USA), pH 6.86 (NIST) or pH 6.97 (Pb) followed by other buffer values.
For a 1-point calibration, calibration should be performed with a pH buffer value closest to the expected sample value being measured. Otherwise calibrating at pH 7.00, pH 6.86 or pH 6.97 is advisable.
The meter has automatic buffer recognition that identifies the correct pH buffer values during calibration. If non-standard pH buffers other than the above standards are used, or the electrode has worn out, the LCD will flash “Er1”. Press the CAL key to abort calibration and resume measurement. In general all pH buffer values have the window of up to +/- 1 pH tolerance during calibration.
Ensure that you use new pH buffer solutions or sachets during calibration. Do not reuse buffer solutions as it may be contaminated and affect the calibration and accuracy of measurements. Always store buffer solutions in a dry, cool environment if possible.
Before use, remove the plastic protective cap of pH electrode and condition the glass bulb by soaking it in tap water for 1-2 hours. This hydrates the glass bulb if electrode is too dry or has not been used for a long period of time. Always rinse the probes with tap water or rinse solution before and after each calibration/sample measurement to avoid cross-contamination. For details refer to section 5 on Electrode care and maintenance.
- 6 -
 Loading...