


Another quality product from
EURO-PRO
TM
INSTRUCTION MANUAL
English
Spanish
French
Model 377/374/373/372
EURO-PRO Operating LLC, 94 Main Mill Street, Door 16, Plattsburgh, NY 12901
4400 Bois Franc,St. Laurent, QC,H4S 1A7

±¡° IMPORTANT SAFETY INSTRUCTIONS
When using an electrical sewing machine, basic safety precautions should always be followed, including the following.
Read all instructions before using this sewing machine.
This sewing machine is designed for household use.
DANGER- TO REDUCE RISK OF ELECTRIC SHOCK:
A sewing machine should never be left unattended when plugged in. Always unplug this sewing machine from the electrical outlet immediately after using and before cleaning.
Warning -To reduce the risk of burns, fire, electric shock or injury to persons...
1. Do not allow to be used as a toy. Attention is necessary when this sewing machine is used by or near children.
2. Use this sewing machine only for its intended use as described in this manual. Use only attachments recommended by the manufacturer as contained in this manual.
3. Never operate this sewing machine if |
it has a damaged cord or plug, |
if it is not working properly, |
if it has been dropped or damaged, |
or dropped into water. Return the |
sewing machine to the nearest |
authorized dealer or service center for examination, repair,electrical or mechanical adjustment.
4.Never operate the sewing machine with any air openings blocked. Keep ventilation openings from the sewing machine and foot control free from the accumulation of lint, dust, and loose cloth.
5.Never drop or insert any object into any opening.
6.Do not use outdoors.
7.Do not operate where aerosol spray products are being used or where oxygen is being administered.
¡± 8. To disconnect, turn all controls to the off O¡±position, then remove plug from outlet.
9.Do not unplug by pulling on cord. To unplug, grasp the plug, not the cord.
10.Keep fingers away from all moving parts. Special care is required around the sewing machine needle.
11.Always use the proper needle plate. The wrong plate can cause the needle to break.
12.Do not use bent needles.
13.Do not pull or push fabric while stitching. It may deflect the needle, causing it to break.
¡± 14. Switch the sewing machine off O¡±when making any adjustments in the needle area, such as
threading needle, changing needle, threading bobbin, or changing presser foot and the like.
15.Always unplug sewing machine from the electrical outlet when removing covers, lubricating, or when making any other user servicing adjustments mentioned in the instruction manual.
16.Always unplug before replacing lamp. Replace bulb with the same rated 15 watts.
SAVE THESE INSTRUCTIONS
English
1
Contents
Principal parts |
3-4 |
|
How to connect the machine to the power supply |
4 |
|
How to use the foot control |
4 |
|
How to replace the sewing lamp |
4 |
|
Changing the needle |
5 |
|
Thread and needle chart |
5 |
|
To select a suitable needle |
5 |
|
Removing and attaching the presser foot |
6 |
|
|
||
Regulating the thread tension |
6 |
|
Reverse stitch |
||
7 |
||
The pattern selector |
7-8 |
|
Removing the bobbin case and bobbin |
8 |
|
Winding the bobbin |
9 |
|
Threading the bobbin case |
9 |
|
Threading the needle |
10 |
|
Drawing up the bobbin thread |
11 |
|
Straight stitch and zigzag stitch |
11 |
|
Changing sewing direction |
12 |
|
Fastening seams |
12 |
|
Triple stretch stitch |
12 |
|
Tricot zigzag stitch |
13 |
|
Smocking stitch |
13 |
|
Overlock stitch |
13 |
|
Double action stitch |
14 |
|
Double overlock stitch |
15 |
|
Sewing buttonholes |
14-15 |
|
Sewing zippers |
15 |
|
Hemming |
16 |
|
Sewing blind hems |
16 |
|
Sewing embroidery |
17 |
|
Darning plate |
17 |
|
Buttons |
17 |
|
Cleaning the feed dog |
18 |
|
Cleaning the shuttle race |
18 |
|
Free arm sewing |
19 |
|
Trouble shooting: causes and remedies |
20 |
2
2 |
3 17 |
4 |
5 |
1 |
|
|
|
15
14
16
13
12
11
(Accessories storage compartment) |
10 9 |
18 |
|
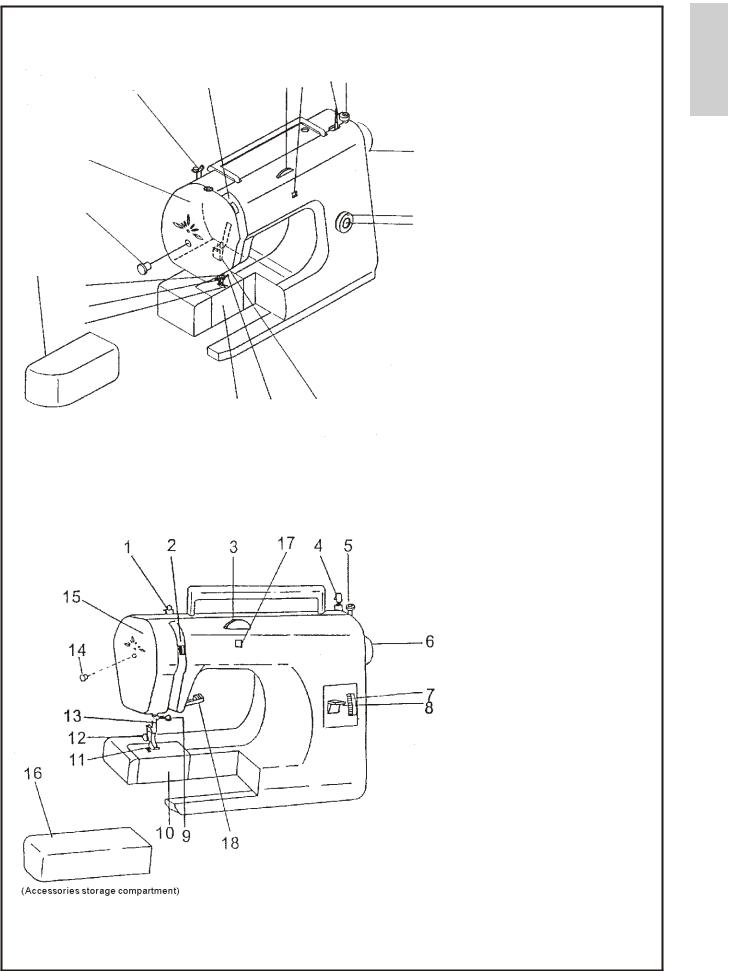
PRINCIPAL PARTS ( Model 377) |
|
|
1.Bobbin winder thread guide |
|
|
2.Thread tension dial |
|
|
3.Pattern selector dial |
|
6 |
4.Bobbin winder spindle |
|
5.Bobbin winder stopper |
||
|
||
|
6.Balance wheel |
|
7 |
7.Stitch length dial |
|
8.Reverse button |
||
8 |
9.Needle clamp and screw |
10.Shuttle cover 11.Presser foot
12.Presser foot thumb screw 13.Needle
14.Screw for face plate 15.Face plate 16.Extension table 17.Stitch display 18.Presser foot lifter
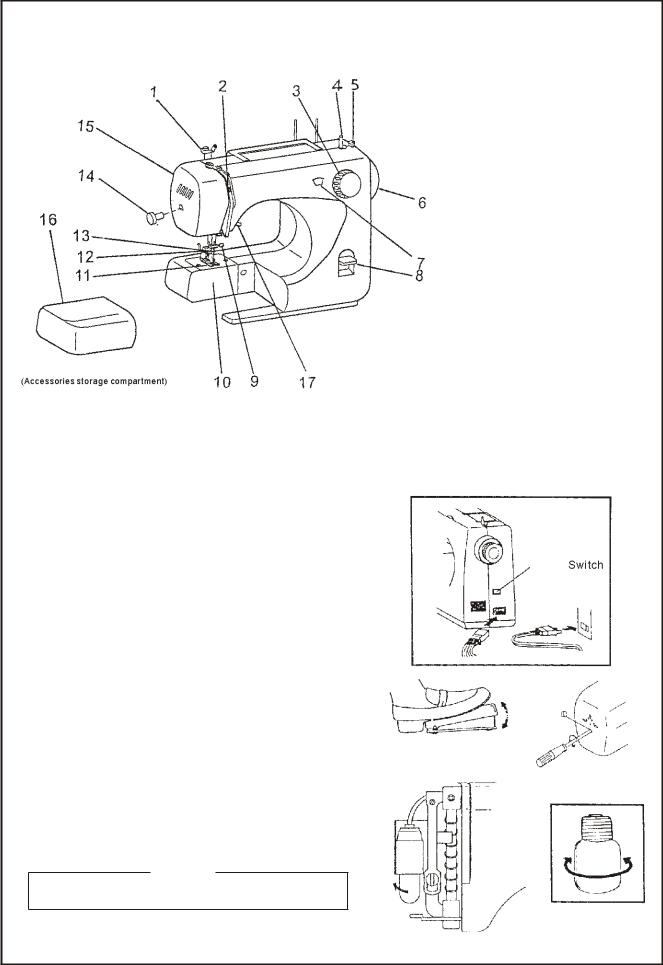
PRINCIPAL PARTS (Model 374)
1.Bobbin winder thread guide 2.Thread tension dial 3.Pattern selector dial 4.Bobbin winder spindle 5.Bobbin winder stopper 6.Balance wheel
7.Stitch length dial 8.Reverse button 9.Needle clamp and screw
10.Shuttle cover 11.Presser foot
12.Presser foot thumb screw 13.Needle
14.Screw for face plate 15.Face plate 16.Extension table 17.Stitch display 18.Presser foot lifter
English
3
PRINCIPAL PARTS ( Model 373/372)
1.Bobbin winder thread guide 2.Thread tension dial 3.Pattern selector dial 4.Bobbin winder spindle 5.Bobbin winder stopper 6.Balance wheel
7.Stitch display 8.Reverse button 9.Needle clamp and screw
10.Shuttle cover 11.Presser foot
12.Presser foot thumb screw 13.Needle
14.Screw for face plate 15.Face plate 16.Extension table 17.Presser foot lifter
HOW TO CONNECT THE MACHINE TO THE POWER SUPPLY
1.Fit the machine plug into the machine. 2.Plug the power cord to the power supply.
Note:*Before plugging in the machine, ensure the voltage and number of cycles indicated, conforms to your electrical power supply.
HOW TO USE THE FOOT CONTROL
Sewing speed can be varied by the foot control. The harder you press on the controller, the faster the machine runs.
Note:*By releasing the controller, the machine stops running automatically.
*Before using the machine, practice controlling the speed without threading.
HOW TO REPLACE THE SEWING LAMP
The sewing lamp is located behind the face plate.
Remove the face plate by loosing the screw of the face plate. Bulb type:  To remove...Unscrew
 To replace...Screw
Note:*Before replacing a bulb, disconnect the machine from the power supply.
*Bulbs are available from sewing machine retailers.(Use a 15-Watt bulb)
Caution!
Before leaving the machine, changing parts or doing any other
work on it, always disconnect the plug from the wall socket.
4
THREAD AND NEEDLE CHART |
|
|
English |
|
|
|
|
|
|
|
FABRICS |
THREADS |
NEEDLE SIZE |
|
|
|
|||
|
|
|
|
|
|
Sheer cottons, Silk, |
Fine Silk |
|
|
LIGHT |
Fine Cotton |
9 or 11 |
|
|
WEIGHT |
Synthetics, Georgette |
Fine Synthetic |
|
|
|
|
Fine Cotton Covered Polyester |
|
|
|
|
|
|
|
|
Medium Weight Cottons, Synthetics, |
50 silk |
|
|
MEDIUM |
50 to 80 Cotton |
|
|
|
WEIGHT |
Poplin, Velvet, Light Weight Woollens |
50 to 60 Synthetic |
11 or 14 |
|
|
|
Cotton Covered Polyester |
|
|
|
Heavy Weight Cottons, Denim |
50 Silk |
|
|
HEAVY |
40 to 50 Cotton |
14 or 16 |
|
|
WEIGHT |
Tweed, Gaberdine, Drapery |
40 to 50 Synthetic |
|
|
|
|
Cotton Covered Polyester |
|
|
|
|
|
|
|
Note: *In general, fine threads and needles are used for sewing thin fabrics, and thicker threads and needles are |
|
|||
used for sewing heavy fabrics, Always test thread and needle size on a small piece of fabric which will |
|
|||
be used for actual sewing. |
|
|
|
|
*Use the same thread for needle and bobbin. |
|
|
|
|
*When sewing stretch, very fine fabrics and synthetics, use a STRETCH needle. |
The STRETCH |
|
||
needle effectively prevents skipped stitches. |
|
|
|
|
*When sewing very fine fabrics, sew over a piece of paper to prevent yarn distortion. |
|
|
||
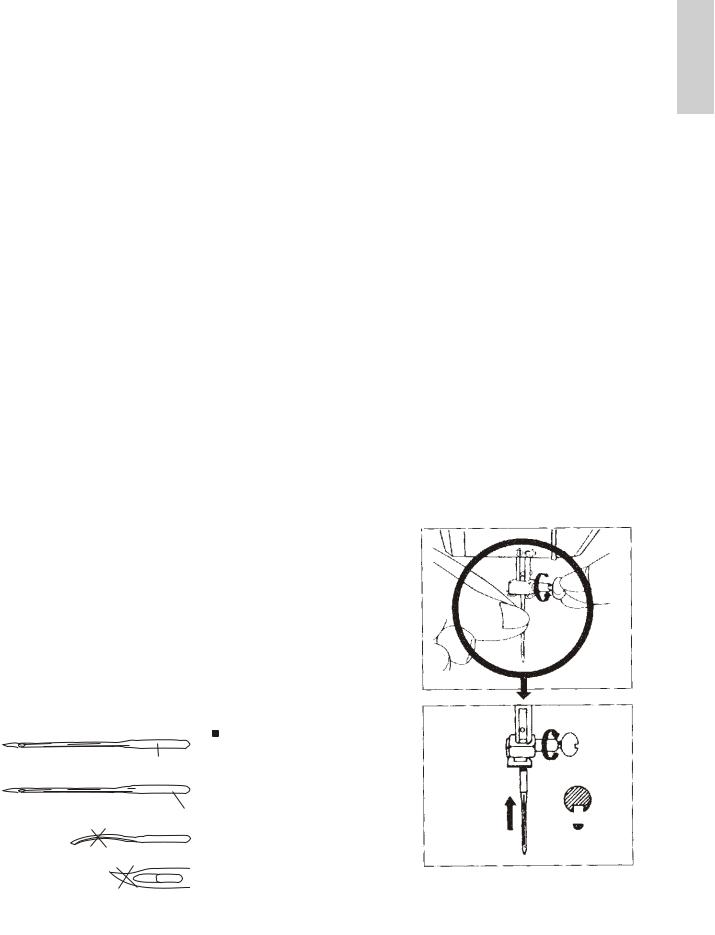
CHANGING THE NEEDLE
1.Turn the balance wheel towards you until the needle is in its highest position.
2.Loosen the needle clamp screw by turning its top edge
towar ds you. Remove the needle from the clamp.
,
3.Place the new needle into the needle clamp with it s flat side f acing away from you. Push the needle up into needle clamp as far as possible.
4.Tighten the needle clamp screw firmly.
TO SELECT A SUITABLE NEEDLE
Stem
stretch needle
A number |
indicating the size |
of needle is |
marked on the |
stem. The higher the number, the thicker the needle.
 A STRETCH needle is recommended for stretch fabrics.
*Do not use any needle which is bent or blunted.
(4)
(3)
5

REMOVING AND ATTACHING THE PRESSER FOOT
To Remove:
1. Turn the balance wheel towards you until the needle is at its highest position
2. By lifting the lever on the back of the foot holder, the presser foot will drop off.
Note: *Do not force the presser foot to remove it.
To Attach:
1. Place the presser foot so that the pin on the foot lies just under the groove of the
foot holder. Lower the foot holder.
,
2. When the presser foot lifter is raised youll fin d the presser foot is locked in place.
REGULATING THE THREAD TENSION
Generally, should any tension adjustment be necessary, the adjustment can normally be made by regulating the upper thread tension dial only. Bobbin thread tension has been adjusted at the factory and readjustment is seldom required except for special instances, thread and fabric.
Bobbin thread tension is just right when you can pull the thread from bobbin case easily with a little resistance. Thread tension may be adjusted by tightening or loosening the thread tension dial.
The needle thread and the bobbin thread
n,
ise.
.
Remember |
the higher the |
number, the |
tighter the tension. Correctly balanced |
tensions |
for one fabric may not |
|
be suitable |
for another. The required |
tension depends upon the |
stiffness of |
fabric, |
thickness of the fabric, |
|
numbers of |
layers of fabric |
being sewn, |
as well as the type of stitch |
you are making. It is better to test the stitch- |
||
ing on a scrap of the fabric you are using before starting to make a garment. The general range for many fabrics is 3-5.
6
 Loading...