


 Loading...
XP-200 User's Guide

Contents |
|
XP-200 User's Guide.................................................................................................................................. |
11 |
Product Basics .......................................................................................................................................... |
12 |
Setting Up the Control Panel .............................................................................................................. |
12 |
Control Panel Buttons and Lights .................................................................................................. |
12 |
Adjusting Control Panel Position ................................................................................................... |
13 |
Product Parts Locations ..................................................................................................................... |
13 |
Product Parts - Top........................................................................................................................ |
14 |
Product Parts - Inside .................................................................................................................... |
15 |
Product Parts - Back...................................................................................................................... |
15 |
The Power Off Timer .......................................................................................................................... |
16 |
Changing the Power Off Timer Setting - Windows......................................................................... |
16 |
Changing the Power Off Timer Setting - Mac OS X ....................................................................... |
17 |
EPSON Connect Solutions................................................................................................................. |
18 |
Using EPSON Email Print ............................................................................................................. |
18 |
Using the EPSON iPrint Mobile App .............................................................................................. |
18 |
Using Google Cloud Print ............................................................................................................. |
19 |
Loading Paper ........................................................................................................................................... |
21 |
Loading Paper for Documents ........................................................................................................... |
21 |
Loading Paper for Photos .................................................................................................................. |
23 |
Loading Envelopes ............................................................................................................................ |
24 |
Paper Loading Capacity ..................................................................................................................... |
26 |
Available EPSON Papers................................................................................................................... |
27 |
Borderless Paper Type Compatibility ................................................................................................. |
29 |
Paper or Media Type Settings ............................................................................................................ |
30 |
Placing Originals on the Product ............................................................................................................. |
31 |
Placing Originals on the Scanner Glass ............................................................................................. |
31 |
Copying...................................................................................................................................................... |
33 |
Copying Documents or Photos........................................................................................................... |
33 |
Printing From a Computer ........................................................................................................................ |
34 |
Printing with Windows ........................................................................................................................ |
34 |
3
Selecting Basic Print Settings - Windows ...................................................................................... |
34 |
Basic Print Options - Windows.................................................................................................. |
36 |
Selecting Advanced Print Settings - Windows ............................................................................... |
37 |
Advanced Print Quality Settings - Windows .............................................................................. |
39 |
Advanced Print Options - Windows........................................................................................... |
40 |
Color Management Options - Windows .................................................................................... |
40 |
Selecting Print Layout Options - Windows..................................................................................... |
41 |
Selecting a Printing Preset - Windows........................................................................................... |
42 |
Printing Your Document or Photo - Windows................................................................................. |
43 |
Checking Print Status - Windows.............................................................................................. |
44 |
Selecting Default Print Settings - Windows.................................................................................... |
45 |
Changing the Language of the Printer Software Screens ......................................................... |
46 |
Changing Automatic Update Options ............................................................................................ |
48 |
Printing with Mac OS X....................................................................................................................... |
48 |
Selecting Basic Print Settings - Mac OS X..................................................................................... |
49 |
Print Quality Settings - Mac OS X ............................................................................................. |
52 |
Print Options - Mac OS X .......................................................................................................... |
53 |
Selecting Page Setup Settings - Mac OS X ................................................................................... |
53 |
Selecting Print Layout Options - Mac OS X ................................................................................... |
54 |
Managing Color - Mac OS X .......................................................................................................... |
55 |
Color Matching and Color Options - Mac OS X ......................................................................... |
56 |
Selecting Printing Preferences - Mac OS X ................................................................................... |
57 |
Printing Preferences - Mac OS X .............................................................................................. |
57 |
Printing Your Document or Photo - Mac OS X ............................................................................... |
58 |
Checking Print Status - Mac OS X ............................................................................................ |
59 |
Cancelling Printing Using a Product Button........................................................................................ |
59 |
Scanning .................................................................................................................................................... |
60 |
Starting a Scan................................................................................................................................... |
60 |
Starting a Scan Using the Product Control Panel .......................................................................... |
60 |
Changing Default Scan Button Settings.................................................................................... |
60 |
Starting a Scan Using the EPSON Scan Icon................................................................................ |
61 |
Starting a Scan from a Scanning Program..................................................................................... |
63 |
Selecting EPSON Scan Settings........................................................................................................ |
65 |
4
Scan Modes................................................................................................................................... |
65 |
Selecting the Scan Mode............................................................................................................... |
65 |
Scanning in Full Auto Mode........................................................................................................... |
66 |
Available Image Adjustments - Full Auto Mode......................................................................... |
69 |
Scanning in Home Mode ............................................................................................................... |
69 |
Selecting a Scan Area - Home Mode ........................................................................................ |
72 |
Available Image Adjustments - Home Mode ............................................................................. |
75 |
Selecting a Scan Size - Home Mode......................................................................................... |
76 |
Scanning in Office Mode................................................................................................................ |
78 |
Selecting a Scan Area - Office Mode ........................................................................................ |
80 |
Available Image Adjustments - Office Mode ............................................................................. |
82 |
Scanning in Professional Mode ..................................................................................................... |
83 |
Available Image Types - Professional Mode ............................................................................. |
86 |
Selecting a Scan Area - Professional Mode.............................................................................. |
86 |
Available Image Adjustments - Professional Mode ................................................................... |
89 |
Selecting a Scan Size - Professional Mode............................................................................... |
90 |
Image Preview Guidelines............................................................................................................. |
94 |
Scan Resolution Guidelines .......................................................................................................... |
94 |
Selecting Scan File Settings.......................................................................................................... |
95 |
Available Scanned File Types and Optional Settings................................................................ |
96 |
Scanning with Mac OS X 10.6/10.7/10.8 Using Image Capture ......................................................... |
97 |
Scanning Special Projects.................................................................................................................. |
99 |
Scanning to a PDF File.................................................................................................................. |
99 |
Restoring Photo Colors as You Scan .......................................................................................... |
102 |
Replacing Ink Cartridges ........................................................................................................................ |
103 |
Check Cartridge Status .................................................................................................................... |
103 |
Checking Cartridge Status Lights ................................................................................................ |
103 |
Checking Cartridge Status with Windows.................................................................................... |
104 |
Checking Cartridge Status with Mac OS X .................................................................................. |
106 |
Purchase EPSON Ink Cartridges ..................................................................................................... |
108 |
Ink Cartridge Part Numbers ......................................................................................................... |
108 |
Removing and Installing Ink Cartridges............................................................................................ |
109 |
Replacing Ink Cartridges Using a Computer Utility........................................................................... |
113 |
5
Printing With Black Ink and Expended Color Cartridges................................................................... |
115 |
Printing With Expended Color Cartridges - Windows................................................................... |
116 |
Printing With Expended Color Cartridges - Mac OS X ................................................................. |
116 |
Conserving Low Black Ink with Windows ......................................................................................... |
118 |
Adjusting Print Quality............................................................................................................................ |
119 |
Print Head Maintenance................................................................................................................... |
119 |
Print Head Nozzle Check............................................................................................................. |
119 |
Checking the Nozzles Using the Product Buttons................................................................... |
119 |
Checking the Nozzles Using a Computer Utility...................................................................... |
120 |
Print Head Cleaning .................................................................................................................... |
123 |
Cleaning the Print Head Using the Product Buttons................................................................ |
123 |
Cleaning the Print Head Using a Computer Utility................................................................... |
124 |
Print Head Alignment ....................................................................................................................... |
127 |
Aligning the Print Head Using a Computer Utility......................................................................... |
128 |
Cleaning the Paper Path .................................................................................................................. |
131 |
Cleaning and Transporting Your Product ............................................................................................. |
132 |
Cleaning Your Product ..................................................................................................................... |
132 |
Transporting Your Product ............................................................................................................... |
132 |
Solving Problems .................................................................................................................................... |
135 |
Checking for Software Updates........................................................................................................ |
135 |
Product Light Status ......................................................................................................................... |
135 |
Running a Product Check ................................................................................................................ |
137 |
Solving Setup Problems ................................................................................................................... |
138 |
Noise After Ink Installation ........................................................................................................... |
138 |
Software Installation Problems .................................................................................................... |
139 |
Solving Network Problems ............................................................................................................... |
139 |
Product Cannot Connect to a Wireless Router or Access Point .................................................. |
140 |
Network Software Cannot Find Product on a Network................................................................. |
141 |
Product Does Not Appear in Mac OS X Printer Window.............................................................. |
141 |
Cannot Print Over a Network....................................................................................................... |
141 |
Cannot Scan Over a Network ...................................................................................................... |
142 |
Printing a Network Status Sheet.................................................................................................. |
143 |
Solving Copying Problems ............................................................................................................... |
143 |
6
Product Makes Noise, But Nothing Copies.................................................................................. |
143 |
Product Makes Noise When It Sits for a While............................................................................. |
143 |
Solving Paper Problems................................................................................................................... |
144 |
Paper Feeding Problems............................................................................................................. |
144 |
Paper Jam Problems ................................................................................................................... |
144 |
Paper Ejection Problems ............................................................................................................. |
145 |
Solving Problems Printing from a Computer..................................................................................... |
146 |
Nothing Prints.............................................................................................................................. |
146 |
Product Icon Does Not Appear in Windows Taskbar ................................................................... |
147 |
Error After Cartridge Replacement .............................................................................................. |
147 |
Printing is Slow ............................................................................................................................ |
148 |
Solving Page Layout and Content Problems.................................................................................... |
149 |
Inverted Image............................................................................................................................. |
149 |
Too Many Copies Print ................................................................................................................ |
149 |
Blank Pages Print ........................................................................................................................ |
150 |
Incorrect Margins on Printout....................................................................................................... |
150 |
Border Appears on Borderless Prints .......................................................................................... |
151 |
Incorrect Characters Print............................................................................................................ |
151 |
Incorrect Image Size or Position.................................................................................................. |
152 |
Slanted Printout........................................................................................................................... |
152 |
Solving Print Quality Problems......................................................................................................... |
153 |
White or Dark Lines in Printout .................................................................................................... |
153 |
Blurry or Smeared Printout .......................................................................................................... |
154 |
Faint Printout or Printout Has Gaps ............................................................................................. |
155 |
Grainy Printout............................................................................................................................. |
156 |
Incorrect Colors ........................................................................................................................... |
156 |
Solving Scanning Problems ............................................................................................................. |
157 |
Scanning Software Does Not Operate Correctly ......................................................................... |
157 |
Cannot Start EPSON Scan.......................................................................................................... |
158 |
Solving Scanned Image Quality Problems ....................................................................................... |
159 |
Image Consists of a Few Dots Only............................................................................................. |
159 |
Line of Dots Appears in All Scanned Images............................................................................... |
160 |
Straight Lines in an Image Appear Crooked ................................................................................ |
160 |
7
Image is Distorted or Blurry ......................................................................................................... |
160 |
Image Colors are Patchy at the Edges ........................................................................................ |
161 |
Image is Too Dark ....................................................................................................................... |
161 |
Back of Original Image Appears in Scanned Image .................................................................... |
161 |
Ripple Patterns Appear in an Image ............................................................................................ |
161 |
Image is Scanned Upside-Down ................................................................................................. |
162 |
Scanned Image Colors Do Not Match Original Colors................................................................. |
162 |
Scan Area is Not Adjustable in Thumbnail Preview ..................................................................... |
162 |
Scanned Image Edges are Cropped ........................................................................................... |
163 |
When to Uninstall Your Product Software ........................................................................................ |
163 |
Uninstalling Product Software - Windows.................................................................................... |
163 |
Uninstalling Product Software - Mac OS X .................................................................................. |
164 |
Where to Get Help............................................................................................................................ |
165 |
Technical Specifications ........................................................................................................................ |
166 |
Windows System Requirements ...................................................................................................... |
166 |
Mac System Requirements .............................................................................................................. |
167 |
Printing Specifications...................................................................................................................... |
167 |
Scanning Specifications ................................................................................................................... |
167 |
Paper Specifications ........................................................................................................................ |
168 |
Printable Area Specifications ........................................................................................................... |
169 |
Ink Cartridge Specifications.............................................................................................................. |
170 |
Dimension Specifications ................................................................................................................. |
171 |
Electrical Specifications ................................................................................................................... |
171 |
Environmental Specifications ........................................................................................................... |
172 |
Interface Specifications .................................................................................................................... |
172 |
Network Interface Specifications ...................................................................................................... |
172 |
Safety and Approvals Specifications ................................................................................................ |
173 |
Notices ..................................................................................................................................................... |
174 |
FCC Compliance Statement............................................................................................................. |
174 |
Software Notices .............................................................................................................................. |
175 |
Trademarks...................................................................................................................................... |
178 |
Copyright Notice............................................................................................................................... |
179 |
libTIFF Software Acknowledgment.............................................................................................. |
179 |
8
A Note Concerning Responsible Use of Copyrighted Materials................................................... |
180 |
Default Delay Times for Power Management for EPSON Products............................................. |
180 |
Copyright Attribution.................................................................................................................... |
180 |
9
XP-200 User's Guide
Welcome to the XP-200 User's Guide.
11
Product Basics
See these sections to learn about the basic features of your product.
Setting Up the Control Panel
Product Parts Locations
The Power Off Timer
EPSON Connect Solutions
Setting Up the Control Panel
See these sections to set up the control panel for use.
Control Panel Buttons and Lights
Adjusting Control Panel Position
Parent topic: Product Basics
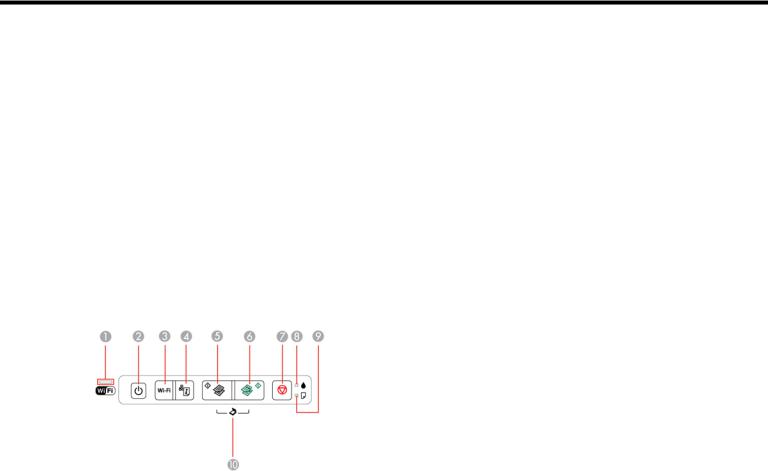
Control Panel Buttons and Lights
1The WiFi light
2The  power button and
  power light
3The Wi-Fi button
4The  network status button
5The  B&W copy button
6The  color copy button
12
7The  stop button
8The  ink light
9The  paper light
10Scan by pressing the  B&W copy button and the
  color copy button simultaneously
Parent topic: Setting Up the Control Panel
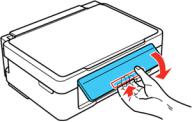
Adjusting Control Panel Position
You can adjust the position of the control panel to make it easier to use.
•To raise the control panel, lift it up from the bottom.
•To lower the control panel, squeeze the release bar and gently push the panel down.
Caution: Do not lower the control panel without first squeezing the release bar or you may damage your product.
Parent topic: Setting Up the Control Panel
Product Parts Locations
See these sections to identify the parts on your product.
Product Parts - Top
Product Parts - Inside
Product Parts - Back
Parent topic: Product Basics
13
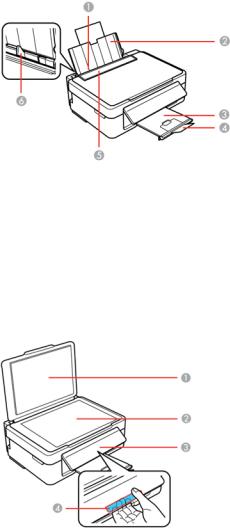
Product Parts - Top
1Sheet feeder
2Paper support
3Output tray
4Paper stopper
5Feeder guard
6Edge guide
1Document cover
2Scanner glass
14
3Control panel
4Control panel release bar (beneath)
Parent topic: Product Parts Locations
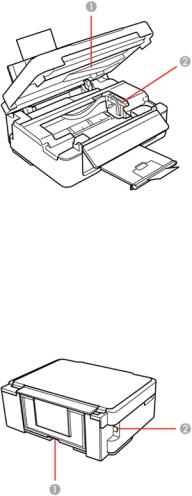
Product Parts - Inside
1Scanner unit
2Ink cartridge holder in home position
Parent topic: Product Parts Locations
Product Parts - Back
15
1AC inlet
2USB port
Parent topic: Product Parts Locations
The Power Off Timer
The product turns off automatically if it is not used for a period of time after it enters sleep mode. You can adjust the time period before power off, but increasing the time reduces the product's energy efficiency.
Changing the Power Off Timer Setting - Windows
Changing the Power Off Timer Setting - Mac OS X
Parent topic: Product Basics
Changing the Power Off Timer Setting - Windows
You can use the printer software to change the time period before the printer turns off automatically.
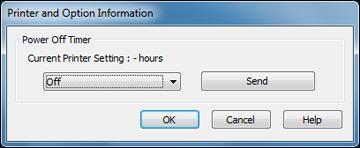
1.Right-click the product icon in the Windows taskbar and select Printer Settings.
2.Click the Maintenance tab and select Printer and Option Information. You see this window:
3.In the drop-down menu, select the length of time after which you want the product to automatically turn off when it is not in use.
4.Click Send.
5.When you see the time you selected listed as the Current Printer Setting, click OK.
Parent topic: The Power Off Timer
16
Changing the Power Off Timer Setting - Mac OS X
You can use the printer software to change the time period before the printer turns off automatically.
1.Do one of the following:
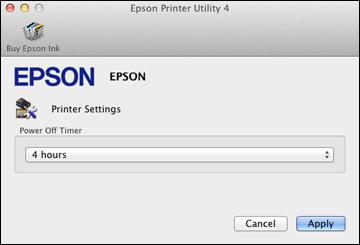
•Mac OS X 10.6/10.7/10.8: In the Apple menu or the Dock, select System Preferences. Select
Print & Fax or Print & Scan, select your product, and select Options & Supplies. Select Utility and select Open Printer Utility.
•Mac OS X 10.5: In the Apple menu or the Dock, select System Preferences. Select Print & Fax, select your product, and select Open Print Queue. Select Utility.
2.Select Printer Settings. You see this window:
3.Select the length of time after which you want the product to automatically turn off when it is not in use as the Power Off Timer setting.
4.Click Apply.
5.Close the Printer Settings window.
Parent topic: The Power Off Timer
17
EPSON Connect Solutions
You can print documents, photos, emails, and web pages from your home, office, or even across the globe. You can use your smartphone, tablet, or computer. Epson offers two solutions to print and scan from anywhere: EPSON Email Print and the EPSON iPrint Mobile App.
Using EPSON Email Print
Using the EPSON iPrint Mobile App
Using Google Cloud Print
Parent topic: Product Basics
Using EPSON Email Print
With EPSON Email Print, you can print from any device that can send email, such as your smartphone, tablet, or laptop. Just activate your product's unique email address. When you want to print, attach a PDF, Microsoft Office document, or photo and send an email to your product.
1.Set up your product for network printing as described on the Start Here sheet.
2.If you did not already set up Email Print when you installed your product software, visit www.epson.com/connect to learn more about Email Print, check compatibility, and get detailed setup instructions.
3.Send an email with attachments to your product's Email Print address.
Note: Both the email and any attachments print by default. You can change these printing options by logging into your EPSON Connect account.
Parent topic: EPSON Connect Solutions
Using the EPSON iPrint Mobile App
Use this free Apple and Android app to print to nearby EPSON networked products. EPSON iPrint lets you print PDFs, Microsoft Office documents, photos, and web pages over a wireless network. You can even scan and save a file on your device, send it as an email, or upload it to an online service such as Box, Dropbox, EverNote, or Google Docs.
1.Set up your product for network printing as described on the Start Here sheet.
2.Visit www.epson.com/connect to learn more about EPSON iPrint and check the compatibility of your mobile device.
3.Download EPSON iPrint from the Apple App Store or Google Play.
4.Connect your mobile device to the same wireless network that your product is using.
18
5. Print from your mobile device to your EPSON product.
Parent topic: EPSON Connect Solutions
Using Google Cloud Print
With a Google Account, you can print from your Apple or Android device to your EPSON wireless product. You can also print from Chromebooks and the Google Chrome browser without drivers or cables.
If you are setting up your product for the first time, set up your EPSON product for wireless printing as described on the Start Here sheet.
Note: Make sure your EPSON printer and computer are connected to the same network before starting the Google Cloud Print setup.
If your product is already on your wireless network, follow these steps:
1.Connect your device to the same wireless network that your EPSON product is using.
2.Print a network status sheet.
3.Locate your product's IP address on the network status sheet.
4.Enter the IP address into the address bar of a web browser.
5.Select the Google Cloud Print Services option.
Note: If you don't see the Google Cloud Print Services option, turn your product off and back on. If the option still doesn't appear, select the Firmware Update option and follow the on-screen instructions to update your product.
6.Click Register.
7.Select the check box to agree to the Usage Advisory and click Next.
8.Click OK to launch the sign-in page. A separate browser window opens.
9.Enter your Google Account username and password and click Sign in, or, if you don't have an account, click Sign up for a new Google Account and follow the on-screen instructions.
10.Click Finish printer registration to complete setup and print a test page.
19
Your product is now linked to your Google Account and can be accessed from any Chromebook, computer, Apple or Android device with internet access. Visit Epson Support for more information on using Google Cloud Print, or the Google Cloud Print website for a list of supported apps.
Parent topic: EPSON Connect Solutions
Related tasks
Printing a Network Status Sheet
20

Loading Paper
Before you print, load paper for the type of printing you will do.
Loading Paper for Documents
Loading Paper for Photos
Loading Envelopes
Paper Loading Capacity
Available EPSON Papers
Borderless Paper Type Compatibility
Paper or Media Type Settings
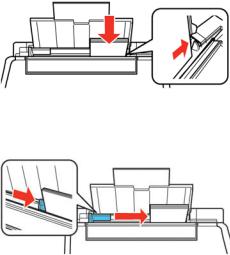
Loading Paper for Documents
You can print documents on a variety of paper types and sizes.
1. Flip the feeder guard forward.
2.Pull up the paper support and its extension.
3.Pull out the output tray and open the paper stopper.
21
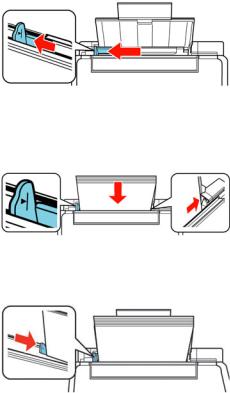
Note: If you print on legal-size or longer paper, leave the paper stopper closed.
4. Slide the edge guide left.
5.Insert paper, glossy or printable side up and short edge first, against the right side. If you are inserting a stack of paper, fan the sheets first and tap the stack on a flat surface to even the edges.
6. Slide the edge guide against the paper, but not too tightly.
7. Flip the feeder guard back.
Always follow these paper loading guidelines:
•Load only the recommended number of sheets.
•Load paper short edge first, no matter which way your document faces.
•Load letterhead or pre-printed paper top edge first.
•Do not load paper above the arrow mark inside the edge guide.
•Check the paper package for any additional loading instructions.
22
Parent topic: Loading Paper
Related references
Paper Loading Capacity
Loading Paper for Photos
You can print photos on a variety of paper types and sizes.
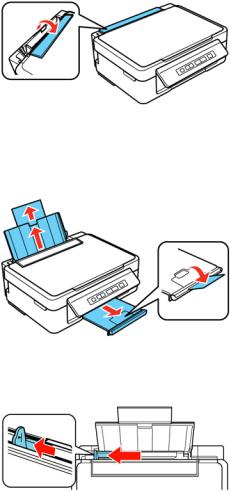
1. Flip the feeder guard forward.
2.Pull up the paper support and its extension.
3.Pull out the output tray and open the paper stopper.
4. Slide the edge guide left.
23
5.Insert paper, glossy or printable side up and short edge first, against the right side. If you are inserting a stack of paper, fan the sheets first and tap the stack on a flat surface to even the edges.
6. Slide the edge guide against the paper, but not too tightly.
7. Flip the feeder guard back.
Always follow these paper loading guidelines:
•Load only the recommended number of sheets.
•Load paper short edge first, no matter which way your photo faces.
•Do not load paper above the arrow mark inside the edge guide.
•Check the paper package for any additional loading instructions.
Parent topic: Loading Paper
Related references
Paper Loading Capacity
Loading Envelopes
You can print on plain paper envelopes in this size: No. 10 (4.1 × 9.5 inches [105 × 241 mm]).
24

1. Flip the feeder guard forward.
2.Pull up the paper support and its extension.
3.Pull out the output tray and open the paper stopper.
4. Slide the edge guide left.
5. Load up to 10 envelopes against the right side. Load them printable side up and flap edge left.
25
6. Slide the edge guide against the envelopes, but not too tightly.
7. Flip the feeder guard back. Always follow these loading guidelines:
•If you have trouble loading a stack of envelopes, press each envelope flat before loading it or load one envelope at a time.
•Do not load envelopes above the arrow mark inside the edge guide.
•Do not load envelopes that are curled, folded, or too thin.
Parent topic: Loading Paper
Paper Loading Capacity
Paper type |
Load up to this many sheets |
Plain paper - Letter (8.5 × 11 inches |
Approximately 100 sheets * |
[216 × 279 mm]) or A4 (8.3 × 11.7 inches |
|
[210 × 297 mm]) ** |
|
EPSON Bright White Paper ** |
80 sheets |
EPSON Presentation Paper Matte - Letter |
|
(8.5 × 11 inches [216 × 279 mm]) |
|
26
Paper type |
Load up to this many sheets |
EPSON Premium Presentation Paper Matte |
20 sheets |
EPSON Premium Presentation Paper Matte |
|
Double-sided |
|
EPSON Ultra Premium Presentation Paper Matte |
|
EPSON Photo Paper Glossy |
|
EPSON Premium Photo Paper Glossy |
|
EPSON Ultra Premium Photo Paper Glossy |
|
EPSON Premium Photo Paper Semi-gloss |
|
EPSON Brochure & Flyer Paper Matte Double- |
|
sided |
|
Plain paper - Legal (8.5 × 14 inches |
1 sheet |
[216 × 357 mm]) |
|
EPSON Presentation Paper Matte - Legal |
|
(8.5 × 14 inches [216 × 357 mm]) |
|
EPSON Photo Quality Self-adhesive Sheets |
|
EPSON Iron-on Cool Peel Transfer paper |
|
User defined paper size of any type |
|
*Based on 20 lb (75 g/m2) paper weight. Do not load paper above the arrow mark inside the edge guide.
**For two-sided printing, load up to 30 sheets.
Parent topic: Loading Paper
Available EPSON Papers
You can purchase genuine EPSON ink and paper at EPSON Supplies Central at www.epson.com/ink3 (U.S. sales) or www.epson.ca (Canadian sales). You can also purchase supplies from an EPSON authorized reseller. To find the nearest one, call 800-GO-EPSON (800-463-7766).
Paper Type |
Size |
Part number |
Sheet count |
EPSON Bright White Paper |
Letter (8.5 × 11 inches |
S041586 |
500 |
|
[216 × 279 mm]) |
|
|
27
Paper Type |
Size |
Part number |
Sheet count |
|
EPSON Photo Paper Glossy |
4 × 6 inches (102 × 152 mm) |
S041809 |
50 |
|
|
|
S042038 |
100 |
|
|
Letter (8.5 × 11 inches |
S041141 |
20 |
|
|
[216 × 279 mm]) |
S041649 |
50 |
|
|
|
|||
|
|
S041271 |
100 |
|
EPSON Premium Photo Paper |
4 × 6 inches (102 × 152 mm) |
S041808 |
40 |
|
Glossy |
|
S041727 |
100 |
|
|
|
|||
|
5 × 7 inches (127 × 178 mm) |
S041464 |
20 |
|
|
8 × 10 inches (203 × 254 mm) |
S041465 |
20 |
|
|
Letter (8.5 × 11 inches |
S042183 |
25 |
|
|
[216 × 279 mm]) |
S041667 |
50 |
|
|
|
|||
EPSON Ultra Premium Photo |
4 × 6 inches (102 × 152 mm) |
S042181 |
60 |
|
Paper Glossy |
|
S042174 |
100 |
|
|
|
|||
|
5 × 7 inches (127 × 178 mm) |
S041945 |
20 |
|
|
8 × 10 inches (203 × 254 mm) |
S041946 |
20 |
|
|
Letter (8.5 × 11 inches |
S042182 |
25 |
|
|
[216 × 279 mm]) |
S042175 |
50 |
|
|
|
|||
EPSON Premium Photo Paper |
4 × 6 inches (102 × 152 mm) |
S041982 |
40 |
|
Semi-gloss |
|
|
|
|
Letter (8.5 × 11 inches |
S041331 |
20 |
||
|
||||
|
[216 × 279 mm]) |
|
|
|
EPSON Presentation Paper Matte |
Letter (8.5 × 11 inches |
S041062 |
100 |
|
|
[216 × 279 mm]) |
|
|
|
|
Legal (8.5 × 14 inches |
S041067 |
100 |
|
|
[216 × 357 mm]) |
|
|
|
EPSON Premium Presentation |
8 × 10 inches (203 × 254 mm) |
S041467 |
50 |
|
Paper Matte |
|
|
|
|
Letter (8.5 × 11 inches |
S041257 |
50 |
||
|
||||
|
[216 × 279 mm]) |
S042180 |
100 |
|
|
|
28
Paper Type |
Size |
Part number |
Sheet count |
EPSON Premium Presentation |
Letter (8.5 × 11 inches |
S041568 |
50 |
Paper Matte Double-sided |
[216 × 279 mm]) |
|
|
EPSON Ultra Premium |
Letter (8.5 × 11 inches |
S041341 |
50 |
Presentation Paper Matte |
[216 × 279 mm]) |
|
|
EPSON Brochure & Flyer Paper |
Letter (8.5 × 11 inches |
S042384 |
150 |
Matte Double-sided |
[216 × 279 mm]) |
|
|
EPSON Photo Quality Self- |
A4 (8.3 × 11.7 inches |
S041106 |
10 |
adhesive Sheets |
[210 × 297 mm]) |
|
|
EPSON Iron-on Cool Peel Transfer |
Letter (8.5 × 11 inches |
S041153 |
10 |
paper |
[216 × 279 mm]) |
|
|
Parent topic: Loading Paper
Borderless Paper Type Compatibility
You can print borderless photos on compatible paper types in compatible sizes:
Borderless Paper Types
•EPSON Premium Presentation Paper Matte
•EPSON Premium Presentation Paper Matte Double-sided
•EPSON Ultra Premium Presentation Paper Matte
•EPSON Brochure & Flyer Paper Matte Double-sided
•EPSON Premium Photo Paper Glossy
•EPSON Ultra Premium Photo Paper Glossy
•EPSON Photo Paper Glossy
•EPSON Premium Photo Paper Semi-gloss
Borderless Paper Sizes
•4 × 6 inches (102 × 152 mm)
•5 × 7 inches (127 × 178 mm)
•8 × 10 inches (203 × 254 mm)
•Letter (8.5 × 11 inches [216 × 279 mm])
29
Parent topic: Loading Paper
Paper or Media Type Settings
For this paper |
Select this paper Type or Media Type setting |
Plain paper |
Plain Paper/Bright White Paper |
EPSON Bright White Paper |
|
EPSON Presentation Paper Matte |
|
EPSON Photo Quality Self-adhesive Sheets |
|
EPSON Iron-on Cool Peel Transfer paper |
|
EPSON Ultra Premium Photo Paper Glossy |
Ultra Premium Photo Paper Glossy |
EPSON Premium Photo Paper Glossy |
Premium Photo Paper Glossy |
EPSON Photo Paper Glossy |
Photo Paper Glossy |
EPSON Premium Photo Paper Semi-gloss |
Premium Photo Paper Semi-Gloss |
EPSON Premium Presentation Paper Matte |
Premium Presentation Paper Matte |
EPSON Premium Presentation Paper Matte |
|
Double-sided |
|
EPSON Ultra Premium Presentation Paper Matte |
|
EPSON Brochure & Flyer Paper Matte Double- |
|
sided |
|
Envelopes |
Envelope |
Parent topic: Loading Paper
30
Loading...