


RX685
Table of contents
 Loading...
Basic Operation Guide
-for use without a computer-
English
Safety Instructions
Important Safety Instructions .........3
Control Panel Functions
Control Panel ...................................4
Handling Paper
Selecting Paper ...............................6
Loading Paper .................................7
Handling a CD/DVD
Loading a CD/DVD.......................10
Removing a CD/DVD....................11
Copying
Placing Originals on the Document
Table ...........................................12
Copying Photos .............................12
Copying Documents.....................14
Printing from a Memory Card
Handling a Memory Card ............15
Printing Photos ...............................17
Selecting and Printing Photos Using
an Index Sheet...........................19
Printing onto a CD/DVD ...............21
Printing a CD/DVD Jacket............22
Replaying a Movie and Printing a
Shot .............................................22
Printing a Photo with Messages or
Drawings.....................................23
Replacing Ink Cartridges
Precautions.................................... 29
Removing and Installing Ink
Cartridges.................................. 29
Maintenance
Checking the Ink Cartridge
Status.......................................... 32
Checking and Cleaning the Print
Head .......................................... 32
Aligning the Print Head ................ 33
Solving Problems
Error Messages .............................. 34
Problems and Solutions ................ 34
Summary of Panel Settings
Copy Mode................................... 40
Memory Card Mode .................... 42
Specialty Print Mode .................... 45
Setup Mode................................... 51
Printing from an External Device
From a Storage Device.................26
Using PictBridge or
USB DIRECT-PRINT.......................26
Saving Your Data
Scanning a Photo / Document ...27
Using an External Storage
Device ........................................27
Where to Find Information
Paper manuals
Start Here
Be sure to read this sheet first.
This sheet tells you how to set up the printer and install the software.
(this book)
Basic Operation Guide -for use without a computer-
This book provides information on using the printer without
connecting to your computer, such as instructions on copying, printing
from a memory card, and printing on a CD/DVD.
If you have problems using the printer, see the Solving Problems
chapter in this book.
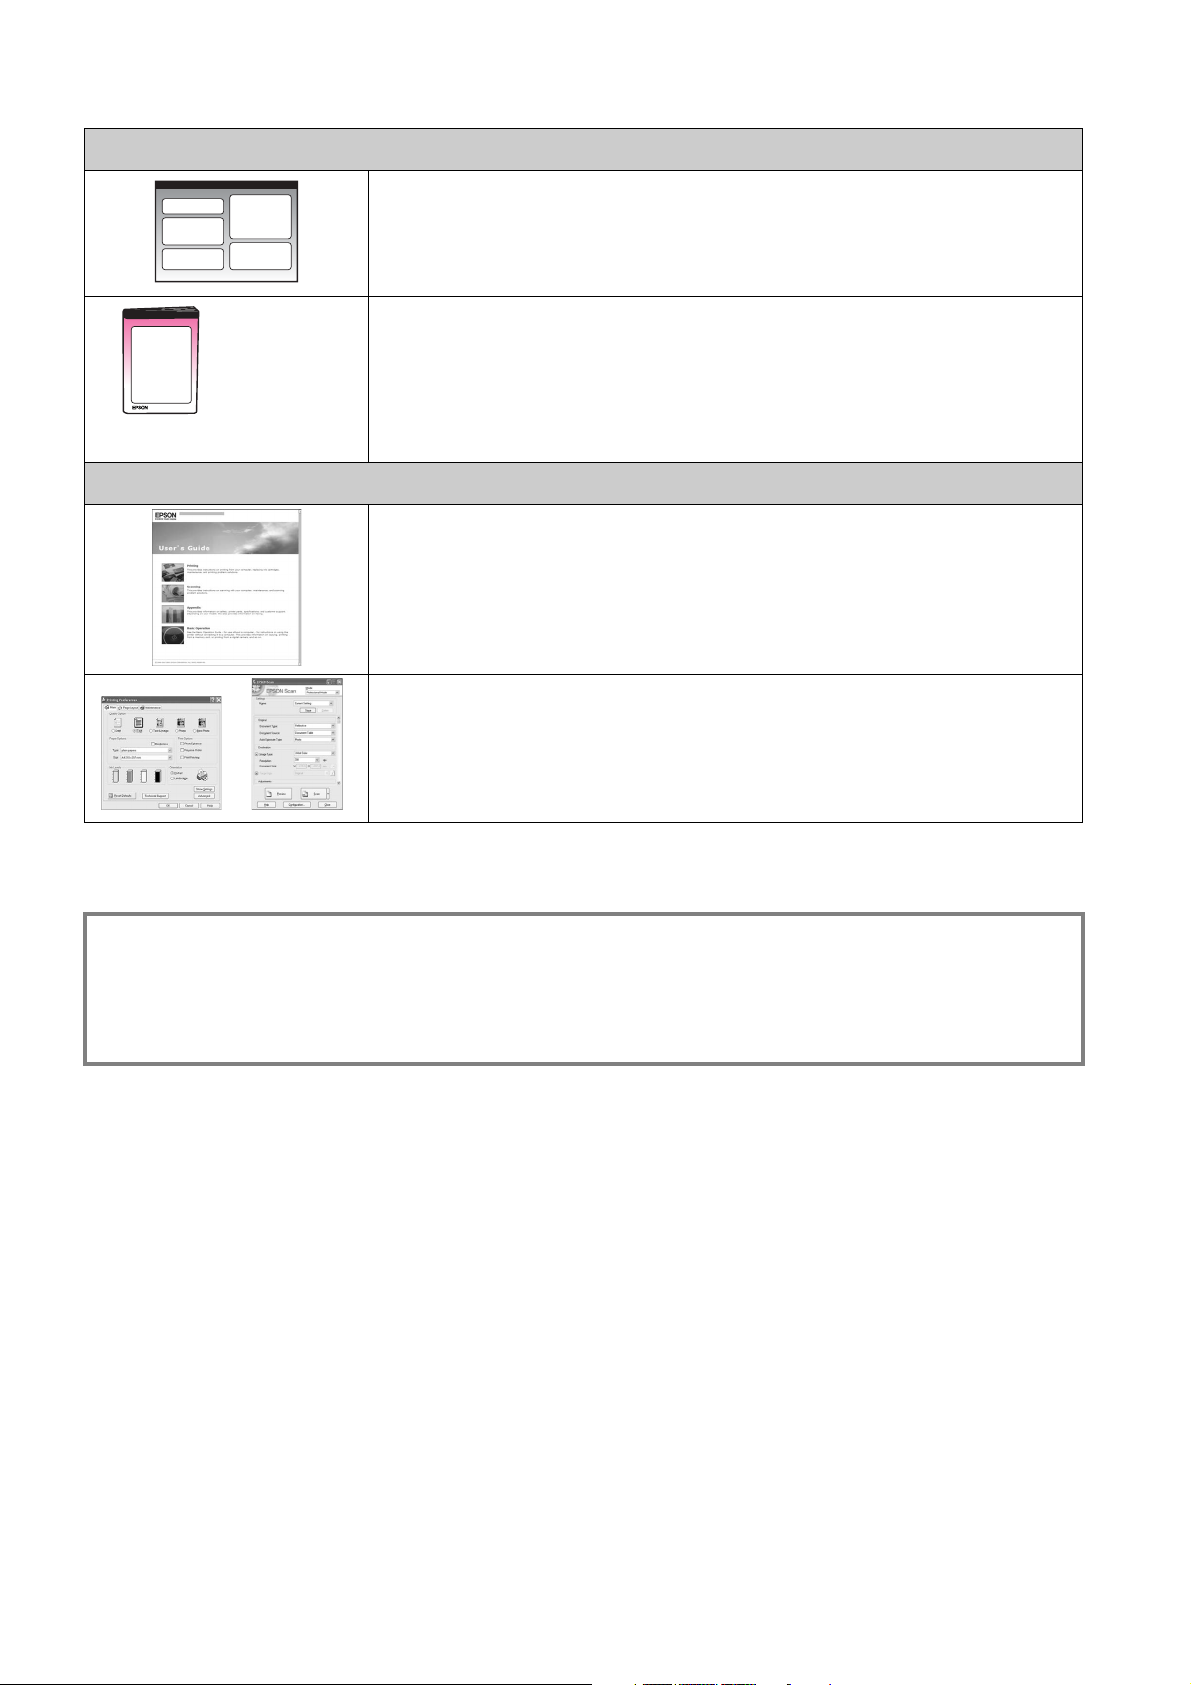
Online manuals
User's Guide
This guide provides instructions for printing and scanning from your
computer and information on the software.
This guide is included in the software CD-ROM and installed
automatically when you install the software. To read this guide,
double-click the icon on your desktop.
Online help
Online help is built into each application included on the software
CD-ROM. It provides detailed information on the application.
Warnings, Cautions, and Notes
Follow these guidelines as you read your instructions:
w Warning: Warnings must be followed carefully to avoid bodily injury.
c Caution: Cautions must be observed to avoid damage to your equipment.
Note: Notes contain important information about the printer.
Tip: Tips contain hints for using the printer.
Copyright Notice
No part of this publication may be reproduced, stored in a retrieval system, or transmitted in any form or by any means, electronic,
mechanical, photocopying, recording, or otherwise, without the prior written permission of Seiko Epson Corporation. The
information contained herein is designed only for use with this product. Epson is not responsible for any use of this information as
applied to other printers.
Neither Seiko Epson Corporation nor its affiliates shall be liable to the purchaser of this product or third parties for damages, losses,
costs, or expenses incurred by the purchaser or third parties as a result of accident, misuse, or abuse of this product or unauthorized
modifications, repairs, or alterations to this product, or (excluding the U.S.) failure to strictly comply with Seiko Epson Corporation's
operating and maintenance instructions.
Seiko Epson Corporation shall not be liable for any damages or problems arising from the use of any options or any consumable
products other than those designated as Original Epson Products or Epson Approved Products by Seiko Epson Corporation.
Seiko Epson Corporation shall not be held liable for any damage resulting from electromagnetic interference that occurs from the use
of any interface cables other than those designated as Epson Approved Products by Seiko Epson Corporation.
®
EPSON
PRINT Image Matching™ and the PRINT Image Matching logo are trademarks of Seiko Epson Corporation. Copyright © 2001 Seiko
Epson Corporation. All rights reserved.
USB DIRECT-PRINT™ and the USB DIRECT-PRINT logo are trademarks of Seiko Epson Corporation. Copyright © 2002 Seiko Epson
Corporation. All rights reserved.
DPOF™ is a trademark of CANON INC., Eastman Kodak Company, Fuji Photo Film Co., Ltd. and Matsushita Electric Industrial Co., Ltd.
SDHC™ is a trademark.
Memory Stick, Memory Stick Duo, Memory Stick PRO, Memory Stick PRO Duo, Memory Stick Micro, MagicGate Memory Stick, and
MagicGate Memory Stick Duo are trademarks of Sony Corporation.
xD-Picture Card™ is a trademark of Fuji Photo Film Co., Ltd.
Zip
The BLUETOOTH
General Notice: Other product names used herein are for identification purposes only and may be trademarks of their respective
owners. Epson disclaims any and all rights in those marks.
is a registered trademark and EPSON STYLUS™ and Exceed Your Vision are trademarks of Seiko Epson Corporation.
®
is a registered trademark of Iomega Corporation.
®
word mark is owned by the Bluetooth SIG, Inc. and licensed to Seiko Epson Corporation.

Safety Instructions
Important Safety Instructions
Before using this printer, read and follow
these safety instructions:
■ Use only the power cord that comes with
the printer. Use of another cord may cause
fire or shock. Do not use the cord with any
other equipment.
■ Make sure the power cord meets all
relevant local safety standards.
■ Use only the type of power source indicated
on the label.
■ Place the printer near a wall outlet where
the power cord can be easily unplugged.
■ Do not let the power cord become damaged
or frayed.
■ Make sure the total ampere rating of the
devices plugged into an extension cord or a
wall outlet does not exceed the ampere
rating limit.
■ Avoid locations that are subject to rapid
changes in heat or humidity, shocks or
vibrations, dust, or direct sunlight.
■ Do not block or cover openings in the case
or insert objects through the slots.
■ Place the printer on a flat, stable surface that
extends beyond its base in all directions. It
will not operate properly if it is tilted or at
an angle. And make sure the back of the
printer is at least 10 cm away from the wall
for sufficient ventilation.
■ Do not open the scanner unit while
copying, printing, or scanning.
■ Do not spill liquid on the printer.
■ Do not use aerosol products that contain
flammable gases inside or around the
printer. Doing so may cause fire.
■ Except as specifically explained in your
documentation, do not attempt to service
the printer yourself.
■ Unplug the printer and refer servicing to
qualified service personnel under the
following conditions: if the power cord or
plug is damaged; if liquid has entered the
printer; if the printer has been dropped or
the case damaged; if the printer does not
operate normally or exhibits a distinct
change in performance.
■ When storing or transporting the printer,
do not tilt it, stand it on its side, or turn it
upside down; otherwise ink may leak from
the cartridge.
■ Be careful not to trap your fingers when
closing the scanner unit.
■ Do not press too hard on the document
table when placing the originals.
Ink cartridge safety instructions
■ Keep ink cartridges out of the reach of
children and do not drink the ink.
■ If ink gets on your skin, wash it off with
soap and water. If it gets in your eyes, flush
them immediately with water. If you still
have discomfort or vision problems, see a
doctor immediately.
■ Do not shake ink cartridges after opening
their packages; this can cause leakage.
■ If you remove an ink cartridge for later use,
protect the ink supply area from dirt and
dust and store it in the same environment as
the printer. Do not touch the ink supply
port or surrounding area.
English
Safety Instructions 3
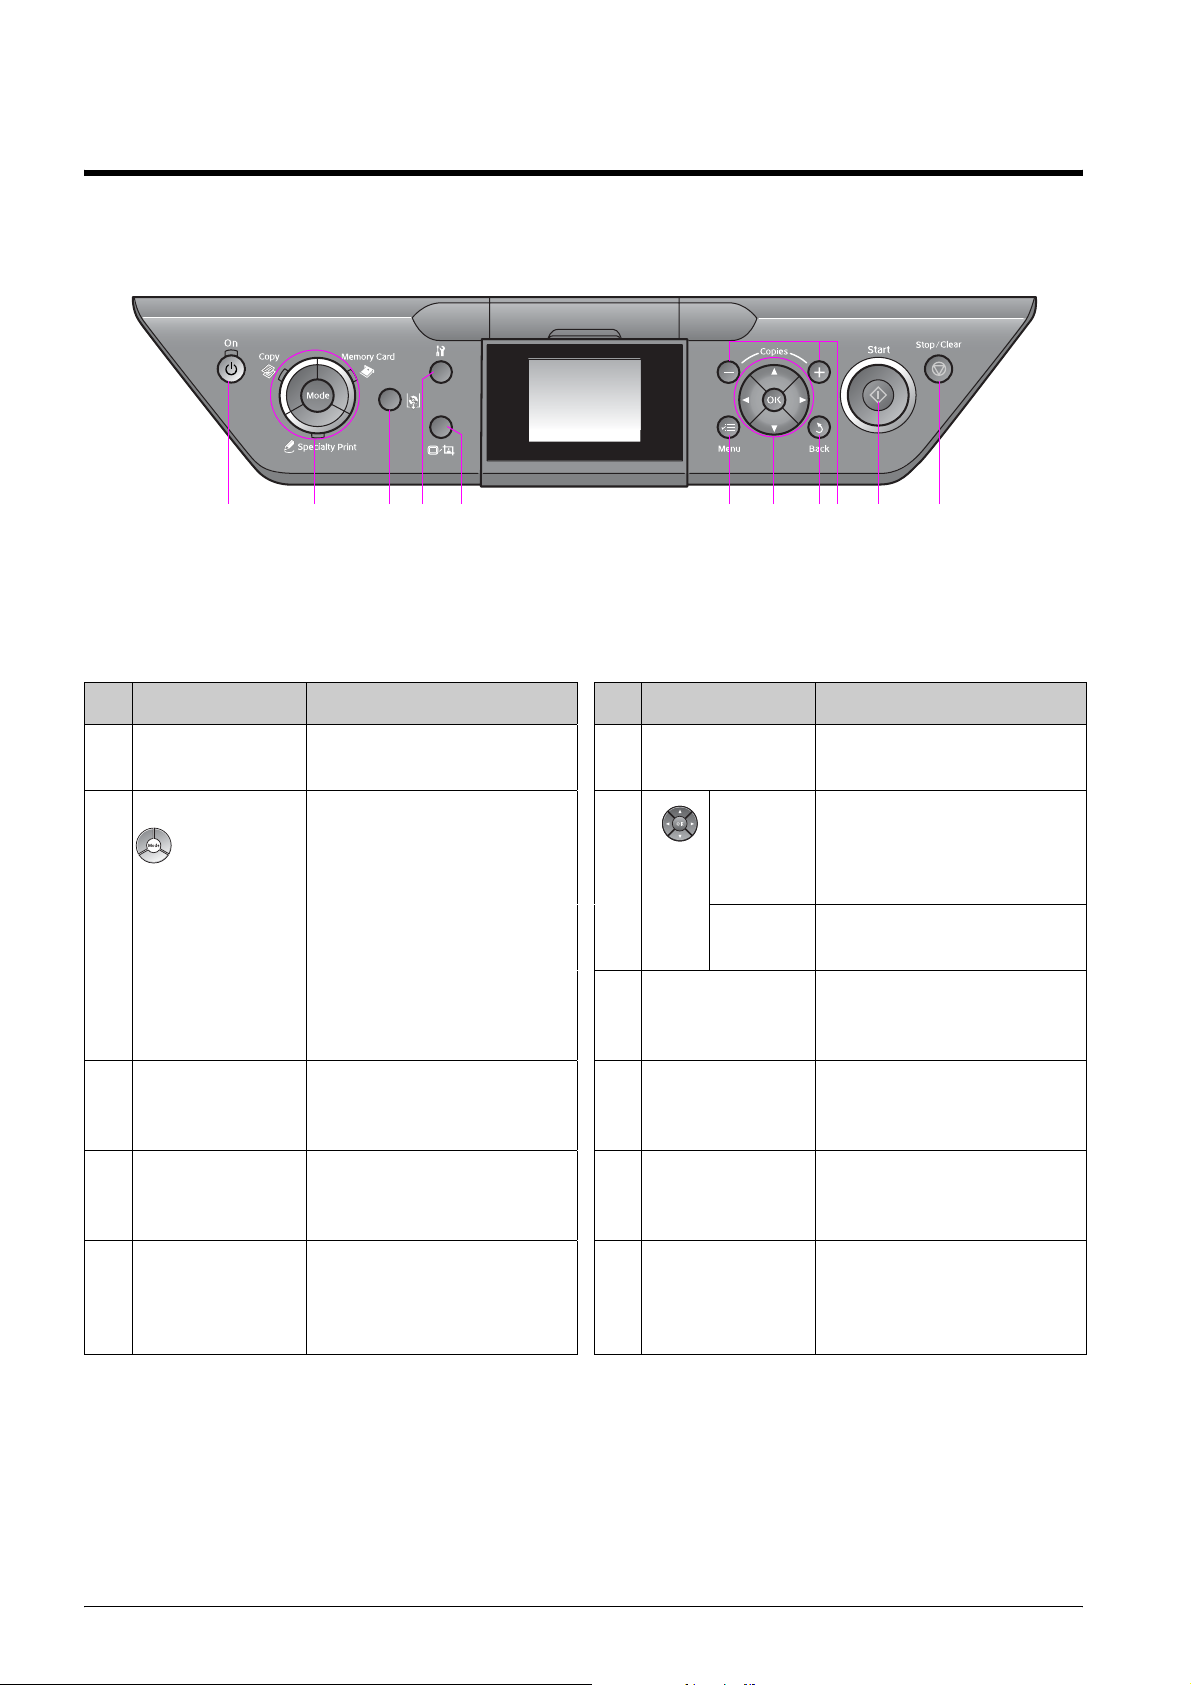
Control Panel Functions
Control Panel
a bdefghi
c
Control panel design varies by location.
Buttons
Button Function Button Function
a P On Turns the printer on and
off.
b Mode * Switches the modes
between r Copy,
s Memory Card, and
v Specialty Print.
(Lights show which mode
is selected.)
c L [CD Print] Moves the CD/DVD
guide.
jk
f x Menu * Displays detailed
settings for each mode.
g ud
lr
4-way
Scroll
OK Activates the settings
h y Back Cancels the current
i Copies
(+ and -)
Selects photos and
menu items.
you have selected.
operation and returns to
the previous menu.
Sets the number of
copies, or changes the
cropping area.
d F [Setup] * Runs maintenance
programs or adjusts
miscellaneous settings.
e G
[Display/Cro
p]
* For details on the items in each mode, see “Summary of Panel Settings” on page 40.
Changes the view of
photos on the LCD
screen, or crops the
photos.
j x Start Starts copying and
printing.
k y Stop/Clear Stops copying and
printing, or resets the
settings you have made.
4 Control Panel Functions
LCD screen
Note:
The LCD screen may contain a few small bright or dark spots, and because of its features it may have
an uneven brightness. These are normal and do not indicate that it is damaged in any way.
Using the LCD screen
Follow the instructions below to select and change the setting menus and the photos on the
LCD screen.
a
a
b
c,d
b,d,e
c
d
aUse Copies + or - to set the number of copies
for the selected photo.
c
a
e
bPress l or r to select the setting item.
cPress u or d to select the menu item. The
highlighted part moves up or down.
dPress r to open the setting item list. Press u
or d to select the setting item and then press
OK.
English
ePress l or r to change the displayed photo on
the LCD screen.
Power saving function
If no buttons are pressed for more than 3 minutes, the printer becomes inactive or a slide show
begins if Screen Saver Settings is set to Memory Card Data.
After 13 minutes of inactivity, the screen turns black to save energy and the Mode lights turn
on and off in a clockwise motion.
Press any button (except P On) to return the screen to its previous state.
Adjusting the angle of the LCD screen
You can change the angle of the LCD screen.
Control Panel Functions 5
Handling Paper
Selecting Paper
Before printing, you need to select the correct paper type setting. This important setting
determines how the ink is applied to the paper.
Note:
❏ The availability of special paper varies by location.
❏ You can find the part number for the following Epson special papers on the Epson support Web site.
Choose from these paper types and settings:
Paper type Paper type
setting
Plain paper ** Plain Paper 15 mm
Epson Bright White Ink Jet Paper 100 sheets
Epson Matte Paper-Heavyweight Matte 20 sheets
Epson Photo Quality Ink Jet Paper 100 sheets
Epson Premium Glossy Photo Paper Prem.Glossy 20 sheets
Epson Premium Semigloss Photo Paper
Epson Ultra Glossy Photo Paper Ultra Glossy 20 sheets
Epson Glossy Photo Paper Photo Paper 20 sheets
Epson Photo Stickers 4 *** PhotoSticker16 1 sheet
Epson Photo Stickers 16 *** 1 sheet
* The loading capacity of the rear feeder and the front paper cassette is the same except Photo Stickers.
** You can use paper with a weight of 64 to 90 g/m².
*** You cannot load Photo Stickers in the front paper cassette.
Loading capacity *
6 Handling Paper
Loading Paper
Into the rear feeder
1. Open and extend the paper support.
2. Move the feeder guard towards you, and
then slide the edge guide.
5. Slide the edge guide to the right. Make
sure the paper fits under the c arrow
mark inside the left edge guide. Set the
feeder guard back.
English
10 × 15 cm (4 × 6 in.) and
13 × 18 cm (5 × 7 in.)
3. Load the paper short edge first, even for
landscape printing, with the printable
side up.
The printable side
is often whiter or
brighter than the
other side.
4. Slide the paper to the right.
Follow the same steps to load A4 paper.
A4
6. Open and extend the output tray.
c Caution:
Make sure the CD/DVD guide is not ejected
before you start printing.
Note:
Make sure the Paper Feed setting is set to Rear
before you start printing.
Handling Paper 7
Into the front paper cassette
Note:
❏ Do not load Photo Stickers into the front paper
cassette.
❏ Do not load paper into the front paper
cassette that has already been printed onto
one side or that has been fed through the
printer once.
1. Pull out the front paper cassette.
❏ Align the edges of the paper before
loading.
5. Fit the edges of the paper snugly against
the paper guides. The paper will not be
loaded correctly if it overflows or does
not fit properly.
6. Replace the cover.
2. Lift off the cover.
3. Pinch the knob and slide the paper
guides to accommodate the paper size
you are loading.
4. Load paper with the printable side face
down. Make sure the paper is under the
c arrow mark inside the paper guide.
7. Insert the cassette back into the printer
and keep it flat as you insert it.
Follow the same steps to load 10 × 15 cm
(4 × 6 in.) and 13 × 18 cm (5 × 7 in.)
paper.
Note:
❏ Do not load paper above the c arrow mark
inside the paper guide.
8 Handling Paper

8. Open and extend the output tray.
c Caution:
Make sure the CD/DVD guide is not ejected
before you start printing.
Note:
❏ Make sure the Paper Feed setting is set to
Front before you start printing.
❏ Do not pull out the front paper cassette while
the printer is operating.
English
Handling Paper 9
Handling a CD/DVD
c Caution:
Store the CD/DVD tray in a flat place. A warped
or damaged CD/DVD tray may stop the printer
from operating normally.
Note:
❏ Make sure the data, music, or video is burned
on your ink jet printable CD/DVDs before you
print.
❏ Moisture on the printable surface may cause
smearing.
❏ The printed surface is easily smeared
immediately after printing.
❏ Be sure to let a CD/DVD dry completely
before using it or touching the printed surface.
❏ Do not allow the printed CD/DVD to dry in
direct sunlight.
❏ If the CD/DVD tray or the internal transparent
compartment are accidentally printed on,
immediately wipe off the ink.
❏ To print on 8-cm mini CDs, use the EPSON
Print CD included in the software CD-ROM.
See your online User's Guide.
3. Place your CD/DVD on the tray.
The label
surface up.
4. Insert the tray into the CD/DVD guide.
c Caution:
Do not insert the tray while the printer is
operating, or you may damage the printer.
Loading a CD/DVD
1. Close the output tray extension.
c Caution:
Make sure there is no paper on the output
tray.
2. Press L [CD Print] to move the CD/DVD
guide.
c Caution
❏ Do not press L [CD Print] while the printer
is operating.
❏ Do not touch the CD/DVD guide while the
printer is operating.
10 Handling a CD/DVD

Removing a CD/DVD
c Caution:
Be sure to remove the CD/DVD tray after
printing has finished. If you turn the printer on or
off with the tray in the CD/DVD guide, you may
damage the printer.
1. Make sure that printing is finished.
2. Remove the CD/DVD tray by pulling it
straight out of the CD/DVD guide.
3. Press L [CD Print] to replace the
CD/DVD guide.
English
Handling a CD/DVD 11
Copying
Note:
❏ The copied image may not be exactly the
same size as the original.
❏ Depending on the type of paper used, print
quality may decline in the top and bottom
areas of the printout, or these areas may be
smeared.
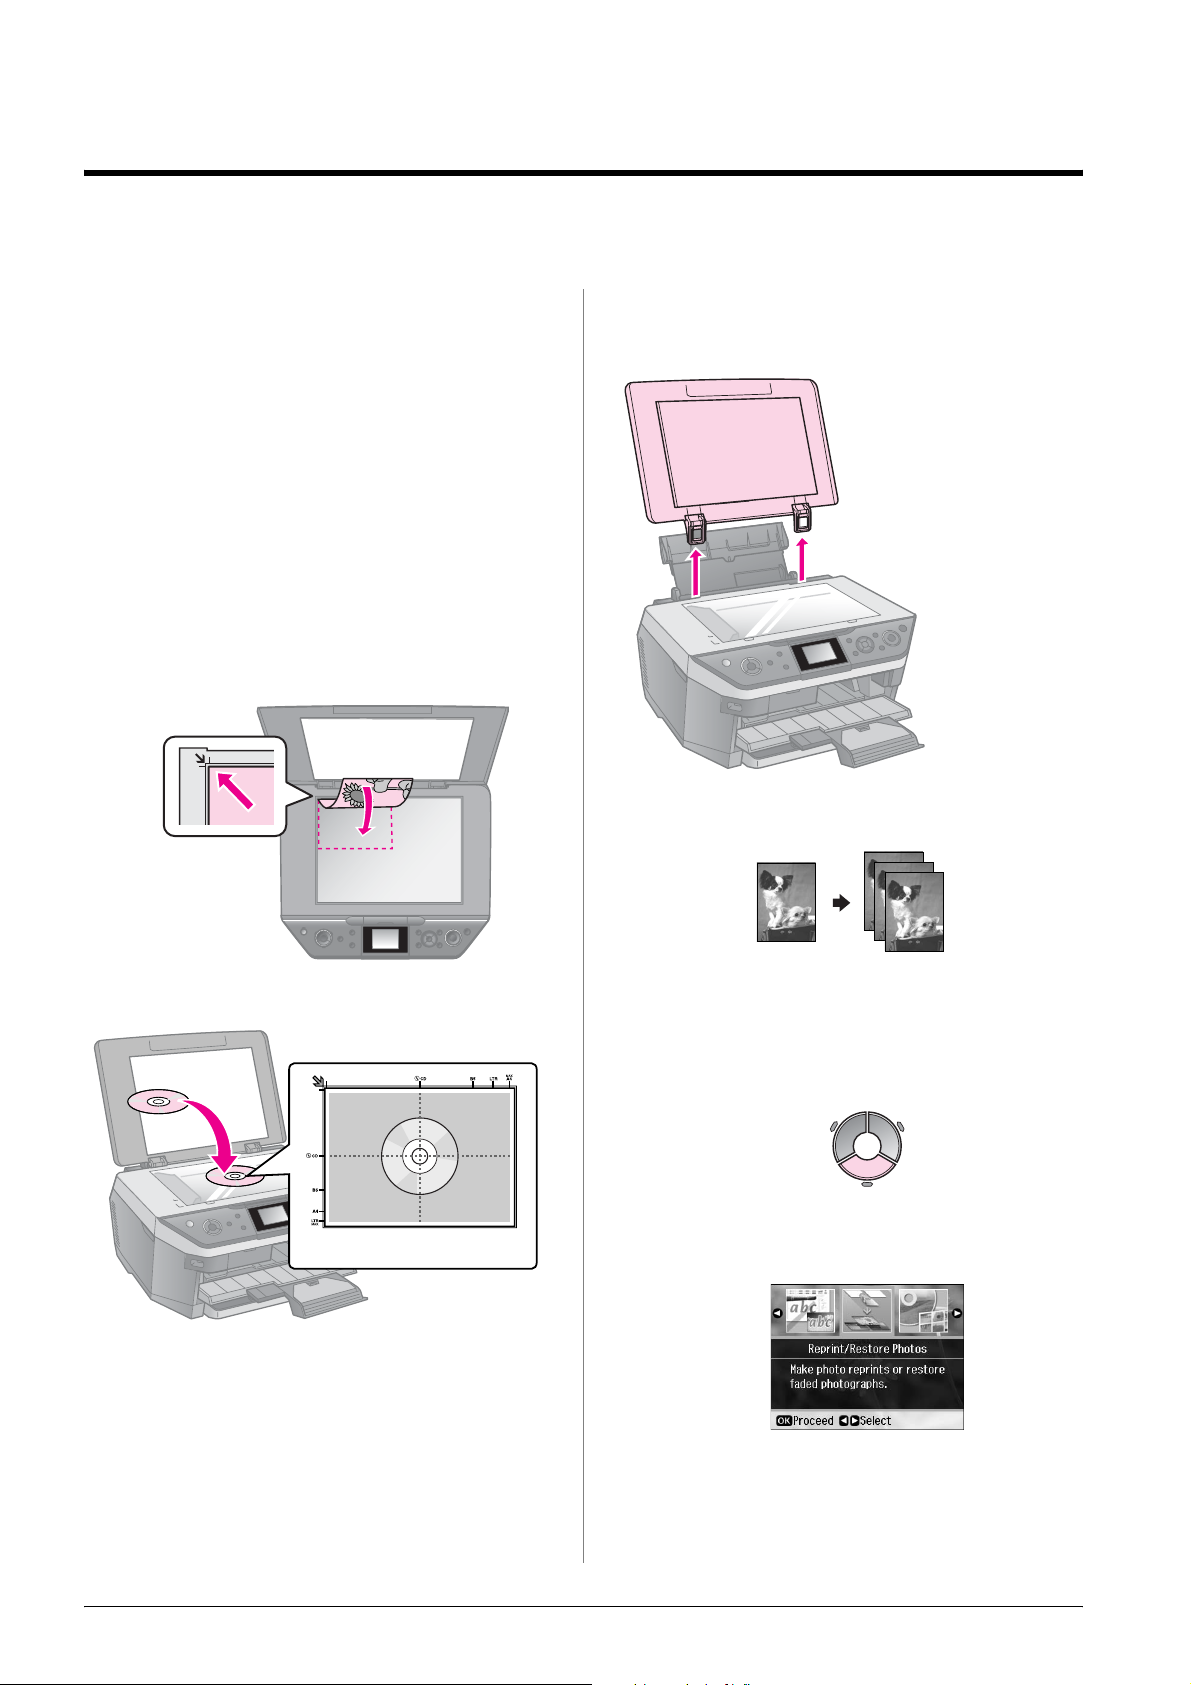
Placing Originals on the Document Table
1. Open the document cover and place
your original face-down on the
document table.
Photos or document:
Tip:
If you want to copy a thick or large document,
you can remove the document cover.
Open it and pull it
straight up.
Copying Photos
CD/DVD:
2. Close the cover gently.
You can copy photos from 30 × 40 mm to
127 × 178 mm. You can also copy two
photos at the same time.
1. Press v Specialty Print.
2. Select Reprint/Restore Photos, then
press OK.
3. Press OK.
12 Copying
Note:
❏ If your photos have faded over time, select
On to bring them back to life.
Cropping and enlarging a photo
❏ If you set Color Restoration to On for a
normal color photo, the photo may not be
printed correctly.
4. Press OK again. Your photo is
previewed.
5. Set the number of copies.
6. Press x Menu and change the settings
(& “Print settings for Reprint/Restore
Photos” on page 45). Then press OK.
7. Press x Start.
Note:
If the edges of the copy are cropped off, move
the original away from the corner slightly.
Copying multiple photos
Place each photo horizontally.
5mm
You can crop out the rest of the photo and
print just the main subject by itself when
you copy a photo.
1. Press v Specialty Print.
2. Refer to “Copying Photos” on page 12
and follow the steps from 2 to 4.
3. Press G [Display/Crop]. You see the
cropping screen.
4. Use the following button to set the area
you want to crop.
English
5mm
5mm
Note:
❏ You can copy two 10 × 15 cm (4 × 6 in.) size
photos at the same time. If the edge of the
photo is missing after you print, try copying
them one at a time.
❏ Place your photo 5 mm away from the edge of
the document table. Also when you place two
photos, position each photo at least 5 mm
away from the adjacent photo.
❏ You can copy several different sized photos at
the same time, as long as they are larger than
30 × 40 mm.
Copies +, - Change the frame size.
u, d, l, r Move the frame.
x Menu Rotate the frame.
Note:
x Menu is only available in the Memory
Card mode.
5. Press OK to confirm the cropped image.
Note:
To readjust the frame’s position, press
y Back to return to the previous screen.
6. When you have finished checking the
cropped image, press OK.
Note:
The icon is displayed on the cropped
image.
7. Set the number of copies.
Copying 13
8. Press x Menu and change the settings
(& “Print settings for Reprint/Restore
Photos” on page 45). Then press OK.
9. Press x Start.
Copying Documents
Note:
❏ If you select 2-up Copy, Book/2-up, or
Double Side 2-up as the Layout setting ,
scan one original at a time.
❏ If the edges of the copy are cropped off, move
the original away from the corner slightly.
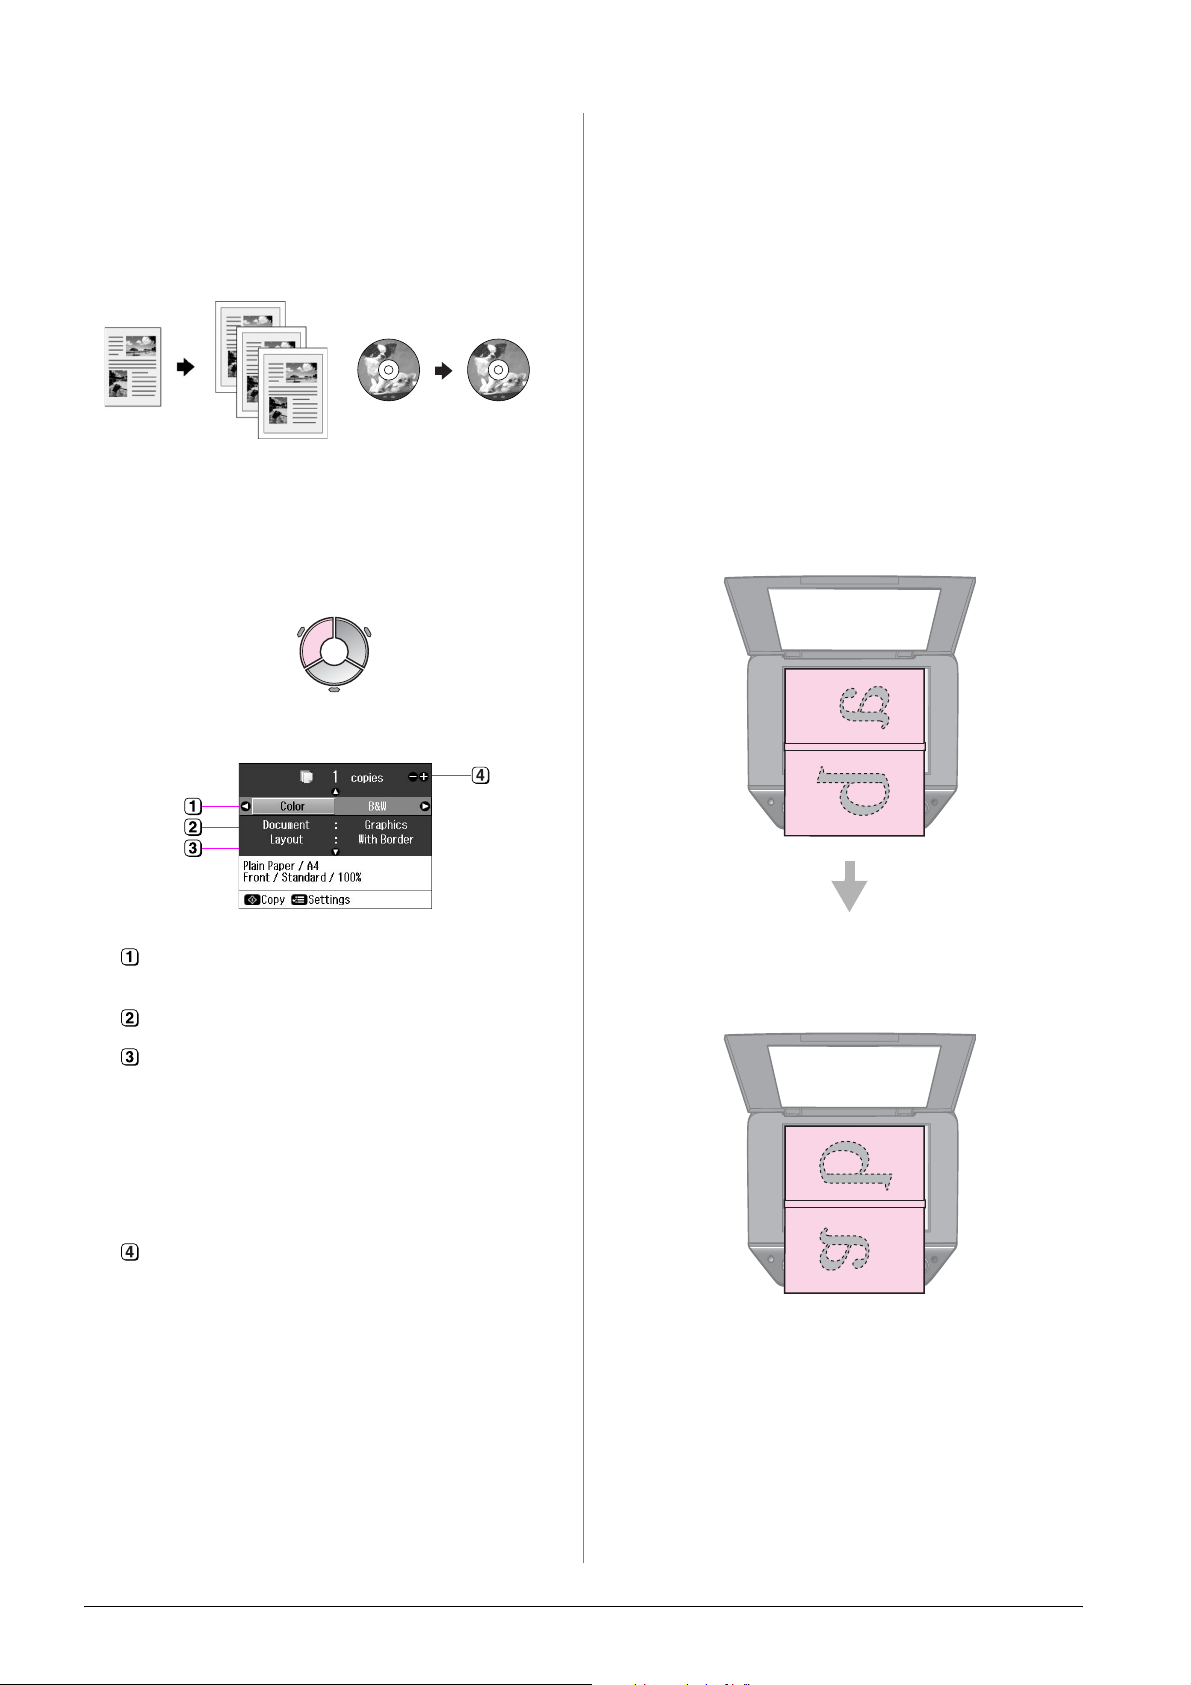
Copying books
When you select Book/2-up or
Book/Double Side as the Layout setting,
place the original on the document table as
shown in the following illustration.
Tip:
By using the Auto Duplexer you can copy and
print on both sides of your paper. For details on
setting it up, see your online User's Guide.
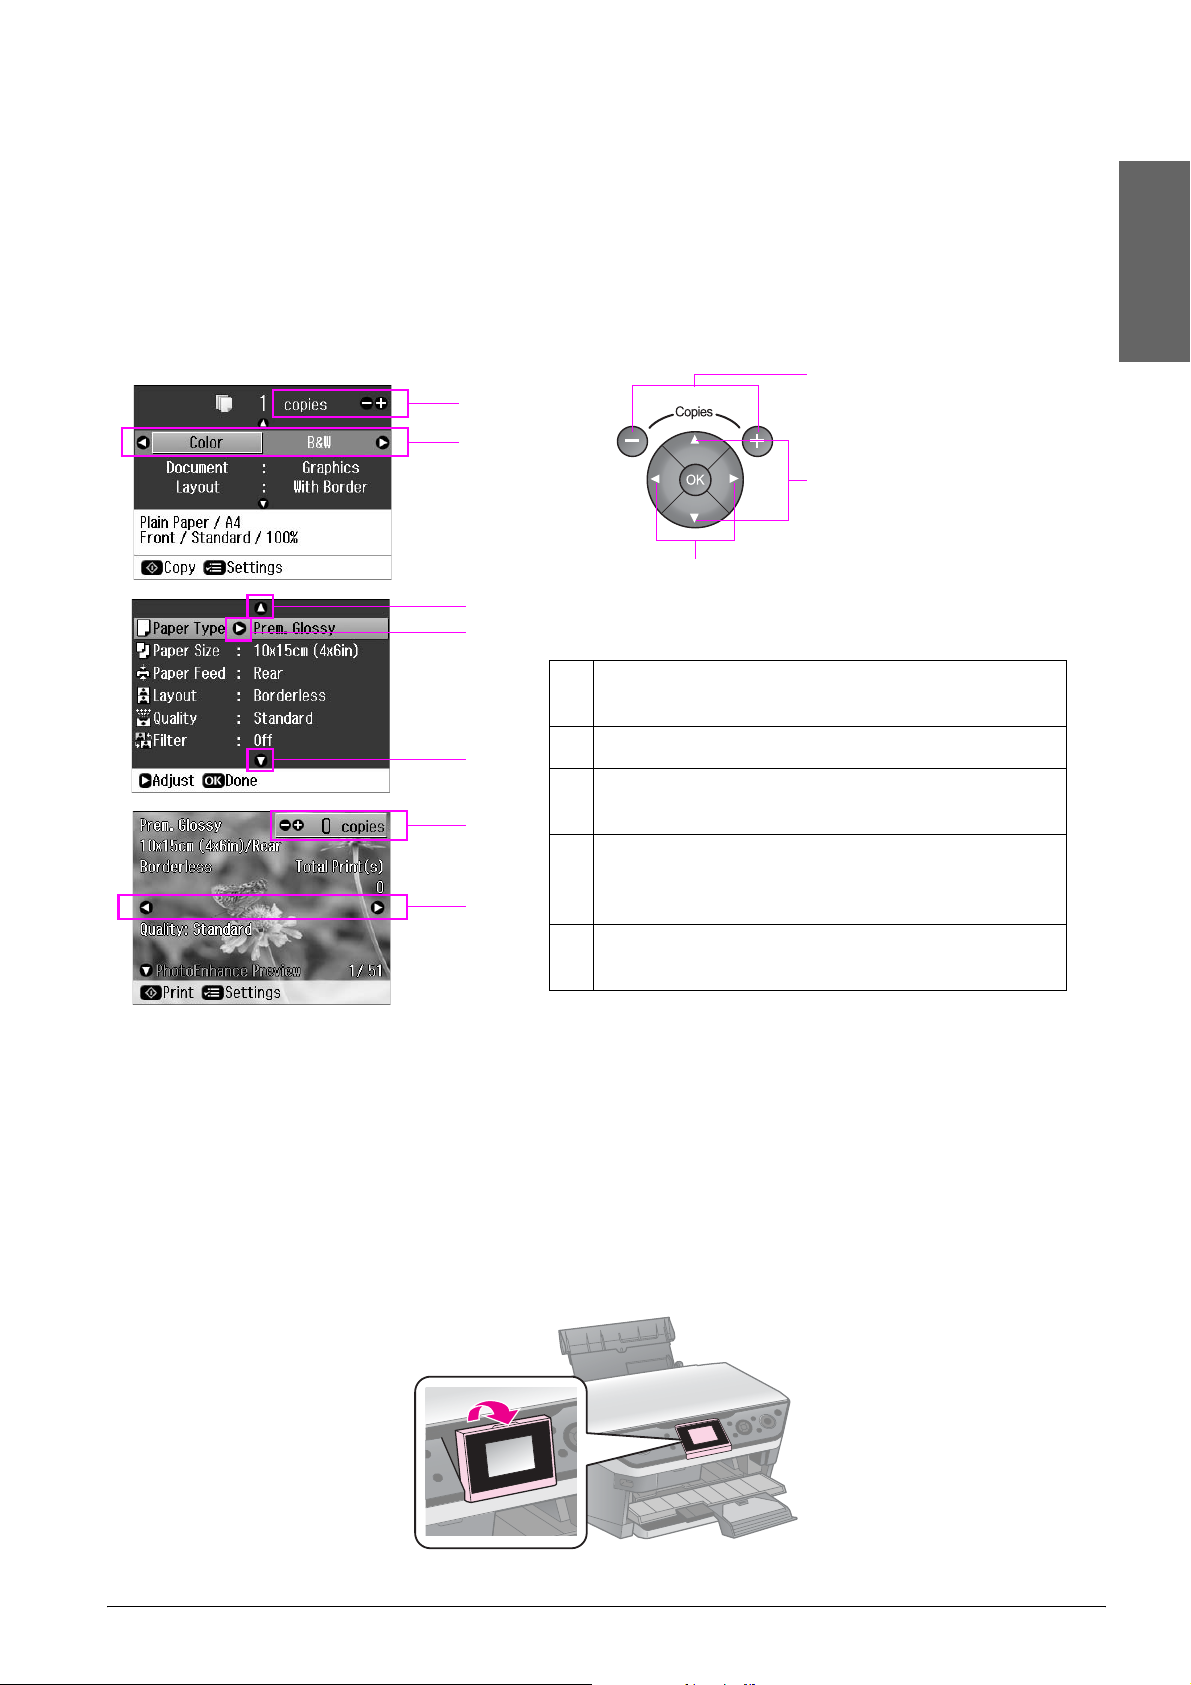
1. Press r Copy.
2. Select the copy settings.
Select Color for color copies or B&W
for black-and-white copies.
Select the type of document.
Open the book to the first page you want to
copy and then place it on the document
table.
When you have finished scanning the first
page, turn the book around, and then place
it on the document table.
Select a layout option (& “Copy
Mode” on page 40).
Note:
When copying onto both sides of the
paper using the optional Auto Duplexer,
select Double Side 1-up, Book/Double
Side or Double Side 2-up as the layout.
Set the number of copies.
3. Press x Menu to change the settings
(& “Print settings for Copy mode” on
page 41). Then press OK.
Tip:
When CD/DVD Copy is selected as the
Layout, try printing a test sample on paper
first. Select Plain Paper as the Paper Type
setting and load plain paper.
4. Press x Start.
14 Copying
Printing from a Memory Card
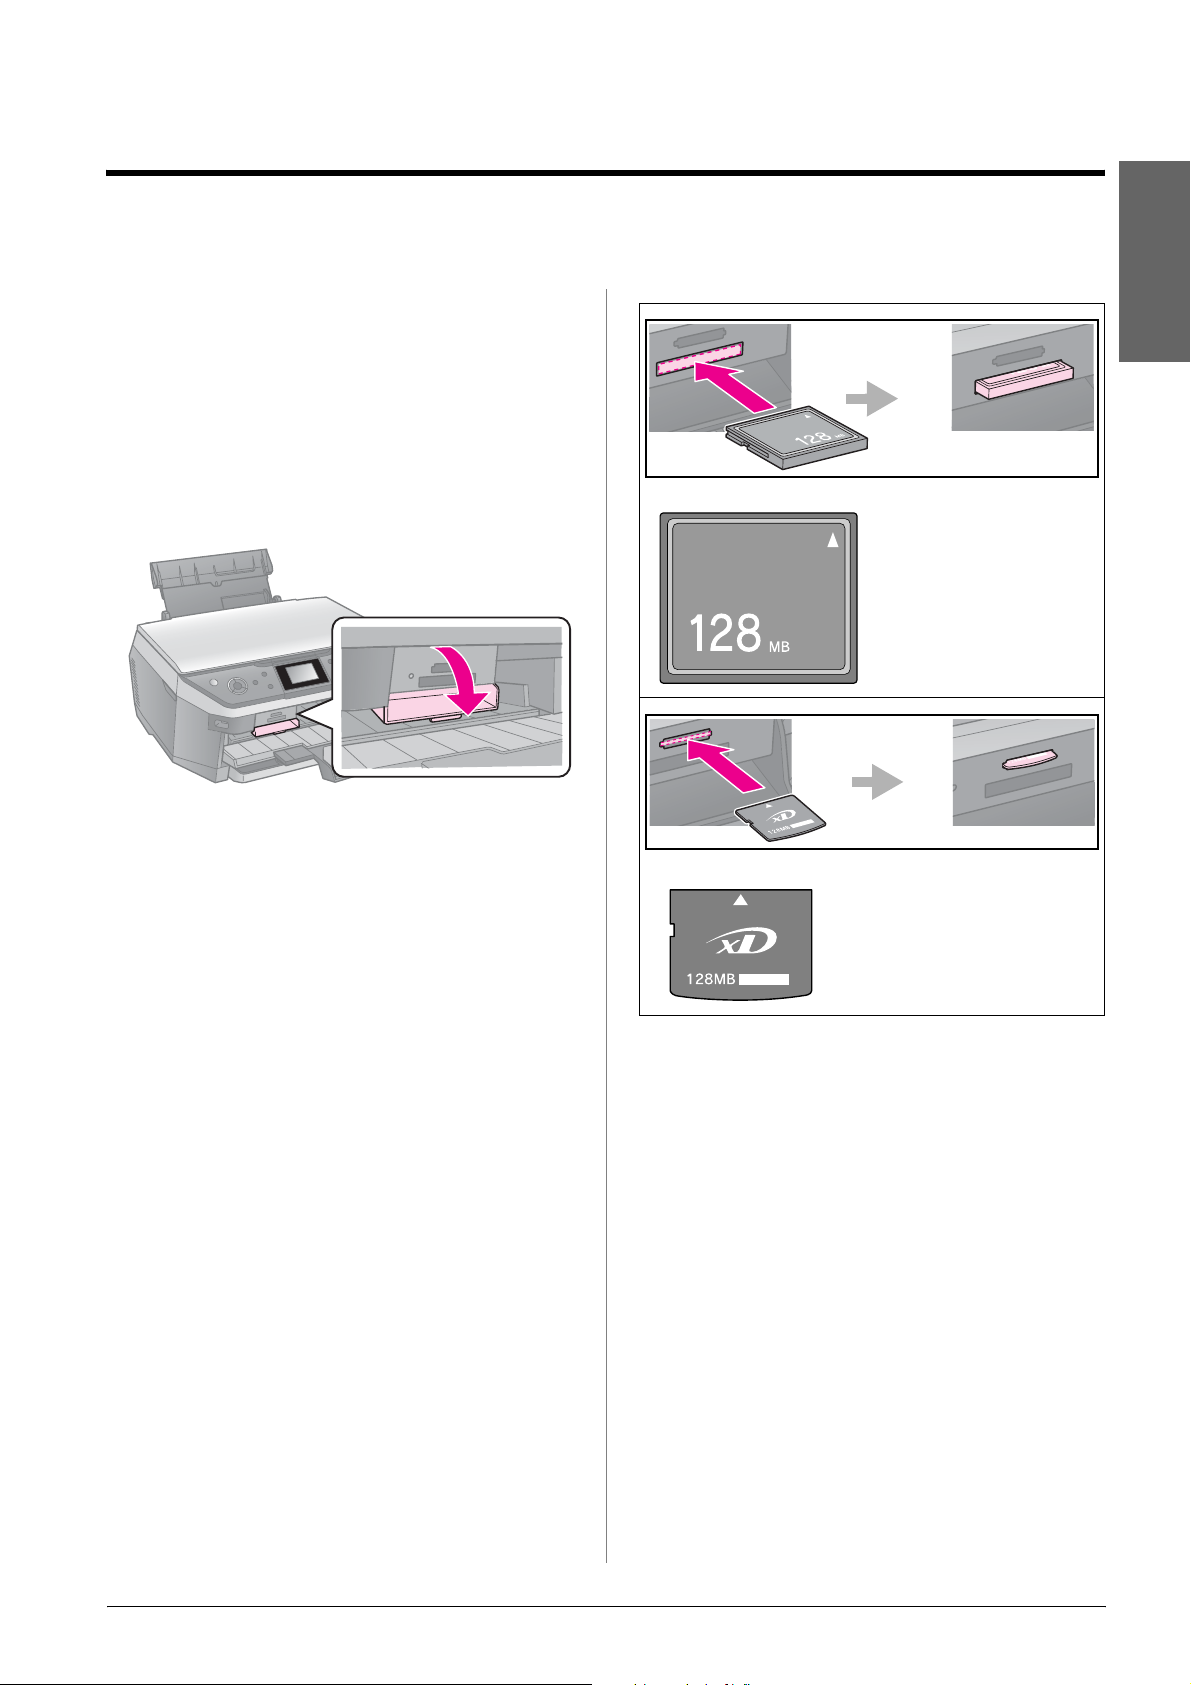
Handling a Memory Card
Inserting a memory card
Note:
If a digital camera is connected to the printer,
disconnect it before you insert your memory
card.
1. Open the memory card slot cover.
2. Make sure no memory cards are in the
slots. Then insert your memory card.
English
CompactFlash
Microdrive
c Caution:
❏ Do not insert more than one memory card
at a time.
❏ Do not try to force the memory card into
the slot. Memory cards will not go all the
way in.
❏ Make sure you check which direction the
card should be inserted, and if the card
needs an adapter, make sure you attach
the adapter before inserting the card.
Otherwise, you may not be able to remove
the card from the printer.
xD-Picture Card
xD-Picture Card Type M
xD-Picture Card Type H
Printing from a Memory Card 15
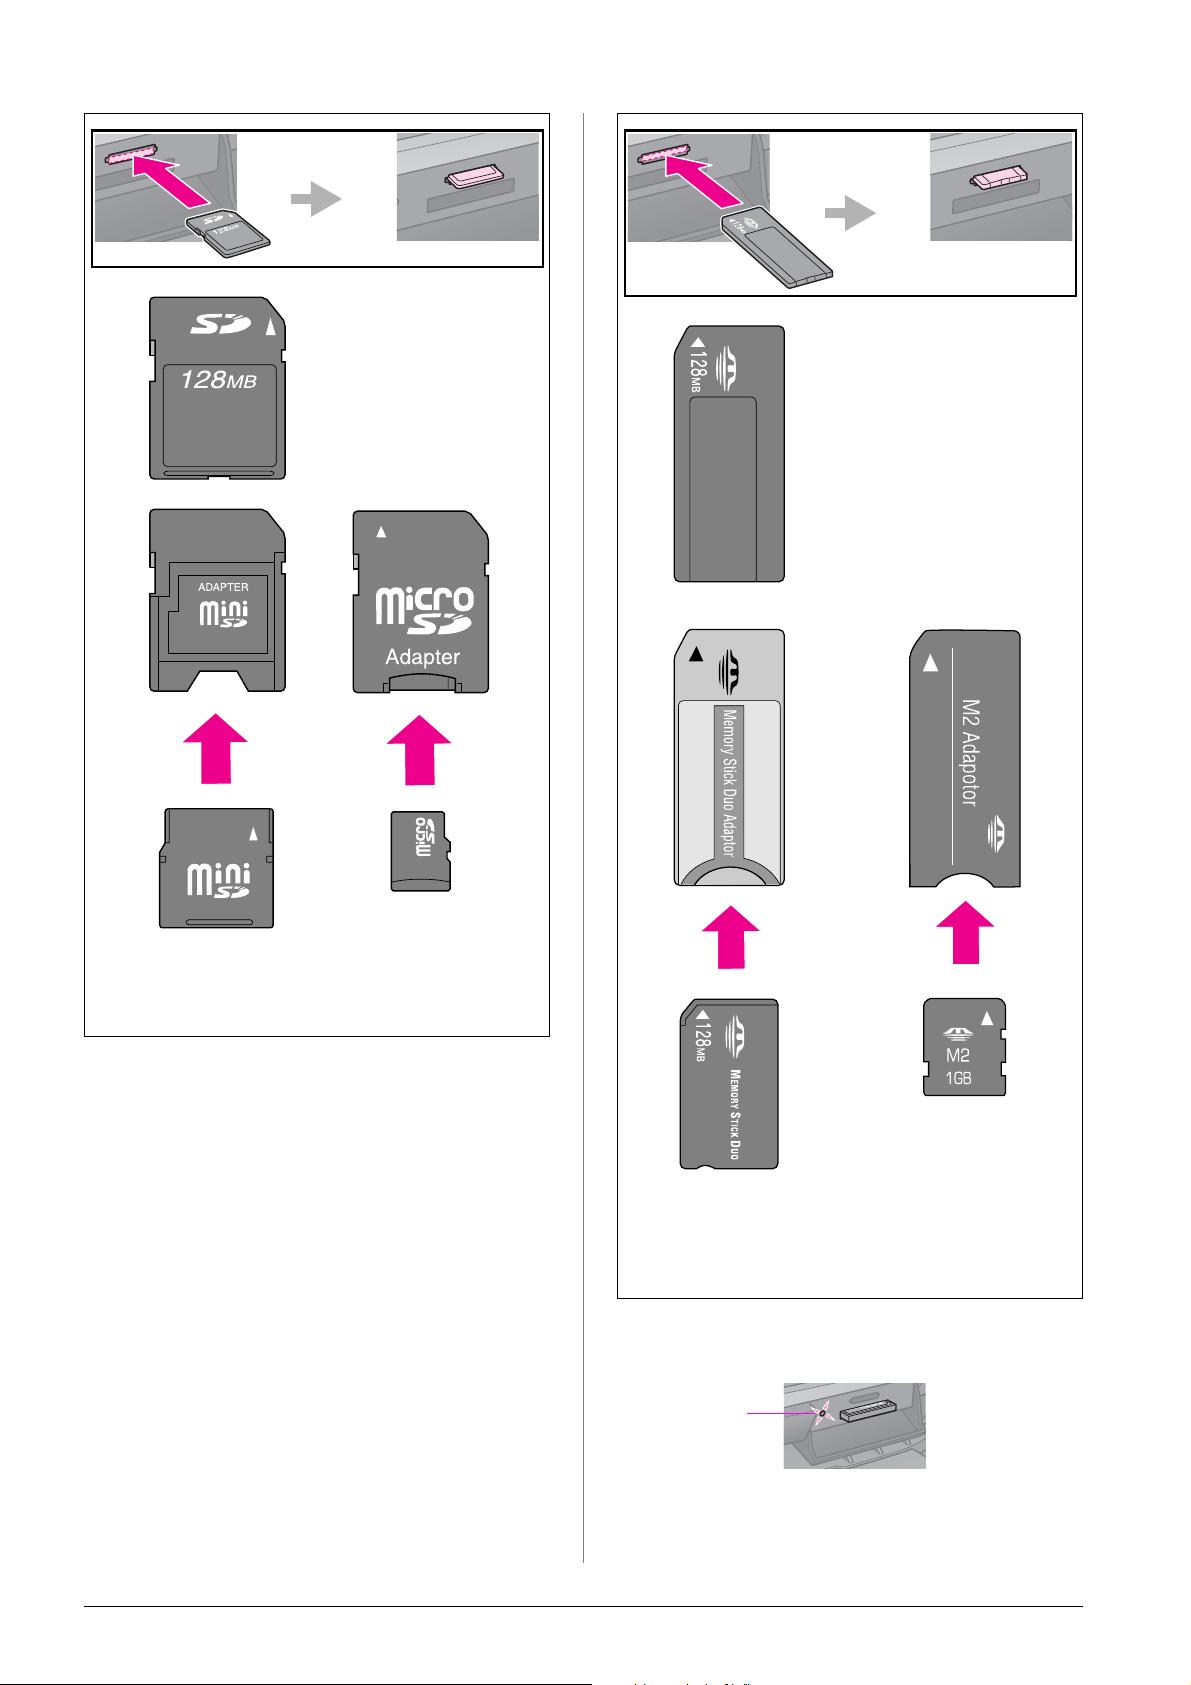
miniSD card*
miniSDHC card*
SD Memory Card
SDHC Memory Card
MultiMediaCard
Memory Stick
Memory Stick PRO
MagicGate Memory Stick
microSD card*
microSDHC card*
(* Adapter required)
16 Printing from a Memory Card
Memory Stick Micro*
Memory Stick Duo*
Memory Stick PRO Duo*
MagicGate Memory Stick Duo*
(* Adapter required)
3. Make sure the memory card light flashes
and then stays on.
Memory
card light
Loading...