


 Loading...


Important Safety Instructions
1.Read all of these instructions and save them for later reference.
2.Follow all warnings and instructions marked on the computer.
3.Unplug the computer from the wall outlet before cleaning. Use a damp cloth for cleaning; do not use liquid or aerosol cleaners.
4.Do not spill liquid of any kind on the computer.
5.Do not place the computer on an unstable cart, stand, or table.
6.Slots and openings in the cabinet and the back or bottom are provided for ventilation; do not block or cover these openings. Do not place the computer near or over a radiator or heat register.
7.Operate the computer using the type of power source indicated on its label. If you are not sure of the type of power available, consult your dealer or local power company.
8.If you plan to operate the computer in Germany, observe the following safety precaution:
To provide adequate short-circuit protection and overcurrent protection for this computer, the building installation must be protected by a 16 Amp circuit breaker.
9.Connect all equipment to properly grounded (earthed) power outlets. If you are unable to insert the plug into an outlet, contact your electrician to replace your outlet. Avoid using outlets on the same circuit as photocopiers or air control systems that regularly switch on and off.
10.Do not allow the computer’s cord to become damaged or frayed.
iii

11.If you use an extension cord with the computer, make sure the total of the ampere ratings of the devices plugged into the extension cord does not exceed the ampere rating for the extension cord. Also, make sure the total of all products plugged into the wall outlet does not exceed 15 amperes.
12.Do not insert objects of any kind into this product through the cabinet slots.
13.Except as specifically explained in this User’s Guide, do not attempt to service the computer yourself. Refer all servicing to qualified service personnel.
14.Unplug the computer from the wall outlet and refer servicing to qualified service personal under the following conditions:
A.When the power cord or plug is damaged.
B.If liquid has entered the computer.
C.If the computer does not operate normally when the operating instructions are followed. Adjust only those controls that are covered by the operating instructions. Improper adjustment of other controls may result in damage and often requires extensive work by a qualified technician to restore the computer to normal operation.
D.If the computer has been dropped or the cabinet has been damaged.
E.If the computer exhibits a distinct change in performance.
iv


Optional Equipment . . . . . . . . . . . . . . . . . . . . . . . . . |
2 |
|
Memory.. . . . . . . . . . . . . . . . . . . . . . . . . . . . |
2 |
|
Drives |
. . . . . . . . . . . . . . . . . . . . . . . . . . . . . . |
3 |
CPU Card . . . . . . . . . . . . . . . . . . . . . . . . . . . . |
3 |
|
OverDrive Module . . . . . . . . . . . . . . . . . . . . . . . |
3 |
|
Math Coprocessor . . . . . . . . . . . . . . . . . . . . . . . |
3 |
|
Video |
Daughterboard . . . . . . . . . . . . . . . . . . . . . |
4 |
VGA UtiIities . . . . . . . . . . . . . . . . . . . . . . . . . . . . . |
4 |
|
How to Use This Manual . . . . . . . . . . . . . . . . . . . . . . |
5 |
|
Where to Get Help . . . . . . . . . . . . . . . . . . . . . . . . . . |
6 |
|
Chapter 1 |
Using Your Computer |
|
Turning On the Computer . . . . . . . . . . . . . . . . . . . . . |
1-2 |
|
Turning Off |
the Computer . . . . . . . . . . . . . . . . . . |
1-4 |
Using Disks and Disk Drives . . . . . . . . . . . . . . . . . . . . |
1-5 |
|
How Disks Store Data . . . . . . . . . . . . . . . . . . . . . |
1-6 |
|
Types of Diskette Drives . . . . . . . . . . . . . . . . . . . |
1-7 |
|
Caring for Diskettes and Diskette Drives . . . . . . . . . |
1-10 |
|
Write-protecting Diskettes . . . . . . . . . . . . . . . . . . |
1-12 |
|
Inserting and Removing Diskettes . . . . . . . . . . . . . . |
1-14 |
|
Using a Single Diskette Drive System . . . . . . . . . . . . |
1-16 |
|
Formatting Diskettes . . . . . . . . . . . . . . . . . . . . . |
1-17 |
|
Making Backup Copies . . . . . . . . . . . . . . . . . . . . |
1-17 |
|
Using a Hard Disk Drive . . . . . . . . . . . . . . . . . . . |
1-18 |
|
Special Keys on the Keyboard . . . . . . . . . . . . . . . . . . . |
1-20 |
|
Stopping a Command or Program . . . . . . . . . . . . . . . . . |
1-21 |
|
Resetting the Computer . . . . . . . . . . . . . . . . . . . . . . . |
1-22 |
|
Locking the Computer’s Cover . . . . . . . . . . . . . . . . . . |
1-23 |
|
v i i

Using a Password . . . . . . . . . . . . . . . . . . . . . . . . . . |
1-24 |
|||
|
Changing a Password . . . . . . . . . . . . . . . . . . . |
1-25 |
||
|
Deleting a Password . . . . . . . . . . . . . . . . . . . . . |
1-26 |
||
Using Your Computer as a Network Server . . . . . . . . . . . |
1-27 |
|||
|
Using a Password in Network Server Mode . . . . . . . . |
1-28 |
||
Changing the Processor Speed . . . . . . . . . . . . . . . . . . . |
1-29 |
|||
|
Entering Keyboard Commands . . . . . . . . . . . . . . . |
1-31 |
||
|
Using the ESPEED Program . . . . . . . . . . . . . . . . . |
1-32 |
||
Changing the Speaker Volume . . . . . . . . . . . . . . . . . . |
1-34 |
|||
Preparing the Hard Disk for Moving . . . . . . . . . . . . . . . |
1-36 |
|||
Using AUTOEXEC.BAT and Other Batch Files . . . . . . . . . |
1-37 |
|||
|
Chapter 2 |
Accessing Internal Components |
|
|
Special Precautions . . . . . . . . . . . . . . . . . . . . . . . . . |
2-2 |
|||
Removing the Cover . . . . . . . . . . . . . . . . . . . . . . . . |
2-3 |
|||
Removing the Front Panel . . . . . . . . . . . . . . . . . . . . . |
2-5 |
|||
Removing |
the |
Subassembly . . . . . . . . . . . . . . . . . . . . |
2-7 |
|
Replacing |
the |
Subassembly . . . . . . . . . . . . . . . . . . . . |
2-9 |
|
|
Replacing the Front Panel . . . . . . . . . . . . . . . . . . . . . |
2-11 |
||
|
Replacing the Cover . . . . . . . . . . . . . . . . . . . . . . . . . |
2-12 |
||
|
Chapter 3 |
Installing and Removing Options |
|
|
|
Main System Board Map . . . . . . . . . . . . . . . . . . . . . . |
3-3 |
||
|
Jumper Settings . . . . . . . . . . . . . . . . . . . . . . . . . . . |
3-4 |
||
|
Setting the Jumpers . . . . . . . . . . . . . . . . . . . . . . |
3-5 |
||
|
Option Cards |
. . . . . . . . . . . . . . . . . . . . . . . . . . . . . |
3-6 |
|
|
Installing an Option Card . . . . . . . . . . . . . . . . . . . |
3-8 |
||
|
Removing an Option Card . . . . . . . . . . . . . . . . . . |
3-10 |
||
|
Memory Modules (SIMMs) . . . . . . . . . . . . . . . . . . . . . |
3-11 |
||
|
Installing |
SIMMs . . . . . . . . . . . . . . . . . . . . . . . . |
3-14 |
|
|
Removing SIMMs . . . . . . . . . . . . . . . . . . . . . . . |
3-16 |
||
|
Replacing the CPU Card . . . . . . . . . . . . . . . . . . . . . . |
3-17 |
||
|
Removing the CPU Card . . . . . . . . . . . . . . . . . . . |
3-18 |
||
|
Installing the CPU Card . . . . . . . . . . . . . . . . . . . |
3-19 |
||
Viii
Installing an |
OverDrive Module . . . . . . . . . . . . . . . . . . |
3-22 |
|||
Installing a Math Coprocessor . . . . . . . . . . . . . . . . . . . |
3-24 |
||||
|
Installing the Intel 487SX/25 Microprocessor . . . . . . . |
3-26 |
|||
|
Installing a Weitek 4167 Coprocessor . . . . . . . . . . . . |
3-27 |
|||
Replacing the Video Daughterboard . . . . . . . . . . . . . . . |
3-29 |
||||
Using the VGA Feature Connector . . . . . . . . . . . . . . . . |
3-34 |
||||
|
Chapter 4 |
Installing and Removing Drives |
|
||
Choosing the Correct Drive Bay . . . . . . . . . . . . . . . . . . |
4-2 |
||||
Installation/Removal |
Sequence . . . . . . . . . . . . . . . . . . |
4-3 |
|||
Checking the IDE Hard Disk Drive Jumpers . . . . . . . . . . . |
4-4 |
||||
|
Where to Go Next . . . . . . . . . . . . . . . . . . . . . . . |
4-5 |
|||
Installing a Drive in the External Bay . . . . . . . . . . . . . . . |
4-6 |
||||
|
Connecting |
the |
Cables . . . . . . . . . . . . . . . . . . . . . |
4-9 |
|
Removing a Drive From the External Bay . . . . . . . . . . . . |
4-14 |
||||
Installing a Hard Disk Drive in the Internal Bay . . . . . . . . . |
4-16 |
||||
|
connecting the Cables . . . . . . . . . . . . . . . . . . . . . |
4-20 |
|||
Removing a Hard Disk Drive From the Internal Bay . . . . . . |
4-25 |
||||
|
Post-installation |
Procedures . . . . . . . . . . . . . . . . . . . . |
4-27 |
||
|
Chapter 5 |
Running System Diagnostics |
|
||
|
Starting the Program |
. . . . . . . . . . . . . . . . . . . . . . . . |
5-2 |
||
|
Deleting |
Tests. . . . . . . . . . . . . . . . . . . . . . . . . . |
5-3 |
||
|
Adding |
Tests . |
. . . . . . . . . . . . . . . . . . . . . . . . . |
5-4 |
|
|
Running Tests |
. . . |
. . . . . . . . . . . . . . . . . . . . . . . . . |
5-5 |
|
|
Resuming From an Error . . . . . . . . . . . . . . . . . |
5-6 |
|||
|
System Diagnostic Tests . . . . . . . . . . . . . . . . . . . . . . |
5-7 |
|||
|
Error Messages |
. . . |
. . . . . . . . . . . . . . . . . . . . . . . . . |
5-8 |
|
i x

Chapter 6 |
Formatting a Hard Disk |
|
|
|
Starting the Program . . . . . . . . . . . . . . . . . . . . . . . . |
6-2 |
|
||
Formatting a New Disk . . . . . . . . . . . . . . . . . . . |
6-3 |
|
||
Reformatting a Used Disk . . . . . . . . . . . . . . . . . . |
6-3 |
|
||
Selecting an Option . . . . . . . . . . . . . . . . . . . . . . |
6-4 |
|
||
Selecting a Drive . . . . . . . . . . . . . . . . . . . . . . . . |
6-4 |
|
||
Option 1, Format |
. . . . . . . . . . . . . . . . . . . . . . . . . . |
6-4 |
|
|
Modifying the Defective Track Table . . . . . . . . . . . . |
6-7 |
|
||
Formatting the Disk . . . . . . . . . . . . . . . . . . . . . |
6-8 |
|
||
Option 2, Destructive Surface Analysis . . . . . . . . . . . . . . |
6-9 |
|
||
Option 3, Nondestructive Surface Analysis . . . . . . . . . . . |
6-11 |
|
||
Exiting the Program . . . . . . . . . . . . . . . . . . . . . . . . . |
6-12 |
|
||
Chapter 7 |
Troubleshooting |
|
|
|
Identifying Your System . . . . . . . . . . . . . . . . . . . . . . |
7-1 |
|
||
Error Messages . |
. . . . . . . . . . . . . . . . . . . . . . . . . . |
7-2 |
|
|
The Computer Won’t Start . . . . . . . . . . . . . . . . . . . . . |
7-5 |
|
||
The Computer Does Not Respond . . . . . . . . . . . . . . . . |
7-6 |
|
||
Restoring the Power Supply . . . . . . . . . . . . . . . . . |
7-8 |
|
||
Password Problems . . . . . . . . . . . . . . . . . . . . . . . . . |
7-9 |
|
||
Accessing Your System . . . . . . . . . . . . . . . . . . . . |
7-10 |
|
||
Keyboard Problems . . . . . . . . . . . . . . . . . . . . . . . . . |
7-11 |
|
||
Monitor Problems . . . . . . . . . . . . . . . . . . . . . . . . . . |
7-12 |
|
||
Diskette Problems . . . . . . . . . . . . . . . . . . . . . . . . . . |
7-13 |
|
||
Diskette Drive |
Problems . . . . . . . . . . . . . . . . . . . . . . |
7-15 |
|
|
Hard Disk Problems . . . . . . . . . . . . . . . . . . . . . . . . |
7-16 |
|
||
Installing |
the |
Drive . . . . . . . . . . . . . . . . . . . . . . |
7-17 |
|
Preparing |
the |
Drive . . . . . . . . . . . . . . . . . . . . . . |
7-18 |
|
Accessing Data on the Drive . . . . . . . . . . . . . . . . . |
7-18 |
|
||
Software Problems |
. . . . . . . . . . . . . . . . . . . . . . . . . |
7-19 |
|
|
Printer Problems |
. . . . . . . . . . . . . . . . . . . . . . . . . . |
7-20 |
|
|
Option Card Problems . . . . . . . . . . . . . . . . . . . . . . . |
7-22 |
|
||
Mouse Problems . . |
. . . . . . . . . . . . . . . . . . . . . . . . . |
7-23 |
|
|
Memory Module Problems . . . . . . . . . . . . . . . . . . . . |
7-23 |
|
||
Math Coprocessor |
Problems . . . . . . . . . . . . . . . . . . . . |
7-24 |
|
|
x

Appendix A Specifications
CPU and Memory . . . . . . . . . . . . . . . . . . . . . . .
Controllers . . . . . . . . . . . . . . . . . . . . . . . . . . .
Interfaces . . . . . . . . . . . . . . . . . . . . . . . . . . . .
Mass Storage . . . . . . . . . . . . . . . . . . . . . . . . . .
Keyboard . . . . . . . . . . . . . . . . . . . . . . . . . . . .
Power Supply . . . . . . . . . . . . . . . . . . . . . . . . . .
Environmental Requirements . . . . . . . . . . . . . . . . .
Physical Characteristics . . . . . . . . . . . . . . . . . . . .
Power Source Requirements . . . . . . . . . . . . . . . . .
System Memory Map . . . . . . . . . . . . . . . . . . . . .
Extended VGA modes . . . . . . . . . . . . . . . . . . . . .
Wingine Modes . . . . . . . . . . . . . . . . . . . . . . . . .
A-1
A-4
A-4
A-5
A-5
A-4
A-7
A-7
A-8
A-9
A-10 A-11
Index

Introduction
Your new Epson® Progression™ computer is a very fast, high-performance system offering flexibility and expandability in a compact design. It provides the following features:
4MB of internal memory, expandable to 128MB
System and video BIOS shadow RAM
8KB of internal cache
VirtualCache™ -the Epson proprietary memory architecture which allows the system to use all its system memory as a virtual cache pool
Integrated VGA (video graphics array) controller with Wingine™ video technology developed by Chips and Technologies® for Microsoft® Windows™ users
Built-in serial and parallel ports
Built-in IBM® PS/2™ compatible keyboard and mouse ports
Six 16-bit option slots
Support for up to five mass storage drives: two internal and three externally-accessible
Upgradable CPU (central processing unit) card with sockets for a math coprocessor and an Intel® OverDrive™ module
Upgradable video interface daughterboard
Password security
Lockable case.
Introduction 1

Your computer’s video and memory features work together to make it extremely fast. The advanced system architecture allows the CPU to communicate directly with the Wingine video controller, providing direct throughput from the system memory to the display. Combined with the speed and graphics capabilities of the Wingine VGA controller, this technology produces screen refresh rates that are ten tunes faster than standard super VGA systems and up to five tunes faster than systems that employ “local bus” technology.
Additionally, your computer can use all of its memory as a virtual cache pool. Unlike most systems that provide only a 64KB or 128KB cache buffer-which typically fills up with the first or second memory access command-your computer uses all the RAM as a “virtual” cache buffer. You’ll notice the improved performance especially when running memory-consuming graphics programs such as Windows applications or draw programs.
Using the built-in interfaces, you can connect your peripheral devices directly to the computer so you don’t have to install option cards. You can use the option slots to enhance your system with extra functions such as a modem card, network card, or additional interface ports.
Optional Equipment
You can easily upgrade your computer by installing additional memory and a wide variety of options, as described below.
Memory
By adding 1MB, 4MB, 16MB, or 64MB SIMMs (single inline memory modules) to the main system board, you can expand the computer’s memory up to 128MB.
2 Introduction

Your system can support up to five mass storage devices, such as hard disk drives, diskette drives, a tape drive, or a CD-ROM drive. As your storage needs expand, you can install these drives to provide the necessary space for all your data.
Because the CPU card is replaceable, you can easily upgrade your system without having to purchase a new computer. The CPU card is available in three models: 486SX/25, 486DX/33, and 486DX2/66. In addition to the system speed and performance enhancements that come with a faster CPU, the Wingine VGA controller speeds up your video performance to match the capability of your CPU card.
OverDrive Module
You can also enhance your system-without replacing the CPU card-by installing an Intel OverDrive module on the CPU card. This doubles the internal clock speed of the microprocessor so your system runs much faster.
Math Coprocessor
You may want to install a math coprocessor to enhance the speed and performance of mathematical calculations in certain application programs. Roth the 486DX/33 and the 486DX2/66 cards have a math coprocessor built into the CPU and also have a socket for an optional Weitek® math coprocessor chip. On the 486SX/25 card you can install an Intel 487SX/25 microprocessor chip, which has a built-in math coprocessor.
Introduction 3

Video Daughterboard
While the Wingine super VGA controller is soldered on the computer’s main system board, the video interface is supplied on a small, upgradable daughterboard which you can replace with an enhanced daughterboard. The standard board provides resolutions up to 1024 x 768 and the enhanced board supports resolutions up to 1280 x 1024, as well as “true color.” The 24-bit, true color technology allows your compatible monitor to display in millions of colors, instead of just 16 or 256.
Check with your authorized Epson dealer for information on optional equipment. For installation instructions, see Chapters 2,3, and 4 of this manual.
VGA Utilities
Your computer comes with special MS-DOS VGA device drivers and utilities for use with the integrated VGA interface. With these utilities, you can take advantage of extended VGA features such as high resolutions and 132-column text mode when you run popular application programs. The Wingine controller works with the display drivers to provide sharp, clear resolutions of up to 1280 x 1024 for the Windows environment. See the VGA Utilities Guide for installation instructions.
4 Introduction
This manual contains the information you need to get the best results from your computer. You don’t have to read everything in this book; check the following summary.
Chapter 1 covers general operating procedures, such as turning the computer on and off, using disks and disk drives, entering a password, and changing the processor speed.
Chapter 2 provides instructions for removing and replacing the computer’s cover, front panel, and subassembly so you can access components inside the computer.
Chapter 3 describes how to change jumper settings and install optional equipment such as option cards, memory modules, a CPU card, an OverDrive module, a math coprocessor, and a video daughter-board.
Chapter 4 explains how to install and remove disk drives.
Chapter 5 provides instructions for running system diagnostics.
Chapter 6 gives the procedure for formatting a hard disk.
Chapter 7 contains troubleshooting tips.
Appendix A lists the specifications of your computer.
At the end of this manual, you’ll find a glossary and an index.
Note
Please see the Setup Guide for instructions on setting up your system and running the SETUP program.

Chapter 1
Using Your Computer
This chapter gives you a brief overview of some basic computer operations that you’ll use on a daily basis, such as how to turn your system on and off, use diskettes and disk drives, and reset the computer.
If you are familiar with these aspects of operating a computer, you may want to skip the first few sections of this chapter. However, be sure to read the later sections which describe system operations specific to your computer, such as using a password, changing the processor speed, and preparing the hard disk for moving.
Using Your Computer 1-1

How Disks Store Data
Diskettes are made of flexible plastic coated with magnetic material. This plastic is enclosed in a square jacket that is either slightly flexible (5.25-inch diskette) or hard (3.5-inch diskette).
Unlike a diskette, a hard disk is rigid and fixed in place. It is sealed in a protective case to keep it free of dust and dirt. A hard disk stores data the same way that a diskette does, but it works much faster and has a much larger storage capacity.
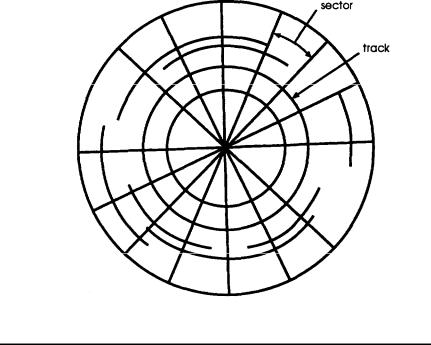
All disks are divided into data storage compartments by sides, tracks, and sectors. Double-sided diskettes store data on both sides. On each side are concentric rings, called tracks, on which a disk can store data.
A disk is further divided by sectors, which can be visualized as pie slices. The illustration below provides a simple representation of tracks and sectors.
1-6 Using Your Computer

1.2MB drive-Use 5.25-inch, double-sided, high-density, 96 TPI, 1.2MB diskettes. These diskettes contain 80 tracks per side, 15 sectors per track, and hold up to 1.2MB of information (approximately 500 pages of text).
720KB drive-Use 3.5-inch, double-sided, double-density, 135 TPI, 720KB diskettes. These diskettes contain 80 tracks per side, 9 sectors per track, and hold up to 720KB of information (approximately 300 pages of text).
360KB drive-use 5.25-inch, double-sided, double-density, 48 TPI, 360KB diskettes. (You can also use single-sided, 160KB or 180KB diskettes.) These diskettes contain 40 tracks per side and 8 or 9 sectors per track. With 8 sectors per track, a diskette holds up to 320KB. With 9 sectors per track, a diskette holds up to 360KB of information (approximately 150 pages of text).
Note
You must format a new diskette before you can store data on it. See “Formatting Diskettes,” later in this section.
Drive and diskette incompatibilities
If your computer has more than one type of diskette drive, or if you use different types of diskettes, you need to be aware of certain incompatibilities between the drives and diskettes.
Because of the type and size differences, you cannot use a 3.5-inch diskette in a 5.25-inch drive or vice versa. There are also limitations on using diskettes that are the same size as the drive but have different capacities. The following tables summarize the possibilities and limitations.
1-8 Using Your Computer

5.25-inch drive/diskette compatibility
Drive type |
Diskette types it can read from and write to |
|
|
360KB |
360KB, 320KB, 180KB, 160KB |
|
|
1.2MB |
1.2MB, 36OKB,* 32OKB,* 18OKB,* 160KB* |
|
|
•* If you write to this diskette in a 1.2MB drive, you may not be able to read it or write to it In a 360KB drive later.
3.5-inch drive/diskette compatibility
Drive type |
Diskette types it can read from and write to |
|
|
720KB |
720KB |
|
|
1.44MB |
1.44MB, 720KB |
|
|
Because of possible incompatibilities, always indicate the diskette type and density when you label your diskettes. (Usually this information appears on the manufacturer’s label.)
Note
If you want to format a 720KB diskette in a 1.44MB drive or format a 360KB diskette in a 1.2MB drive, make sure you include the correct parameter in your format command. See your operating system manuals for instructions.
If you have any combination of the above drives (1.44MB, 1.2MB, 720KB, or 360KB) and you are using MS-DOS, you can copy files from one drive to another-using COPY or XCOPY -as long as the correct diskette type is in each drive.
You can also use these commands to copy files between a hard disk and any type of diskette. However, you cannot use the MS-DOS DISKCOPY command to copy from one diskette drive to another if the two drives are not the same type. For more about copying files and diskettes, see your MS-DOS or other operating system manuals.
Using Your Computer 1-9

 Loading...