


 Loading...
EPSON® PowerLite® 500c/700c/710c
Multimedia Projector
User’s Guide
Supplement

Important Safety Information
WARNING: Never look into the projector lens when the lamp is turned on; the bright light can damage your eyes. Never let children look into the lens when it is on. Never open any cover on the projector, except the lamp and filter covers. Dangerous electrical voltages inside the projector can severely injure you. Except as specifically explained in the User’s Guide or this Supplement, do not attempt to service this product yourself. Refer all
2

CContents
ConnectingA to a Desktop Computer
Positioning the Projector . . . . . . . . . . . . . . . . . . . . . . . . . . . . 5 Identifying the Projector Ports . . . . . . . . . . . . . . . . . . . . . . . . 7 Connecting to a PC Desktop Computer . . . . . . . . . . . . . . . . 7 Connecting the Computer Cable . . . . . . . . . . . . . . . . . . 8 Connecting the Audio Cable . . . . . . . . . . . . . . . . . . . . . . 9 Connecting the Cable for Remote Mouse Control . . . . . 9 Connecting to a Desktop Macintosh . . . . . . . . . . . . . . . . . . 10 Connecting the Computer Cable . . . . . . . . . . . . . . . . . 11 Connecting the Audio Cable . . . . . . . . . . . . . . . . . . . . . 13 Connecting the Cable for Remote Mouse Control . . . . 13 Turning the Projector On and Off . . . . . . . . . . . . . . . . . . . 14 Turning On Other Equipment . . . . . . . . . . . . . . . . . . . 16
UsingBthe
Projector
Menus
Changing Menu Settings . . . . . . . . . . . . . . . . . . . . . . . . . . . 18 Video Menu (Computer Image Source) . . . . . . . . . . . . . . . . 20 Video Menu (Video Image Source) . . . . . . . . . . . . . . . . . . . 22 Audio Menu . . . . . . . . . . . . . . . . . . . . . . . . . . . . . . . . . . . . 23 Effect Menu . . . . . . . . . . . . . . . . . . . . . . . . . . . . . . . . . . . . 24 Setting Menu . . . . . . . . . . . . . . . . . . . . . . . . . . . . . . . . . . . . 25 User’s Logo Feature . . . . . . . . . . . . . . . . . . . . . . . . . . . . . . . 26
Capturing the Image . . . . . . . . . . . . . . . . . . . . . . . . . . . 26 Assigning the Image to the No-Signal Message
and/or A/V Mute Button . . . . . . . . . . . . . . . . . . . . 29 Advanced Menu . . . . . . . . . . . . . . . . . . . . . . . . . . . . . . . . . 30 About Menu (Computer Image Source) . . . . . . . . . . . . . . . 31 About Menu (Video Image Source) . . . . . . . . . . . . . . . . . . . 32 Reset All Feature . . . . . . . . . . . . . . . . . . . . . . . . . . . . . . . . . 32
3

TechnicalC
Specifications
Index
General . . . . . . . . . . . . . . . . . . . . . . . . . . . . . . . . . . . . . . . . 33
Projection Lamp . . . . . . . . . . . . . . . . . . . . . . . . . . . . . . . . . 34
Remote Control . . . . . . . . . . . . . . . . . . . . . . . . . . . . . . . . . . 34
Mouse Compatibility . . . . . . . . . . . . . . . . . . . . . . . . . . . . . . 34
Remote IR Receiver . . . . . . . . . . . . . . . . . . . . . . . . . . . . . . . 34
Mechanical . . . . . . . . . . . . . . . . . . . . . . . . . . . . . . . . . . . . . 34
Electrical . . . . . . . . . . . . . . . . . . . . . . . . . . . . . . . . . . . . . . . 34
Environmental . . . . . . . . . . . . . . . . . . . . . . . . . . . . . . . . . . . 34
Safety . . . . . . . . . . . . . . . . . . . . . . . . . . . . . . . . . . . . . . . . . . 35
CE Marking . . . . . . . . . . . . . . . . . . . . . . . . . . . . . . . . . . . . 35
Supported Monitor Displays . . . . . . . . . . . . . . . . . . . . . . . . 35
Computer Connector Pin Assignments . . . . . . . . . . . . . . . . 37
4

|
This appendix describes how to connect the projector to your |
|
|
desktop computer and turn everything on. The projector must |
|
Abe connected to a computer or a video source such as a VCR, |
||
note |
camcorder, digital camera, DVD player, or laser disc player |
|
For instructions on |
||
before it can project any images. You may also want to set up |
||
connecting to a laptop |
||
the projector for one or more of the following: |
||
computer or to external |
||
speakers, see your User’s |
Appendix A: |
||
|
|
Connecting to a Desktop |
|
|
|
Computer |
|
Guide. |
■ Connect the mouse cable to use the remote control as a |
||
wireless mouse. Except for some laptops, this disables your |
|||
|
|
||
|
|
computer’s mouse. You use the remote control’s pointer to |
|
|
|
control the screen cursor. |
|
|
|
■ Provide audio for one or both image sources. The audio |
|
|
|
source can be the computer, video source, or another device |
|
|
|
such as a stereo. |
|
|
|
■ Connect to an external speaker or PA system to amplify the |
|
|
|
audio (see your User’s Guide for instructions). |
|
|
|
Positioning the Projector |
|
|
|
Before you can set up the projector, you need to decide where |
|
|
|
to place it. Keep the following in mind: |
|
|
|
■ Place the projector on a sturdy, level surface. |
|
|
|
■ Make sure the projector is within 10 feet of a grounded |
|
|
|
electrical outlet or extension cord. |
|
|
|
■ Place the computer and/or video source within 5 feet of the |
|
|
|
projector. |
|
|
|
■ Make sure the projector is at right angles to the screen. |
|
|
|
Otherwise, your image will be distorted. |
|
Connecting to a Desktop Computer 5

note
It is easier to position the projector when the screen is directly in front of the room. If the screen is placed diagonally in a corner, it is much more difficult to position the projector perpendicular to the screen and get a non-distorted image.
Most presenters find it convenient to place the projector (and computer) in the front of the room. With this arrangement, the projector is placed close to the screen. You need to raise the front of the projector (by extending the legs) in order to position the image high enough on the screen. Then you can use the projector’s keystone control to correct the distortion caused by tilting up the front of the projector.
The distance between the projector and the screen determines the actual image size. Use the general guidelines in the table below to determine the proper distance.
|
Horizontal distance from projector to |
|
|
screen |
|
|
|
|
Image size |
Minimum |
Maximum |
(diagonal) |
(lens set to W) |
(lens set to T) |
|
|
|
2.2 feet (0.7 meter) |
— |
3.6 feet (1.1 meters) |
|
|
|
2.5 feet (0.8 meter) |
3.6 feet (1.1 meters) |
4.3 feet (1.3 meter) |
|
|
|
3.3 feet (1.0 meter) |
4.8 feet (1.5 meters) |
5.6 feet (1.7 meters) |
|
|
|
5.0 feet (1.5 meters) |
7.5 feet (2.3 meters) |
8.9 feet (2.7 meters) |
|
|
|
6.7 feet (2.0 meters) |
9.8 feet (3.0 meters) |
11.8 feet (3.6 meters) |
|
|
|
8.3 feet (2.5 meters) |
12.5 feet (3.8 meters) |
14.8 feet (4.5 meters) |
|
|
|
12.5 feet (3.8 meters) |
18.7 feet (5.7 meters) |
22.6 feet (6.9 meters) |
|
|
|
16.7 feet (5.1 meters) |
25.3 feet (7.7 meters) |
30.2 feet (9.2 meters) |
|
|
|
25 feet (7.6 meters) |
37.7 feet |
45.3 feet |
|
(11.5 meters) |
(13.8 meters) |
|
|
|
6 Connecting to a Desktop Computer

Identifying the Projector Ports
The following illustrations identify all the interface ports on the back and side of the projector; you may want to refer to them as you connect your computer or other equipment to the projector.
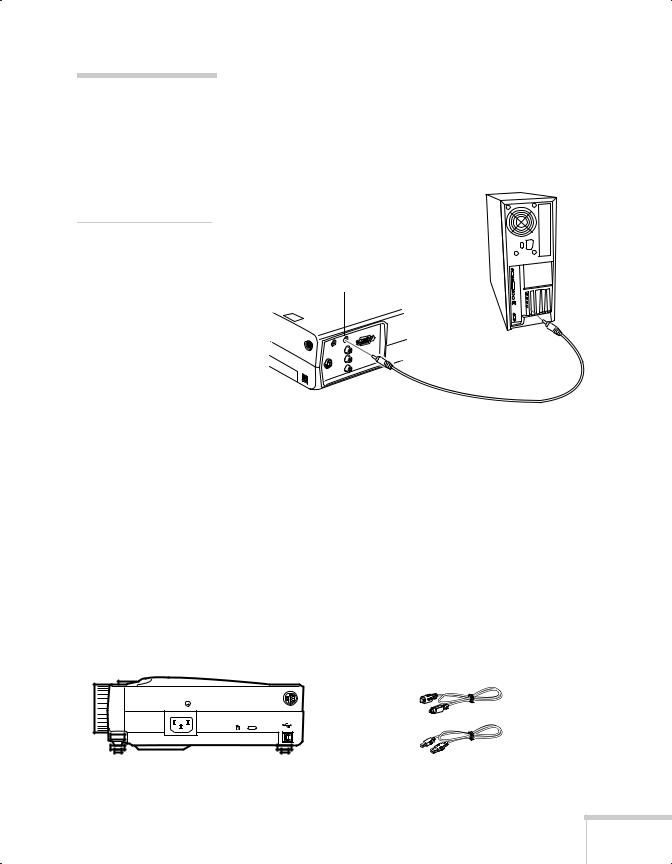
Connecting to a PC Desktop Computer
To connect the projector to your PC desktop computer, you need to:
■Connect the computer cable
■Connect the audio cable (if you’ll be projecting with audio)
■Connect the mouse cable (if you want to use the remote control as a mouse)
If you connect the projector to your desktop computer, you cannot view your images on the computer monitor.
Follow the steps in each section for the cables you need to connect.
Connecting to a Desktop Computer 7
note
If you need maximum volume (in a large auditorium, for example), you can also connect external speakers or a public address system to the projector. See your User’s Guide for instructions.
Connecting the Audio Cable
If your presentation includes sound effects or other types of computer audio, you need to connect the audio cable.
1.Connect one end of the audio cable to the Audio In jack on the projector.
Audio in jack
audio cable
2.Connect the other end of the audio cable to the speaker or audio out port on your computer’s sound card.
Connecting the Cable for Remote Mouse Control
Using the remote control as a wireless mouse gives you more flexibility. You can deliver your presentation from anywhere in the room and interact with the audience. You don’t need to stand near your computer or near the projector.
You’ll use different cables and different ports on the projector, depending on whether your computer has a round PS/2 mouse port or a flat USB mouse port.
Mouse/Com
PS/2 mouse port
USB Mouse
USB mouse port
PS/2 mouse cable |
USB mouse cable
Connecting to a Desktop Computer 9

1.Determine which type of mouse port your computer has:
■Round PS/2 mouse port
■Flat USB mouse port
2.Connect one end of the appropriate mouse cable to the PS/2 Mouse/Com port or the USB Mouse port on the projector.
connecting PS/2 mouse cable |
connecting USB mouse cable |
|
|
3.Connect the other end to the mouse port on your computer. (Your computer’s mouse will be disabled while you are using the remote control as a mouse.)
note
Macintosh configurations vary. See your computer manual for the location of the ports needed to connect your projector.
Connecting to a Desktop Macintosh
To connect the projector to your desktop Macintosh,® you need to:
■Connect the computer cable
■Connect the audio cable (if you’ll be projecting with audio)
■Connect the mouse cable (if you want to use the remote control as a mouse)
If you connect the projector to your Macintosh, you cannot view your images on the computer monitor.
Follow the steps in each section for the cables you need to connect.
10 Connecting to a Desktop Computer

note
If you have an older Macintosh, you may need to use a Macintosh adapter (available from Apple®). Check the documentation for your Macintosh to determine what type of connections are available.
Connecting the Computer Cable
Before you start, make sure your projector, computer, and all peripherals are all turned off.
1.Disconnect the monitor cable from the monitor port on the back of your Macintosh.
2.Connect one end of the computer cable to the projector’s
Computer port.
3.Connect the other end to the monitor port on your Macintosh.
Connecting to a Desktop Computer 11
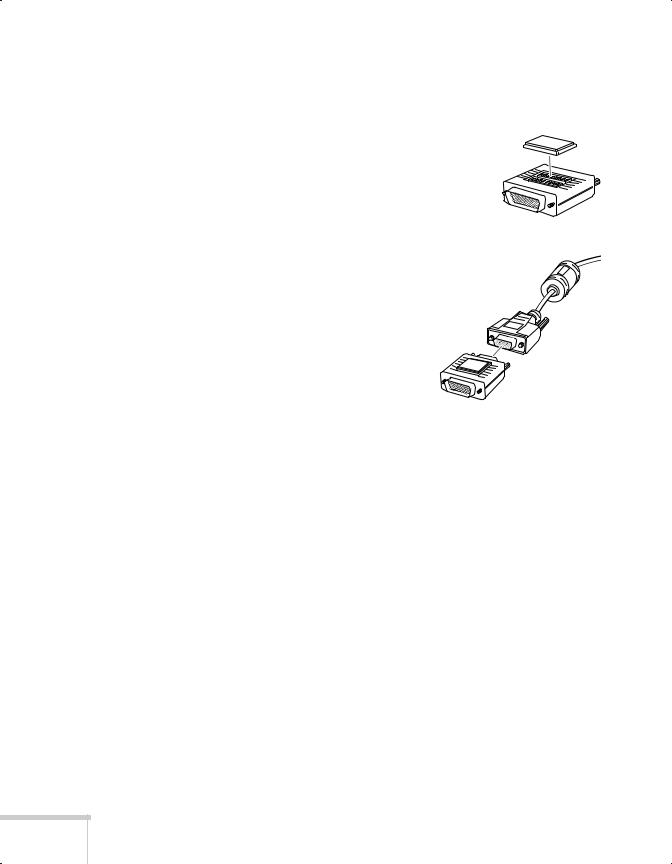
If you can’t connect the projector’s computer cable to your Macintosh, you may need to use a Macintosh adapter (available from Apple).
■Remove the small cover on the Macintosh adapter and set its DIP
switches according to the resolution you want to use (such as 16-inch mode). See your Macintosh documentation for instructions.
■ Connect the small end of the Macintosh adapter to the computer cable.
■ Connect the computer cable (with the Macintosh adapter attached) to the monitor port on your Macintosh.
4. Tighten the screws on all the connectors.
If you don’t need to make any other connections, you can plug in your projector and turn it on. See page 14 for instructions.
12 Connecting to a Desktop Computer
Loading...