


 Loading...
Epson PowerLite 1700c, PowerLite 1710c, PowerLite 1715c, Ceiling Mount, PowerLite 500c Installation Guide
...INSTALLATION MANUAL
ELPMBUNI
EPSON AMERICA, INC.
INDIANAPOLIS DISTRIBUTION CENTER
2350 Stafford Road Suite 101
Plainfield, IN 46168
IN-ELPMBUNI.R3

ELPMBUNI
|
Table of Contents |
Warranty ............................................................................................................................................................................................... |
- 3 - |
Contact Premier Mounts ....................................................................................................................................................................... |
- 3 - |
Warning Statements.............................................................................................................................................................................. |
- 4 - |
Parts List ............................................................................................................................................................................................... |
- 5 - |
Installation Tools .................................................................................................................................................................................. |
- 5 - |
ELPMBUNI Universal Mount Assembly ............................................................................................................................................. |
- 6 - |
Projector Preparation ............................................................................................................................................................................ |
- 7 - |
Securing the Bracket to the Projector ................................................................................................................................................... |
- 9 - |
Leveling the Mounting bracket........................................................................................................................................................... |
- 14 - |
Securing the Upper Assembly Ceiling Plate....................................................................................................................................... |
- 15 - |
Low-Profile Installation ...................................................................................................................................................................... |
- 16 - |
Securing the Projector to the Upper Assembly ................................................................................................................................... |
- 18 - |
Final Adjustments ............................................................................................................................................................................... |
- 19 - |
Installing the Plastic Caps................................................................................................................................................................... |
- 20 - |
Warranty
Limited Lifetime Warranty
All Premier Mounts products carry a limited lifetime warranty from ship date against defects in materials and workmanship. Premier Mounts is not liable for improper installation that results in damage to mounts, adapters, display equipment or personal injury.
DISCLAIMER OF WARRANTY
THE FOREGOING WARRANTY IS IN LIEU OF ALL OTHER WARRANTIES, EXPRESS OR IMPLIED, INCLUDING BUT NOT LIMITED TO THE IMPLIED WARRANTIES OF MERCHANTABILITY AND FITNESS FOR A PARTICULAR PURPOSE.
Contact Premier Mounts
In the event of missing and/or damage equipment, or technical questions, the following information can help in the completion of the installation.
Customer Service – (800) 368-9700
Technical Support – techsupport@mounts.com
Installation Instructions |
Page - 3 - |

ELPMBUNI
Warning Statements
WARNING: PREMIER MOUNTS DOES NOT WARRANT AGAINST DAMAGE CAUSED BY THE USE OF ANY PREMIER MOUNTS PRODUCT FOR PURPOSES OTHER THAN THOSE FOR WHICH IT WAS DESIGNED OR DAMAGE CAUSED BY UNAUTHORIZED ATTACHMENTS OR MODIFICATIONS, AND IS NOT RESPONSIBLE FOR ANY DAMAGES, CLAIMS, DEMANDS, SUITS, ACTIONS OR CAUSES OF ACTION OF WHATEVER KIND RESULTING FROM, ARISING OUT OF OR IN ANY MANNER RELATING TO ANY SUCH USE, ATTACHMENTS OR MODIFICATIONS.
WARNING: THE CEILING STRUCTURE MUST BE CAPABLE OF SUPPORTING A MAX WEIGHT OF 25 LBS., THE WEIGHT OF THE PROJECTOR. IF NOT, THE CEILING MUST BE REINFORCED. PROPER INSTALLATION PROCEDURE BY QUALIFIED PERSONNEL AS OUTLINED IN THE INSTALLATIONS INSTRUCTIONS MUST BE ADHERED TO. FAILURE TO DO SO COULD RESULT IN SERIOUS PERSONAL INJURY.
WARNING: SAFETY MEASURES MUST BE PRACTICED AT ALL TIMES DURING THE INSTALLATION OF THIS PRODUCT. USE PROPER SAFETY GEAR AND TOOLS FOR THE INSTALLATION PROCEDURE TO PREVENT PERSONAL INJURY.
WARNING: PRIOR TO THE INSTALLATION OF THIS PRODUCT, THE INSTALLATION INSTRUCTIONS SHOULD BE READ AND COMPLETELY UNDERSTOOD. THE INSTALLATION INSTRUCTIONS MUST BE READ TO PREVENT PERSONAL INJURY AND PROPERTY DAMAGE. KEEP THESE INSTALLATION INSTRUCTIONS IN AN EASILY ACCESSIBLE LOCATION FOR FUTURE REFERENCE.
Indicates that the power plug is to be |
Contact Premier Mounts with any |
disconnected from the power outlet. |
questions – (800) 368-9700. |
Safety precautions must be taken at all times. |
|
Warning and Caution statements.
A secure structure must support the weight, or load, of the projector. When mounting to a ceiling that contains wooden studs, dead center of the wooden stud must be confirmed prior to installation.
Do not install on a structure that is prone to vibration, movement or chance of impact. Failure to do so could result in damage to the projector and/or damage to the mounting surface.
Do not install near heater, fireplace, direct sunlight, air conditioning or any other source of direct heat energy. Failure to do so may result in damage to the projector and could increase the risk of fire.
At least two qualified people should perform the installation procedure. Injury and/or damage can result from dropping or mishandling the projector.
Recommended mounting surfaces: wooden studs, solid-flat concrete, and reinforced metal studs. If the mount is to be installed on any surface other than wooden studs, use suitable hardware (which is commercially available).
Page - 4 - |
Installation Manual |
ELPMBUNI
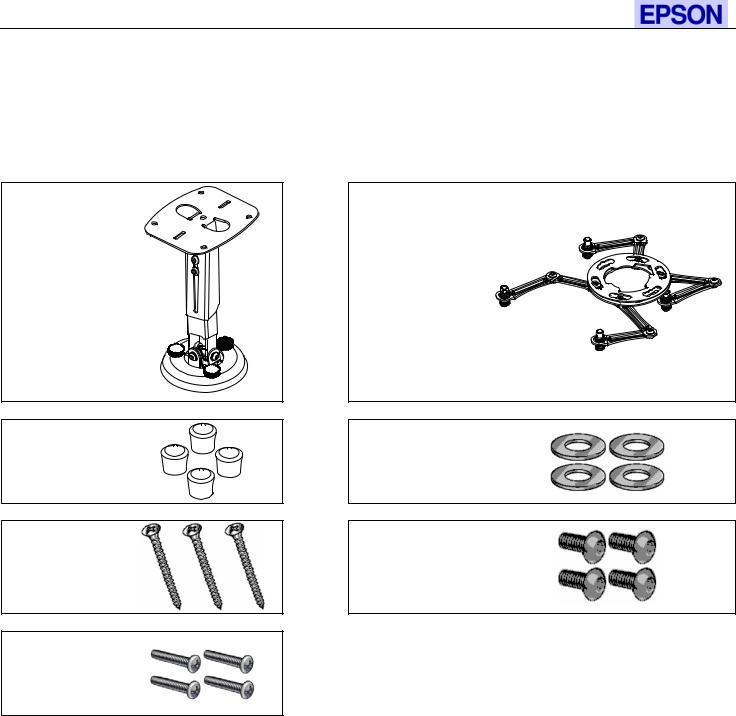
Parts List
NOTE: This mount is shipped with all proper installation hardware and components. Make sure that none of these parts are missing and/or damaged before beginning installation. If there are parts missing and/or damaged, please stop the installation and contact Premier Mounts (800-368-9700).
Upper Assembly
(Qty 1)
Plastic Barrel Caps
(Qty 4)
Lag Screws (#14 x 2”)
(Qty 3)
M3 x 16mm
Phillips Head
Screws (Qty 4)
Mounting Bracket (Qty 1)
M3 Flat Washers (Qty 4)
Note: Must be used with the M3 x 16 Phillips screws.
M4 x 12 Security
Head Screws
(Qty 4)
NOTE: The following hardware is included in the hardware pack but is not required for the installation.
M5 x 12mm Security Head Screws (Qty 4)
M6 x 12mm Security Head Screws (Qty 4)
Installation Tools
Phillips Head Screw Driver |
Portable Drill |
Soft Material/ Blanket |
Pencil |
Allen Wrench (Supplied) |
Level (Supplied) |
Tape Measure |
Stud Finder (Commercially Available) |
Ladder |
M5 Allen Wrench |
NOTE: Mounting screws will vary by projector. Please see the following pages for model specific hardware: Pages 10, 11, 12, and 13.
Installation Manual |
Page - 5 - |

ELPMBUNI
ELPMBUNI Universal Mount Assembly
A |
Single Wooden Stud |
Option 1 |
|
Mounting Points |
|
B |
Solid Structure Mounting |
|
|
Points |
|
C |
Ceiling Plate |
|
D |
Allen Wrench |
|
E |
Height Adjustment Screws |
|
F |
Tension Knobs |
|
G |
Safety Knob |
D |
H |
Security Screws |
|
I |
Leveling Barrels |
|
J |
Universal Mounting Bracket |
|
K |
Leg Assembly |
|
L |
Projector (Not Supplied) |
|
M |
Tri-Lock Opening |
|
|
H |
|
Combination |
|
|
|
I |
|
Leg |
|
|
|
|
|
|
|
|
Single Leg
D
Option 2
M
NOTE: See the best configuration for your projector for filter and lamp access.
B |
A |
NOTE: The four (2-piece) leg |
|
assemblies can be used as |
|
|
|
|
|
C |
single leg or any combination |
|
of single and dual legs |
|
|
|
together as shown in Options |
|
|
1 and 2. The number of legs |
Emay vary depending on the number of mounting points
F |
G |
found on the bottom of your |
|
projector. |
|
|
K |
|

 M
M
J
 L
L
J
L
Page - 6 - |
Installation Manual |
ELPMBUNI
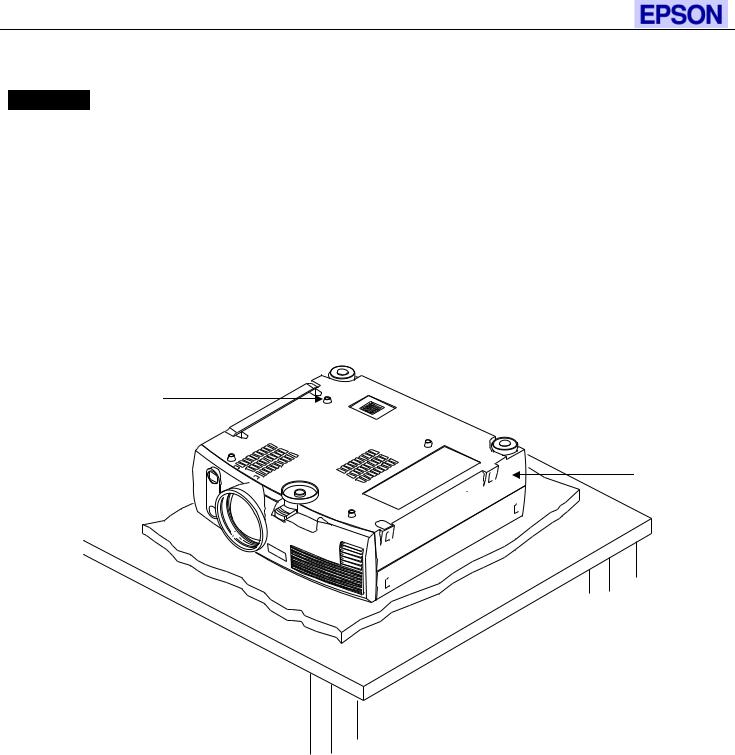
Projector Preparation
WARNING: Proper installation procedure by qualified personnel as outlined in the installation instructions must be adhered to. Failure to do so could result in serious personal injury and possible damage to the projector.
CAUTION: THE PROJECTOR IS FRAGILE; HANDLE WITH CARE AT ALL TIMES.
NOTE: Review the projectors manufacture’s operation manual and refer to the ceiling installation instruction. Here you will normally find important reference information regarding installation dimensions such as (distance from the screen to the lens of the projector, top of the lens placement to the top screen etc. Adherence to these recommendations during your installation will enhance the quality of your final image on the screen.
1.Carefully invert the projector and place it on a smooth flat surface.
2.Identify the number of mounting points and screw thread (pitch) size.
3.Most projectors have either three or four mounting points and are M4 in thread size (Figure 1).
Mounting
Points
Inverted
Projector
Blanket, soft
cloth etc  Flat
Flat  surface
Figure 1
Installation Manual |
Page - 7 - |
Loading...