


 Loading...
Table of Contents
INSTRUCTION BOOK SYMBOLS . . . . . . . . . . . . . . . . . . . . . . . . . . . 4 IMPORTANT SAFETY INSTRUCTIONS . . . . . . . . . . . . . . . . . . . . . 4
WHEN USING THIS PRODUCT . . . . . . . . . . . . . . . . . . . . . . . . 4 WHEN USING THE STRAP . . . . . . . . . . . . . . . . . . . . . . . . . . . . 5 WHEN USING THE BATTERIES. . . . . . . . . . . . . . . . . . . . . . . . 5 FOR USERS IN HONG KONG. . . . . . . . . . . . . . . . . . . . . . . . . . 6 WHEN CHOOSING A POWER SOURCE . . . . . . . . . . . . . . . . 6
EPSON FEATURES . . . . . . . . . . . . . . . . . . . . . . . . . . . . . . . . . . . . . . . . . 8
Chapter 1 CAMERA SETUP
ITEMS. . . . . . . . . . . . . . . . . . . . . . . . . . . . . . . . . . . . . . . . . . . . . . . . . . . . . 9
CHECKING THE PACKING CONTENTS. . . . . . . . . . . . . . . . 9
TOP VIEW . . . . . . . . . . . . . . . . . . . . . . . . . . . . . . . . . . . . . . . . . . . . . . . . . 10 BATTERIES AND MEMORY CARD INSTALLATION . . . . . . . . . 11
ACCESSING THE BATTERIES AND MEMORY CARD . . . . 11 HOW TO INSERT AND REMOVE THE MEMORY CARD. . 11 BATTERY SETUP . . . . . . . . . . . . . . . . . . . . . . . . . . . . . . . . . . . . . 11 BATTERY LIFE INDICATOR . . . . . . . . . . . . . . . . . . . . . . . . . . . 12
SETTING UP YOUR CAMERA. . . . . . . . . . . . . . . . . . . . . . . . . . . . . . . 12
POWER ON/OFF . . . . . . . . . . . . . . . . . . . . . . . . . . . . . . . . . . . . . 12 INITIAL SETTINGS . . . . . . . . . . . . . . . . . . . . . . . . . . . . . . . . . . . 13
Chapter 2 STANDARD OPERATION
HOLDING THE CAMERA / RELEASING THE SHUTTER . . . . . . 14
FULL & HALF SHUTTER BUTTON POSITONS . . . . . . . . . . 14 CAMERA RANGE . . . . . . . . . . . . . . . . . . . . . . . . . . . . . . . . . . . . 15
THE IMAGE SYSTEM . . . . . . . . . . . . . . . . . . . . . . . . . . . . . . . . . . . . . . . 15
TAKING PHOTOS USING THE LCD MONITOR . . . . . . . . . . 15 TURNING THE QUICK VIEW ON/OFF. . . . . . . . . . . . . . . . . . 16 USING THE VIEWFINDER-ONLY METHOD . . . . . . . . . . . . . 16 IF THE CAPTURED IMAGE IS OUT OF FOCUS FRAME . . . 17 OPTICAL ZOOM & DIGITAL ZOOM . . . . . . . . . . . . . . . . . . . . 18 IMAGE CAPTURE SETTINGS . . . . . . . . . . . . . . . . . . . . . . . . . . 18 CONFIRMING THE NUMBER OF PHOTOGRAPHS. . . . . . . 19 FLASH CONTROL . . . . . . . . . . . . . . . . . . . . . . . . . . . . . . . . . . . . 19 USING THE SELF TIMER . . . . . . . . . . . . . . . . . . . . . . . . . . . . . . 20
PLAYBACK SYSTEM . . . . . . . . . . . . . . . . . . . . . . . . . . . . . . . . . . . . . . . . 21
ONE BY ONE PLAYBACK. . . . . . . . . . . . . . . . . . . . . . . . . . . . . . 21 DISPLAYING MULTIPLE IMAGES . . . . . . . . . . . . . . . . . . . . . . 21 LCD MONITOR IMAGE ENLARGEMENT . . . . . . . . . . . . . . . 21 SLIDE SHOW . . . . . . . . . . . . . . . . . . . . . . . . . . . . . . . . . . . . . . . . . 22 QUICK PHOTO REVIEW. . . . . . . . . . . . . . . . . . . . . . . . . . . . . . . 22
DELETING FILES . . . . . . . . . . . . . . . . . . . . . . . . . . . . . . . . . . . . . . . . . . . 23
DELETING A SINGLE PHOTO. . . . . . . . . . . . . . . . . . . . . . . . . . 23 DELETING ALL IMAGES . . . . . . . . . . . . . . . . . . . . . . . . . . . . . . 23
USING YOUR IMAGES. . . . . . . . . . . . . . . . . . . . . . . . . . . . . . . . . . . . . . 24
DISPLAYING ON A TV . . . . . . . . . . . . . . . . . . . . . . . . . . . . . . . . 24 EXPORTING IMAGES TO A COMPUTER . . . . . . . . . . . . . . . . 24 WORKING WITH IMAGES ON A COMPUTER . . . . . . . . . . . 24 DIRECT PRINTING FROM CAMERA TO PRINTER . . . . . . . 24
USING THE AC ADAPTER . . . . . . . . . . . . . . . . . . . . . . . . . . . . . . . . . . 25
HOW TO CONNECT THE AC ADAPTER . . . . . . . . . . . . . . . . 25
English
1

Chapter 3 ADVANCED FUNCTIONS
DISPLAY & MENU BUTTON SETTINGS . . . . . . . . . . . . . . . . . . . . . 26
DISPLAY BUTTON FUNCTION . . . . . . . . . . . . . . . . . . . . . . . . 26 MENU BUTTON FUNCTION . . . . . . . . . . . . . . . . . . . . . . . . . . 26
Print Image Framer (P.I.F.) FUNCTION. . . . . . . . . . . . . . . . . . . . . . . . 27 Print Image Framer (P.I.F.) SHOOTING . . . . . . . . . . . . . . . . . . . . . . . 28
TAKING PHOTOS WITHIN THE FRAME. . . . . . . . . . . . . . . . 28 VIEWING A P.I.F. IMAGE . . . . . . . . . . . . . . . . . . . . . . . . . . . . . 28
REPLACING FRAMES . . . . . . . . . . . . . . . . . . . . . . . . . . . . . . . . . . . . . . 29
USING THE CD-ROM . . . . . . . . . . . . . . . . . . . . . . . . . . . . . . . . . 29 DOWNLOADING FROM THE WEB. . . . . . . . . . . . . . . . . . . . . 29 DELETING FRAMES . . . . . . . . . . . . . . . . . . . . . . . . . . . . . . . . . . 30 INSTALLING FRAMES . . . . . . . . . . . . . . . . . . . . . . . . . . . . . . . . 30
MACRO MODE . . . . . . . . . . . . . . . . . . . . . . . . . . . . . . . . . . . . . . . . . . . . 30
TAKING PHOTOS IN MACRO MODE . . . . . . . . . . . . . . . . . . 30
CONTINUOUS SHOOTING. . . . . . . . . . . . . . . . . . . . . . . . . . . . . . . . . 31
CONTINUOUS SHOOTING. . . . . . . . . . . . . . . . . . . . . . . . . . . . 31
SCENE MODES . . . . . . . . . . . . . . . . . . . . . . . . . . . . . . . . . . . . . . . . . . . . 32
SELECTING A SCENE MODE . . . . . . . . . . . . . . . . . . . . . . . . . . 32 NORMAL MODE . . . . . . . . . . . . . . . . . . . . . . . . . . . . . . . . . . . . . 32 LANDSCAPE MODE . . . . . . . . . . . . . . . . . . . . . . . . . . . . . . . . . . 32 PORTRAIT MODE . . . . . . . . . . . . . . . . . . . . . . . . . . . . . . . . . . . . 32
WHITE BALANCE . . . . . . . . . . . . . . . . . . . . . . . . . . . . . . . . . . . . . . . . . . 33
AUTOMATIC WHITE BALANCE. . . . . . . . . . . . . . . . . . . . . . . 33 SELECTING WHITE BALANCE MANUALLY. . . . . . . . . . . . 33
LIGHT SENSITIVITY . . . . . . . . . . . . . . . . . . . . . . . . . . . . . . . . . . . . . . . 33
CHANGING TO AUTOMATIC SENSITIVITY MODE . . . . . 34 SETTING LIGHT SENSITIVITY MANUALLY . . . . . . . . . . . . 34
MAKING EXPOSURE SETTINGS . . . . . . . . . . . . . . . . . . . . . . . . . . . . 34
ADJUSTMENTS . . . . . . . . . . . . . . . . . . . . . . . . . . . . . . . . . . . . . . 34
MENU SHORTCUTS. . . . . . . . . . . . . . . . . . . . . . . . . . . . . . . . . . . . . . . . 35
MENU SHORTCUTS . . . . . . . . . . . . . . . . . . . . . . . . . . . . . . . . . . 35
RESETTING TO DEFAULT MODE. . . . . . . . . . . . . . . . . . . . . . . . . . . 36
RESETTING TO DEFAULT MODE . . . . . . . . . . . . . . . . . . . . . . 36
VIEWING RECORDED IMAGE DATA. . . . . . . . . . . . . . . . . . . . . . . .36
DISPLAYING RECORDED IMAGE DATA. . . . . . . . . . . . . . . .36
VIDEO CLIPS. . . . . . . . . . . . . . . . . . . . . . . . . . . . . . . . . . . . . . . . . . . . . . .37
RECORDING A VIDEO CLIP . . . . . . . . . . . . . . . . . . . . . . . . . . .37 PLAYING BACK A CLIP . . . . . . . . . . . . . . . . . . . . . . . . . . . . . . .37 DELETING VIDEO CLIPS . . . . . . . . . . . . . . . . . . . . . . . . . . . . . .38
Chapter 4 DIRECT PRINTING
DIRECT PRINTING . . . . . . . . . . . . . . . . . . . . . . . . . . . . . . . . . . . . . . . . .39
LIST OF COMPATIBLE PRINTERS . . . . . . . . . . . . . . . . . . . . . .39
DIRECT PRINTING PROCESS . . . . . . . . . . . . . . . . . . . . . . . . . . . . . . .39
PRINTING THE IMAGE SEEN ON THE LCD MONITOR. . .40 PRINTING SELECTED IMAGES. . . . . . . . . . . . . . . . . . . . . . . . .40 PICK IMAGES . . . . . . . . . . . . . . . . . . . . . . . . . . . . . . . . . . . . . . . .40
PRINT Image Framer (P.I.F.) PRINTING . . . . . . . . . . . . . . . . . . . . . . .41 PRINTING PRINT Image Framer (P.I.F.) IMAGES . . . . . . . . . . . . . .41
PRINTING THE P.I.F. IMAGE DISPLAYED ON THE LCD MONITOR. . . . . . . . . . . . . . . . . . . . . . . . . . . . . . . . . . . . . . . . .41
OTHER P.I.F. PRINTING OPTIONS. . . . . . . . . . . . . . . . . . . . . .41 CHANGING THE FRAMES. . . . . . . . . . . . . . . . . . . . . . . . . . . . .42
PRINT SETTINGS. . . . . . . . . . . . . . . . . . . . . . . . . . . . . . . . . . . . . . . . . . .42
HOW TO CHANGE PRINT SETTINGS . . . . . . . . . . . . . . . . . . .42 SETTING PAPER SIZE . . . . . . . . . . . . . . . . . . . . . . . . . . . . . . . . .43 SELECTING PRINT BORDERS . . . . . . . . . . . . . . . . . . . . . . . . . .43 PRINTING THE DATE . . . . . . . . . . . . . . . . . . . . . . . . . . . . . . . . .43 HIGH SPEED PRINTING . . . . . . . . . . . . . . . . . . . . . . . . . . . . . . .43
PRINTER UTILITIES . . . . . . . . . . . . . . . . . . . . . . . . . . . . . . . . . . . . . . . .44
PRINTER UTILITIES . . . . . . . . . . . . . . . . . . . . . . . . . . . . . . . . . . .44 TEST PRINTING FOR NOZZLE CHECK . . . . . . . . . . . . . . . . .44 HEAD CLEANING . . . . . . . . . . . . . . . . . . . . . . . . . . . . . . . . . . . .44 PRINT HEAD ALIGNMENT . . . . . . . . . . . . . . . . . . . . . . . . . . . .45 INK LEVEL CHECK . . . . . . . . . . . . . . . . . . . . . . . . . . . . . . . . . . .45
2

Chapter 5 ADDITIONAL SETTINGS
DIGITAL PRINT ORDER FORMAT (DPOF) . . . . . . . . . . . . . . 46 SAVING PHOTOS IN DPOF . . . . . . . . . . . . . . . . . . . . . . . . . . . 46 SOUND AND SHUTTER SETTINGS . . . . . . . . . . . . . . . . . . . . 47 INSTALL / CHANGE SHUTTER SOUND . . . . . . . . . . . . . . . 47 REGISTER / DELETE SOUND DATA . . . . . . . . . . . . . . . . . . . 48 REGISTER SOUND DATA . . . . . . . . . . . . . . . . . . . . . . . . . . . . . 48 DELETE SOUND DATA . . . . . . . . . . . . . . . . . . . . . . . . . . . . . . . 48 AUTO POWER SAVE . . . . . . . . . . . . . . . . . . . . . . . . . . . . . . . . . 48 RESETTING THE AUTO POWER SAVE . . . . . . . . . . . . . . . . . 49 DATE & TIME AND DATE / TIME FORMATS . . . . . . . . . . . 49 ADJUSTING LCD BRIGHTNESS. . . . . . . . . . . . . . . . . . . . . . . . 49 MEMORY CARD FORMATTING . . . . . . . . . . . . . . . . . . . . . . . 49 RULES FOR NAMING FILES (Cumulative function) . . . . . . 50 RESETTING FILE NUMBERS. . . . . . . . . . . . . . . . . . . . . . . . . . . 50 RESETTING VIDEO OUT . . . . . . . . . . . . . . . . . . . . . . . . . . . . . . 50 SETTING THE MENU LANGUAGE. . . . . . . . . . . . . . . . . . . . . 50 RESETTING CAMERA DEFAULTS . . . . . . . . . . . . . . . . . . . . . 51 VERSION CONFIRMATION . . . . . . . . . . . . . . . . . . . . . . . . . . . 51
Appendix A ADDITIONAL INFORMATION
CLEANING THE CAMERA. . . . . . . . . . . . . . . . . . . . . . . . . . . . . . . . . . 52
WHEN THE CAMERA NEEDS CLEANING. . . . . . . . . . . . . . 52 STORING THE CAMERA. . . . . . . . . . . . . . . . . . . . . . . . . . . . . . 52
SPECIFICATIONS L-400 . . . . . . . . . . . . . . . . . . . . . . . . . . . . . . . . . . . . 53
Appendix B TROUBLESHOOTING
TROUBLESHOOTING. . . . . . . . . . . . . . . . . . . . . . . . . . . . . . . . . . . . . . 54
IF YOU RUN INTO TROUBLE. . . . . . . . . . . . . . . . . . . . . . . . . . 54 BEFORE YOU CALL CUSTOMER SUPPORT . . . . . . . . . . . . . 54 CAMERA BODY PROBLEMS. . . . . . . . . . . . . . . . . . . . . . . . . . . 54
IMAGE PROBLEMS . . . . . . . . . . . . . . . . . . . . . . . . . . . . . . . . . . . 56 PRINTING PROBLEMS . . . . . . . . . . . . . . . . . . . . . . . . . . . . . . . . 56
LIST OF ERROR MESSAGES . . . . . . . . . . . . . . . . . . . . . . . . . . . . . . . . 57
PHOTO MODE MESSAGES . . . . . . . . . . . . . . . . . . . . . . . . . . . . 57 PLAYBACK MODE MESSAGES. . . . . . . . . . . . . . . . . . . . . . . . . 57 SET UP MODE MESSAGES . . . . . . . . . . . . . . . . . . . . . . . . . . . . . 57 DIRECT PRINTING MESSAGES. . . . . . . . . . . . . . . . . . . . . . . . . 58
EPSON INFORMATION
CONTACTING CUSTOMER SUPPORT. . . . . . . . . . . . . . . . . . . . . . . 60 INDEX . . . . . . . . . . . . . . . . . . . . . . . . . . . . . . . . . . . . . . . . . . . . . . . . . . . . . 62
English
3

INSTRUCTION BOOK SYMBOLS
The symbols used in this book are explained below.
Symbols
Required Reading
w WARNING
Must be followed carefully to avoid bodily injury.
c CAUTION
Necessary to avoid damaging the camera and/or other devices.
ALERT
Necessary to ensure correct camera function.
Very Useful Information
Note:
Useful extra information.
FYI
For Your Information:
Technical terms and professional concepts.
HINT
This suggestion will improve your photography.
Copyrights and Trademarks
Copyrights
All rights reserved. No part of this publication may be reproduced, stored in a retrieval system, or transmitted in any form or by any means, electronic, mechanical, photocopying, recording, or otherwise, without the prior written permission of SEIKO EPSON CORPORATION. No patent liability is assumed with respect to the use of the information contained herein. Neither is any liability assumed for damages resulting from the use of the information contained herein.
Neither SEIKO EPSON CORPORATION nor its affiliates shall be liable to the purchaser of this product or third parties for damages, losses, costs, or expenses incurred by the purchaser or third parties as a result of: accident, misuse, or abuse of this product or unauthorized modifications, repairs, or alterations to this product, or (excluding the U.S.) failure to strictly comply with SEIKO EPSON CORPORATION's operating and maintenance instructions.
SEIKO EPSON CORPORATION shall not be liable against any damages or problems arising from the use of any options or any consumable products other than those designated as Original EPSON Products or EPSON Approved Products by SEIKO EPSON CORPORATION.
Trademarks
EPSON is a registered trademark of SEIKO EPSON CORPORATION. PRINT Image Matching is a trademark of SEIKO EPSON CORPORATION. The PRINT Image Matching logo is a trademark of SEIKO EPSON CORPORATION. DPOF is a trademark of CANON INC., Eastman Kodak Company, Fuji Photo Film Co., Ltd. and Matsushita Electric Industrial Co., Ltd. The PRINT Image Framer is a trademark of SEIKO EPSON CORPORATION. The PRINT Image Framer will be abreviated within this User’s Guide and will simply be called P.I.F.
MultiMediaCard is a registered trademark of Infineon Technologies AG (Germany), licensed to MMCA (MultiMediaCard Association).
General Notice: Other product names used herein are for identification purposes only and may be trademarks of their respective owners. EPSON disclaims any and all rights in those marks.
Copyright © 2003 by SEIKO EPSON CORPORATION, Nagano, Japan.
IMPORTANT SAFETY INSTRUCTIONS
w WARNING
Read all of these instructions before using this product, and keep this guide handy for later reference. Follow all warnings and instructions marked on this product and options.
WHEN USING THIS PRODUCT
Note the following when using this product.
To reduce the risk of electric shock, do not remove the cover of this product or options. Do not open any compartments except as instructed in this User's Guide.
Do not insert objects into any openings.
To prevent fire or electric shock, do not expose this product or options to rain or moisture.
To prevent fire or electric shock, do not cover this product with a blanket or other covering that may give off an electric charge.
To prevent fire or explosion, do not use this product where flammable or volatile gas is stored.
4

Do not use this product outdoors during a thunderstorm.
To prevent possible injury, do not take flash pictures in close proximity to anyone's eyes.
Remove the batteries from and/or unplug this product and refer servicing to qualified service personnel under the following conditions:
The power cord or plug is damaged; liquid has entered this product or its options; this product or its options have been dropped or the case damaged; this product or its options do not operate normally or exhibit a distinct change in performance; this product or its options emit unusual noises, odors, or smoke.
Never adjust controls that are not mentioned in the operating instructions.
If the liquid crystal solution contained in the LCD monitor leaks out and gets on your hands, wash them thoroughly with soap and water. If it gets into your eyes, flush them immediately with water.
Do not look at the sun through the viewfinder. Doing so could damage your eyes.
WHEN USING THE STRAP
Note the following when using this product’s strap.
Do not swing this product about. Doing so could damage this product or other objects, or cause injury.
Do not pull or tighten the strap too much when wearing it. Doing so could cause serious injury.
Keep the strap away from children.
WHEN USING THE BATTERIES
Note the following when using batteries.
Only use the batteries in EPSON Digital Cameras as specified in this manual.
To guard against short-circuiting, do not remove the outside sleeves of the batteries.
Keep the batteries from making contact with metal objects such as coins or keys, which could short-circuit the batteries.
Do not put the batteries near or into fire or water.
Read all relevant safety and operating instructions before using the batteries.
Do not use manganese batteries (IEC R6).
Do not charge primary (non-rechargeable) batteries.
To avoid fire or electric shock, do not use batteries that are leaking or damaged in any way.
Do not handle the batteries with wet hands or use them near water. Do not expose the batteries to water or high humidity.
Do not place the batteries near or into heat sources or fire.
Do not drop, puncture, disassemble, mutilate, or short-circuit batteries.
To protect against short-circuiting, do not remove the outside sleeves of the batteries.
Prevent the batteries from coming into contact with metal objects which could short-circuit the batteries, such as coins or keys.
Do not insert batteries into wall outlets or other power sources such as car cigarette lighter sockets.
Do not solder lead wires or terminals directly to a battery.
Replacing the batteries
You can replace them with any of the following batteries.
Single-use AA alkaline batteries Rechargeable AA Ni-MH batteries Rechargeable AA nickel-manganese batteries
Note:
Battery life varies depending on the battery type and the manufacturer.
If you use rechargeable batteries in the L-400, replace them with four fully-charged batteries. If you find that your batteries run out soon after recharging them a number of times, make sure you discharge them completely before recharging.
English
5

Handling the batteries
Keep the battery ends clean by wiping them with a dry cloth.
wWARNING
Do not apply heat or force to batteries, and do not disassemble, drop, short-circuit, or put batteries into fire or water.
Do not keep batteries loose in your pockets.
Do not mix different types of batteries; this can cause fire or explosion.
Always use batteries from the same package as a set. Do not mix old and new batteries.
Storing the batteries
If you do not plan to use the camera for a long period of time, remove the batteries and store them at a low temperature in a dry location.
wWARNING
Do not store batteries with metal objects, which could short-circuit the batteries.
Avoid storing batteries in extremely hot or humid locations.
Store batteries out of reach of children.
Always remove the batteries from the camera and charger before storing. Batteries left in your camera and charger for a long time may leak and cause damage.
Disposing of the batteries
Before disposing of batteries, make sure you discharge them completely.
wWARNING
Be sure to securely cover the + end of each battery with tape to prevent combustion or explosion when disposing.
Dispose of used batteries according to the manufacturer's instructions and in compliance with all applicable laws. Contact your local government agency for information about battery recycling and disposal.
For the Netherlands users:
Do not dispose of the batteries with ordinary refuse. Instead, dispose of them as small chemical waste in accordance with local laws, and the following Dutch Government Gazette 45, KCA Marking:
Bij dit produkt zijn batterijen geleverd. Wanneer deze leeg zijn, moet u ze niet weggooien maar inleveren als KCA.
For German users:
Do not dispose of batteries with ordinary refuse. Instead, dispose of them in a recycle box in accordance with local laws.
w WARNING
If battery acid gets into your eyes or on your skin, immediately rinse the affected area thoroughly with water and seek medical treatment. If a battery is swallowed, seek medical treatment immediately.
FOR USERS IN HONG KONG
If damage occurs to the plug, replace the cord set or consult a qualified electrician.
Replace fuses only with fuses of the correct size and rating.
WHEN CHOOSING A POWER SOURCE
The AC adapter converts AC voltage from a wall outlet into the correct DC voltage for your EPSON product.
1)Read these instructions.
2)Keep these instructions.
3)Heed all warnings.
4)Follow all instructions.
5)Do not use this apparatus near water.
6)Clean only with dry cloth.
7)Do not block any ventilation openings. Install in accordance with the manufacturer's instructions.
6

8)Do not install near any heat sources such as radiators, heat registers, stoves, or other apparatus (including amplifiers) that produce heat.
9)Protect the power cord from being walked on or pinched particularly at plugs, convenience recectables, and the point where they exit from the apparatus.
10)Only use attachments/accessories specified by the manufacturer.
11)Unplug this apparatus during lightning storms or when unused for long periods of time.
12)Refer all servicing to qualified service personal. Servicing is required when the apparatus has been damaged in any way, such as power-supply cord or plug is damaged, liquid has been spilled or objects have fallen into the apparatus, the apparatus has been exposed to rain or moisture, does not operate normally, or has been dropped.
wWARNING
To reduce the risk of fire or electric shock, do not expose this apparatus to rain or moisture.
The apparatus shall not be exposed to dripping or splashing and that no objects filled with liquids, such as vases, shall be placed on the apparatus.
Only use this adapter in the manner described in your product's documentation. Check the product's documentation to make sure that this is the correct adapter for your product.
Read all relevant safety and operating instructions before using these products, as misuse could result in personal injury from fire, explosion, leakage, overheating, or electric shock.
These safety and operating instructions should be kept for future reference.
Note:
AC Adapter model A211H conforms to CE marking requirements in accordance with EC Directives 73/23/EEC and 89/336/EEC.
Beware of electrical shock hazards.
Do not use this product near water or handle it with wet hands.
Keep away from heat sources. Do not use the charger outside the temperature range of 5°C to 35°C (41°F to 95°F).
Do not insert objects into any openings as they may touch dangerous voltage points or short out parts.
Never disassemble or modify this product.
Use only indoors, in a dry location.
Do not expose to water or excess humidity.
Use the type of power source indicated on the label, and always supply power directly from a standard domestic electrical outlet.
Do not place multiple loads on the electrical outlet.
Be sure your AC power cord meets the relevant local safety standards.
Never insert or disconnect the power plug with wet hands.
Power-supply cords should be protected from abrasion, cuts, crimping and kinking. Be sure to place your cords to avoid any damage. Do not place objects on top of the power cord or allow the power cord to be stepped on or run over. You should take special care to try to keep the power cord straight at the ends and the points where it enters and leaves the transformer.
Do not allow the AC power cord to become damaged or frayed.
Unplug your equipment from the wall outlet and refer servicing to qualified personnel under the following conditions:
If the power cord or plug is damaged; if liquid has entered your equipment; if your equipment has been exposed to rain or water; if your equipment has been dropped or damaged; if your equipment is operating abnormally or exhibits a distinct change in performance. Adjust only those controls described in your product documentation.
Never attempt to repair this product yourself. Improper repair work can be dangerous.
Unplug this product from the wall outlet before cleaning.
Clean only with a clean, soft dry cloth.
Do not use liquid or aerosol cleaners.
Keep out of reach of children.
For US and Canadian users:
Use the included power cord or a 6 to 10 foot UL-approved type SPT-2 or heavier type, 2 x 18 AWG cord with a 125 V 10 A plug and 125V 7A connector.
If you plan to use the AC Adapter in Germany, observe the following: To provide adequate short-circuit protection and over-current protection for these products, the building installation must be protected by a 16 Amp circuit breaker.
c CAUTION:
This product is designed for use with EPSON products ONLY. Do not attempt to use it with other electronic devices.
English
7

EPSON FEATURES
Thank you for purchansing an EPSON L-400. It's not only a high quality digital camera, but has many useful features as well. Please read the Instruction Booklet thoroughly to prepare for many years of enjoyable photography.
Get beautiful results frommany easy-to-use camera features!
You can take high quality photos just like a normal film camera. This camera has special 'Scene Modes' that result in fool-proof automatic photography in every situation.
For 'Scene Modes' (See page 32.)
Print your pictures directly to your own EPSON printer!
There is no need for a computer. You can print directly to an EPSON printer using a USB cable. (See page 39.) The cameras excellent digital images allow for truly high quality direct prints.
For 'Direct Printing' (See page 39.)
Enhance your photos with special printing features!
Select from a variety of frames stored right in the camera and add them to your photos when you print directly from the camera to an EPSON printer.
For 'PRINT Image Framer' (See page 28.)
For 'Direct Printing' (See page 39.)
8
Chapter 1
CAMERA SETUP
How to set up your camera for optimal performance
ITEMS
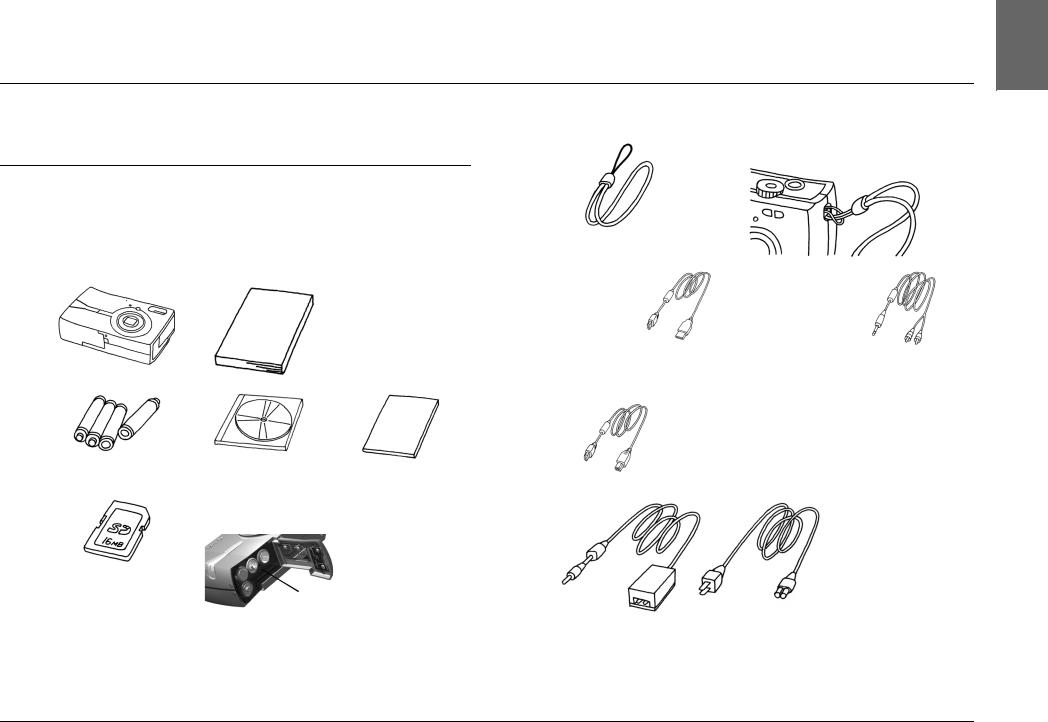
CHECKING THE PACKING CONTENTS
Make sure that your camera box contains all of the items shown below and that they are undamaged. If there is a problem, check with the store where you bought it.
User's Guide
Camera Body
4 AA Alkaline Batteries One CD-ROM |
Digital Camera |
|
Software Guide |
SD Memory Card
Installed in the camera
Batteries do not come installed in the camera.
SD Memory Card16 MB memory card
SD Memory Card
Attaching The STRAP
Please refer to the illustration.
Strap
PC Cable |
AV Cable |
|
May be used to connect the camera to a printer |
||
|
||
that can support USB DIRECT-PRINT (STYLUS Photo |
|
|
935). |
|
Printer Cable
AC-Adapter (A211H) AC-Adapter AC Cable
The AC power cord packed with your adapter is designed to match the voltage of the country of purchase.
English
CAMERA SETUP |
9 |

TOP VIEW
|
|
Light Sensor |
Built-in Flash |
|
|
|
|
Dial Switch |
|
||
|
|
|
|
|
|
|
|||||
|
|
|
|
|
|
Speaker |
|||||
Eyelet For Attaching Strap |
Lens/lens Cover |
Microphone |
|
|
|
|
|||||
|
|
|
|
|
|
|
|
|
|
|
|
|
|
|
|
|
|
|
|
|
|
|
|
|
|
|
|
|
|
|
|
|
|
|
|
|
|
|
|
|
|
|
|
|
|
|
|
|
|
|
|
|
|
|
|
|
|
|
|
|
|
|
|
|
|
|
|
|
|
|
|
|
|
|
Power Button |
|
|
|
Viewfinder |
|
Shutter Button |
||
Print button |
|
Menu On/off Button |
|||
Indicator lights |
Zoom Button |
||||
|
|
|
|||
Illumination Light
Battery / Memory Card Cover
|
|
|
|
|
|
|
|
|
|
|
|
|
|
|
|
|
|
|
|
|
|
|
|
|
|
|
|
|
|
|
|
|
|
|
|
|
|
|
|
|
|
|
|
|
|
|
|
|
|
|
|
|
|
|
|
|
|
|
|
|
|
|
|
|
|
|
|
|
|
|
|
|
|
|
Tripod Mount |
|
|
|
|
|
|
|
|
|
|
|
|
|
|
|
|
|
|
|
|
||||
|
Connector Cover |
|
Macro Button |
Flash Button |
|
|
|
|
|
|
|
|
Review Button |
|||||||||||
|
|
|
|
|
|
|
|
|
|
LCD Monitor Display |
|
|
|
|
|
|
Memory Card |
|||||||
|
|
|
|
|
|
|
|
|
|
|
|
|
Button |
|
|
Access Light |
||||||||
|
|
|
|
|
|
|
|
|
|
|
|
|
Multi |
|
-selector |
|||||||||
|
|
Inside the Connector Cover |
|
|
|
|
|
|||||||||||||||||
|
|
|
|
|
|
|
|
|
|
|
|
|
|
|
|
|
|
|||||||
|
|
|
|
|
|
|
|
|
|
|
|
|
|
|
|
|
|
|||||||
|
|
|
|
|
|
|
|
|
|
|
|
|
|
|||||||||||
|
|
|
|
|
|
|
|
AV Connector |
|
|
Multi-Selector |
|||||||||||||
|
|
|
|
|
|
|
|
|
|
|
|
|
|
|
|
|
|
|
|
|
l Button |
|||
|
|
|
|
|
|
|
|
|
|
|
|
|
|
|
|
|
|
|
|
|
|
|
||
|
|
|
|
|
|
|
|
|
|
|
|
|
|
|
|
|
|
|
|
|
|
|
||
|
|
|
|
|
|
|
|
Digital Interface |
|
|
|
|
|
|
|
|
|
|
|
|
|
u Button |
||
|
|
|
|
|
|
|
|
|
|
|
|
|
|
|
|
|
|
|
|
|
||||
|
|
|
|
|
|
|
|
|
|
|
|
|
|
|
|
|
|
|
|
|
|
|
||
|
|
|
|
|
|
|
|
Connector |
|
|
|
|
|
|
|
|
|
|
|
|
|
r Button |
||
|
|
|
|
|
|
|
|
AC Adapter |
|
|
|
|
|
|
|
|
|
|
|
|
|
|||
|
|
|
|
|
|
|
|
|
|
|
|
|
|
|
|
|
|
|
|
|
|
|
||
|
|
|
|
|
|
|
|
|
|
|
|
|
|
|
|
|
|
|
|
|
|
|
||
|
|
|
|
|
|
|
|
Connector |
|
|
|
|
|
|
|
|
|
|
|
|
|
d Button |
||
|
|
|
|
|
|
|
|
|
|
|
|
|
|
|
|
|
|
|
|
|
||||
10 CAMERA SETUP
BATTERIES AND MEMORY CARD INSTALLATION
ACCESSING THE BATTERIES AND MEMORY CARD
ALERT
Be sure the camera is turned OFF before opening and closing the battery / memory card cover.
Opening the cover
Slide the Battery/Memory Card Cover in the direction of the arrow while pressing down on it.
Closing the cover
Slide the Battery/Memory Card Cover in the direction of the arrow until it clicks into place.
HOW TO INSERT AND REMOVE THE MEMORY CARD
The memory card is installed in the camera at the factory. Check that it is properly set.
MEMORY CARD INSERTION
Checking that the card is facing the right direction, slide it in until it clicks.
REMOVING THE MEMORY CARD
Release the card by pushing once and then pull it out with your fingers. (Push once to set it, push again to release it.)
c CAUTION
The memory card is a precision electronic component. Comply with the instructions below to avoid damage.
Don't touch the terminals with your fingers or metal. Resulting static electricity could cause damage. Discharge body static electricity by touching something metal before you handle the card.
Don't bend, drop or otherwise shock the memory card.
Keep the memory card away from water, excessive heat or direct sunlight.
Don’t break down or take apart the memory card.
Note:
You may also use a MultiMedia Card
You may use an SD memory card or a MultiMedia Card. (See pages 19, 53.)
Note:
The memory card must be removed when:
you would like to copy images saved on the memory card to a computer.
the printer has a memory card slot that you may use directly.
BATTERY SETUP
Be sure the battery poles + - are aligned properly.
SETTING THE BATTERIES
Insert the batteries according to the pole indications on the cover.
Note:
To find out what batteries may be used. See page 53.
c CAUTION
If you insert the batteries incorrectly you may cause leaking, overheating or injury to yourself. You may also damage the camera.
English
CAMERA SETUP |
11 |
BATTERY LIFE INDICATOR
As the batteries lose power, the icon on the LCD monitor will change from 
 to
to 
 .
.
|
|
|
|
|
|
When the icon changes from |
|
|
|
|
||||||
|
|
|
|
|
|
to |
|
|
. |
|
|
|
|
|
|
|
|
|
|
|
|
|
|
|
|
|
|
|
|
|
|
||
|
|
|
|
|
|
|
|
|
|
|
|
|
|
|||
|
|
|
|
|
|
|
|
|
|
|
|
|
|
|||
|
|
|
|
|
|
|
|
|
|
|
|
|
|
|
|
|
|
|
|
|
|
|
Power in the batteries is almost |
||||||||||
|
|
|
|
|
|
depleted. Please be ready to insert a |
||||||||||
|
|
|
|
|
|
spare. |
|
|
|
|
|
|
|
|
||
|
|
|
|
|
|
|
|
|
|
|
|
|
|
|||
|
|
|
|
|
|
|
|
|
|
|
|
|
|
|||
|
|
|
|
|
|
When the |
|
|
is flashing |
|||||||
|
|
|
|
|
|
|
|
|||||||||
|
|
|
|
|
|
|
|
|||||||||
|
|
|
|
|
|
|||||||||||
Batteries Icon |
|
The power is low and you can no |
||||||||||||||
longer photograph.
Then the indicator light will show red and the camera will automatically shut down.
wWARNING
When changing the batteries, change all 4 at the same time and use the same brand.
The life of a battery will vary depending on the brand and grade. The conditions and modes that are used will also affect the length of use.
Non-rechargeable batteries cannot be recharged. Follow the instructions provided to discharge batteries.
Note:
If the batteries run low, you can simply plug in the AC adapter to continue using the camera. (See page 25.)
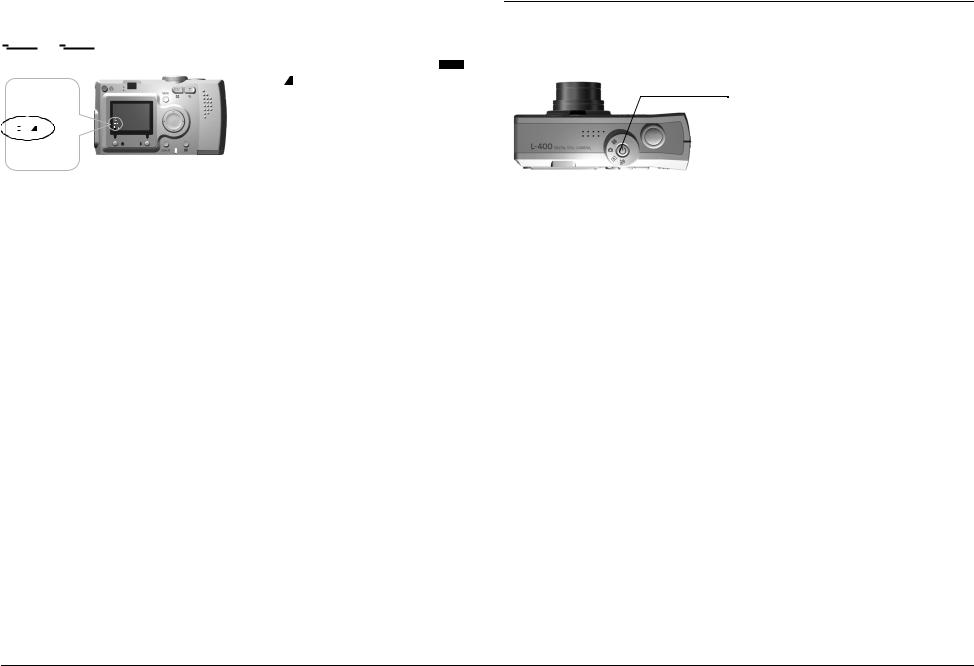
SETTING UP YOUR CAMERA
POWER ON/OFF
P POWER button
Note:
Turning on the Power
Turn on the camera by pressing the POWER button. The lens cover will openautomatically, andthe lens will extend.
Turning off the Power
Pressing the POWER button again will turn the power off. The lens will automatically retract and the lens cover will close.
When the camera is left on for a long period of time without being used, it will automatically shut down to save the batteries. (See page 48.)
12 CAMERA SETUP
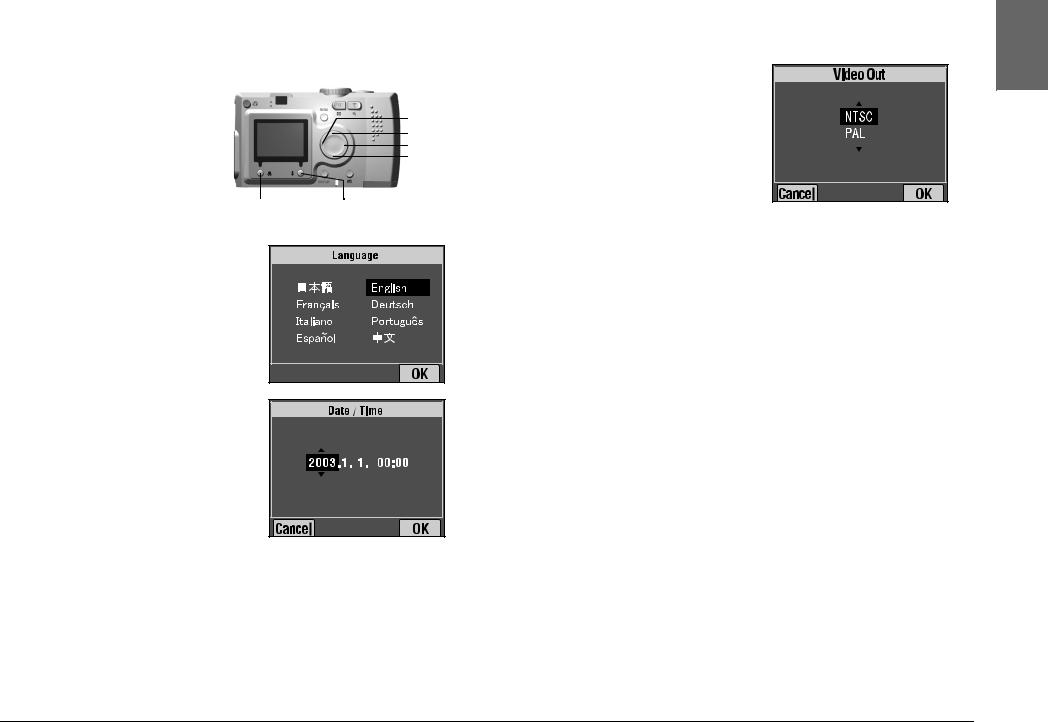
INITIAL SETTINGS
The first time you use the camera, you must set the following three items. You will only need to do this once.
l button u button r button d button
MACRO button FLASH button
1.Selecting a Language
The first time you turn on the POWER, the 'Language' screen
appears. Use the ud buttons to select English, then press the  FLASH button. (See page 50.)
2.Setting Date & Time
Next the screen 'Date/Time' will appear with the year highlighted.
Use the ud buttons to change the numbers.
Usethel r buttons tohighlight the
next item.
Press the  FLASH button to save
the settings.
Press the  MACRO button to return to previous settings. Hold down the ud buttons to scroll faster.
You may change these settings at a later date. (See page 49.)
3.Setting the Video Out Signal
The last screen will say Video Out. Use the ud buttons to highlight
PAL or NTSC. Then press
the  FLASH button to save. (See page 50.)
Initial settings are complete.
English
CAMERA SETUP |
13 |
Chapter 2
STANDARD OPERATION
How to use in the automatic mode.
HOLDING THE CAMERA / RELEASING THE SHUTTER
There is no special picture-taking stance for this particular camera, but it is useful to know these basic techniques for taking good pictures in general.
Good Form For Taking Horizontal Shots
Avoid arching your shutter
button finger
Poor Form
Both hands are clutching the camera
Arms are extended
Knees are locked
Make an L-shape platform with the left hand
Both arms are close to your body
Kneesslightly bent to create a cushion
LCD Viewer Stance (Horizontal)
Maintain the same L-shaped left hand grip and relax shoulders to bring arms forward.
Good Form For Taking Vertical Shots
Right thumb |
|
Left thumb |
|
controls the |
|
next to your |
|
shutter button |
|
forehead |
|
Forms a |
|
Both arms |
|
human |
|
are close to |
|
tripod |
|
your body |
LCD Viewer Stance |
|
|
|
|
|
|
Knees slightly |
(Vertical) |
|
|
bent to |
Right thumb controls |
|
|
create a |
shutter button. Left |
|
|
cushion |
hand shades the LCD |
|
|
|
screen for easier |
|
|
|
viewing. |
Note:
In P.I.F. mode the image will sometimes appear upside down.
FULL & HALF SHUTTER BUTTON POSITONS
Half Pressed |
Turns On the Light |
Fully Pressed |
Releases the Shutter |
Indicator lights |
|
Full & Half Positions
The shutter button has a two-step function. Hold it halfway down to activate the flashing green Indicator light. The camera is automatically setting focus and shutter speed.
Fully press it completely to release the shutter.
HINT
Remember to make an L-shape platform and to avoid covering the lens or flash with your fingers. If you arch your right forefinger, you may press the shutter button too hard, jerking the camera as the shutter releases. Also, it is difficult to maintain a half-press when the finger is arched.
14 STANDARD OPERATION
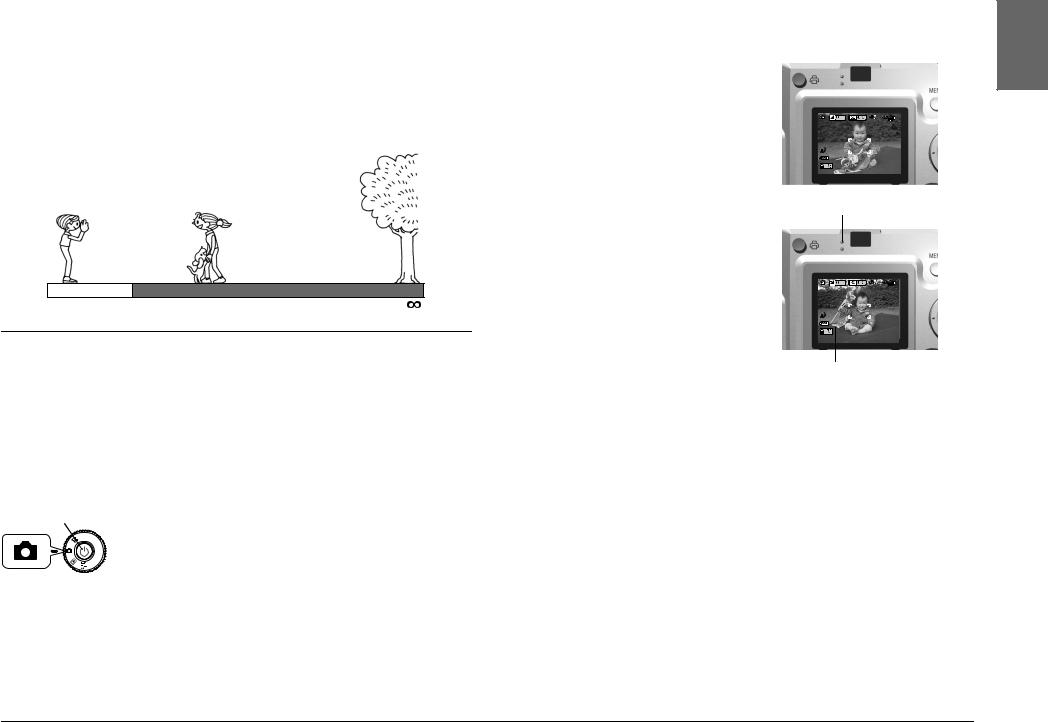
CAMERA RANGE
When taking a photograph, you will want your subject to stand at least 50cm(19.6 inches) away.
When you want to photograph something that is 50cm use the MACRO mode for better results. (See page 30.)
2.Center the subject in the middle of the focus frame of the LCD monitor.
Focal Point
50cm (19.6 inches)
THE IMAGE SYSTEM
A brief description of how to take photos.
TAKING PHOTOS USING THE LCD MONITOR
You can use the LCD Monitor to compose the picture with automatic focusing. The captured image will appear, then disappear.
c CAUTION
Be careful to avoid placing your fingers in front of the lens. Do not try to extend or retract the lens manually. This may damage the mechanism.
P POWER button Turn the DIAL SWITCH to PHOTO MODE.
1.Press the POWER button to turn the camera ON.
The lens will extend and the cover will open. The picture will appear on the LCD screen.
3.Press the SHUTTER button halfway to set the focus.
When focus is set, the indicator light turns steady and the focus frame on the LCD monitor will turn green a beep will sound.
When the picture is not in focus the indicator light will flash and the focus frame on the LCD monitor will turn red. If this occurs, take your finger off the shutter button and try refocus the picture. Please note that the picture will not focus if your subject is closer than 50 cm. Use the MACRO mode. (See page 30.)
Indicator light (green)
focus frame
4.Press the SHUTTER button fully to take the photo.
You will know the picture is recorded when you hear the shutter sound. This sound may be turned off. (See page 47.)
5.Press the POWER button to turn the camera OFF when finished.
The lens will retract and the lens cover will close.
English
STANDARD OPERATION |
15 |
TURNING THE QUICK VIEW ON/OFF
This system sends the recorded photo to the LCD monitor 3 seconds after the image is captured. This function may be turned ON or OFF.
Turn the DIAL SWITCH to SET UP mode and press the POWER button.
|
Use the ud BUTTONS to highlight |
l button |
QUICK VIEW. Use the l r |
BUTTONS to select ON/OFF. |
|
u button |
The recorded picture is displayed. It |
r button |
|
d button |
will disappear after 3 seconds, or after |
|
the shutter button is pressed halfway, |
|
whichever is sooner. |
|
When using only the VIEWFINDER the |
|
QUICK VIEW function will not work. |
USING THE VIEWFINDER-ONLY METHOD
How to take photos using the viewfinder only with the LCD monitor turned off. It is similar to using a standard range finder camera. This saves battery power when compared to using the LCD monitor to compose your pictures.
c CAUTION
Be careful to avoid placing your fingers in front of the lens. Do not try to extend or retract the lens manually. This may damage the mechanism.
P POWER button Turn the DIAL SWITCH to PHOTO MODE.
1.Press the POWER button to turn on the camera.
The lens will extend and the cover will open. The subject will appear on the LCD monitor.
The explanation for turning ON the POWER will be omitted from now on.
2.Press the DISPLAY button to turn off the LCD MONITOR.
See page 26 for the explanation for the DISPLAY button.
VIEWFINDER
DISPLAY button
3.Center the subject in the focus frame.
Thecamerawill set the focus onthe image located in the exact center of the frame.
4.Press the SHUTTER button halfway to set the focus.
When focus is set, the indicator light turns steady a beep will sound. When the picture is not in focus the indicator light will flash and send signal by sound. If this occurs, take your finger off the shutter button and try refocus the picture.
Please note that the picture will not focus if your subject is closer than 50 cm. Use the MACRO mode. (See page 30.)
The viewfinder during shooting.
Indicator light (green)
5.Press the SHUTTER button all the way to take the photo.
The shutter sound indicates the shutter has released. To turn off the shutter sound, see page 47. You are ready for the next shot when the green light stops flashing.
16 STANDARD OPERATION
6.Be sure to turn OFF the camera when you are finished by pressing the POWER button.
The lens will retract and the automatic cover will close.
The explanation for turning OFF the POWER will be omitted from now on.
ALERT
When using the VIEWFINDER to take close-up pictures, there will be a slight difference between what you see and what the camera records through the lens, referred to as parallax. Be mindful of this difference in close-up situations using the viewfinder.
Note:
When taking photos using the VIEWFINDER with the LCD Monitor off, pushing the MENU button will turn on the function display menus so you can change settings for different situations. (See pages 26, 32-34.)
You can turn off the menu display by pressing the MENU button again.
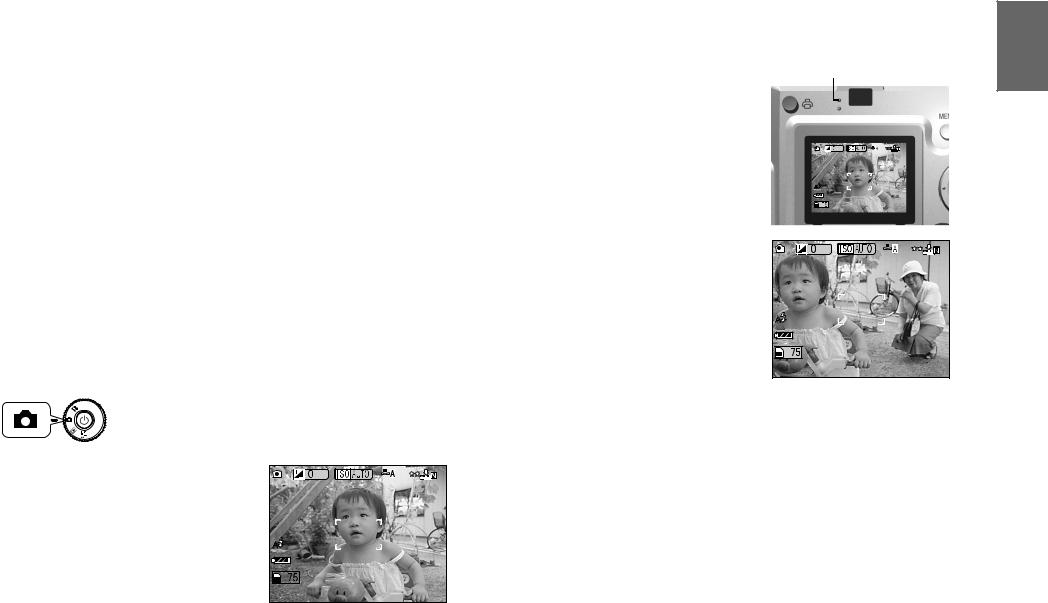
IF THE CAPTURED IMAGE IS OUT OF FOCUS FRAME
The automatic focus works only if the subject is in the FOCUS FRAME while the SHUTTER button is first pressed halfway down. After the focus is locked on the subject, you can adjust the frame to the desired composition and release the SHUTTER.
Turn the DIAL SWITCH to PHOTO MODE, and then turn the POWER ON.
1. Place the subject in the center of the focus frame.
Just as when using the LCD monitor to compose the shot, you must put the object to be focused on in the center of the viewfinder.
2. Press the shutter button halfway |
Indicator light (green) |
to set focus. |
|
When focus is set, the indicator light stops blinking on both the LCD monitor and the VIEWFINDER.
3. Maintain the halfway shutter button position and if you wish, reposition the framing to your liking.
4.Press the shutter button completely to take the photo.
The shutter sound indicates the shutter has released.
English
|
|
|
|
|
|
|
|
|
|
STANDARD OPERATION |
17 |

OPTICAL ZOOM & DIGITAL ZOOM
This camera has a 3X OPTICAL ZOOM and a 2X DIGITAL ZOOM (2 frames) installed. As DIGITAL ZOOMis available when to photo with LCD monitor, maximum 9X ZOOM photo is possible.
Double digital magnification of 204 mm
Tripledigital magnificationof 306 mm
Note:
When using digital magnification, the digital zoom indicator will appear at the right side of T bar. When 2X on the center, 3X on the right side of T.
OPTICAL ZOOM RANGE (3X) |
DIGITAL ZOOM (2X) |
DIGITAL ZOOM (3X) |
|
To zoom in press T |
To zoom in press T |
|
to zoom out press W. |
to zoom out press W. |
Focal length covered by the 35mm optical zoom lens.
To activate DIGITAL ZOOM, first press T zoom button to maximize the OPTICAL ZOOM, release it, then press it again. This produces 2X DIGITAL ZOOM. Release and press again to achieve a 3X DIGITAL ZOOM. To return to the normal OPTICAL ZOOM mode, press the W zoom button, release and press it again.
Note:
Selecting Digital Zoom through the MENU
After pressing the MENU button, use the l r buttons to highlight Digital Zoom. Using the du buttons, select either ON or OFF.
ALERT
You can also use the Digital Zoom while shooting through the VIEWFINDER, although all digitally enhanced images are inferior in resolution.
IMAGE CAPTURE SETTINGS
Selecting the Resolution and Compression
Turn the DIAL SWITCH to PHOTO MODE and then turn the POWER ON.
1.Press the MENU button and use the l r to highlight RESOLUTION.
2.Use the ud buttons to select the number of pixels (size) from
Standard, Fine or Superfine.
RESOLUTION |
Normal |
DIGITAL ZOOM |
DIGITAL ZOOM |
|
|
2X |
3X |
|
|
|
|
Standard |
640 × 480 pixels |
640 × 480 pixels |
640 × 480 pixels |
|
|
|
|
Fine |
1600 × 1200 pixels |
1280 × 960 pixels |
800 × 600 pixels |
|
|
|
|
Super fine |
2304 × 1728 pixels |
1280 × 960 pixels |
800 × 600 pixels |
|
|
|
|
3.Press the MENU button and use the l r buttons to highlight
COMPRESSION.
Normal mode is set at high compression, which takes less memory space but produces a lower quality picture.
Fine mode produces the highest quality picture, but will require more memory.
18 STANDARD OPERATION
4.Use the ud buttons to select Normal or Fine Compression.
Note:
Photograph Quality Settings
The number of pictures you can fit on a memory card is determined by photograph quality. (See page 19.)
The camera keeps your last choice when it is turned off.
The camera is set in the "Normal" compression mode at the factory. Changing to "Fine" mode will improve the quality of your pictures (See page 19.), but the number of pictures that fit on a single memory card will be reduced.
CONFIRMING THE NUMBER OF PHOTOGRAPHS
The number of pictures stored on the memory card (at current quality and resolution settings) is displayed on the LCD monitor.
Number of Images
Approximate Number of Images
Quality |
Approximate Number of Images (16MB) |
|
|
|
|
COMPRESSION |
Normal |
Fine |
RESOLUTION |
|
|
|
|
|
Standard |
Approx. 127 Images |
Approx. 68 Images |
|
|
|
Fine |
Approx. 35 Images |
Approx. 17 Images |
|
|
|
Super Fine |
Approx. 17 Images |
Approx. 00 Images |
|
|
|
Frame data will also be installed on the provided SD Memory card. This may reduce the total indicated on the table.
ALERT
The numbers are the result of factory tests made by the manufacturer.
The numbers on the LCD monitor are only a guide. The actual numbers may vary.
The numbers on the LCD monitor may vary with image capture settings.
The number on the LCD monitor may change after each picture is taken. Each one will take up different amounts of memory. The number is calculated based on the factory average.
When you take VIDEO CLIPS the amount of pictures you can take will change drastically. See page 37 for more detailed information on VIDEO CLIPS.
The number of the sheets which can take pictures is a maximum of 9999.
FYI
Comparing the SD and MultiMedia Memory Cards
You may use both the SD Memory card and the MultiMediaCard (MMC) with this camera. The SD Memory card is quite fast and has the ability to hold large amounts of data. The MultiMedia Card uses less power so that the batteries last longer.
If you decide to buy a new memory card, the SD Memory card is recommended for its speed and ability to lock and protect your data. (See page 50.)
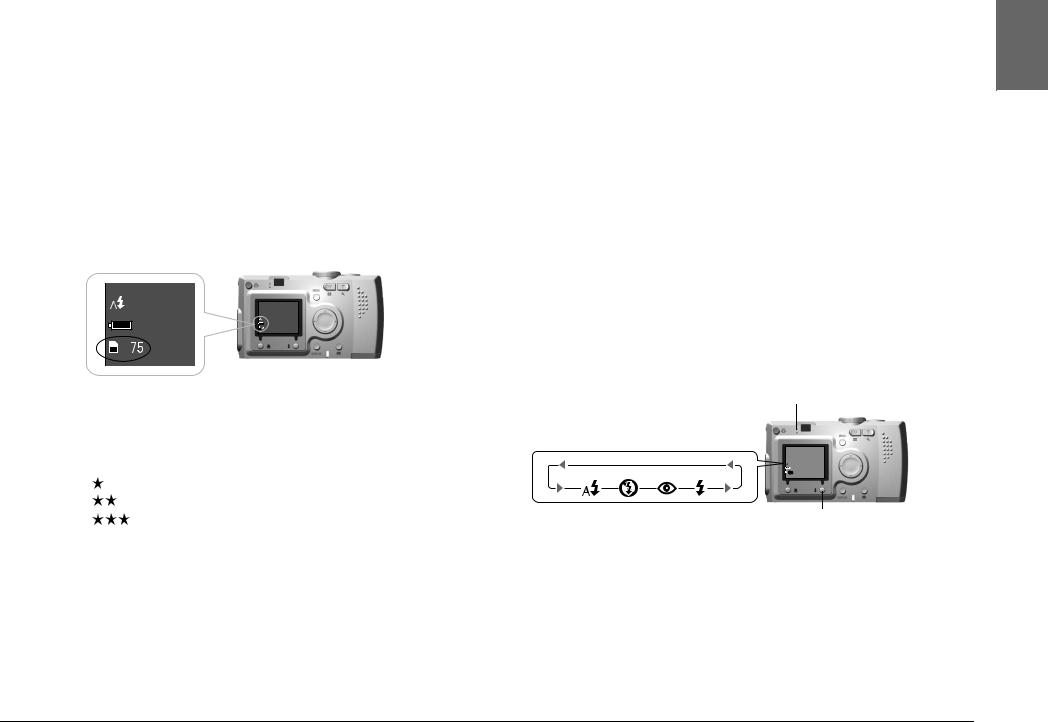
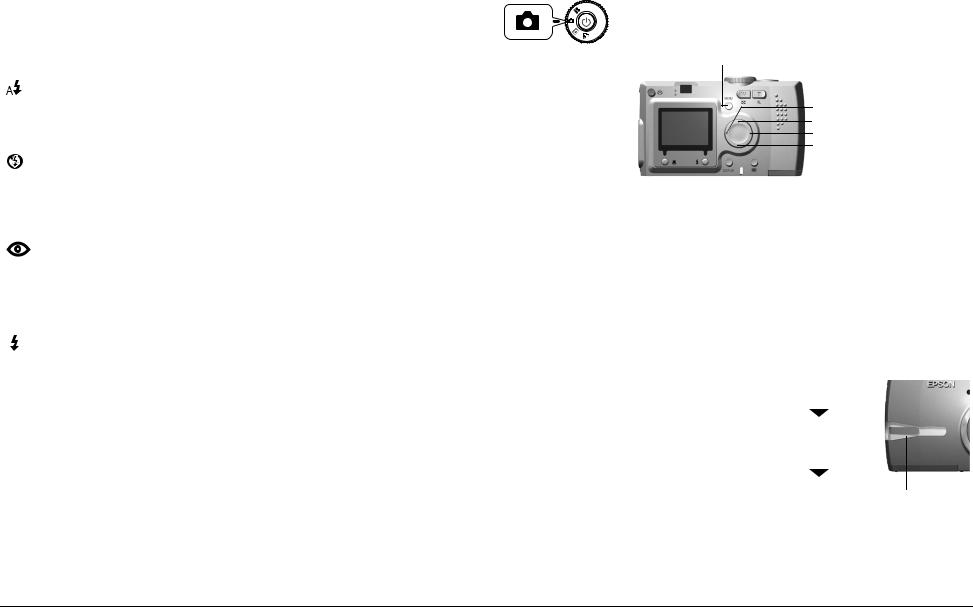
FLASH CONTROL
You can change the flash setting by pushing the  FLASH button and observing the icons on the LCD monitor.
The mode changes each time you press the  FLASH button.
Flashing green means
Indicator light the battery is recycling for the next shot.
FLASH button
Note:
Blurred Shot
When taking pictures in "No Flash" setting or in the "Forced Flash" setting (Slow Synchro), the shutter will be slower than 1/30 sec. at wide angle or 1/60 sec. at telephoto. At such slow speeds in low light, the image may blur from camera motion, therefore, a green light will flash to warn you.
English
STANDARD OPERATION |
19 |
FYI
Slow Synchro Shutter Shooting
This technique allows you to sync the Flash with the Slow Shutter Shooting. In most cases, if the flash is used in a very dark setting the background turns out dark, but when using the Forced Flash settings the exposure time lengthens (Slow Synchro Shutter Shooting) and brightens the background. The use of a tripod is recommended to prevent blurring.
Main Functions Of The Flash Icons
Automatic Flash (default |
The flash will automatically go off in a dark |
setting) |
setting. In a well lit setting, the flash will not |
|
go off. This can be used for most settings. |
|
|
No Flash |
Turns off the flash even in dark scenes. Use |
|
it for night scenes or wherever you are |
|
prohibited from using a flash. Please note |
|
that these shots may become blurred due |
|
to very slow shutter speed. ’No Flash’ is the |
|
automatic setting in CONTINUOUS or |
|
VIDEO CLIP mode. |
|
|
Auto red-eye reduction |
Use this setting when recording with a flash |
|
at night or indoors. The flash will go off |
|
once and will go off again when the |
|
picture is taken. This will help to reduce |
|
red-eye phenomenon. |
|
|
Forced Flash |
The flash will go off at any time no matter |
|
the brightness. Use it when the |
|
background is bright or when you are |
|
shooting against the sun. When used in |
|
dark settings, the length of exposure |
|
becomes longer, changing into Slow |
|
SynchroShutter Shooting. Pleasenotethat |
|
these shots may become blurred. |
|
|
Flash Range
ISO Sensitivity |
|
Normal (Wide Angle) |
Normal (Telephoto) |
|
|
|
|
|
|
Standard Sensitivity |
ISO 100 |
0.5 - 2.6m (1.6 |
- 8.5ft) |
0.5 - 1.5m (1.6 - 4.9ft) |
|
|
|
|
|
High Sensitivity |
ISO 200 |
0.5 - 3.7m (1.6 - 12.1ft) |
0.5 - 2.1m (1.6 - 6.9ft) |
|
|
|
|
|
|
Super High Sensitivity |
ISO 400 |
0.5 - 5.2m (1.6 |
- 17.1ft) |
0.5 - 3.0m (1.6 - 9.8ft) |
|
|
|
|
|
ISO Sensitivity (See page 33.)
USING THE SELF TIMER
Use the self-timer when you are recording an image of yourself or a group that includes you. Also, this feature will eliminate blurring.
Turn the DIAL SWITCH to PHOTO MODE and then turn the POWER ON.
MENU Button
l button u button r button d button
1.Press the MENU button and select  SELF TIMER by using the l r buttons.
2.Select either 2 sec. or 10 sec. by using the ud buttons.
HINT
Short Self Timer
Shots taken at night, at sunset or in MACRO mode can easily become blurred. The shot often becomes blurred when the camera moves (because the shutter is open) while the shutter button is pressed down. When using the Short Self Timer the shutter is set to release 2 seconds after the button has been pressed, helping you to take photos that are not blurred. The light will flash quickly for 2 seconds before the shutter goes off.
3.Center the image and press the SHUTTER button.
In the 10-sec. mode, the light flashes slowly for 8 seconds, then faster for the last 2 seconds before the shutter releases.
To turn on the self timer sound, see page 47.
Light will flash slowly for 8 seconds
Light will flash quickly for 2 seconds
Shutter will release
illumination Light
Note:
If you want to stop the process after pressing the shutter button in self timer mode, just press the  MACRO button. EPSON recommends using a tripod or placing the camera on a flat horizontal surface when using this mode.
20 STANDARD OPERATION
Loading...