


 Loading...
9-pin Dot Matrix Printer
Reference Guide
All rights reserved. No part of this publication may be reproduced, stored in a retrieval system, or transmitted in any form or by any means, electronic, mechanical, photocopying, recording, or otherwise, without the prior written permission of Seiko Epson Corporation. The information contained herein is designed only for use with this Epson printer. Epson is not responsible for any use of this information as applied to other printers.
Neither Seiko Epson Corporation nor its affiliates shall be liable to the purchaser of this product or third parties for damages, losses, costs, or expenses incurred by the purchaser or third parties as a result of: accident, misuse, or abuse of this product or unauthorized modifications, repairs, or alterations to this product, or (excluding the U.S.) failure to strictly comply with Seiko Epson Corporation’s operating and maintenance instructions.
Seiko Epson Corporation shall not be liable for any damages or problems arising from the use of any options or any consumable products other than those designated as Original Epson Products or Epson Approved Products by Seiko Epson Corporation.
Epson and Epson ESC/P are registered trademarks, and Exceed Your Vision is a trademark of Seiko Epson Corporation.
Epson Store is a service mark of Epson America, Inc.
General Notice: Other product names used herein are for identification purposes only and may be trademarks of their respective owners. Epson disclaims any and all rights in those marks.
© 2006 Epson America, Inc. All rights reserved. |
7/07 OSS |

Contents
Introduction
About This Manual . . . . . . . . . . . . . . . . . . . . . . . . . . . . . . . . . . . . . . . . .6 Warnings, Cautions, and Notes . . . . . . . . . . . . . . . . . . . . . . . . . .7 Safety Instructions . . . . . . . . . . . . . . . . . . . . . . . . . . . . . . . . . . . . . . . . . .7 Hot parts caution symbol . . . . . . . . . . . . . . . . . . . . . . . . . . . . . . .7 When setting up the printer . . . . . . . . . . . . . . . . . . . . . . . . . . . . .8 When operating the printer. . . . . . . . . . . . . . . . . . . . . . . . . . . . . .9 When handling paper . . . . . . . . . . . . . . . . . . . . . . . . . . . . . . . . . .9 When maintaining the printer . . . . . . . . . . . . . . . . . . . . . . . . . .10
Chapter 1 Paper Handling
Printing on Continuous Paper. . . . . . . . . . . . . . . . . . . . . . . . . . . . . . .11 Printing with the push tractor . . . . . . . . . . . . . . . . . . . . . . . . . .12 Printing with the pull tractor . . . . . . . . . . . . . . . . . . . . . . . . . . .17 Adjusting the top-of-form position . . . . . . . . . . . . . . . . . . . . . .22 Advancing paper to the tear-off edge . . . . . . . . . . . . . . . . . . . .23
Printing on Single Sheets . . . . . . . . . . . . . . . . . . . . . . . . . . . . . . . . . . .26 Printing on Special Paper . . . . . . . . . . . . . . . . . . . . . . . . . . . . . . . . .29 Adjusting the paper thickness lever . . . . . . . . . . . . . . . . . . . . .29 Multipart forms. . . . . . . . . . . . . . . . . . . . . . . . . . . . . . . . . . . . . . .30 Labels . . . . . . . . . . . . . . . . . . . . . . . . . . . . . . . . . . . . . . . . . . . . . . .31 Envelopes. . . . . . . . . . . . . . . . . . . . . . . . . . . . . . . . . . . . . . . . . . . .32
Chapter 2 Using the Printer Software
Accessing the Printer Driver . . . . . . . . . . . . . . . . . . . . . . . . . . . . . . . .34
From Windows applications. . . . . . . . . . . . . . . . . . . . . . . . . . . .34
From the Start menu . . . . . . . . . . . . . . . . . . . . . . . . . . . . . . . . . .36
Changing the Printer Driver Settings . . . . . . . . . . . . . . . . . . . . . . . . .38
3

Using EPSON Status Monitor 3 . . . . . . . . . . . . . . . . . . . . . . . . . . . . . 41 Setting up EPSON Status Monitor 3. . . . . . . . . . . . . . . . . . . . . 42 Accessing EPSON Status Monitor 3 . . . . . . . . . . . . . . . . . . . . . 43 Installing EPSON Status Monitor 3 . . . . . . . . . . . . . . . . . . . . . 44 Setting Up Your Printer on a Network . . . . . . . . . . . . . . . . . . . . . . . 45 Setting up the printer server . . . . . . . . . . . . . . . . . . . . . . . . . . . 45 Setting up the clients. . . . . . . . . . . . . . . . . . . . . . . . . . . . . . . . . . 49 Installing the printer driver from the CD-ROM . . . . . . . . . . . 57 Canceling Printing . . . . . . . . . . . . . . . . . . . . . . . . . . . . . . . . . . . . . . . . 58 Uninstalling the Printer Software . . . . . . . . . . . . . . . . . . . . . . . . . . . 59
Uninstalling the printer driver and EPSON
Status Monitor 3 . . . . . . . . . . . . . . . . . . . . . . . . . . . . . . . . . . . 59
Chapter 3 Using the Control Panel
Control Panel Buttons and Lights . . . . . . . . . . . . . . . . . . . . . . . . . . . 63 Selecting a built-in font . . . . . . . . . . . . . . . . . . . . . . . . . . . . . . . 65 Changing the Default Settings . . . . . . . . . . . . . . . . . . . . . . . . . . . . . . 67 Using Default Setting mode. . . . . . . . . . . . . . . . . . . . . . . . . . . . 72 Restoring the printer’s default settings . . . . . . . . . . . . . . . . . . 73
Chapter 4 Maintenance and Troubleshooting
Cleaning the Printer . . . . . . . . . . . . . . . . . . . . . . . . . . . . . . . . . . . . . . 74 Transporting the Printer . . . . . . . . . . . . . . . . . . . . . . . . . . . . . . . . . . . 75 Troubleshooting . . . . . . . . . . . . . . . . . . . . . . . . . . . . . . . . . . . . . . . . . . 76 Using the error indicators . . . . . . . . . . . . . . . . . . . . . . . . . . . . . 77 Problems and solutions . . . . . . . . . . . . . . . . . . . . . . . . . . . . . . . 79 Clearing a paper jam. . . . . . . . . . . . . . . . . . . . . . . . . . . . . . . . . . 93 Printing a self test . . . . . . . . . . . . . . . . . . . . . . . . . . . . . . . . . . . . 94 Where To Get Help . . . . . . . . . . . . . . . . . . . . . . . . . . . . . . . . . . . . . . . 96 Internet support. . . . . . . . . . . . . . . . . . . . . . . . . . . . . . . . . . . . . . 96 Speak to a support representative . . . . . . . . . . . . . . . . . . . . . . 96 Purchase supplies and accessories . . . . . . . . . . . . . . . . . . . . . . 97
4

Chapter 5 Options and Consumables
Cut-sheet Feeder . . . . . . . . . . . . . . . . . . . . . . . . . . . . . . . . . . . . . . . . . .98
Optional Tractor . . . . . . . . . . . . . . . . . . . . . . . . . . . . . . . . . . . . . . . . .102
Roll Paper Holder . . . . . . . . . . . . . . . . . . . . . . . . . . . . . . . . . . . . . . . .104
Replacing the Ribbon Cartridge . . . . . . . . . . . . . . . . . . . . . . . . . . . .105
Chapter 6 Product Information
Printer Parts . . . . . . . . . . . . . . . . . . . . . . . . . . . . . . . . . . . . . . . . . . . . .109 Specifications . . . . . . . . . . . . . . . . . . . . . . . . . . . . . . . . . . . . . . . . . . . .111 Mechanical. . . . . . . . . . . . . . . . . . . . . . . . . . . . . . . . . . . . . . . . . .111 Electronic . . . . . . . . . . . . . . . . . . . . . . . . . . . . . . . . . . . . . . . . . .113 Electrical . . . . . . . . . . . . . . . . . . . . . . . . . . . . . . . . . . . . . . . . . . .115 Environmental . . . . . . . . . . . . . . . . . . . . . . . . . . . . . . . . . . . . . .115 Paper . . . . . . . . . . . . . . . . . . . . . . . . . . . . . . . . . . . . . . . . . . . . . .115 Printable area . . . . . . . . . . . . . . . . . . . . . . . . . . . . . . . . . . . . . . .119 Paper alignment . . . . . . . . . . . . . . . . . . . . . . . . . . . . . . . . . . . . .121 Command Lists . . . . . . . . . . . . . . . . . . . . . . . . . . . . . . . . . . . . . . . . . .122 EPSON ESC/P control codes . . . . . . . . . . . . . . . . . . . . . . . . . .122 IBM 2380 Plus emulation control codes . . . . . . . . . . . . . . . . .123 Standards and approvals . . . . . . . . . . . . . . . . . . . . . . . . . . . . . . . . . .125 Safety approvals . . . . . . . . . . . . . . . . . . . . . . . . . . . . . . . . . . . . .125 CE marking . . . . . . . . . . . . . . . . . . . . . . . . . . . . . . . . . . . . . . . . .125
Index . . . . . . . . . . . . . . . . . . . . . . . . . . . . . . . . . . . . . . . . . . . . . . . . . . .126
5

Introduction
Your Epson® LX-300+II printer provides high-quality printing and superior performance in a compact design. This 9-pin dot matrix printer provides:
A variety of paper paths to suit your printing needs.
The ability to handle a wide range of paper types, including continuous paper, multipart forms (with one original and up to four copies), labels, single sheets, and envelopes.
High-speed printing of up to 300 cps (characters per second) at 10 cpi (characters per inch).
The CD-ROM that came with your printer contains the printer driver for Microsoft® Windows® 98, Me, 2000, XP and NT 4.0, plus the EPSON Status Monitor 3 utility.
About This Manual
This manual provides detailed information about your printer:
Chapter 1, “Paper Handling,” explains how to load various types of paper.
Chapter 2, “Using the Printer Software,” describes how to print using the printer software.
Chapter 3, “Using the Control Panel,” provides information about the control panel functions, including how to change the printer’s default settings.
Chapter 4, “Maintenance and Troubleshooting,” includes basic maintenance procedures and solutions to possible problems.
6 Introduction

Chapter 5, “Options and Consumables,” describes how to use options such as the roll paper holder and cut-sheet feeder, and explains how to replace the ribbon cartridge.
Chapter 6, “Product Information,” contains technical information about the printer.
For setup instructions and basic information, please see the
User’s Guide.
Warnings, Cautions, and Notes
wWarnings
must be followed carefully to avoid bodily injury.
cCautions
must be observed to avoid damage to your equipment.
Notes
contain important information and useful tips on the operation of your printer.
Safety Instructions
Read all of these safety instructions before using the printer and follow all warnings and instructions marked on the printer.
Hot parts caution symbol
KThis symbol is placed on the print head and other parts to indicate that they may be hot. Never touch these parts just after the printer has been used. Let them cool for a few minutes before touching them.
Introduction 7

When setting up the printer
Do not place the printer on an unstable surface or near a radiator or heat source.
Place the printer on a flat, stable surface. It will not operate properly if it is tilted or placed at an angle.
Do not place the printer on a soft surface like a bed or a sofa, or a small, enclosed area, as this restricts ventilation.
Do not block or cover the slots and openings in the printer’s cabinet, and do not insert objects through the slots.
Use only the type of power source indicated on the printer’s label. If you are not sure of the power supply specifications in your area, contact your local power company or consult your Epson reseller.
Connect all equipment to properly grounded electrical outlets. Avoid using outlets on the same circuit as photocopiers or air control systems that regularly switch on and off.
Do not use a damaged or frayed power cord.
The power cord should be placed to avoid abrasions, cuts, fraying, crimping, kinking, and other damage.
If you use an extension cord with the printer, make sure the total ampere rating of all devices plugged into the extension cord does not exceed the cord’s ampere rating. Also, make sure the total ampere of all devices plugged into the electrical outlet does not exceed the electrical outlet’s ampere rating.
Use only the power cord that comes with this product. Use of another cord may result in fire or electric shock.
8 Introduction

When operating the printer
Adjust only those controls that are covered in the user documentation. Improper adjustment of other controls may result in damage requiring extensive repair by a qualified technician.
Whenever you turn off the printer, wait at least five seconds before turning it back on; otherwise, you may damage it.
Do not turn off the printer while it is printing the self test. Always press the Pause button to stop printing and then turn off the printer.
Do not reconnect the power cord to an electrical outlet that has the wrong voltage for your printer.
Never replace the print head yourself; you may damage the printer. Also, other parts of the printer must be checked when the print head is replaced.
You may need to move the print head by hand to replace the ribbon cartridge. If you have just used the printer, the print head may be hot; let it cool before touching it.
When handling paper
Because labels are sensitive to temperature and humidity, use them only under these normal operating conditions:
Temperature: 59 to 77°F (15 to 25°C) Humidity: 30 to 60% RH
Do not leave labels in the printer between jobs; they may curl around the platen and jam when you resume printing.
Do not load paper that is curled or has been folded.
Introduction 9

When maintaining the printer
Unplug the printer before cleaning it, and always clean it with a damp cloth only.
Do not spill liquid onto the printer.
Except as specifically explained in this manual, do not attempt to service the printer yourself.
Unplug the printer and refer servicing to qualified service personnel under the following conditions:
i.If the power cord or plug is damaged.
ii.If liquid has entered the printer.
iii.If the printer has been dropped or the cabinet damaged.
iv.If the printer does not operate normally or exhibits a distinct change in performance.
Do not use aerosol blowers which contain flammable gas inside or around this product. Doing so may cause fire.
Adjust only those controls that are covered by the operating instructions.
10 Introduction
Chapter 1
Paper Handling
Your printer can handle continuous paper in either the push or the pull position, as well as single sheets and special papers such as labels and envelopes.
For instructions on using continuous paper, see the following section. To load single sheets, see page 26. For information about special paper, see page 29.
Printing on Continuous Paper
You can print on continuous paper using the tractor in either the push or pull position:
Use the tractor in the push position if you want to be able to switch between printing on single sheets and continuous paper without removing the paper supply, or if you will be tearing off continuous paper sheet-by-sheet. (Follow the instructions in the next section.) The printer comes with the tractor installed in the push position.
Use the tractor in the pull position if you will be printing on labels, multipart forms, or other documents that require a precise print position. (See “Printing with the pull tractor” on page 17 for instructions.)
Paper Handling |
11 |
Printing with the push tractor
Follow these steps to load continuous paper on the push tractor:
1.Turn off the printer.
2.Remove the printer cover and the paper guide, and pull the paper release lever forward to the continuous paper position.
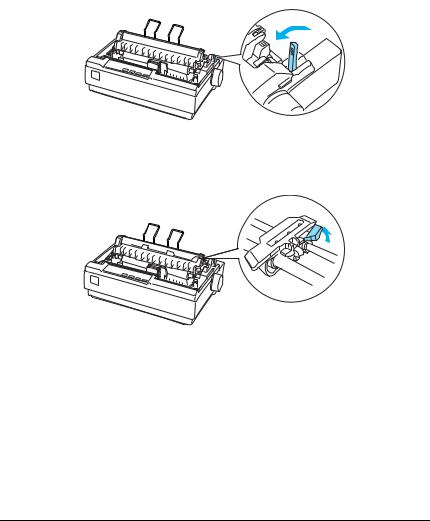
3.Unlock the sprockets on the tractor by pulling the blue lock levers forward.
12 Paper Handling

4.Slide the left sprocket so the pins are aligned with the 0 mark on the printer scale (which is beneath the tractor). Push the lock lever back to lock it in place. Then slide the right sprocket to match the width of your paper, but do not lock it. Move the paper support so it is midway between the sprockets.
0mark
5.Stack your continuous paper behind the printer. Make sure there are no obstructions between the paper and the printer and that the paper is aligned squarely with the printer so it will feed in straight.
6.Make sure your paper has a clean, straight, leading edge. Then open the sprocket covers and fit the first holes of the paper over the sprocket pins.
7.Close the covers. Slide the right sprocket to remove any slack in the paper and lock it in place.
Paper Handling |
13 |
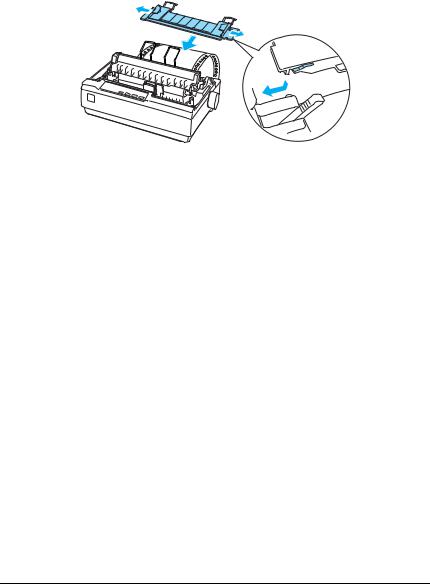
8.To separate the incoming paper from the printed paper, attach the paper guide by holding it horizontally and fitting its notches over the printer’s mounting posts as shown below. Then slide the paper guide toward the front of the printer until you feel it click.
9.Replace the printer cover and close it.
10.Turn on the printer.
11.When using the push tractor, it is a good idea to turn on the Auto tear off feature in Default Setting mode. See page 67.
12.Press the LF/FF button to feed the paper to the loading position. When the printer receives data, it begins printing automatically.
13.After you finish printing, follow the steps in the next section to tear off your printed document. If the first printed line on your page appears too high or too low, you can change its position using the Micro Adjust feature. See “Adjusting the top-of-form position” on page 22.
cCaution:
Never use the paper feed knob to adjust the top-of-form position; this may damage the printer or cause it to lose the top-of-form position.
The next time you print, the paper automatically feeds back to the loading position.
14 Paper Handling
Removing a printed document from the push tractor
Follow these steps to remove the printed document:
1.Press the Tear Off (Font) button. The Tear Off (Font) lights start flashing. (This indicates that your paper is at the current tear-off position.)
2.Open the printer cover and tear off the printed document using the tear-off edge on the paper tension unit.
Note:
If your paper’s perforation is not properly aligned with the tear-off edge, you can adjust the tear-off position using the Micro Adjust feature. See “Adjusting the tear-off position” on page 25.
cCaution:
Never use the paper feed knob to adjust the tear-off position; this may damage the printer or cause it to lose the tear-off position.
3. Close the printer cover.
When you resume printing, the printer automatically feeds the paper back to the top-of-form position and starts printing.
Paper Handling |
15 |

To feed continuous paper backward to the standby position, where you can remove the paper, first tear off any printed sheets. Then press the Load/Eject button. Open the sprocket covers on the tractor and remove the paper.
cCaution:
Always tear off your printed document before you press the Load/Eject button. Reverse feeding several pages at a time may cause a paper jam.
Switching between continuous paper and single sheets
If you want to switch to single sheets while continuous paper is loaded in the push tractor position, follow these steps:
1. Tear off your printed document.
cCaution:
Always tear off your printed document before you press the Load/Eject button. Reverse feeding several pages at a time may cause a paper jam.
2.Press the Load/Eject button to feed the paper backward to the standby position.
3.Push the paper release lever back to the single sheet position.
4.Follow the instructions on page 26 to load single sheets. To switch back to continuous paper, follow these steps:
1.Press the Load/Eject button to eject any sheet in the printer.
2.Move the paper release lever to the continuous paper position.
3.Press the LF/FF button to load the paper on the tractor.
16 Paper Handling
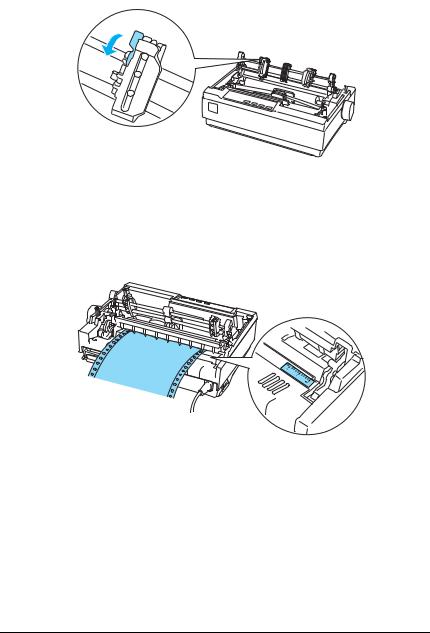
Printing with the pull tractor
To load continuous paper using the pull tractor, you must move the tractor to the pull tractor position, as described below. If your tractor is already installed in this position, make sure the printer is turned off and skip to step 6.
1.Turn off the printer.
2.Remove the printer cover and the paper guide.
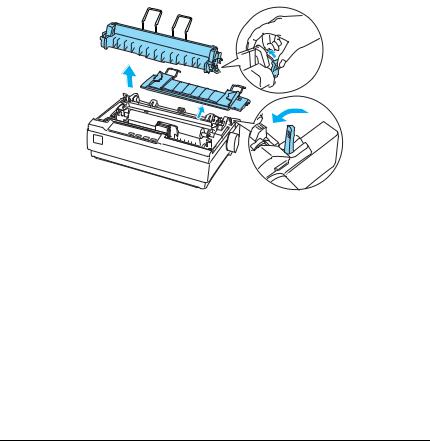
3.Remove the paper tension unit by gently squeezing the lock tabs and pulling it out of the printer.
4.Pull the paper release lever forward to the continuous paper position.
Paper Handling |
17 |

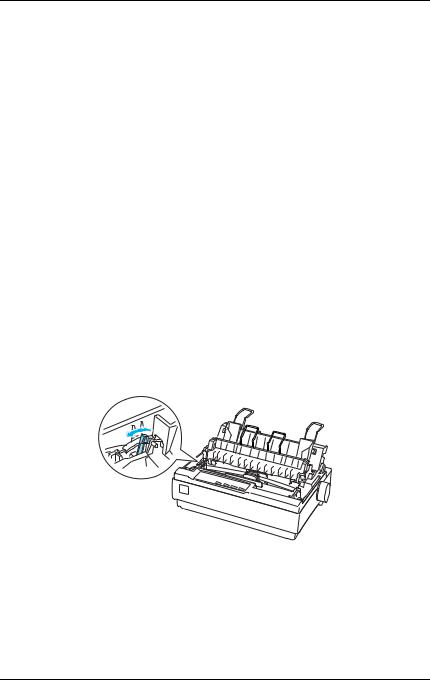
5.To remove the tractor from the push position, gently squeeze the lock tabs on both sides and then rotate the tractor up to pull it away from the printer.
6.Lower the tractor onto the mounting slots at the top of the printer as shown below, and tilt it back until you feel it lock into place.
18 Paper Handling
7.Unlock the sprockets by pulling the blue lock levers forward.
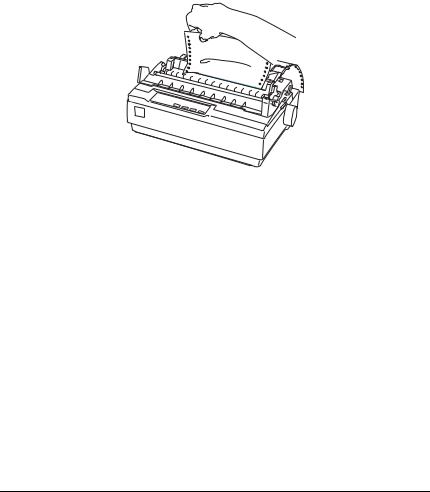
8.Feed the paper into the rear paper slot as shown below, and pull it up. Position the paper using the scale on the printer as a guide. Printing starts to the right of the position marked 0 (under the paper now).
Paper Handling |
19 |
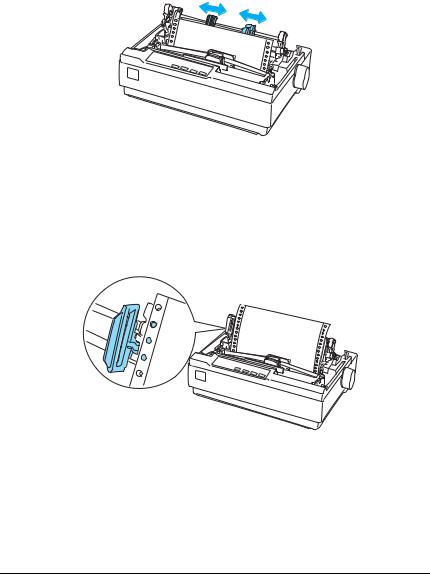
9.Slide the left sprocket so its pins are aligned with the holes in the paper and push the blue lock lever to lock the sprocket in place. Then slide the right sprocket to match the width of your paper, but do not lock it. Move the paper supports midway between the two sprockets.
10.Make sure your paper has a clean, straight leading edge. Open the sprocket covers. Fit the first holes of the paper over the sprocket pins and then close the sprocket covers. Slide the right sprocket to remove any slack in the paper and then lock it in place.
Note:
Remove any remaining slack by gently pulling the paper from the back.
20 Paper Handling
11.To separate the incoming paper from the printed paper, attach the paper guide. Hold it horizontally and fit its notches over the printer’s mounting posts. Then slide the paper guide toward the back of the printer until you feel it click.
12.Turn the paper feed knob to adjust the paper position. The perforation between pages should be just above the print head.
13.Replace the printer cover but leave it open.
14.Turn on the printer.
15.Set the Auto tear off feature in the Default Setting mode to Off; otherwise, the paper may jam. (See page 67 for more information.)
When the printer receives data, it begins printing automatically. If you want to change the position where printing begins on the page, press the LF/FF button to advance the page to the next top- of-form position, and then see the next section to adjust the loading position.
To eject the paper, tear off the paper entering the printer; then press the LF/FF button to feed the paper forward.
Paper Handling |
21 |
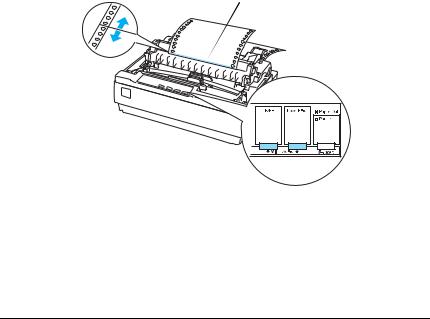
Adjusting the top-of-form position
The top-of-form position is the position on the page where the printer starts printing. If your printing appears too high or too low on the page, you can use the Micro Adjust mode to adjust the top-of-form position.
cCaution:
Never use the paper feed knob to adjust the top-of-form position; this may damage the printer or cause it to lose the top-of-form position.
1.Make sure the printer is turned on and paper is loaded.
2.Remove the printer cover.
3.Hold down the Pause button for about three seconds. The printer beeps and the Pause light starts flashing as the printer enters Micro Adjust mode.
4.Press the LF/FF D button to move the top-of-form position higher on the page, or press the Load/Eject U button to move the top-of-form position lower on the page.
22 Paper Handling

Note:
The printer has a minimum and a maximum top-of-form position. If you try to adjust it beyond these limits, the printer beeps and stops moving the paper.
When the paper reaches the default top-of-form position, the printer beeps and stops moving the paper briefly. You can use the default position as a reference point when adjusting the top-of-form position.
5.After you set the top-of-form position, press the Pause button to exit Micro Adjust mode.
Note:
Your top-of-form position setting remains in effect until you change it, even if you turn off the printer.
The top margin setting made in some software applications overrides the top-of-form position setting you make with the Micro Adjust feature. If necessary, adjust the top-of-form position in your software.
If you want to restore the printer’s default top-of-form position, you can reset the printer. See page 73 for instructions.
Advancing paper to the tear-off edge
When the push tractor is installed, you can use the tear-off feature to advance your continuous paper to the printer’s tearoff edge when you finish printing. You can then easily tear off the printed document. When you resume printing, the printer automatically feeds the paper back to the top-of-form position; so you can save the paper normally lost between documents.
Paper Handling |
23 |

You can use the tear-off feature in two ways:
Manually, by pressing the printer’s Tear Off (Font) button
Automatically, by turning on the Auto tear-off function in Default-setting mode.
Using the Tear Off button
After the printer finishes printing your document, check that the Tear Off (Font) lights are not flashing. Then press the Tear Off (Font) button. The printer advances the paper to the tear-off edge.
Note:
If the Tear Off (Font) lights are flashing, the paper is in the tear-off position. If you press the Tear Off (Font) button again, the printer feeds your paper to the next top-of-form position.
Advancing paper to the tear-off position automatically
To automatically advance your printed documents to the tearoff position, you need to turn on the Auto tear-off mode and select the appropriate page length for continuous paper in Default Setting mode. For instructions, see page 67.
When Auto tear-off is on, the printer automatically advances the paper to the tear-off position whenever it receives a full page of data or a form feed command followed by no more data.
24 Paper Handling
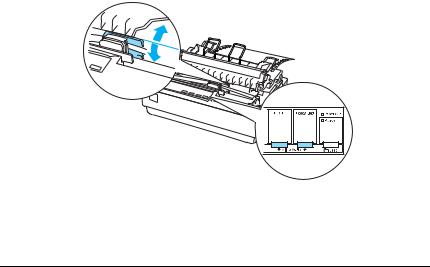
Adjusting the tear-off position
If your paper’s perforation is not aligned with the tear-off edge, you can use the Micro Adjust mode to move the perforation to the tear-off position. Follow these steps:
1.Make sure the Tear Off (Font) lights are flashing. You may need to press the Tear Off (Font) button to advance the paper to the tear-off position.
2.Open the printer cover.
3.Hold down the Pause button for about three seconds. The printer beeps and the Pause light begins to flash as the printer enters Micro Adjust mode.
4.Press the LF/FF D button to feed the paper backward, or press the Load/Eject U button to feed the paper forward, until the paper perforation is aligned with the tear-off edge on the paper tension unit.
Tear-off edge
Note:
The printer has a minimum and a maximum tear-off position. If you try to adjust the tear-off position beyond these limits, the printer beeps and stops moving the paper.
Paper Handling |
25 |

5.After you set the tear-off position, press the Pause button to exit Micro Adjust mode.
6.Tear off the printed pages.
When you resume printing, the printer automatically feeds the paper back to the top-of-form position and begins printing.
Note:
Your tear-off position setting remains in effect until you change it, even if you turn off the printer. (If you want to restore the printer’s default tear-off position, you can reset the printer. See page 73 for instructions.)
Printing on Single Sheets
You can load single sheets of paper one at a time using the printer’s paper guide.
Before printing on single-sheet multipart forms, envelopes, or other special paper, make sure the paper thickness lever is set to the correct position. See “Printing on Special Paper” on page 29.
Note:
Load only one sheet at a time.
To load a stack of single-sheet paper, use the optional cut-sheet feeder. (See page 98 for more information.)
For detailed specifications on the types of single-sheet paper you can use, see page 115.
You can use the paper guide to load single-sheet carbonless multipart forms that are fastened at the top by line gluing.
Insert multipart forms in the paper guide, bound edge first and printable side down.
26 Paper Handling

Follow these steps to load a single sheet:
1.If continuous paper is loaded in the push tractor, press the Load/Eject button to feed it back to the standby position.
2.Push the paper release lever back to the single-sheet position and make sure the paper guide is in the upright position, as shown below.
3.Slide the left edge guide until it locks in place at the guide mark. Then adjust the right edge guide to match the width of your paper.
Paper Handling |
27 |
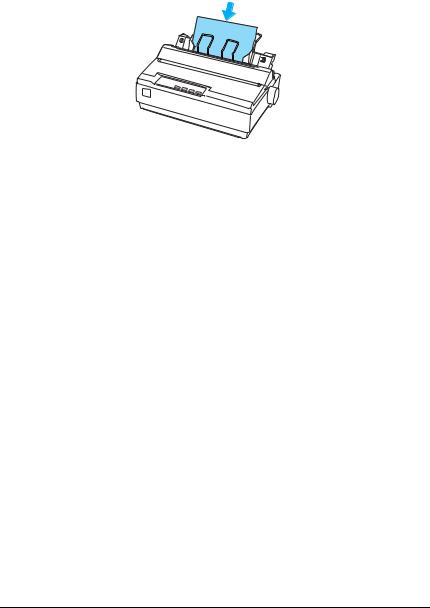
4.Insert a sheet of paper between the edge guides until it meets resistance. The printer automatically pulls it into the correct printing position.
When the printer receives data, it begins printing. If the document is more than one page, the printer beeps three times after printing each page. Load the next sheet and the printer will continue printing.
cCaution:
Use the paper feed knob on the right side of the printer only to clear paper jams and only when the printer is off. Otherwise, you may damage the printer or cause it to lose the top-of-form position.
28 Paper Handling
Printing on Special Paper
With the LX-300+II, you can print on a wide variety of special paper types, including multipart forms, labels, and envelopes.
cCaution:
When printing on multipart forms, thicker-than-normal paper, labels, or envelopes, make sure your application software settings keep the printing entirely within the printable area. Printing past the edge of these papers can damage the print head.
Adjusting the paper thickness lever
Before printing on special paper, you need to make sure the paper thickness lever is set correctly for the type of paper you’re using. Follow these steps:
1.Lift up or remove the printer cover. The paper thickness lever is on the left side of the printer.
Paper Handling |
29 |

2.The numbers next to the lever indicate the thickness setting. Use the table below to select the appropriate paper thickness.
Paper type |
|
Lever position |
|
|
|
Standard paper (single sheets or continuous) |
0 |
|
|
|
|
Multipart forms |
2-sheet |
0 |
|
3-sheet |
1 |
|
4-sheet |
2 |
|
5-sheet |
3 |
|
|
|
Labels |
|
1 |
|
|
|
Envelopes |
|
2 or 4 |
|
|
|
3. Close the printer cover.
Multipart forms
You can use continuous or single-sheet carbonless multipart forms of up to five parts (one original plus four copies). Follow these guidelines:
Set the paper thickness lever to the correct position for your forms. (See page 29.)
Use continuous multipart forms that are joined only by spot gluing or side-crimping. Never load continuous multipart forms joined by metal staples, tape, or continuous gluing.
Use single-sheet multipart forms that are line-glued only at the top. Insert the forms glued-edge-first into the printer.
Make sure that multipart forms are not wrinkled.
30 Paper Handling
Loading...