


 Loading...
EPSON LQ-2180
paper guide |
edge guides |
paper guide |
|
||
cover |
|
paper |
|
|
separator |
printer cover |
|
|
front paper guide
(closed) |
|
paper release |
|
lever |
|
|
control panel |
|
|
|
|
|
|
knob |
|
paper thickness |
ribbon cartridge |
|
lever |
|
|
|
|
shield plate |
|
|
parallel interface
|
paper tension |
tractor |
unit |
front paper guide |
front edge guides |
(open) |
|
User Replaceable Parts
User Replaceable Part |
Parts Price List Name |
Part Number |
|
|
|
Bottom cover |
Bottom cover |
1039404 |
|
|
|
Connector cover |
Upper connector cover |
1037223 |
|
|
|
Connector cover screws (2) |
C.B. S-tite screw |
1002674 |
|
|
|
Front edge guides |
Front edge guides |
1039456 |
|
|
|
Front paper guide |
Front cover |
1039403 |
|
|
|
Knob |
Knob |
1039462 |
|
|
|
Logo plate |
Logo plate |
1039774 |
|
|
|
User Replaceable Part |
Parts Price List Name |
Part Number |
|
|
|
Paper guide cover |
Rear printer cover |
1028340 |
|
|
|
Paper separator |
Paper separator |
n/a |
|
|
|
Paper tension unit |
Paper eject assembly |
1039457 |
|
|
|
Paper thickness lever cap |
Lever cap |
1039412 |
|
|
|
Printer cover |
Printer cover assembly |
1025024 |
|
|
|
Rear edge guides |
Rear edge guides |
1039459 |
|
|
|
Rear push tractor |
Rear tractor assembly |
1039012 |
|
|
|
Ribbon cartridge |
Ribbon cartridge |
S015086 |
|
|
|
Tractor (pull or front push) |
Front tractor assembly |
1039013 |
|
|
|
Options
Paper Handling Options
High-capacity cut-sheet feeder (C80673 )
Feeds up to 150 sheets of paper, 25 plain bond envelopes, or 30 postcards into the printer without reloading. You can also load a stack of single-sheet multi-part forms up to 0.59 inch (15 mm) thick in this feeder.
Second-bin cut-sheet feeder (C80674 )
Connects to the high-capacity cut-sheet feeder to create a double-bin cut-sheet feeder. You can load up to 50 sheets of ordinary single-sheet paper in the second-bin cut-sheet feeder.
Pull tractor (C80032 )
Improves continuous paper handling and reduces the chance of paper jams. Using a pull tractor in combination with a push tractor is especially useful for printing on continuous preprinted forms, multi-part forms, and labels, and also for printing high-quality graphics.
Roll paper holder (#8310)
Allows you to use your printer with 8.5-inch roll paper like that used with telex machines.
Note:
The asterisk ( ) is a substitute for the last digit of the product number, which varies by country.
2/99 |
EPSON LQ-2180 - 1 |

EPSON LQ-2180
Optional Interface Cards
You can install an optional interface card to supplement your printer’s built-in parallel interface and provide added network compatibility. The EPSON interface cards in the table below are compatible with your printer. (Not all interfaces are available in all countries.)
Model number |
Name |
|
|
C82305 / C82306 |
Serial interface card |
|
|
C82307 / C82308 |
32KB serial interface card |
|
|
C82310 / C82311 |
32KB parallel interface card |
|
|
C82312 |
LocalTalk interface card |
|
|
C82313 |
32KB IEEE-488 interface card |
|
|
C82314 |
Coax interface card |
|
|
C82315 |
Twinax interface card |
|
|
C82345 |
IEEE-1284 parallel interface card |
|
|
C82357 / C82362 / |
Ethernet interface card |
C82363 / C82364 |
|
|
|
The asterisk ( ) is a substitute for the last digit, which varies by country.
Printer Specifications
Mechanical
Printing method |
24-pin impact dot matrix |
Printing speed |
High-speed draft |
|
480 cps at 10 cpi maximum |
|
Draft |
|
360 cps at 10 cpi |
|
Letter-quality |
|
120 cps at 10 cpi |
Printing direction |
Bidirectional logic seeking for text and |
|
graphics printing. Unidirectional text |
|
or graphics printing can be selected |
|
using software commands. |
Line spacing |
1/6-inch or programmable in |
|
1/360-inch increments |
Printable columns |
136 columns (at 10 cpi) |
Resolution |
Maximum |
|
360 × 180 dpi (letter quality) |
|
360 × 360 dpi (raster graphics) |
Interfaces |
One standard bidirectional, 8-bit, |
|
parallel interface with IEEE 1284 |
|
nibble mode support and one optional |
|
interface slot |
Paper feed methods |
Friction (front or top paper entry) |
|
Push tractor (front or rear paper entry) |
|
Pull tractor (front, bottom, or rear |
|
paper entry) |
|
Push and pull tractor (additional |
|
tractor is required for front push and |
|
pull tractor combination) |
|
Cut-sheet feeder (optional) |
|
Roll paper holder (optional) |
Paper feed speed |
Continuous |
|
5 inches/second |
|
Intermittent |
|
45 ms/line at 1/6-inch line spacing |
Paper capacity |
High-capacity cut-sheet feeder |
|
up to 150 sheets of 22 lb |
|
(82 g/m2) paper |
|
up to 25 plain or bond envelopes |
|
up to 30 airmail envelopes |
|
up to 30 postcards |
|
a stack of multi-part forms up to |
|
0.59 inch (15 mm) thick |
|
Note: |
|
The total thickness of the paper stack |
|
can be up to 0.59 inch (15 mm). |
|
Second-bin cut-sheet feeder |
|
up to 30 airmail envelopes |
|
up to 30 postcards |
|
Note: |
|
The total thickness of the paper stack |
|
can be up to 0.20 inch (5 mm). |
Buffer |
64KB or 0KB (selectable in the |
|
default-setting mode or the EPSON |
|
Remote! utility) |
2 - EPSON LQ-2180 |
2/99 |

EPSON LQ-2180
Built-in fonts |
Bitmap fonts |
|
EPSON Draft 10, 12, 15 cpi |
|
EPSON Roman 10, 12, 15 cpi, proportional |
|
EPSON Sans Serif 10, 12, 15 cpi, proportional |
|
EPSON Courier 10, 12, 15 cpi |
|
EPSON Prestige 10, 12 cpi |
|
EPSON Script 10 cpi |
|
EPSON OCR-B 10 cpi |
|
EPSON Orator 10 cpi |
|
EPSON Orator-S 10 cpi |
|
EPSON Script C proportional |
|
Scalable fonts (selectable in 2-point increments) |
|
EPSON Roman 10.5, 8–32 pt |
|
EPSON Sans Serif 10.5, 8–32 pt |
|
EPSON Roman T 10.5, 8–32 pt |
|
EPSON Sans Serif H 10.5, 8–32 pt |
|
Barcode fonts |
|
EAN-13, EAN-8, Interleaved 2 of 5, UPC-A, |
|
UPC-E, Code 39, Code 128, POSTNET |
Character tables |
1 Italic table and 12 graphical |
|
character tables (34 graphical |
|
character tables are available in |
|
some countries) |
Character sets |
14 international character sets and |
|
1 legal character set |
Reliability |
Total print volume |
|
24 million lines (except print head) |
|
MTBF 10,000 POH (25% duty) |
|
Print head life |
|
400 million strokes/wire |
Dimensions and |
Height |
weight |
10.1 inches (257 mm) |
|
Width |
|
25.2 inches (639 mm) |
|
Depth |
|
15.8 inches (402 mm) |
|
Weight |
|
28.8 lb (13 kg) |
Ribbon |
Black ribbon cartridge (S015086) |
|
Ribbon life |
|
8 million characters |
|
(LQ, 10 cpi, 48 dots/character) |
Electrical
|
120 V Model |
220 to 240 V Model |
|
|
|
|
|
Input voltage range |
99 to 132 V |
198 to 264 V |
|
|
|
|
|
Rated frequency range |
50 to 60 Hz |
||
|
|
|
|
Input frequency range |
49.5 to 60.5 |
Hz |
|
|
|
|
|
Rated current |
1.0 A (maximum 4 A |
0.5 |
A (maximum 2 A |
|
depending on the |
depending on the |
|
|
character type) |
character type) |
|
|
|
|
|
Power consumption |
Approx. 52 W (ISO/IEC 10561 letter pattern) |
||
|
|
|
|
This product is also designed for IT power systems with Phase to Phase voltage 220 to 240 V.
Note:
Check the label on the back of the printer for the printer’s voltage.
Environmental
|
|
Humidity |
|
Temperature |
(without condensation) |
|
|
|
Operation |
41 to 95 °F (5 to 35 °C) |
10 to 80% RH |
|
|
|
Storage |
–22 to 140 °F (–30 to 60 °C) |
0 to 85% RH |
|
|
|
Paper
Note:
Use recycled paper and envelopes only under normal temperature and humidity conditions, as follows:
Temperature |
59 to 77 °F (15 to 25 °C) |
Humidity |
30 to 60% RH |
Donotload paper thathasbeen folded oris damaged,wrinkled,orcurled.
Ordinary single sheets:
front, top, and cut-sheet feeder entry
Width |
Front and Top |
|
3.9 to 16.5 inches (100 to 420 mm) |
|
High capacity cut-sheet feeder |
|
3.9 to 16.5 inches (100 to 420 mm) |
|
Second bin cut-sheet feeder |
|
7.2 to 16.5 inches (182 to 420 mm) |
Length |
Front |
|
5.8 to 16.5 inches (148 to 420 mm) |
|
Top |
|
3.9 to 16.5 inches (100 to 420 mm) |
|
High capacity cut-sheet feeder |
|
3.9 to 16.5 inches (100 to 420 mm) |
|
Second bin cut-sheet feeder |
|
8.3 to 16.5 inches (210 to 420 mm) |
2/99 |
EPSON LQ-2180 - 3 |

EPSON LQ-2180
Thickness |
0.0025 to 0.0055 inch (0.065 to 0.14 mm) |
Weight |
14 to 24 lb (52 to 90 g/m2) |
Single-sheet multi-part forms:
front, top, and cut-sheet feeder entry
Width |
Front and Top |
|
3.9 to 16.5 inches (100 to 420 mm) |
|
High-capacity cut-sheet feeder |
|
3.9 to 11.7 inches (100 to 297 mm) |
Length |
Front |
|
5.8 to 16.5 inches (148 to 420 mm) |
|
Top |
|
3.9 to 16.5 inches (100 to 420 mm) |
|
High-capacity cut-sheet feeder |
|
3.9 to 11.7 inches (100 to 297 mm) |
Copies |
1 original + up to 5 copies |
Thickness |
0.0047 to 0.018 inch (0.12 to 0.46 mm) |
Weight |
12 to 15 lb (40 to 58 g/m2) |
Binding |
Line glue at the top of form |
|
(both front and top entry) |
|
Single side line glue (front entry only) |
Envelopes: top entry only
Size |
No. 6: 6.5 × 3.6 inches (165 × 92 mm) |
|
No. 10: 9.5 × 4.1 inches (241 × 105 mm) |
Thickness |
0.0063 to 0.0197 inch (0.16 to 0.52 mm) |
Weight |
12 to 24 lb (45 to 90 g/m2) |
Postcards:
front and top entry
Width |
3.9 to 5.8 inches (100 to 148 mm) |
Length |
Front |
|
5.8 inches (148 mm) |
|
Top |
|
3.9 to 5.8 inches (100 to 148 mm) |
Thickness |
0.0087 inch (0.22 mm) |
Weight |
51 lb (192 g/m2) |
Continuous paper (standard and multi-part): front, rear, and bottom entry
Width |
4.0 to 16.0 inches (101 to 406 mm) |
Length |
4.0 to 22.0 inches (101 to 558 mm) |
Copies |
1 original + up to 5 copies |
Thickness |
Printable area |
|
0.0025 to 0.018 inch (0.065 to 0.46 mm) |
|
Perforated edges |
|
up to 0.035 inch (0.9 mm) |
Weight (not multi-part)
14 to 22 lb (52 to 82 g/m2)
Weight (one sheet of multi-part)
12 to 15 lb (40 to 58 g/m2)
Binding |
Point glue or paper staples on both sides |
|
(front, bottom, or rear entry) |
Note:
Because thick multi-part forms require a straight paper path, load them in the front slot.
Continuous paper with labels: front and bottom entry
Label size (minimum)
0.938 × 2.5 inches (23.8 × 63.5 mm)
0.1 inch (2.5 mm) corner radius
Backing sheet width
4.0 to 16.0 inches (101 to 406 mm)
Backing sheet length (one page)
4.0 to 22.0 inches (101 to 558 mm)
Backing sheet thickness
0.0028 to 0.0035 inch (0.07 to 0.09 mm)
Total thickness
0.0063 to 0.0075 inch (0.16 to 0.19 mm)
Label weight 17 lb (68 g/m2)
Roll paper:
rear entry with optional roll paper holder only
Width |
8.5 ± 0.12 inch (216 ± 3 mm) |
Thickness |
0.0028 to 0.0035 inch (0.07 to 0.09 mm) |
Weight |
14 to 22 lb (52 to 82 g/m2) |
4 - EPSON LQ-2180 |
2/99 |
EPSON LQ-2180
Paper Alignment
Front entry
Printing starts at the arrow mark. The unprintable area is to the left of the arrow mark.
Rear entry
Printing starts at “0” on the scale. The unprintable area is to the left of the “0.”
Printable Area
Single sheets, envelopes, and postcards
A |
B |
|
|
|
|
|
A |
printable |
|
printable |
B |
area |
|
|
|
|
area |
|
|
|
|
|
|
|
B |
|
A |
|
A |
|
|
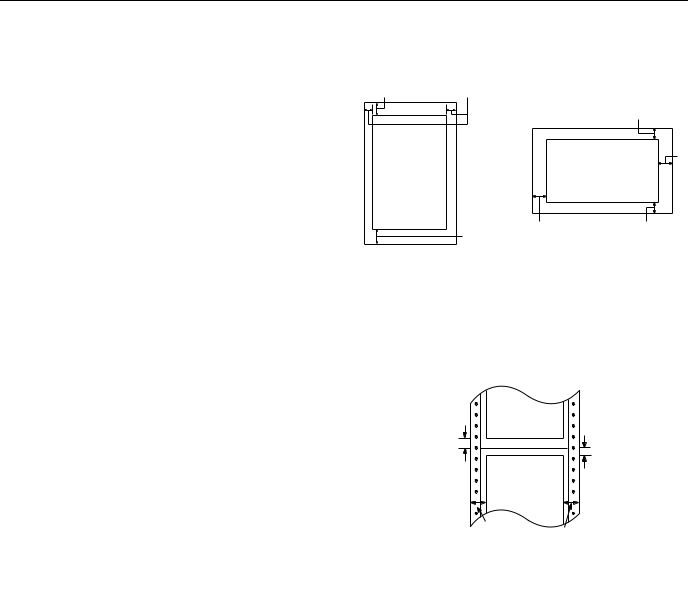
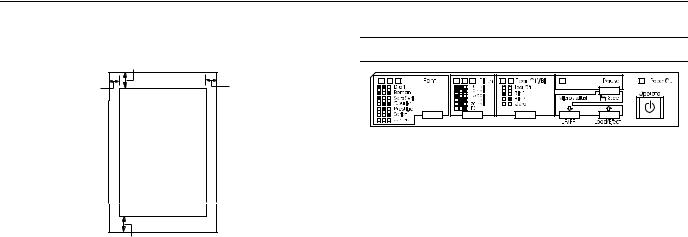
AThe minimum top and bottom margins are 0.17 inch (4.2 mm).
BThe minimum left and right margins are 0.12 inch (3 mm). The maximum width is 16.5 inches (420 mm).
The maximum printable width is 13.6 inches (345 mm).
For paper wider than 13.8 inches (351 mm), the side margins increase to match the width of the paper.
Continuous paper
printable area
A
A
printable area
B
B
AThe minimum top and bottom margins (above and below the perforation) are 0.17 inch (4.2 mm).
BThe minimum left and right margins are 0.51 inch (13 mm). The maximum width is 16.5 inches (420 mm).
The maximum printable width is 13.6 inches (345 mm).
For paper wider than 13.8 inches (351 mm), the side margins increase to match the width of the paper.
2/99 |
EPSON LQ-2180 - 5 |
EPSON LQ-2180
Roll paper
A
Control Panel Buttons and Lights
B |
B |
printable area
A
AThe minimum top and bottom margins are 0.17 inch (4.2 mm).
BThe minimum left and right margins are 0.12 inch (3 mm). The maximum printable width is 8 inches (203 mm).
Safety Approvals
120 V model: |
|
Safety standards |
UL1950 |
|
CSA C22.2 No. 950 |
EMI |
FCC part 15 subpart B class B |
|
CSA C108.8 class B |
230 V model: |
|
Safety standards |
EN 60950 (TÜV) |
EMI |
EN 55022 (CISPR pub. 22) class B |
|
AS/NZS 3548 class B |
Acoustic noise |
Approx. 54 dB (A) (ISO 7779 pattern) |
CE Marking
230 V model: |
|
Low Voltage Directive 73/23/EEC |
EN 60950 |
EMC Directive 89/336/EEC |
EN 55022 Class B |
|
EN 61000-3-2 |
EN 61000-3-3
EN 50082-1
IEC 801-2
IEC 801-3
IEC 801-4
Font button
Selects the font.
Font lights
Indicate which font is selected.
Pitch button
Selects the font size.
Pitch lights
Indicate what font size is selected.
Pause button
Stops printing temporarily, and resumes printing when pressed again.
Pause light
On when the printer is paused.
Flashes when the printer is in the micro adjust mode.
Paper Out light
On when no paper is loaded in the selected paper source or paper is not loaded correctly.
Flashes when paper has not been fully ejected or a paper jam has occurred.
Tear Off/Bin button
Advances continuous paper to the tear-off position.
Feeds continuous paper backward from the tear-off position to the top-of-form position.
Selects a cut-sheet feeder bin when the cut-sheet feeder is installed.
Enters the card mode to print on postcards and envelopes.
Tear Off/Bin lights
f f when continuous paper is in the tear-off position.
o n when bin 1 of the optional cut-sheet feeder is selected.
n o when bin 2 of the optional cut-sheet feeder is selected.
n n when the printer is in the card mode. n = on, o = off, f = flashing
6 - EPSON LQ-2180 |
2/99 |

EPSON LQ-2180
LF/FF button
Feeds paper line by line.
Ejects a single sheet or advances continuous paper to the next top-of-form position when held down.
Load/Eject button
Loads a single sheet of paper.
Ejects a single sheet of paper if a sheet is loaded.
Loads continuous paper from the standby position.
Feeds continuous paper backward to the standby position.
Micro Adjust
When the Pause button is held down for three seconds, the printer enters the micro adjust mode. Using the micro adjust feature, you can adjust the top-of-form or tear-off position with the D and U buttons.
Operate button
Turns the printer on and off. The printer is off when the top of this button is even with the button protectors.
Error Indicators
You can identify many common printer problems using the lights on the control panel. If your printer stops working and one or more control panel lights are on or flashing or the printer beeps, use the following table to diagnose and fix the problem. If you can’t fix your printer problem using this table, go to the next section.
State of |
Beep |
Problem |
|
||
panel lights |
pattern |
Solution |
|
|
|
n Pause |
– |
The printer is paused. |
|
|
|
|
|
Press the Pause button to resume |
|
|
printing. |
|
|
|
|
••• |
The printer cover is open. |
|
|
|
|
|
Close the printer cover and press the |
|
|
Pause button to resume printing. |
|
|
|
|
••••• |
Paper from another paper source |
|
|
is currently in the paper path. |
|
|
|
|
|
Move the paper release lever back to |
|
|
the appropriate position and press |
|
|
the Load/Eject button to feed the |
|
|
paper out of the paper path. Then set |
|
|
the lever to the position you want to |
|
|
use. Press the Pause button to turn |
|
|
off the Pause light, if necessary. |
|
|
|
State of |
Beep |
Problem |
|
||
panel lights |
pattern |
Solution |
|
|
|
n Paper Out |
••• |
No paper is loaded in the selected |
n Pause |
|
paper source. |
|
|
Load paper in the printer. Then press |
|
|
the Pause button to turn off the |
|
|
Pause light, if necessary. |
|
|
|
|
••• |
The paper is not loaded correctly. |
|
|
|
|
|
Remove your paper and reload it |
|
|
correctly. Then press the Pause |
|
|
button to turn off the Pause light, if |
|
|
necessary. |
|
|
|
|
••• |
Paper is jammed in the printer. |
|
|
|
|
|
Clear the paper jam. |
|
|
|
f Paper Out |
••• |
Continuous paper is not fed to the |
n Pause |
|
standby position. |
|
|
Tear off the printed document at the |
|
|
perforation; then press the Load/ |
|
|
Eject button. The printer feeds the |
|
|
paper to the standby position. Press |
|
|
the Pause button to turn off the |
|
|
Pause light. |
|
|
|
|
••• |
A single sheet of paper is not fully |
|
|
ejected. |
|
|
|
|
|
Press the Load/Eject button to eject |
|
|
the sheet. Then press the Pause |
|
|
button to turn off the Pause light, if |
|
|
necessary. |
|
|
|
|
••• |
Paper is jammed in the printer. |
|
|
|
|
|
Clear the paper jam. |
|
|
|
f Pause |
– |
The print head is overheated. |
|
|
|
|
|
Wait a few minutes; the printer |
|
|
resumes printing automatically once |
|
|
the print head cools. |
|
|
|
f Paper Out |
– |
An unknown printer error has |
f Pause |
|
occurred. |
f f Tear Off/Bin |
|
|
|
Turn off the printer and leave it off |
|
f f Font |
|
|
|
for several minutes; then turn on the |
|
|
|
|
|
|
printer again. If the error recurs, |
|
|
contact your dealer. |
|
|
|
n = on, f = flashing
••• = short series of beeps (three beeps)
••••• = long series of beeps (five beeps)
Note:
The printer beeps once if you press a control panel button when the corresponding function is not available.
2/99 |
EPSON LQ-2180 - 7 |
EPSON LQ-2180
Status Monitor
The EPSON Status Monitor 2 utility comes with your printer but is available only for use with Microsoft® Windows 95 and 98. It allows you to monitor your printer’s status, alerts you when printer errors occur, and provides troubleshooting instructions when needed.
Available Paper Paths
Your printer provides a variety of paper paths for printing on continuous and single-sheet paper. As described in this section, paper can be fed into the printer from the top, front, bottom, or rear. You select the paper path that best suits your current printing needs.
Printing on Continuous Paper
Paper Positions
Top-of-Form Position
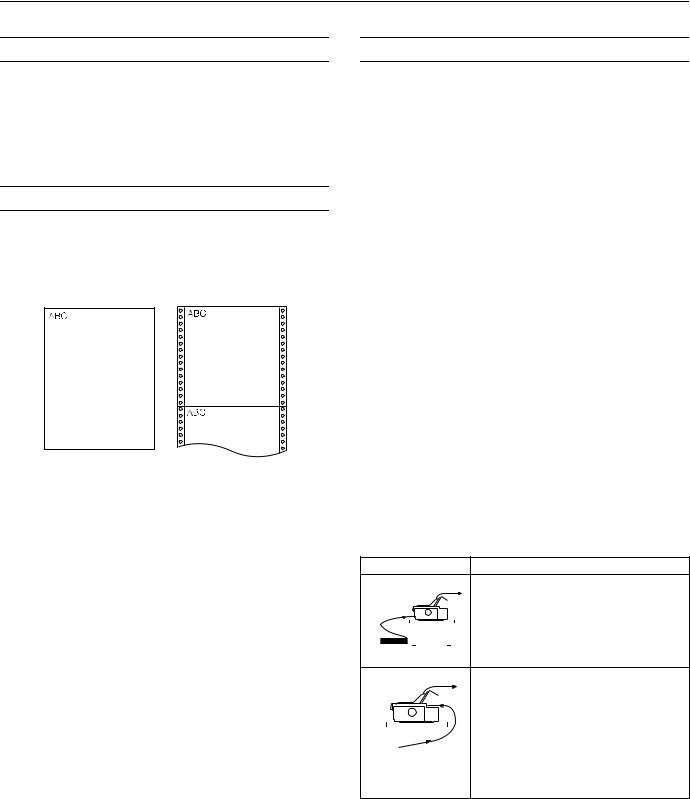
The top-of-form position is the position where the printer starts printing on a page of single-sheet or continuous paper.
The letters ABC above are printed at the top-of-form position.
Tear-off Position
Your continuous paper is in the tear-off position when the perforation is aligned with the printer’s tear-off edge. You can easily tear off your printed document when your paper is in this position.
Standby Position
Your continuous paper is in the standby position when it is attached to the tractor but not loaded in the printer.
You can choose from three tractor positions (front push, rear push, and pull) and three paper entry slots (front, rear, and bottom) for continuous paper printing. This section helps you determine which paper paths and tractor positions are best for your continuous paper printing needs.
Using a push tractor
If you often need to tear off sheets of continuous paper (for example, if you are printing purchase orders or sales slips), it is best to use a push tractor. This allows you to use the printer’s tear-off edge to easily tear off printed sheets of continuous paper at the perforation. Also, when continuous paper is loaded on a push tractor, you can load single sheets of paper from the paper guide without removing the continuous paper.
There are two push tractor positions: front and rear. The tractors are installed in the front push and rear push positions when the printer is shipped. See the table below for details about the push positions and the corresponding paper-feeding paths.
Note:
The tractor in the rear push position cannot be removed.
Tractor position |
|
|
|
Description |
|||||||||||
|
|
|
|
|
|
|
|
|
|
|
|
|
|
|
To use this tractor, load paper in the front slot. |
|
|
|
|
|
|
|
|
|
|
|
|
|
|
|
If you print on thick paper such as multi-part |
|
|
|
|
|
|
|
|
|
|
|
|
|
|
|
forms or continuous paper with labels, load the |
|
|
|
|
|
|
|
|
|
|
|
|
|
|
|
paper in the front paper slot because the paper |
|
|
|
|
|
|
|
|
|
|
|
|
|
|
|
|
|
|
|
|
|
|
|
|
|
|
|
|
|
|
|
path from this slot is almost straight. This |
|
|
|
|
|
|
|
|
|
|
|
|
|
|
|
reduces the chance of paper jams. |
front push |
|
|
|
||||||||||||
|
|
|
|
||||||||||||
|
|
|
|
|
|
|
|
|
|
|
|
|
|
|
To use this tractor, load paper in the rear slot. |
|
|
|
|
|
|
|
|
|
|
|
|
|
|
|
Note: |
|
|
|
|
|
|
|
|
|
|
|
|
|
|
|
Because thick multi-part forms require a |
|
|
|
|
|
|
|
|
|
|
|
|
|
|
|
straight paper path, load them in the front slot. |
|
|
|
|
|
|
|
|
|
|
|
|
|
|
|
|
|
|
|
|
|
|
|
|
|
|
|
|
|
|
|
|
|
|
|
|
|
|
|
|
|
|
|
|
|
|
|
Caution: |
|
|
|
|
|
|
|
|
|
|
|
|
|
|
|
|
|
|
|
|
|
|
|
|
|
|
|
|
|
|
|
Do not load continuous paper with labels in the |
rear push |
|
|
|
rear slot. The labels may come off their backing |
|||||||||||
|
|
|
|
|
|
|
|
|
|
|
|
|
|
|
sheet inside the printer and cause a paper jam. |
8 - EPSON LQ-2180 |
2/99 |
EPSON LQ-2180
Using a pull tractor
If you often print on thick or heavy continuous paper, such as multi-part forms or continuous paper with labels, use a tractor in the pull position. The pull tractor provides the best paper jam prevention, and allows you to load continuous paper from the front, rear, or bottom of the printer. However, you cannot use the tear-off feature with the pull tractor.
Note:
If you plan to use a pull tractor, you can remove the tractor from the front push position and install it in the pull position, or you can purchase the optional pull tractor (C80032 ) and install it in the pull position.
As shown in the table below, three paper entry slots are available for use with the pull tractor: front, bottom, and rear.
|
Paper slot |
Description |
||||||||||||||||
|
|
|
|
|
|
|
|
|
|
|
|
|
|
|
|
|
|
|
|
|
|
|
|
|
|
|
|
|
|
|
|
|
|
|
|
|
If you print on thick paper such as multi-part |
|
|
|
|
|
|
|
|
|
|
|
|
|
|
|
|
|
|
forms or continuous paper with labels, load it |
|
|
|
|
|
|
|
|
|
|
|
|
|
|
|
|
|
|
using the front paper slot because the paper |
|
|
|
|
|
|
|
|
|
|
|
|
|
|
|
|
|
|
path from this slot is almost straight. This |
|
|
|
|
|
|
|
|
|
|
|
|
|
|
|
|
|
|
|
|
|
|
|
|
|
|
|
|
|
|
|
|
|
|
|
|
|
reduces the chance of paper jams. |
|
|
|
|
|
|
|
|
|
|
|
|
|
|
|
|
|
|
|
|
front |
|
||||||||||||||||
|
|
|
|
|
|
|
|
|
|
|
|
|
|
|
|
|
|
|
|
Paper slot |
Description |
||||||||||||||||
|
|
|
|
|
|
|
|
|
|
|
|
|
|
|
|
|
|
|
|
|
|
|
|
|
|
|
|
|
|
|
|
|
|
|
|
|
Because the bottom paper slot has the |
|
|
|
|
|
|
|
|
|
|
|
|
|
|
|
|
|
|
straightest paper path, it is ideal for printing on |
|
|
|
|
|
|
|
|
|
|
|
|
|
|
|
|
|
|
thick paper, such as multi-part forms or |
|
|
|
|
|
|
|
|
|
|
|
|
|
|
|
|
|
|
continuous paper with labels. |
|
|
|
|
|
|
|
|
|
|
|
|
|
|
|
|
|
|
Note: |
|
|
|
|
|
|
|
|
|
|
|
|
|
|
|
|
|
|
|
|
|
|
|
|
|
|
|
|
|
|
|
|
|
|
|
|
|
When loading paper in the bottom slot, be sure |
|
|
|
|
|
|
|
|
|
|
|
|
|
|
|
|
|
|
|
|
bottom |
to use a printer stand with an opening large |
||||||||||||||||
|
|
|
|
|
|
|
|
|
|
|
|
|
|
|
|
|
|
enough so that the paper can feed through it |
|
|
|
|
|
|
|
|
|
|
|
|
|
|
|
|
|
|
without obstruction. |
|
|
|
|
|
|
|
|
|
|
|
|
|
|
|
|
|
|
|
|
|
|
|
|
|
|
|
|
|
|
|
|
|
|
|
|
|
You can also load continuous paper onto the |
|
|
|
|
|
|
|
|
|
|
|
|
|
|
|
|
|
|
pull tractor using the rear slot. |
|
|
|
|
|
|
|
|
|
|
|
|
|
|
|
|
|
|
Note: |
|
|
|
|
|
|
|
|
|
|
|
|
|
|
|
|
|
|
Because thick multi-part forms require a |
|
|
|
|
|
|
|
|
|
|
|
|
|
|
|
|
|
|
|
|
|
|
|
|
|
|
|
|
|
|
|
|
|
|
|
|
|
|
|
|
|
|
|
|
|
|
|
|
|
|
|
|
|
|
|
|
straight paper path, load them in the front slot. |
|
|
|
|
|
|
|
|
|
|
|
|
|
|
|
|
|
|
Caution: |
|
|
|
|
|
|
|
|
|
|
|
|
|
|
|
|
|
|
|
|
|
|
|
|
|
|
|
|
|
|
|
|
|
|
|
|
|
|
|
rear |
Do not load continuous paper with labels in the |
||||||||||||||||
|
|
|
|
|
|
|
|
|
|
|
|
|
|
|
|
|
|
rear slot. The labels may come off their backing |
|
|
|
|
|
|
|
|
|
|
|
|
|
|
|
|
|
|
sheet inside the printer and cause a paper jam. |
|
|
|
|
|
|
|
|
|
|
|
|
|
|
|
|
|
|
|
Using the push and pull tractors in combination
To improve continuous paper feeding and reduce paper jams, you can use two tractors at the same time. This is especially helpful for printing on continuous preprinted forms, multipart forms, or labels, and for printing high-quality graphics. When using two tractors in combination, you can load paper in the front paper slot onto the front push and the pull tractors, or load paper in the rear paper slot onto the rear push and the pull tractors.
Combination Description
To use the front push tractor with the pull tractor, you need to purchase the optional pull tractor (C80032 ) and install it in the pull position.
front push and pull
To use the rear push tractor with the pull tractor, you need to remove the standard tractor that comes in the front push position and install it in the pull position.
|
Note: |
|
Because thick multi-part forms require a |
rear push and pull |
straight paper path, load them in the front slot. |
Caution:
Do not load continuous paper with labels onto the rear push tractor even when it is used in combination with the pull tractor. If you load continuous paper with labels onto the rear push/pull tractor, the labels may come off their backing sheet inside the printer and cause a paper jam.
Printing on Single Sheets
Your printer has two paper entry slots for printing on single sheets: top and front. When continuous paper is loaded on the front or rear push tractor, you can load single sheets in the top or front slot without removing the continuous paper.
This section helps you determine which paper slot best suits your single-sheet printing needs.
2/99 |
EPSON LQ-2180 - 9 |
Loading...