


 Loading...
KM-1650
KM-2050
KM-2550
Advanced Operation Guide

Legal Information
CAUTION: No liability is assumed for any damage caused by improper installation
Notice
The information in this guide is subject to change without notification. Additional pages may be inserted in future editions. The user is asked to excuse any technical inaccuracies or typographical errors in the present edition.
No responsibility is assumed if accidents occur while the user is following the instructions in this manual. No responsibility is assumed for defects in the printer’s firmware (contents of its read-only memory).
Copyright
This guide, any copyrightable subject matter sold or provided with or in connection with the sale of the machine, are protected by copyright. All rights are reserved. Any copies made of all or part of this manual, or any copyrightable subject must contain the same copyright notice as the material from which the copying is done.
Regarding Trade names
PRESCRIBE is a registered trademark of Kyocera Corporation. KPDL and
KIR (Kyocera Image Refinement) are trademarks of Kyocera Corporation.
Diablo 630 is a product of Xerox Corporation. IBM Proprinter X24E is a product of International Business Machines Corporation. Epson LQ-850 is a product of Seiko Epson Corporation. Hewlett-Packard, PCL, and PJL are registered trademarks of Hewlett-Packard Company. Centronics is a trade name of Centronics Data Computer Corp. PostScript is a registered trademark of Adobe Systems Incorporated. Macintosh is a registered trademark of Apple computer, Inc. Microsoft, Windows, and Windows NT are registered trademarks of Microsoft Corporation. PowerPC is a trademark of International Business Machines Corporation. ENERGY STAR is a U.S. registered mark. All other brand and product names are registered trademarks or trademarks of their respective companies.
ADVANCED OPERATION GUIDE |
i |

ii |
ADVANCED OPERATION GUIDE |

Introduction
This Advanced Operation Guide has the following chapters:
•1 Copy Functions
Explains the copier functions available on the machine.
•2 Printer Settings
Explains the settings available for the printer functions.
•3 System Settings
Explains the general settings available on the machine.
•4 Job Accounting
Explains the Job Accounting function and settings.
•Appendix
Contains machine specifications.
ADVANCED OPERATION GUIDE |
iii |

Guides Included
The following guides are included with this machine. Refer to the guide that corresponds to your particular objective.
Basic Operation Guide
The Basic Operation Guide contains procedural steps for initial installation and set-up of the machine and connection to a computer. It also includes basic procedures for using the machine as a copier and printer and has a Troubleshooting section.
Advanced Operation Guide (this guide)
This Advanced Operation Guide contains explanations on copier and printer functions as well as default settings adjusted on the machine.
KX Printer Driver Operation Guide
Describes how to install and set-up the printer driver.
PRESCRIBE Technical Reference
PRESCRIBE is the native language of these printers. This Technical Reference contains information about how printing is performed using the PRESCRIBE commands, as well as a font and emulation description.
PRESCRIBE Command Reference
Gives a detailed explanation of the PRESCRIBE command syntax and parameters with the aid of print examples. This guide is stored on the CD-ROM as a PDF document.
iv

Conventions
This manual uses the following conventions.
Convention |
Description |
|
Example |
|
|
|
|
|
|
Italic Typeface |
Used to emphasise a key word, |
|
Open the Multi-Bypass Tray. |
|
|
phrase or message. In addition, |
|
|
|
|
references to other publications |
|
|
|
|
are displayed in italic typeface. |
|
|
|
|
|
|
|
|
Bracket Bold Text |
Used to emphasise the |
|
Press [Enter]. |
|
Typeface |
selection of a feature mode or |
|
|
|
|
key. |
|
|
|
|
|
|
|
|
Notes |
Used to provide additional or |
|
|
|
NOTE: To ensure best copying quality, |
|
|||
|
useful information about a |
|
|
|
|
function or feature. |
|
it is recommended this cleaning task is |
|
|
|
performed at least once a month. |
|
|
|
|
|
|
|
|
|
|
|
|
|
|
|
|
|
Important |
Use to provide important |
|
IMPORTANT: Never use water, thinner |
|
|
information. |
|
or other organic solvents to clean the slit |
|
|
|
|
glass. |
|
|
|
|
|
|
Caution |
Cautions are statements that |
|
CAUTION: For safety purposes, |
|
|
suggest mechanical damage as |
|
always remove the power plug from the |
|
|
a result of an action. |
|
outlet when cleaning the machine. |
|
|
|
|
|
|
Warning |
Used to alert users to the |
|
WARNING: High voltage is present |
|
|
possibility of personal injury. |
|
in the charger section. |
|
|
|
|
|
|
Measurements
This guide contains information that corresponds to using both the inch and metric versions of the machine. The screens and messages shown in the guide reflect the inch version of the machine. When using the metric version, refer to the messages on your machine.
ADVANCED OPERATION GUIDE |
v |

vi |
ADVANCED OPERATION GUIDE |

Contents
Legal Information . . . . . . . . . . . . . . . . . . . . . . . . . . . . . . . . . . . . . . . . . . . . . Legal and Safety-i
Introduction
Guides Included . . . . . . . . . . . . . . . . . . . . . . . . . . . . . . . . . . . . . . . . . . . . . . . . . . . . . . . . . . . iv
Conventions . . . . . . . . . . . . . . . . . . . . . . . . . . . . . . . . . . . . . . . . . . . . . . . . . . . . . . . . . . . . . . . v
1 Copy Functions
Original Size . . . . . . . . . . . . . . . . . . . . . . . . . . . . . . . . . . . . . . . . . . . . . . . . . . . . . . . . . . . . . 1-2
Original Placement . . . . . . . . . . . . . . . . . . . . . . . . . . . . . . . . . . . . . . . . . . . . . . . . . . . . . . . . 1-4
Offset Mode. . . . . . . . . . . . . . . . . . . . . . . . . . . . . . . . . . . . . . . . . . . . . . . . . . . . . . . . . . . . . . 1-5
Stapling . . . . . . . . . . . . . . . . . . . . . . . . . . . . . . . . . . . . . . . . . . . . . . . . . . . . . . . . . . . . . . . . . 1-6
Combine Mode . . . . . . . . . . . . . . . . . . . . . . . . . . . . . . . . . . . . . . . . . . . . . . . . . . . . . . . . . . . 1-7
Margin Mode . . . . . . . . . . . . . . . . . . . . . . . . . . . . . . . . . . . . . . . . . . . . . . . . . . . . . . . . . . . . 1-12
Border Erase Mode . . . . . . . . . . . . . . . . . . . . . . . . . . . . . . . . . . . . . . . . . . . . . . . . . . . . . . . 1-13
Continuous Scan. . . . . . . . . . . . . . . . . . . . . . . . . . . . . . . . . . . . . . . . . . . . . . . . . . . . . . . . . 1-14
Auto Rotation . . . . . . . . . . . . . . . . . . . . . . . . . . . . . . . . . . . . . . . . . . . . . . . . . . . . . . . . . . . 1-15
EcoPrint Mode. . . . . . . . . . . . . . . . . . . . . . . . . . . . . . . . . . . . . . . . . . . . . . . . . . . . . . . . . . . 1-16
Auto Selection Mode . . . . . . . . . . . . . . . . . . . . . . . . . . . . . . . . . . . . . . . . . . . . . . . . . . . . . . 1-17
Program Function . . . . . . . . . . . . . . . . . . . . . . . . . . . . . . . . . . . . . . . . . . . . . . . . . . . . . . . . 1-18
2 Printer Settings
Status Page. . . . . . . . . . . . . . . . . . . . . . . . . . . . . . . . . . . . . . . . . . . . . . . . . . . . . . . . . . . . . . 2-2
e-MPS Function . . . . . . . . . . . . . . . . . . . . . . . . . . . . . . . . . . . . . . . . . . . . . . . . . . . . . . . . . . 2-3
Interface . . . . . . . . . . . . . . . . . . . . . . . . . . . . . . . . . . . . . . . . . . . . . . . . . . . . . . . . . . . . . . . 2-11
Emulation . . . . . . . . . . . . . . . . . . . . . . . . . . . . . . . . . . . . . . . . . . . . . . . . . . . . . . . . . . . . . . 2-18
Font. . . . . . . . . . . . . . . . . . . . . . . . . . . . . . . . . . . . . . . . . . . . . . . . . . . . . . . . . . . . . . . . . . . 2-21
Print Configuration . . . . . . . . . . . . . . . . . . . . . . . . . . . . . . . . . . . . . . . . . . . . . . . . . . . . . . . 2-26
Print Quality. . . . . . . . . . . . . . . . . . . . . . . . . . . . . . . . . . . . . . . . . . . . . . . . . . . . . . . . . . . . . 2-31
Memory Card Operation . . . . . . . . . . . . . . . . . . . . . . . . . . . . . . . . . . . . . . . . . . . . . . . . . . . 2-34
Hard Disk Operation . . . . . . . . . . . . . . . . . . . . . . . . . . . . . . . . . . . . . . . . . . . . . . . . . . . . . . 2-40
RAM Disk Operation . . . . . . . . . . . . . . . . . . . . . . . . . . . . . . . . . . . . . . . . . . . . . . . . . . . . . . 2-41
Paper Handling . . . . . . . . . . . . . . . . . . . . . . . . . . . . . . . . . . . . . . . . . . . . . . . . . . . . . . . . . . 2-44
Other Printer Settings . . . . . . . . . . . . . . . . . . . . . . . . . . . . . . . . . . . . . . . . . . . . . . . . . . . . . 2-48
3 System Settings
Copy Default Settings . . . . . . . . . . . . . . . . . . . . . . . . . . . . . . . . . . . . . . . . . . . . . . . . . . . . . . 3-2
Machine Default Settings . . . . . . . . . . . . . . . . . . . . . . . . . . . . . . . . . . . . . . . . . . . . . . . . . . 3-14
Viewing and Printing the Total Counter . . . . . . . . . . . . . . . . . . . . . . . . . . . . . . . . . . . . . . . . 3-28
Report Output . . . . . . . . . . . . . . . . . . . . . . . . . . . . . . . . . . . . . . . . . . . . . . . . . . . . . . . . . . . 3-30
Language Setting . . . . . . . . . . . . . . . . . . . . . . . . . . . . . . . . . . . . . . . . . . . . . . . . . . . . . . . . 3-32
User Adjustment . . . . . . . . . . . . . . . . . . . . . . . . . . . . . . . . . . . . . . . . . . . . . . . . . . . . . . . . . 3-33
4 Job Accounting
ADVANCED OPERATION GUIDE |
vii |

Contents
Job Accounting Mode . . . . . . . . . . . . . . . . . . . . . . . . . . . . . . . . . . . . . . . . . . . . . . . . . . . . . . 4-2
Managing Accounts. . . . . . . . . . . . . . . . . . . . . . . . . . . . . . . . . . . . . . . . . . . . . . . . . . . . . . . . 4-4
Default Settings. . . . . . . . . . . . . . . . . . . . . . . . . . . . . . . . . . . . . . . . . . . . . . . . . . . . . . . . . . 4-12
Using Job Accounting . . . . . . . . . . . . . . . . . . . . . . . . . . . . . . . . . . . . . . . . . . . . . . . . . . . . . 4-15
Appendix
Paper. . . . . . . . . . . . . . . . . . . . . . . . . . . . . . . . . . . . . . . . . . . . . . . . . . . . . . . . . . . . .Appendix-2
Specifications . . . . . . . . . . . . . . . . . . . . . . . . . . . . . . . . . . . . . . . . . . . . . . . . . . . . . Appendix-11
Glossary . . . . . . . . . . . . . . . . . . . . . . . . . . . . . . . . . . . . . . . . . . . . . . . . . . . . . . . . .Appendix-17
viii |
ADVANCED OPERATION GUIDE |
1 Copy Functions
This chapter explains how to use the copier functions of the machine.
• |
Original Size................................................................. |
1-2 |
• |
Original Placement....................................................... |
1-4 |
• |
Offset Mode.................................................................. |
1-5 |
• |
Stapling......................................................................... |
1-6 |
• |
Combine Mode............................................................. |
1-7 |
• |
Margin Mode .............................................................. |
1-12 |
• |
Border Erase Mode .................................................... |
1-13 |
• |
Continuous Scan........................................................ |
1-14 |
• |
Auto Rotation.............................................................. |
1-15 |
• |
EcoPrint Mode............................................................ |
1-16 |
• |
Auto Selection Mode .................................................. |
1-17 |
• |
Program Function....................................................... |
1-18 |
ADVANCED OPERATION GUIDE |
1-1 |

Copy Functions
Original Size
Use Original Size to select the size of original being scanned. The selection must match the physical size of the original.
The following Original Size options are available:
•Regular Size - use to select a standard original size.
•Other Regular Size - use for additional standard original sizes.
•Input Size - use this option to enter a custom original size if the size required is not displayed.
Regular Size
Use the following procedure to select a standard original size.
1 |
Position the original and press [Original Size]. |
|||||
2 |
Press S or T to select the |
|
|
|
|
|
Original Size: |
||||||
original size required and press |
||||||
|
|
* |
Auto |
|||
|
[Enter]. |
|
|
|||
|
|
|
|
Input Size |
||
|
Select Auto to allow the machine |
|
|
|
|
|
|
|
|
|
|
||
|
|
|
|
|
||
|
to automatically select the same size as the original on the platen. |
|||||
3 |
Press [Start]. Copying commences. |
|
||||
Other Regular Size
1
2
Use the following procedure to select additional standard original sizes.
Position the original and press [Original Size].
Press S or T to select Other |
|
|
|
|
Original Size: |
||||
Regular Size and press [Enter]. |
||||
|
|
Other Regular Size |
||
|
|
|
||
|
|
|
||
3 |
Press S or T to select the |
|
|
|
|
Other Regular Size: |
|||||
original size required and press |
|||||
|
|
|
|||
4 |
[Enter]. |
|
|
|
|
|
|
|
|||
|
|
|
|
||
|
|
|
|
||
Press [Start]. Copying commences. |
|||||
1-2 |
ADVANCED OPERATION GUIDE |
Copy Functions
Input Size
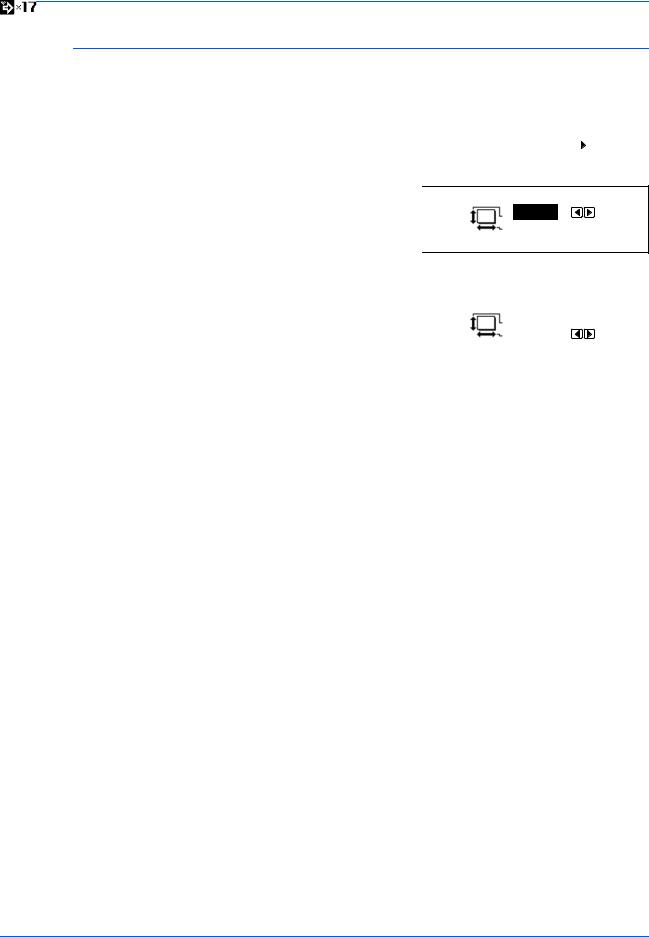
1
2
Position the original and press [Original Size].
Press S or T to select Input Size |
|
|||
Original Size: |
||||
and press [Enter]. |
|
|
* |
Auto |
|
|
|||
|
|
|
|
Input Size |
|
|
|
|
|
|
|
|
|
|
3 |
Press < or > to select the vertical |
|
Input Size: |
||
|
|||||
size required, 2" to 11 5/8" in 1/8" |
|
||||
|
|
|
|
||
|
increments (50 to 297 mm in 1 |
|
|
|
|
|
|
|
|
|
|
|
mm increments) can be selected. |
|
|
|
|
|
|
|
|
|
|
2"
2"
|
Press T to select the horizontal size. |
|
||||
4 |
Press < or > to select the |
|
|
|
|
|
Input Size: |
|
|||||
horizontal size, 2" to 17" in 1/8" |
|
|||||
|
|
2" |
|
|||
|
increments (50 to 432 mm in 1 |
|
|
|
||
|
|
|
|
2" |
|
|
|
mm increments) can be selected. |
|
|
|
|
|
|
|
|
|
|
|
|
|
Press [Enter]. |
|
|
|
|
|
|
|
|
|
|
|
|
5 |
Press [Start]. Copying commences. |
|
||||
ADVANCED OPERATION GUIDE |
1-3 |
Copy Functions
Original Placement
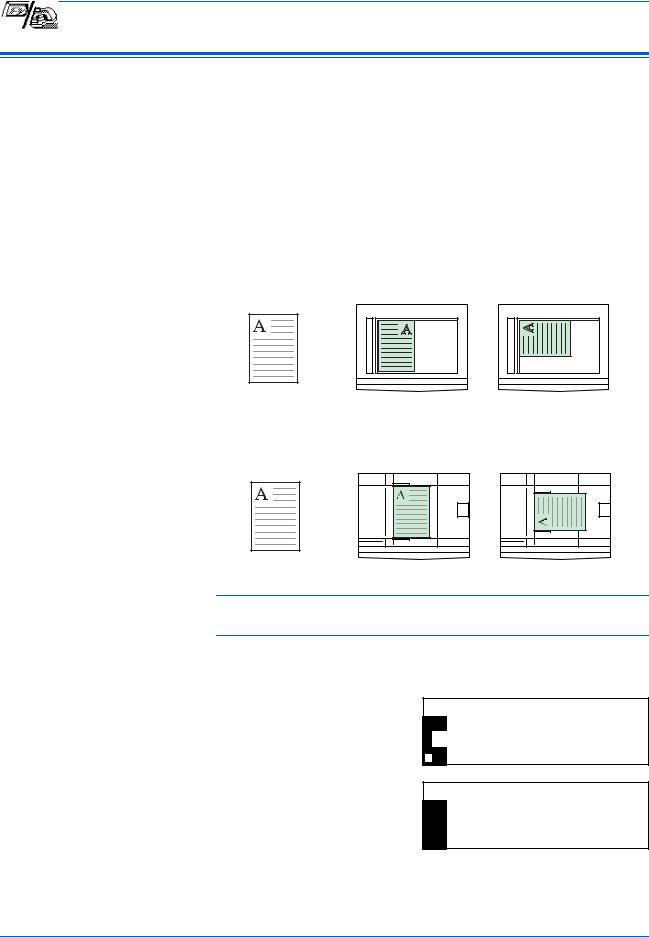
You must specify the orientation of the original when using the following functions:
-Duplex Copying
-Split Copying (from 2-sided originals)
-Margin mode
-Border Erase mode
-Combine mode
-Auto Selection mode (Optional)
-Stapling (Optional)
When the originals are positioned on the Platen:
Original |
Rear |
Left Top |
When the originals are loaded in the Document Processor:
Original |
Rear |
Left Top |
NOTE: To change the default setting for Original Orientation, refer to
Original Orientation, on page 3-20.
1 |
Press [Function]. |
2 |
Press S or T to select Orig. |
|
direction and press [Enter]. |
3 |
Press S or T to select Rear or |
|
Left top and press [Enter]. |
Function:
End
Orig. Direction : Rear
Continuous Scan : Off
Orig. Direction:
 *
* Rear
Rear
 Left top
1-4 |
ADVANCED OPERATION GUIDE |
Copy Functions
Offset Mode
|
Use this mode to change the orientation of the output at the end of each |
|||||||||
|
set for easy division. |
|||||||||
|
|
|
|
|
|
|
|
|
|
|
|
NOTE: If the Document Processor (option) or Finisher (option) is not |
|||||||||
|
installed, use this function with Sort copying. |
|||||||||
|
|
|
|
|
|
|
|
|
|
|
|
The paper sizes that can be used for Offset copying are A4, B5 and |
|||||||||
|
11 × 8 1/2" |
|
|
|
|
|
|
|
|
|
|
|
|
|
|
|
|
|
|
|
|
|
NOTE: Ensure the Auto Rotation feature is On, refer to Auto Rotation, on |
|||||||||
|
page 1-15. |
|||||||||
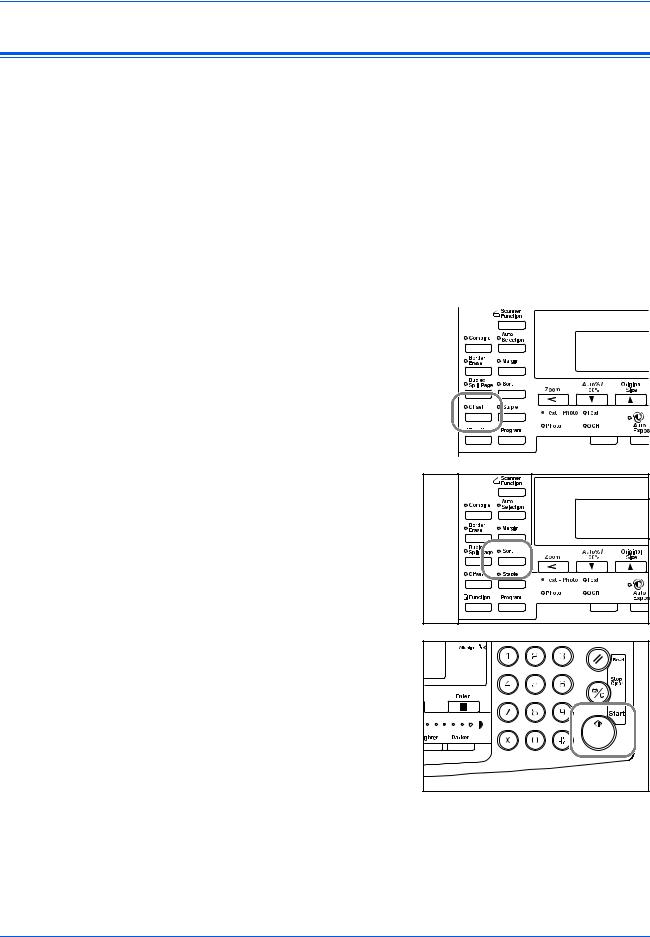
1 |
|
|
|
|
|
|
|
|
|
|
Position the original and press |
|
|
|
|
||||||
|
|
|
|
|||||||
|
[Offset]. |
|
|
|
|
|||||
|
|
|
|
|
|
|
|
|
|
|
|
|
|
|
|
|
|
|
|
|
|
|
|
|
|
|
|
|
|
|
|
|
|
|
|
|
|
|
|
|
|
|
|
|
|
|
|
|
|
|
|
|
|
|
|
|
|
|
|
|
|
|
|
|
|
2 |
Press [Sort]. |
3 |
Enter the number of copies |
|
required and press [Start]. |
|
If using the optional Document |
|
Processor, copying completes |
|
automatically. |
|
If using the platen, a message |
|
displays when the next original is |
|
required. Position the next original |
|
and press [Start]. |
|
When all originals have been scanned, press [Enter]. |
ADVANCED OPERATION GUIDE |
1-5 |
Copy Functions
Stapling
Copies can be stapled in the upper left or upper right corner.
NOTE: The optional Finisher must be installed.
The orientation of originals and the stapling position is shown below.
|
|
|
|
|
|
|
|
|
|
|
|
|
|
|
|
|
|
|
|
|
|
|
|
|
|
|
|
|
|
|
|
|
|
|
|
|
|
|
|
|
|
|
|
|
|
|
|
|
|
|
|
|
|
|
|
|
|
|
|
|
|
|
|
|
|
|
|
|
|
|
|
|
|
|
|
|
|
|
|
|
|
|
|
|
|
|
|
|
|
|
|
|
|
|
|
|
|
|
|
|
|
|
|
|
|
|
|
|
|
|
|
|
|
|
|
|
|
|
|
|
|
|
|
|
|
|
|
|
|
|
|
|
|
|
|
|
|
|
|
|
|
|
|
|
|
|
|
|
|
|
|
|
|
|
|
|
|
|
|
|
|
|
|
|
|
|
|
|
|
|
|
|
|
|
|
|
|
|
|
|
|
|
|
|
|
|
|
|
|
|
|
|
|
|
|
|
|
|
|
|
|
|
|
|
|
|
|
|
|
|
|
|
|
|
|
|
|
|
|
|
|
|
|
|
|
|
|
|
|
|
|
|
|
|
|
|
|
|
|
|
|
|
|
|
|
|
|
|
|
|
|
|
|
|
|
|
|
|
|
|
|
|
|
|
|
|
|
|
|
|
|
|
|
|
|
|
|
|
|
|
|
|
|
|
|
|
|
|
|
|
|
|
|
|
|
|
|
|
|
|
|
|
|
|
|
|
|
|
|
|
|
|
|
|
|
|
|
|
|
|
|
|
|
|
|
|
|
|
|
|
|
|
|
|
|
|
|
|
|
|
|
|
|
|
|
|
|
|
|
|
|
|
|
|
|
|
|
|
|
|
|
|
|
|
|
|
|
|
|
|
|
|
|
|
|
|
|
|
Original |
|
|
|
Copy |
|
|
|
|
|
|
|
||||||||||||||
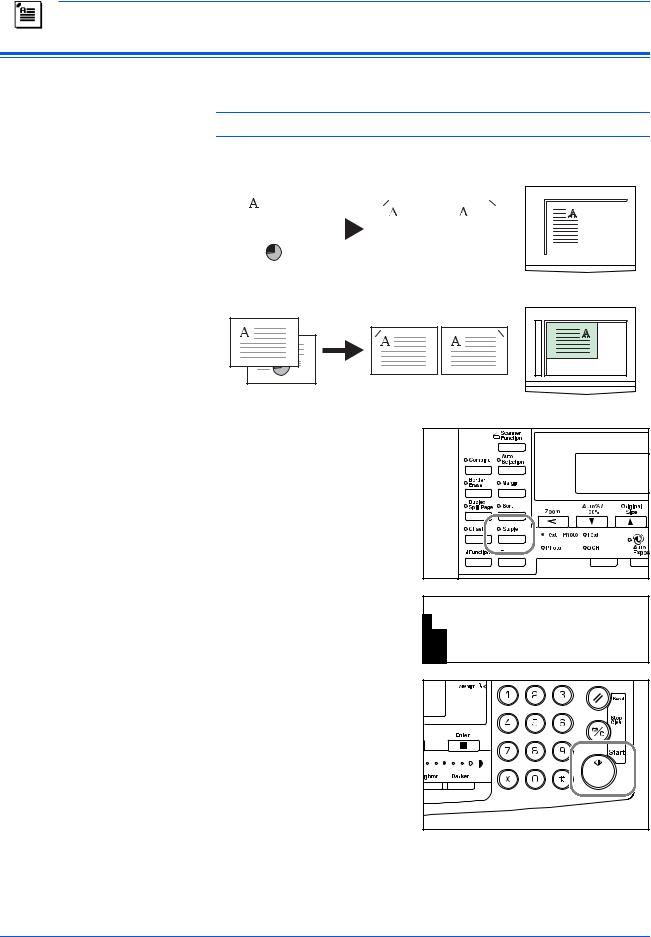
Original |
1 |
Position the original and press |
|
[Staple]. |
2 |
Press S or T to select the |
stapling position and press |
[Enter].
Copy |
Staple: |
 Left Top
 Right Top
3 |
Press [Start]. |
|
If using the optional Document |
|
Processor, copying completes |
|
automatically. |
|
If using the platen, a message |
|
displays when the next original is |
|
required. Position the next original |
|
and press [Start]. |
|
When all originals have been scanned, press [Enter]. |
1-6 |
ADVANCED OPERATION GUIDE |
Copy Functions
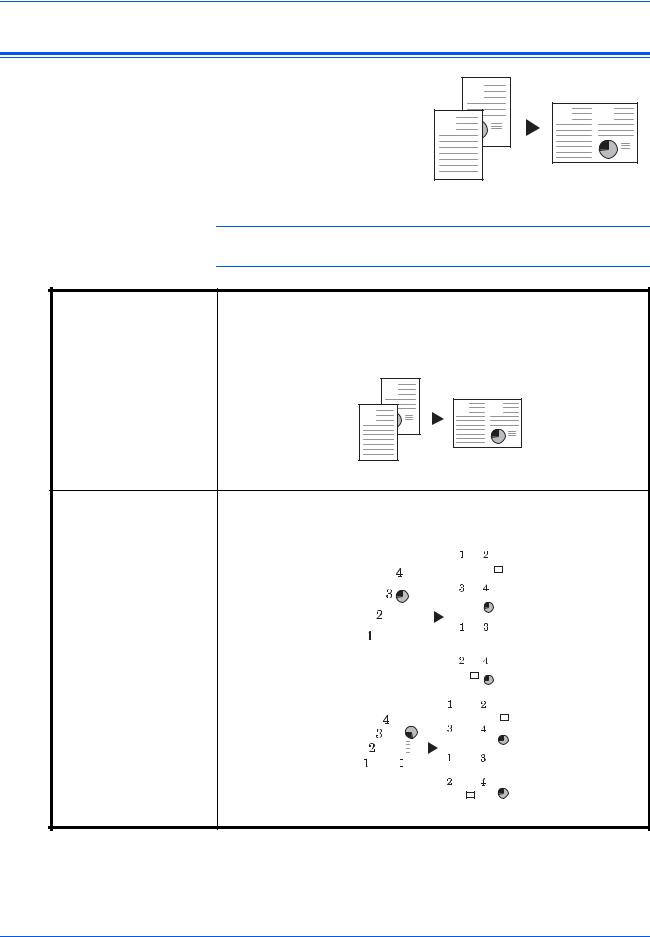
Combine Mode
The images from either 2 or 4 originals can be reduced and combined onto a single copy. The Border Line of each original can also be marked with a solid or dotted line.
|
2 |
|
1 |
1 |
2 |
|
|
The following Combine modes |
Original |
Copy |
|
are available: |
|||
|
|
NOTE: Both the Original Size and the Copy Paper Size must be regular sizes.
Mode |
Description |
|
|
2 in 1 |
Copies two originals onto one sheet. This mode can also be used in |
|
conjunction with Duplex Mode (optional) in order to copy four originals |
|
onto both sides of one sheet. |
2 |
1 |
2 |
|
1 |
|||
|
|
||
Original |
|
Copy |
4 in 1 (Vertical |
Copies four originals onto one sheet. This mode can also be used in |
|||||||||||||||||||||||
Arrangement) |
conjunction with Duplex Mode (optional) in order to copy eight originals |
|||||||||||||||||||||||
4 in 1 (Horizontal |
onto both sides of one sheet. |
|||||||||||||||||||||||
Arrangement) |
|
|
|
|
|
|
|
|
|
|
|
|
|
|
|
|
|
|
|
|
|
|
|
|
|
|
|
|
|
|
|
|
|
|
|
|
|
|
|
|
|
|
|
|
|
|
|
|
|
|
|
|
|
|
|
|
|
|
|
|
|
|
|
|
|
|
|
|
|
|
|
|
|
|
|
|
|
|
|
|
|
|
|
|
|
|
|
|
|
|
|
|
|
|
|
|
|
|
|
|
|
|
|
|
|
|
|
|
|
|
|
|
|
|
|
|
|
|
|
|
|
|
|
|
|
|
|
|
|
|
|
|
|
|
|
|
|
|
|
|
|
|
|
|
|
|
|
|
|
|
|
|
|
|
|
|
|
|
|
|
|
|
|
|
|
|
|
|
|
|
|
|
|
|
|
|
|
|
|
|
|
|
|
|
|
|
|
|
|
|
|
|
|
|
|
|
|
|
|
|
|
|
|
|
|
|
|
|
|
|
|
|
|
|
|
|
|
|
|
|
|
|
|
|
|
|
|
|
|
|
|
|
|
|
|
|
|
|
|
|
|
|
|
|
|
|
|
|
|
|
|
|
|
|
|
|
|
|
|
|
|
|
|
|
|
|
|
|
|
|
|
|
|
|
|
|
|
|
|
|
|
|
|
|
|
|
|
|
|
|
|
|
|
|
|
|
|
|
|
|
|
|
|
|
|
|
|
|
|
|
|
|
|
|
|
|
|
|
|
|
|
|
|
|
|
|
|
|
|
|
|
|
|
|
|
|
|
|
|
|
|
|
|
|
|
|
|
|
|
|
|
|
|
|
|
|
|
|
|
|
|
|
|
|
|
|
|
|
|
|
|
|
|
|
|
|
|
|
|
|
|
|
|
|
|
|
|
|
|
|
|
|
|
|
|
|
|
|
|
|
|
|
|
|
|
|
|
|
|
|
|
|
|
|
|
|
|
|
|
|
|
|
|
|
|
|
|
|
|
|
|
|
|
|
|
|
|
|
|
|
|
|
|
|
|
|
|
|
|
|
|
|
|
|
|
|
|
|
|
|
|
|
|
|
|
|
|
|
|
|
|
|
|
|
|
|
|
|
|
|
|
|
|
|
|
|
|
|
|
|
|
|
|
|
|
|
|
|
|
|
|
|
|
|
|
|
|
|
|
|
|
|
|
|
|
|
|
|
|
|
|
|
|
|
|
|
|
|
|
|
|
|
|
|
|
|
|
|
|
|
|
|
|
|
|
|
|
|
|
|
|
|
|
|
|
|
|
|
|
|
|
|
|
|
|
|
|
|
|
|
|
|
|
|
|
|
|
|
|
|
|
|
|
|
|
|
|
|
|
|
|
|
|
|
|
|
|
|
|
|
|
|
|
|
|
|
|
|
|
|
|
|
|
|
|
|
|
|
|
|
|
|
|
|
|
|
|
|
|
|
|
|
|
|
|
|
|
|
|
|
|
|
|
|
|
|
|
|
|
|
|
|
|
|
|
|
|
|
|
|
|
|
|
|
|
|
|
|
|
|
|
|
|
|
|
|
|
|
|
|
|
|
|
|
|
|
|
|
|
|
|
|
|
|
|
|
|
|
|
|
|
|
|
|
|
|
|
|
|
|
|
|
|
|
|
|
|
|
|
|
|
|
|
|
|
|
|
|
|
|
|
|
|
|
|
|
|
|
|
|
|
|
|
|
|
|
|
|
|
|
|
|
|
|
|
|
|
|
|
|
|
|
|
|
|
|
|
|
|
|
|
|
|
|
|
|
|
|
|
|
|
|
|
|
|
|
|
|
|
|
|
|
|
|
|
|
|
|
|
|
|
|
|
|
|
|
|
|
|
|
|
|
|
|
|
|
|
|
|
|
|
|
|
|
|
|
|
|
|
|
|
|
|
|
|
|
|
|
|
|
|
|
|
|
|
|
|
|
|
|
|
|
|
|
|
|
|
|
|
|
|
|
|
|
|
|
|
|
|
|
|
|
|
|
|
|
|
|
|
|
|
|
|
|
|
|
|
|
|
|
|
|
|
|
|
|
|
|
|
|
|
|
|
|
|
|
|
|
|
|
|
|
|
|
|
|
|
|
|
|
|
|
|
|
|
|
|
|
|
|
|
|
|
|
|
|
|
|
|
|
|
|
|
|
|
|
|
|
|
|
|
|
|
|
|
|
|
|
|
|
|
|
|
|
|
|
|
|
|
|
|
|
|
|
|
|
|
|
|
|
|
|
|
|
|
|
|
|
|
|
|
|
|
|
|
|
|
|
|
|
|
|
|
|
|
|
|
|
|
|
|
|
|
|
|
|
|
|
|
|
|
|
|
|
|
|
|
|
|
|
|
|
|
|
|
|
|
|
|
|
|
|
|
|
|
|
|
|
|
|
|
|
|
|
|
|
|
|
|
|
|
|
|
|
|
|
|
|
|
|
|
|
|
|
|
|
|
|
|
|
|
|
|
|
|
|
|
|
|
|
|
|
|
|
|
|
|
|
|
|
|
|
|
|
|
|
|
|
|
|
|
|
|
|
|
|
|
|
|
|
|
|
|
|
|
|
|
|
|
|
|
|
|
|
|
|
|
|
|
|
|
|
|
|
|
|
|
|
|
|
|
|
|
|
|
|
|
|
|
|
|
|
|
|
|
|
|
|
|
|
|
|
|
|
|
|
|
|
|
|
|
|
|
|
|
|
|
|
|
|
|
|
|
|
|
|
|
|
|
Original Copy
ADVANCED OPERATION GUIDE |
1-7 |
Copy Functions
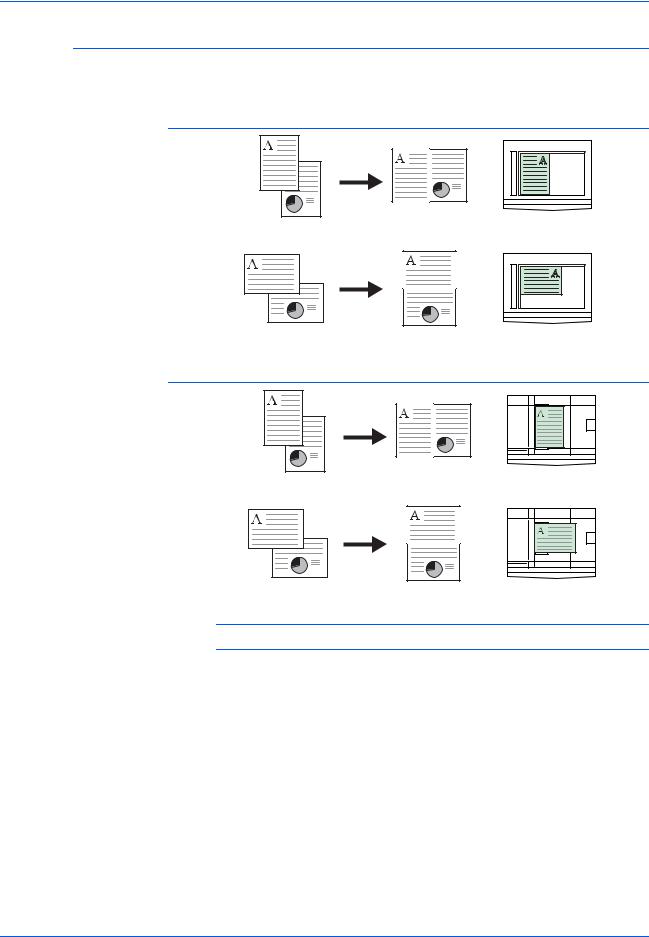
2 in 1
The following illustrations indicate how the orientation of the original will affect the resulting copies:
Using the Platen
Original |
Copy |
Original |
Copy |
Using the Document Processor
Original |
Copy |
Original |
Copy |
NOTE: Ensure that the first page of the originals is scanned first.
1-8 |
ADVANCED OPERATION GUIDE |
Copy Functions
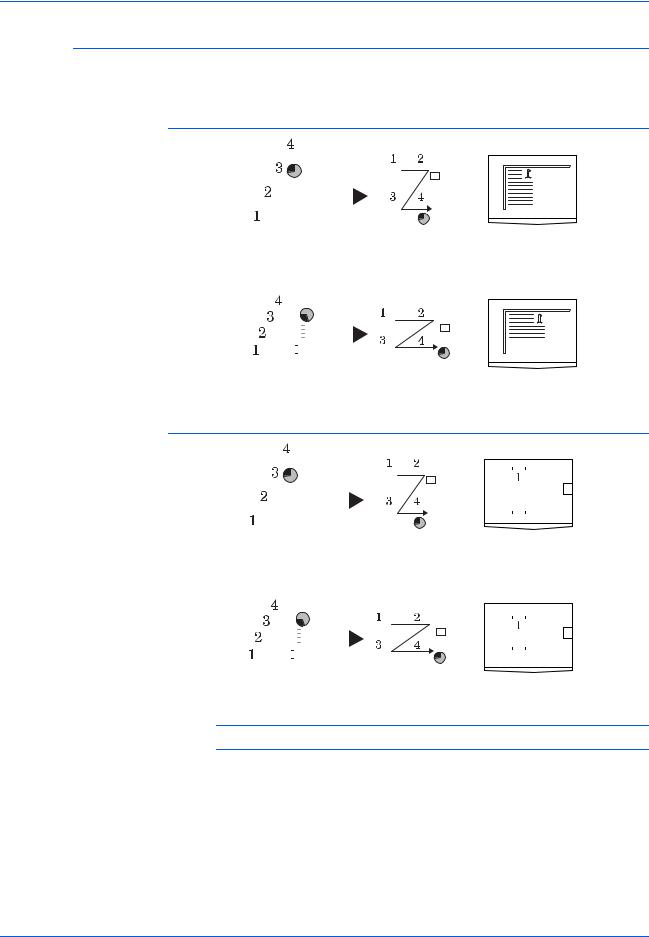
4 in 1 (Horizontal Arrangement)
The following illustrations indicate how the orientation of the original will affect the resulting copies:
Using the Platen
|
|
|
|
|
|
|
|
|
|
|
|
|
|
|
|
|
|
|
|
|
|
|
|
|
|
|
|
|
|
|
|
|
|
|
|
|
|
|
|
|
|
|
|
|
|
|
|
|
|
|
|
|
|
|
|
|
|
|
|
|
|
|
|
|
|
|
|
|
|
|
|
|
|
|
|
|
|
|
|
|
|
|
|
|
|
|
|
|
|
|
|
|
|
|
|
|
|
|
|
|
|
|
|
|
|
|
|
|
|
|
|
|
|
|
|
|
|
|
|
|
|
|
|
|
|
|
|
|
|
|
|
|
|
|
|
|
|
|
|
|
|
|
|
|
|
|
|
|
|
|
|
|
|
|
|
|
|
|
|
|
|
|
|
|
|
|
|
|
|
|
|
|
|
|
|
|
|
|
|
|
|
|
|
|
|
|
|
|
|
|
|
|
|
|
|
|
|
|
|
|
|
|
|
|
|
|
|
|
|
|
|
|
|
|
|
|
|
|
|
|
|
|
|
|
|
|
|
|
|
|
|
|
|
|
|
|
|
|
|
|
|
|
|
|
|
|
|
|
|
|
|
|
|
|
|
|
|
|
|
|
|
|
|
|
|
|
|
|
|
|
|
|
|
|
|
|
|
|
|
|
|
|
|
|
|
|
|
|
|
|
|
|
|
|
|
|
|
|
|
|
|
|
|
|
|
|
|
|
|
|
|
|
|
|
|
|
|
|
|
|
|
|
|
|
|
|
|
|
|
|
|
|
|
|
|
|
|
|
|
|
|
|
|
|
|
|
|
|
|
|
|
|
|
|
|
|
|
|
|
|
|
|
|
|
|
|
|
|
|
|
|
|
|
|
|
|
|
|
|
|
|
|
|
|
|
|
|
|
|
|
|
|
|
|
|
|
|
|
|
|
|
|
|
|
|
|
|
|
|
|
|
|
|
|
|
|
|
|
|
|
|
|
|
|
|
|
|
|
|
|
|
|
|
|
|
|
|
|
|
|
|
|
|
|
|
|
|
|
|
|
|
|
|
|
|
|
|
|
|
|
|
|
|
|
|
|
|
|
|
|
|
|
|
|
|
|
|
|
|
|
|
|
|
|
|
|
|
|
|
|
|
|
|
|
|
|
|
|
|
|
|
|
|
|
|
|
|
|
|
|
|
|
|
|
|
|
|
|
|
|
|
|
|
|
|
|
|
|
|
|
|
|
|
|
|
|
|
|
|
|
|
|
|
|
|
|
|
|
|
|
|
|
|
|
|
|
|
|
|
|
|
|
|
|
|
|
|
|
|
|
|
|
|
|
|
|
|
|
|
|
|
|
|
|
|
|
|
|
|
|
|
|
|
|
|
|
|
|
|
|
|
|
|
|
|
|
|
|
|
|
|
|
|
|
|
|
|
|
|
|
|
|
|
|
|
|
|
|
|
|
|
|
|
|
|
|
|
|
|
|
|
|
Original |
Copy |
|
|
|
|
|
|
|
|
|||||||||||||||||||
|
|
|
|
|
|
|
|
|
|
|
|
|
|
|
|
|
|
|
|
|
|
|
|
|
|
|
|
|
|
|
|
|
|
|
|
|
|
|
|
|
|
|
|
|
|
|
|
|
|
|
|
|
|
|
|
|
|
|
|
|
|
|
|
|
|
|
|
|
|
|
|
|
|
|
|
|
|
|
|
|
|
|
|
|
|
|
|
|
|
|
|
|
|
|
|
|
|
|
|
|
|
|
|
|
|
|
|
|
|
|
|
|
|
|
|
|
|
|
|
|
|
|
|
|
|
|
|
|
|
|
|
|
|
|
|
|
|
|
|
|
|
|
|
|
|
|
|
|
|
|
|
|
|
|
|
|
|
|
|
|
|
|
|
|
|
|
|
|
|
|
|
|
|
|
|
|
|
|
|
|
|
|
|
|
|
|
|
|
|
|
|
|
|
|
|
|
|
|
|
|
|
|
|
|
|
|
|
|
|
|
|
|
|
|
|
|
|
|
|
|
|
|
|
|
|
|
|
|
|
|
|
|
|
|
|
|
|
|
|
|
|
|
|
|
|
|
|
|
|
|
|
|
|
|
|
|
|
|
|
|
|
|
|
|
|
|
|
|
|
|
|
|
|
|
|
|
|
|
|
|
|
|
|
|
|
|
|
|
|
|
|
|
|
|
|
|
|
|
|
|
|
|
|
|
|
|
|
|
|
|
|
|
|
|
|
|
|
|
|
|
|
|
|
|
|
|
|
|
|
|
|
|
|
|
|
|
|
|
|
|
|
|
|
|
|
|
|
|
|
|
|
|
|
|
|
|
|
|
|
|
|
|
|
|
|
|
|
|
|
|
|
|
|
|
|
|
|
|
|
|
|
|
|
|
|
|
|
|
|
|
|
|
|
|
|
|
|
|
|
|
|
|
|
|
|
|
|
|
|
|
|
|
|
|
|
|
|
|
|
|
|
|
|
|
|
|
|
|
|
|
|
|
|
|
|
|
|
|
|
|
|
|
|
|
|
|
|
|
|
|
|
|
|
|
|
|
|
|
|
|
|
|
|
|
|
|
|
|
|
|
|
|
|
|
|
|
|
|
|
Original |
Copy |
Using the Document Processor
|
|
|
|
|
|
|
|
|
|
|
|
|
|
|
|
|
|
|
|
|
|
|
|
|
|
|
|
|
|
|
|
|
|
|
|
|
|
|
|
|
|
|
|
|
|
|
|
|
|
|
|
|
|
|
|
|
|
|
|
|
|
|
|
|
|
|
|
|
|
|
|
|
|
|
|
|
|
|
|
|
|
|
|
|
|
|
|
|
|
|
|
|
|
|
|
|
|
|
|
|
|
|
|
|
|
|
|
|
|
|
|
|
|
|
|
|
|
|
|
|
|
|
|
|
|
|
|
|
|
|
|
|
|
|
|
|
|
|
|
|
|
|
|
|
|
|
|
|
|
|
|
|
|
|
|
|
|
|
|
|
|
|
|
|
|
|
|
|
|
|
|
|
|
|
|
|
|
|
|
|
|
|
|
|
|
|
|
|
|
|
|
|
|
|
|
|
|
|
|
|
|
|
|
|
|
|
|
|
|
|
|
|
|
|
|
|
|
|
|
|
|
|
|
|
|
|
|
|
|
|
|
|
|
|
|
|
|
|
|
|
|
|
|
|
|
|
|
|
|
|
|
|
|
|
|
|
|
|
|
|
|
|
|
|
|
|
|
|
|
|
|
|
|
|
|
|
|
|
|
|
|
|
|
|
|
|
|
|
|
|
|
|
|
|
|
|
|
|
|
|
|
|
|
|
|
|
|
|
|
|
|
|
|
|
|
|
|
|
|
|
|
|
|
|
|
|
|
|
|
|
|
|
|
|
|
|
|
|
|
|
|
|
|
|
|
|
|
|
|
|
|
|
|
|
|
|
|
|
|
|
|
|
|
|
|
|
|
|
|
|
|
|
|
|
|
|
|
|
|
|
|
|
|
|
|
|
|
|
|
|
|
|
|
|
|
|
|
|
|
|
|
|
|
|
|
|
|
|
|
|
|
|
|
|
|
|
|
|
|
|
|
|
|
|
|
|
|
|
|
|
|
|
|
|
|
|
|
|
|
|
|
|
|
|
|
|
|
|
|
|
|
|
|
|
|
|
|
|
|
|
|
|
|
|
|
|
|
|
|
|
|
|
|
|
|
|
|
|
|
|
|
|
|
|
|
|
|
|
|
|
|
|
|
|
|
|
|
|
|
|
|
|
|
|
|
|
|
|
|
|
|
|
|
|
|
|
|
|
|
|
|
|
|
|
|
|
|
|
|
|
|
|
|
|
|
|
|
|
|
|
|
|
|
|
|
|
|
|
|
|
|
|
|
|
|
|
|
|
|
|
|
|
|
|
|
|
|
|
|
|
|
|
|
|
|
|
|
|
|
|
|
|
|
|
|
|
|
|
|
|
|
|
|
|
|
|
|
|
|
|
|
|
|
|
|
|
|
|
|
|
|
|
|
|
|
|
|
|
|
|
|
|
|
|
|
|
|
|
|
Original |
|
Copy |
|
|
|
|
|
|
|
|
|
|
|
||||||||||||||||
|
|
|
|
|
|
|
|
|
|
|
|
|
|
|
|
|
|
|
|
|
|
|
|
|
|
|
|
|
|
|
|
|
|
|
|
|
|
|
|
|
|
|
|
|
|
|
|
|
|
|
|
|
|
|
|
|
|
|
|
|
|
|
|
|
|
|
|
|
|
|
|
|
|
|
|
|
|
|
|
|
|
|
|
|
|
|
|
|
|
|
|
|
|
|
|
|
|
|
|
|
|
|
|
|
|
|
|
|
|
|
|
|
|
|
|
|
|
|
|
|
|
|
|
|
|
|
|
|
|
|
|
|
|
|
|
|
|
|
|
|
|
|
|
|
|
|
|
|
|
|
|
|
|
|
|
|
|
|
|
|
|
|
|
|
|
|
|
|
|
|
|
|
|
|
|
|
|
|
|
|
|
|
|
|
|
|
|
|
|
|
|
|
|
|
|
|
|
|
|
|
|
|
|
|
|
|
|
|
|
|
|
|
|
|
|
|
|
|
|
|
|
|
|
|
|
|
|
|
|
|
|
|
|
|
|
|
|
|
|
|
|
|
|
|
|
|
|
|
|
|
|
|
|
|
|
|
|
|
|
|
|
|
|
|
|
|
|
|
|
|
|
|
|
|
|
|
|
|
|
|
|
|
|
|
|
|
|
|
|
|
|
|
|
|
|
|
|
|
|
|
|
|
|
|
|
|
|
|
|
|
|
|
|
|
|
|
|
|
|
|
|
|
|
|
|
|
|
|
|
|
|
|
|
|
|
|
|
|
|
|
|
|
|
|
|
|
|
|
|
|
|
|
|
|
|
|
|
|
|
|
|
|
|
|
|
|
|
|
|
|
|
|
|
|
|
|
|
|
|
|
|
|
|
|
|
|
|
|
|
|
|
|
|
|
|
|
|
|
|
|
|
|
|
|
|
|
|
|
|
|
|
|
|
|
|
|
|
|
|
|
|
|
|
|
|
|
|
|
|
|
|
|
|
|
|
|
|
|
|
|
|
|
|
|
|
|
|
|
|
|
|
|
|
|
|
|
|
|
|
|
|
Original |
Copy |
NOTE: Ensure that the first page of the originals is scanned first.
ADVANCED OPERATION GUIDE |
1-9 |
Copy Functions
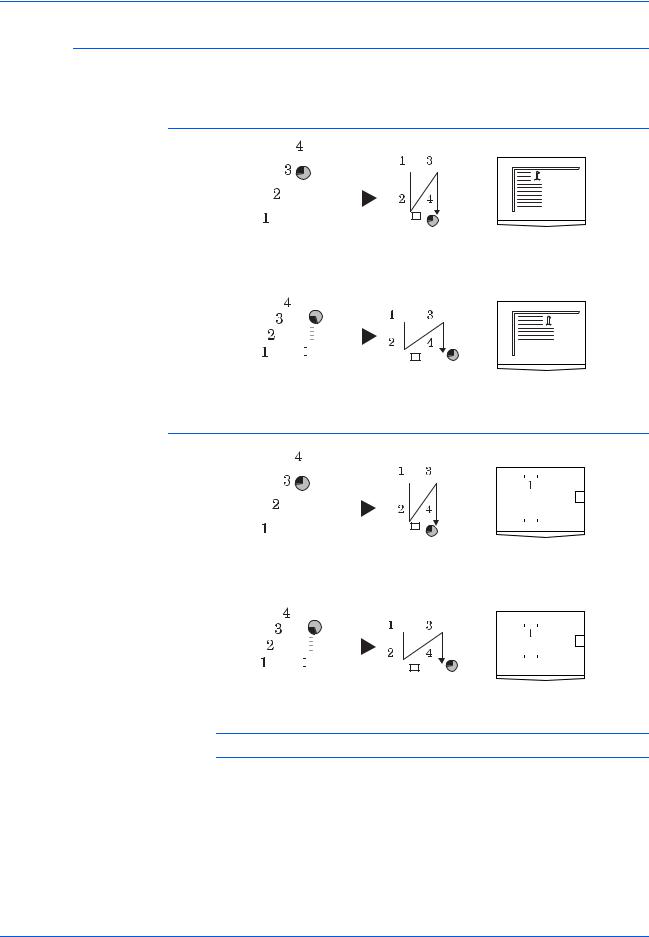
4 in 1 (Vertical Arrangement)
The following illustrations indicate how the orientation of the original will affect the resulting copies:
Using the Platen
|
|
|
|
|
|
|
|
|
|
|
|
|
|
|
|
|
|
|
|
|
|
|
|
|
|
|
|
|
|
|
|
|
|
|
|
|
|
|
|
|
|
|
|
|
|
|
|
|
|
|
|
|
|
|
|
|
|
|
|
|
|
|
|
|
|
|
|
|
|
|
|
|
|
|
|
|
|
|
|
|
|
|
|
|
|
|
|
|
|
|
|
|
|
|
|
|
|
|
|
|
|
|
|
|
|
|
|
|
|
|
|
|
|
|
|
|
|
|
|
|
|
|
|
|
|
|
|
|
|
|
|
|
|
|
|
|
|
|
|
|
|
|
|
|
|
|
|
|
|
|
|
|
|
|
|
|
|
|
|
|
|
|
|
|
|
|
|
|
|
|
|
|
|
|
|
|
|
|
|
|
|
|
|
|
|
|
|
|
|
|
|
|
|
|
|
|
|
|
|
|
|
|
|
|
|
|
|
|
|
|
|
|
|
|
|
|
|
|
|
|
|
|
|
|
|
|
|
|
|
|
|
|
|
|
|
|
|
|
|
|
|
|
|
|
|
|
|
|
|
|
|
|
|
|
|
|
|
|
|
|
|
|
|
|
|
|
|
|
|
|
|
|
|
|
|
|
|
|
|
|
|
|
|
|
|
|
|
|
|
|
|
|
|
|
|
|
|
|
|
|
|
|
|
|
|
|
|
|
|
|
|
|
|
|
|
|
|
|
|
|
|
|
|
|
|
|
|
|
|
|
|
|
|
|
|
|
|
|
|
|
|
|
|
|
|
|
|
|
|
|
|
|
|
|
|
|
|
|
|
|
|
|
|
|
|
|
|
|
|
|
|
|
|
|
|
|
|
|
|
|
|
|
|
|
|
|
|
|
|
|
|
|
|
|
|
|
|
|
|
|
|
|
|
|
|
|
|
|
|
|
|
|
|
|
|
|
|
|
|
|
|
|
|
|
|
|
|
|
|
|
|
|
|
|
|
|
|
|
|
|
|
|
|
|
|
|
|
|
|
|
|
|
|
|
|
|
|
|
|
|
|
|
|
|
|
|
|
|
|
|
|
|
|
|
|
|
|
|
|
|
|
|
|
|
|
|
|
|
|
|
|
|
|
|
|
|
|
|
|
|
|
|
|
|
|
|
|
|
|
|
|
|
|
|
|
|
|
|
|
|
|
|
|
|
|
|
|
|
|
|
|
|
|
|
|
|
|
|
|
|
|
|
|
|
|
|
|
|
|
|
|
|
|
|
|
|
|
|
|
|
|
|
|
|
|
|
|
|
|
|
|
|
|
|
|
|
|
|
|
|
|
|
|
|
|
|
|
|
|
|
|
|
|
|
|
|
|
|
|
|
|
|
|
|
|
|
|
|
|
|
|
|
|
|
|
|
|
|
|
|
|
|
|
|
|
|
|
|
|
|
|
|
|
|
|
|
|
|
|
|
|
|
|
|
|
|
|
|
|
|
|
|
|
|
|
|
|
|
|
|
|
|
Original |
|
|
|
|
|
|
|
Copy |
|
|
|
|
|
|
|
|
|||||||||||||
|
|
|
|
|
|
|
|
|
|
|
|
|
|
|
|
|
|
|
|
|
|
|
|
|
|
|
|
|
|
|
|
|
|
|
|
|
|
|
|
|
|
|
|
|
|
|
|
|
|
|
|
|
|
|
|
|
|
|
|
|
|
|
|
|
|
|
|
|
|
|
|
|
|
|
|
|
|
|
|
|
|
|
|
|
|
|
|
|
|
|
|
|
|
|
|
|
|
|
|
|
|
|
|
|
|
|
|
|
|
|
|
|
|
|
|
|
|
|
|
|
|
|
|
|
|
|
|
|
|
|
|
|
|
|
|
|
|
|
|
|
|
|
|
|
|
|
|
|
|
|
|
|
|
|
|
|
|
|
|
|
|
|
|
|
|
|
|
|
|
|
|
|
|
|
|
|
|
|
|
|
|
|
|
|
|
|
|
|
|
|
|
|
|
|
|
|
|
|
|
|
|
|
|
|
|
|
|
|
|
|
|
|
|
|
|
|
|
|
|
|
|
|
|
|
|
|
|
|
|
|
|
|
|
|
|
|
|
|
|
|
|
|
|
|
|
|
|
|
|
|
|
|
|
|
|
|
|
|
|
|
|
|
|
|
|
|
|
|
|
|
|
|
|
|
|
|
|
|
|
|
|
|
|
|
|
|
|
|
|
|
|
|
|
|
|
|
|
|
|
|
|
|
|
|
|
|
|
|
|
|
|
|
|
|
|
|
|
|
|
|
|
|
|
|
|
|
|
|
|
|
|
|
|
|
|
|
|
|
|
|
|
|
|
|
|
|
|
|
|
|
|
|
|
|
|
|
|
|
|
|
|
|
|
|
|
|
|
|
|
|
|
|
|
|
|
|
|
|
|
|
|
|
|
|
|
|
|
|
|
|
|
|
|
|
|
|
|
|
|
|
|
|
|
|
|
|
|
|
|
|
|
|
|
|
|
|
|
|
|
|
|
|
|
|
|
|
|
|
|
|
|
|
|
|
|
|
|
|
|
|
|
|
|
|
|
|
|
|
|
|
|
|
|
|
|
|
|
|
|
|
|
|
|
|
|
|
|
|
|
|
|
|
|
|
|
|
|
|
|
|
|
|
|
|
|
|
|
|
|
|
|
|
|
|
Original |
Copy |
Using the Document Processor
|
|
|
|
|
|
|
|
|
|
|
|
|
|
|
|
|
|
|
|
|
|
|
|
|
|
|
|
|
|
|
|
|
|
|
|
|
|
|
|
|
|
|
|
|
|
|
|
|
|
|
|
|
|
|
|
|
|
|
|
|
|
|
|
|
|
|
|
|
|
|
|
|
|
|
|
|
|
|
|
|
|
|
|
|
|
|
|
|
|
|
|
|
|
|
|
|
|
|
|
|
|
|
|
|
|
|
|
|
|
|
|
|
|
|
|
|
|
|
|
|
|
|
|
|
|
|
|
|
|
|
|
|
|
|
|
|
|
|
|
|
|
|
|
|
|
|
|
|
|
|
|
|
|
|
|
|
|
|
|
|
|
|
|
|
|
|
|
|
|
|
|
|
|
|
|
|
|
|
|
|
|
|
|
|
|
|
|
|
|
|
|
|
|
|
|
|
|
|
|
|
|
|
|
|
|
|
|
|
|
|
|
|
|
|
|
|
|
|
|
|
|
|
|
|
|
|
|
|
|
|
|
|
|
|
|
|
|
|
|
|
|
|
|
|
|
|
|
|
|
|
|
|
|
|
|
|
|
|
|
|
|
|
|
|
|
|
|
|
|
|
|
|
|
|
|
|
|
|
|
|
|
|
|
|
|
|
|
|
|
|
|
|
|
|
|
|
|
|
|
|
|
|
|
|
|
|
|
|
|
|
|
|
|
|
|
|
|
|
|
|
|
|
|
|
|
|
|
|
|
|
|
|
|
|
|
|
|
|
|
|
|
|
|
|
|
|
|
|
|
|
|
|
|
|
|
|
|
|
|
|
|
|
|
|
|
|
|
|
|
|
|
|
|
|
|
|
|
|
|
|
|
|
|
|
|
|
|
|
|
|
|
|
|
|
|
|
|
|
|
|
|
|
|
|
|
|
|
|
|
|
|
|
|
|
|
|
|
|
|
|
|
|
|
|
|
|
|
|
|
|
|
|
|
|
|
|
|
|
|
|
|
|
|
|
|
|
|
|
|
|
|
|
|
|
|
|
|
|
|
|
|
|
|
|
|
|
|
|
|
|
|
|
|
|
|
|
|
|
|
|
|
|
|
|
|
|
|
|
|
|
|
|
|
|
|
|
|
|
|
|
|
|
|
|
|
|
|
|
|
|
|
|
|
|
|
|
|
|
|
|
|
|
|
|
|
|
|
|
|
|
|
|
|
|
|
|
|
|
|
|
|
|
|
|
|
|
|
|
|
|
|
|
|
|
|
|
|
|
|
|
|
|
|
|
|
|
|
|
|
|
|
|
|
|
|
|
|
|
|
|
|
|
|
|
|
|
|
|
|
|
|
|
|
|
|
|
|
|
|
|
|
|
|
|
|
|
|
|
|
|
|
|
|
|
|
|
|
|
|
|
|
|
|
|
|
|
|
|
|
|
|
|
|
|
|
|
|
|
|
|
|
|
|
|
|
|
|
|
|
|
|
|
|
|
|
|
|
|
|
|
|
|
|
|
|
|
|
|
|
|
|
|
|
|
|
|
|
|
|
|
|
|
|
|
|
|
Original |
|
|
|
|
|
|
|
|
Copy |
|
|
|
|
|
|
|
|
|
|
|
||||||||||||
|
|
|
|
|
|
|
|
|
|
|
|
|
|
|
|
|
|
|
|
|
|
|
|
|
|
|
|
|
|
|
|
|
|
|
|
|
|
|
|
|
|
|
|
|
|
|
|
|
|
|
|
|
|
|
|
|
|
|
|
|
|
|
|
|
|
|
|
|
|
|
|
|
|
|
|
|
|
|
|
|
|
|
|
|
|
|
|
|
|
|
|
|
|
|
|
|
|
|
|
|
|
|
|
|
|
|
|
|
|
|
|
|
|
|
|
|
|
|
|
|
|
|
|
|
|
|
|
|
|
|
|
|
|
|
|
|
|
|
|
|
|
|
|
|
|
|
|
|
|
|
|
|
|
|
|
|
|
|
|
|
|
|
|
|
|
|
|
|
|
|
|
|
|
|
|
|
|
|
|
|
|
|
|
|
|
|
|
|
|
|
|
|
|
|
|
|
|
|
|
|
|
|
|
|
|
|
|
|
|
|
|
|
|
|
|
|
|
|
|
|
|
|
|
|
|
|
|
|
|
|
|
|
|
|
|
|
|
|
|
|
|
|
|
|
|
|
|
|
|
|
|
|
|
|
|
|
|
|
|
|
|
|
|
|
|
|
|
|
|
|
|
|
|
|
|
|
|
|
|
|
|
|
|
|
|
|
|
|
|
|
|
|
|
|
|
|
|
|
|
|
|
|
|
|
|
|
|
|
|
|
|
|
|
|
|
|
|
|
|
|
|
|
|
|
|
|
|
|
|
|
|
|
|
|
|
|
|
|
|
|
|
|
|
|
|
|
|
|
|
|
|
|
|
|
|
|
|
|
|
|
|
|
|
|
|
|
|
|
|
|
|
|
|
|
|
|
|
|
|
|
|
|
|
|
|
|
|
|
|
|
|
|
|
|
|
|
|
|
|
|
|
|
|
|
|
|
|
|
|
|
|
|
|
|
|
|
|
|
|
|
|
|
|
|
|
|
|
|
|
|
|
|
|
|
|
|
|
|
|
|
|
|
|
|
|
|
|
|
|
|
|
|
|
|
|
|
|
|
|
|
|
|
|
|
|
|
|
|
|
|
|
|
|
|
|
|
|
|
|
|
|
|
|
|
|
|
|
|
|
|
|
|
|
|
|
|
|
|
|
|
|
|
|
|
|
|
|
|
|
|
|
|
|
|
|
|
|
|
|
|
|
|
|
|
|
|
|
|
|
|
|
|
|
|
|
|
|
|
|
Original |
Copy |
NOTE: Ensure that the first page of the originals is scanned first.
1-10 |
ADVANCED OPERATION GUIDE |
Copy Functions
Borderline Types
The following borderline types are available.
|
|
|
|
|
|
|
|
|
|
Copy |
||||||||
Borderline type |
|
|
|
|
|
|
|
|
|
|
|
|
|
|
|
|
|
|
|
|
|
2 in 1 |
4 in 1 (horizontal arrangement)/ |
||||||||||||||
|
|
|
|
|||||||||||||||
|
|
|
|
4 in 1 (vertical arrangement) |
||||||||||||||
|
|
|
|
|
|
|
|
|
|
|||||||||
|
|
|
|
|
|
|
|
|
|
|
|
|
|
|
|
|
|
|
None |
|
|
|
|
|
|
|
|
|
|
|
|
|
|
|
|
|
|
|
|
|
|
|
|
|
|
|
|
|
|
|
|
|
|
|
|
|
|
|
|
|
|
|
|
|
|
|
|
|
|
|
|
|
|
|
|
|
|
|
|
|
|
|
|
|
|
|
|
|
|
|
|
|
|
|
|
|
|
|
|
|
|
|
|
|
|
|
|
|
|
|
|
|
|
|
|
|
|
|
|
|
|
|
|
|
|
|
|
|
|
|
|
|
|
|
|
|
|
|
|
|
|
|
|
|
|
|
|
|
|
|
|
|
|
|
|
|
|
|
|
|
|
|
|
|
|
|
|
|
|
|
|
|
|
|
|
|
|
|
|
|
|
|
|
|
|
|
|
|
|
|
|
|
|
|
|
|
|
|
|
|
|
|
|
|
|
|
|
|
|
|
|
|
|
|
|
|
|
|
|
|
|
|
|
|
|
|
|
|
|
|
|
|
|
|
|
|
|
|
|
|
|
|
|
|
|
|
|
|
|
|
|
|
|
|
|
|
|
|
|
|
|
|
|
|
|
|
|
|
|
|
|
|
|
|
|
|
|
|
|
|
|
|
|
|
|
|
|
|
|
|
|
|
|
|
|
|
|
|
|
|
|
|
|
|
|
|
|
|
|
|
|
|
|
|
|
|
|
|
|
|
|
|
|
|
|
|
|
|
|
|
|
|
|
|
|
|
|
|
|
|
|
|
|
|
|
|
|
|
|
|
|
|
|
|
|
|
|
|
|
|
Solid
Dotted
Mark or Cropmark
Using Combine Mode
1 |
Position the original and press |
|
[Combine]. |
2 |
Press S or T to select the |
combine option required and |
press [Enter].
Combine: |
|
2 in 1 |
|
4 in 1 |
(Z) |
4 in 1 |
(N) |
3 |
Press Sor Tto select the Border |
|
Line type and press [Enter]. |
Border Line:
None
Solid
Dotted
ADVANCED OPERATION GUIDE |
1-11 |
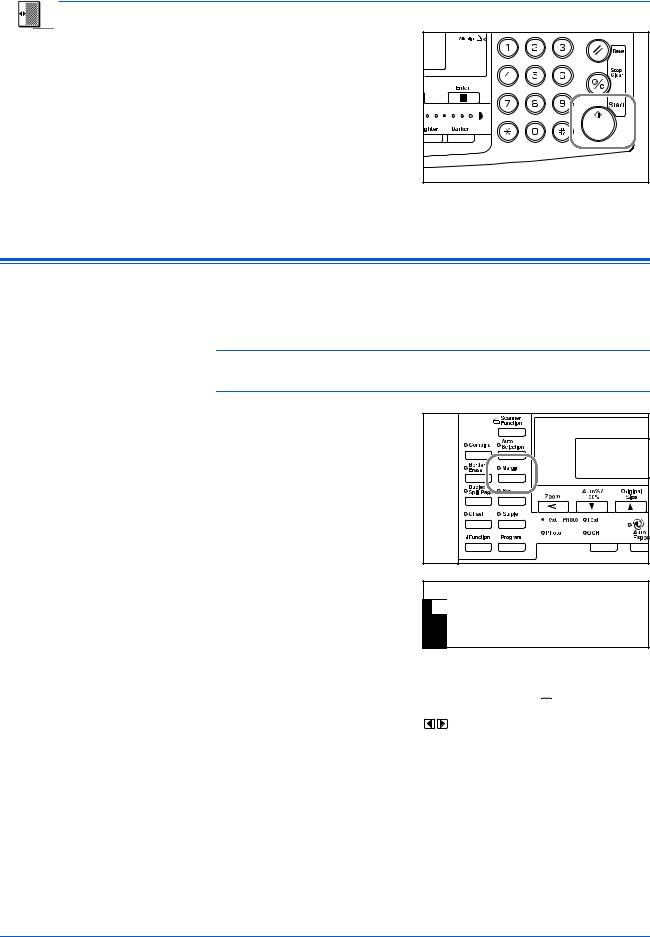
Copy Functions
4
Margin Mode
Press [Start].
If using the optional Document Processor, copying completes automatically.
If using the platen, a message displays when the next original is required. Position the next original and press [Start].
When all originals have been scanned, press [Enter].
The image of the original can be shifted to make a margin (blank) space at the left or top side of the copy. You can set the width of each margin to 1/8" to 3/4" in 1/8" increments (1 mm to 18 mm in 1 mm increments).
NOTE: To set the default value for Margin Width, refer to Margin Width Default Value, on page 3-11.
1 |
Position the original and press |
|
|
[Margin]. |
|
2 |
Press S or T to select Left |
Margin: |
Margin or Top Margin and press |
||
|
[Enter]. |
Left Margin |
|
Top Margin |
3 |
Press < or > to select the Margin |
|
|
|
|
Margin Width: |
|
||||
Width, 1/8" to 3/4" in 1/8" |
|
||||
|
|
|
1/8" 3/4" |
||
|
increments (1 mm to 18 mm in 1 |
|
1/4" |
|
|
|
mm increments) can be selected. |
|
|
|
|
|
Press [Enter]. |
|
|
|
|
|
|
|
|
|
|
4 |
Press [Start]. Copying commences. |
|
|||
1-12 |
ADVANCED OPERATION GUIDE |

|
|
|
|
|
|
|
|
|
|
|
Copy Functions |
|
|
|
|
|
|
|
|
|
|
|
|
|
|
Border Erase Mode |
|
|
|
|
|
|
|
|
|
|
|
|
|
|
|
|
|
|
|
|
|
|
|
|
|
|
|
Shadows that appear around the edges of copies can be erased. The |
||||||||||
|
|
following modes are available: |
||||||||||
|
|
|
|
|
|
|
|
|
|
|
|
|
|
Mode |
|
Description |
|||||||||
|
|
|
|
|
|
|
|
|
|
|
|
|
|
Sheet Erase |
|
Use this mode to erase shadows which appear when using |
|||||||||
|
|
|
sheet originals. You can set the width of the border to be |
|||||||||
|
|
|
erased from 1/8" to 3/4" in 1/8" increments (1 mm to 18 mm in |
|||||||||
|
|
|
1 mm increments). |
|||||||||
|
|
|
|
|
|
|
|
|
|
|
|
|
|
Book Erase |
|
Use this mode to produce clean copies from a thick book. You |
|||||||||
|
|
|
can set the width of the border to be erased from 1/8" to 3/4" in |
|||||||||
|
|
|
1/8" increments (1 mm to 18 mm in 1 mm increments). |
|||||||||
|
|
|
|
|
|
|
|
|
|
|
|
|
|
|
NOTE: To set the default value for Border Erase width, refer to Border |
||||||||||
|
|
Erase Width Default Value, on page 3-12. |
||||||||||
1 |
|
|
|
|
|
|
|
|
|
|
|
|
Position the original and press |
|
|
|
|
||||||||
|
|
|
|
|||||||||
|
|
[Border Erase]. |
|
|
|
|
||||||
|
|
|
|
|
|
|
|
|
|
|
|
|
|
|
|
|
|
|
|
|
|
|
|
|
|
|
|
|
|
|
|
|
|
|
|
|
|
|
|
|
|
|
|
|
|
|
|
|
|
|
|
|
|
|
|
|
|
|
|
|
|
|
|
|
|
|
|
|
|
|
|
|
|
|
|
|
|
2 |
Press S or T to select Sheet |
Erase or Book Erase and press |
[Enter].
MaBordergin:Erase:
 LeftSheetMarginErase
 BTookp MarginErase
3 |
Press < or > to set the Border |
|
|
|
|
Border Erase Width: |
|||||
Erase Width, 1/8" to 3/4" in 1/8" |
|||||
|
|
||||
|
|
|
|
1/8" 3/4" |
|
|
increments (1 mm to 18 mm in 1 |
1/4" |
|||
|
mm increments) can be selected. |
|
|
|
|
|
Press [Enter]. |
|
|
|
|
|
|
|
|
||
4 |
Press [Start]. Copying commences. |
|
|||
ADVANCED OPERATION GUIDE |
1-13 |
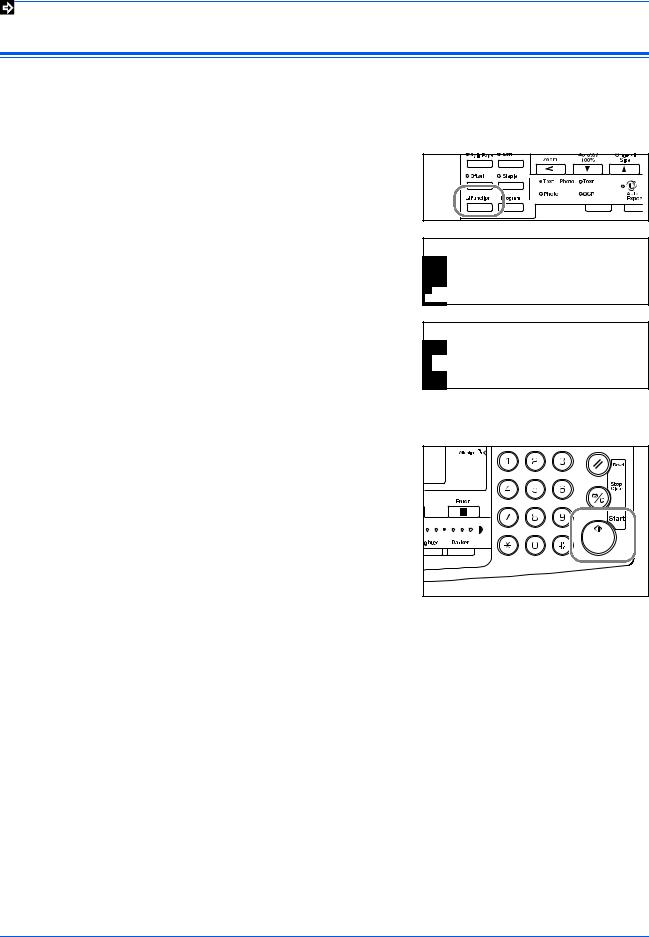
Copy Functions
Continuous Scan
|
Using Continuous Scan, originals can be scanned individually or in blocks |
|
but still be processed as a single job. The originals are scanned into the |
|
machine’s memory until all the originals have been scanned, copies are |
|
then made. |
1 |
Position the first original(s) and |
|
press [Function]. |
2 |
Press S or T to select |
Continuous Scan and press |
|
|
[Enter]. |
3 |
Press S or T to select On and |
|
press [Enter]. |
Function:
End
Orig. Direction : Rear
Continuous Scan : Off
Continuous Scan:
* Off
Off
 On
On
4
5
Press S or T to select End and press [Enter].
Press [Start].
Position the next original(s) and press [Start]. Repeat the procedure to scan the remaining originals.
When all originals have been scanned, press [Enter].
Copying commences.
1-14 |
ADVANCED OPERATION GUIDE |
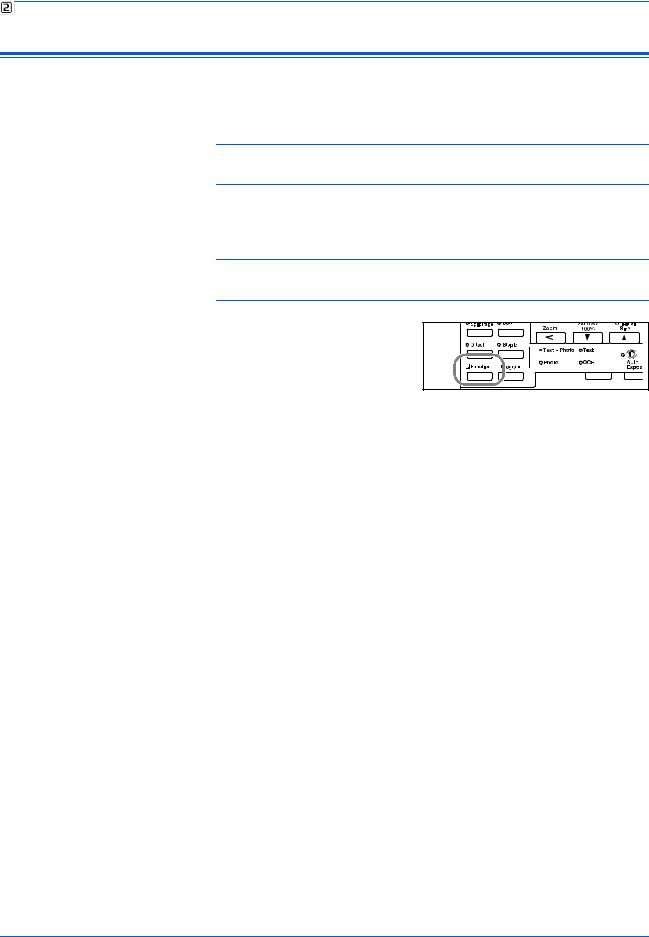
Copy Functions
Auto Rotation
Use Auto Rotation to automatically rotate images counterclockwise by 90 degrees, if the orientation of the original is different to the paper loaded in the cassette.
NOTE: To enable Auto Rotation as the default setting, refer to Auto
Rotation Copy, on page 3-11.
The paper sizes that can be used for Auto Rotation are A4, 11 × 8 1/2" or smaller sizes
NOTE: A3, B4, Folio, 11 × 17" (Ledger) or 8 1/2 × 14" (Legal) cannot be used for Auto Rotation.
1 |
Position the first original(s) and |
|
press [Function]. |
2 |
Press S or T to select Auto |
|
Rotation and press [Enter]. |
3 |
Press S or T to select On and |
|
press [Enter]. |
Function: |
|
||
|
|
Orig. Direction |
: Rear |
|
|
||
|
|
Continuous Scan |
: Off |
|
|
Auto Rotation |
: On |
|
|
||
|
|
||
Auto Rotation: |
|
||
|
|
Off |
|
|
|
* On |
|
|
|
|
|
ADVANCED OPERATION GUIDE |
1-15 |
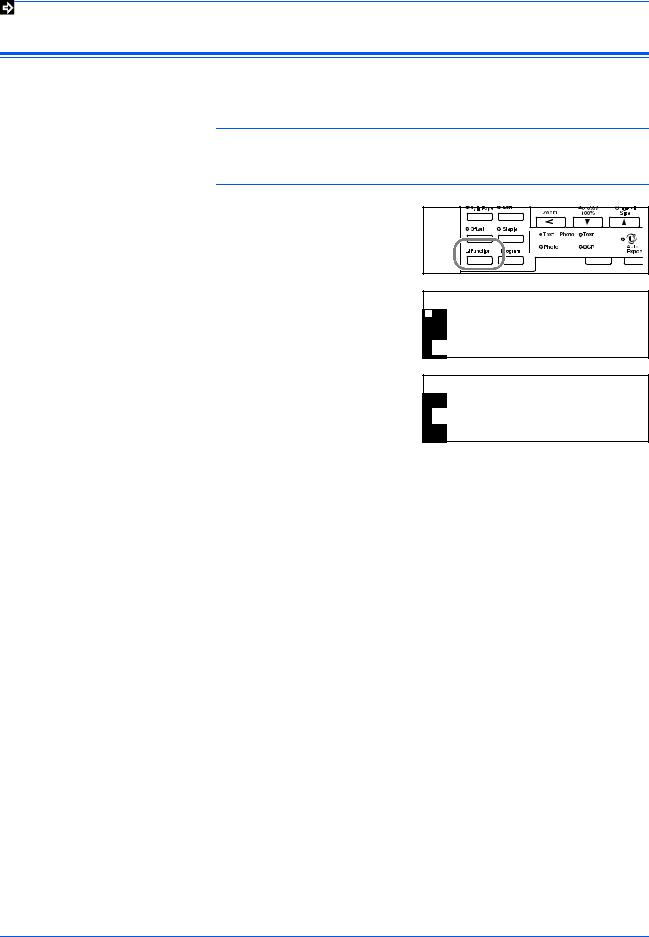
Copy Functions
EcoPrint Mode
Ecoprint mode reduces toner consumption. Use this mode when high quality copies are not necessary, for example, for draft copies.
NOTE: The copy exposure will be a little lighter.
To set the EcoPrint mode as the default setting, refer to EcoPrint Mode, on page 3-4.
1 |
Position the first original(s) and |
|
press [Function]. |
2 |
Press S or T to select EcoPrint |
|
and press [Enter]. |
3 |
Press S or T to select On and |
|
press [Enter]. |
Function:
Continuous Scan : Off
Auto Rotation : On
EcoPrint : Off
EcoPrint:
* Off
Off
 On
On
1-16 |
ADVANCED OPERATION GUIDE |
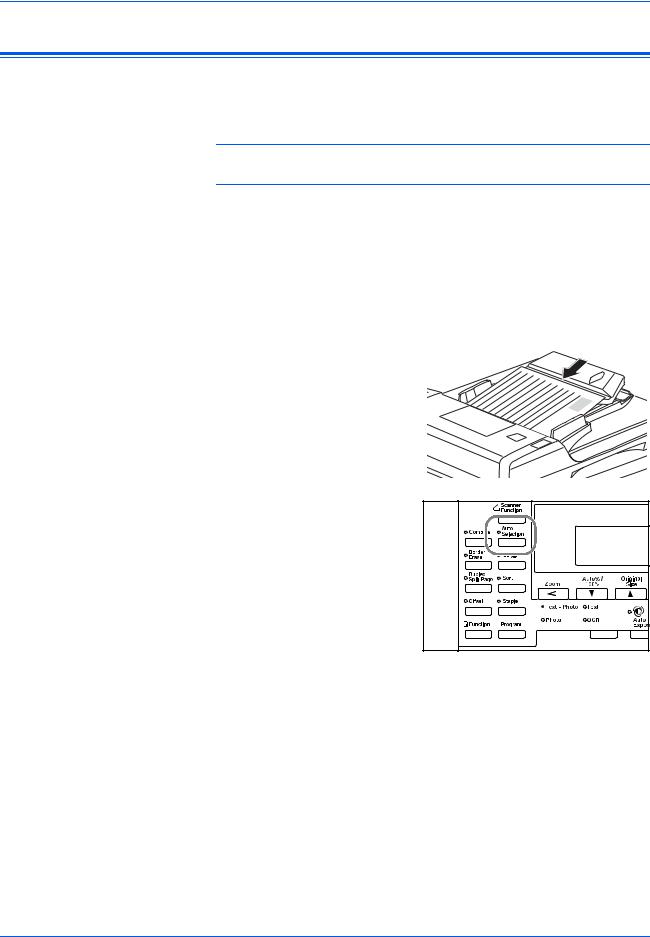
Copy Functions
Auto Selection Mode
If using the optional Document Processor, Auto Selection mode enables the machine to detect each original size and produce copies on the same size paper as the original.
NOTE: The maximum number of sheets that can be loaded in the
Document Processor in this mode is 30.
|
The following original sizes can be used in Auto Selection mode: |
|
|
• Inch Specification — 11 × 8 1/2" and 11 × 17" (Ledger) or |
|
|
8 1/2 × 14" (Legal) and 8 1/2 × 11" (Letter) |
|
|
• Metric Specification — A3 and A4, folio and A4R, or B4 and B5. |
|
|
The original width must be the same. |
|
1 |
Load the originals in the |
|
|
||
Document Processor. |
|
|
|
|
|
2 |
Press [Auto Selection]. |
3 |
Press [Start]. Copying commences. |
ADVANCED OPERATION GUIDE |
1-17 |
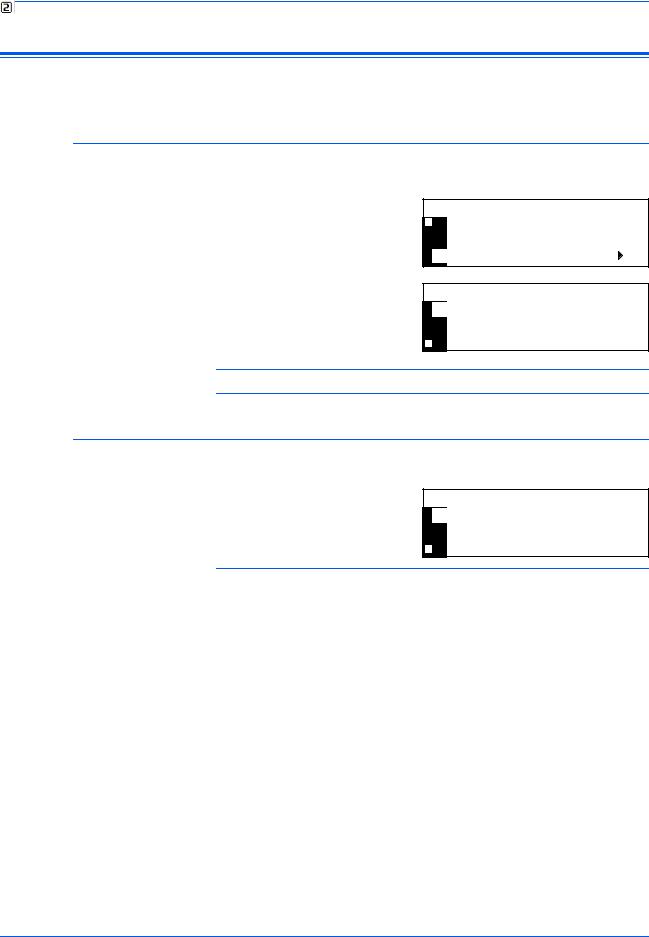
Copy Functions
Program Function
Up to eight combinations of copy modes and functions displayed on the operation panel can be registered as a single program.
Registering a Program
1 |
Select the copy options to be registered (for example 5 copies, Sort, |
|
Margin) and press [Program]. |
2 |
Press S or T to select Register |
|
program and press [Enter]. |
Program:
Program #7 Program #8 Register program.
3 |
Press S or T to select the |
program number required (1 to 8) |
and press [Enter].
The program is registered.
Register program:
Program #1
Program #2
Program #3
NOTE: You can also select the program number using a numeric key.
Using a Program
1 Press [Program].
2 |
Press S or T to select the |
program number required and |
press [Enter].
Program:
Program #1
Program #2
Program #3
|
NOTE: You can also select the program number using a numeric key. |
3 |
Position the originals and press [Start]. |
|
Copies are produced using the settings registered in the program. |
1-18 |
ADVANCED OPERATION GUIDE |

2 Printer Settings
This section explains how to change settings which are required for the printer functions of the machine.
• |
Status Page .................................................................. |
2-2 |
• |
e-MPS Function............................................................ |
2-3 |
• |
Interface ...................................................................... |
2-11 |
• |
Emulation ................................................................... |
2-18 |
• |
Font ............................................................................ |
2-21 |
• |
Print Configuration...................................................... |
2-26 |
• |
Print Quality................................................................ |
2-31 |
• |
Memory Card Operation............................................. |
2-34 |
• |
Hard Disk Operation................................................... |
2-40 |
• |
RAM Disk Operation................................................... |
2-41 |
• |
Paper Handling........................................................... |
2-44 |
• |
Other Printer Settings................................................. |
2-48 |
ADVANCED OPERATION GUIDE |
2-1 |
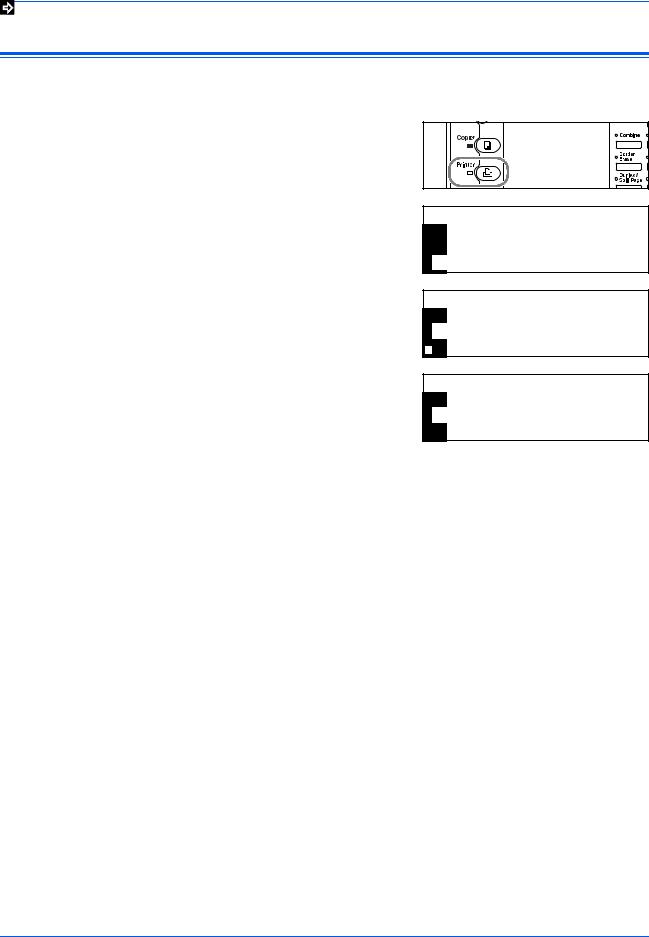
Printer Settings
Status Page
|
The printer default settings, the memory capacity, and other details are |
|
printed on the Status Page. |
1 |
Press [Printer]. |
2 |
Press S or T to select MENU |
|
and press [Enter]. |
3 |
Press S or T to select Print |
|
Status Page and press [Enter]. |
Ready
GO
CANCEL
MENU
Menu
Back
Print Status Page
Interface
4 Press S or T to select Print and press [Enter].
The Status Page is printed.
Print Status Page
No
2-2 |
ADVANCED OPERATION GUIDE |
Loading...