


 Loading...
Epson EH-TW9400, EH-TW8400W, 6050UB, 5050UB, 5050UBE User Manual
...Model: H928A,H930A,H931A
User's Guide
EH-TW9400
EH-TW8400W
EH-TW8400
Pro Cinema 6050UB
Home Cinema 5050UBe
Home Cinema 5050UB
LCD Projector
Organization of the Guide and Notations in the Guide
 Using Each Guide
The guides for this projector are organized as shown below.
Safety Instructions/Support and Service Guide
Contains information on using the projector safely, as well as a support and service guide, troubleshooting check lists, and so on. Make sure you read this guide before using the projector.
User's Guide (this guide)
Contains information on setting up and basic operations before using the projector, using the Configuration menu, and handling problems and performing routine maintenance.
WirelessHD Transmitter User's Guide (H931A/EH-TW8400W/Home Cinema
5050UBe only) Contains information on handling the WirelessHD Transmitter and warnings
and so on.
Quick Start Guide
Contains information on the procedures for setting up the projector. Read this first.
1

Organization of the Guide and Notations in the Guide
 Notations Used in This Guide
Safety Indications
The documentation and the projector use graphical symbols to show how to use the projector safely.
The following shows the symbols and their meanings. Please understand and respect these caution symbols in order to avoid injury to persons or property.
 Warning
This symbol indicates information that, if ignored, could possibly result in personal injury or even death due to incorrect handling.
 Caution
This symbol indicates information that, if ignored, could possibly result in personal injury or physical damage due to incorrect handling.
General Information Indications
Attention
Indicates procedures which may result in damage or malfunctions to occur.
c |
Indicates additional information and points which may be useful to know regarding a topic. |
|
|
|
|
s |
Indicates a page where detailed information regarding a topic can be found. |
|
|
|
|
Menu Name |
Indicates Configuration menu items. |
|
|
Example: Image - Color Mode |
|
|
|
|
Button Name |
Indicates the buttons on the remote control or the control panel. |
|
|
Example: |
button |
|
|
|
About the Use of "This Product" or "This Projector"
As well as the main projector unit, supplied items or optional extras may be referred to using the phrase "this product" or "this projector".
2

Contents
Organization of the Guide and
Notations in the Guide
Using Each Guide . . . . . . . . . . . . . . . . . . . . . 1
Notations Used in This Guide . . . . . . . . . . . 2
Safety Indications . . . . . . . . . . . . . . . . . . . . . . . 2
General Information Indications . . . . . . . . . . . . . 2
AbouttheUseof"ThisProduct"or"ThisProjector"
. . . . . . . . . . . . . . . . . . . . . . . . . . . . . . . . . . . . . 2
Introduction
Part Names and Functions . . . . . . . . . . . . . 6
Front/Top . . . . . . . . . . . . . . . . . . . . . . . . . . . . . 6
Control Panel . . . . . . . . . . . . . . . . . . . . . . . . . . 7
Remote Control . . . . . . . . . . . . . . . . . . . . . . . . . 9
Rear . . . . . . . . . . . . . . . . . . . . . . . . . . . . . . . . 12
Base . . . . . . . . . . . . . . . . . . . . . . . . . . . . . . . . 13
Preparing
Installing . . . . . . . . . . . . . . . . . . . . . . . . . . . . 14
Projected Image and Position of Projector . . . . . 14 Installing in parallel with the screen . . . . . . . . 14
Installing the projector horizontally by
adjusting the height of either side . . . . . . . . . 14 Various Setting Methods . . . . . . . . . . . . . . . . . 15 Placing on a table and projecting . . . . . . . . . 15
Suspending from the ceiling and projecting
. . . . . . . . . . . . . . . . . . . . . . . . . . . . . . . . . . 16
Projection Distance and Lens Shift Maximum
Values . . . . . . . . . . . . . . . . . . . . . . . . . . . . . . . 16
Connecting a Device . . . . . . . . . . . . . . . . . 19
Removing the Terminal Cover . . . . . . . . . . . . . . 19 Connecting Video Equipment . . . . . . . . . . . . . . 19 Connecting a Computer . . . . . . . . . . . . . . . . . . 20 Connecting External Equipment . . . . . . . . . . . . 20 Connecting to the Trigger Out port . . . . . . . . 20
Connecting WirelessHD devices (EH- TW9400W/EH-TW8400W only) . . . . . . . . . . . 20
Connecting to the LAN port . . . . . . . . . . . . . 21 Attaching the Wireless LAN unit . . . . . . . . . . . . 21 Connecting an HDMI Cable Clamp . . . . . . . . . . . 22
Preparing the Remote Control . . . . . . . . 23
Installing the Remote Control Batteries . . . . . . . 23 Remote Control Operating Range . . . . . . . . . . . 24 Operating range (left to right) . . . . . . . . . . . . 24 Operating range (top to bottom) . . . . . . . . . . 24
Basic Operations
Projecting Images . . . . . . . . . . . . . . . . . . . 25
Turning On the Projector . . . . . . . . . . . . . . . . . 25 If the target image is not projected . . . . . . . . 26 Using the Home Screen . . . . . . . . . . . . . . . . . . 26 Turning Off . . . . . . . . . . . . . . . . . . . . . . . . . . . 27
Adjusting the Projected Image . . . . . . . . 28
Displaying the Test Pattern . . . . . . . . . . . . . . . . 28
Lens Adjustment Function (Focus, Zoom, Lens
Shift) . . . . . . . . . . . . . . . . . . . . . . . . . . . . . . . . 28
Adjusting the focus . . . . . . . . . . . . . . . . . . . 29
Adjusting the projection size (Zoom
Adjustment) . . . . . . . . . . . . . . . . . . . . . . . . 29
Adjusting the position of the projected
image (Lens Shift Adjustment) . . . . . . . . . . . 30 Adjusting the Projector's Tilt . . . . . . . . . . . . . . . 31 Correcting Keystone Distortion . . . . . . . . . . . . . 31 Hiding the Image Temporarily . . . . . . . . . . . . . . 31
Adjusting the Image
Adjusting the Image . . . . . . . . . . . . . . . . . 32
Selecting the Projection Quality (Color Mode)
. . . . . . . . . . . . . . . . . . . . . . . . . . . . . . . . . . . . 32
Switching the Screen Between Full and Zoom (Aspect) . . . . . . . . . . . . . . . . . . . . . . . . . . . . . 33
Adjusting the Sharpness . . . . . . . . . . . . . . . . . . 34
Adjusting Image Resolution (Image
Enhancement) . . . . . . . . . . . . . . . . . . . . . . . . . 35
Setting Auto Iris . . . . . . . . . . . . . . . . . . . . . . . . 36
Setting Frame Interpolation . . . . . . . . . . . . . . . 36
Adjusting the Color . . . . . . . . . . . . . . . . . . 38
Adjusting the Color Temp. . . . . . . . . . . . . . . . . 38 Adjusting the RGB (Offset and Gain) . . . . . . . . . 38 Adjusting Hue, Saturation, and Brightness . . . . . 38 Adjusting the Gamma . . . . . . . . . . . . . . . . . . . 40 Select and adjust the correction value . . . . . . 40
3

Contents
Adjust using the gamma adjustment graph
. . . . . . . . . . . . . . . . . . . . . . . . . . . . . . . . . . 40
Viewing the Image at the Saved Image
Quality (Memory Function) . . . . . . . . . . . 42
Saving a Memory . . . . . . . . . . . . . . . . . . . . . . . 42
Loading, Deleting, and Renaming a Memory
. . . . . . . . . . . . . . . . . . . . . . . . . . . . . . . . . . . . 42
Useful Functions
Enjoying 3D Images . . . . . . . . . . . . . . . . . . 44
Preparing to View 3D Images . . . . . . . . . . . . . . 44 If the 3D image cannot be viewed . . . . . . . . . 44 Using 3D Glasses . . . . . . . . . . . . . . . . . . . . . . . 45 Warnings Regarding Viewing 3D Images . . . . . . 45
Connecting with WirelessHD . . . . . . . . |
47 |
Installing the WirelessHD Transmitter . . . . . . . . 47 WirelessHD Transmitter part names . . . . . . . . 48
WirelessHD Transmitter connection
example and signal flow . . . . . . . . . . . . . . . . 49 Setting the WirelessHD Transmitter . . . . . . . . 54 Projecting Images . . . . . . . . . . . . . . . . . . . . . . 54 WirelessHD Settings Menu . . . . . . . . . . . . . . . . 56 WirelessHD Transmission Range . . . . . . . . . . . . 57 Operating the Remote Control . . . . . . . . . . . . . 58 Remote Control Operating Range . . . . . . . . . . . 58 Switching the Input and Output . . . . . . . . . . . . 58 Switching the target image . . . . . . . . . . . . . . 59 Switching the image source . . . . . . . . . . . . . 60
Using the HDMI Link Function . . . . . . . . 61
HDMI Link Function . . . . . . . . . . . . . . . . . . . . . 61
HDMI Link Settings . . . . . . . . . . . . . . . . . . . . . . 61
Connecting . . . . . . . . . . . . . . . . . . . . . . . . . . . 62
Using the Projector on a Network
Projecting Using Wired LAN . . . . . . . . . . 63
Selecting Wired Network Settings . . . . . . . . . . . 63
Projecting Using Wireless LAN . . . . . . . . 65
Selecting Wireless Network Settings Manually
. . . . . . . . . . . . . . . . . . . . . . . . . . . . . . . . . . . . 65
Selecting the Computer's Wireless LAN Settings
. . . . . . . . . . . . . . . . . . . . . . . . . . . . . . . . . . . . 67
Selecting wireless network settings in
Windows . . . . . . . . . . . . . . . . . . . . . . . . . . . 67
Selecting wireless network settings in OS X
. . . . . . . . . . . . . . . . . . . . . . . . . . . . . . . . . . 67 Setting Up Wireless Network Security . . . . . . . . 68
Projecting in Epson iProjection (iOS/Android)
. . . . . . . . . . . . . . . . . . . . . . . . . . . . . . . . . . . . 68
Operating using a smartphone (remote
control function) . . . . . . . . . . . . . . . . . . . . . 69
Configuration Menu
Configuration Menu Functions . . . . . . . . 71
Configuration Menu Operations . . . . . . . . . . . . 71 Configuration Menu Table . . . . . . . . . . . . . . . . 72 Image menu . . . . . . . . . . . . . . . . . . . . . . . . 72 Signal menu . . . . . . . . . . . . . . . . . . . . . . . . 74 Settings menu . . . . . . . . . . . . . . . . . . . . . . . 75 Extended menu . . . . . . . . . . . . . . . . . . . . . . 78 Network menu . . . . . . . . . . . . . . . . . . . . . . . 82 Info menu . . . . . . . . . . . . . . . . . . . . . . . . . . 86 Reset menu . . . . . . . . . . . . . . . . . . . . . . . . . 86
Troubleshooting
Problem Solving . . . . . . . . . . . . . . . . . . . . . 87
Reading the Indicators . . . . . . . . . . . . . . . . . . . 87 Indicator status during an error/warning . . . . 87 Indicator status during normal operation . . . . 89 When the Indicators Provide No Help . . . . . . . . 89 Check the problem . . . . . . . . . . . . . . . . . . . . 89 Problems relating to images . . . . . . . . . . . . . 90 Problems when projection starts . . . . . . . . . . 94 Problems with the remote control . . . . . . . . . 94 Problems with the control panel . . . . . . . . . . 94 Problems with 3D . . . . . . . . . . . . . . . . . . . . 95 Problems with HDMI . . . . . . . . . . . . . . . . . . 95
Problems with WirelessHD (EH-TW9400W/ EH-TW8400W only) . . . . . . . . . . . . . . . . . . . 96
Network problems . . . . . . . . . . . . . . . . . . . . 98 About Event ID . . . . . . . . . . . . . . . . . . . . . . . . 98
4

Contents
Maintenance
Maintenance . . . . . . . . . . . . . . . . . . . . . . . 100
Cleaning the Parts . . . . . . . . . . . . . . . . . . . . . 100 Cleaning the air filter . . . . . . . . . . . . . . . . . 100 Cleaning the main unit . . . . . . . . . . . . . . . . 101 Cleaning the lens . . . . . . . . . . . . . . . . . . . . 102 Replacement Periods for Consumables . . . . . . 102 Air filter replacement period . . . . . . . . . . . . 102 Lamp replacement period . . . . . . . . . . . . . . 102 Replacing Consumables . . . . . . . . . . . . . . . . . 102 Replacing the air filter . . . . . . . . . . . . . . . . . 102 Replacing the lamp . . . . . . . . . . . . . . . . . . 103 Resetting lamp hours . . . . . . . . . . . . . . . . . 105
Panel Alignment . . . . . . . . . . . . . . . . . . . . 106
Color Uniformity . . . . . . . . . . . . . . . . . . . 108
About PJLink . . . . . . . . . . . . . . . . . . . . . . . 110
Appendix
Optional Accessories and
Consumables . . . . . . . . . . . . . . . . . . . . . . . 111
Optional Items . . . . . . . . . . . . . . . . . . . . . . . . 111
Consumables . . . . . . . . . . . . . . . . . . . . . . . . . 111
Supported Resolutions . . . . . . . . . . . . . . 112
PC . . . . . . . . . . . . . . . . . . . . . . . . . . . . . . . . . 112 SD . . . . . . . . . . . . . . . . . . . . . . . . . . . . . . . . . 112 HD . . . . . . . . . . . . . . . . . . . . . . . . . . . . . . . . 113 4K . . . . . . . . . . . . . . . . . . . . . . . . . . . . . . . . . 113 3D . . . . . . . . . . . . . . . . . . . . . . . . . . . . . . . . . 114
3D Input Signals MHL (via a WirelessHD
Transmitter*) . . . . . . . . . . . . . . . . . . . . . . . . . 115
WirelessHD Input Signal MHL* . . . . . . . . . . . . . 115
Specifications . . . . . . . . . . . . . . . . . . . . . . 116
Appearance . . . . . . . . . . . . . . . . . . . . . . . . 119
List of Safety Symbols . . . . . . . . . . . . . . . 120
Glossary . . . . . . . . . . . . . . . . . . . . . . . . . . . 122
General Notes . . . . . . . . . . . . . . . . . . . . . . 123
Warning Labels . . . . . . . . . . . . . . . . . . . . . . . |
123 |
General Notice . . . . . . . . . . . . . . . . . . . . . . . . |
124 |
5
Introduction
 Part Names and Functions
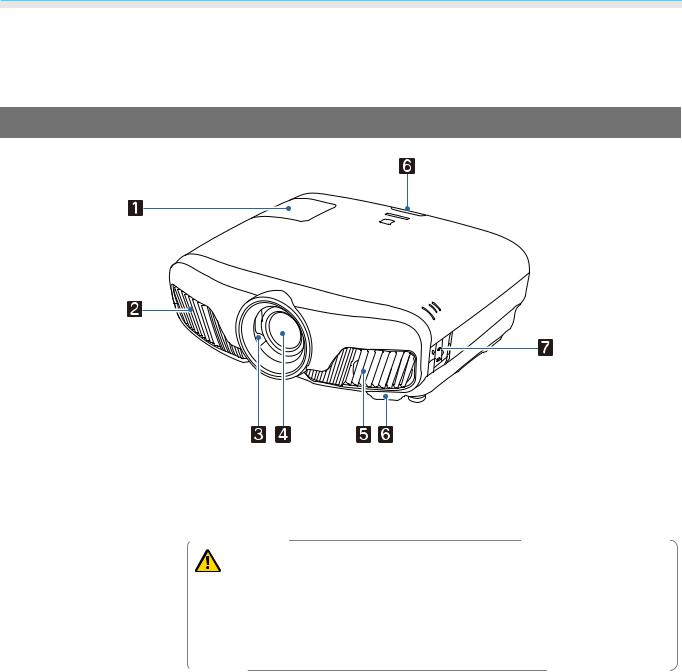
Front/Top
|
Name |
|
Function |
|
a |
Lamp cover |
Open when replacing the projector's lamp. s p.103 |
||
|
|
|
||
b |
Air exhaust vent |
Exhaust vent for air used to cool the projector internally. |
||
|
|
|
Caution |
|
|
|
|
|
|
|
|
While projecting, do not put your face or hands near the air exhaust vent, |
||
|
|
and do not place objects that may become warped or damaged by heat near |
||
|
|
the vent. Hot air from the air exhaust vent could cause burns, warping, or |
||
|
|
accidents to occur. |
||
|
|
|
||
c |
Lens shutter |
Links to the projector's power on/off function, and automatically opens and closes |
||
|
|
the shutter. s p.25 |
||
|
|
|
||
d |
Lens |
Images are projected from here. |
||
|
|
|
||
e |
Air intake vent |
Intake vent for air used to cool the projector internally. |
||
|
|
|
||
|
Air filter cover |
When replacing the air filter, open this cover and remove the air filter. s p.102 |
||
|
|
|
||
f |
Remote receiver |
Receives signals from the remote control. s p.24 |
||
|
|
|
||
g |
Control panel |
Operates the projector. s p.7 |
||
|
|
|
|
|
6
Introduction
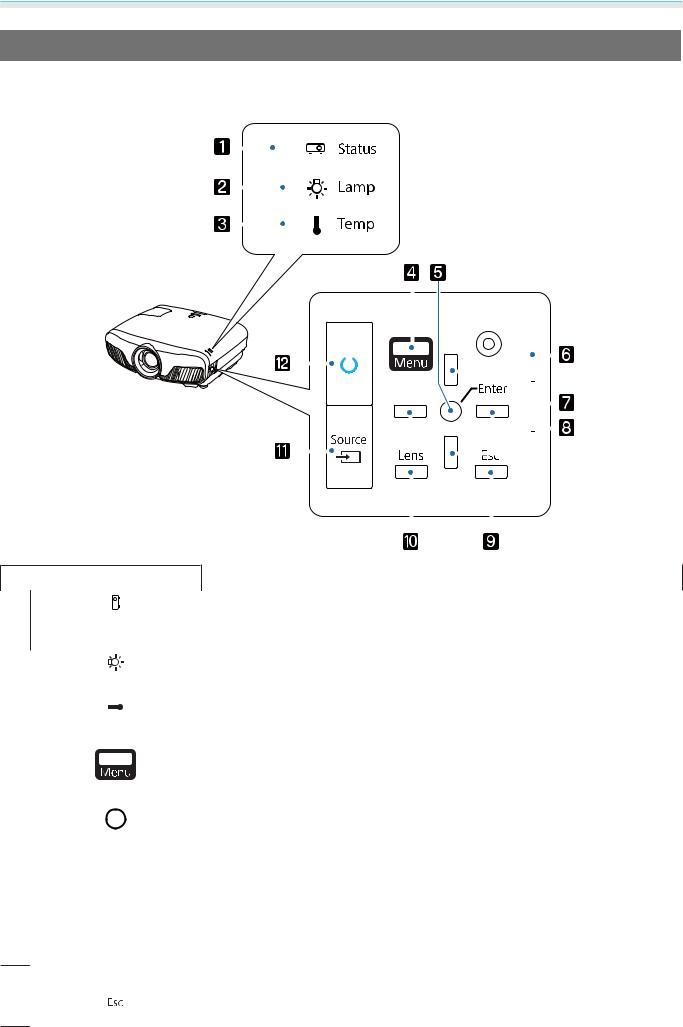
Control Panel
When the Illumination function is set to Off, all indicators are off under normal projection conditions.s Extended - Operation - Illumination p.78
|
|
|
|
|
|
|
|
|
|
|
|
|
|
|
|
|
|
|
|
|
|
|
|
|
|
|
|
|
|
|
|
|
|
|
|
|
|
|
|
|
|
|
|
|
|
|
|
|
|
|
|
|
|
|
|
|
|
|
|
|
|
|
|
|
|
|
|
|
|
|
|
|
|
|
|
|
|
|
|
|
|
|
|
|
|
|
|
|
|
|
|
|
|
|
|
|
|
|
|
|
|
|
|
|
|
|
|
|
|
|
|
|
|
|
|
|
|
|
|
|
|
|
|
|
|
|
|
|
|
|
|
|
|
|
|
|
|
|
|
|
|
|
|
|
|
|
|
|
|
|
|
|
|
|
|
|
|
|
|
|
|
|
|
|
|
|
|
|
|
|
|
|
|
|
|
|
|
|
|
|
|
|
|
|
|
|
|
|
|
|
|
|
|
|
|
|
|
|
|
|
|
|
|
|
|
|
|
|
|
|
|
|
|
|
|
|
|
|
|
|
|
|
|
|
|
|
|
|
|
|
|
|
|
|
|
|
|
|
|
|
|
|
|
|
|
|
|
|
|
|
|
|
|
|
|
|
|
|
|
|
|
|
|
|
|
|
|
|
|
|
|
|
|
|
|
|
|
|
|
|
|
|
|
|
|
|
|
|
|
|
|
|
|
|
|
|
|
|
|
|
|
|
|
|
|
|
|
|
|
|
|
|
|
|
|
|
|
|
|
|
|
|
|
|
|
|
|
|
|
|
|
|
|
|
|
|
|
|
|
|
|
|
|
|
|
|
|
|
|
|
|
|
|
|
|
|
|
|
|
|
|
|
|
|
|
|
|
|
|
|
|
|
|
|
|
|
|
|
|
|
|
|
|
|
|
|
|
|
|
|
|
|
|
|
|
|
|
|
|
|
|
|
|
|
|
|
|
|
|
|
|
|
|
|
|
|
|
|
|
|
|
|
|
|
|
|
|
|
|
|
|
|
|
|
|
|
|
|
|
|
|
|
|
|
|
|
|
|
|
|
|
|
|
|
|
|
|
|
|
|
|
|
|
|
|
|
|
|
|
|
|
|
|
|
|
|
|
|
|
|
|
|
|
|
|
|
|
|
|
|
|
|
|
|
|
|
|
|
|
|
|
|
|
|
|
|
|
|
|
|
|
|
|
|
|
|
|
|
|
|
|
|
|
|
|
|
|
|
|
|
|
|
|
|
|
|
|
|
|
|
|
|
|
|
|
|
|
|
|
|
|
|
|
|
|
|
|
|
|
|
|
|
|
|
|
|
|
|
|
|
|
|
|
|
|
|
|
|
|
|
|
|
|
|
|
|
|
|
|
|
|
|
|
|
|
|
|
Buttons/Indicators |
|
|
|
|
|
|
|
|
|
|
|
|
|
Function |
|||||||||||
a |
Flashes to indicate warm-up in progress or cool-down in progress. Shows the |
||||||||||||||||||||||||
|
|
|
|
projector's status through a combination of other indicators lit and flashing. |
|||||||||||||||||||||
|
|
|
|
||||||||||||||||||||||
|
|
|
|
s p.87 |
|||||||||||||||||||||
|
|
|
|
||||||||||||||||||||||
|
|
|
|
|
|
|
|
|
|
|
|
|
|
|
|
|
|||||||||
b |
Flashes orange when it is time to replace the lamp. Shows the projector's errors |
||||||||||||||||||||||||
|
|
|
|
through a combination of other indicators lit and flashing. s p.87 |
|||||||||||||||||||||
|
|
|
|
||||||||||||||||||||||
|
|
|
|
|
|
|
|
|
|
|
|
|
|
|
|
|
|
|
|
||||||
|
|
|
|
|
|
|
|
|
|
|
|
|
|
|
|
|
|
|
|||||||
c |
|
|
Flashes orange if the internal temperature is too high. Shows the projector's |
||||||||||||||||||||||
|
|
|
|
errors through a combination of other indicators lit and flashing. s p.87 |
|||||||||||||||||||||
|
|
|
|
|
|
|
|
|
|
|
|
|
|
|
|
|
|||||||||
d |
Displays and closes the Configuration menu. |
||||||||||||||||||||||||
|
|
|
|
On the Configuration menu, you can make adjustments and settings for Signal, |
|||||||||||||||||||||
|
|
|
|
Image, Input Signal, and so on. s p.71 |
|||||||||||||||||||||
|
|
|
|
|
|
|
|
|
|
|
|
|
|
|
|
|
|||||||||
e |
Selects functions and settings when a menu is displayed. s p.71 |
||||||||||||||||||||||||
|
|
|
|
|
|
|
|
|
|
|
|
|
|
|
|
|
|||||||||
f Control panel cover |
Cover for the control panel. When you want to use the control panel, grip the |
||||||||||||||||||||||||
|
|
|
|
knob and slide the cover open. |
|||||||||||||||||||||
|
|
|
|
|
|
|
|
|
|
|
|
|
|
|
|
|
|
||||||||
g |
|
|
|
Selects the adjustment value for the keystone correction and for menu items. |
|||||||||||||||||||||
|
|
|
|||||||||||||||||||||||
|
|
|
|
s p.31 |
|||||||||||||||||||||
|
|
|
|
|
|
|
|
|
|
|
|
|
|
|
|
|
|
|
|
|
|
|
|
|
|
|
|
|
|
|
|
|
|
|
|
|
|
|
|
|
|
|
|
|
|
|
|
|
|
|
|
h |
|
|
|
|
|
Selects adjustment values for menu items. s p.71 |
|
|
|
|
|||
|
|
|
|
|||
|
|
|
|
|
|
|
i |
|
|
|
|
|
Returns to the previous menu level when a menu is displayed. s p.71 |
|
|
|
|
|
||
|
|
|
|
|
|
|
7
Introduction
|
Buttons/Indicators |
|
Function |
||
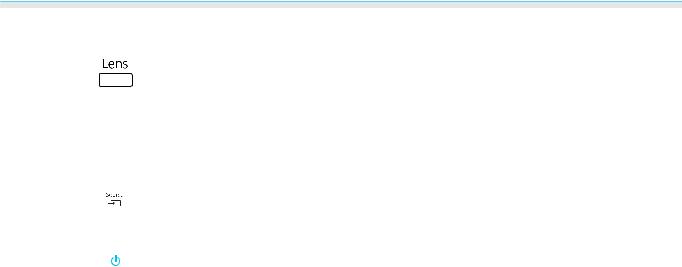
j |
|
Changes the adjustment items for the motorized lens function. |
|||
|
|
|
|
The adjustment items are as follows. |
|
|
|
|
|
• |
Focus s p.29 |
|
|
|
|
• |
Zoom s p.29 |
|
|
|
|
• |
Lens shift s p.30 |
|
|
|
|
|
|
k |
|
|
|
Changes to the image from each input port. s p.26 |
|
|
|
|
|||
|
|
|
|
|
|
|
|
|
|
||
l |
|
|
|
Turns the projector on or off. s p.25 |
|
|
|
|
|||
|
|
|
|
Lit when the projector is on. Shows the projector's errors through a combina- |
|
|
|
|
|
tion of other indicators lit and flashing. s p.87 |
|
|
|
|
|
|
|
8

Introduction
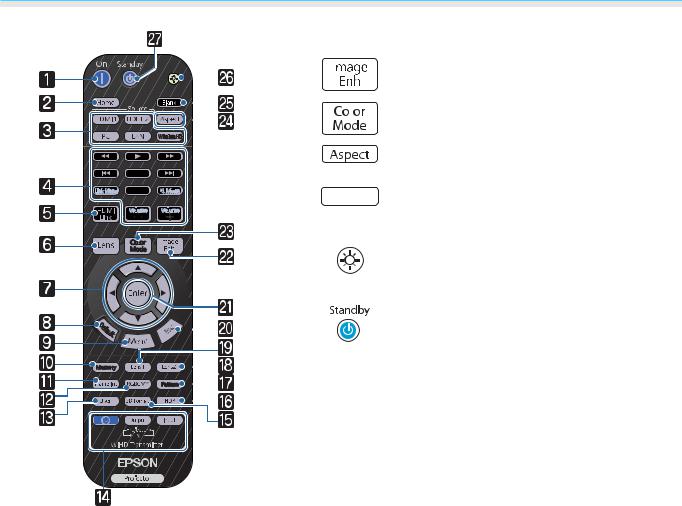
Remote Control
The remote control varies depending on the projector model you are using. This examples in this section are for the remote control for the EH-TW9400W/EH-TW8400W.
|
|
|
|
|
|
|
|
|
|
|
|
Button |
|
|
Function |
|
|
|
|
|
|
|
|
|
|
|
|
|
a |
|
Turns the projector on. s p.25 |
||
|
|
|
|
|
|
|
|
|
|
|
|
|
|
|
|
|
|
|
|
|
|
|
|
|
|
|
|
|
|
|
|
||
|
|
|
|
|
|
|
|
|
|
|
|
b |
|
Displays and closes the Home screen. |
||
|
|
|
|
|
|
|
|
|
|
|
|
|||||
|
|
|
|
|
|
|
|
|
|
|
|
|
|
|
s p.26 |
|
|
|
|
|
|
|
|
|
|
|
|
|
|
|
|||
|
|
|
|
|
|
|
|
|
|
|
|
|
|
|
||
|
|
|
|
|
|
|
|
|
|
|
|
c |
|
Changes to the image from each input port. |
||
|
|
|
|
|
|
|
|
|
|
|
|
|
||||
|
|
|
|
|
|
|
|
|
|
|
|
|
||||
|
|
|
|
|
|
|
|
|
|
|
|
|
|
|
s p.26 |
|
|
|
|
|
|
|
|
|
|
|
|
|
|
|
|||
|
|
|
|
|
|
|
|
|
|
|
|
|
|
|||
|
|
|
|
|
|
|
|
|
|
|
|
|
|
|
||
|
|
|
|
|
|
|
|
|
|
|
|
|
|
|
|
is only available for the EH-TW9400W/ |
|
|
|
|
|
|
|
|
|
|
|
|
|
|
|
|
|
|
|
|
|
|
|
|
|
|
|
|
|
|
|
|
|
|
|
|
|
|
|
|
|
|
|
|
|
|
|
|
|
|
|
|
|
|
|
|
|
|
|
|
|
|
|
|
|
|
EH-TW8400W. |
|
|
|
|
|
|
|
|
|
|
|
|
|
|
|
|||
|
|
|
|
|
|
|
|
|
|
|
|
|
|
|
||
|
|
|
|
|
|
|
|
|
|
|
|
|
|
|
|
|
|
|
|
|
|
|
|
|
|
|
|
|
|
|
|
|
|
|
|
|
|
|
|
|
|
|
|
|
|
|
|
|
|
|
|
|
|
|
|
|
|
|
|
|
|
|
|
|
|
|
|
|
|
|
|
|
|
|
|
|
|
|
|
|
|
|
||
|
|
|
|
|
|
|
|
|
|
|
|
d |
|
Performs operations such as play, stop, and |
||
|
|
|
|
|
|
|
|
|
|
|
|
|
|
|
volume adjustment for connected devices |
|
|
|
|
|
|
|
|
|
|
|
|
|
|
|
|
that meet the HDMI CEC standards. s p.61 |
|
|
|
|
|
|
|
|
|
|
|
|
|
|
|
|
|
|
e |
|
|
|
|
|
|
• |
When HDMI Link is On |
|
|
|
|
|
|
|||
|
|
|
|
|
|
|||
|
|
|
|
|
|
|||
|
|
|
|
|
|
|||
|
|
|
|
|
|
|||
|
|
|
|
|
||||
|
|
|
|
|
||||
|
|
|
|
|
|
|
|
sSettings - HDMI Link - HDMI Link p.75 |
|
|
|
|
|
|
|
|
|
|
|
|
|
|
|
|
|
Displays the device connections list. |
|
|
|
|
|
|
|
• When HDMI Link is Off |
|
|
|
|
|
|
|
|
|
sSettings - HDMI Link - HDMI Link p.75 |
|
|
|
|
|
|
|
|
Displays the HDMI link settings menu. |
|
|
|
|
|
|
|
s p.61 |
|
|
|
|
|
|
|
|||
f |
|
|
|
Changes the adjustment items for the motor- |
||||
|
|
|
|
|
|
|
ized lens function. |
|
|
|
|
|
|
|
|
The adjustment items are as follows. |
|
|
|
|
|
|
|
|
• |
Focus s p.29 |
|
|
|
|
|
|
|
• |
Zoom s p.29 |
|
|
|
|
|
|
|
• |
Lens shift s p.30 |
9
Introduction
|
|
|
|
|
|
|
|
|
|
Button |
Function |
|
|
|
|
|
|
|
|
|
|
g |
Selects menu items and adjustment values. |
|
|
|
|
|
|
|
|
|
|
|
s p.71 |
|
|
|
|
|
|
|
|
|
|
|
|
|
|
|
|
|
|
|
|
|
|
|
|
|
|
|
|
|
|
|
|
|
|
|
|
|
|
|
|
|
|
|
|
|
|
|
|
|
|
|
|
|
|
|
|
|
|
|
|
|
|
|
|
|
|
|
|
|
|
|
|
|
|
|
|
|
|
|
|
|
|
h |
|
|
The adjustment value returns to its default |
||||
|
|||||||||||||||||
|
|
|
|
|
|
|
|
|
|
|
|
|
|
|
|
value when pressed while the menu's adjust- |
|
|
|
|
|
|
|
|
|
|
|
|
|
|
|
||||
|
|
|
|
|
|
|
|
|
|
|
|
|
|
||||
|
|
|
|
|
|
|
|
|
|
|
|
|
|
|
|
ment screen is displayed. s p.71 |
|
|
|
|
|
|
|
|
|
|
|
i |
|
|
Displays and closes the Configuration menu. |
||||
|
|
|
|
|
|
|
|
|
|
|
|
|
|
|
|
On the Configuration menu, you can make |
|
|
|
|
|
|
|
|
|
|
|
|
|
|
|
|
|
adjustments and settings for Signal, Image, |
|
|
|
|
|
|
|
|
|
|
|
|
|
|
|
|
|
and so on. s p.71 |
|
|
|
|
|
|
|
|
|
|
|
|
|
|
|
||||
|
|
|
|
|
|
|
|
|
|
j |
|
|
Saves, loads, or erases a memory. s p.42 |
||||
|
|
|
|
|
|
|
|
|
|||||||||
|
|
|
|
|
|
|
|
|
|
|
|
|
|
||||
|
|
|
|
|
|
|
|
|
|
k |
|
|
Sets the strength for Frame Interpolation. |
||||
|
|
|
|
|
|
|
|
|
|
||||||||
|
|
|
|
|
|
|
|
|
|
||||||||
|
|
|
|
|
|
|
|
|
|||||||||
|
|
|
|
|
|
|
|
|
|
|
|
|
|
|
|
s p.36 |
|
|
|
|
|
|
|
|
|
|
|
|
|
|
|
|
|
|
|
|
|
|
|
|
|
|
|
|
|
l |
|
|
Adjusts the hue, saturation, and brightness |
||||
|
|
|
|
|
|
|
|
|
|||||||||
|
|
|
|
|
|
|
|
|
|
|
|
|
|
|
|
for each RGBCMY color. s p.38 |
|
|
|
|
|
|
|
|
|
|
|
|
|
|
|
||||
|
|
|
|
|
|
|
|
|
|
m |
|
|
Performs the function assigned to the user |
||||
|
|
|
|
|
|
|
|
|
|
|
|
|
|
|
|
button. s p.75 |
|
|
|
|
|
|
|
|
|
|
|
|
|
|
|
|
|
||
|
|
|
|
|
|
|
|
|
|
n |
|
|
|
|
(EH-TW9400W/EH-TW8400W only) |
||
|
|
|
|
|
|
|
|
|
|
|
|||||||
|
|
|
|
|
|
|
|
|
|
|
|||||||
|
|
|
|
|
|
|
|
|
|
|
|
|
|
|
|
This is the button for controlling the Wire- |
|
|
|
|
|
|
|
|
|
|
|
|
|
|
|
|
|
lessHD Transmitter. |
|
|
|
|
|
|
|
|
|
|
|
|
|
|
|
|
|||
|
|
|
|
|
|
|
|
|
|
|
|
|
|
|
|
Turns on the WirelessHD Transmitter, or |
|
|
|
|
|
|
|
|
|
|
|
|
|
|
|
|
|
switches the input and output. |
|
|
|
|
|
|
|
|
|
|
|
|
|
|
|
|
|
Make sure you point the remote control at the |
|
|
|
|
|
|
|
|
|
|
|
|
|
|
|
|
|
WirelessHD Transmitter when performing |
|
|
|
|
|
|
|
|
|
|
|
|
|
|
|
|
|
operations. s p.47 |
|
|
|
|
|
|
|
|
|
|
|
|
|
|
|
||||
|
|
|
|
|
|
|
|
|
|
o |
|
|
Changes the 3D format. |
||||
|
|
|
|
|
|
|
|
|
|
|
|
|
|
|
|
This projector supports the following 3D for- |
|
|
|
|
|
|
|
|
|
|
|
|
|
|
|
|
|
mats. |
|
|
|
|
|
|
|
|
|
|
|
|
|
|
|
|
|
• |
Frame Packing |
|
|
|
|
|
|
|
|
|
|
|
|
|
|
|
|
• |
Side by Side |
|
|
|
|
|
|
|
|
|
|
|
|
|
|
|
|
• |
Top and Bottom |
|
|
|
|
|
|
|
|
|
|
|
|
|
|
|
|
s p.44 |
|
|
|
|
|
|
|
|
|
|
|
|
|
|
|
||||
|
|
|
|
|
|
|
|
|
|
p |
|
|
The adjustment screen for the dynamic range |
||||
|
|
|
|
|
|
|
|
|
|
|
|
|
|
|
|
is displayed.s p.74 |
|
|
|
|
|
|
|
|
|
|
|
|
|
|
|
||||
|
|
|
|
|
|
|
|
|
|
q |
|
|
Displays and closes the test pattern. s p.28 |
||||
|
|
|
|
|
|
|
|
|
|
|
|
|
|
||||
|
|
|
|
|
|
|
|
|
|
r |
|
|
Loads the lens position registered as Memo- |
||||
|
|
|
|
|
|
|
|
|
|
|
|
|
|
|
|
ry1 or Memory2 in the Save Lens Position. |
|
|
|
|
|
|
|
|
|
|
|
s |
|
|
|||||
|
|
|
|
|
|
|
|
|
|
|
|
s p.42 |
|||||
|
|
|
|
|
|
|
|
|
|
|
|
|
|
||||
|
|
|
|
|
|
|
|
|
|
t |
|
|
Returns to the previous menu level when a |
||||
|
|
|
|
|
|
|
|
|
|
|
|
|
|
|
|
menu is displayed. s p.71 |
|
|
|
|
|
|
|
|
|
|
|
|
|
|
|
||||
|
|
|
|
|
|
|
|
|
|
A |
|
|
When a menu is displayed, it accepts and en- |
||||
|
|
|
|
|
|
|
|
|
|
|
|
|
|
|
|
ters the current selection and moves to the |
|
|
|
|
|
|
|
|
|
|
|
|
|
|
|
|
|
next level. s p.71 |
|
10
Introduction
|
|
|
|
|
|
|
|
|
|
|
|
|
|
|
Button |
|
Function |
|||||
|
|
|
|
|
|
|
|
|
|
|
|
|
|
B |
|
|
|
|
|
|
Displays the Image Enhancement menu. |
|
|
|
|
|
|
|
|
|
|
|
|
|
|
|
|
||||||||
|
|
|
|
|
|
|
|
|
|
|
|
|
|
|
||||||||
|
|
|
|
|
|
|
|
|
|
|
|
|
|
|
|
|
|
|
|
|
|
s p.35 |
|
|
|
|
|
|
|
|
|
|
|
|
|
|
|
|
|
|
|
|
|
|
|
|
|
|
|
|
|
|
|
|
|
|
|
|
|
C |
|
|
|
|
|
|
|
Changes the Color Mode. s p.32 |
|
|
|
|
|
|
|
|
|
|
|
|
|
|
|
|
|
||||||
|
|
|
|
|
|
|
|
|
|
|
|
|
|
|
||||||||
|
|
|
|
|
|
|
|
|
|
|
|
|
|
|
|
|
|
|
|
|
|
|
|
|
|
|
|
|
|
|
|
|
|
|
|
|
|
|
|
|
|
|
|
|
|
|
|
|
|
|
|
|
|
|
|
|
|
|
|
|
|
|
|
|||||
|
|
|
|
|
|
|
|
|
|
|
|
|
|
D |
|
|
|
|
|
|
|
Selects the aspect mode according to the in- |
|
|
|
|
|
|
|
|
|
|
|
|
|
|
|
|
|
|
|
|
|
|
put signal.s p.33 |
|
|
|
|
|
|
|
|
|
|
|
|
|
|
|
|
|
|
|
|
|
||
|
|
|
|
|
|
|
|
|
|
|
|
|
|
|
|
|
|
|
||||
|
|
|
|
|
|
|
|
|
|
|
|
|
|
E |
|
|
|
Temporarily stops projection. To turn the im- |
||||
|
|
|
|
|
|
|
|
|
|
|
|
|
|
|
||||||||
|
|
|
|
|
|
|
|
|
|
|
|
|
|
|
|
|
|
|
|
|
|
age back on, press this button again. |
|
|
|
|
|
|
|
|
|
|
|
|
|
|
|
|
|
|
|
|
|
||
|
|
|
|
|
|
|
|
|
|
|
|
|
|
|
|
|
|
|
|
|
||
|
|
|
|
|
|
|
|
|
|
|
|
|
|
|
|
|
|
|
|
|
|
s p.31 |
|
|
|
|
|
|
|
|
|
|
|
|
|
|
F |
|
|
The remote control buttons light up for ap- |
|||||
|
|
|
|
|
|
|
|
|
|
|
|
|
|
|
|
|
|
|
|
|
|
proximately 10 seconds. This is useful when |
|
|
|
|
|
|
|
|
|
|
|
|
|
|
|
|
|
|
|
|
|
|
operating the remote control in the dark. |
|
|
|
|
|
|
|
|
|
|
|
|
|
|
|
|
|
|
|||||
|
|
|
|
|
|
|
|
|
|
|
|
|
|
G |
|
|
|
|
|
|
|
Turns the projector off. s p.27 |
|
|
|
|
|
|
|
|
|
|
|
|
|
|
|
|
|
|
|
|
|
|
|
|
|
|
|
|
|
|
|
|
|
|
|
|
|
|
|
|
|
|
|
|
|
|
|
|
|
|
|
|
|
|
|
|
|
|
|
|
|
|
|
|
|
|
|
|
|
|
|
|
|
|
|
|
|
|
|
|
|
|
|
|
|
|
|
|
|
|
|
|
|
|
|
|
|
|
|
|
|
|
|
|
|
|
|
|
|
|
|
|
|
|
|
|
|
|
|
|
|
|
|
|
|
|
|
|
|
|
|
|
|
|
|
|
|
|
11
Introduction
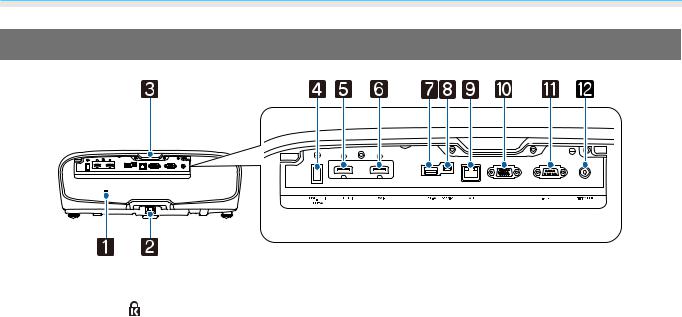
Rear
|
Name |
Function |
a |
Security slot ( ) |
The security slot compatible with the MicroSaver security system manufac- |
|
|
tured by Kensington. For more details, visit the homepage of Kensington at |
|
|
http://www.kensington.com/. |
|
|
|
b |
Power inlet |
Connect the power cord. s p.25 |
|
|
|
c |
Remote receiver |
Receives signals from the remote control. s p.24 |
|
|
|
d |
Opt.HDMI port |
Connects the power supply port for the optical HDMI cable. However, con- |
|
|
nection for all the devices is not guaranteed. Make sure to check if your device |
|
|
works beforehand. |
|
|
|
e |
HDMI1 port |
Connects HDMI compatible video equipment and computers.s p.19 |
|
|
HDMI1/HDMI2 ports support HDCP 2.2. |
f |
HDMI2 port |
|
|
|
|
g |
USB-A port |
Connects the optional Wireless LAN unit. It is also used when updating the |
|
|
firmware. s p.21 |
|
|
|
h |
Service port |
Service port. This is not normally used. |
|
|
|
i |
LAN port |
Connects a LAN cable to connect to a network. s p.21 |
|
|
|
j |
PC port |
Connects to the RGB output port on a computer. s p.20 |
|
|
|
k |
RS-232C port |
When controlling the projector, connect the projector to a computer with an |
|
|
RS-232C cable. This port is for control use and should not normally be used. |
|
|
|
l |
Trigger Out port |
Connects with external devices such as motorized screens. s p.20 |
|
|
|
12
Introduction
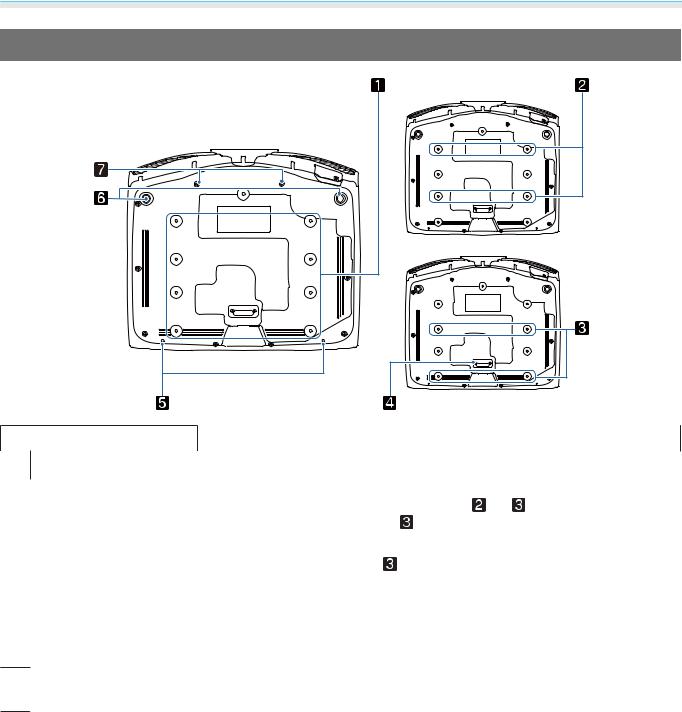
Base
LENS
|
Name |
|
Function |
|
|
|
a Ceiling mount fixing |
Attaches the optional ceiling mount here when suspending the projector from |
|||||
|
|
a ceiling. s p.111 |
|
|
|
|
b points |
|
or |
depending on the in- |
|||
Use the four ceiling mount fixing points for |
||||||
c |
|
|||||
stallation environment. Use the |
fixing points when installing next to a wall |
|||||
|
|
in a small room. |
|
|
|
|
|
|
|
||||
d Rear foot |
Remove this when using the |
ceiling mount fixing points. |
||||
e Cable cover fixing |
Screw holes for attaching the cable cover. |
|
|
|||
|
screw |
|
|
|
|
|
|
|
|||||
f Front adjustable foot |
When set up on a surface such as a table, extend the foot to adjust horizontal |
|||||
|
|
tilt. s p.31 |
|
|
|
|
gScrew holes for ana- Screw holes for attaching the anamorphic lens. morphic lens
13
Preparing
 Installing
Projected Image and Position of Projector
Install the projector as follows.
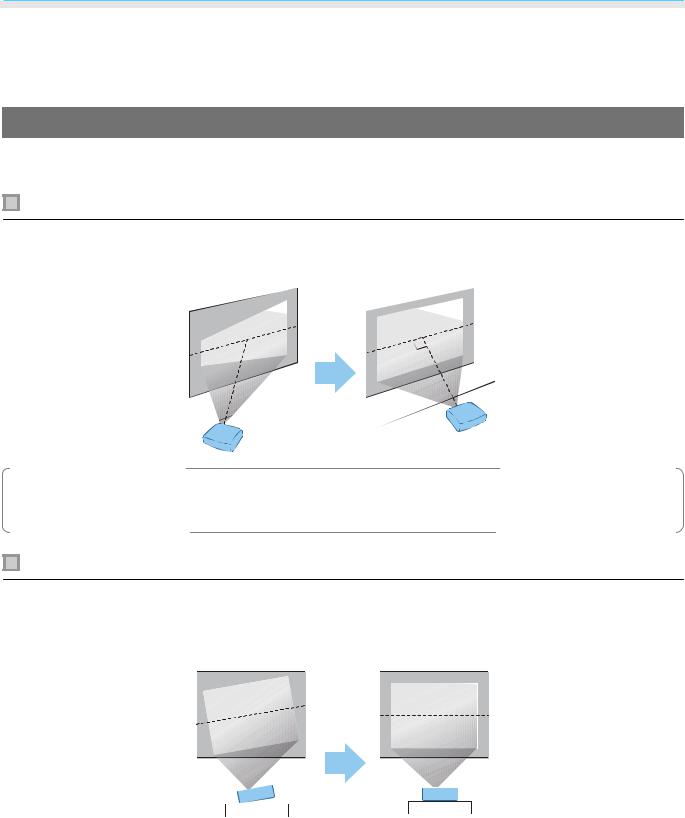
Installing in parallel with the screen
If the projector is installed at an angle to the screen, keystone distortion occurs in the projected image. Adjust the projector's position so that it is installed in parallel with the screen.
cIf the projector cannot be installed in front of the screen, you can adjust the position of the image by using lens shift. s p.30
Installing the projector horizontally by adjusting the height of either side
If the projector is tilted, the projected image is also tilted.
Install the projector horizontally so that both sides are at the same height.
If the projector cannot be installed horizontally, you can adjust the projector's tilt with the front foot. s p.31
14
Preparing
Various Setting Methods
 Warning
•A special method of installation is required when suspending the projector from a ceiling (ceiling mount). If it is not installed correctly, it could fall, causing an accident and injury.
•If you use adhesives, lubricants, or oil on the ceiling mount fixing points to prevent screws from loosening, or if you use items such as lubricants or oils on the projector, the outer projector case may crack, which causes it to fall from its ceiling mount. This could cause serious injury to anyone under the projector and also damage the projector.
•Do not set up the projector in locations exposed to high humidity and dust, such as on a kitchen counter, in the kitchen, or near a humidifier, or in locations exposed to oil smoke or steam. Doing so could cause fire or electric shock. In addition, the oil content could cause the projector’s outer case to deteriorate and could cause the projector to fall off from the ceiling where it is suspended.
•Do not install it on an unstable shelf or in a place out of load range. Otherwise, it could fall or topple causing an accident and injury.
•When installing it in a high position such as on a shelf, take measures against falling by using wires to ensure the safety in an emergency, such as an earthquake, and prevent accidents. If it is not installed correctly, it could fall causing an accident and injury.
•Do not block the air intake vent and air exhaust vent of the projector. Blocking its air intake vent and air exhaust vent may trap heat inside causing fire.
Attention
•Do not use the projector installed vertically. Doing so could cause a malfunction.
•Clean the air filter once every three months. Clean it more often if the environment is particularly dusty. s p.100
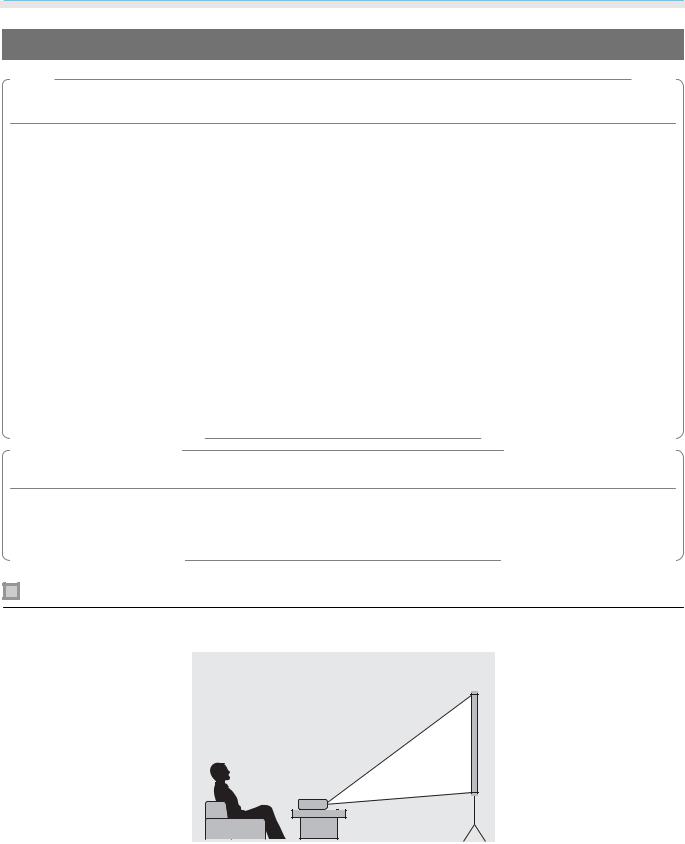
Placing on a table and projecting
You can install the projector on a table in your living room or on a low shelf to project images.
15
Preparing
Suspending from the ceiling and projecting
You can suspend the projector from the ceiling with the optional ceiling mount to project images.
cWhen suspending from the ceiling and projecting, set Projection to Front/Ceiling or Rear/ Ceiling. s Extended - Projection p.78
Projection Distance and Lens Shift Maximum Values
The size of the projection increases as the projector is moved away from the screen.
Use the table below to setup the projector at the optimum position from the screen. The values given here are for your reference only.
The maximum lens shift adjustment values are shown in the following table.
cThe projected image becomes smaller after correcting distortion. Increase the projection distance to fit the projected image to the screen size.
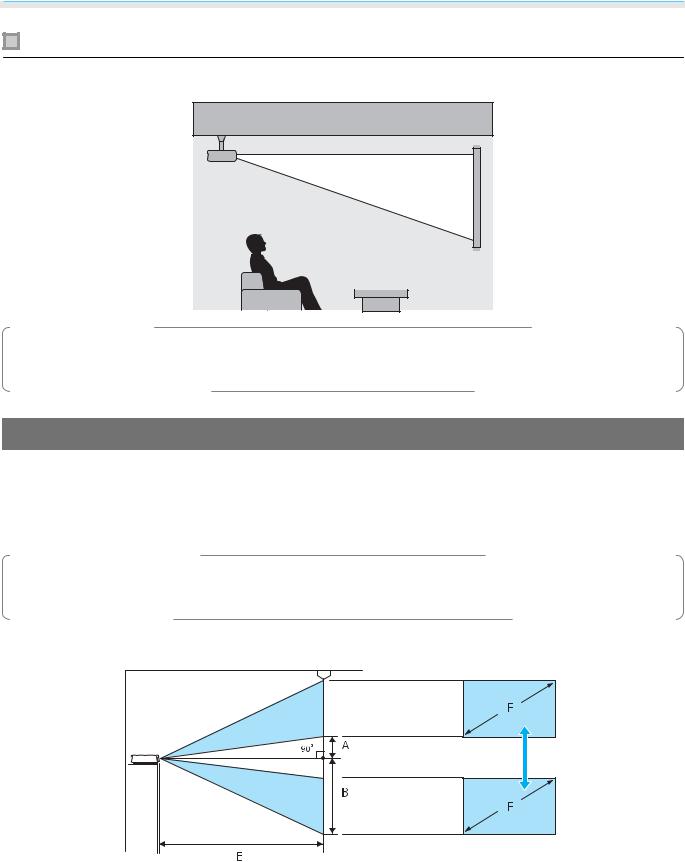
When adjusting the projection position vertically in lens shift
A: Distance from the center of the lens to the bottom edge of the projected image (when lens shift is raised to its highest level)
B: Distance from the center of the lens to the bottom edge of the projected image (when lens shift is lowered to its lowest level)
E : Projection distance from the projector to the screen
F: Size of the projected image
16
Loading...