


 Loading...
User’s Guide
BPS0139-02 EN

GP-C830/GP-M830/GP-C831/GP-M831/GP-C832/GP-M832 User’s Guide
Contents
Chapter 1 Getting to Know Your Printer
Features. . . . . . . . . . . . . . . . . . . . . . . . . . . . . . . . . . . . . . . . . . . . . . . . . . . . . . . . . . . . . . . . . . . . . . . . . . . . . . . 7
Chapter 2 Safety Instructions
Safety Instructions. . . . . . . . . . . . . . . . . . . . . . . . . . . . . . . . . . . . . . . . . . . . . . . . . . . . . . . . . . . . . . . . . . . . . . . 8 Warnings, Cautions, and Notes. . . . . . . . . . . . . . . . . . . . . . . . . . . . . . . . . . . . . . . . . . . . . . . . . . . . . . . . 8 Important safety instructions. . . . . . . . . . . . . . . . . . . . . . . . . . . . . . . . . . . . . . . . . . . . . . . . . . . . . . . . . . 8 For Turkish users. . . . . . . . . . . . . . . . . . . . . . . . . . . . . . . . . . . . . . . . . . . . . . . . . . . . . . . . . . . . . . . . . . 12 For Ukrainian users. . . . . . . . . . . . . . . . . . . . . . . . . . . . . . . . . . . . . . . . . . . . . . . . . . . . . . . . . . . . . . . . 12 For Brazilian users. . . . . . . . . . . . . . . . . . . . . . . . . . . . . . . . . . . . . . . . . . . . . . . . . . . . . . . . . . . . . . . . . 12 For Argentina users. . . . . . . . . . . . . . . . . . . . . . . . . . . . . . . . . . . . . . . . . . . . . . . . . . . . . . . . . . . . . . . . 13
Chapter 3 Paper Handling
Acceptable Paper Conditions. . . . . . . . . . . . . . . . . . . . . . . . . . . . . . . . . . . . . . . . . . . . . . . . . . . . . . . . . . . . . 15 Printing on Continuous Paper. . . . . . . . . . . . . . . . . . . . . . . . . . . . . . . . . . . . . . . . . . . . . . . . . . . . . . . . . . . . 15 Printing with the push tractor. . . . . . . . . . . . . . . . . . . . . . . . . . . . . . . . . . . . . . . . . . . . . . . . . . . . . . . . 16 Using the tear-off function. . . . . . . . . . . . . . . . . . . . . . . . . . . . . . . . . . . . . . . . . . . . . . . . . . . . . . . . . . . 20 Loading Special Paper. . . . . . . . . . . . . . . . . . . . . . . . . . . . . . . . . . . . . . . . . . . . . . . . . . . . . . . . . . . . . . . . . . . 22 Labels. . . . . . . . . . . . . . . . . . . . . . . . . . . . . . . . . . . . . . . . . . . . . . . . . . . . . . . . . . . . . . . . . . . . . . . . . . . . 22 Using the Micro Adjust Function. . . . . . . . . . . . . . . . . . . . . . . . . . . . . . . . . . . . . . . . . . . . . . . . . . . . . . . . . 23 Adjusting the tear-off position. . . . . . . . . . . . . . . . . . . . . . . . . . . . . . . . . . . . . . . . . . . . . . . . . . . . . . . 23 Adjusting the top-of-form position. . . . . . . . . . . . . . . . . . . . . . . . . . . . . . . . . . . . . . . . . . . . . . . . . . . . 24
Chapter 4 Printer Software
About Your Printer Software. . . . . . . . . . . . . . . . . . . . . . . . . . . . . . . . . . . . . . . . . . . . . . . . . . . . . . . . . . . . . 26 Using the Printer Driver. . . . . . . . . . . . . . . . . . . . . . . . . . . . . . . . . . . . . . . . . . . . . . . . . . . . . . . . . . . . . . . . . 26 Accessing the printer driver from Windows applications. . . . . . . . . . . . . . . . . . . . . . . . . . . . . . . . . . 27 Accessing the printer driver from the Start menu. . . . . . . . . . . . . . . . . . . . . . . . . . . . . . . . . . . . . . . . 27 Changing the printer driver settings. . . . . . . . . . . . . . . . . . . . . . . . . . . . . . . . . . . . . . . . . . . . . . . . . . . 28 Printing barcodes. . . . . . . . . . . . . . . . . . . . . . . . . . . . . . . . . . . . . . . . . . . . . . . . . . . . . . . . . . . . . . . . . . 28
Contents 2

GP-C830/GP-M830/GP-C831/GP-M831/GP-C832/GP-M832 User’s Guide
Printer Driver Settings Overview. . . . . . . . . . . . . . . . . . . . . . . . . . . . . . . . . . . . . . . . . . . . . . . . . . . . . . . . . . 29 Printer settings. . . . . . . . . . . . . . . . . . . . . . . . . . . . . . . . . . . . . . . . . . . . . . . . . . . . . . . . . . . . . . . . . . . . 30 Monitoring settings. . . . . . . . . . . . . . . . . . . . . . . . . . . . . . . . . . . . . . . . . . . . . . . . . . . . . . . . . . . . . . . . 31 Using EPSON Status Monitor 3. . . . . . . . . . . . . . . . . . . . . . . . . . . . . . . . . . . . . . . . . . . . . . . . . . . . . . . . . . . 32 Setting up EPSON Status Monitor 3. . . . . . . . . . . . . . . . . . . . . . . . . . . . . . . . . . . . . . . . . . . . . . . . . . . 32 Accessing EPSON Status Monitor 3. . . . . . . . . . . . . . . . . . . . . . . . . . . . . . . . . . . . . . . . . . . . . . . . . . . 34 Setting the Auto Tear-Off Function. . . . . . . . . . . . . . . . . . . . . . . . . . . . . . . . . . . . . . . . . . . . . . . . . . . . . . . 35 Setting the Buzzer. . . . . . . . . . . . . . . . . . . . . . . . . . . . . . . . . . . . . . . . . . . . . . . . . . . . . . . . . . . . . . . . . . . . . . 35 Setting whether the buzzer sounds when printing is finished. . . . . . . . . . . . . . . . . . . . . . . . . . . . . . 35 Setting whether the buzzer sounds when an error occurs. . . . . . . . . . . . . . . . . . . . . . . . . . . . . . . . . . 36 Using Reduce Scraping Mode. . . . . . . . . . . . . . . . . . . . . . . . . . . . . . . . . . . . . . . . . . . . . . . . . . . . . . . . . . . . 36 Adjusting the Print Position. . . . . . . . . . . . . . . . . . . . . . . . . . . . . . . . . . . . . . . . . . . . . . . . . . . . . . . . . . . . . . 36 USB Replacement Service. . . . . . . . . . . . . . . . . . . . . . . . . . . . . . . . . . . . . . . . . . . . . . . . . . . . . . . . . . . . . . . . 37 Installing USB Replacement Service. . . . . . . . . . . . . . . . . . . . . . . . . . . . . . . . . . . . . . . . . . . . . . . . . . . 37 Replacing a USB-connected printer. . . . . . . . . . . . . . . . . . . . . . . . . . . . . . . . . . . . . . . . . . . . . . . . . . . 38 BI Parallel Port Driver. . . . . . . . . . . . . . . . . . . . . . . . . . . . . . . . . . . . . . . . . . . . . . . . . . . . . . . . . . . . . . . . . . 38
EpsonNet Config. . . . . . . . . . . . . . . . . . . . . . . . . . . . . . . . . . . . . . . . . . . . . . . . . . . . . . . . . . . . . . . . . . . . . . . 39 Installing EpsonNet Config. . . . . . . . . . . . . . . . . . . . . . . . . . . . . . . . . . . . . . . . . . . . . . . . . . . . . . . . . . 40 EPSON Printer Setting. . . . . . . . . . . . . . . . . . . . . . . . . . . . . . . . . . . . . . . . . . . . . . . . . . . . . . . . . . . . . . . . . . 41 Setting Up Your Printer on a Network. . . . . . . . . . . . . . . . . . . . . . . . . . . . . . . . . . . . . . . . . . . . . . . . . . . . . 41 Sharing the printer. . . . . . . . . . . . . . . . . . . . . . . . . . . . . . . . . . . . . . . . . . . . . . . . . . . . . . . . . . . . . . . . . 41 Setting up your printer as a shared printer. . . . . . . . . . . . . . . . . . . . . . . . . . . . . . . . . . . . . . . . . . . . . . 42 Setting the clients. . . . . . . . . . . . . . . . . . . . . . . . . . . . . . . . . . . . . . . . . . . . . . . . . . . . . . . . . . . . . . . . . . 45 Canceling Printing. . . . . . . . . . . . . . . . . . . . . . . . . . . . . . . . . . . . . . . . . . . . . . . . . . . . . . . . . . . . . . . . . . . . . 47 Using the printer button. . . . . . . . . . . . . . . . . . . . . . . . . . . . . . . . . . . . . . . . . . . . . . . . . . . . . . . . . . . . 47 Using Windows. . . . . . . . . . . . . . . . . . . . . . . . . . . . . . . . . . . . . . . . . . . . . . . . . . . . . . . . . . . . . . . . . . . . 47 Uninstalling the Printer Software. . . . . . . . . . . . . . . . . . . . . . . . . . . . . . . . . . . . . . . . . . . . . . . . . . . . . . . . . 48 Uninstalling the printer driver and utilities. . . . . . . . . . . . . . . . . . . . . . . . . . . . . . . . . . . . . . . . . . . . . 48
Chapter 5 Control Panel
Using the Control Panel. . . . . . . . . . . . . . . . . . . . . . . . . . . . . . . . . . . . . . . . . . . . . . . . . . . . . . . . . . . . . . . . . 51
Control panel buttons and lights. . . . . . . . . . . . . . . . . . . . . . . . . . . . . . . . . . . . . . . . . . . . . . . . . . . . . . 51
Chapter 6 Troubleshooting
Using the Error Indicators. . . . . . . . . . . . . . . . . . . . . . . . . . . . . . . . . . . . . . . . . . . . . . . . . . . . . . . . . . . . . . . 55
Problems and Solutions. . . . . . . . . . . . . . . . . . . . . . . . . . . . . . . . . . . . . . . . . . . . . . . . . . . . . . . . . . . . . . . . . 57
Contents 3

GP-C830/GP-M830/GP-C831/GP-M831/GP-C832/GP-M832 User’s Guide
Power supply. . . . . . . . . . . . . . . . . . . . . . . . . . . . . . . . . . . . . . . . . . . . . . . . . . . . . . . . . . . . . . . . . . . . . . 57 Printing. . . . . . . . . . . . . . . . . . . . . . . . . . . . . . . . . . . . . . . . . . . . . . . . . . . . . . . . . . . . . . . . . . . . . . . . . . 57 Paper handling. . . . . . . . . . . . . . . . . . . . . . . . . . . . . . . . . . . . . . . . . . . . . . . . . . . . . . . . . . . . . . . . . . . . 60 Network problems. . . . . . . . . . . . . . . . . . . . . . . . . . . . . . . . . . . . . . . . . . . . . . . . . . . . . . . . . . . . . . . . . 61 Other problems. . . . . . . . . . . . . . . . . . . . . . . . . . . . . . . . . . . . . . . . . . . . . . . . . . . . . . . . . . . . . . . . . . . . 61
Correcting USB Problems. . . . . . . . . . . . . . . . . . . . . . . . . . . . . . . . . . . . . . . . . . . . . . . . . . . . . . . . . . . . . . . 61 Make sure that your computer is a Windows 8, 7, Vista, XP, or 2000 pre-installed model. . . . . . . 62 Printer does not work correctly with the USB cable. . . . . . . . . . . . . . . . . . . . . . . . . . . . . . . . . . . . . . 62 Clearing Paper Jams. . . . . . . . . . . . . . . . . . . . . . . . . . . . . . . . . . . . . . . . . . . . . . . . . . . . . . . . . . . . . . . . . . . . 62
Chapter 7 Where To Get Help
Technical Support Web Site. . . . . . . . . . . . . . . . . . . . . . . . . . . . . . . . . . . . . . . . . . . . . . . . . . . . . . . . . . . . . . 64 Contacting Customer Support. . . . . . . . . . . . . . . . . . . . . . . . . . . . . . . . . . . . . . . . . . . . . . . . . . . . . . . . . . . . 64 Before Contacting Epson. . . . . . . . . . . . . . . . . . . . . . . . . . . . . . . . . . . . . . . . . . . . . . . . . . . . . . . . . . . . 64 Help for Users in Australia. . . . . . . . . . . . . . . . . . . . . . . . . . . . . . . . . . . . . . . . . . . . . . . . . . . . . . . . . . 65 Help for Users in Singapore. . . . . . . . . . . . . . . . . . . . . . . . . . . . . . . . . . . . . . . . . . . . . . . . . . . . . . . . . . 66 Help for Users in Thailand. . . . . . . . . . . . . . . . . . . . . . . . . . . . . . . . . . . . . . . . . . . . . . . . . . . . . . . . . . . 66 Help for Users in Indonesia. . . . . . . . . . . . . . . . . . . . . . . . . . . . . . . . . . . . . . . . . . . . . . . . . . . . . . . . . . 66 Help for Users in Hong Kong. . . . . . . . . . . . . . . . . . . . . . . . . . . . . . . . . . . . . . . . . . . . . . . . . . . . . . . . 66 Help for Users in Malaysia. . . . . . . . . . . . . . . . . . . . . . . . . . . . . . . . . . . . . . . . . . . . . . . . . . . . . . . . . . . 67 Help for Users in India. . . . . . . . . . . . . . . . . . . . . . . . . . . . . . . . . . . . . . . . . . . . . . . . . . . . . . . . . . . . . . 67 Help for Users in the Philippines. . . . . . . . . . . . . . . . . . . . . . . . . . . . . . . . . . . . . . . . . . . . . . . . . . . . . 67 Help for Users in Europe. . . . . . . . . . . . . . . . . . . . . . . . . . . . . . . . . . . . . . . . . . . . . . . . . . . . . . . . . . . . 68 Help for Users in North America. . . . . . . . . . . . . . . . . . . . . . . . . . . . . . . . . . . . . . . . . . . . . . . . . . . . . 68 Help for Users in Latin America. . . . . . . . . . . . . . . . . . . . . . . . . . . . . . . . . . . . . . . . . . . . . . . . . . . . . . 69
Chapter 8 Consumables
Replacing the Ink Cartridges. . . . . . . . . . . . . . . . . . . . . . . . . . . . . . . . . . . . . . . . . . . . . . . . . . . . . . . . . . . . . 71 Genuine Epson ink cartridges. . . . . . . . . . . . . . . . . . . . . . . . . . . . . . . . . . . . . . . . . . . . . . . . . . . . . . . . 71 Checking the ink cartridge status. . . . . . . . . . . . . . . . . . . . . . . . . . . . . . . . . . . . . . . . . . . . . . . . . . . . . 71 Precautions on ink cartridge replacement. . . . . . . . . . . . . . . . . . . . . . . . . . . . . . . . . . . . . . . . . . . . . . 73 Replacing an ink cartridge. . . . . . . . . . . . . . . . . . . . . . . . . . . . . . . . . . . . . . . . . . . . . . . . . . . . . . . . . . . 75
Chapter 9 Product Information
Printer Parts. . . . . . . . . . . . . . . . . . . . . . . . . . . . . . . . . . . . . . . . . . . . . . . . . . . . . . . . . . . . . . . . . . . . . . . . . . . 80
Contents 4

GP-C830/GP-M830/GP-C831/GP-M831/GP-C832/GP-M832 User’s Guide
Printer Specifications. . . . . . . . . . . . . . . . . . . . . . . . . . . . . . . . . . . . . . . . . . . . . . . . . . . . . . . . . . . . . . . . . . . 81 Mechanical. . . . . . . . . . . . . . . . . . . . . . . . . . . . . . . . . . . . . . . . . . . . . . . . . . . . . . . . . . . . . . . . . . . . . . . 81 Electronic. . . . . . . . . . . . . . . . . . . . . . . . . . . . . . . . . . . . . . . . . . . . . . . . . . . . . . . . . . . . . . . . . . . . . . . . . 83 Electrical. . . . . . . . . . . . . . . . . . . . . . . . . . . . . . . . . . . . . . . . . . . . . . . . . . . . . . . . . . . . . . . . . . . . . . . . . 88 Environmental. . . . . . . . . . . . . . . . . . . . . . . . . . . . . . . . . . . . . . . . . . . . . . . . . . . . . . . . . . . . . . . . . . . . 89 Paper. . . . . . . . . . . . . . . . . . . . . . . . . . . . . . . . . . . . . . . . . . . . . . . . . . . . . . . . . . . . . . . . . . . . . . . . . . . . 89 Printable area. . . . . . . . . . . . . . . . . . . . . . . . . . . . . . . . . . . . . . . . . . . . . . . . . . . . . . . . . . . . . . . . . . . . . . 92
AC Adapter Electrical Specifications. . . . . . . . . . . . . . . . . . . . . . . . . . . . . . . . . . . . . . . . . . . . . . . . . . . . . . . 93 Command Lists. . . . . . . . . . . . . . . . . . . . . . . . . . . . . . . . . . . . . . . . . . . . . . . . . . . . . . . . . . . . . . . . . . . . . . . . 94 Character Tables. . . . . . . . . . . . . . . . . . . . . . . . . . . . . . . . . . . . . . . . . . . . . . . . . . . . . . . . . . . . . . . . . . . . . . . 94 Standards and Approvals. . . . . . . . . . . . . . . . . . . . . . . . . . . . . . . . . . . . . . . . . . . . . . . . . . . . . . . . . . . . . . . . 95 Taiwan. . . . . . . . . . . . . . . . . . . . . . . . . . . . . . . . . . . . . . . . . . . . . . . . . . . . . . . . . . . . . . . . . . . . . . . . . . . 96 North America. . . . . . . . . . . . . . . . . . . . . . . . . . . . . . . . . . . . . . . . . . . . . . . . . . . . . . . . . . . . . . . . . . . . 96 Europe. . . . . . . . . . . . . . . . . . . . . . . . . . . . . . . . . . . . . . . . . . . . . . . . . . . . . . . . . . . . . . . . . . . . . . . . . . . 97 Checking the Print Head Nozzles. . . . . . . . . . . . . . . . . . . . . . . . . . . . . . . . . . . . . . . . . . . . . . . . . . . . . . . . . 97 Using the Nozzle Check utility for Windows. . . . . . . . . . . . . . . . . . . . . . . . . . . . . . . . . . . . . . . . . . . . 97 Using the control panel. . . . . . . . . . . . . . . . . . . . . . . . . . . . . . . . . . . . . . . . . . . . . . . . . . . . . . . . . . . . . 98 Cleaning the Print Head. . . . . . . . . . . . . . . . . . . . . . . . . . . . . . . . . . . . . . . . . . . . . . . . . . . . . . . . . . . . . . . . . 99 Using the Head Cleaning utility for Windows. . . . . . . . . . . . . . . . . . . . . . . . . . . . . . . . . . . . . . . . . . . 99 Using the control panel. . . . . . . . . . . . . . . . . . . . . . . . . . . . . . . . . . . . . . . . . . . . . . . . . . . . . . . . . . . . 100 Aligning the Print Head. . . . . . . . . . . . . . . . . . . . . . . . . . . . . . . . . . . . . . . . . . . . . . . . . . . . . . . . . . . . . . . . 101 Adjusting the media feed. . . . . . . . . . . . . . . . . . . . . . . . . . . . . . . . . . . . . . . . . . . . . . . . . . . . . . . . . . . 101 Adjusting the bi-directional printing. . . . . . . . . . . . . . . . . . . . . . . . . . . . . . . . . . . . . . . . . . . . . . . . . 101 Printing the Status Sheet. . . . . . . . . . . . . . . . . . . . . . . . . . . . . . . . . . . . . . . . . . . . . . . . . . . . . . . . . . . . . . . . 102 General information. . . . . . . . . . . . . . . . . . . . . . . . . . . . . . . . . . . . . . . . . . . . . . . . . . . . . . . . . . . . . . . 102 Network settings. . . . . . . . . . . . . . . . . . . . . . . . . . . . . . . . . . . . . . . . . . . . . . . . . . . . . . . . . . . . . . . . . . 103 Printer settings. . . . . . . . . . . . . . . . . . . . . . . . . . . . . . . . . . . . . . . . . . . . . . . . . . . . . . . . . . . . . . . . . . . 103 Initializing the Network Setting. . . . . . . . . . . . . . . . . . . . . . . . . . . . . . . . . . . . . . . . . . . . . . . . . . . . . . . . . . 103 Cleaning the Printer. . . . . . . . . . . . . . . . . . . . . . . . . . . . . . . . . . . . . . . . . . . . . . . . . . . . . . . . . . . . . . . . . . . 103 Cleaning the outer case. . . . . . . . . . . . . . . . . . . . . . . . . . . . . . . . . . . . . . . . . . . . . . . . . . . . . . . . . . . . . 104 Cleaning the inside of the printer. . . . . . . . . . . . . . . . . . . . . . . . . . . . . . . . . . . . . . . . . . . . . . . . . . . . 104 Cleaning the paper feed rollers. . . . . . . . . . . . . . . . . . . . . . . . . . . . . . . . . . . . . . . . . . . . . . . . . . . . . . 106 Transporting the Printer. . . . . . . . . . . . . . . . . . . . . . . . . . . . . . . . . . . . . . . . . . . . . . . . . . . . . . . . . . . . . . . . 107
Copyright and Trademarks
Operating System Versions
Contents 5

GP-C830/GP-M830/GP-C831/GP-M831/GP-C832/GP-M832 User’s Guide
Index
Contents 6

GP-C830/GP-M830/GP-C831/GP-M831/GP-C832/GP-M832 User’s Guide
Chapter 1
Getting to Know Your Printer
Features
Your EPSON® GP-C830/GP-M830/GP-C831/GP-M831/GP-C832/GP-M832 is an ink jet printer with a tractor feeder. Your printer provides high-quality printing and superior performance in a compact design. The printer has the following features:
The ability to handle a wide range of paper types, including continuous medicine bags, labels (continuous base sheet), continuous plain paper, and other paper with sprocket holes.
The ability to use individual, large-capacity ink cartridges. Durable design for high-volume printing.
The pigment inks that are used achieve high-quality printing on plain paper and have excellent waterproof capability.
Your printer comes packaged with the printer driver and other software, including the EPSON Status Monitor 3 utility for Microsoft Windows 8, 7, Vista, XP, Server 2012, Server 2008 R2, Server 2008, and Server 2003. The EPSON Status Monitor 3 utility lets you check the status of your printer quickly and easily.
Getting to Know Your Printer 7

GP-C830/GP-M830/GP-C831/GP-M831/GP-C832/GP-M832 User’s Guide
Chapter 2
Safety Instructions
Safety Instructions
Warnings, Cautions, and Notes
!Warningsmust be followed carefully to avoid bodily injury.
!Cautionsmust be observed to avoid damage to your equipment.
Notes
contain important information and useful tips on the operation of your printer.
Important safety instructions
Read all of these safety instructions before using the printer. In addition, follow all warnings and instructions marked on the printer itself.
When setting up the printer
!Warning:Use the specified AC Adapter (EPSON AC Adapter K, Model: M248A) only.
Do not place the printer on an unstable surface or near a radiator or heat source.
Place the printer on a flat, stable surface. Tilting or placing the printer at an angle may adversely affect the print quality.
Do not place the printer on a soft, unstable surface like a bed or a sofa, or in a small, enclosed area, as this restricts ventilation.
Do not block or cover the slots and openings in the printer’s cabinet, and do not insert objects through the slots.
Leave adequate room around the printer for easy operation and maintenance.
Safety Instructions 8

GP-C830/GP-M830/GP-C831/GP-M831/GP-C832/GP-M832 User’s Guide
Place the printer where you can easily connect it to a interface cable, if necessary.
Use only the type of power source indicated on the printer’s label. If you are not sure of the power supply specifications in your area, contact your local power company or consult your dealer.
Connect all equipment to properly grounded electrical outlets. Avoid using outlets on the same circuit as photocopiers or air control systems that regularly switch on and off.
Do not use a damaged or frayed power cord.
The power cord should be placed to avoid abrasions, cuts, fraying, crimping, kinking, and other damage.
If you use an extension cord with the printer, make sure the total ampere rating of all devices plugged into the extension cord does not exceed the cord’s ampere rating. Also, make sure the total ampere of all devices plugged into the electrical outlet does not exceed the electrical outlet’s ampere rating.
Use only the power cord that comes with this product. Use of another cord may result in fire or electric shock.
This product’s power cord is for use with this product only. Use with other equipment may result in fire or electric shock.
Be sure the AC power cord meets the relevant local safety standards.
Depending on the area, the interface cable may be included with the product. If so, use that cable.
Seiko Epson Corporation shall not be held liable for any damage resulting from electromagnetic interference that occurs from the use of any interface cables other than those designated as Epson approved products. For details about approved cables, contact Epson customer support.
Avoid using or storing the printer in places subject to rapid changes in temperature and humidity. Also, keep it away from direct sunlight, strong light, heat sources, or excessive moisture or dust.
Avoid places subject to shocks and vibrations.
Place the printer near a wall outlet where you can easily unplug the power cord.
Keep the entire computer system away from potential sources of electromagnetic interference, such as loudspeakers or the base units of cordless telephones.
Avoid electrical outlets controlled by wall switches or automatic timers. An interruption in power can erase information in the memory of your printer or computer. Also, avoid outlets on the same circuit as large motors or other appliances that can cause voltage fluctuations.
Use a grounded power outlet; do not use an adapter plug.
Safety Instructions 9

GP-C830/GP-M830/GP-C831/GP-M831/GP-C832/GP-M832 User’s Guide
If you plan to use a printer stand, follow these guidelines:
-Use a stand that can support at least twice the weight of the printer.
-Never use a stand that tilts the printer. The printer should always be kept level.
-Position your printer’s power cord and interface cable so they do not interfere with paper feeding. If possible, secure the cables to a leg of the printer stand.
When maintaining the printer
Unplug the printer before cleaning it, and always clean it with a damp cloth only.
Do not spill liquid onto the printer.
Do not attempt to service the printer yourself except as specifically explained in this manual.
Unplug the printer and refer servicing to qualified service personnel under the following conditions:
i.If the power cord or plug is damaged.
ii.If liquid has entered the printer.
iii.If the printer has been dropped or the cabinet damaged.
iv.If the printer does not operate normally or exhibits a distinct change in performance.
Do not use aerosol blowers which contain flammable gas inside or around this product. Doing so may cause fire.
Adjust only those controls that are covered in this manual.
When handling paper
Do not load paper that is curled or has been folded.
When operating the printer
Adjust only those controls that are covered in the user documentation. Improper adjustment of other controls may result in damage requiring extensive repair by a qualified technician.
When the printer encounter difficulties, turn off the printer, and then unplug the power cord from the electrical outlet.
When handling ink cartridges
Observe the following when handling ink cartridges:
Keep ink cartridges out of the reach of children and do not drink the ink.
Safety Instructions 10
GP-C830/GP-M830/GP-C831/GP-M831/GP-C832/GP-M832 User’s Guide
If ink gets on your skin, wash it off with soap and water. If it gets in your eyes, flush them immediately with water.
For best results, shake the ink cartridge four or five times.
!Caution:Do not shake cartridges (that have been installed previously) with too much force.
Use an ink cartridge prior to the date printed on the cartridge carton.
Use up the ink cartridge within six months of installation for best results.
Do not disassemble or modify the ink cartridge; otherwise, you may not be able to print normally.
Store ink cartridges in a cool, dark place.
After bringing an ink cartridge inside from a cold storage site, allow it to warm up at room temperature for at least three hours before using it.
Do not touch the green IC chip on the side of the cartridge. This may affect normal operation and printing.The IC chip on this ink cartridge retains a variety of cartridge related-information, such as the ink cartridge status, so that the cartridge may be removed and reinserted freely. If you remove an ink cartridge for later use, protect the ink supply area from dirt and dust, and store it in the same environment as this product. Note that there is a valve in the ink supply port, making covers or plugs unnecessary, but care is needed to prevent the ink from staining items that the cartridge touches. Do not touch the ink supply port or surrounding area.
Safety Instructions 11

GP-C830/GP-M830/GP-C831/GP-M831/GP-C832/GP-M832 User’s Guide
Restriction of use
When this product is used for applications requiring high reliability/safety, such as transportation devices related to aviation, rail, marine, automotive, etc.; disaster prevention devices; various safety devices, etc.; or functional/precision devices, etc., you should use this product only after giving consideration to including fail-safes and redundancies into your design to maintain safety and total system reliability. Because this product was not intended for use in applications requiring extremely high reliability/safety such as aerospace equipment, main communication equipment, nuclear power control equipment, or medical equipment related to direct medical care etc., please make your own judgment on this product's suitability after a full evaluation.
For Turkish users
AEEE Yönetmeliğine Uygundur.
For Ukrainian users
Обладнання відповідає вимогам Технічного регламенту обмеження використання деяких небезпечних речовин в електричному та електронному обладнанні.
For Brazilian users
A Epson preocupa-se com o meio ambiente e sabe que o planejamento para o futuro requer um forte compromisso ambiental. Para isso, nos empenhamos em criar produtos inovadores que são confiáveis, recicláveis e eficientes. Produtos melhores utilizando menos recursos naturais para ajudar a garantir um futuro melhor para todos.
As embalagens deste produto - papelão, plástico, isopor e espuma - são recicláveis e podem ser entregues a cooperativas de reciclagem, postos de recolhimento de resíduos ou empresas recicladoras.
Os materiais que compõem o produto - plástico, metais, placa eletrônica e cartucho - são recicláveis. O produto não deve ser desmontado, deve ser encaminhado para os Centros de Serviços Autorizados que darão o destino ambientalmente adequado. Consulte em nosso site - http:// global.latin.epson.com/br os Centros de Serviços Autorizados.
Todos os Centros de Serviços Autorizados podem receber equipamentos da marca Epson destinados para reciclagem.
Conheça nossas ações ambientais e o Programa de Coleta de Cartuchos (www.epson.com.br/coleta) em nosso site.
Safety Instructions 12

GP-C830/GP-M830/GP-C831/GP-M831/GP-C832/GP-M832 User’s Guide
For Argentina users
When handling AC adapter
!Precaución:
Confirme que el cable de alimentación de CA cumpla con las normas de seguridad locales pertinentes.
Coloque la impresora y la fuente externa de poder cerca a una toma eléctrica de pared de la que pueda desenchufar la fuete externa de poder fácilmente.
No coloque el cable de alimentación de CA en lugares donde se pueda enroscar, cortar, desgastar, deshilachar o rizar. No coloque ningún objeto sobre el cable de alimentación de CA y no coloque la fuente extrerna de poder o el cable de alimentación en zonas donde se puedan pisar. Tome especial precaución de no doblar los cables de alimentación en los extremos y en los puntos de entrada de la fuente extrerna de poder.
Utilice únicamente la fuente extrerna de poder suministrada con la impresora. El uso de otro fuente externa de poder podría provocar incendios, descargas eléctricas u otros daños.
La fuente extrerna de poder está diseñada para ser utilizada con la impresora a la que acompaña. No intente usarla con otros dispositivos electrónicos, a menos que esté especificado.
Utilice sólo el tipo de corriente indicado en la etiqueta de la fuente extrerna de poder. Use siempre tomas de corriente eléctricas, domésticas y estándar con el cable de alimentación que cumplan con las regulaciones locales de seguridad.
No use tomas de corriente que se encuentren en el mismo circuito que fotocopiadoras o sistemas de aire acondicionado que se enciendan y apaguen periódicamente. Si utiliza un cable de extensión con el impresor, compruebe que la suma de las corrientes nominales en amperios de todos los dispositivos conectados al cable de extensión no sea superior a la corriente nominal de dicho cable. Además, compruebe que el total de amperios de intensidad de todos los dispositivos enchufados a la toma eléctrica de pared no supere el total de amperios de la toma. No coloque varias cargas en la toma eléctrica de la pared.
Nunca desmonte, modifique o intente reparar Ud. mismo la fuente externa de poder o la impresora.
No inserte objetos en las aberturas del impresor, pues podrían entrar en contacto con puntos de voltaje peligrosos o provocar cortocircuitos en dichos elementos. Existe el peligro de descargas eléctricas.
Safety Instructions 13

GP-C830/GP-M830/GP-C831/GP-M831/GP-C832/GP-M832 User’s Guide
Desenchufe la impresora y la fuente externa de poder antes de limpiar la impresora. Límpiela sólo con un paño húmedo. No utilice productos de limpieza líquidos o en aerosol. No aplique líquido de ningún tipo directamente al cristal de la impresora.
Desenchufe la impresora y la fuente externa de poder y póngase en contacto con un técnico de servicio ante las siguientes situaciones: el cable de CA o el enchufe están estropeados; ha entrado líquido en el impresor o en la fuente externa de poder; la impresora o la fuente externa de poder se han caído o se ha dañado la carcasa; la impresora o la fuente externa de poder no funcionan con normalidad o muestran un cambio en su rendimiento. (No ajuste los controles que no hayan sido especificados en las instrucciones de funcionamiento).
Cuando no vaya a utilizar el impresor durante un periodo de tiempo prolongado, desenchufe la fuente externa de poder de la toma eléctrica.
Safety Instructions 14

GP-C830/GP-M830/GP-C831/GP-M831/GP-C832/GP-M832 User’s Guide
Chapter 3
Paper Handling
Acceptable Paper Conditions
!Caution:Do not use paper that is folded, creased, curled, torn, stained, or stamped.
A:Torn
B:Curled
C:Creased
D:Folded
Use only paper that meets the paper specifications. For more information, see “Paper” on page 89.
Printing on Continuous Paper
Your printer can handle continuous paper with the push tractor.
Paper Handling 15

GP-C830/GP-M830/GP-C831/GP-M831/GP-C832/GP-M832 User’s Guide
Position the printer and continuous paper as shown in the illustrations below so that the paper is loaded smoothly.
* 1 m or less
Note:
The printing position may be misaligned if the continuous paper touches the printer’s stand or any cables. Position the continuous paper so that it is loaded smoothly. (A)
Overlapping paper may be fed if the top of the stack of continuous paper is as high as or higher than the push tractor. (B)
Be sure to remove the continuous paper from its box and place it within 1 m of the printer. (C)
Load the continuous paper straight into the printer. (D)
Printing with the push tractor
Follow these steps to load continuous paper using the push tractor.
Note:
Do not touch the paper sensor on the left sprocket unit.
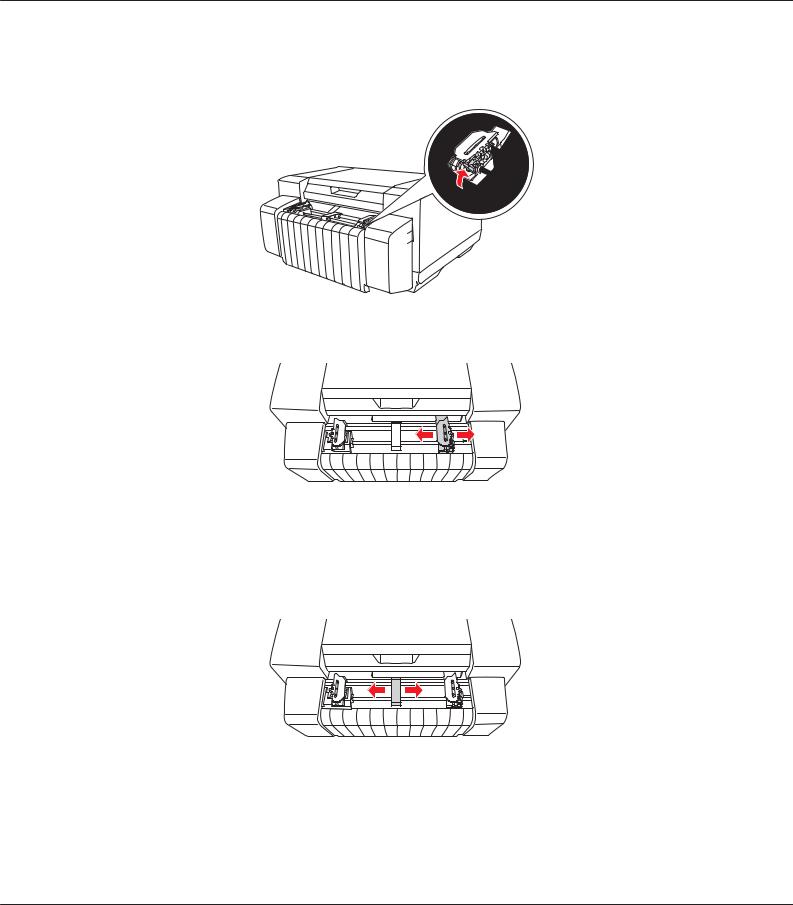
1. Turn off the printer.
Paper Handling 16
GP-C830/GP-M830/GP-C831/GP-M831/GP-C832/GP-M832 User’s Guide
2.Facing the back of the printer, release the right sprocket unit by pulling the sprocket lock lever up.
3. Slide the right sprocket to match the width of your paper, but do not lock it.
Note:
The left sprocket unit is fixed in place and cannot be adjusted.
4. Slide the center paper support halfway between the two sprockets.
Paper Handling 17

GP-C830/GP-M830/GP-C831/GP-M831/GP-C832/GP-M832 User’s Guide
5. Open the sprocket covers of both sprockets.
* sprocket cover
6.Fit the first two holes of the paper over the sprocket pins on both sides. Slide the right sprocket unit slightly to the right so that the paper is not slack.
!Caution:Make sure the first sheet of your continuous paper has a clean, straight edge so that it can feed
smoothly into the printer.
Paper Handling 18

GP-C830/GP-M830/GP-C831/GP-M831/GP-C832/GP-M832 User’s Guide
7. Close the sprocket covers.
8. Slide the right sprocket unit to remove any slack in the paper and lock it in place.
9.Turn on the printer.
10.Press the Load/Eject button to feed the paper to the top-of-form position. When the printer receives data, it begins printing.
11.After you finish printing, follow the steps in the next section to tear off your printed document. If the first printed line on your page appears too high or low, you can change its position using the Micro Adjust function. See “Adjusting the top-of-form position” on page 24.
Note:
After you finish printing, tear off your printed document, and then turn off the printer. If you turn the printer off and on without tearing off the printed document, the top-of-form position setting may become misadjusted.
Paper Handling 19

GP-C830/GP-M830/GP-C831/GP-M831/GP-C832/GP-M832 User’s Guide
If the trailing edge of the paper is past the paper sensor after the printed document is torn off, the paper will be fed forward without being printed.
Do not pull the loaded paper out of the tractor unit. Doing so may cause paper jams or printer malfunctions. Also, the top-of-form position setting may become misadjusted.
The last page of continuous paper that is printed may have low print quality.
If the first line on your page appears too high or low, you can change its position using the Micro Adjust function. For more information, see “Adjusting the top-of-form position” on page 24.
Make sure that the right and left edges of continuous paper are straight and not slack when you load the paper.
Do not pull the paper while printing. Doing so may adversely affect the print quality.
!Caution:Never open the top cover or ink cartridge cover while printing.
Using the tear-off function
You can use the tear-off function to advance your continuous paper to the printer’s tear-off position after you finish printing.
To tear off the printed sheet manually after printing, press the Tear Off button to advance the perforation of the paper to the tear-off position.
To enable the auto tear-off function, turn on the Auto Tearoff Setting from the printer driver. The printer advances the perforation of the paper to the tear-off position automatically when a set time has passed after printing. When the printer receives the print data, the printer feeds the paper backward to the top-of-form position automatically. For more information, see “Setting the Auto Tear-Off Function” on page 35.
If the paper perforation is not in the desired tear-off position, you can use the Micro Adjust function to adjust the position of the perforation. For more information, see “Adjusting the tear-off position” on page 23.
Follow these steps to use the auto tear-off function.
Paper Handling 20
GP-C830/GP-M830/GP-C831/GP-M831/GP-C832/GP-M832 User’s Guide
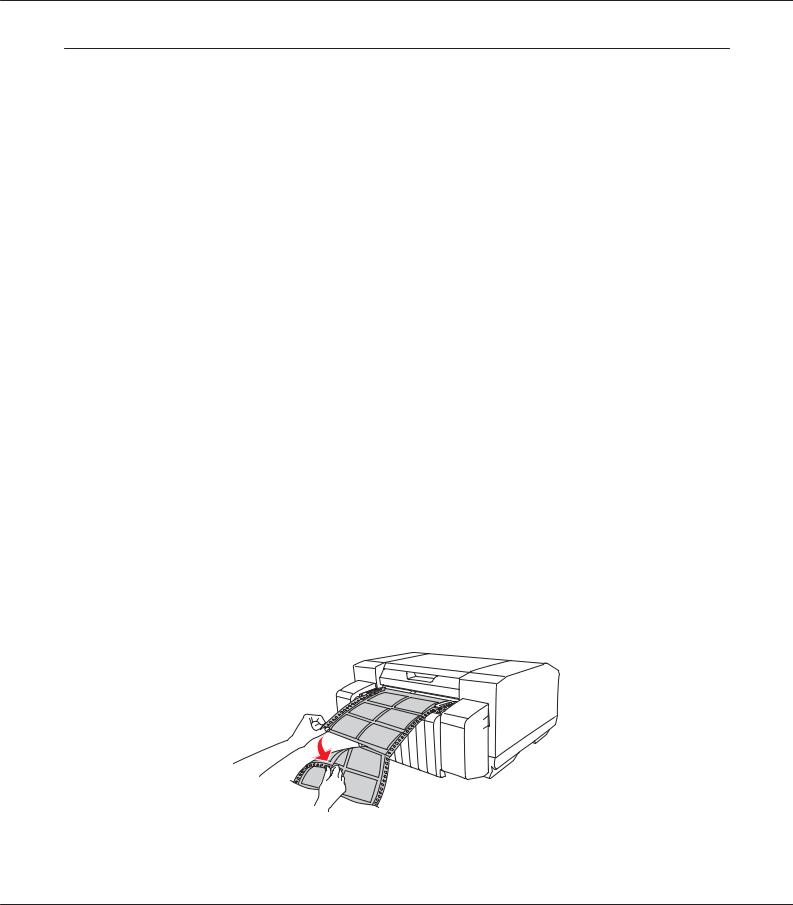
1.After printing is finished and the printer advances the paper to the tear-off position, tear off all printed pages while holding the paper.
* perforation
Note:
The time until the paper begins to advance to the tear-off position after printing is finished can be set. To change the settings, see “Setting the Auto Tear-Off Function” on page 35.
2.When you resume printing, the printer feeds the paper back to the top-of-form position and begins printing.
Removing continuous paper
Follow these steps to remove continuous paper from the printer.
1.After printing is finished and the printer advances the paper to the tear-off position, tear off all printed pages.
2.Press the Tear Off button to feed the paper backward to the top-of-form position.
3.Press the Load/Eject button to feed the paper backward out of the printer to the standby position.
Note:
Do not feed the paper backward 558.8 mm (22 inches) or more using the Load/Eject button. Doing so may cause paper jams.
4.To completely remove the paper from the printer, open the sprocket covers. Remove the paper from the tractor unit, and then close the sprocket covers.
Paper Handling 21
GP-C830/GP-M830/GP-C831/GP-M831/GP-C832/GP-M832 User’s Guide
Loading Special Paper
Labels
You can use only labels with a continuous base sheet. Single-sheet labels cannot be used.
Follow these steps to load labels.
!Caution:Use labels only under normal operating conditions because labels are especially sensitive to temperature and humidity.
When using glossy labels, tear off the printed label form and turn off the printer after printing is finished. Do not leave the printed label form connected to the unprinted label forms.
1.Make sure that your software settings keep the printing entirely within the printable area. For information about the printable area, see “Printable area” on page 92.
2.Load labels as described in “Printing on Continuous Paper” on page 15.
Ejecting labels
Always follow these steps to tear off and eject labels.
!Caution:
Never feed labels backward using the Load/Eject button. Labels can easily peel off their backing and jam the printer.
1.At the back of your printer, tear off the last label form that has entered the printer along the perforation. See the illustration below.
Paper Handling 22
GP-C830/GP-M830/GP-C831/GP-M831/GP-C832/GP-M832 User’s Guide
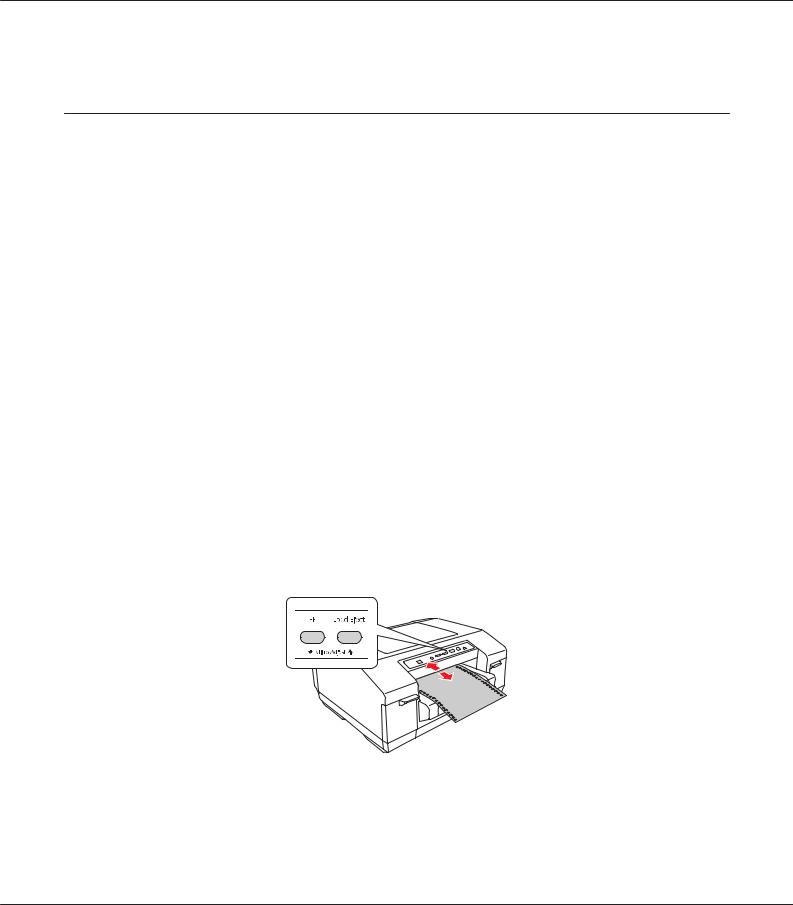
2. Press the FF button to eject the last label form forward.
Using the Micro Adjust Function
The Micro Adjust function allows you to move the paper forward or backward in 0.141 mm (1/180-inch) increments so that you can make precise adjustments to the top-of-form and tear-off positions.
Adjusting the tear-off position
If the paper perforation is not in the desired tear-off position, you can use the Micro Adjust function to adjust the position of the perforation.
Follow these steps to adjust the tear-off position.
Note:
Your tear-off position setting remains in effect until you change it, even if you turn off the printer.
1.Make sure the paper is at the current tear-off position.
2.Hold down the Pause button for about three seconds. The Pause light flashes and the printer enters Micro Adjust mode.
3.Press the FF D button to feed the paper forward, or press the Load/Eject U button to feed the paper backward, until the paper perforation is in the desired tear-off position.
Paper Handling 23

GP-C830/GP-M830/GP-C831/GP-M831/GP-C832/GP-M832 User’s Guide
Note:
The printer has a minimum and a maximum tear-off position (up to 50.8 mm [2 inches] backward or 25.4 mm [1 inch] forward). If you try to adjust the tear-off position beyond these limits, the printer beeps and stops moving the paper. When the paper reaches the default tear-off position, the printer also beeps.
4.Tear off the printed pages.
5.Press the Pause button to exit Micro Adjust mode.
Adjusting the top-of-form position
The top-of-form position is the position on the page where the printer starts printing. If your printing appears too high or low on the page, you can use the Micro Adjust function to adjust the top-of-form position.
Follow these steps to adjust the top-of-form position.
Note:
Your top-of-form position setting remains in effect until you change it, even if you turn off the printer.
The top margin setting made in some applications overrides the top-of-form position setting you make with the Micro Adjust function. If necessary, adjust the top-of-form position in your application.
1.Open the top cover.
2.Hold down the Pause button for about three seconds. The Pause light flashes, the printer enters Micro Adjust mode, and then the paper is advanced to the current top-of-form position.
3.Press the FF D button to move the top-of-form position down on the page, or press the Load/Eject U button to move the top-of-form position up on the page.
Note:
The printer has a minimum and a maximum top-of-form position (up to 23.4 mm [0.921 inches] backward or 50.8 mm [2 inches] forward). If you try to adjust it beyond these limits, the printer beeps and stops moving the paper.
When the paper reaches the default top-of-form position, the printer also beeps and stops moving the paper briefly. You can use the default setting as a reference point when adjusting the top-of-form position.
Paper Handling 24
GP-C830/GP-M830/GP-C831/GP-M831/GP-C832/GP-M832 User’s Guide
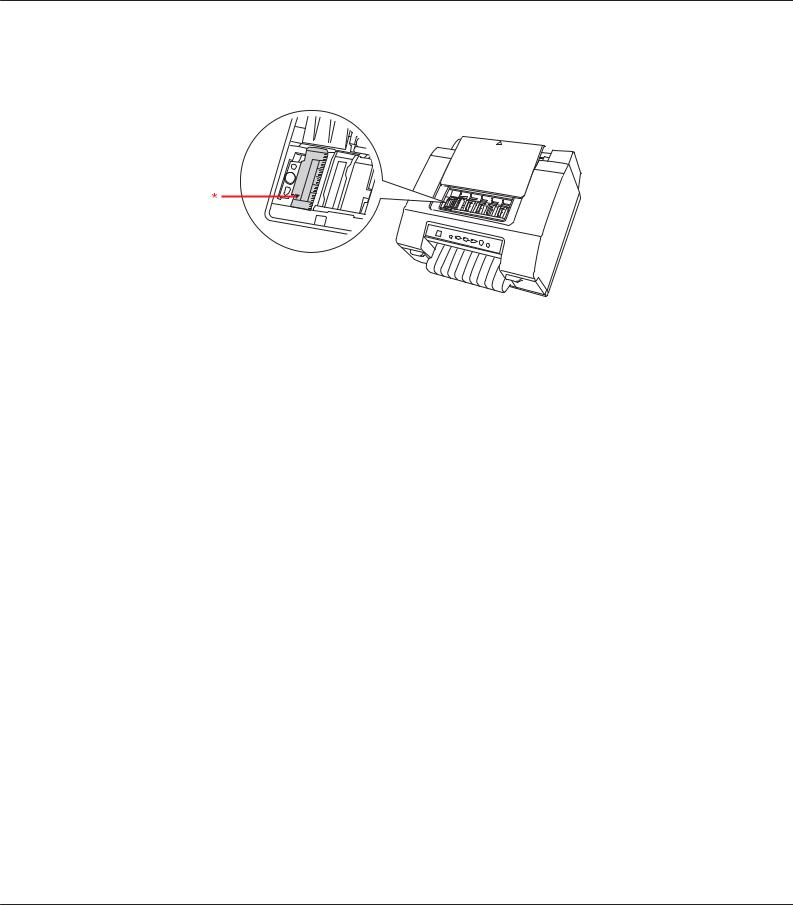
You can adjust the top-of-form position by opening the top cover and aligning the paper with the scale in the printer.
* top-of-form position
4.Press the Pause button to exit Micro Adjust mode.
Note:
If the forward adjustment of the top-of-form position is longer than the page length of the paper that you are using, you cannot print on the page that has been moved forward.
If the backward adjustment of the top-of-form position is longer than the page length of the paper that you are using, you cannot print the first part of the document or image.
Paper Handling 25

GP-C830/GP-M830/GP-C831/GP-M831/GP-C832/GP-M832 User’s Guide
Chapter 4
Printer Software
About Your Printer Software
The Epson software includes the printer driver and EPSON Status Monitor 3.
The printer driver is software that allows your computer to control the printer. You need to install the printer driver so your Windows applications can take full advantage of the printer’s capabilities.
EPSON Status Monitor 3 allows you to monitor the status of your printer, alerts you when errors occur, and provides you with troubleshooting tips. EPSON Status Monitor 3 is automatically installed when you install the printer driver.
Note:
Before proceeding, make sure you have installed the printer driver on your computer described in the Start Here.
On-screen displays on the following pages may differ depending on the version of the printer driver.
Using the Printer Driver
You can access the printer driver from your Windows applications or from the Start menu.
When you access the printer driver from a Windows application, any settings you make apply only to the application you are using. For more information, see “Accessing the printer driver from Windows applications” on page 27.
When you access the printer driver from the Start menu, the printer driver settings you make apply to all your applications. For more information, see “Accessing the printer driver from the Start menu” on page 27.
To check and change the printer driver settings, see “Changing the printer driver settings” on page 28.
Note:
While many Windows applications override the settings made with the printer driver, some do not. Therefore, you must verify that the printer driver settings match your requirements.
Printer Software 26

GP-C830/GP-M830/GP-C831/GP-M831/GP-C832/GP-M832 User’s Guide
Accessing the printer driver from Windows applications
Follow these steps to access the printer driver from a Windows application.
1.Select Print Setup or Print from the File menu of your application. In the Print or Print Setup dialog box displayed, make sure that your printer is selected.
2.Click Preferences, Printer Properties, or Options. (The button you click depends on your application and you may need to click a combination of these buttons.) The Document Properties dialog box appears. The Main, Paper, Layout, and Utility menus in the dialog box contain the printer driver settings.
3.To view a menu, click the corresponding tab at the top of the dialog box. To change the settings, see “Changing the printer driver settings” on page 28.
Accessing the printer driver from the Start menu
Follow these steps to access the printer driver from the Start screen or Start menu.
Note:
The screen shots used in this procedure are from Windows XP. They may vary in appearance from what actually appears on your screen; however, the instructions are the same.
1.For Windows 8 or Server 2012:
Click Desktop on the Start screen, move the cursor to the top-right corner of the screen, click
Settings, and then click Control Panel. Next, click View devices and printers from the Hardware and Sound category.
For Windows 7 or Server 2008 R2:
Click Start, and then click Devices and Printers.
For Windows Vista or Server 2008:
Click Start, click Control Panel, click Hardware and Sound, and then click Printers.
For Windows XP Professional or Server 2003: Click Start, and then click Printers and Faxes.
2.Right-click your printer icon, and then click Printing Preferences. The Printing Preferences dialog box appears. The Main, Paper, Layout, and Utility menus in the dialog box contain the printer driver settings.
Printer Software 27

GP-C830/GP-M830/GP-C831/GP-M831/GP-C832/GP-M832 User’s Guide
If you click Printer properties (Windows 8, 7, Server 2012, or Server 2008 R2) or Properties (Windows Vista, XP, Server 2008, or Server 2003) in the menu displayed by right-clicking the printer icon, the Properties dialog box appears. The menus in the dialog box are used to make the printer driver settings.
Note:
For Windows 8, 7, Server 2012, or Server 2008 R2, do not click Properties even though both
Properties and Printer properties are displayed in the menu.
3.To view a menu, click the corresponding tab at the top of the dialog box. To change the settings, see “Printer Driver Settings Overview” on page 29.
Changing the printer driver settings
Your printer driver has three menus (Main, Paper, and Layout) from which you can change the printer driver settings. You can also change settings on the Utility menu in the printer software. For an overview of the available settings, see “Printer Driver Settings Overview” on page 29. To view online help, click Help on the Printer Driver dialog box. You can also view online help by right-clicking items in the driver and selecting Help.
When you finish making your printer driver settings, click OK to apply the settings, or click Cancel to cancel your changes.
Once you have checked your printer driver settings and changed them if necessary, you are ready to print.
Printing barcodes
Barcodes can be easily printed using barcode fonts loaded in the printer driver.
Printer Software 28

GP-C830/GP-M830/GP-C831/GP-M831/GP-C832/GP-M832 User’s Guide
Before printing barcodes, specify the font name for the barcode, the font size, the font script of the printed data, the common settings, and the barcode settings with the printer driver, and then specify the font name, the font size, and the font script with your application. For more information about these settings, see the online help.
Note:
Specify the font size that is set with the Specified Point for the barcode. If other font sizes are specified, the barcode cannot be printed.
When printing and using barcodes, make sure that they can be scanned correctly under the actual usage conditions.
Printer Driver Settings Overview
The following tables show the Windows printer driver settings. Note that not every setting is available in all versions of Windows. For more information, see the online help for the printer driver.
Printer Software 29

GP-C830/GP-M830/GP-C831/GP-M831/GP-C832/GP-M832 User’s Guide
Printer settings
Settings |
Explanations |
|
|
Media Type |
Select the media type you want to use. |
|
|
Color |
This setting cannot be changed. The GP-C830/GP-C831/GP-C832 can print only in color |
|
and the GP-M830/GP-M831/GP-M832 can print only in black and white. |
|
|
Mode* |
Select Automatic to print with the best settings based on the Media Type and Color |
|
settings. |
|
Select Custom if you prefer to have more control over the printer driver settings. |
|
Select Silent Feed to make the operating sound of the printer quiet. |
|
|
Print Density |
This setting allows you to prevent the printout from becoming blurrydepending on the |
|
media type. |
|
Select Custom, clickAdvanced, and then adjust the print density using the Print Density |
|
slider. |
|
|
Ink Levels |
The amount of ink remaining is displayed. |
|
|
Print Preview |
This setting allows you to see a preview of your document before printing it. |
|
|
Paper Size |
Select the size of the paper you want to use. If you do not see your paper size, use the |
|
scroll bar to scroll through the list. If your paper size is not included in the list, see |
|
“Adding custom paper sizes” on page 31 for instructions. |
|
Note: |
|
If the width of the paper size set with the printer driver is larger than the width of the |
|
loaded paper, the portion of the data that is outside the printable area for the loaded |
|
paper is not printed. |
|
|
Copies* |
Specify the number of copies in the Copies box. |
|
Select Collate to print multi-page documents in sets. |
|
Select Reverse Order to print from back to front. |
|
|
Orientation |
Select Portrait or Landscape. |
|
Select Rotate by 180 degrees to print the documents upside down. |
|
|
Reduce/Enlarge* |
These settings allow you to enlarge or reduce the size of a document while maintaining |
|
its aspect ratio. |
|
|
Multi-Page* |
These settings allow you to enable the multi-page printing. |
|
|
Stampmark* |
These settings allow you to print documents with the selected stampmark. |
|
|
Extended Settings |
This setting allows you to adjust the print position vertically. |
|
|
* For more information, see Windows Help.
Printer Software 30
Loading...