


EB 824
Table of contents
 Loading...
User’s Guide
Notations Used in This Guide
• Safety indications
The documentation and the projector use graphical symbols to show how to use the projector safely.
Please understand and respect these caution symbols in order to avoid injury to persons or property.
Warning
This symbol indicates information that, if ignored, could possibly result in personal injury or even death due to incorrect handling.
Caution
This symbol indicates information that, if ignored, could possibly result in personal injury or physical damage due to incorrect handling.
• General information indications
Attention
Indicates procedures which may result in damage or injury if sufficient care is not taken.
q
Indicates additional information and points which may be useful to know regarding a topic.
s
Indicates a page where detailed information regarding a topic can be found.
g
Indicates that an explanation of the underlined word or words in front of this symbol appears in the glossary of terms. See the
"Glossary" section of the "Appendix". s p.102
Procedure
Indicates operating methods and the order of operations.
The procedure indicated should be carried out in the order of the numbered steps.
[ (Name) ] Indicates the name of the buttons on the Remote Control or the Control panel.
Example: [Return] button
"(Menu Name)"
Brightness
Indicates Configuration Menu items.
Example:
Select "Brightness" from the Image menu.
Image menu - Brightness

Notations Used in This Guide.......................... 2
Introduction
Projector Features........................................... 7
Features Common to Each Model....................................7
Easy to handle...............................................7
Enhanced security functions......................................7
EB-826W/825/85 Features. . . . . . . . . . . . . . . . . . . . . . . . . . . . . . . . . . . . . . . . . 8
Taking full advantage of a network connection......................... 8
Projecting JPEG images without connecting a computer..................8
Part Names and Functions.................................... 9
Front/Top....................................................9
Rear.......................................................10
Base.......................................................11
Control panel.................................................12
Remote Control............................................... 13
Useful Functions
Changing the Projected Image............................... 16
Automatically Detect Input Signal and Change the Projected Image (Source Search)
.......................................................... 16
Switch to the target image by Remote Control.......................... 17
Functions for Enhancing Projection.......................... 18
Selecting the Projection Quality (Selecting Color Mode)....................18
Setting the Auto Iris.............................................19
Hiding the Image and Sound Temporarily (A/V Mute)......................19
Freezing the Image (Freeze)....................................... 20
Changing the Aspect Ratio........................................20
Changing methods...........................................20
Changing the Aspect for video equipment images......................21
Changing the Aspect for computer images (EB-825/824/85/84)............. 22
Changing the Aspect for computer images (EB-826W)...................23
Pointer Function (Pointer)........................................25
Enlarging Part of the Image (E-Zoom)................................. 26
Operating the Mouse Pointer by Remote Control (Wireless Mouse)............. 27
Security Functions.......................................... 29
Managing Users (Password Protect)..................................29
Type of Password Protect.......................................29
Setting Password Protect.......................................29
Entering the Password.........................................30
Restricting Operation (Control Panel Lock).............................31
Anti-Theft Lock................................................32
Installing the wire lock......................................... 32
Configuration Menu
Using the Configuration Menu............................... 34
List of Functions............................................ 35
Image Menu..................................................35
Signal Menu..................................................36
Settings Menu................................................37
Extended Menu............................................... 39
Network Menu (EB-826W/825/85/84 only). . . . . . . . . . . . . . . . . . . . . . . . . . . . . 41
Notes on operating the Network menu.............................42
Soft keyboard operations....................................... 42
Basic Menu.................................................43
Wireless LAN Menu (EB-826W/825/85 only). . . ........................ 44
Security Menu (EB-826W/825/85 only).............................. 45
When WEP is selected......................................... 46
When WPA-PSK (TKIP) or WPA2-PSK (AES) is selected.................... 46
Wired LAN Menu.............................................47
Mail Menu.................................................48
Others Menu............................................... 49
Reset Menu................................................50
Info Menu (Display Only)......................................... 51
Reset Menu..................................................52
Contents
3

Troubleshooting
Using the Help.............................................. 54
Problem Solving............................................ 55
Reading the Indicators........................................... 55
t
Indicator is lit or flashing red................................... 56
m
o
Indicator is flashing or lit orange..............................57
When the Indicators Provide No Help.................................58
Problems relating to images..................................... 59
Problems when projection starts..................................63
Other problems.............................................63
Appendix
Installation Methods........................................ 66
Cleaning................................................... 67
Cleaning the Projector's Surface....................................67
Cleaning the Lens..............................................67
Cleaning the Air filter............................................ 67
Replacing Consumables..................................... 68
Replacing the Remote Control Batteries...............................68
Replacing the Lamp.............................................69
Lamp replacement period......................................69
How to replace the Lamp.......................................69
Resetting the Lamp Hours......................................72
Replacing the Air Filter...........................................72
Air filter replacement period.....................................72
How to replace the air filter......................................72
Optional Accessories and Consumables....................... 75
Optional accessories............................................75
Consumables................................................. 75
Saving a User's Logo........................................ 76
Screen Size and Projection Distance.......................... 78
Projection Distance (EB-825/824/85/84). . ............................. 78
Projection Distance (EB-826W).....................................78
Connecting and Removing USB Devices (EB-826W/825/824/85
only)....................................................... 80
Connecting USB Devices.........................................80
Removing USB Devices..........................................81
Connecting with a USB cable and Projecting (USB Display)..... 82
Connecting.................................................. 82
Connecting for the first time..................................... 83
From the second time.........................................84
Connecting a LAN Cable (EB-826W/825/85/84 only). . . . . . . . . . . . 85
Installing the Wireless LAN Unit (EB-826W/825/85 only)........ 86
Connecting to External Equipment........................... 87
Connecting to an external monitor (EB-826W/825/85/84 only). . . . . . . . . . . . . . . . 87
Connecting to an external speaker (EB-826W/825/85/84 only)................88
Connecting a microphone........................................88
Reading Problem Mail Notification Function (EB-826W/
825/85/84 only). . . . . . . . . . . . . . . . . . . . . . . . . . . . . . . . . . . . . . . . . . . . . 89
ESC/VP21 Commands....................................... 90
Command List................................................ 90
Cable Layouts.................................................90
Serial Connection............................................90
Communications protocol...................................... 91
About PJLink............................................... 92
Supported Monitor Displays. ................................ 93
Supported Monitor Displays (EB-825/824/85/84).........................93
Computer signals (analog RGB)...................................93
Component Video............................................94
Contents
4

Composite Video/S-Video.......................................94
Supported Monitor Displays (EB-826W)............................... 95
Computer signals (analog RGB)...................................95
Component Video............................................96
Composite Video/S-Video.......................................96
Specifications.............................................. 97
Projector General Specifications....................................97
Software Requirement...........................................99
Appearance............................................... 101
Glossary.................................................. 102
General Notes............................................. 104
General Notice:............................................... 104
Index..................................................... 120
Contents
5

Introduction
This chapter explains the projector's features and the part names.
Features Common to Each Model
Easy to handle
• The A/V mute slide knob makes it easy to project and store
You can stop and resume projection easily by opening and closing the
A/V mute slide knob which makes giving clear presentations easier.
• A single foot design means you do not have to make any difficult
leveling adjustments
You can easily make height adjustments with one hand.
s
Quick
Start Guide
• No cool down delay
After turning the projector's power off, you can disconnect the
projector's power cable without having to wait for the projector to
cool down.
• Projection screen for WXGA (EB-826W)
With a computer that has a 16:10 WXGA wide LCD display, the
image can be projected in the same aspect. You can use whiteboards
and other landscape format screens.
• Enlarge and project your files with the Document Camera
A USB compatible Document Camera is available as an optional extra.
With this Document Camera there is no need for a power cable. You
can connect easily with one USB cable, and its clean design really
simplifies projecting and enlarging your documents.
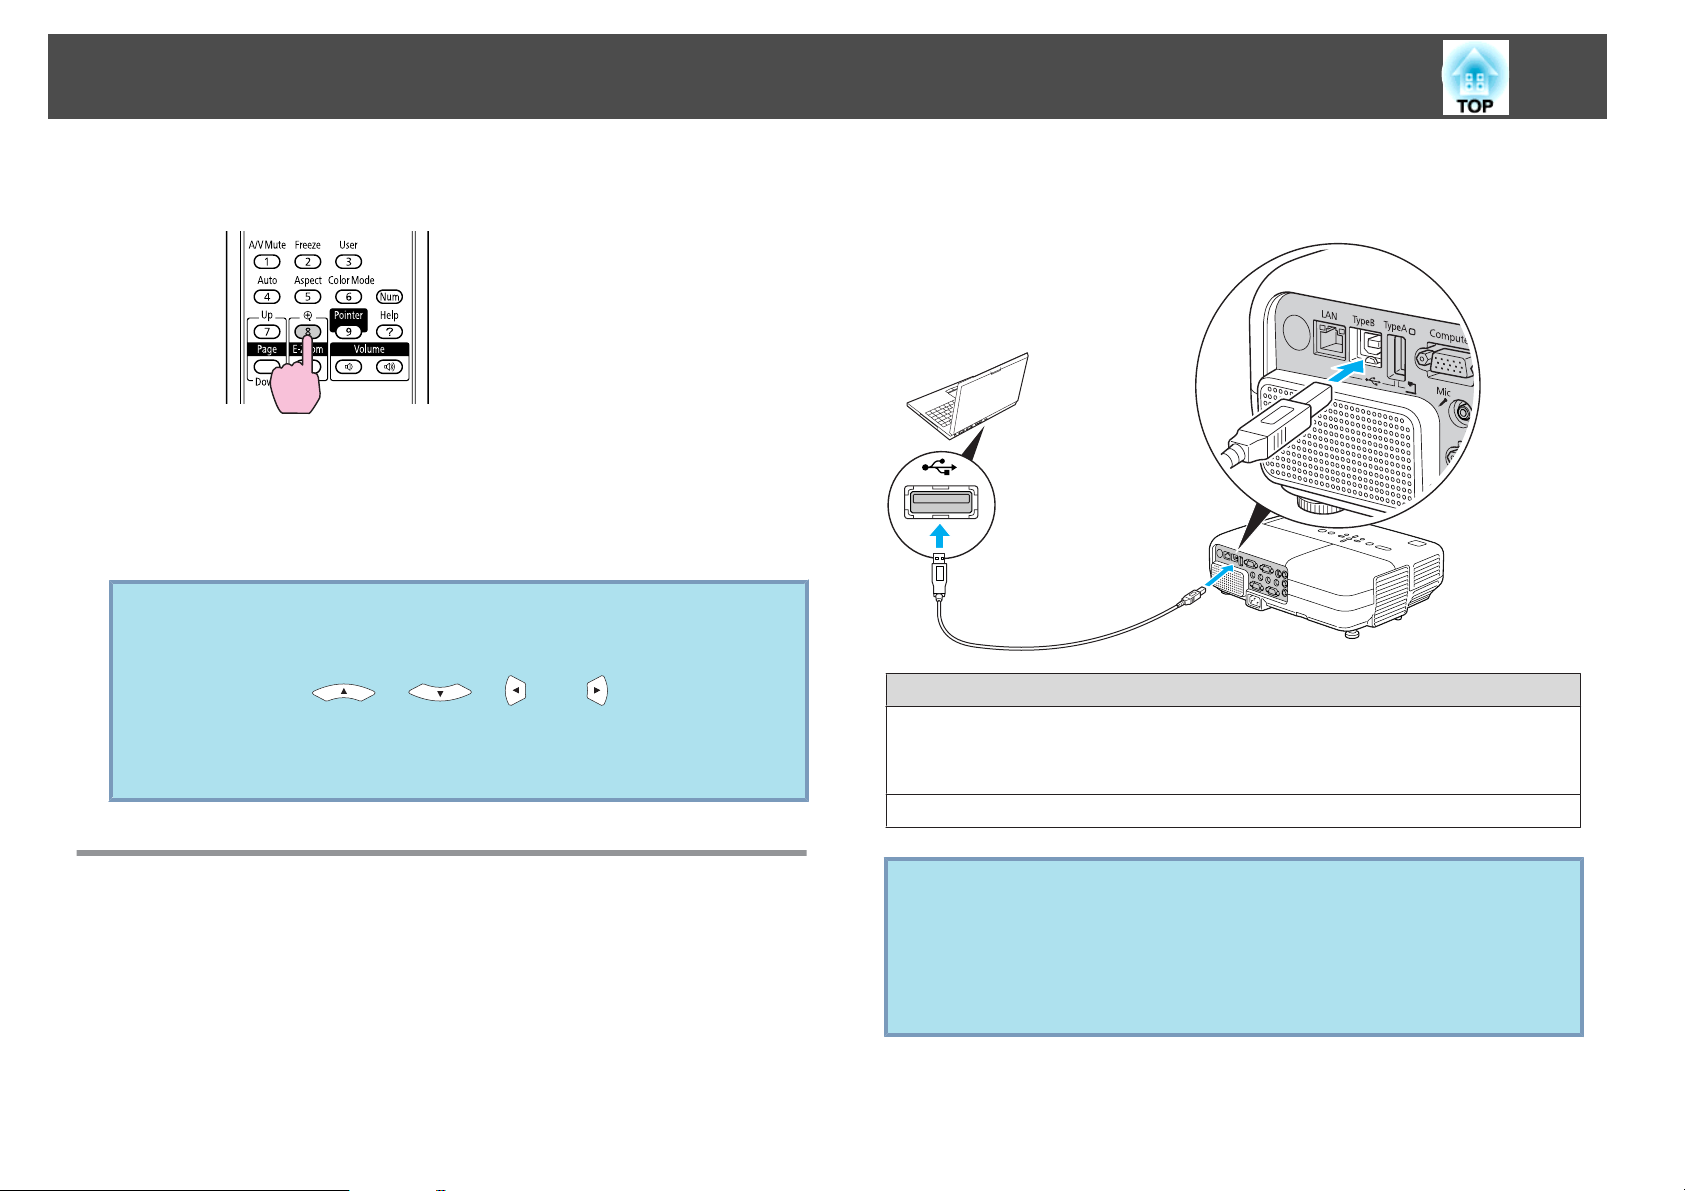
• Connecting with a USB cable and Projecting (USB Display)
Simply by connecting the projector to a Windows Computer with the
supplied USB cable you can project images from the computer screen.
s
p.82
Enhanced security functions
• Password Protect to restrict and manage users
By setting a Password you can restrict who can use the projector.
s
p.29
• Control Panel Lock restricts button operation on the Control panel
You can use this to prevent people changing projector settings without
permission at events, in schools, and so on.
s
p.31
Projector Features
7

• Equipped with various anti-theft devices
The projector is equipped with the following types of anti-theft
security devices.
s
p.32
• Security slot
• Security cable installation point
EB-826W/825/85 Features
Taking full advantage of a network connection
You can make effective use of your network by using the supplied
"
EPSON Projector Software for Meeting & Monitoring
" to perform
efficient and varied presentations and meetings.
s
Projector Operation
Guide
• Connect a Computer to the projector via a network
You can project by connecting to an already constructed network system.
You can hold efficient meetings by projecting from multiple computers
connected to a network system without having to change any cables.
• Connecting wirelessly to a computer
When you install the optional wireless LAN unit in the projector, you
can connect wirelessly to a computer.
• Connection method for various networks
The following methods are available for connecting the projector to a
network. Select whichever method suites your environment.
s
Projector Operation Guide
• Advanced Connection Mode
Advanced Connection Mode is an infrastructure connection, offering
you a method of connecting to an already constructed network.
• Quick Connection Mode
Quick Connection Mode is a connection method that can only be
executed when the optional wireless LAN unit is installed.
Quick Connection Mode temporarily allocates the projector's SSID
to the computer in ad-hoc mode, and restores the computer's net‐
work settings after disconnecting.
• Network connection using Quick Wireless Connection USB Key
Using the optional Quick Wireless Connection USB Key, you can
quickly connect a computer to the projector for projection.
Projecting JPEG images without connecting a computer
You can project a slideshow of JPEG images saved on a USB device
such as a USB compatible digital camera, hard disk, or USB memory by
simply connecting to the projector.
s
Projector Operation Guide
Projector Features
8
Front/Top
Name Function
A
Air exhaust vent
Exhaust vent for air used to cool the projector internally.
Caution
Do not place objects that may become warped or
otherwise affected by heat near the Air exhaust
vent and do not put your face or hands near the
vent while projection is in progress.
B
Remote Receiver
Receives signals from the remote control. s Quick
Start Guide
Name Function
C
A/V mute slide knob
Slide the knob to open and close the A/V mute slide knob.
D
Foot adjust lever
Pull out the Foot adjust lever to extend and retract the
Front adjustable foot.
s
Quick Start Guide
E
Front adjustable foot
Extend and adjust the position of the projected image
when the projector is placed on a surface such as a desk.
s Quick Start Guide
F
A/V mute slide knob
Slide shut when not using the projector to protect the
lens. By closing during projection you can hide the
image and the sound (A/V Mute). s Quick Start
Guide , s p.19
G
Air intake vent
(Air filter)
Takes in air to cool the projector internally. If dust
collects here it can cause the internal temperature to
rise, and this can lead to problems with operation and
shorten the optical engine's service life. Be sure to clean
the Air filter regularly.
s
p.67, p.72
H
Air filter cover open/
close switch
Opens and closes the air filter cover. s p.72
Open this cover when installing the optional Wireless
LAN unit.
I
Security cable
installation point
Pass a commercially available wire lock through here
and lock it in place.
s
p.32
J
Security slot
The Security slot is compatible with the Microsaver
Security System manufactured by
Kensington
.
s p.32
K
Focus ring
Adjusts the image focus. s Quick Start Guide
L
Zoom ring
Adjusts the image size. s Quick Start Guide
M
Control panel
s p.12
N
Lamp cover
Open this cover when replacing the projector's Lamp.
s
p.69
Part Names and Functions
9
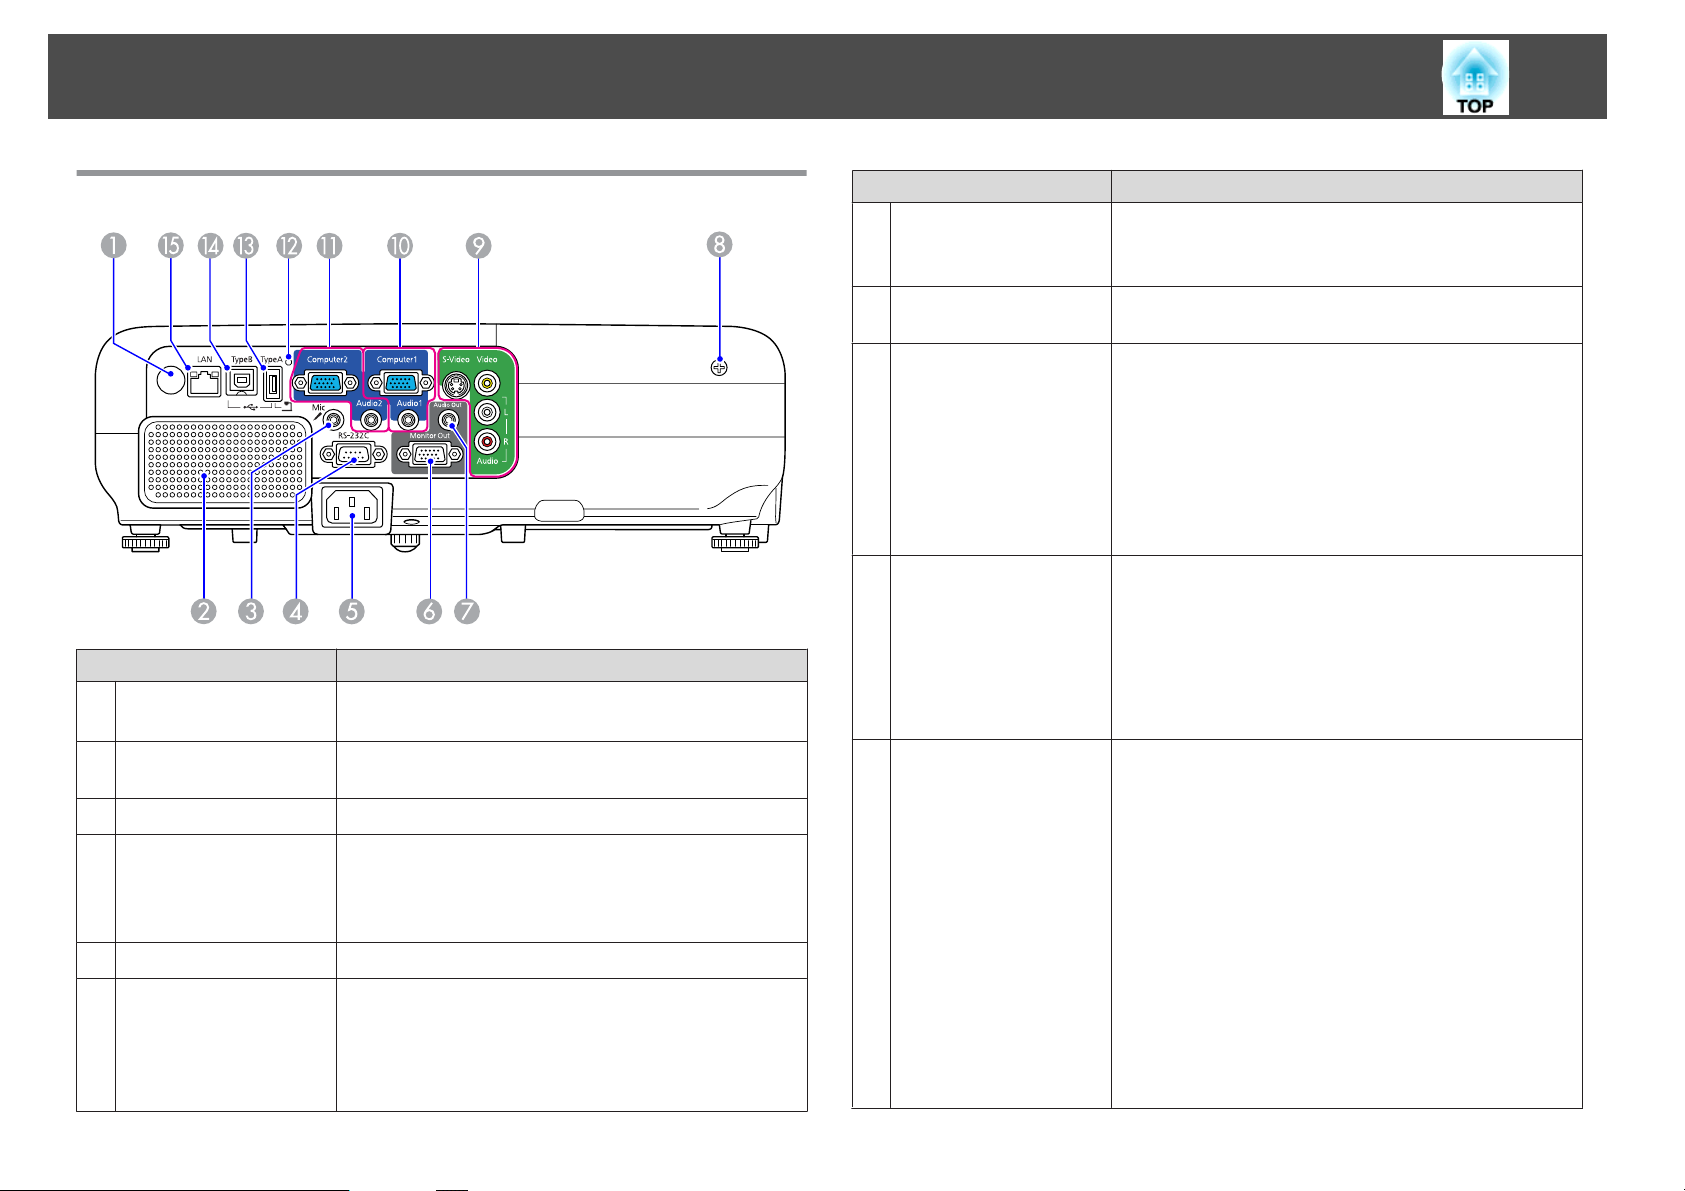
Rear
Name Function
A
Remote Receiver
Receives signals from the remote control. s Quick
Start Guide
B
Speaker
Outputs audio from the Mic Input Port and the image
currently being projected.
C
Mic Input Port
Connects to a microphone. s p.88
D
RS-232C Port
When controlling the projector from a computer,
connect it to the computer with an RS-232C cable. This
port is for control use and should not normally be used.
s p.90
E
Power inlet
Connects to the power cable. s Quick Start Guide
F
Monitor Out Port
(EB-826W/825/85/84
only)
Outputs to an external monitor the image signal from
the computer connected to the Computer1/2 input port.
This is not available for Component Video signals or
other signals being input to any port other than the
Computer1/2 input port. s p.87
Name Function
G
Audio Out Port
(EB-826W/825/85/84
only)
Outputs the image currently being projected and audio
from the Mic Input Port to an external speaker.
s
p.88
H
Lamp Cover Fixing
Screw
Screw to fix the Lamp cover in place. s p.69
I
S-Video Input Port
Video Input Port
Audio-L/R input port
For S-video signals from video sources.
For composite video signals from video sources.
Connects to the audio out port when you want to output
audio from equipment connected to the S-Video Input
Port or the Video Input Port.
s Quick Start Guide
J
Computer1 Input Port
Audio1 Port
For video signals from a computer and component
video signals from other video sources.
Connects to the audio out port when you want to output
audio from equipment connected to the Computer1
Input Port.
s Quick Start Guide
K
Computer2 Input Port
Audio2 Port
For video signals from a computer and component
video signals from other video sources.
Connects to the audio out port when you want to output
audio from equipment connected to the Computer2
Input Port. Also, when you want to output audio from
the projector for the following Sources, connect the
audio source to the Audio2 port.
- USB: When playing back a Slideshow from a USB
storage device connected to USB port (TypeA), or when
projecting from the optional Document Camera
- USB Display
- LAN
s Quick Start Guide
Part Names and Functions
10
Name Function
L
USB indicator
(EB-826W/825/824/85
only)
The following explains the status of USB devices
connected to USB port. (TypeA).
OFF: USB device is not connected
Orange Light ON: USB device is connected
Green Light ON: USB device is operating
Red Light ON: Error
M
USB Port (TypeA)
(EB-826W/825/824/85
only)
Projects a JPEG image Slideshow when memories or
digital cameras are connected to the
USB
compatible
port. s Projector Operation Guide
Also when the optional Document Camera is connected.
N
USB Port (TypeB)
Connects the projector to a computer via the supplied
USB cable, and the image on the computer is projected.
s p.82
Also use this port to connect to a computer via the
supplied USB cable to use the wireless mouse function.
s p.27
O
LAN Port
(EB-826W/825/85/84
only)
Connects to a LAN cable and then to a network.
s p.85
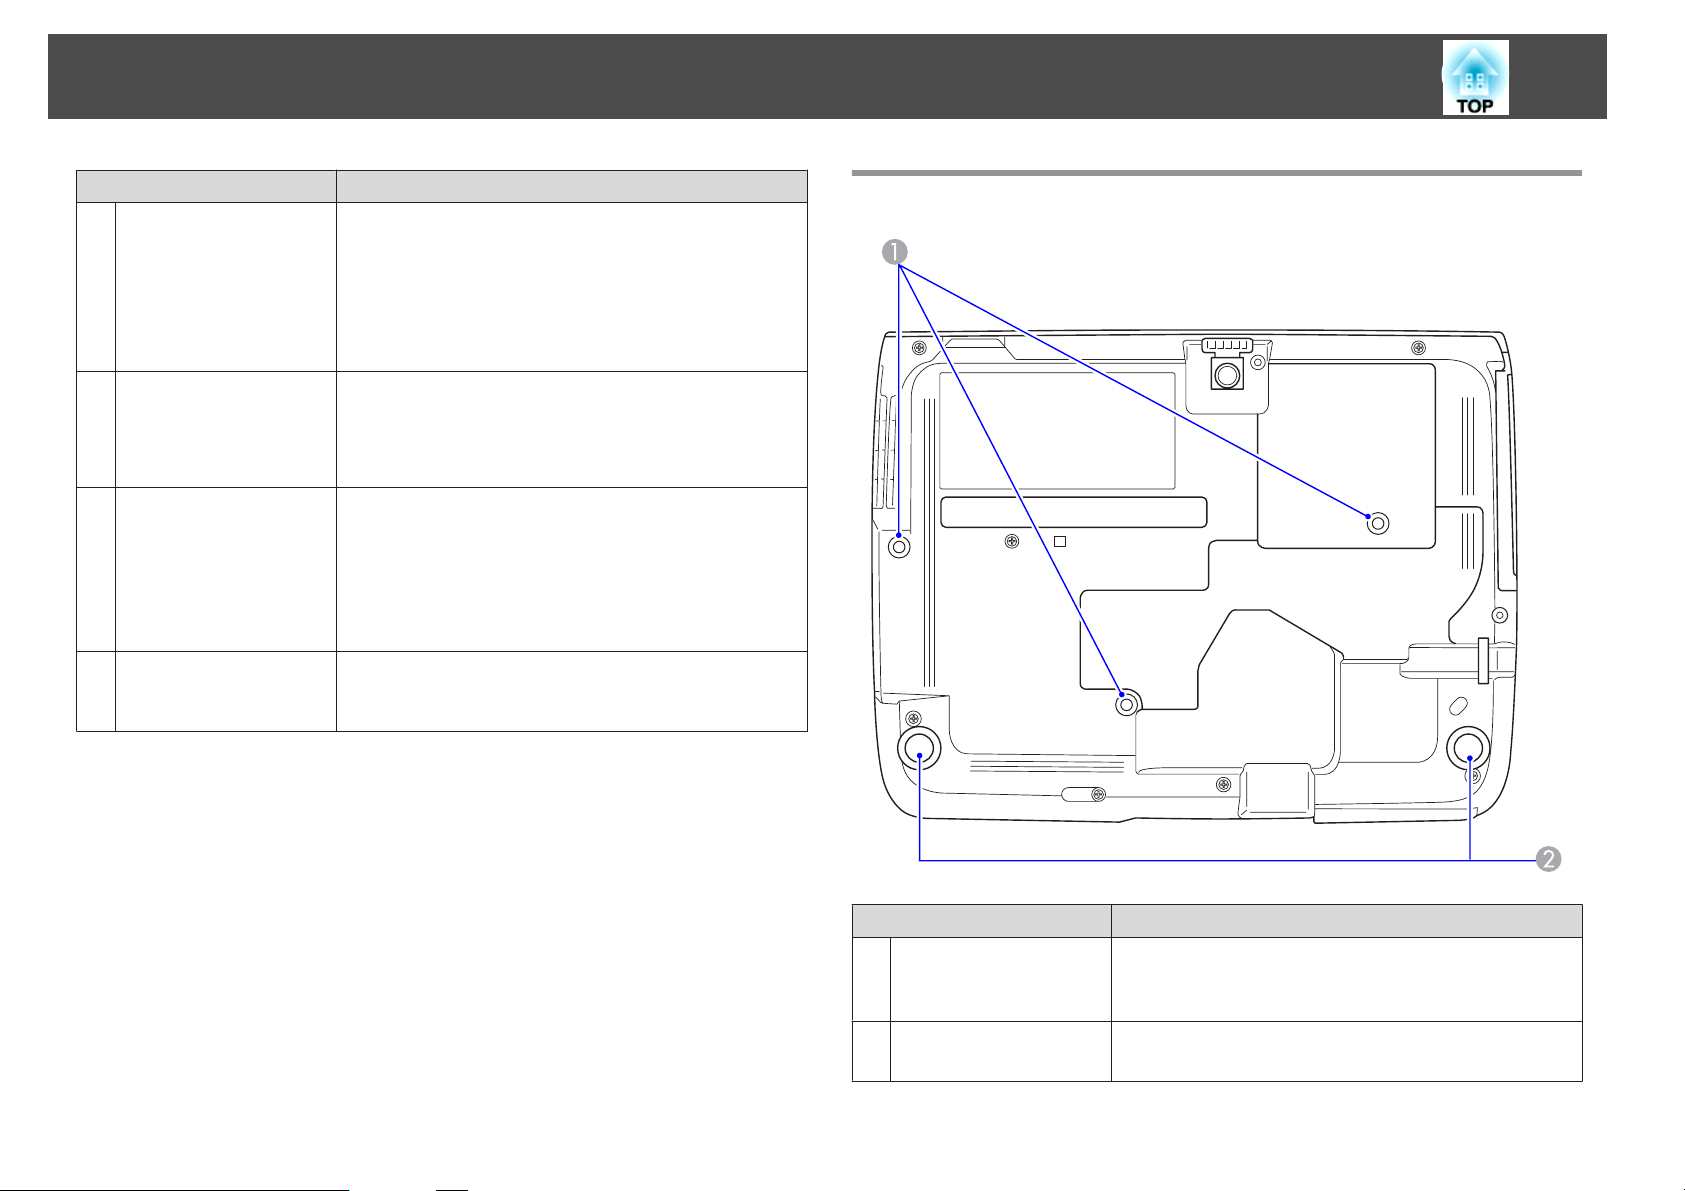
Base
Name Function
A
Ceiling mount fixing
points
(3 points)
Attach the optional Ceiling mount here when
suspending the projector from a ceiling. s p.66,
p.75
B
Rear foot
When setup on a desk, turn to extend and retract to
adjust the horizontal tilt.
s
Quick Start Guide
Part Names and Functions
11
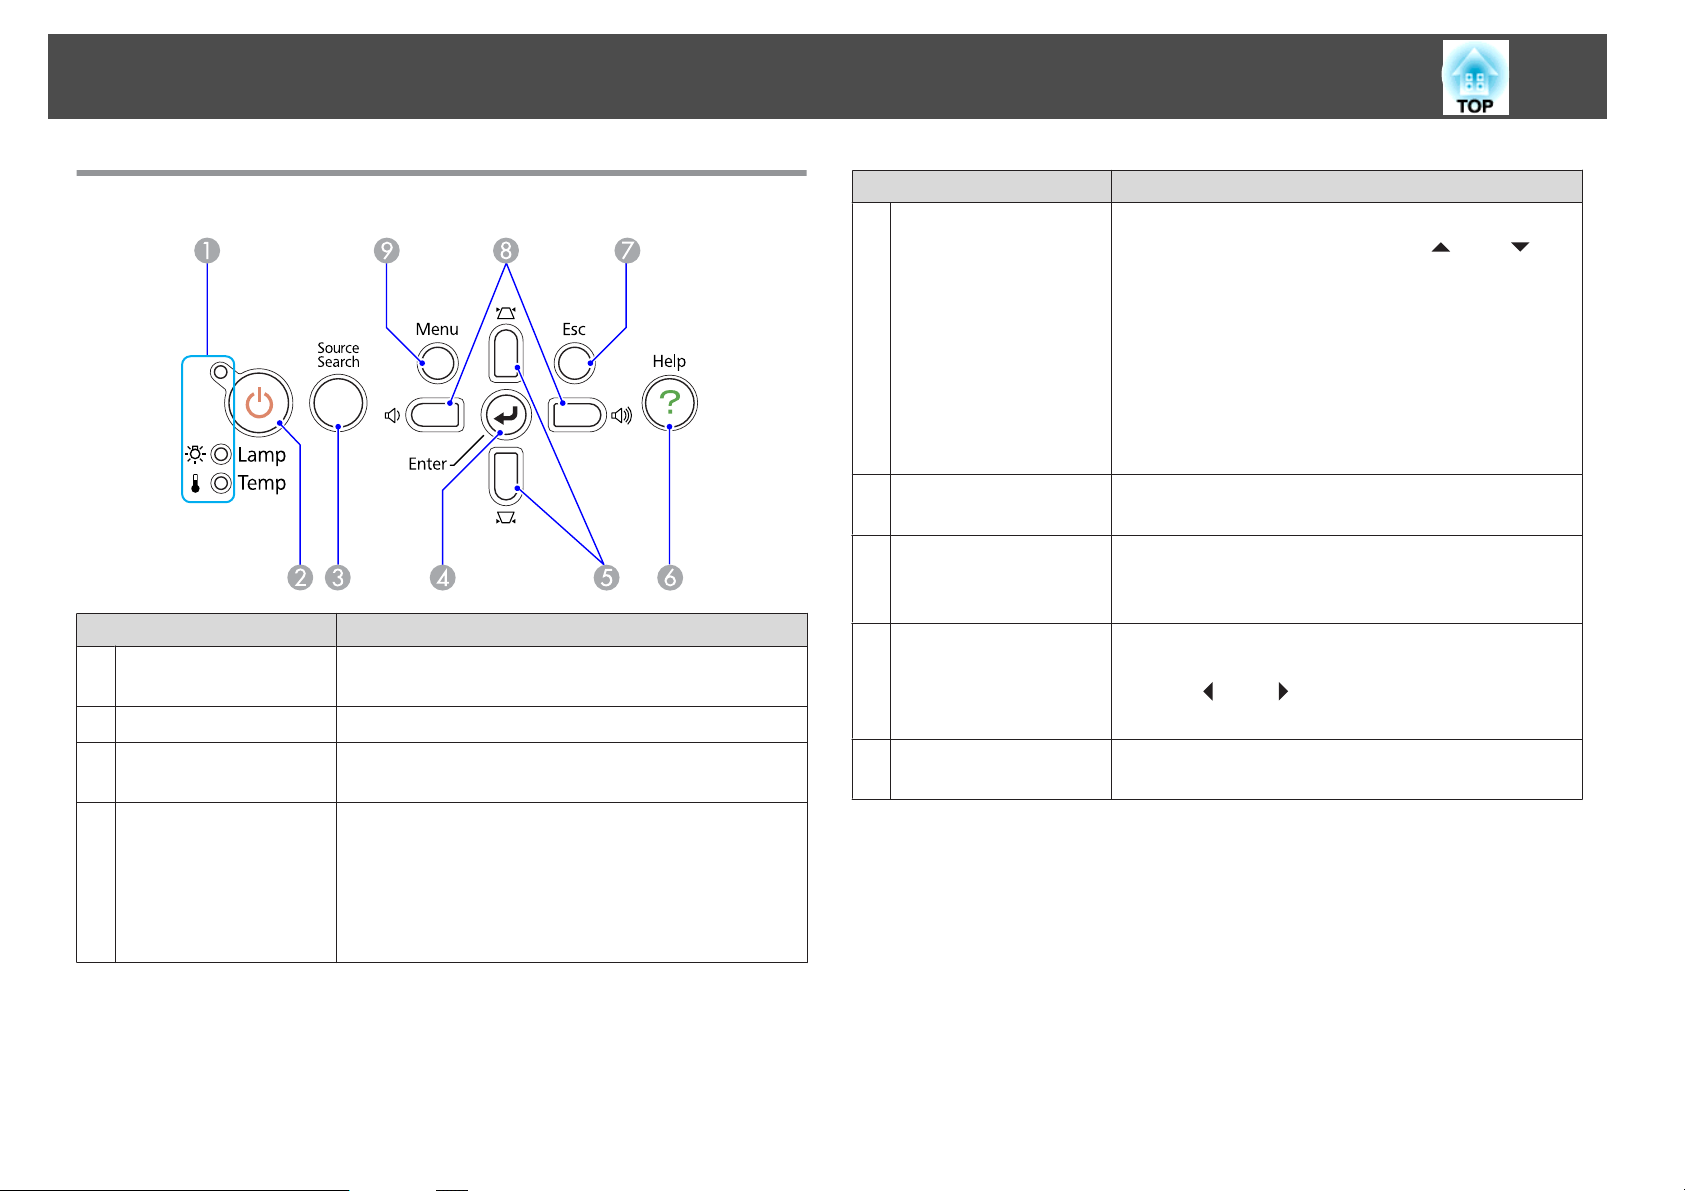
Control panel
Name Function
A
Status indicators
The color of the indicators and whether they are flashing
or lit indicate the status of the projector. s p.55
B
[t] button Turns the projector power on or off. s Quick Start Guide
C
[Source Search]
button
Changes to the next input source that is connected to
the projector and is sending an image. s p.16
D
[Enter] button
If pressed during projection of computer signal images,
it automatically adjusts the Tracking, Sync., and
Position to project the optimum image.
When a Configuration Menu or a Help screen is
displayed, it accepts and enters the current selection and
moves to the next level. s p.34
Name Function
E
[w][v] button
Corrects Keystone distortion. In the following cases,
however, these buttons only have the [
] and [ ]
functions.
- When the projected image is being sent through a
Network connection
- When the Slideshow function is being used for
projection
If pressed when a Configuration Menu or a Help screen
is displayed, these buttons select menu items and setting
values. s Quick Start Guide , p.34
F
[Help] button
Displays and closes the Help screen which shows you
how to deal with problems if they occur. s p.54
G
[Return] button
Stops the current function.
If pressed when a configuration menu is displayed, it
moves to the previous menu level. s p.34
H
[a][b] button
Adjusts the volume. If pressed while a Configuration
Menu or a Help screen is displayed, these buttons only
have the [
] and [ ] functions which select menu
items and setting values. s Quick Start Guide , p.34
I
[Menu] button
Displays and closes the Configuration Menu.
s p.34
Part Names and Functions
12
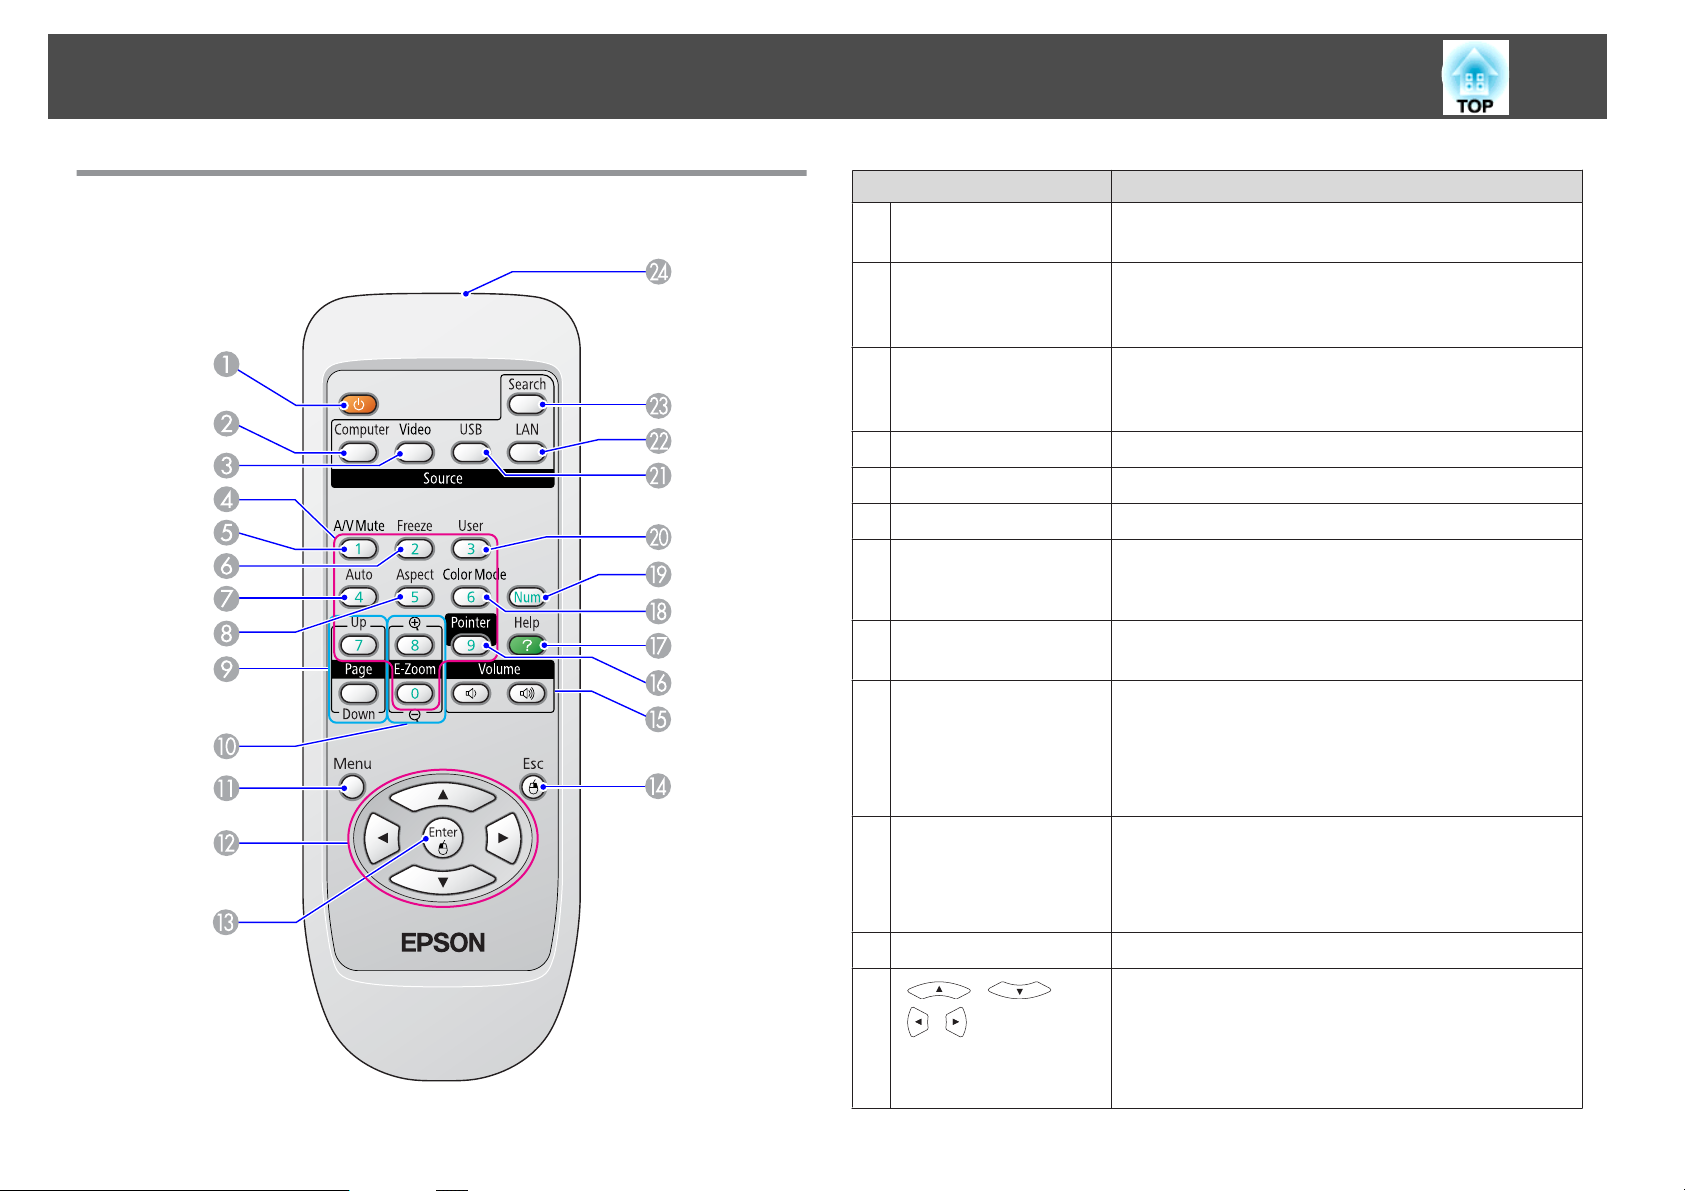
Remote Control
Name Function
A
[t] button Turns the projector power On or Off. s Quick Start
Guide
B
[Computer] button
Each time the button is pressed, the image changes from
the Computer1 input port to the Computer2 input port.
s p.17
C
[Video] button
Each time the button is pressed, the image changes from
the Video input port to the S-Video input port.
s p.17
D
Numeric buttons
Use when entering a password. s p.29
E
[A/V Mute] button
Turns the video and audio on or off. s p.19
F
[Freeze] button
Images are paused or unpaused. s p.20
G
[Auto] button
If pressed during projection of computer signal images,
it automatically adjusts the Tracking, Sync., and
Position to project the optimum image.
H
[Aspect] button
The Aspect Ratio changes each time the button is
pressed.
s
p.20
I
[Page] buttons
(Up) (Down)
Moves the Page Up/Down when using the Wireless
Mouse function, or projecting a PowerPoint file or a
scenario from LAN as the Source. The LAN Source is
only available on the EB-826W/825. s p.27, Projector
Operation Guide
J
[E-Zoom] buttons
(
z
)(
x
)
(
z
) Enlarges the image without changing the projection
size.
(Reduces parts of images that have been enlarged using
the (x) [z] button. s p.26
K
[Menu] button
Displays and closes the Configuration Menu. s p.34
L
[ ][ ]
[
][ ] button
When a Configuration Menu or Help screen is
displayed, it selects menu items and setting values.
s p.34, p.54
During Wireless Mouse function, the mouse pointer
moves in the direction the button is pushed. s p.27
Part Names and Functions
13
Name Function
M
[Enter] button
When a Configuration Menu or a Help screen is
displayed, it accepts and enters the current selection and
moves to the next level.
s
p.34, p.54
Acts as a mouse's left button when using the Wireless
Mouse function.
s
p.27
N
[Return] button
Stops the current function. If pressed when a
Configuration Menu is displayed, it moves to the
previous level. s p.34, p.54
Acts as a mouse's right button when using the Wireless
Mouse function. s p.27
O
[Volume] buttons (a)
(b)
(a) Decreases the Volume.
(
b
) Increases the Volume.
s Quick Start Guide
P
[Pointer] button
Press to activate the on screen Pointer. s p.25
Q
[Help] button
Displays and closes the Help screen which shows you
how to deal with problems if they occur.
s
p.54
R
[Color Mode] button
Each time the button is pressed, the Color Mode
changes. s p.18
S
[Num] button
Use when entering a Password. s p.29
T
[User] button
Press to assign a frequently used item from the five
available Configuration Menu items. By pressing the
button the assigned menu item selection/adjustment
screen is displayed, allowing you to make one-touch
settings/adjustments.
s
p.37
Brightness Control is assigned as the default setting.
U
[USB] button
Each time the button is pressed, it changes to the image
from equipment connected to USB Display/USB port
(TypeA). Only changes to USB Display when using the
EB-84. s p.17
Name Function
V
[LAN] button
Changes to the EMP NS Connection image.(EB-826W/
825/85 only)
s
p.17
When using EB-824/84, this does not function even if
the button is pressed.
W
[Search] button
Changes to the next input source that is connected to
the projector and is sending an image.
s
p.16
X
Remote control
light-emitting area
Outputs remote control signals.
Part Names and Functions
14

Useful Functions
This chapter explains useful tips for giving presentations, and the Security functions.
You can change the projected image in the following two ways.
• Changing by Source Search
The projector automatically detects signals being input from connected
equipment, and the image being input from the equipment is projected.
• Changes to the target image.
You can use the Remote Control buttons to change to the target
input port.
Automatically Detect Input Signal and Change
the Projected Image (Source Search)
You can project the target image quickly as input ports with no image
signal being input are ignored when you change by pressing the [Source
Search] button.
A
Computer1
B
Computer2
C
S-Video
D
Video
E
USB Display
F
USB: When image is from a device connected to USB Port (TypeA).
G
LAN: When the projector is connected to a computer via a
network, and images from EMP NS Connection are projected.
Skipped when no image signal is being input.
Only EB-826W/825/824/85 can switch to USB.
Only EB-826W/825/85 can switch to
LAN
.
Procedure
When your video equipment is connected, start playback before
beginning this operation.
Using the Remote Control Using the Control panel
When two or more pieces of equipment are connected, press the
[Source Search] button until the target image is projected.
Changing the Projected Image
16
q
The following screen showing the status of image signals is
displayed when only the image that the projector is currently
displaying is available, or when no image signal can be found. You
can select the input port where the equipment you want to use is
connected. If no operation is performed after about 10 seconds, the
screen closes.
USB is only displayed for EB-826W/825/824/85.
LAN
is only displayed for EB-826W/825/85.
Switch to the target image by Remote Control
You can change directly to the target image by pressing the following
buttons on the Remote Control.
Remote Control
A
Each time the button is pressed, the image changes from the Computer1
input port to the Computer2 input port.
B
Each time the button is pressed, the image changes from the Video input
port to the S-Video input port.
C
Each time the button is pressed, it changes to the image from equipment
connected to USB Display/USB port (TypeA). Only changes to USB
Display when using the EB-84.
D
When the projector is connected to a computer via a network, you can
switch to images projected from EMP NS Connection.(EB-826W/825/85
only)
When using EB-824/84, this does not function even if the button is pressed.
Changing the Projected Image
17
Selecting the Projection Quality (Selecting Color
Mode)
You can easily obtain the optimum image quality simply by selecting
the setting that best corresponds to your surroundings when projecting.
The brightness of the image varies depending on the mode selected.
Mode Application
Dynamic
Ideal for use in a bright room. This is the brightest
mode, and reproduces shadow tones well.
If you are worried about image delays during
projection for games involving speed, try turning off
Progressive in the Configuration Menu. s p.36
Presentation
Ideal for making presentations using color materials in
a bright room.
Theatre
Ideal for watching films in a dark room. Gives images
a natural tone.
Photo
(When the computer image input and the Source are
USB or LAN.)
Ideal for projecting still pictures, such as photos, in a
bright room. The images are vivid and brought into
contrast.
Sports
(When Component Video, S-Video, or composite
video images are input)
Ideal for watching TV programmes in a bright room.
The images are vivid and brought to life.
sRGB
g
Ideal for images that conform to the sRGB color
standard.
Blackboard
Even if you are projecting onto a Blackboard
(greenboard), this setting gives your images a natural
tint, just like when projecting onto a screen.
Whiteboard
Ideal for making presentations using black-and-white
materials in a bright room.
Procedure
Remote Control
Each time you press the button, the Color Mode name is displayed on
the screen and the Color Mode changes.
If you press the button while the Color Mode name is displayed on the
screen, it changes to the next Color Mode.
q
The color mode can also be set using Color Mode in the Image
menu from the Configuration Menu. s p.35
Functions for Enhancing Projection
18
Setting the Auto Iris
By automatically setting the luminance according to the brightness of
the displayed image, it lets you enjoy deep and rich images.
Procedure
A
Press the [Menu] button and select Image - Auto Iris from
the Configuration Menu.
s
"Using the Configuration Menu"
Using the Remote Control Using the Control panel
B
Select On.
The setting is stored for each Color Mode.
C
Press the [Menu] button to close the Configuration Menu.
q
Auto Iris can be set only when the Color Mode is Dynamic or
Theatre.
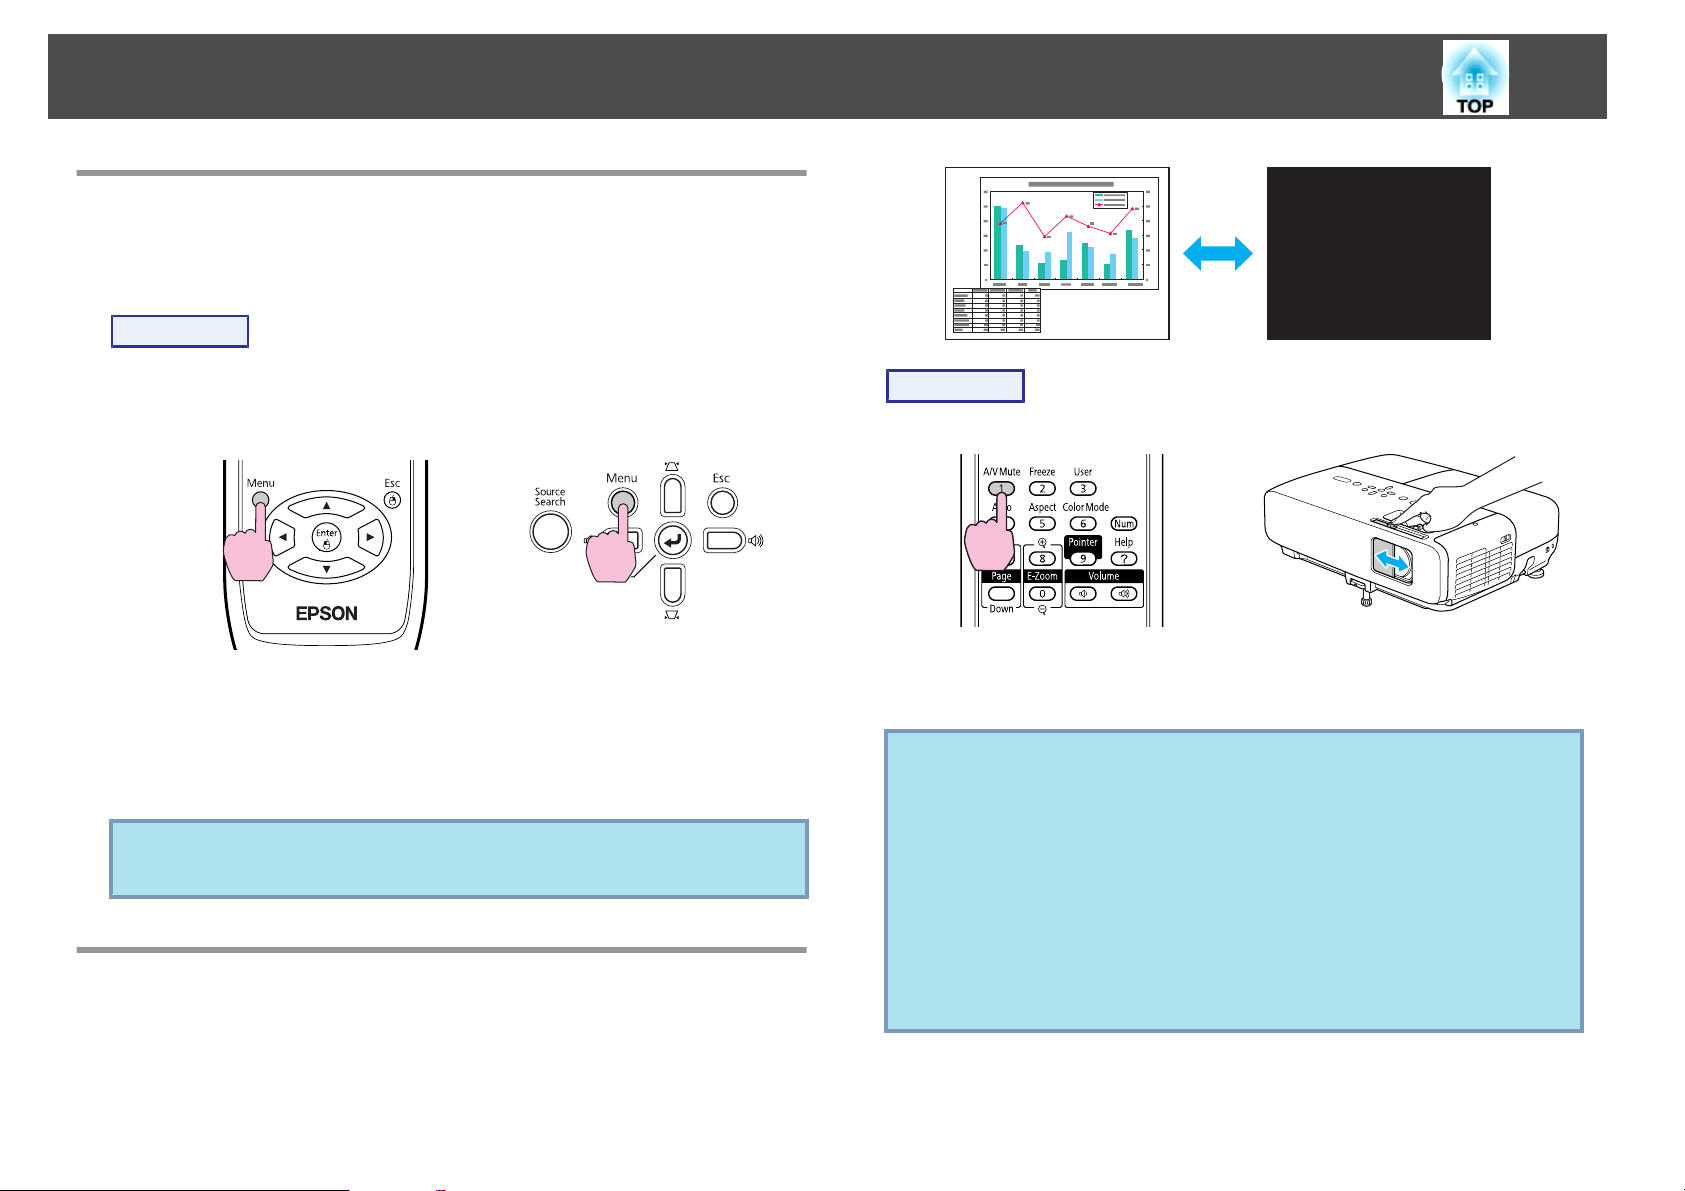
Hiding the Image and Sound Temporarily (A/V
Mute)
You can use this when you want to focus the audience's attention on
what you are saying, or if you do not want to show details such as
when you are changing between files during presentations from a computer.
Procedure
Remote Control Body
Each time you press the button, or open/close the lens cover A/V Mute
turns on or off.
q
• If you use this function when projecting moving images, the
images and sound continue to be played back by the source, and
you cannot return to the point where A/V Mute was activated.
• You can choose to display Black, Blue, or Logo as the A/V
Mute display using the Extended - Display - A/V Mute setting
from the configuration menu. s p.39
• When the A/V mute slide knob is closed, or when no operations
are made for approximately 30 minutes, Sleep Mode activates and
the power is automatically turned off. If you do not want Sleep
Mode to activate, change the Lens Cover Timer setting to Off
from Operation in the Extended menu. s p.39
Functions for Enhancing Projection
19
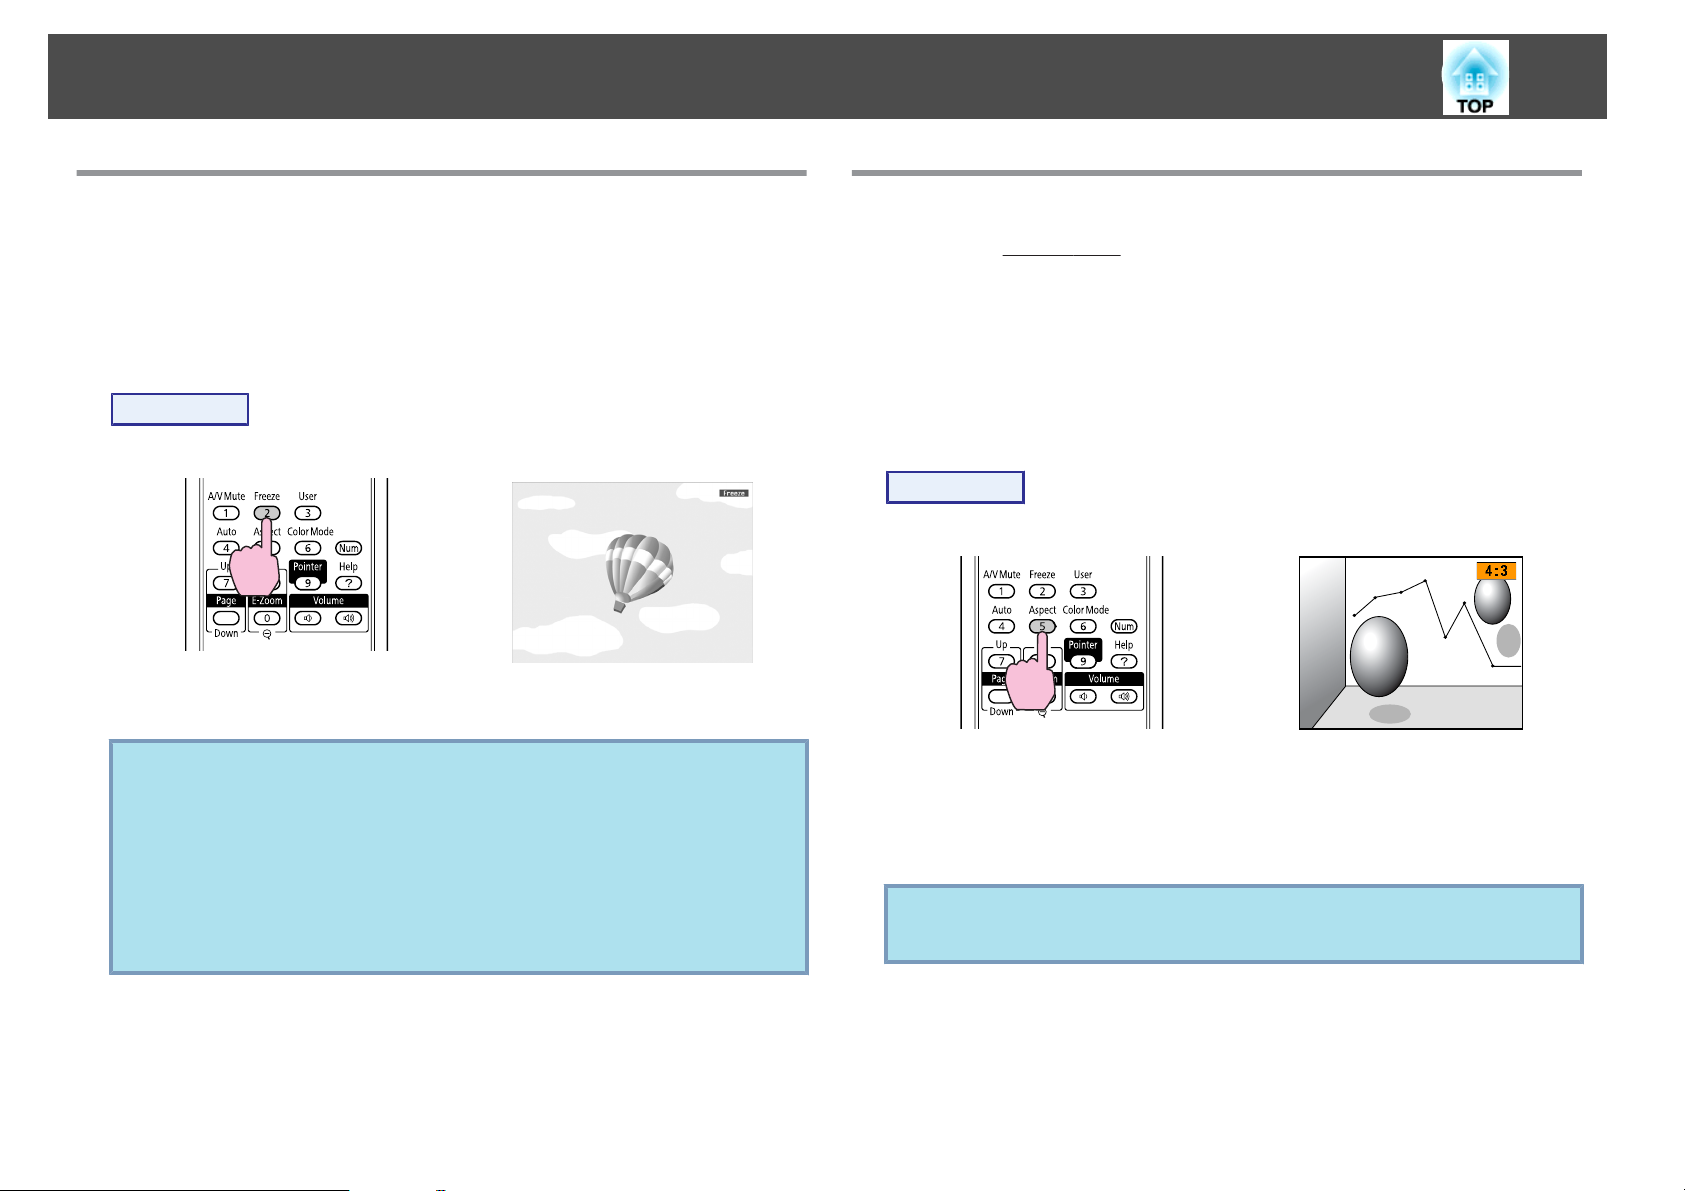
Freezing the Image (Freeze)
When the moving image on the screen is frozen, the image continues
to project, so you can project a moving image one frame at a time like
a still photo. Also, you can perform operations such as changing
between files during presentations from a computer without projecting
any images if the freeze function is activated beforehand.
Procedure
Remote Control
Each time you press the button, Freeze turns on or off.
q
• Audio does not stop.
• The image source continues to play back the moving images
even while the screen is frozen, and so it is not possible to
resume projection from the point where it was paused.
• If the [Freeze] button is pressed while the Configuration Menu
or a Help screen is displayed, the menu or Help screen being
displayed is cleared.
• Freeze still works while E-Zoom is being used.
Changing the Aspect Ratio
Change the Aspect Ratio
g
when video equipment is connected so that
images that have been recorded in digital video or onto DVDs can be
viewed in 16:9 wide-screen format. Change the Aspect Ratio when
projecting computer images at full size.
The changing methods and the types of Aspect ratio are as follows.
Changing methods
Procedure
Remote Control
Each time you press the button, the Aspect name is displayed on the
screen and the Aspect changes.
If you press the button while the Aspect name is displayed on the
screen, it changes to the next Aspect Mode.
q
The color mode can also be set using Aspect in the Signal menu
from the Configuration Menu. s p.36
Functions for Enhancing Projection
20
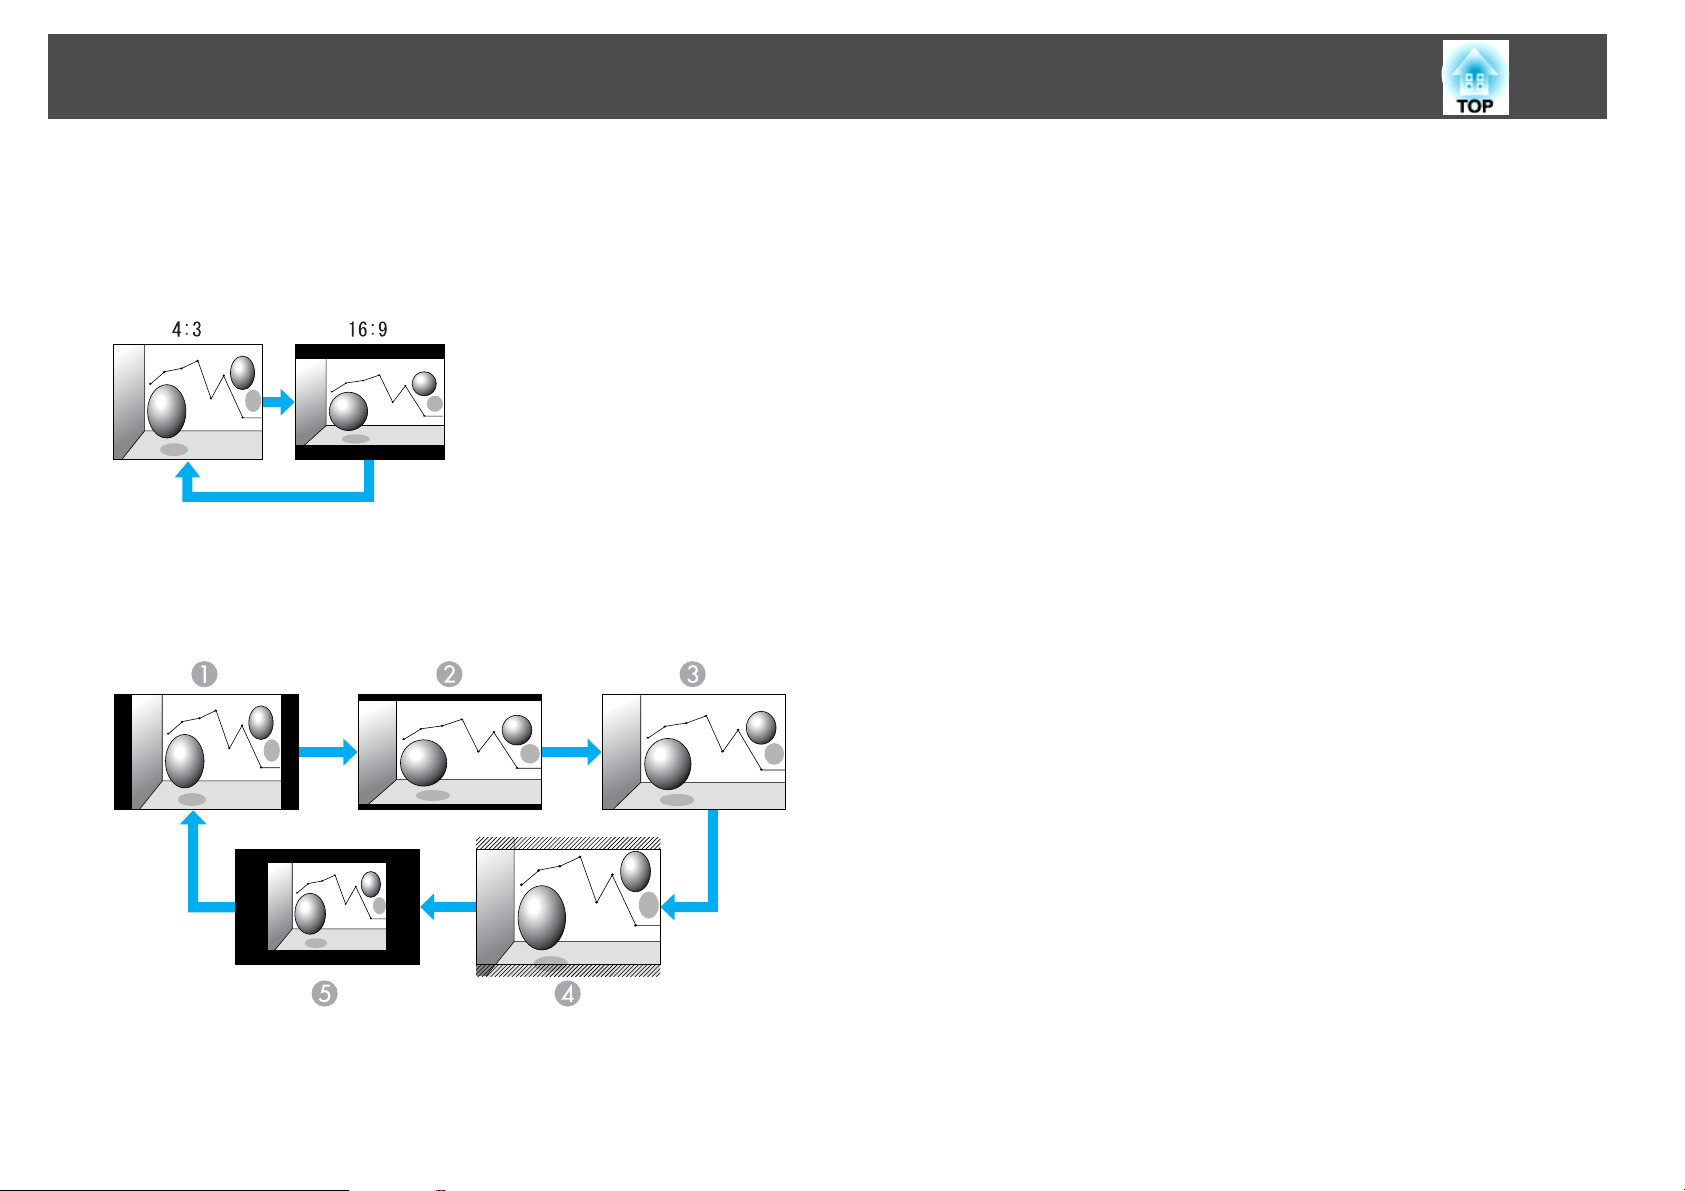
Changing the Aspect for video equipment images
EB-825/824/85/84
Each time you press the button, it switches between 4:3 and 16:9.
EB-826W
Each time the button is pressed, it changes in the order Normal,
16:9
,
Full, Zoom, and Through.
A
Normal
B
16:9
C
Full
D
Through
E
Zoom
Functions for Enhancing Projection
21
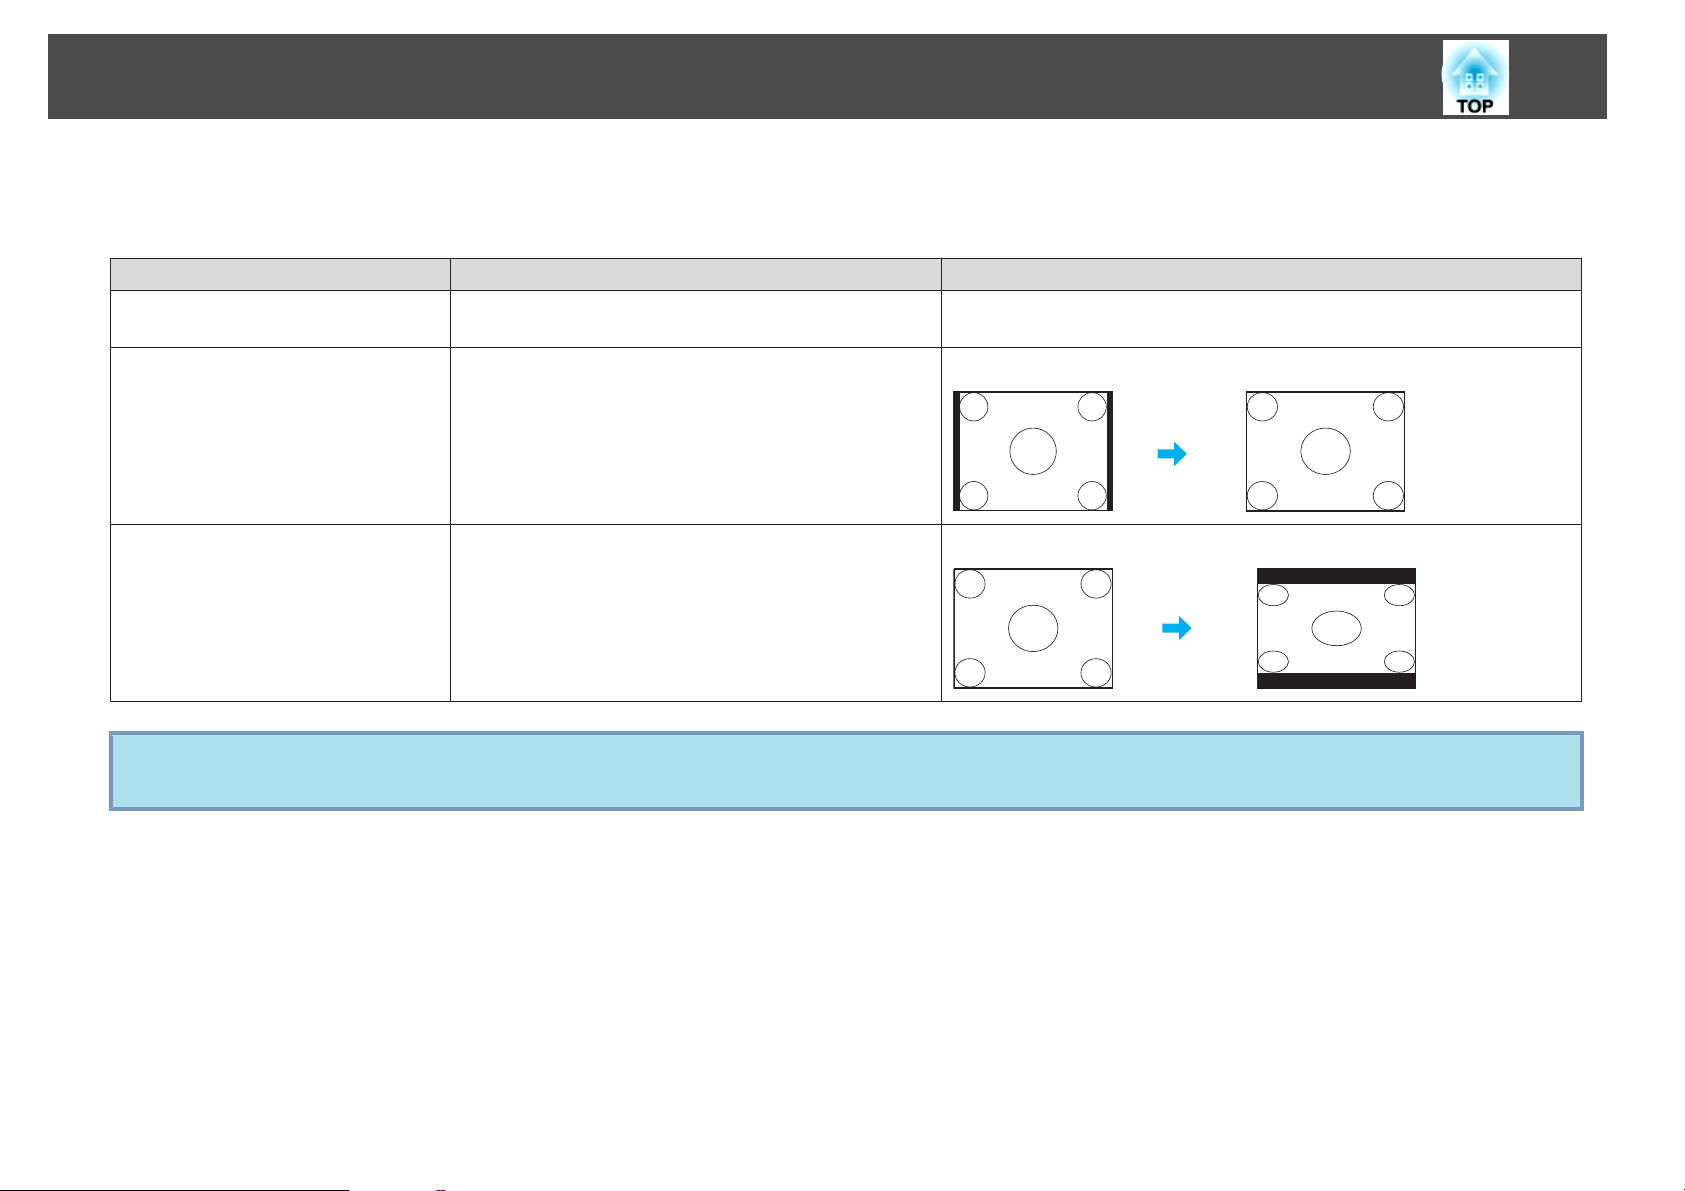
Changing the Aspect for computer images (EB-825/824/85/84)
You can change the Aspect as follows.
Set Values Operation Projection example
Normal
Projects to the full projection size retaining the Aspect of
the input image.
4:3
Projects to the full projection size at an Aspect of 4:3. This
is ideal for when you want to project images at an Aspect
of 5:4 (1280 x 1024) to the full projection size.
When a 1280x1024 signal is input
16:9
Projects at a 16:9 Aspect. This is ideal for projecting at full
screen size when using a 16:9 screen.
When a 1280x1024 signal is input
q
If parts of the image are missing, set Wide or Normal in Resolution from the Configuration Menu depending on the size of the computer panel.
s p.36
Functions for Enhancing Projection
22
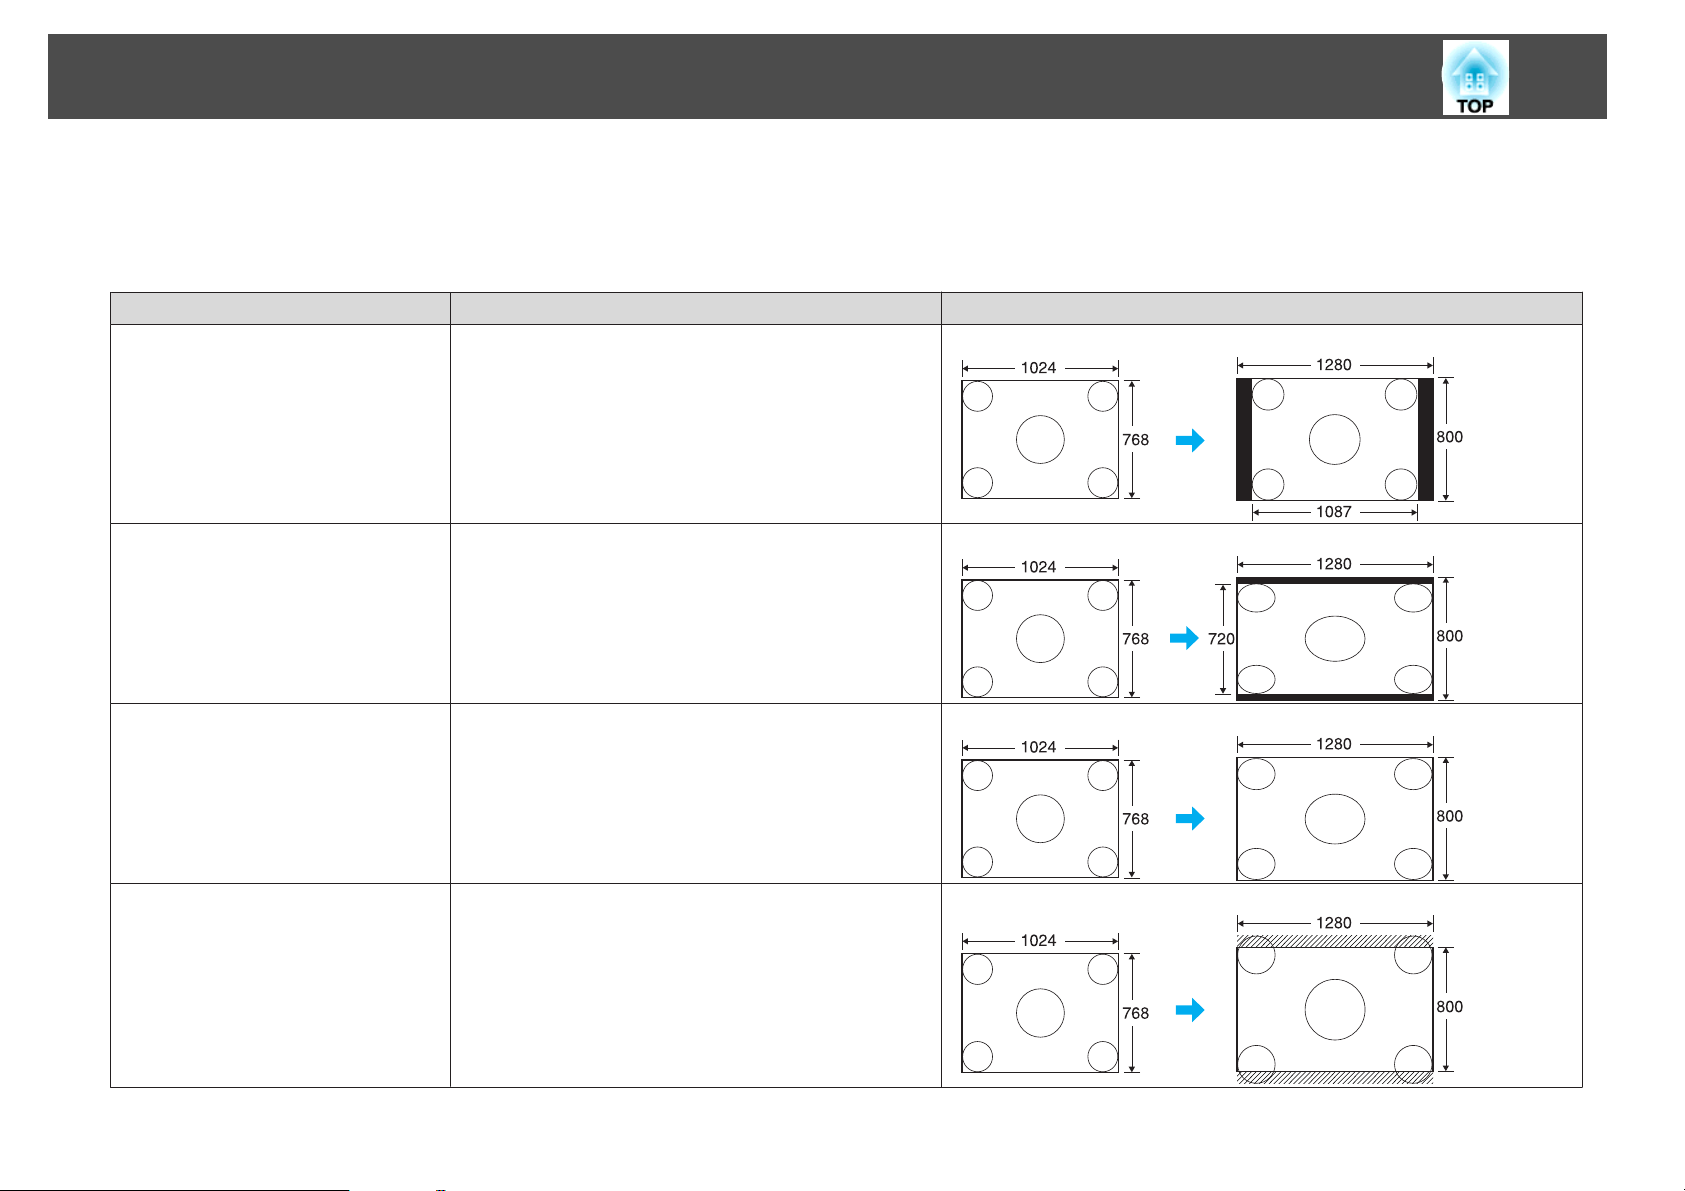
Changing the Aspect for computer images (EB-826W)
You can change the Aspect as follows. EB-826W offers WXGA 1280x800 resolution (Aspect Ratio 16:10). When projecting onto 16:9 screens, set the
Aspect to 16:9.
Set Values Operation Projection example
Normal
Projects to the full projection size retaining the Aspect of
the input image.
When a 1024x768 signal is input
16:9
Projects to the full projection size at an Aspect of 16:9. When a 1024x768 signal is input
Full
Project at full size.
When a 1024x768 signal is input
Zoom
Projects the input image at the lateral direction aspect size
as it is. Parts that extend beyond the projection size are not
projected.
When a 1024x768 signal is input
Functions for Enhancing Projection
23
Set Values Operation Projection example
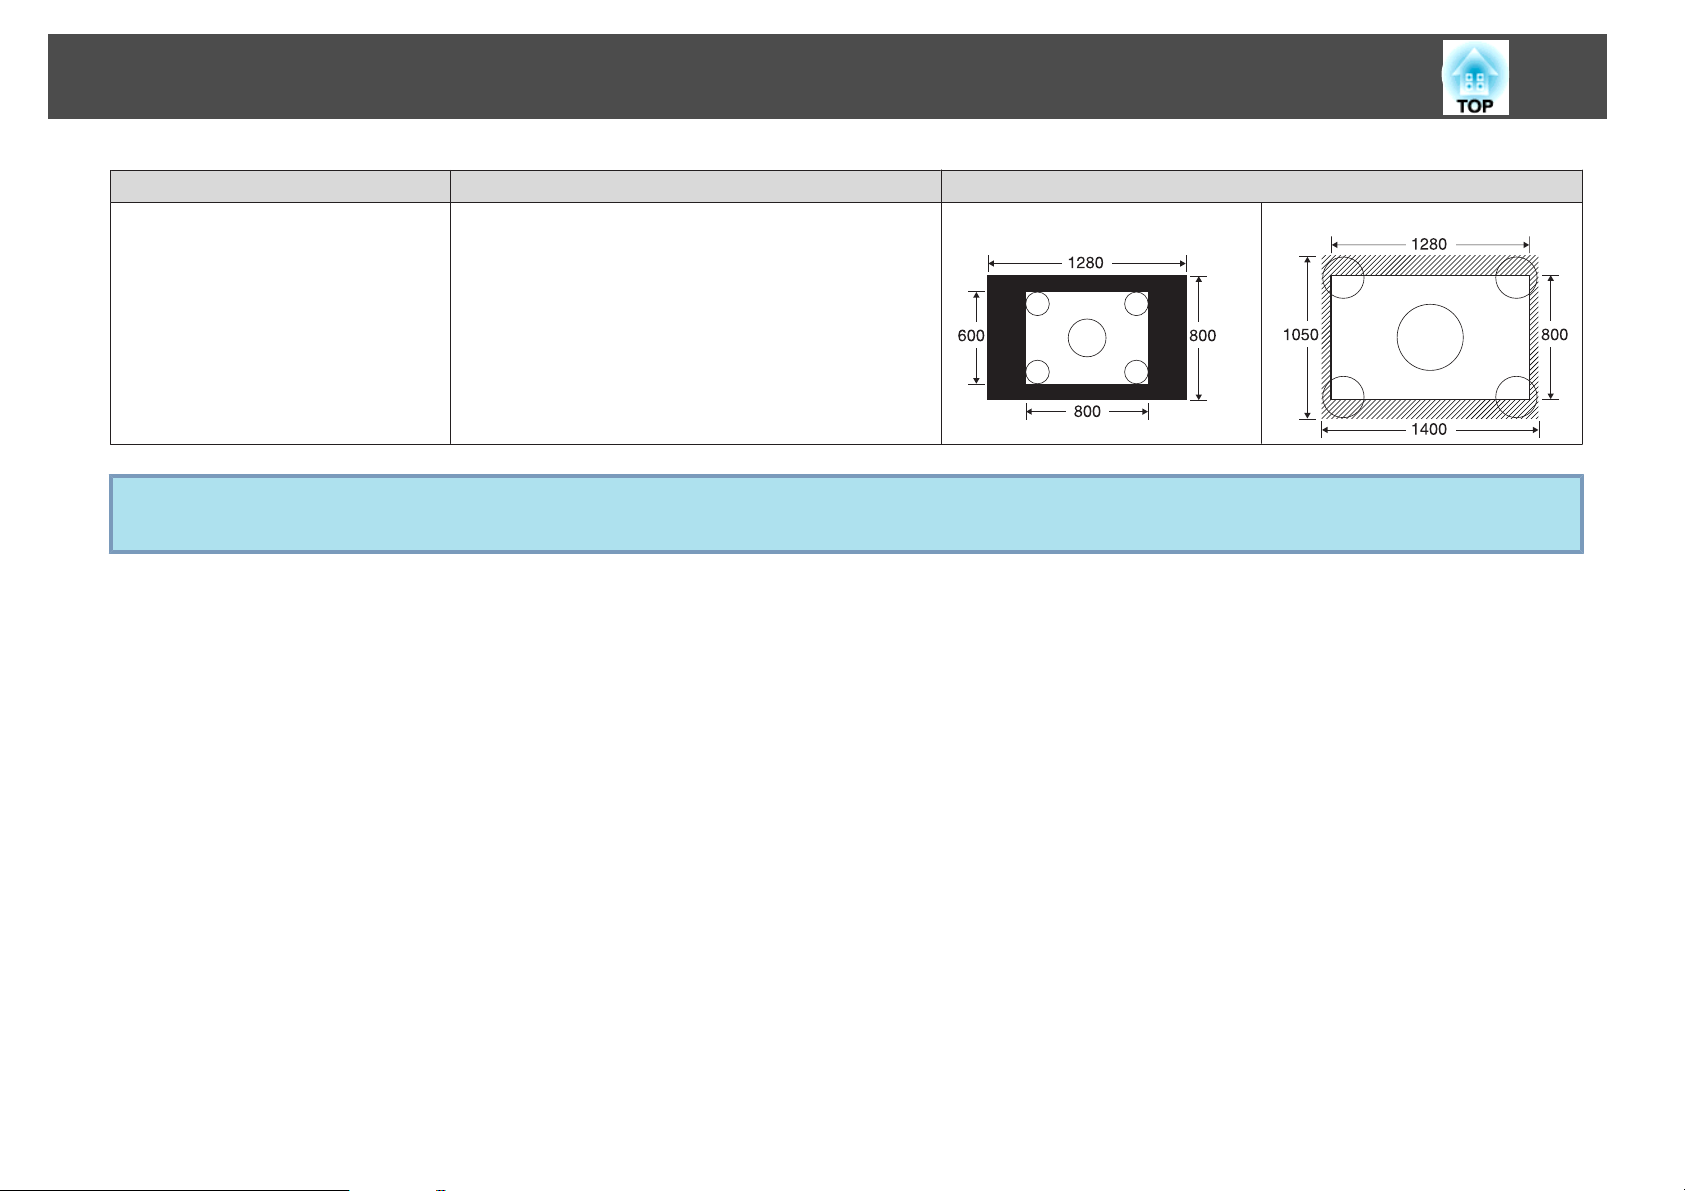
Through
Projects at the resolution of the input image size to the
center of the screen. This is ideal for projecting clear images.
If the image resolution exceeds 1280x800, the edges of the
image are not projected.
When an 800x600 signal is input
When an 1400x1050 signal is input
q
If parts of the image are missing, set Wide or Normal in Resolution from the Configuration Menu depending on the size of the computer panel.
s p.36
Functions for Enhancing Projection
24
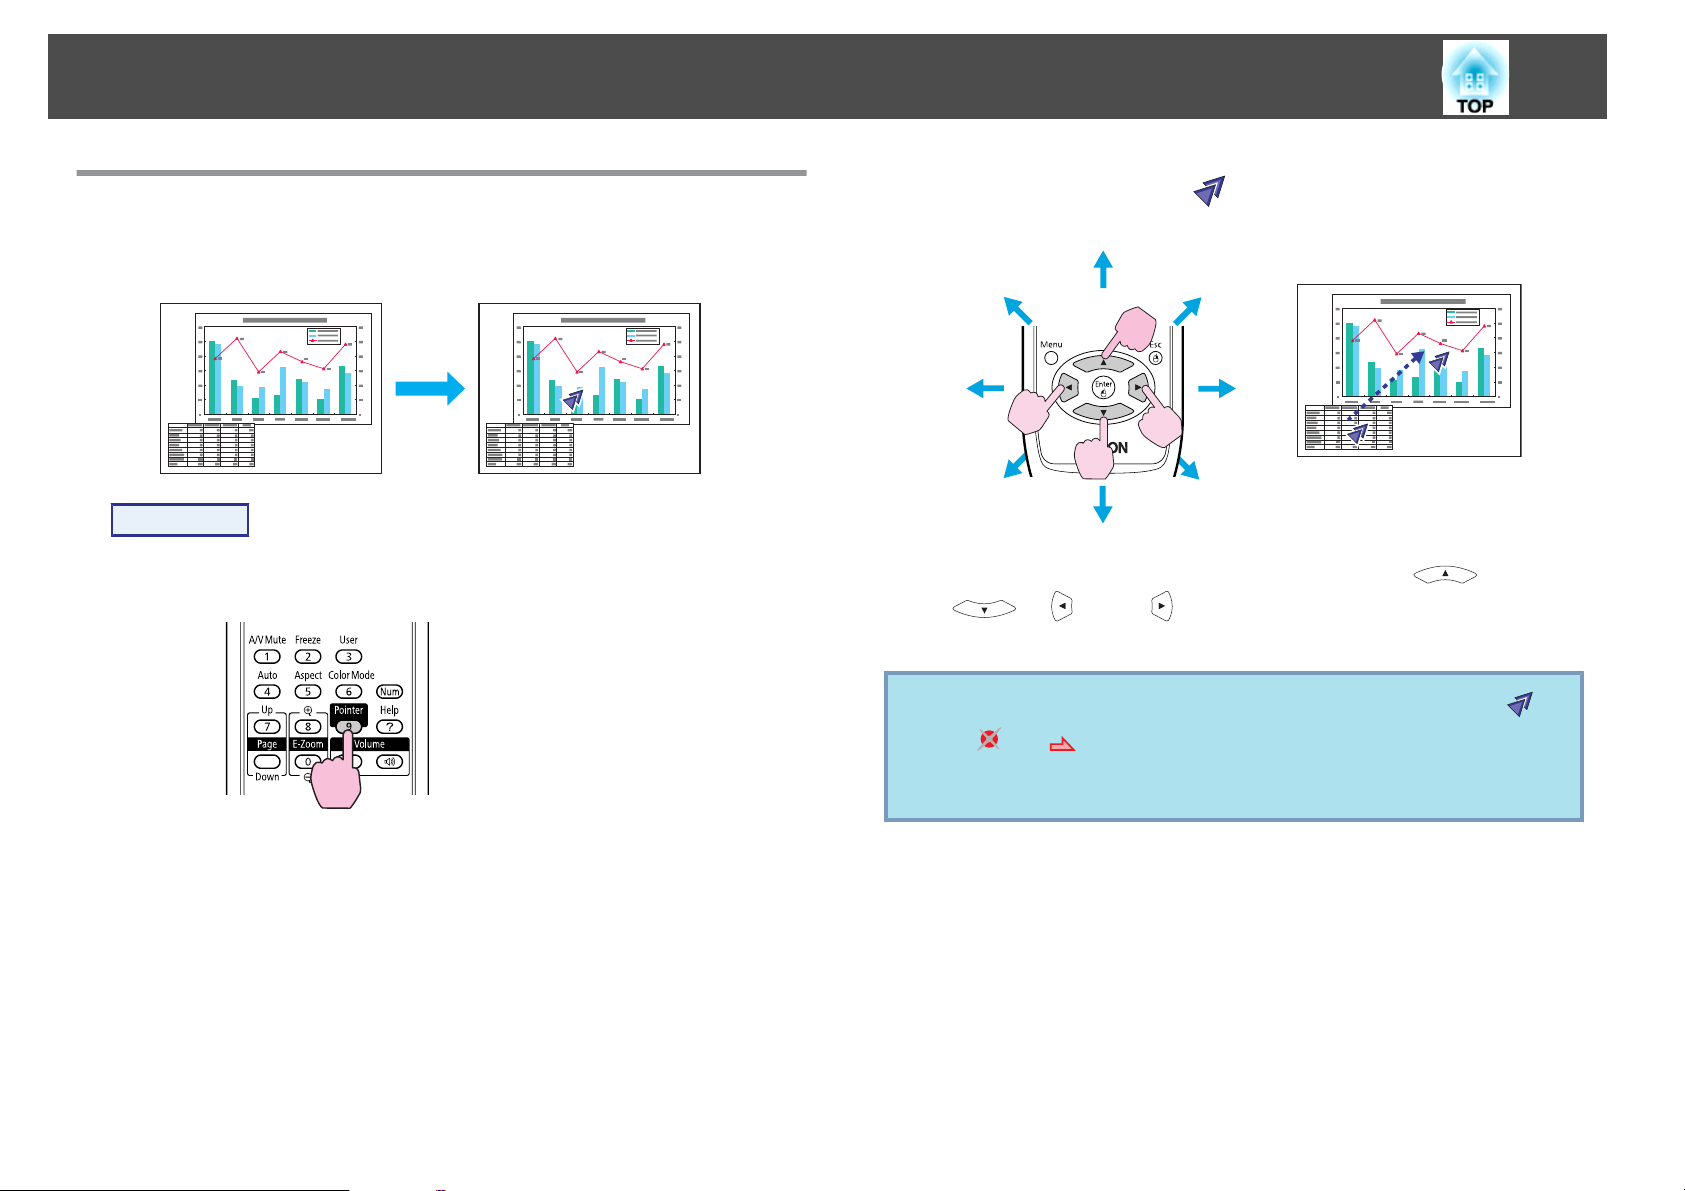
Pointer Function (Pointer)
This allows you to move a Pointer icon on the projected image, and
helps you draw attention to the area you are talking about.
Procedure
A
Display the Pointer.
Remote Control
Each time you press the button, the pointer appears or disappears.
B
Move the Pointer icon ( ).
Remote Control
When pressed in conjunction with the adjacent [ ],
[
], [ ], and [ ] buttons, the pointer can be moved
diagonally in addition to up/down and left/right.
q
You can choose from three different kinds of Pointer icon ( ,
, or ) in Settings - Pointer Shape from the Configuration
Menu.
s p.37
Functions for Enhancing Projection
25
Enlarging Part of the Image (E-Zoom)
This is useful when you want to expand images to see them in greater
detail, such as graphs and tables.
Procedure
A
Start E-Zoom.
Remote Control
B
Move the ( ) to the area of the image that you want to
enlarge.
Remote Control
When pressed in conjunction with the adjacent [ ],
[
], [ ], and [ ] buttons, the pointer can be moved
diagonally in addition to up/down and left/right.
Functions for Enhancing Projection
26
C
Enlarge.
Remote Control
Each time the button is pressed, the area is expanded. You can
expand quickly by holding the button down.
You can reduce the enlarged image by pressing the [
x
] button.
Press the [Return] button to cancel.
q
• The enlargement ratio appears on the screen. The selected
area can be enlarged to between 1 to 4 times in 25 incremental
steps.
• Press the [
], [ ], [ ], or [ ] buttons to scroll
the image.
• If E-Zoom is selected, Progressive and Noise Reduction are
cancelled.
Operating the Mouse Pointer by Remote Control
(Wireless Mouse)
To activate the Wireless Mouse function, set USB Type B to Wireless
Mouse from Extended in the Configuration Menu. By default, USB
Type B is set to USB Display. Change the setting beforehand.
s
p.39
When the USB port of a computer and the USB port TypeB on the
rear of the projector are connected with the supplied USB cable, you
can use the projector's Remote Control like a Wireless Mouse to control
the computer's mouse pointer.
Compatible OS
Windows: 98/98SE/2000/Me/XP Home Edition/
XP Professional/Vista Home Basic/Vista Home Premium/
Vista Business/Vista Enterprise/Vista Ultimate
Macintosh: Mac OS X 10.3 to 10.5
q
• It may not be possible to use the Wireless Mouse function under
some versions of both the Windows and Macintosh operating
systems.
• Some computer settings may have to be changed in order for
the mouse function to be used. Consult the documentation for
the computer for further details.
Functions for Enhancing Projection
27
Once the connection has been made, the mouse pointer can be operated
as follows.
Moving the mouse pointer Mouse clicks
Left click: Press the Enter button.
Right click: Press the Return button.
Double click: Press quickly twice.
Drag and drop Switch PowerPoint screens
This is useful for displaying the
previous or next slide in a PowerPoint
Slideshow.
To previous slide
To next slide
: Keep pressed
1. While holding down the [Enter]
button, press the [
],
[
], [ ], or [ ] button.
2. Release the [Enter] button to drop at
the desired location.
q
• When pressed in conjunction with the adjacent [ ],
[
], [ ], and [ ] buttons, the pointer can be moved
diagonally in addition to up/down and left/right.
• If the mouse button settings are set to reverse on the computer,
the operation of the Remote Control buttons will also be reversed.
• The Wireless Mouse function cannot be used while the following
functions are being used.
- While the Configuration Menu is being displayed
- While a Help menu is being displayed
- While the E-Zoom function is being used
- While a User's Logo is being captured
- While the Pointer function is being used
- While the Volume is being adjusted
- While USB Display is being operated
- While a Test Pattern is being displayed
- While Color Mode is being set
- While the Source name is being displayed
Functions for Enhancing Projection
28

The projector has the following enhanced security functions.
• Password Protect
You can limit who can use the projector.
• Control Panel Lock
You can prevent people changing the settings on the projector without
permission.
s
p.31
• Anti-Theft Lock
The projector is equipped with various types of anti-theft security
devices.
s
p.32
Managing Users (Password Protect)
When Password Protect is activated, people who do not know the
Password cannot use the projector to project images even if the
projector power is on. Furthermore, the user's logo that is displayed
when you turn on the projector cannot be changed. This acts as an
anti-theft device as the projector cannot be used even if it is stolen. At
the time of purchase, Password Protect is not activated.
Type of Password Protect
The following three kinds of Password Protect settings can be made
according to how the projector is being used.
1. Power On Protect
When Power On Protect is On, you need to enter a preset Password after the
projector is plugged in and turned on (this also applies to Direct Power On). If
the correct Password is not entered, projection does not start.
2. User's Logo Protect
Even if someone tries to change the User's Logo set by the owner of the
projector, it cannot be changed. When User's Logo Protect is set to On, the
following setting changes for the User's Logo are prohibited.
• Capturing a User's Logo
• Settings for Display Background, Startup Screen, and A/V Mute from
Display in the Configuration Menu.
3. Network Protect (EB-826W/825/85/84 only)
When Network Protect is set to On setting changes for Network in the
Configuration Menu are prohibited.
Setting Password Protect
Use the following procedure to set Password Protect.
Security Functions
29
Procedure
A
During projection, hold down the [Freeze] button for about
five seconds.
The Password Protect setting menu is displayed.
Remote Control
q
• If Password Protect is already activated, you must enter the
Password.
If the Password is entered correctly, the Password Protect setting
menu is displayed. s "Entering the Password" p.30
• When the Password is set, stick the Password protect sticker in a
visible position on the projector as a further theft deterrent.
B
Turn on Power On Protect.
(1)
Select Power On Protect, and then press the [Enter] button.
(2)
Select On, and then press the [Enter] button.
(3) Press the [Return] button.
C
Turn on User's Logo Protect.
(1)
Select User's Logo Protect, and then press the [Enter] button.
(2)
Select On, and then press the [Enter] button.
(3) Press the [Return] button.
D
Turn on Network Protect.(EB-826W/825/85/84 only)
(1)
Select Network Protect, and then press the [Enter] button.
(2)
Select On, and then press the [Enter] button.
(3) Press the [Return] button.
E
Set the Password.
(1)
Select Password, and then press the [Enter] button.
(2)
The message Change the password? is displayed, select Yes and then
press the [Enter] button. The default setting for the Password is "0000".
Change this to your own desired Password. If you select No, the screen
shown in step 1 is displayed again.
(3) While holding down the [Num] button, enter a four digit number using
the numeric buttons. The number entered is displayed as "* * * *". When
you enter the fourth digit, the confirmation screen is displayed.
Remote Control
(4) Re-enter the Password.
The message Password accepted. is displayed.
If you enter the Password incorrectly, a message is displayed prompting
you to re-enter the password.
Entering the Password
When the Password entry screen is displayed, enter the Password using
the numeric buttons on the Remote Control.
Security Functions
30
Loading...