


EE542-1Z
Smart Energy
Programmable Thermostat + Energy Monitor
EE542-1Z I User Manual
Contents
1
1.0 Welcome!
4-5
5-8
8-9
10-11
15
15-17
17-19
19
20-22
2
3
3
4
5
12
13
13
14
2.0 Get to Know Your Thermostat
2.1 Use the Navigation Keypad
2.2 Initiate a Temporary Hold
2.3 Away Preset
2.4 Get Messages
3.0 Customize Thermostat Settings
3.1 Program a Heating / Cooling Schedule
3.2 Set Thermostat Clock
3.3 Set Alerts
3.4 Set Thermostat Lock
3.5 Set Vacation Hold
3.6 Activate the Fan
3.7 Advanced Settings
4.0 Monitor Whole-Home Energy Use When
Connected to a Smart Meter
4.1 Set Monthly Budget Target
4.2 Track Energy Use Against Budget Target
5.0 Tiered Pricing Plan Program
Exclusive Features
5.1 Enable Price Protection
22
23
5.2 View Scheduled Rate Changes
5.3 View Costs by Rate
23
24-25
25
6.0 Direct Load Control Program
Exclusive Features
6.1 View Scheduled Utility Events
7.0 Support

1.0 Welcome
Congratulations on the purchase of your new Smart Energy
Thermostat! The thermostat is designed to help you save money and
conserve energy. When connected to a smart meter, you can use
the product to get real-time access to information about energy
consumption in your home so you can make more informed decisions
and better manage your energy use.
This thermostat may have been installed in conjunction with a plan
from your utility designed to help you save money and/or to ensure
grid reliability. Two prevalent utility plans are:
• DIRECT LOAD CONTROL PLAN
In a Direct Load Control (DLC) plan, you voluntarily allow your utility company to
control major appliances in your home when demand for electricity peaks. These
instances of peak demand are called “utility events” and when they occur, the
utility will take action, such as adjusting the thermostat temperature or cycling
your air conditioner on and off, for the duration of the event. These events are
relatively infrequent and under most circumstances, you will have the option to
opt in or opt out of the event. (To view thermostat features exclusive to Direct
Load Control plan customers, see page 24-26.)
• TIERED PRICING PLAN
In a tiered pricing plan, electricity rates fluctuate with demand during the course
of each day. You can determine - in advance - how you want your thermostat to
respond when prices change. You may decide it’s worth giving up a few degrees
of comfort to save money when rates reach a certain level. (To view thermostat
features exclusive to Tiered Pricing plan customers, see page 20-23.)
For more information about this product:
Customer Service: 1-888-725-9797
1
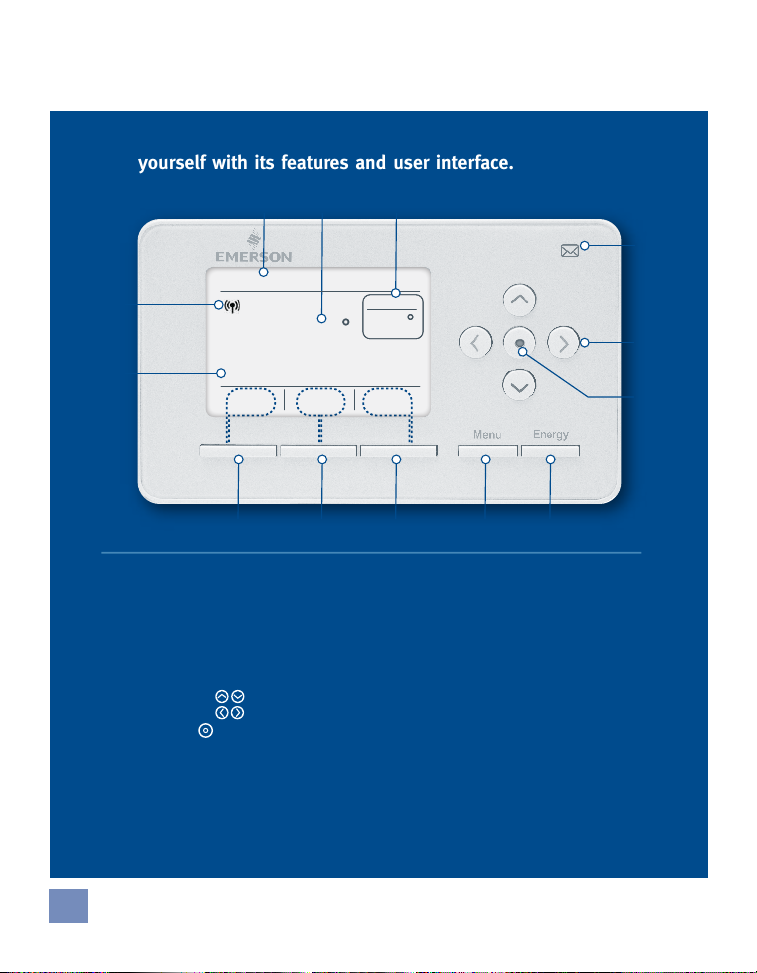
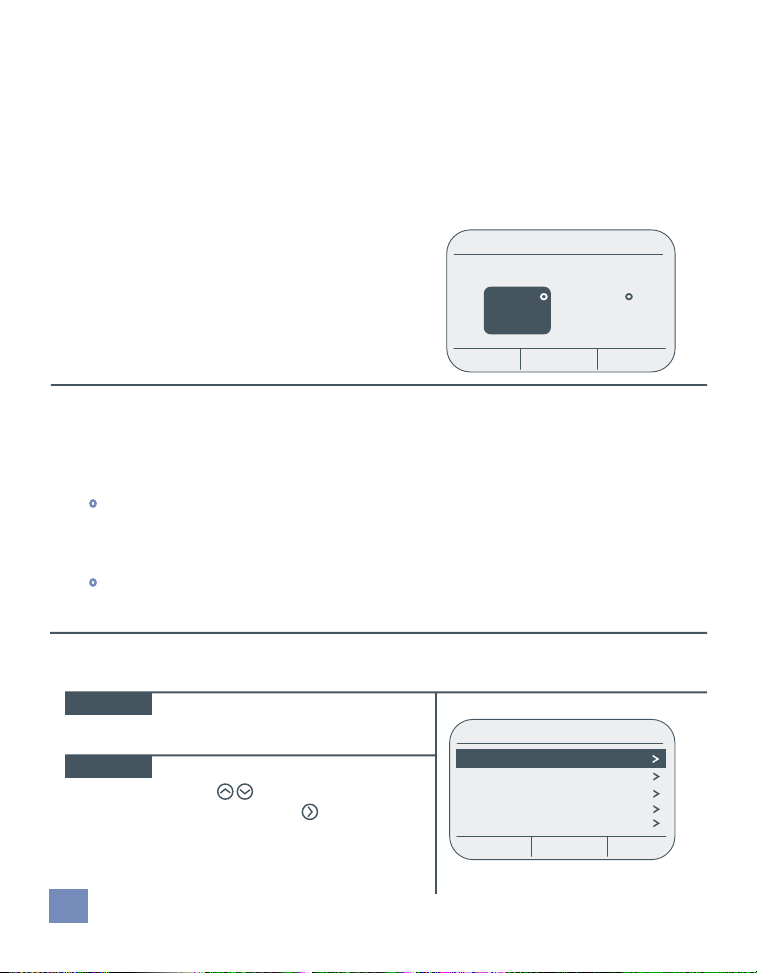
2.0 Get to Know Your Thermostat
Before setting up your thermostat, familiarize
yourself with its features and user interface.
13
Base Rate
12
Base Rate
$0.08
$0.08
Inbox
Inbox
11 10 9 8 7
1.
Current time and date
2.
Current room temperature
3.
Desired temperature
4.
Message icon
Lit when an unread message
is in the inbox
5.
Navigation pad
Up/Down
Left/Right
Enter ( )
(see section 2.1 for details.)
6.
Tri-color LED
Lit during utility events and price tiers
7.
Energy key
Use to access whole-home
energy use information
21
1:54 PM - Mar. 12
1:54 PM - Mar. 12
79
79
kWh
kWh
Cool
Cool
3
Set At76Set At
Set At76Set At
76
76
F
F
Away
Away
8.
Menu key
Use to configure thermostat
settings
9.
Away “soft” key
Use to set one-touch
temperature hold
10.
Heating/cooling “soft” key
(Indicates current mode, press to change.)
11.
Inbox “soft” key
use to view messages
12.
Current electricity rate
when in a tiered pricing plan
(see section 7.0 for details.)
13.
Wireless icon
appears when thermostat has
established a wireless connection
4
5
6
2
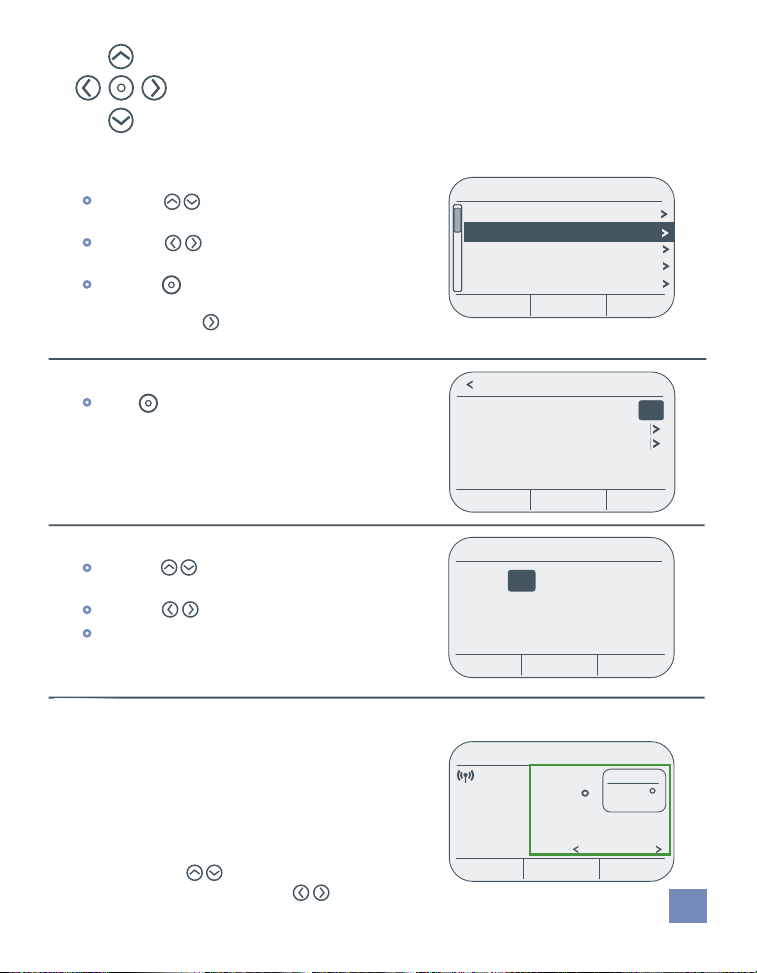
2.1 Use the Navigation Keypad
When on a menu screen, the five-way navigation pad
functions as follows:
•
Use the arrows to move through the
displayed menu listings
•
Use the arrows to advance to the next
screen or return to a previous screen.
•
Use the key to confirm a selection or
advance to the next screen.
(similar to the key.)
Settings
Settings
Fan Auto
Fan Auto
Clock
Clock
Schedules On
Schedules On
Price Protection
Price Protection
Alerts
Alerts
Home
Exit
On
On
•
The key is also used to toggle back
and forth between options, such as On/Off,
as shown in the Schedules menu.
When setting preferences for a specific menu option:
•
Use the arrows to change the setting
of the highlighted item.
•
Use the arrows to tab between values.
•
Use the three “soft keys” at the bottom of the
screen to complete a step.
2.2 Initiate a Temporary Hold
TEMPORARY HOLD lets you override a
programmed heating/cooling schedule
for a brief period of time.
To initiate a TEMPORARY HOLD, adjust the temperature
by pressing the arrows. To change the duration
of the temporary hold, press the arrows.
Schedules
Schedules On
Set Heat Schedule
Set Cool Schedule
Periods Per Day 4
Exit
Set Time & Date
12 : 00 pm
1/1/12
Friday
Cancel Save
1:54 PM - Mar. 12
Hold At
77
F
kWh
75
CoolInbox
Hold Until
5:30PM – Mon
End
Hold
Base Rate
$0.08
3
2.3 Set One-touch Away Preset
With just one touch, the AWAY preset will instantly change your desired
temperature to a set point that will save you money. This is a convenient feature
when you’re leaving home unexpectedly or intend to be away from home for an
extended period of time. The unit has been shipped with “Away” settings based
on Energy Star recommendations of 85° in the summer and 62° in the winter, but
those temperatures can easily be changed with
the touch of one key.
To change the default setting, press and hold
the AWAY key for three seconds, adjust settings,
then press SAVE.
Away Preset
COOLING HEATING
85 62
Cancel Save
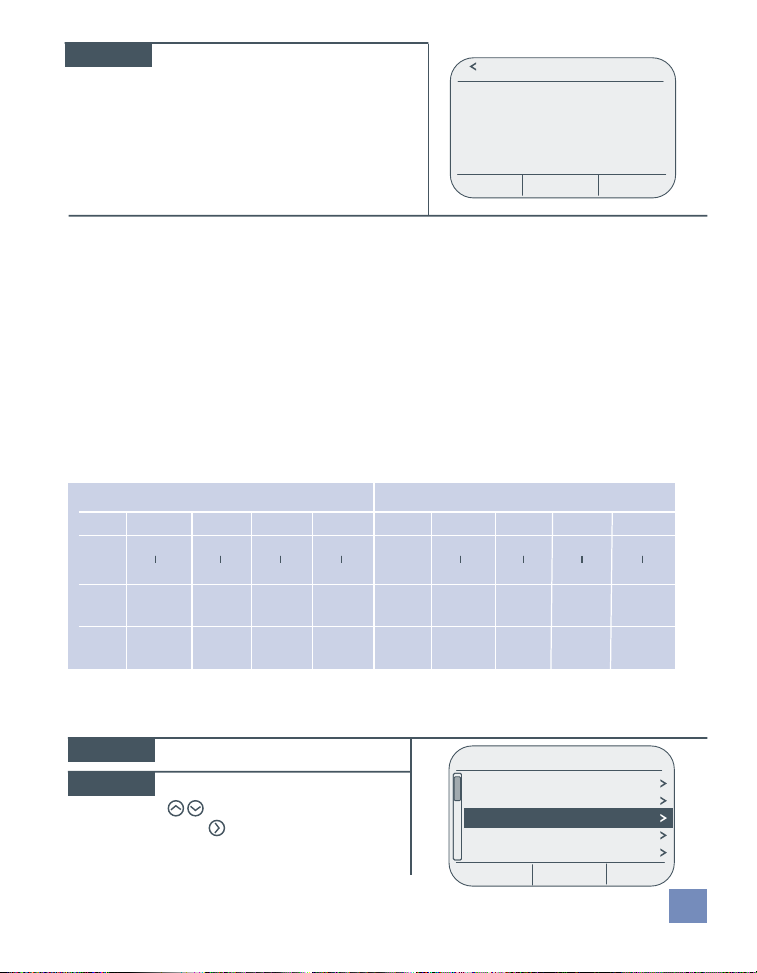
2.4 Get Messages
In the upper right corner of the unit, an envelope icon will be illuminated when
an unread message is in your INBOX.
• Messages may be sent from your utility or software service provider.
As an example, the utility may send an alert that “Crews will be working in
your neighborhood and you may experience an intermittent outage between
2:00 pm and 4:00 pm.”
•
Messages may also be generated by the thermostat itself. “It’s time to
replace the air filter.”
To view a message:
STEP 1
STEP 2
4
Press INBOX key in the lower left
corner of the thermostat display.
From the MESSAGE INBOX menu,
use the arrows to select a
message, then press .
Message Inbox
• Air Filter
• Cost Alert
• 9:30 am 4/28/11
2:37 pm 4/23/11
5:11 pm 4/18/11
Exit
STEP 3
The resulting screen displays the
message details.
Air Filter
It’s time to replace this item.
Press “Reset” to reset the timer.
Press “Snooze” to be reminded
again in one week.
Reset Snooze
3.0 Customize
Thermostat Settings
3.1 Program a Heating/Cooling Schedule
By programming a thermostat schedule, you can save energy while maintaining
comfort. The thermostat was installed with the following pre-programmed,
energy-efficient schedule. If this schedule meets your needs, no further action
is required.
Heating
MORN DAY EVEN NITE
Period
MonFri
SatSun
6:00am
8:00am
8:00am
6:00pm
70°F 60°F 70°F 62°F
62°F 70°F 70°F 62°F
6:00pm
10:00pm
10:00pm
6:00am
Cooling
MORN DAY EVEN NITE
6:00am
8:00am
MonFri
SatSun
78°F 85°F 78°F 82° F
82°F 78° F 78°F 82°F
To run the thermostat as a non-programmable model:
Menu > Settings > Schedules
STEP 1
STEP 2
Press the MENU key.
From the Settings menu, use the
arrows to select SCHEDULES.
Press .
Fan Auto
Clock
Schedules On
Price Protection
Alerts
Exit
8:00am
6:00pm
SettingsSettings
6:00pm
10:00pm
10:00pm
6:00am
5
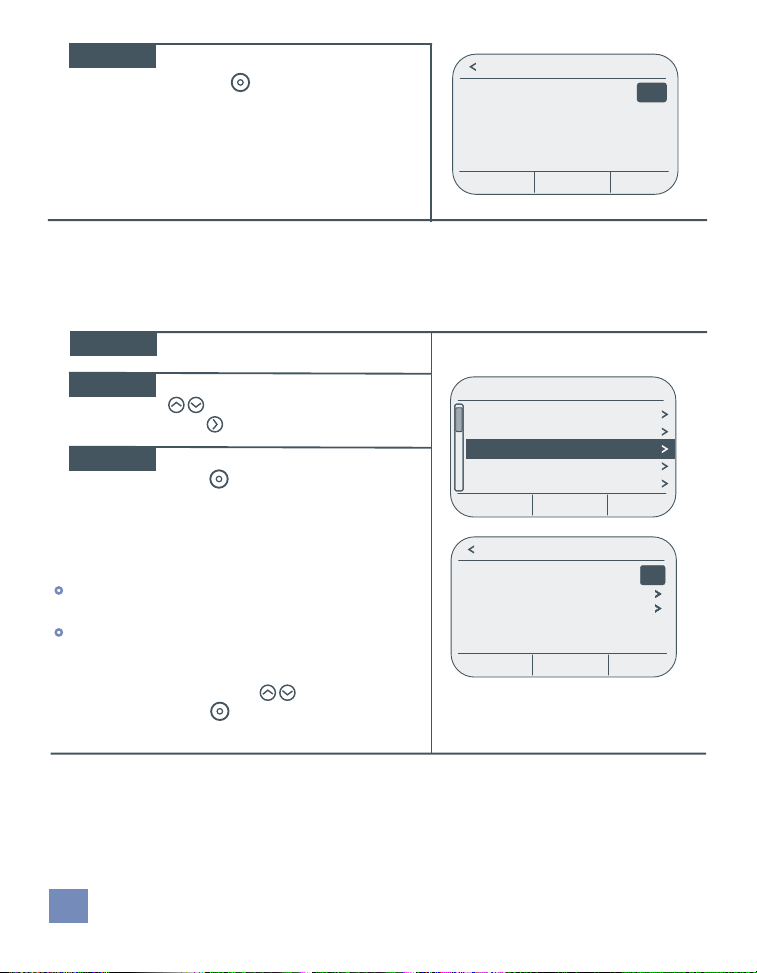
STEP 3
If the SCHEDULES feature is ON,
press the key to turn it OFF.
Schedules
Schedules Off
Exit
To customize the heating/cooling schedule:
Menu > Settings > Schedules
You can easily change the day, time period or temperature settings of the
pre-programmed schedule.
STEP 1
STEP 2
Press the MENU key.
From the Settings menu, use the
arrows to select SCHEDULES.
Press .
STEP 3
If the SCHEDULES feature is OFF,
press . You should now
see options to set a schedule for
heating, cooling and periods per day.
Start by deciding how many times during the day
you want the temperature to change.
•
If you want to set one temperature for daytime
and one temperature for night time, select 2.
•
If you want to set four temperature settings
throughout the day (morning, day, evening,
night) select 4.
To make your selection, use the arrows to select
PERIODS PER DAY. Press to select either 2 or 4.
6
SettingsSettings
Fan Auto
Clock
Schedules Off
Alerts
Thermostat Lock
Exit
Schedules
Schedules On
Set Heat Schedule
Set Cool Schedule
Periods Per Day 4
Exit
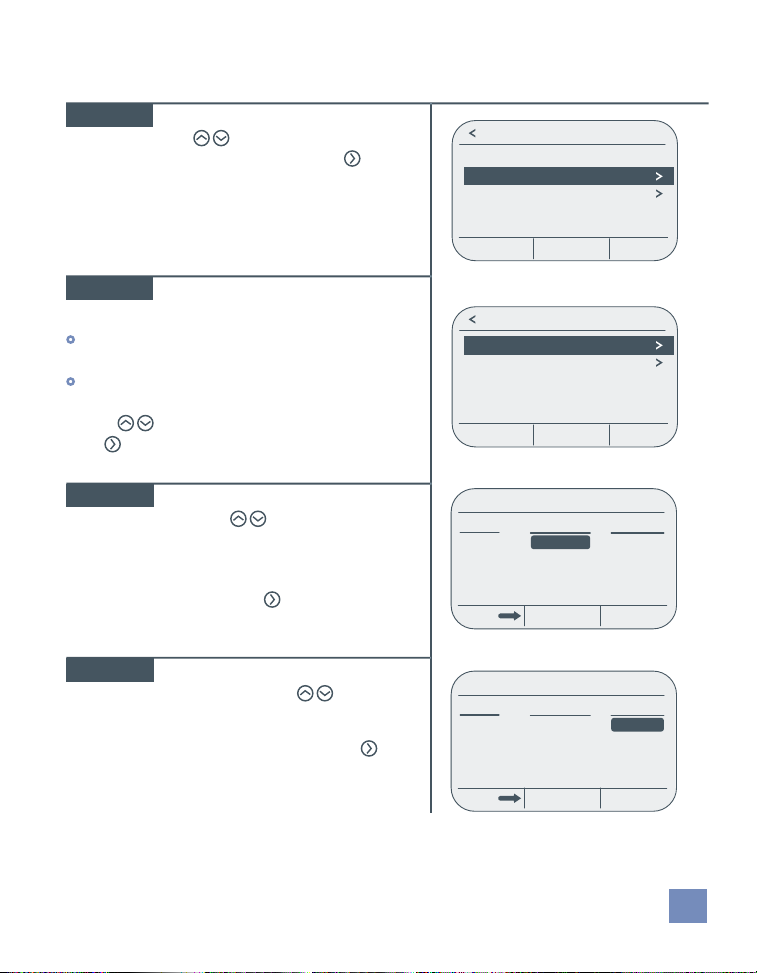
To set a schedule:
Menu > Settings > Schedules > Set Heat (or Cool) Schedule
STEP 1
From the SCHEDULES menu, use
the arrows to select
SET HEAT SCHEDULE. Press .
STEP 2
From the HEAT SCHEDULE
screen, you can either:
•
Set one schedule for weekdays and one
for the weekend.
•
Make edits to the schedule of any
individual day.
Use the arrow keys to make your selection.
Press .
STEP 3
The first day part should be highlighted.
Using the arrows, adjust the start
time for the first temperature setting.
Times adjust in increments of
15 minutes. Once the start time is
selected, press to move to the
HEAT TO column.
STEP 4
With the HEAT TO field
highlighted, use the
arrows to set the temperature for
your first day period. Once the
temperature is selected, press
to proceed to the next day period.
Schedules
Schedules On
Set Heat Schedule
Set Cool Schedule
Periods Per Day 4
Exit
Heat Schedule
Weekdays / Weekend
Individual Days
Exit
Mon - Fri
Period
Morning
Day
Evening
Night
Period
Morning
Day
Evening
Night
Starts At
6:00 AM
8:00 AM
6:00 PM
10:00 PM
CancelDays Save
Mon - Fri
Starts At
6:00 AM
8:00 AM
6:00 PM
10:00 PM
CancelDays Save
Heat To
70º
60º
70º
62º
Heat To
68º
60º
70º
62º
7
 Loading...