


 Loading...
Elo TouchSystems ET1545L-XXWC-X, ET1547L-XXWC-X, ET1567L-XXWC-X, ET1548L-XXWC-X, ET1549L-XXWC-X User Manual

Elo Entuitive Touchmonitor
User Guide
15" LCD Rear and Front Mount Touchmonitors
ET1545L-XXWC-X Series
ET1547L-XXWC-X Series
ET1548L-XXWC-X Series
ET1549L-XXWC-X Series
ET1567L-XXWC-X Series
Revision E
P/N 008521
Elo TouchSystems, Inc.
1-800-ELOTOUCH www.elotouch.com

Copyright © 2002 Elo TouchSystems Inc. All Rights Reserved.
No part of this publication may be reproduced, transmitted, transcribed, stored in a retrieval system, or translated into any language or computer language, in any form or by any means, including, but not limited to, electronic, magnetic, optical, chemical, manual, or otherwise without prior written permission of Elo TouchSystems.
Disclaimer
The information in this document is subject to change without notice. Elo TouchSystems makes no representations or warranties with respect to the contents hereof, and specifically disclaims any implied warranties of merchantability or fitness for a particular purpose. Elo TouchSystems reserves the right to revise this publication and to make changes from time to time in the content hereof without obligation of Elo TouchSystems to notify any person of such revisions or changes.
Trademark Acknowledgments
IntelliTouch, SecureTouch, AccuTouch, Entuitive, and MonitorMouse are trademarks of Elo TouchSystems, Inc.
Other product names mentioned herein may be trademarks or registered trademarks of their respective companies. Elo TouchSystems claims no interest in trademarks other than its own.
3
4
 Table of Contents
Chapter 1 |
Chapter 3 |
|
Introduction |
1 Operation |
25 |
Precautions . . . |
. . . . . . . . |
. . . . . |
. . |
. |
. 1 |
About the Product |
. . . . . . . . |
. . . . . |
. . |
. |
. 1 |
Chapter 2 |
|
|
|
Installation and Setup |
|
3 |
|
Unpacking Your Touchmonitor. . |
. . . . |
. . . . . 3 |
|
Product Overview (1545L). . . . |
. . . . |
. . . . . 4 |
|
Main Unit . . . |
. . . . . . . . . . . . |
. . . . . 4 |
|
Rear View . . . . . . . . . . . . . . |
. . . . . 4 |
||
Bottom View/Side View . . . . . . . |
. . . . . 5 |
||
Product Overview (1547L/1548L/1549L) |
. . . . . 5 |
||
Main Unit . . . . . . . . . . . . . . . . . . . . 5 |
|||
Rear View . . . . . . . . . . . . . . |
. . . . . 6 |
||
Side View. . . |
. . . . . . . . . . . . |
. . . . . 6 |
|
Product Overview (1567L). . . . |
. . . . |
. . . . . 7 |
|
Main Unit . . . |
. . . . . . . . . . . . |
. . . . . 7 |
|
Rear View . . . . . . . . . . . . . . |
. . . . . 7 |
||
Side View. . . . . . . . . . . . . . . . . . . . 8 |
|||
Attaching the L-Brackets . . . . . . . . . . . . . 9 |
|||
Touch Interface Connection . . . . . . . . . . . 10 Serial Connection . . . . . . . . . . . . . . 10 Connecting the Video Cable . . . . . . . 11 Connecting the Serial Touchscreen Cable 12 Connect the Remote OSD Cable . . . . . 13 Connecting the Power Cable . . . . . . . 14 USB Connection . . . . . . . . . . . . . . . 15 Connecting the Video Cable . . . . . . . 16 Connecting the USB Touchscreen Cable . 17 Connecting the Remote OSD Cable . . . 18 Connecting the Power Cable . . . . . . . 19
Optimizing the LCD Display . . . . . . . . . . . 20 VESA Mount on Your Touchmonitor . . . . . . . 20 Installing the Driver Software . . . . . . . . . . 21 Installing the Serial Touch Driver for Windows
XP, Windows 2000, Me, 95/98 and NT 4.0 . 22 Installing the Serial Touch Driver for MS-DOS and
Windows 3.1 . . . . . . . . . . . . . . . 23 Installing the USB Touch Driver . . . . . . . 24 Installing the USB Touch Driver for Windows 98 and Windows 2000 . . . . . . . . . . 24
About Touchmonitor Adjustments . . . . . . . . 25 Using the On-Screen Display Menus . . . . . . 25 OSD Menu Function . . . . . . . . . . . . . . 27
Chapter 4 |
|
Troubleshooting |
29 |
Solutions to Common Problems . . . . . . . . 29
Appendix A
Appendix B
Care and Handling of Your Touchmonitor . . . . 34
Appendix C
Compatibility Modes . . . . . . . . . . . . . . |
35 |
Touchmonitor Specifications ET1545L/1547L/ |
|
1548L/1567L . . . . . . . . . . . . . . . . . |
36 |
Touchmonitor Specifications ET1549L . . . . . |
37 |
15" LCD Touchmonitor Dimensions . . . . . . . |
40 |
ET1545L . . . . . . . . . . . . . . . . . . . |
40 |
ET1547L/1548L/1549L . . . . . . . . . . . |
41 |
ET1567L . . . . . . . . . . . . . . . . . . . |
43 |
Cut Out Dimensions . . . . . . . . . . . . . |
44 |
ET1545L Front Mount Cut Out . . . . . . |
44 |
ET1545L Rear Mount Cut Out . . . . . . |
45 |
ET1547L/1548L/1549L Rear Mount Plate Cut |
|
Out . . . . . . . . . . . . . . . . . . . . |
45 |
ET1567L Front Mount Plate Cut Out . . . 46 |
|
Regulatory Information |
47 |
Warranty |
51 |
Index |
53 |
1

C H A P T E R
1
INTRODUCTION
Congratulations on your purchase of an Elo TouchSystems Entuitive LCD touchmonitor. Your new high-resolution touchmonitor combines the reliable performance of Elo’s touch technology with the latest advances in LCD display design. This combination of features creates a natural flow of information between a user and your touchmonitor.
Precautions
Follow all warnings, precautions and maintenance as recommended in this user’s manual to maximize the life of your unit. See Appendix B for more information on touchmonitor safety.
About the Product
Your LCD Kiosk Touchmonitor is a 15.0” XGA TFT color display with the following features:
•Direct analog RGB input
•15.0” diagonal screen size
•16.7 million displayable colors (262,144-1549L)
•1024 x 768 resolution
•XGA/ SVGA/ VGA/ VESA/ Mac/ NEC PC-98 compatible
•24~60kHz horizontal scan
•56~75Hz refresh rate
1-1
•Auto adjustment capability
•High quality full screen re-scaling
•Multilingual OSD menus in four languages: English, French, Italian, Spanish, and Japanese
•VESA flat panel monitor physical mounting interface (75mm)
•For full Product Specifications refer to Appendix C.
1-2 E l o E n t u i t i v e T o u c h m o n i t o r U s e r G u i d e
C H A P T E R
2
INSTALLATION AND SETUP
Unpacking Your Touchmonitor
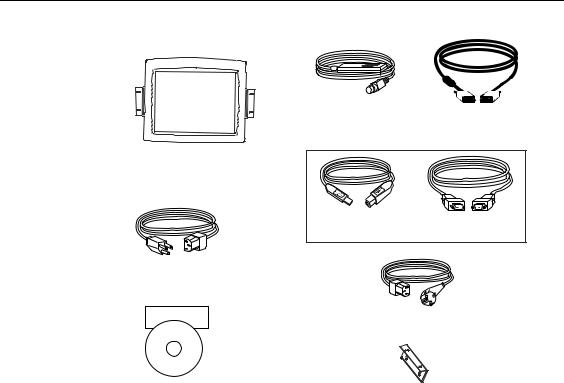
Check that the following 9 items are present and in good condition:
|
|
|
|
|
|
OSD Remote |
Video cable |
||||
LCD Display
|
OR |
USB touchscreen |
Serial touchscreen |
cable |
cable |
Monitor power cable (US/Canada)
Elo Quick Install Guide
European monitor power cable
CD
Software
Quick Install Guide and software CD |
Mounting brackets (2) |
|
2-3
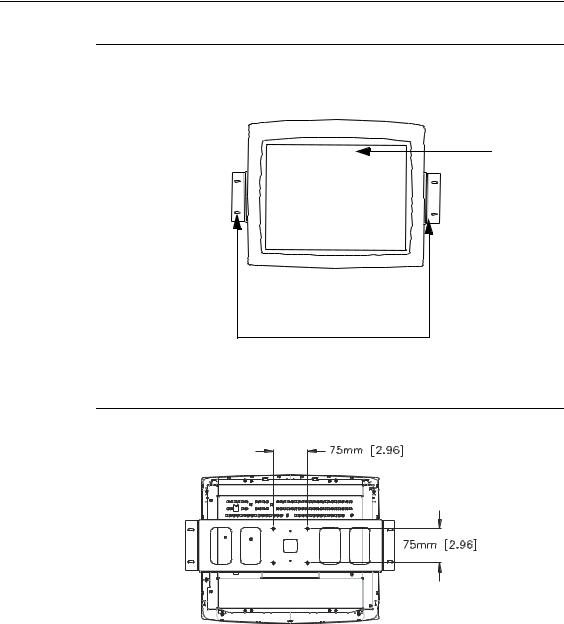
Product Overview (1545L)
Main Unit
LCD Display
Detachable mounting L-brackets |
Rear View
2-4 E l o E n t u i t i v e T o u c h m o n i t o r U s e r G u i d e
Bottom View/Side View
Power switch
|
|
Remote OSD |
Power |
|
|
|
connector |
||
Touch interface |
Video cable |
connector |
||
|
||||
serial |
connector |
|
|
Product Overview (1547L/1548L/1549L)
Main Unit
2-5
Rear View
75 |
75
Side View
Power switch
|
|
Remote OSD |
Power |
|
|
|
connector |
||
Touch interface |
Video cable |
connector |
||
|
||||
serial |
connector |
|
|
2-6 E l o E n t u i t i v e T o u c h m o n i t o r U s e r G u i d e

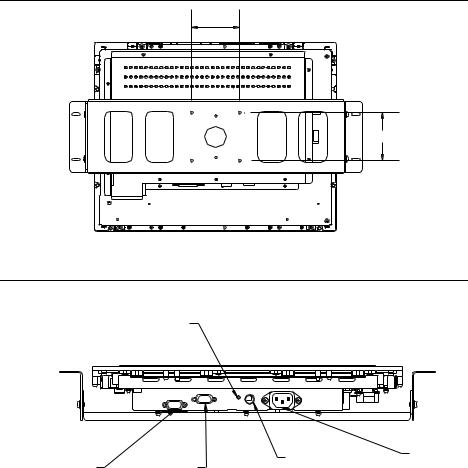
Product Overview (1567L)
Main Unit
Rear View
75 |
75
2-7
Side View
Power switch
|
|
Remote OSD |
Power |
|
|
|
connector |
||
Touch interface |
Video cable |
connector |
||
|
||||
serial |
connector |
|
|
2-8 E l o E n t u i t i v e T o u c h m o n i t o r U s e r G u i d e
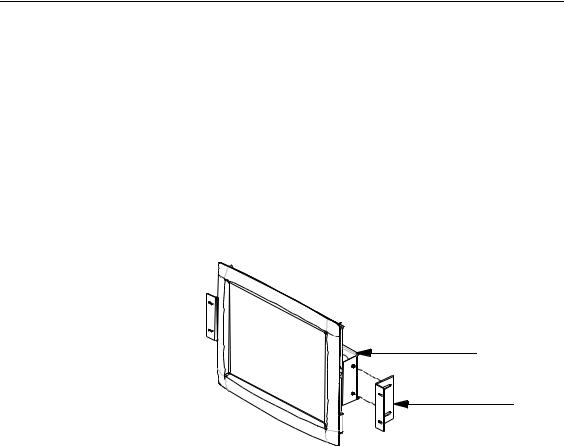
Attaching the L-Brackets
Depending on your mounting scheme, use the L-brackets or the VESA 75mm standard holes located on the back of the kiosk monitor. See page 15 for VESA mounting information.
NOTE: You will need a screwdriver to attach the L-brackets.
Your kiosk touchmonitor comes with a mounting bracket (C-bracket) attached at the back. Included are two L-brackets (and four screws) that attach to both ends of the C-bracket for additional mounting options.
To attach the L-brackets:
1Lay the monitor face down.
2Place the long end of the L-bracket against the end of the mounting C-bracket. Line up the two holes of the L-bracket with the two holes of the C-bracket. See the illustration below.
C-bracket
L-bracket
3Place two screws in the holes and with the screwdriver, screw them in to secure the bracket.
4Repeat steps 2 and 3 to attach the other L-bracket to the other side of the mounting bracket.
2-9
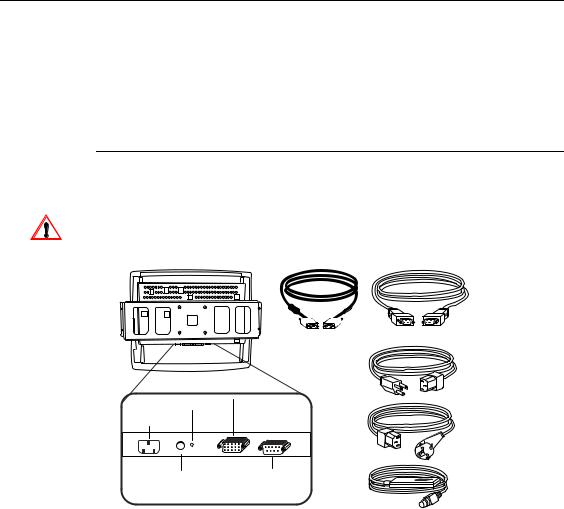
Touch Interface Connection
NOTE: Your interface cables may have been pre-connected to your monitor at the factory.
Your touchmonitor comes with one of the following touchscreen connector cables: Serial (RS-232) cable or USB cable (For Windows 98 or Windows 2000 computers only.)
To setup this display, please refer to the following figures and procedures:
Serial Connection
The following illustrations guide you step by step in connecting your touchmonitor using a serial cable connection.
Before connecting the cables to your touchmonitor and PC, be sure that the computer and the touchmonitor are turned off.
|
|
Serial touchscreen |
|
|
|
cable |
|
|
Video cable |
|
|
|
|
Monitor power cable |
|
|
|
(US/Canada) |
|
Power Switch |
Female |
|
|
video |
|
||
Power |
European monitor |
||
connector |
|||
|
|
power cable |
|
OSD Remote |
Female serial |
|
|
touchscreen |
OSD Remote |
||
port |
|||
|
connector |
|
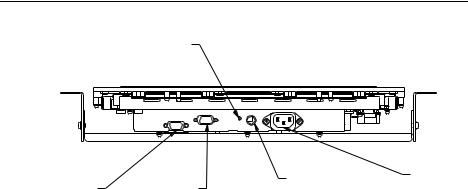
Connections on underside
2-10 E l o E n t u i t i v e T o u c h m o n i t o r U s e r G u i d e
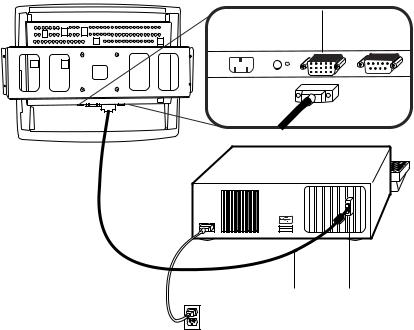
Connecting the Video Cable
Connections on underside
Female 15-pin video connector
Video |
Video |
cable |
port |
•Connect the 15-pin video cable to the video port on your PC.
•Connect the other end of the video cable to the video connector on your touchmonitor.
•Secure the cable to your touchmonitor and PC by turning the screws on the connector clockwise.
2-11
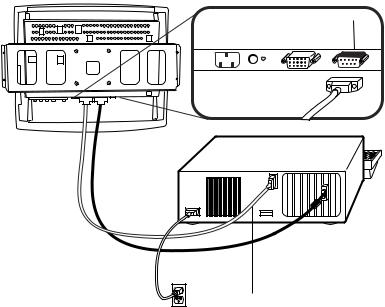
Connecting the Serial Touchscreen Cable
Connections on underside
Serial touchscreen cable
Serial touchscreen cable
•Connect the female end of the serial (RS-232) cable to the serial port on the back of your PC.
•Connect the male end of the cable to the serial touchscreen connector on your touchmonitor.
•Secure the cable to your touchmonitor and PC by turning the screws on the connector.
2-12 E l o E n t u i t i v e T o u c h m o n i t o r U s e r G u i d e
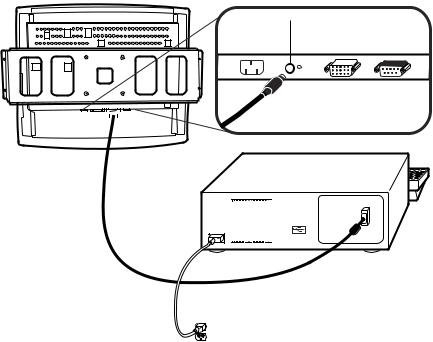
Connect the Remote OSD Cable
Connections on underside
OSD remote port
|
|
|
|
|
|
|
|
|
|
|
|
|
|
|
|
|
|
|
|
|
|
|
|
|
|
|
|
|
|
|
|
|
|
|
|
|
|
|
|
|
|
|
|
|
|
|
|
|
|
|
|
|
|
|
|
|
|
|
|
|
|
|
|
|
|
|
|
|
|
|
|
|
|
|
|
|
|
|
|
|
|
|
|
|
|
|
|
|
|
|
|
|
|
|
|
|
|
|
|
|
|
|
|
|
|
|
|
|
|
|
|
|
|
|
|
|
|
|
|
|
|
|
|
|
|
|
|
|
|
|
|
|
|
|
|
|
|
|
|
|
|
|
|
|
|
|
|
|
|
|
|
|
|
|
|
|
|
|
|
|
|
|
|
|
|
Video |
|
|
|
|
Video |
|||
|
|
|
|
|
|
|
|
|
|
|
|
|
|
|
|
|
|
|
|
|||||
|
|
|
|
|
|
|
|
|
|
|
|
|
|
|
|
cable |
|
|
|
|
port |
|||
|
|
|
|
|
|
|
|
|
|
|
|
|
|
|
|
|
|
|
|
Ferrite bead |
||||
|
|
|
|
|
|
|
|
|
|
|
|
|
|
|
|
|
|
|
|
|
|
|
|
|
|
|
|
|
|
|
|
|
|
|
|
|
|
|
|
|
|
|
|
|
|
|
|
|
|
|
|
|
|
|
|
|
|
|
|
|
|
|
|
|
|
|
|
|
|
|
|
|
|
|
• Connect the 6 pin DIN cable to the OSD Remote port on your touchmonitor.
2-13
Loading...