


TKHS 315 (AUS)
 Operating Instruction . . . . . . . . . . . . . . . . . 3
115 168 4633 / 1402 - 1.0
2

ENGLISH
1. Scope of delivery
4
|
|
|
3 |
|
|
|
|
2 |
|
|
|
|
1 |
|
|
|
|
|
9 |
|
|
|
32 |
|
|
|
|
31 |
|
|
|
30 |
|
|
|
29 |
|
|
|
|
|
|
21 |
13 |
|
28 |
|
22 |
|
|
|
|
|
|
|
27 |
|
|
|
|
|
|
23 |
|
|
26 |
|
20 |
|
|
|
|
|
|
|
|
|
|
19 |
|
|
|
24 |
|
|
25 |
|
|
|
1 |
Table insert |
16 |
Leg (4x) |
|
2 |
Riving knife |
17 |
Handwheel / blade tilt |
|
3 |
Blade guard |
18 |
Handwheel / blade rise and fall |
|
4 |
Saw blade |
19 |
Chipcase guide panel, front |
|
5 |
Suction hose |
20 |
Bearing plate, front |
|
6 |
Handle for push block |
21 |
Threaded rod |
|
7 |
Push stick / feeding aid |
22 |
Pinion shaft |
|
8 |
Hose carrier |
23 |
Setting tube |
|
9 |
Rip fence extrusion / rip fence |
24 |
Motor carrier unit |
|
10 |
Rip fence |
25 |
Dust extraction port |
|
11 |
Table top |
26 |
Chipcase |
|
12 |
Guide extrusion / rip fence |
27 |
Cover |
|
13 |
Guide bar / mitre fence |
28 |
Bearing plate, rear |
|
14 |
Stanchion, short (2x) |
29 |
Chipcase guide panel, rear |
|
15 |
Stanchion, long (2x) |
|
|
|
5
6


7


8

 10
10
 11
11  12
12 
14
15

 16
16
17
18
30Fence carrier, lower / mitre fence
31Fence carrier, upper / mitre fence
32Mitre fence extrusion
–Assembly wrench
–Hardware bag
3
 ENGLISH
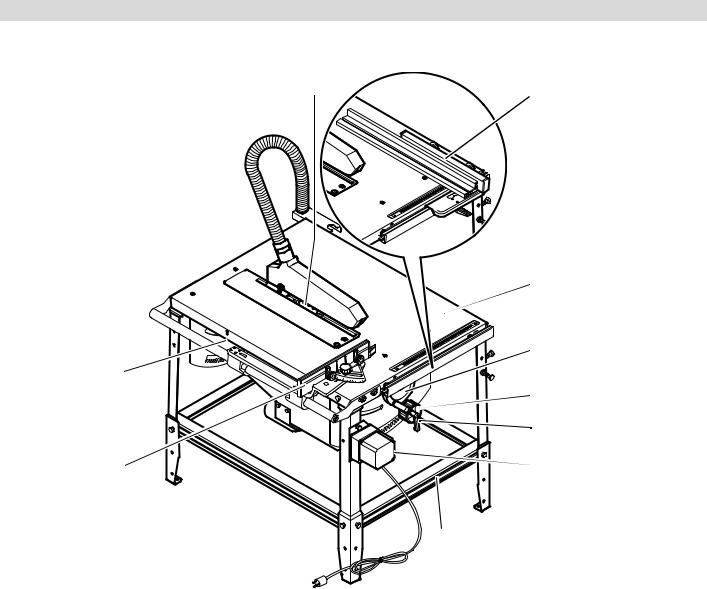
2. Machine overview
42
41
33Saw blade 315 mm
34Rip fence
35Table top of galvanized steel plate – high stability under load and permanent protection against corrosion
36Handwheel for setting the depth of cut steplessly from
0 – 85 mm
37Handwheel for stepless blade tilt setting from 90° through 45°
38Lock lever for locking the blade tilt angle
39ON/OFF switch
33
 34
34
 35
35
 36
36
 37
37
38
 39
39
40
40Stand with multiple reinforcement beads for high stability
41Mitre fence
42Maintenance-free induction motor
4

Table of Contents |
|
|
1. |
Scope of delivery ........................ |
3 |
2. |
Machine overview ....................... |
4 |
3. |
Please read first!......................... |
5 |
4. |
Safety instructions ..................... |
5 |
4.1 |
Specified conditions of use ........... |
5 |
4.2 |
General safety instructions ........... |
5 |
4.3 |
Symbols used throughout |
|
|
these instructions.......................... |
6 |
4.4 |
Safety devices .............................. |
6 |
5. |
Special product features............ |
6 |
6. |
Operating elements .................... |
6 |
7. |
Assembly..................................... |
7 |
7.1 |
Mains connection........................ |
13 |
7.2 |
Installation................................... |
13 |
8. |
Operation................................... |
13 |
8.1 |
Dust collector .............................. |
13 |
8.2 |
Setting the depth of cut............... |
14 |
8.3 |
Setting the saw blade tilt............. |
14 |
8.4 |
Sawing with the rip fence............ |
14 |
8.5 |
Sawing with the mitre fence........ |
15 |
9. |
Tips and tricks .......................... |
15 |
10. |
Care and maintenance ............. |
15 |
10.1 Saw blade change ...................... |
15 |
|
10.2 |
Cleaning the saw blade's |
|
|
height adjustment mechanism ....15 |
|
10.3 |
Saw storage................................ |
16 |
10.4 |
Maintenance ............................... |
16 |
11. |
Repairs....................................... |
16 |
12. |
Transportation .......................... |
16 |
13. |
Available accessories ......... |
16/19 |
14. |
Technical specifications .......... |
17 |
3. Please read first!
•Assemble tool in strict accordance with these instructions. Only if you follow the instructions exactly does the machine conform to the safety regulations and can be safely operated.
•Read the safety instructions before initial operation.
•If you notice transport damage while unpacking, notify your supplier immediately. In this case, do not assemble and operate the saw!
•Dispose of the packing in an environmentally friendly manner. Take to a proper collecting point.
•Keep these instructions for reference on any issues you may be uncertain about.
•If you lend or sell this machine be sure to have these instructions go with it.
4. Safety instructions
4.1Specified conditions of use
This machine is intended to rip and crosscut grown timber, faced boards, chip board and wood-core plywood sheets, and similar wood-derived materials.
Do not cut round stock without suitable jigs or fixtures. The rotating saw blade could turn the workpiece.
Any other use is considered to be not as specified and not permitted. The manufacturer is not liable for any damage caused by unspecified use.
Modification of the machine or use of parts not approved by the equipment manufacturer can cause unforeseeable damage!
4.2General safety instructions
When using this tool observe the following safety instructions, to exclude the risk of personal injury or material damage.
Please also observe the special safety instructions in the respective chapters; where applicable, follow the legal directives or regulations for the prevention of accidents pertaining to the use of circular saws.
AGeneral hazards!
Keep your work area tidy – a messy work area invites accidents.
Be alert. Know what you are doing. Set out to work with reason. Do not operate tool while under the influence of drugs, alcohol or medication.
Consider environmental effects: provide proper lighting.
Prevent adverse body positions. Ensure firm footing and keep your balance at all times. Use suitable workpiece supports when cutting long stock.
Do not operate tool near inflammable liquids or gases.
The saw shall only be started and operated by persons familiar with circular saws, and who are at any time aware of the dangers associated with the operation of such tool.
Keep bystanders, particularly children, out of the danger zone. Persons under 18 years of age shall use this tool only in the course of their vocational training, under the supervision of an instructor.
Do not permit other persons to touch the tool or power cable while it is running. Do not overload tool – use it only within the performance range it was designed for (see "Technical specifications").
BDanger! Risk of electric shock!
Do not expose tool to rain.
Do not operate tool in damp or wet envi-
ENGLISH
ronment.
Prevent body contact with earthed objects such as radiators, pipes, cooking stoves, refrigerators when operating this tool.
Do not use the power cable for purposes it is not intended for.
ARisk of personal injury and crushing by moving parts!
Do not operate the tool without installed guards.
Always keep sufficient distance to the saw blade. Use suitable feeding aids, if necessary.
Keep sufficient distance to driven components when operating the electric tool. Do not attempt to stop the saw blade by pushing the workpiece against its side.
Ensure the tool is disconnected from power supply before servicing.
Ensure that when switching on (e.g. after servicing) no tools or loose parts are left on or in the tool.
Turn power off if the tool is not used.
ACutting hazard, even with the cutting tool at standstill!
Wear gloves when changing cutting tools.
ARisk of kickback (workpiece is caught by the saw blade and thrown against the operator):
Always work with a properly set riving knife.
Do not jam workpieces.
Cut thin or thin-walled workpieces only with fine-toothed saw blades. Always use sharp saw blades.
If in doubt, check workpiece for inclusion of foreign matter (e.g. nails or screws). Cut only stock of dimensions that allow for safe and secure holding while cutting. Never cut several workpieces at the same time – and also no bundles containing several individual pieces. Risk of personal injury if individual pieces are caught by the saw blade uncontrolled. When cutting round stock, use a suitable jig to prevent the workpiece from turning.
cDrawing-in/trapping hazard!
Ensure that no parts of the body or clothing can be caught and drawn in by rotating components (no neckties, no loosefitting clothes; contain long hair with hairnet).
Never cut workpieces containing the following materials:
−ropes
−strings
−cords
−cables
−wires
5
 ENGLISH
AHazard generated by insufficient personal protection gear!
Wear hearing protection. Wear safety glasses. Wear dust mask.
Wear suitable work clothes. When working outdoors wearing of non-slip shoes is recommended.
ARiskdust!of injury by inhaling wood
Dust of certain timber species (e.g. oak, beech, ash) can cause cancer when inhaled: work only with a suitable dust collector attached to the saw.
AHazard generated by modification of the machine or use of parts not tested and approved by the equipment manufacturer!
Assemble tool in strict accordance with these instructions.
Use only parts approved by the equipment manufacturer.
Use only tools (saw blades) conforming to EN 847-1:1997.
Do not make changes to any of the parts.
Use only matching saw blades and riving knives.
AHazarddefects! generated by tool
Keep tool and accessories in good repair. Observe the maintenance instructions.
Before any use check tool for possible damage: before operating the tool all safety devices, protective guards or slightly damaged parts need to be checked for proper function as specified. Check to see that all moving parts work properly and do not jam. All parts must be correctly installed and meet all conditions necessary for the proper operation of the tool.
Damaged protection devices or parts must be repaired or replaced by a qualified specialist. Have damaged switches replaced by a service centre. Do not operate tool if the switch can not be turned ON or OFF.
Keep handles free of oil and grease.
4.3Symbols used throughout these instructions
ADanger!
Indicates risk of personal injury or severe material damage.
BRisk of electric shock!
Risk of personal injury by electric shock.
cDrawing-in/trapping hazard!
Risk of personal injury by body parts or clothing being drawn into the rotating saw blade.
A Caution!
Risk of material damage.
3 Note:Additional information.
4.4Safety devices
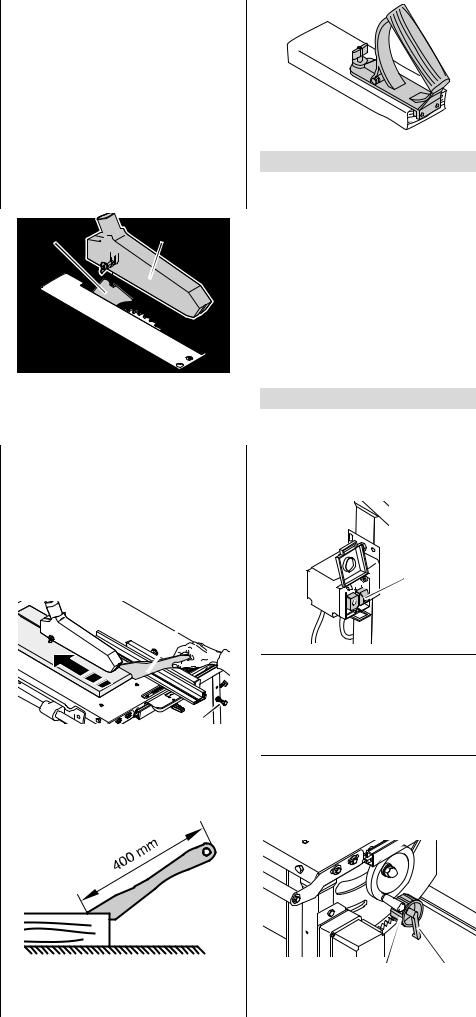
Riving knife
The riving knife (43) prevents the workpiece from being caught by the rising teeth of the saw blade and being thrown against the operator.
Always have the riving knife installed during operation.
43 
 44
44
Blade guard
The blade guard (44) protects against unintentional contact with the saw blade and from chips flying about.
Always have the blade guard installed during operation.
Push stick
The push stick (45) serves as an extension of the hand and protects against accidental contact with the saw blade.
Always use the push stick if the distance between saw blade and rip fence is less than 120 mm.
45
46
Guide the push stick at an angle of 20° … 30° against the saw table's surface.
When the push stick is not used, it can be hung to the holder (46) provided.
Replace the push stick if damaged.
Handle for push block
To be affixed to a suitable board. For the safe guiding of small stock.
5. Special product features
•Steplessly adjustable bevel tilt from 90° to 45°.
• Stepless depth of cut setting to
85 mm.
•An undervoltage relay prevents the machine from starting up when power is restored after a power failure.
•All operating elements are located at the machine's front.
•Robust sheet metal construction with galvanized saw table.
6. Operating elements
ON/OFF switch
•To start = press green switch button
(47).
•To stop = press red switch button
(48).


 48 47
48 47 

3 Note:In the event of a power failure an undervoltage relay is activated. This prevents the starting of the machine when the power is restored. To restart, the green switch button must be actuated.
Setting device for saw blade tilt
The saw blade tilt can be steplessly set by the handwheel (49) from 0° through 45°.
49 50
6
 Loading...