


LAVAMAT TURBO 12710 VIT LAVAMAT TURBO 14710 VIT
Washer-Dryer
Instruction Booklet
|
|
|
|
|
|
|
|
|
|
|
|
L 12710 VIT |
|
ON/ |
1200 |
|
|
|
|
|
|
|
PREWASH |
RESET |
|
|
COTTON |
OFF |
900 |
|
|
|
WASH |
|
|
|
WASH |
MINIPROGRAMM |
95 |
|
|
|
700 |
|
|
|
TIME |
|
|
|
RINSE |
SPIN |
60 E |
|
|
|
500 |
|
|
|
|
|
|
|
DRAIN |
DRAIN |
|
60 |
|
|
RINSE |
|
|
|
|
|
|
|
SPIN |
SOFT- |
|
50 |
|
|
|
|
|
|
|
|
|
ENER |
|
|
|
||
5 mm |
HOLD |
PRE- |
STAIN |
QUICK |
EASY |
DRYING |
DELAY |
START |
DRY |
RINSES |
|
40 |
|
SPIN |
SOAK |
|
30 |
|
|||||||||
|
SPEED |
WASH |
|
|
IRON |
TIME |
START |
PAUSE |
CLEAN |
|
|
||
|
|
|
|
|
|
|
|
|
FILTER |
COLD |
|
DRYING |
|
|
|
|
|
|
|
|
|
|
END |
|
|||
|
|
|
|
|
|
|
|
|
|
30 |
|
60 |
EASY- |
|
|
|
|
|
|
|
|
|
|
|
50 |
CARE |
|
|
|
|
|
|
|
|
|
|
|
WOOL 40 |
|
|
|
|
|
|
|
|
|
|
|
|
|
30 40 |
30 |
40 |
|
|
|
|
|
|
|
|
|
|
|
DELICATES |
DRYING |
|
|
PERFEKT IN FORM UND FUNKTION
Dear customer,
Please read these operating instructions carefully and pay particular attention to the safety notes indicated in the first pages. We recommend that you keep this instruction booklet for future reference and pass it on to any future owners.
The warning triangle and/or the key words (Warning!, Caution!) emphasize information that is particularly important for your safety or correct functioning of the appliance.
This symbol guides you, step by step, in the operation of the appliance.
The information marked with this symbol provides additional instructions and practical tips on the use of the appliance.
Tips and information about economical and ecological use of the machine are marked with the clover symbol.
If you require assistance or advice on your appliance, please contact our customer care department by letter or telephone:
Customer Care Department
AEG/ELECTROLUX Major Appliances
Addington Way
Luton
Bedfordshire LU4 9QQ
Tel: 08705 350 350*
*calls to this number may be recorded for training purposes.
Important
Your machine is fitted with a balance control device, which ensures the ma-chine is stable during the spin.
If the wash load appears not to have been spun sufficiently at the end of the wash cycle, because it is not evenly distributed in the drum, the balance control device may have operated. It will therefore be necessary to redistribute the wash load manually and select a spin programme. For more detailed information see the section headed "Something Not Working".
Printed on recycled paper.
People who think ecologically, act accordingly....
2

Contents |
|
Safety instructions . . . . . . . . . . . . . . . . . . . . . . . . . . . . . . . . . . . . . . . . . . . . . . . . . . . . . . . |
6 |
Disposal . . . . . . . . . . . . . . . . . . . . . . . . . . . . . . . . . . . . . . . . . . . . . . . . . . . . . . . . . . . . . . . . . |
8 |
Tips for environmental protection . . . . . . . . . . . . . . . . . . . . . . . . . . . . . . . . . . . . . . . . |
9 |
Main features of your washer-dryer . . . . . . . . . . . . . . . . . . . . . . . . . . . . . . . . . . . . . . 10
Description of the appliance . . . . . . . . . . . . . . . . . . . . . . . . . . . . . . . . . . . . . . . . . . . . . . 11 Control panel. . . . . . . . . . . . . . . . . . . . . . . . . . . . . . . . . . . . . . . . . . . . . . . . . . . . . . . . . . . . . 12 Programme selector dial. . . . . . . . . . . . . . . . . . . . . . . . . . . . . . . . . . . . . . . . . . . . . . . . 12 ON/OFF button . . . . . . . . . . . . . . . . . . . . . . . . . . . . . . . . . . . . . . . . . . . . . . . . . . . . . . . . 13 Mains-on light . . . . . . . . . . . . . . . . . . . . . . . . . . . . . . . . . . . . . . . . . . . . . . . . . . . . . . . . 13 START/PAUSE button. . . . . . . . . . . . . . . . . . . . . . . . . . . . . . . . . . . . . . . . . . . . . . . . . . . 13 DELAY START button . . . . . . . . . . . . . . . . . . . . . . . . . . . . . . . . . . . . . . . . . . . . . . . . . . . 13 DRYING TIME button. . . . . . . . . . . . . . . . . . . . . . . . . . . . . . . . . . . . . . . . . . . . . . . . . . . 14 Programme Option buttons. . . . . . . . . . . . . . . . . . . . . . . . . . . . . . . . . . . . . . . . . . . . . 14 SPIN SPEED . . . . . . . . . . . . . . . . . . . . . . . . . . . . . . . . . . . . . . . . . . . . . . . . . . . . . . . . . . . 14 RINSE HOLD. . . . . . . . . . . . . . . . . . . . . . . . . . . . . . . . . . . . . . . . . . . . . . . . . . . . . . . . . . . 15 PREWASH. . . . . . . . . . . . . . . . . . . . . . . . . . . . . . . . . . . . . . . . . . . . . . . . . . . . . . . . . . . . . 15 STAIN . . . . . . . . . . . . . . . . . . . . . . . . . . . . . . . . . . . . . . . . . . . . . . . . . . . . . . . . . . . . . . . . 15 QUICK . . . . . . . . . . . . . . . . . . . . . . . . . . . . . . . . . . . . . . . . . . . . . . . . . . . . . . . . . . . . . . . . 15 EASY IRON. . . . . . . . . . . . . . . . . . . . . . . . . . . . . . . . . . . . . . . . . . . . . . . . . . . . . . . . . . . . 16 Display . . . . . . . . . . . . . . . . . . . . . . . . . . . . . . . . . . . . . . . . . . . . . . . . . . . . . . . . . . . . . . . 16 Programme progress display . . . . . . . . . . . . . . . . . . . . . . . . . . . . . . . . . . . . . . . . . . . . 16 Cancelling/Altering a programme . . . . . . . . . . . . . . . . . . . . . . . . . . . . . . . . . . . . . . . 17 Opening the door after the programme has started . . . . . . . . . . . . . . . . . . . . . . . 17 Detergent dispenser drawer. . . . . . . . . . . . . . . . . . . . . . . . . . . . . . . . . . . . . . . . . . . . . . . . 18
Before the first wash. . . . . . . . . . . . . . . . . . . . . . . . . . . . . . . . . . . . . . . . . . . . . . . . . . . . . 18
Preparing the wash cycle. . . . . . . . . . . . . . . . . . . . . . . . . . . . . . . . . . . . . . . . . . . . . . . . . |
19 |
Sorting out and preparing the laundry. . . . . . . . . . . . . . . . . . . . . . . . . . . . . . . . . . . . . . |
19 |
Weight of laundry . . . . . . . . . . . . . . . . . . . . . . . . . . . . . . . . . . . . . . . . . . . . . . . . . . . . . . . . |
20 |
Types of fabric and care labels . . . . . . . . . . . . . . . . . . . . . . . . . . . . . . . . . . . . . . . . . . . . . |
20 |
Detergents and additives . . . . . . . . . . . . . . . . . . . . . . . . . . . . . . . . . . . . . . . . . . . . . . . . . . |
22 |
Which detergent?.... . . . . . . . . . . . . . . . . . . . . . . . . . . . . . . . . . . . . . . . . . . . . . . . . . . . . . . . |
22 |
WHITES. . . . . . . . . . . . . . . . . . . . . . . . . . . . . . . . . . . . . . . . . . . . . . . . . . . . . . . . . . . . . . . |
22 |
NON BIOLOGICAL. . . . . . . . . . . . . . . . . . . . . . . . . . . . . . . . . . . . . . . . . . . . . . . . . . . . . . |
22 |
COLOUREDS. . . . . . . . . . . . . . . . . . . . . . . . . . . . . . . . . . . . . . . . . . . . . . . . . . . . . . . . . . . |
22 |
DELICATE ITEMS . . . . . . . . . . . . . . . . . . . . . . . . . . . . . . . . . . . . . . . . . . . . . . . . . . . . . . . |
22 |
LAUNDRY BLEACH . . . . . . . . . . . . . . . . . . . . . . . . . . . . . . . . . . . . . . . . . . . . . . . . . . . . . |
22 |
STAIN REMOVER. . . . . . . . . . . . . . . . . . . . . . . . . . . . . . . . . . . . . . . . . . . . . . . . . . . . . . . |
22 |
3

Contents
And in which form?. . . . . . . . . . . . . . . . . . . . . . . . . . . . . . . . . . . . . . . . . . . . . . . . . . . . . . . 23 TRADITIONAL POWDERS. . . . . . . . . . . . . . . . . . . . . . . . . . . . . . . . . . . . . . . . . . . . . . . . 23 TRADITIONAL LIQUIDS. . . . . . . . . . . . . . . . . . . . . . . . . . . . . . . . . . . . . . . . . . . . . . . . . . 23 COMPACT POWDERS AND LIQUIDS. . . . . . . . . . . . . . . . . . . . . . . . . . . . . . . . . . . . . . 23 FABRIC CONDITIONERS. . . . . . . . . . . . . . . . . . . . . . . . . . . . . . . . . . . . . . . . . . . . . . . . . 23
Preparing the drying cycle. . . . . . . . . . . . . . . . . . . . . . . . . . . . . . . . . . . . . . . . . . . . . . . . 24 Load. . . . . . . . . . . . . . . . . . . . . . . . . . . . . . . . . . . . . . . . . . . . . . . . . . . . . . . . . . . . . . . . . . . . . 24 Garments not suitable for drying . . . . . . . . . . . . . . . . . . . . . . . . . . . . . . . . . . . . . . . . . . . 24 Drying symbols on garment labels . . . . . . . . . . . . . . . . . . . . . . . . . . . . . . . . . . . . . . . . . . 25 Duration of the drying cycle . . . . . . . . . . . . . . . . . . . . . . . . . . . . . . . . . . . . . . . . . . . . . . . 25 Modification of the drying time. . . . . . . . . . . . . . . . . . . . . . . . . . . . . . . . . . . . . . . . . . . . 25 Fibre residue. . . . . . . . . . . . . . . . . . . . . . . . . . . . . . . . . . . . . . . . . . . . . . . . . . . . . . . . . . . . . . 25 Additional drying . . . . . . . . . . . . . . . . . . . . . . . . . . . . . . . . . . . . . . . . . . . . . . . . . . . . . . . . . 26
How to wash . . . . . . . . . . . . . . . . . . . . . . . . . . . . . . . . . . . . . . . . . . . . . . . . . . . . . . . . . . . . 27 Load the laundry . . . . . . . . . . . . . . . . . . . . . . . . . . . . . . . . . . . . . . . . . . . . . . . . . . . . . . . . . 27 Add detergent and additive . . . . . . . . . . . . . . . . . . . . . . . . . . . . . . . . . . . . . . . . . . . . . . . . 27 Switching the machine on. . . . . . . . . . . . . . . . . . . . . . . . . . . . . . . . . . . . . . . . . . . . . . . . . 27 Selection of the desired wash programme. . . . . . . . . . . . . . . . . . . . . . . . . . . . . . . . . . . 28 Selection of the SPIN SPEED or RINSE HOLD option . . . . . . . . . . . . . . . . . . . . . . . . . . 28 Selection of the STAIN, PREWASH or QUICK WASH option. . . . . . . . . . . . . . . . . . . . 28 Selection of the EXTRA RINSE option . . . . . . . . . . . . . . . . . . . . . . . . . . . . . . . . . . . . . . . 28 Selection of the DELAY START option . . . . . . . . . . . . . . . . . . . . . . . . . . . . . . . . . . . . . . . 29 Starting the programme. . . . . . . . . . . . . . . . . . . . . . . . . . . . . . . . . . . . . . . . . . . . . . . . . . . 29 At the end of the programme. . . . . . . . . . . . . . . . . . . . . . . . . . . . . . . . . . . . . . . . . . . . . . 30
How to dry . . . . . . . . . . . . . . . . . . . . . . . . . . . . . . . . . . . . . . . . . . . . . . . . . . . . . . . . . . . . . . 31 Drying only. . . . . . . . . . . . . . . . . . . . . . . . . . . . . . . . . . . . . . . . . . . . . . . . . . . . . . . . . . . . . . . 31 Automatic washing and drying (NON-STOP programme). . . . . . . . . . . . . . . . . . . . . . 31
Programme charts . . . . . . . . . . . . . . . . . . . . . . . . . . . . . . . . . . . . . . . . . . . . . . . . . . . . 32-33
Programme chart . . . . . . . . . . . . . . . . . . . . . . . . . . . . . . . . . . . . . . . . . . . . . . . . . . . . . . . . 34 Drying . . . . . . . . . . . . . . . . . . . . . . . . . . . . . . . . . . . . . . . . . . . . . . . . . . . . . . . . . . . . . . . . . . . 34
Cleaning and maintenance . . . . . . . . . . . . . . . . . . . . . . . . . . . . . . . . . . . . . . . . . . . . . . . 35 After each wash . . . . . . . . . . . . . . . . . . . . . . . . . . . . . . . . . . . . . . . . . . . . . . . . . . . . . . . . . . 35 Periodical cleaning . . . . . . . . . . . . . . . . . . . . . . . . . . . . . . . . . . . . . . . . . . . . . . . . . . . . . . . . 35 Exterior. . . . . . . . . . . . . . . . . . . . . . . . . . . . . . . . . . . . . . . . . . . . . . . . . . . . . . . . . . . . . . . 35 Detergent dispenser drawer. . . . . . . . . . . . . . . . . . . . . . . . . . . . . . . . . . . . . . . . . . . . . 35 Door seal . . . . . . . . . . . . . . . . . . . . . . . . . . . . . . . . . . . . . . . . . . . . . . . . . . . . . . . . . . . . . 36 Drain filter . . . . . . . . . . . . . . . . . . . . . . . . . . . . . . . . . . . . . . . . . . . . . . . . . . . . . . . . . . . . 36 Water inlet filter. . . . . . . . . . . . . . . . . . . . . . . . . . . . . . . . . . . . . . . . . . . . . . . . . . . . . . . 36 Emergency emptying out . . . . . . . . . . . . . . . . . . . . . . . . . . . . . . . . . . . . . . . . . . . . . . . . . . 37 Frost precautions . . . . . . . . . . . . . . . . . . . . . . . . . . . . . . . . . . . . . . . . . . . . . . . . . . . . . . . . . 37
4

Contents
Something not working? . . . . . . . . . . . . . . . . . . . . . . . . . . . . . . . . . . . . . . . . . . . . . . . . . 38 Troubleshooting . . . . . . . . . . . . . . . . . . . . . . . . . . . . . . . . . . . . . . . . . . . . . . . . . . . . . . . . . . 38 Unsatisfactory washing results . . . . . . . . . . . . . . . . . . . . . . . . . . . . . . . . . . . . . . . . . . . . . 42
Technical data . . . . . . . . . . . . . . . . . . . . . . . . . . . . . . . . . . . . . . . . . . . . . . . . . . . . . . . . . . . 43
Service & Spare Parts . . . . . . . . . . . . . . . . . . . . . . . . . . . . . . . . . . . . . . . . . . . . . . . . . . . . 44
Guarantee Conditions. . . . . . . . . . . . . . . . . . . . . . . . . . . . . . . . . . . . . . . . . . . . . . . . . 46-47
Instructions for installation and electrical connection . . . . . . . . . . . . . . . . . . . . . 48 Safety instructions for the installer . . . . . . . . . . . . . . . . . . . . . . . . . . . . . . . . . . . . . . . . . 48
Dimensions of the appliance. . . . . . . . . . . . . . . . . . . . . . . . . . . . . . . . . . . . . . . . . . . . . . 49 Front view and side view . . . . . . . . . . . . . . . . . . . . . . . . . . . . . . . . . . . . . . . . . . . . . . . . . . 49 Rear view . . . . . . . . . . . . . . . . . . . . . . . . . . . . . . . . . . . . . . . . . . . . . . . . . . . . . . . . . . . . . . . . 49
Installation . . . . . . . . . . . . . . . . . . . . . . . . . . . . . . . . . . . . . . . . . . . . . . . . . . . . . . . . . . . . . . 50 Unpacking . . . . . . . . . . . . . . . . . . . . . . . . . . . . . . . . . . . . . . . . . . . . . . . . . . . . . . . . . . . . . . . 50 Positioning . . . . . . . . . . . . . . . . . . . . . . . . . . . . . . . . . . . . . . . . . . . . . . . . . . . . . . . . . . . . . . . 51 Levelling . . . . . . . . . . . . . . . . . . . . . . . . . . . . . . . . . . . . . . . . . . . . . . . . . . . . . . . . . . . . . . . . . 51 Water inlet (cold water connection only). . . . . . . . . . . . . . . . . . . . . . . . . . . . . . . . . . . . 52 Water drainage. . . . . . . . . . . . . . . . . . . . . . . . . . . . . . . . . . . . . . . . . . . . . . . . . . . . . . . . 52-53 In the interest of the environment. . . . . . . . . . . . . . . . . . . . . . . . . . . . . . . . . . . . . . . . . . 54 Electrical connections . . . . . . . . . . . . . . . . . . . . . . . . . . . . . . . . . . . . . . . . . . . . . . . . . . 54-55 Permanent connection . . . . . . . . . . . . . . . . . . . . . . . . . . . . . . . . . . . . . . . . . . . . . . . . . . . . 55
Building-in . . . . . . . . . . . . . . . . . . . . . . . . . . . . . . . . . . . . . . . . . . . . . . . . . . . . . . . . . . . 56-59
5

 Safety instructions
Your safety is of paramount importance, please ensure you read this instruction book before installing or using this appliance.
General safety
•Repairs to the machine must be carried out only by qualified personnel. Repairs carried out by inexperienced persons could cause injury or serious malfunctioning. Contact your local AEG/ELECTROLUX Service Force Centre.
•Never start the machine if the mains cable is damaged or the control panel or worktop are damaged allowing inner components to be accessible.
•Unplug the appliance before carrying out any cleaning or maintenance operations.
•Never pull the mains cable to remove the plug from the socket; always take hold of the plug itself.
•During high temperature wash programmes and during the drying cycle, the door glass may get hot.
•Let the water cool down before carrying out emergency emptying or before opening the door in an emergency.
Installation
•Follow the installation instructions carefully.
•Carry out a first wash without laundry (COTTONS 95, with half the amount of detergent) in order to remove any manufacturing residue from the tub and the drum.
6

Safety instructions
Child safety
•This appliance is designed to be operated by adults. Children should not be allowed to tamper with the controls or play with the appliance.
•Pets and children have been known to climb into washing machines. Please check the drum before use.
•Keep all packaging well away from children.
•Keep all detergents in a safe place out of children’s reach.
•When disposing of the appliance, cut off the mains cable, and destroy the plug. Disable the door catch to prevent young children being trapped inside.
During use
•Always unplug the appliance and turn off the water tap after use.
•This appliance is designed for domestic use only. If the machine is used for any other purposes or is not used correctly, the manufacturer accepts no responsibility for any possible damage that might occur.
•For safety reasons, the appliance must not be modified.
•Use only detergents suitable for washing machines and follow the manufacturer’s instructions.
•Garments which have been in contact with flammable solvents should not be machine washed.
•Dyes and bleaching agents may only be used if specifically permitted by the manufacturer of these products. We cannot be held liable for any damage.
7
Disposal
Packaging materials
The materials marked with the symbol  are recyclable. >PE<=polyethylene
>PS<=polystyrene >PP<=polypropylene
This means that they can be recycled by disposing of them properly in appropriate collection containers.
Machine
Use authorised disposal sites for your old appliance. Help to keep your country tidy!
The symbol  on the product or on its packaging indicates that this product may not be treated as household waste. Instead it shall be handed over to the applicable collection point for the recycling of electrical and electronic equipment. By ensuring this product is disposed of correctly, you will help prevent potential negative consequences for the environment and human health, which could otherwise be caused by inappropriate waste handling of this product. For more detailed information about recycling of this product, please contact your local city office, your household waste disposal service or the shop where you purchased the product.
8

Tips for environmental protection
To save water, energy and to help protect the environment, we recommend that you follow these tips:
•Normally soiled laundry may be washed without prewashing in order to save detergent, water and time (the environment is protected too!).
•Use the energy saving programme when washing normally soiled garments.
•The machine works more economically if it is fully loaded (for both washing and drying cycles).
•When small loads are washed, use only half to two thirds of the recommended amount of detergent.
•The machine will consume less energy if the laundry is adequately spun before being dried.
•With adequate pre-treatment, stains and limited soiling can be removed; the laundry can then be washed at a lower temperature.
9

Main features of your washer-dryer
•Programme and temperature setting using the programme selector.
•Stain option for effectively treating stained washing.
•Energy saving programme for normally soiled cotton items.
•SOAK programme for heavy soiled items. The machine performs a soak at 30°C. By pressing the DELAY START button the soak time can be prolonged up to 10 hours max. This programme cannot be used with WOOL programme. The Soak programme ends with water in the tub. Before selecting the desired washing programme, drain the water setting the drain programme.
•Speed for the final spin can be reduced to 900, 700 or 500 rpm.
•RINSE HOLD: the laundry is left immersed in the final rinse water to prevent creasing.
•DELAY START (delayed start): programme start can be delayed by 30 minutes to 23 hours (e.g. to times with a more economical power rate).
•Programme progress display showing the programme steps selected and the programme phase which is running.
•Because of its gentle washing action, the special wool cycle washes your garments with extreme care.
•The drying programmes will enable you to have dry and soft laundry in a short time.
•3-compartment drawer for detergent and fabric softener.
•Unbalance detection device: to prevent vibration during spinning.
10

Description of the appliance
Front view
Detergent drawer
Control panel |
|
|
|
|
|
||||||||
|
|
|
|
|
|
|
|
|
|
|
|
L 12710 VIT |
|
ON/ |
1200 |
|
|
|
|
|
|
|
PREWASH |
RESET |
|
|
COTTON |
OFF |
900 |
|
|
|
WASH |
|
|
|
WASH |
MINIPROGRAMM |
95 |
|
|
|
700 |
|
|
|
TIME |
|
|
|
RINSE |
SPIN |
60 E |
|
|
|
500 |
|
|
|
|
|
|
|
DRAIN |
DRAIN |
|
60 |
|
|
|
|
|
|
|
|
|
SOFT- |
|
50 |
|
||
|
RINSE |
|
|
|
|
|
|
|
SPIN |
ENER |
|
|
|
5 mm |
HOLD |
PRE- |
STAIN |
QUICK |
EASY |
DRYING |
DELAY |
START |
DRY |
RINSES |
|
40 |
|
SPIN |
SOAK |
|
30 |
|
|||||||||
|
SPEED |
WASH |
|
|
IRON |
TIME |
START |
PAUSE |
CLEAN |
|
|
||
|
|
|
|
|
|
|
|
|
FILTER |
COLD |
|
DRYING |
|
|
|
|
|
|
|
|
|
|
END |
|
|
|
EASY- |
|
|
|
|
|
|
|
|
|
|
30 |
|
60 |
|
|
|
|
|
|
|
|
|
|
|
|
50 |
CARE |
|
|
|
|
|
|
|
|
|
|
|
WOOL 40 |
|
|
|
|
|
|
|
|
|
|
|
|
|
30 40 |
30 |
40 |
|
|
|
|
|
|
|
|
|
|
|
DELICATES |
DRYING |
|
|
|
|
|
|
|
|
|
|
|
|
|
|
|
Door |
|
|
|
|
|
|
|
|
|
|
|
|
|
Drain filter |
Adjustable feet
11
Description of the appliance
Control panel
F
|
|
|
|
|
|
|
|
|
|
|
L 12710 VIT |
|
ON/ |
1200 |
|
|
|
|
|
PREWASH |
RESET |
|
|
|
COTTON |
OFF |
900 |
|
WASH |
|
|
|
WASH |
MINIPROGRAMM |
95 |
|
|
|
|
|
TIME |
|
|
|
SPIN |
60 E |
|
|
|||
|
700 |
|
|
|
|
RINSE |
|
|
||||
|
|
|
|
|
|
DRAIN |
|
60 |
|
|
||
|
500 |
|
|
|
|
|
DRAIN |
|
|
|
||
|
|
|
|
|
|
SOFT- |
|
50 |
|
|||
|
RINSE |
|
|
|
|
|
SPIN |
ENER |
|
|
40 |
|
|
HOLD |
PRE- |
STAIN QUICK EASY |
DRYING |
DELAY |
START |
DRY |
RINSES |
|
|
|
|
|
SPIN |
SOAK |
|
|
30 |
|
||||||
|
SPEED |
WASH |
IRON |
TIME |
START |
PAUSE |
CLEAN |
|
|
|
||
|
|
|
|
|
|
|
FILTER |
COLD |
|
|
DRYING |
|
|
|
|
|
|
|
|
END |
|
|
|||
|
|
|
|
|
|
|
|
|
|
|
EASY- |
|
|
|
|
|
|
|
|
|
30 |
|
60 |
||
|
|
|
|
|
|
|
|
|
CARE |
|||
|
|
|
|
|
|
|
|
WOOL 40 |
|
50 |
|
|
|
|
|
|
|
|
|
|
|
|
|
||
|
|
|
|
|
|
|
|
30 40 |
30 |
40 |
|
|
|
|
|
|
|
|
|
|
DELICATES |
DRYING |
|
|
|
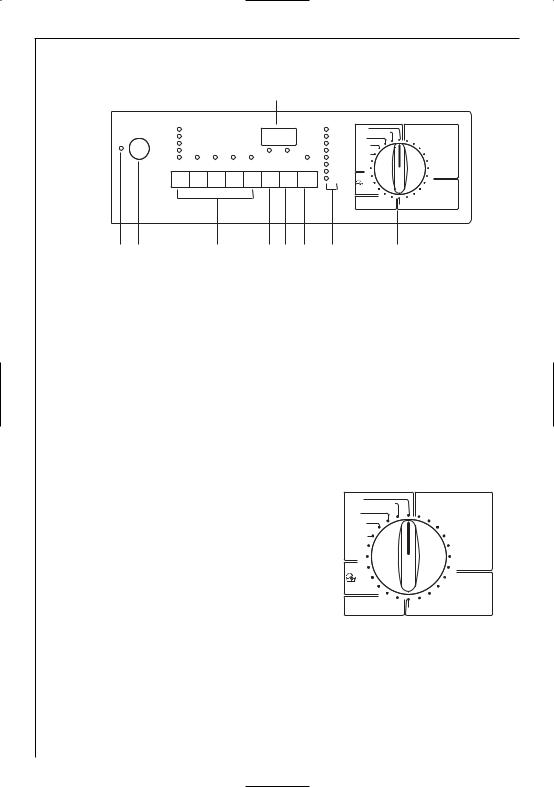
A B C D E G H J
A= Mains-on light
B= ON/OFF button
C= Option buttons
D= Drying time button
E= Delay start button
F= Display
G= START/PAUSE button
H= Programme progress display
J= Programme selector dial
Programme selector dial
The programme selector determines the type of washing cycle (e.g. water level, drum movement, number of rinses, spin speed), the washing temperature and enables the required drying programme to be selected according to the type of laundry.
The selector is divided into 5 sections:
L 12710 VIT
RESET |
|
|
COTTON |
MINIPROGRAMM |
|
|
|
95 |
|
|
|
SPIN |
60 E |
|
|
DRAIN |
|
60 |
|
SOFT- |
|
50 |
|
ENER |
|
40 |
|
RINSES |
|
|
|
SOAK |
|
30 |
|
COLD |
|
DRYING |
|
30 |
|
60 |
EASY- |
|
CARE |
||
WOOL 40 |
|
50 |
|
|
|
||
30 40 |
30 |
40 |
|
DELICATES |
DRYING |
|
|
•Cotton
•Easy-cares (Synthetics)
•Delicates
•Woollens  (hand washing)
•Special programmes
The selector dial can be turned either clockwise or anticlockwise.
12

Description of the appliance
Position 60E corresponds to the ENERGY SAVING programme for normally soiled laundry, extended washing time. The washing temperature will decrease (cannot be combined with QUICK).
Position DRYING = drying phase;
Position COLD = cold wash.
ON/OFF button
Press this button to switch the machine on. Press it again to switch the machine off.
Mains-on light
This light comes on when the ON/OFF button is pressed, and goes out when it is pressed again.
START/PAUSE button
This button has two functions:
a) Start
After having selected the required programme, press this button to start the machine. The relevant pilot light stops flashing and remains static. If you have selected the DELAY START option, the machine starts its hourly countdown.
b) Pause
To interrupt a programme which is running, press the START/PAUSE button: the information on the display remains lit and the START/PAUSE pilot light starts to flash.
To restart the programme from the point at which it was interrupted, press the START/PAUSE button again.
DELAY START button
The wash programme can be delayed from 30, 60, 90 minutes and then 1 hour by 1 hour up to a maximum of 23 hours.
The button must be pressed after selecting the programme and before pressing the START/PAUSE button.
The figures indicating the delay appear for about 3 seconds in the display. The duration of the selected wash programme is then displayed. After depressing the START/PAUSE button, the machine starts its hourly countdown.
13

Description of the appliance
To annul the preset delay, press the START/PAUSE button, then press the DELAY START button until the symbol 0’ is displayed.
Then press the START/PAUSE button again to restart the programme.
DRYING TIME button
If you wish to carry out a timed drying programme push the button until the drying time you want appears in the display according to the fabrics (cotton or easy cares) you have to dry.
For COTTON and EASY CARES you can select a drying time from 10 minutes to 130 minutes.
In automatic washing and drying programme the drying time is displayed for 3 seconds, then the duration of the programme will appear.
Programme Option buttons
Depending on the programme, different functions can be combined. These must be selected after choosing the desired programme and before depressing the START/PAUSE button.
When these buttons are pressed, the corresponding pilot lights come on. When they are pressed again, the pilot lights go out.
When an incorrect option is selected, the button light flashes for 2 seconds and in the display the Err message appears.
SPIN SPEED
Press this button to reduce the maximum speed of the final speed proposed by the machine for the selected programme or to select RINSE HOLD option. The maximum spin speed for cotton is 1400 rpm (for L14710VIT), 1200 rpm (for L12710VIT), for easy cares, wool 900 rpm and for delicates and Miniprogramm 700 rpm.
RINSE HOLD
By selecting this option, the last rinse water is not emptied out, to prevent the fabrics from creasing. When the programme has finished, the pilot light END on the programme progress display illuminates and the Door will be locked to indicate that the water must be emptied out.
14

Description of the appliance
To empty out water:
•select the DRAIN programme to empty out the water without spinning.
•select the SPIN programme for draining and spinning.
•select the SPIN SPEED and depress the START/PAUSE button;
Warning! The programme selector dial must be turned first to RESET and then to the DRAIN or SPIN programmes.
The RINSE HOLD option cannot be selected for the automatic WASHING & DRYING programme.
PREWASH
The machine performs a prewash cycle at 30°C max. The prewash cycle ends with a short spin in programmes for Cotton and Easy-cares, and with emptying of the water only for Delicates.
This option is not available with the wool programme and cannot be used with STAIN.
For use when washing heavily soiled laundry.
STAIN
To treat heavily soiled washing or stained washing with stain remover (extended main wash with time optimised stain action phase, not selectable for wool/handwash or programmes with temperatures lower than 40°C).
This function cannot be used with PREWASH.
QUICK
By pressing this button the washing time is reduced. For use when washing lightly soiled laundry.
This option is not available with the wool/handwash and Economy programme.
EASY IRON
Selecting this button the laundry is gently washed and spun to avoid any creasing. In this way ironing is easier. Furthermore the machine will perform 6 rinses instead of 3 for cotton and 4 rinses instead of 3 for synthetics. This function can be used only for cotton and Easy-Cares (synthetic) fabrics.
If this option is selected for cotton programmes, the spin speed automaticaly will reduce to 900 rpm.
If this option is selected for synthetic programmes with a temperature of 60°C, the machine will perform a washing cycle at max 40°C.
15
Description of the appliance
Display
The display shows the following information:
•Duration of the selected programme (in hours and minutes), calculated automatically on the basis of the maximum recommended load for each type of fabric.
•Selected drying time (max. 130 minutes for cotton and easy cares).
After the programme has started, the time remaining is updated every minute.
•When the programme has finished, a blinking lit zero is displayed.
•Delayed start, (23 hours max.) programmed using the special button. The countdown is updated every hour and by 30 minutes the last 2 hours.
•Alarm code indicating a fault in the machine operation (see page 38).
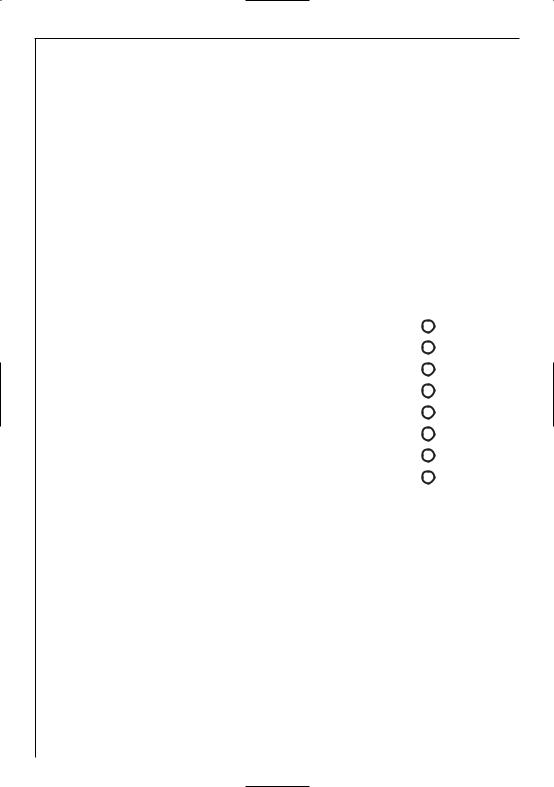
Programme progress display
By selecting the wash programme, the pilot lights corresponding to the various phases making up the programme come on.
After the machine has started, only the running phase pilot light stays on. When the programme has finished, the END pilot light comes on.
PREWASH WASH RINSE DRAIN SPIN
DRY
CLEAN
FILTER
END
Cancelling a programme
To cancel a programme which is running, turn the programme selector dial to the RESET position.
Warning! After a programme which ends with water in the drum (RINSE HOLD option), turn the selector dial first to RESET and then to the DRAIN or SPIN programme.
16

Description of the appliance
Altering an option/programme which is running
To alter an option, first set the machine to PAUSE by pressing the START/PAUSE button.
Any option can be modified before the machine starts it. After selecting the new option press the START/PAUSE button again to re-start the selected programme.
To modify the selected programme turn the programme selector dial to RESET and then choose a new programme.
After pressing the START/PAUSE button again, the machine restarts with the newly selected programme and the water is not emptied out.
Opening the door after the programme has started
You can open the door, after having set the machine to PAUSE, provided the following conditions exist:
•the machine is not in the heating or drying phase beyond 55°C;
•the level of the water is not high;
•the drum is not turning.
If these requirements are met, when you pause the machine the door can be opened.
Should it not be possible to open the door, and should it be absolutely necessary to do so, switch the machine off by pressing the ON/OFF button.
After approximately 3 minutes, you can open the door.
Pay attention to the level and temperature of the water in the machine!
When you close the door and press the ON/OFF and START/PAUSE buttons again, the washing machine will resume the programme from the point where it had been interrupted.
17
Description of the appliance
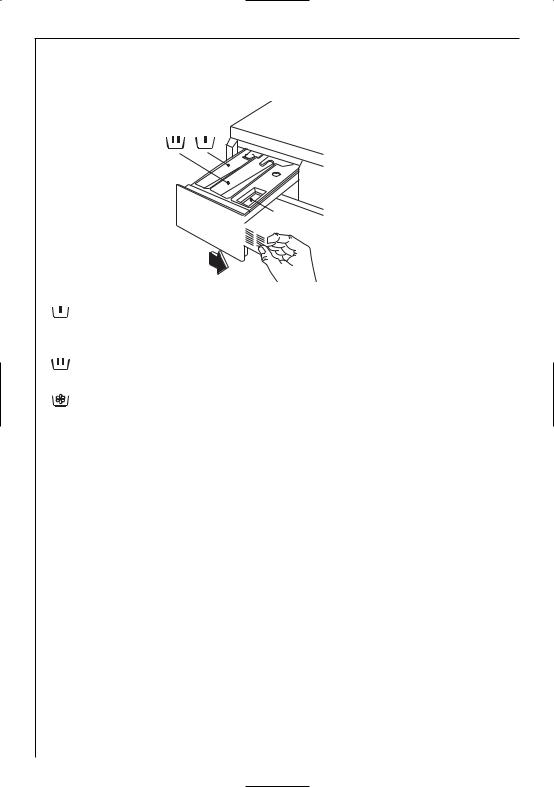
Detergent dispenser drawer


 Programme chart
Compartment for prewash or soak detergent and stain remover. The prewash or soak detergent is added at the beginning of the wash programme. The stain remover is added during the STAIN-Action phase in the main wash.
Compartment for powder or liquid detergent used for main wash. It is emptied at the beginning of the wash cycle.
Compartment for liquid additives (fabric softener, starch). It is emptied at the last rinse.
The quantity of additives must not exceed the “MAX” mark in the drawer.
Before the first wash
Before your first wash, we recommend that you run a cotton cycle at 95°C, without any laundry in the machine, to remove any manufacturing residue from the drum and tub.
Pour 1/2 a measure of detergent into the dispenser drawer and start the machine.
18
 Loading...