


Use & Care Guide
Ice Maker
Guia de Uso y Cuidado
Máquina de hielo
Guide d’utilisation et d’entretien
Machine à glaçons
241927600 November 2007

2 |
Finding Information |
|
|
Please read and save this guide
Thank you for choosing Electrolux, the new premium brand in home appliances. This Use & Care Guide is part of our commitment to customer satisfaction and product quality throughout the service life of your new ice maker.
We view your purchase as the beginning of a relationship. To ensure our ability to continue serving you, please use this page to record key product information.
IMPORTANT
PLEASE READ all instructions completely before attempting to install or operate the unit.
All ice makers require a connection to both a water supply and an electrical power source. Improper hook-up can result in substantial property damage! Proper installation, in accordance with the manufacturer’s specifications and all local codes, is the sole responsibility of the consumer. The manufacturer is not responsible for any installation expenses or damages incurred due to improper installation. If you are unsure of your ability to safely make electric power, water supply, and water drain connections to the unit, consult licensed and insured professionals to perform all electrical and plumbing work.
Once you have your unit installed, we suggest you keep this manual in a safe place for future reference. Should any problems occur, refer to the Troubleshooting section of this manual. This information will help you quickly identify a problem and get it remedied. In the event you require assistance, please contact the dealer where you purchased your unit.
©2007 Electrolux Home Products, Inc.
Post Office Box 212378, Augusta, Georgia 30917, USA
Keep a record for quick reference
Whenever you call to request information or service, you will need to know your model number and serial number. You can find this information on the serial plate located on the inside wall of your unit and on the product registration card.
NOTE
Registering your product with Electrolux enhances our ability to serve you. You can register online at www.electroluxusa.com or by dropping your Product Registration Card in the mail.
Please record the purchase date of your Electrolux unit and your dealer’s name, address and telephone number.
________________________________________
Purchase Date
________________________________________
Electrolux Model Number
________________________________________
Electrolux Serial Number
________________________________________
Dealer Name
________________________________________
Dealer Address
________________________________________
Dealer Telephone
Keep this manual and the sales receipt together in a safe place for further reference.
Questions?
For toll-free telephone support in the U.S. and Canada: 1-877-4ELECTROLUX (1-877-435-3287)
For online support and product information visit http://www.electroluxusa.com
All rights reserved. Printed in the USA
Finding Information |
3 |
|
|
Table of Contents |
|
Finding Information.................................................. |
2 |
Please read and save this guide............................................... |
2 |
Keep a record for quick reference............................................ |
2 |
Questions?.............................................................................. |
2 |
Table of contents..................................................................... |
3 |
Safety................................................................... |
4 |
Important Safety Instructions.................................................. |
4 |
Safety Precautions............................................................... |
4 |
Definitions............................................................................ |
4 |
General Precautions............................................................. |
4 |
Installation............................................................ |
5 |
Installation Dimensions .......................................................... |
5 |
Installing the Drain.................................................................. |
5 |
Gravity Drain................................................................... |
5 |
Connecting a Drain Pump........................................................ |
6 |
Site Preparation...................................................... |
7 |
Preparing the Site ................................................................... |
7 |
Water Supply Connection........................................... |
8 |
Connecting the Water Supply.................................................. |
8 |
Leveling................................................................ |
9 |
Leveling the Unit...................................................................... |
9 |
Door Reversal....................................................... |
10 |
Reversing the Door (some models) ...................................... |
10 |
Adjusting the Door ............................................................... |
12 |
Built-In Installation / Start-Up.................................... |
13 |
Installing a Built-In................................................................ |
13 |
Initial Start-Up....................................................................... |
13 |
Blackout Mode................................................................... |
13 |
Normal Operating Sounds..................................................... |
13 |
Operation............................................................ |
14 |
Normal Operation.................................................................. |
14 |
Ice Cube Thickness................................................................ |
14 |
Ice Dispenser Operation and Care......................................... |
14 |
Ice Cube Thickness Adjustment............................................. |
15 |
Drain Pump........................................................................... |
15 |
Maintenance........................................................ |
16 |
Special Considerations.......................................................... |
16 |
Maintaining and Cleaning Your Ice Maker............................. |
16 |
Exterior Cleaning - As Required......................................... |
16 |
Stainless Steel Models....................................................... |
16 |
Interior Cleaning - As Required.......................................... |
16 |
Condenser Cleaning - Every 3 Months.................................. |
17 |
Self Cleaning - Every 6 Months............................................. |
17 |
Inlet Screen Cleaning - Every Year......................................... |
19 |
Storing, Vacation and Moving.................................... |
19 |
Draining for Non-Use............................................................ |
19 |
Troubleshooting..................................................... |
20 |
Before you Call for Service.................................................... |
20 |
If Service is Required............................................................ |
21 |
Warranty Information.............................................. |
22 |
WARNING
You must follow these guidelines to ensure that your refrigerator’s safety mechanisms are operating correctly.
4 Safety
Important Safety Instructions
Safety Precautions
Do not attempt to install or operate your unit until you have read the safety precautions in this manual. Safety items throughout this manual are labeled with a Danger, Warning or Caution based on the risk type.
Definitions
This is the safety alert symbol. It is used to alert you to potential personal injury hazards. Obey all safety messages that follow this symbol to avoid possible injury or death.
DANGER
DANGER indicates an imminently hazardous situation which, if not avoided, will result in death or serious injury.
WARNING
WARNING indicates a potentially hazardous situation which, if not avoided, could result in death or serious injury.
CAUTION
CAUTION indicates a potentially hazardous situation which, if not avoided, may result in minor or moderate injury, product damage, or property damage.
IMPORTANT
Indicates installation, operation or maintenance information which is important but not hazard related.
WARNING
•Never attempt to repair or perform maintenance on the unit until the electricity has been disconnected.
•Altering, cutting of power cord, removal of power cord, removal of power plug, or direct wiring can cause serious injury, fire and/or loss of property and/or life and will void the warranty.
•Do not lift unit by door handle.
CAUTION
•Use care when moving the unit. Some edges are sharp and may cause personal injury. Wear gloves when moving or repositioning the unit.
•Never install the unit behind closed doors. Be sure front grille is free of obstruction. Obstructing free air flow can cause the unit to malfunction, and may void the warranty.
•Allow unit temperature to stabilize for 24 hours before use.
•Never use an ice pick or other sharp instrument to help speed up defrosting. These instruments can puncture the inner lining or damage cooling unit
•Failure to clean the condenser every three months can cause the unit
to malfunction. This could void the warranty.
General Precautions
DANGER
RISK OF CHILD ENTRAPMENT. Before you throw away your old appliance, take off the doors and leave shelves in place so that children may not easily climb inside.
IMPORTANT
To turn off power to your ice maker, unplug the power cord from the wall outlet.
CAUTION
•Using a heater to speed up defrosting can cause personal injury and damage to the inner lining. DO NOT use any type of heater to defrost.
•Use only genuine Electrolux replacement parts. Imitation parts can reduce ice rate, cause water to overflow from ice maker mold, damage the unit, and may void the warranty.
Installation 5
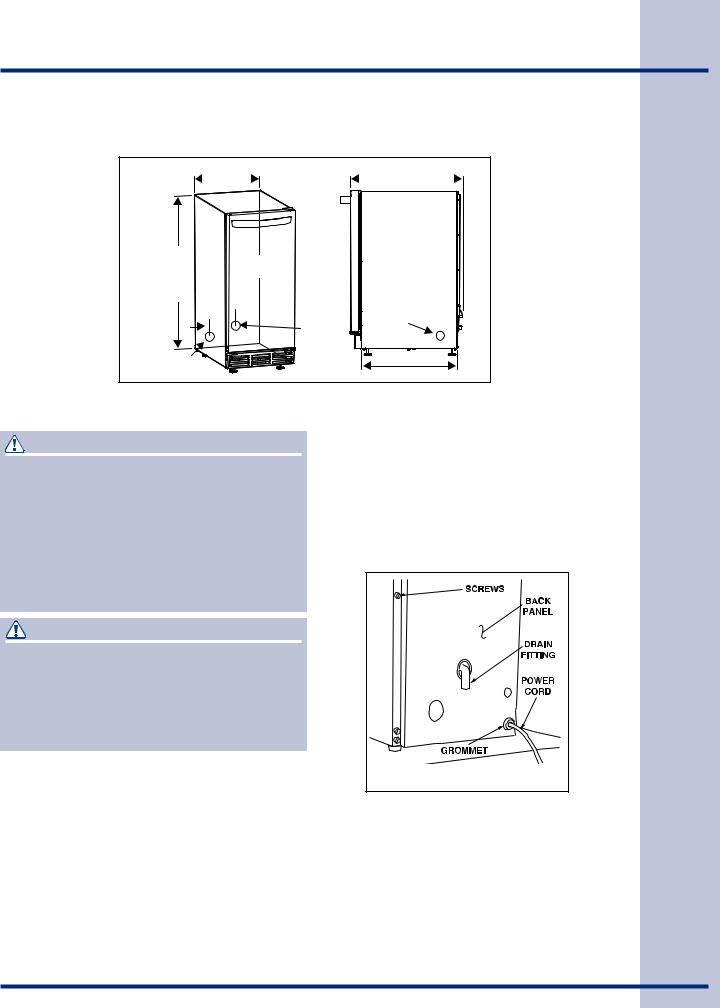
Installation Dimensions
14 - 15/16” |
24” |
(37.9) |
(61) |
34 - 1/8”
(86.7) FULL RETRACT
HEIGHT 5” (12.7)
WATER
WATER VALVE
DRAIN
WATER |
21 - 3/4” |
|
OUTLET |
||
(55.2) |
||
|
Installing the Drain
CAUTION
PLEASE READ all instructions completely before attempting to install or operate the unit. All ice makers require a connection to the water supply and improper hook-up can result in substantial property damage! All water
and drain connections MUST BE made by a licensed/qualified plumbing contractor. Failure to follow recommendations and instructions may result in damage and/or harm.
CAUTION
Plumbing installation must observe all state and local codes. All water and drain connections MUST BE made by a licensed/
qualified plumbing contractor. Failure to follow recommendations and instructions may result in damage and/or harm.
Model EI15IM55GS can be installed using a gravity drain or the Electrolux EIMP60, optional drain pump kit.
Follow these guidelines when installing drain lines to prevent water from flowing back into the ice maker storage bin and/or potentially flowing onto the floor causing water damage:
Gravity Drain
•Drain lines must have a 1 inch drop per 48 inches of run (1/4 inch per foot) and must not create traps.
•The floor drain must be large enough to accommodate drainage from all drains.
•Insulate the bin drain line to prevent condensation.
Figure 1 |
•Drain lines must have a 5/8 inch inside diameter.
6 Installation
Connecting a Drain Pump
If a gravity drain connection is not available, we strongly recommend the use of the Electrolux EIMP60 drain pump. The Electrolux EIMP60 drain pump is available through your Dealer, or direct from Electrolux with complete installation instructions. If a pump other than the Electrolux
EIMP60 drain pump is to be used, it must meet the following specifications:
•It must be UL listed and have a UL listed,
120 VAC, 3-wire grounded power cord.
•It must have overall maximum outside dimensions of 8-3/4” wide x 5-3/4” deep x 7-3/4” high.
•It must have a minimum flow rate of 15 gallons per hour at 10 feet of lift.
•It must have a sealed sump which does not allow water leakage in the case of a power outage, restricted drain or pump failure.
•It must have a check valve in the discharge line to prevent waste water return to the pump.
•It must have an overflow protection control which will shut off power to the ice maker in the event of a pump failure.
•It must have an operating temperature range of 50°F to 110°F (10°C to 43°C).
CAUTION
In the event of a power outage, restricted drain or pump failure, the failure to use the
Electrolux EIMP60 drain pump or a pump with the above listed specifications, could result in substantial water leakage and pooling with severe and costly water damage and related consequential damages and harm.

Site Preparation |
7 |
|
|
Preparing the Site
IMPORTANT
It is extremely important that the unit is level. If it is not level, the ice mold will not fill evenly. This can cause a reduction in ice rate, uneven sized cubes or water spilling into the storage area which will cause the ice in the bin to melt prematurely. Remember that floors near drains have a tendency to slope towards the drain.
1Position the unit on a flat, level surface, capable of supporting the entire weight of the unit. Remember that the unit will be significantly heavier once it is fully loaded.
2The surrounding air temperature must be at least 50°F (10°C) but must not exceed 110°F (43°C).
3The unit must not be located near heatgenerating equipment or in direct sunlight.
DANGER
ELECTROCUTION HAZARD!
Electrical Grounding Required. This appliance is equipped with a three prong (grounding) polarized plug for your protection against possible shock hazards.
•NEVER remove the round grounding prong from the plug.
•NEVER use a two-prong grounding adapter.
•NEVER use an extension cord to connect power to the unit.
Where a two-prong wall receptacle is encountered or a longer power cord is required, contact a qualified electrician to have it replaced in accordance with applicable electrical codes.
4The unit must be located to allow clearance for water, drain and electrical
connections in the rear of the ice maker.
5Connect the unit to a grounded and polarized 115 VAC, 60 Hz, 15 A circuit (normal household current).
6Avoid connecting the unit to a Ground Fault Interruptor (GFI). GFIs are prone to
nuisance tripping which will cause the unit to shut down. GFIs are generally not used on circuits which power equipment that must run unattended for long periods of time.
7The unit must be installed according to your local codes and ordinances.
NOTE
The door of the unit may be mounted on either side of the cabinet (see REVERSING THE DOOR). All units require zero clearance when installed flush with a cabinet or wall (see Figure 2). Electrolux stainless steel models require
a minimum 2-3/4 inch handle clearance when installed against a wall or cabinet that extends beyond the front edge of the unit (see Figure 3).
|
CABINET |
|
OR WALL |
DOOR |
|
SWING |
0" |
|
|
|
CLEARANCE |
Figure 2 |
NEEDED |
|
2 - 3/4” |
Figure 3 |
8Position the unit to allow free air flow through the front grille (see Figure 4).
9Wipe out inside of unit with a damp cloth.
EXHAUST |
Figure 4 |
INTAKE |
|
|
 Loading...