


Important
Please read this User’s Manual and Setup Manual (separate volume) carefully to familiarize yourself with safe and effective usage.
PRECAUTIONS
CONTENTS
Chapter 1 Features and Overview
1-1 Features
1-2 Buttons and Indicators
1-3 Functions and Basic Operation
Chapter 2 Settings and Adjustments
2-1 Utility Disk
2-2 ScreenAdjustment
2-3 ColorAdjustment
2-4 Off Timer/Power Saving Settings
2-5 Screen Size Selection
2-6 Power Indicator/EIZO Logo Display Setting
2-7 Locking Buttons
2-8 Disabling DDC/CI Communication
2-9 SettingAdjustment Menu Display
2-10 Setting Orientation
2-11 Viewing Information/Setting Language
2-12 Setting BrightRegulator
2-13 Resumption of Default Setting
Chapter 3 Connecting Cables
3-1 Connecting Two PCs to the Monitor
3-2 Connecting Peripheral USB Devices
Chapter 4 Troubleshooting
Chapter 5 Reference
5-1 Attaching anArm
5-2 |
Cleaning |
5-3 |
Specifications |
5-4 |
Glossary |
5-5 |
Preset Timing |
How to Setup
Please read the Setup Manual (separate volume)
SAFETY SYMBOLS
This manual uses the safety symbols below. They denote critical information. Please read them carefully.
WARNING |
CAUTION |
Failure to abide by the information in a WARNING |
Failure to abide by the information in a CAUTION |
may result in serious injury and can be life threatening. |
may result in moderate injury and/or property or |
|
product damage. |
Indicates a prohibited action. |
|
Indicates a mandatory action that must be followed. |
|
Copyright© 2007 EIZO NANAO CORPORATIONAll rights reserved.
No part of this manual may be reproduced, stored in a retrieval system, or transmitted, in any form or by any means, electronic, mechanical, or otherwise, without the prior written permission of EIZO NANAO CORPORATION. EIZO NANAO CORPORATION is under no obligation to hold any submitted material or information confidential unless prior arrangements are made pursuant to EIZO NANAO CORPORATION’s receipt of said information. Although every effort has been made to ensure that this manual provides up-to-date information, please note that EIZO monitor specifications are subject to change without notice.
ENERGY STAR is a U.S. registered mark.
Apple and Macintosh are registered trademarks of Apple Inc.
VGA is a registered trademark of International Business Machines Corporation.
DPMS and DDC/CI are trademarks and VESA is a registered trademark of Video Electronics Standards Association. Windows is a registered trademark of Microsoft Corporation.
PowerManager is a trademark of EIZO NANAO CORPORATION.
FlexScan, ScreenManager, i•Sound and EIZO are registered trademarks of EIZO NANAO CORPORATION in Japan and other countries.
As an ENERGY STAR® Partner, EIZO NANAO CORPORATION has determined that this product meets the ENERGY STAR guidelines for energy efficiency.
Product specification may vary with sales areas.
Confirm the specification in the manual written in language of the region of purchase.
 PRECAUTIONS
IMPORTANT
•This product has been adjusted specifically for use in the region to which it was originally shipped. If the product is used outside the region, it may not operate as specified in the specifications.
•To ensure personal safety and proper maintenance, please read carefully this section and the caution statements on the monitor.
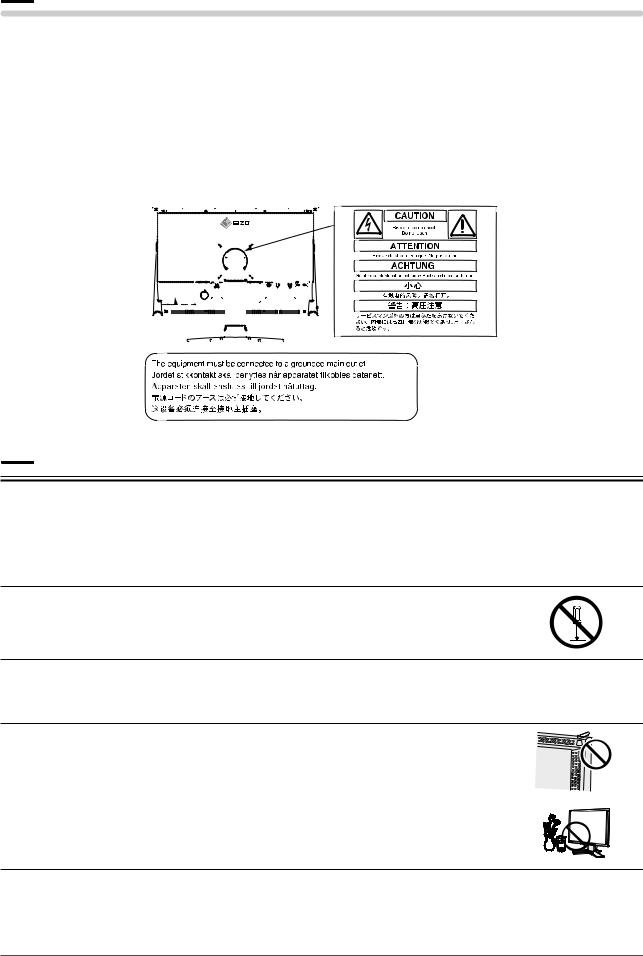
[Location of Caution Statement]
Ex. S2431W
 WARNING
If the unit begins to emit smoke, smells like something is burning, or makes strange noises, disconnect all power connections immediately and contact your dealer for advice.
Attempting to use a malfunctioning unit may result in fire, electric shock, or equipment damage.
Do not open the cabinet or modify the unit.
Opening the cabinet or modifying the unit may result in fire, electric shock, or burn.
Refer all servicing to qualified service personnel.
Do not attempt to service this product yourself as opening or removing covers may result in fire, electric shock, or equipment damage.
Keep small objects or liquids away from the unit.
Small objects accidentally falling through the ventilation slots into the cabinet or spillage into the cabinet may result in fire, electric shock, or equipment damage.
If an object or liquid falls/spills into the cabinet, unplug the unit immediately. Have the unit checked by a qualified service engineer before using it again.
PRECAUTIONS 1

 WARNING
Place the unit at the strong and stable place.
Aunit placed on an inadequate surface may fall and result in injury or equipment damage. If the unit falls, disconnect the power immediately and ask your dealer for advice. Do not continue using a damaged unit. Using a damaged unit may result in fire or electric shock.
Set the unit in an appropriate location.
Not doing so may result in fire, electric shock, or equipment damage.
•Do not place outdoors.
•Do not place in the transportation system (ship, aircraft, trains, automobiles, etc.)
•Do not place in a dusty or humid environment.
•Do not place in a location where the steam comes directly on the screen.
•Do not place near heat generating devices or a humidifier.
To avoid danger of suffocation, keep the plastic packing bags away from babies and children.
Use the enclosed power cord and connect to the standard power outlet of your country.
Be sure to remain within the rated voltage of the power cord. Not doing so may result in fire or electric shock.
To disconnect the power cord, grasp the plug firmly and pull.
Tugging on the cord may damage and result in fire or electric shock.
The equipment must be connected to a grounded main outlet.
Failure to do so may result in fire or electric shock.
Use the correct voltage.
•The unit is designed for use with a specific voltage only. Connection to another voltage than specified in this User’s Manual may cause fire, electric shock, or equipment damage.
•Do not overload your power circuit, as this may result in fire or electric shock.
2PRECAUTIONS

 WARNING
Handle the power cord with care.
•Do not place the cord underneath the unit or other heavy objects.
•Do not pull on or tie the cord.
If the power cord becomes damaged, stop using it. Use of a damaged cord may result in fire or electric shock.
Never touch the plug and power cord if it begins to thunder.
Touching them may result in electric shock.
When attaching an arm stand, please refer to the user’s manual of the arm stand and install the unit securely.
Not doing so may cause the unit to become unattached, which may result in injury or equipment damage. When the unit is dropped, please ask your dealer for advice. Do not continue using a damaged unit. Using a damaged unit may result in fire or electric shock. When reattaching the tilt stand, please use the same screws and tighten them securely.
Do not touch a damaged LCD panel directly with bare hands.
The liquid crystal that may leak from the panel is poisonous if it enters the eyes or mouth. If any part of the skin or body comes in direct contact with the panel, please wash thoroughly. If some physical symptoms result, please consult your doctor.
Lamps contain mercury, dispose according to local, state or federal laws.
PRECAUTIONS 3
 CAUTION
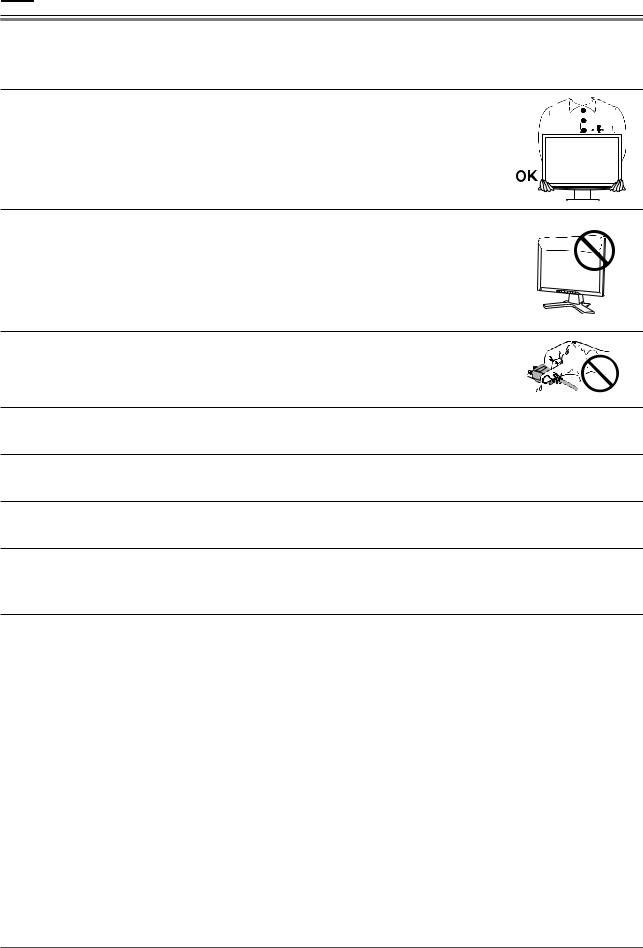
Handle with care when carrying the unit.
Disconnect the power cord and cables when moving the unit. Moving the unit with the cord attached is dangerous. It may result in injury.
When handling the unit, grip the bottom of the unit firmly with both hands ensuring the panel faces outward before lifting.
Dropping the unit may result in injury or equipment damage.
Do not block the ventilation slots on the cabinet.
•Do not place any objects on the ventilation slots.
•Do not install the unit in a closed space.
•Do not use the unit laid down or upside down.
Blocking the ventilation slots prevents proper airflow and may result in fire, electric shock, or equipment damage.
Do not touch the plug with wet hands.
Doing so may result in electrical shock.
Use an easily accessible power outlet.
This will ensure that you can disconnect the power quickly in case of a problem.
Periodically clean the area around the plug.
Dust, water, or oil on the plug may result in fire.
Unplug the unit before cleaning it.
Cleaning the unit while it is plugged into a power outlet may result in electric shock.
If you plan to leave the unit unused for an extended period, disconnect the power cord from the wall socket after turning off the power button for the safety and the power conservation.
4PRECAUTIONS

Notice for this monitor
In order to suppress the luminosity change by long-term use and to maintain the stable luminosity, use of a monitor in lower brightness is recommended.
The LCD panel is manufactured using high-precision technology. However, note that the appearance of any missing pixels or lit pixels does not indicate damage to the LCD monitor.
Percentage of effective pixels: 99.9994% or higher.
The backlight of the LCD panel has a fixed life span. When the screen becomes dark or begins to flicker, please contact your dealer.
Do not press on the panel or edge of the frame strongly, as this may result in the display malfunction, such as the interference patterns, etc. If pressure is continually applied to the LCD panel, it may deteriorate or damage your LCD panel. (If the pressure marks remain on the LCD panel, leave the monitor with a white or black screen. The symptom may disappear.)
Do not scratch or press on the panel with any sharp objects, such as a pencil or pen as this may result in damage to the panel. Do not attempt to brush with tissues as this may scratch the LCD panel.
When the monitor is cold and brought into a room or the room temperature goes up quickly, dew condensation may occur inside and outside the monitor. In that case, do not turn the monitor on and wait until dew condensation disappears, otherwise it may cause damage to the monitor.
When the screen image is changed after displaying the same image for extended periods of time, an afterimage may appear. Use the screen saver or timer to avoid displaying the same image for extended periods of time.
To use the monitor comfortably
An excessively dark or bright screen may affect your eyes.Adjust the brightness of the monitor according to the environmental conditions.
Staring at the monitor for a long time tires your eyes. Take a 10-minute rest every hour.
PRECAUTIONS 5

CONTENTS
PRECAUTIONS ...................................................... |
1 |
||
..............................................Notice for this monitor |
5 |
||
To use the monitor comfortably............................... |
5 |
||
Chapter 1 |
Features and Overview ..................... |
7 |
|
1-1 |
............................................................Features |
7 |
|
1-2 |
Buttons and Indicators.................................... |
7 |
|
1-3 |
Functions and Basic Operation...................... |
8 |
|
Chapter 2 |
Settings and Adjustments .............. |
11 |
|
2-7 |
Locking Buttons ............................................ |
21 |
● To lock operation [Adjustment Lock]................. |
21 |
|
2-8 |
Disabling DDC/CI Communication............... |
22 |
● To disable DDC/CI communication................... |
22 |
|
2-9 |
Setting Adjustment Menu Display................ |
22 |
● To update menu settings |
|
|
|
[Menu Size/Menu Position/Menu Off Timer/ |
|
|
Translucent]...................................................... |
22 |
2-10 |
Setting Orientation ........................................ |
23 |
● To set the orientation of the Adjustment menu |
|
|
|
[Orientation]...................................................... |
23 |
2-11 |
Viewing Information/Setting Language....... |
23 |
2-1 |
Utility Disk....................................................... |
11 |
|
● Disk contents and software overview................ |
11 |
|
● To use ScreenManager Pro for LCD................. |
11 |
2-2 |
Screen Adjustment........................................ |
12 |
Digital Input.......................................................... |
12 |
|
Analog Input ........................................................ |
12 |
|
2-3 |
Color Adjustment........................................... |
15 |
Simple adjustment [FineContrast mode].......... |
15 |
|
|
● FineContrast Mode........................................... |
15 |
|
● To select FineContrast mode............................ |
15 |
● To check settings, usage time, etc. |
|
[Information] ..................................................... |
23 |
● To set a language to be displayed |
|
[Language] ....................................................... |
23 |
2-12 Setting BrightRegulator................................ |
24 |
● To set automatic brightness adjustment |
|
[BrightRegulator] .............................................. |
24 |
2-13 Resumption of Default Setting..................... |
24 |
● To reset color adjustment [Reset]..................... |
24 |
● To reset all settings [Reset].............................. |
24 |
Advanced Adjustments [Adjustment menu]..... |
16 |
Chapter 3 |
Connecting Cables.......................... |
25 |
|
.......● To select an appropriate mode for images |
16 |
|
|
|
|
● To set/adjust color ............................................ |
17 |
3-1 |
Connecting Two PCs to the Monitor |
25 |
|
|
|
||||
2-4 Off Timer/Power Saving Settings |
18 |
● |
To set input signal selection [Input Signal] ....... |
26 |
|
|
|
|
|
||
● To set monitor power-off time [Off Timer] ......... |
18 |
3-2 |
Connecting Peripheral USB Devices |
26 |
|
● To set monitor power-saving |
|
||||
|
|
|
|
|
|
[VESA DPMS/DVI DMPM]................................ |
19 |
Chapter 4 |
Troubleshooting............................... |
27 |
|
....................................2-5 Screen Size Selection |
20 |
|
|
|
|
● To change screen size [Screen Size]............... |
20 |
Chapter 5 |
Reference ......................................... |
30 |
|
● To adjust brightness of non-display area |
|
|
|
|
|
[Border Intensity].............................................. |
20 |
5-1 |
Attaching an Arm........................................... |
30 |
|
2-6 Power Indicator/EIZO Logo Display Setting |
|
......................................................................... |
21 |
● To turn off the Power indicator while a screen is |
|
displayed [Power Indicator].............................. |
21 |
● To display EIZO logo [EIZO Logo Appearing |
|
Function]........................................................... |
21 |
5-2 |
Cleaning.......................................................... |
31 |
5-3 |
Specifications ................................................ |
32 |
5-4 |
Glossary ......................................................... |
38 |
5-5 |
Preset Timing................................................. |
40 |
6CONTENTS
Chapter 1 Features and Overview
Thank you very much for choosing an EIZO color LCD monitor.
1-1 Features
•20.1"(S2031W)/24.1"(S2431W) wide format LCD
•Applicable to HDCP
•Stereo speakers
•Dual-input compliant (DVI-I and D-Sub mini 15-pin connectors)
•DVI digital input (TMDS) compliant
•Horizontal scan frequency,Vertical scan frequency and Resolution are as follows;
Horizontal scan |
Analog |
S2031W |
24 |
- 82 kHz |
|||
frequency |
|
|
|
|
|
||
|
S2431W |
24 |
- 94 kHz |
||||
|
Digital |
S2031W |
31 |
- 65 kHz |
|||
|
|
S2431W |
31 |
- 76 kHz |
|||
Vertical scan |
Analog |
S2031W |
49 |
- 86 Hz |
|
49 - 61 Hz (1680 × 1050) |
|
frequency |
|
|
49 |
- 76 |
Hz |
(1280 × 1024) |
|
|
|
S2431W |
49 |
- 86 |
Hz |
|
49 - 61 Hz (1920 × 1200) |
|
|
|
49 |
- 76 |
Hz |
(1600 × 1200) |
|
|
Digital |
S2031W |
59 |
- 61 |
Hz |
(VGATEXT 69 - 71 Hz) |
|
|
|
S2431W |
59 |
- 61 Hz (VGATEXT 69 - 71 Hz) |
|||
Resolution |
S2031W |
1680 dots × 1050 lines |
|||||
|
S2431W |
1920 dots × 1200 lines |
|||||
• Compatible with frame synchronization mode 59 - 61 Hz
* Only if the [Full Screen] is selected from the <Screen Size>.
•Portrait/Landscape display available (rotate 90 degrees clockwise)
•Smoothing (soft - sharp) function for adjustment of enlarged images
•FineContrast mode to allow the best mode for screen display
•The utility software “ScreenManager Pro for LCD” (for Windows) to control the monitor from a PC with mouse/keyboard is included (refer to the EIZO LCD Utility Disk).
•BrightRegulator function incorporate
•SelfAutoAdjust function incorporate
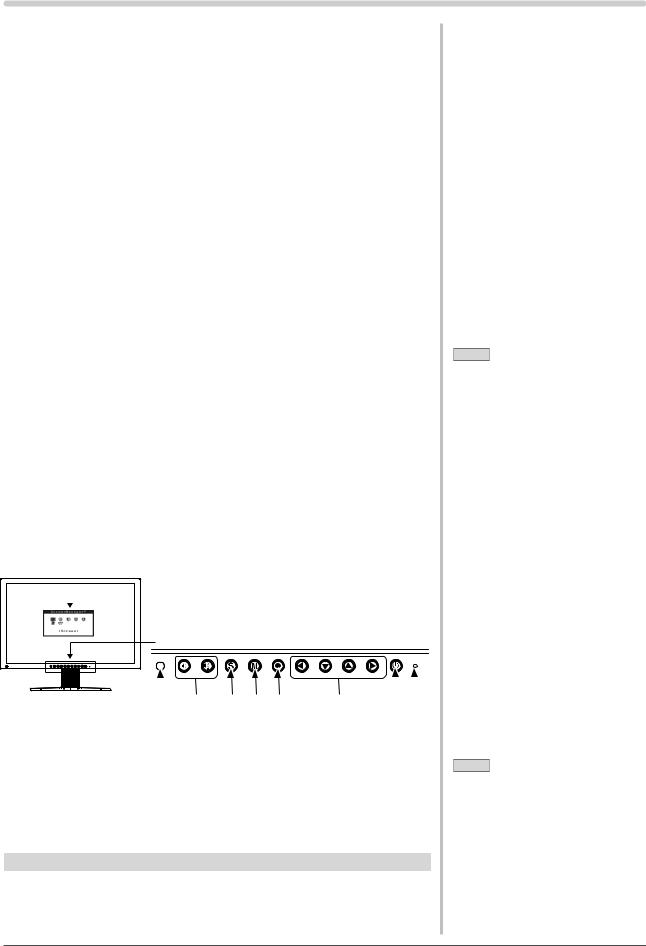
1-2 Buttons and Indicators
 Adjustment menu (*ScreenManager ® )
Button
|
|
|
|
|
|
|
|
|
|
|
|
|
|
|
|
|
|
|
|
|
|
1 |
2 |
3 |
4 |
5 |
6 |
7 |
8 |
|||
1.Sensor (BrightRegulator)
2.Volume control button (Up, Down)
3.Input signal selection button
4.Mode button
5.Enter button
6.Control buttons (Left, Down, Up, Right)
7.Power button
8.Power indicator
Indicator status |
Operation status |
Blue |
The screen is displayed |
Orange |
Power saving |
Off |
Power off |
*ScreenManager ® is an EIZO’s nickname of theAdjustment menu.
NOTE
•This monitor supports the Portrait/ Landscape display. This function allows you to change the orientation of theAdjustment menu when using the monitor screen in vertical display position. (Refer to “To set the orientation of theAdjustment menu [Orientation]” on page 23.)
•If you use the monitor with “Portrait” position, the setting may be required to change depending on the graphics board used in your PC. Refer to the manual of the graphics board for details.
•Select “Portrait” for <Orientation> on <Others> menu of theAdjustment menu to turn the menu 90 degrees.
NOTE
•While the screen is displayed, the power indicator that is lighting blue can be turned off (see “To turn off the Power indicator while a screen is displayed [Power Indicator]” on page 21).
•For the power indicator status with “Off Timer” set, refer to “To set monitor power-off time [Off Timer]” on page 18.
Chapter 1 Overview and Features |
7 |

1-3 Functions and Basic Operation To adjust the screen and color
Main menu (Refer to page 10 for operation) |
Analog input only |
[At analog signal input]
[At digital signal input]
•TheAdjustment menu and the FineContrast mode name cannot be displayed at the same time.
 FineContrast mode
Color Adjustment |
Page 15 |
Simple Adjustment [FineContrast mode]
This function allows easy selection of a desired mode from five modes according to monitor application.
Brightness Adjustment |
Page 16 |
||
Press |
or |
to adjust brightness. |
|
Volume Adjustment
Press  or
or  to adjust volume.
1 Screen Adjustment |
Page 12 |
(Automatic Adjustment) |
|
●To adjust flickering and position
[Screen]………………………………see page 12
●To adjust color gradation automatically
[Range] ………………………………see page 14
2 Screen Adjustment |
Page 13 |
(Advanced Adjustment) |
|
[At analog signal input] [At digital signal input]
●To eliminate vertical bars [Clock*]…see page 13
●To remove flickering or blurring [Phase*]………………………………see page 13
●To correct screen position
[Position*] ……………………………see page 13
●To modify blurred characters/lines
[Smoothing] …………………………see page 14
●To set when a noise appears on the screen
[Signal Filter*] ………………………see page 27
*Items marked with * can be adjusted with analog input.
Color Adjustment |
Page 16 |
Advanced Adjustment |
|
●“Brightness”, “Contrast”, “Temperature”, “Gamma”, “Saturation”, “Hue” and “Gain” can be set for each mode (Custom/sRGB/Text/Picture/ Movie).
Settable functions vary with the display mode.
Resuming the default settings
● To reset color adjustment [Reset] …see page 24
8 |
Chapter 1 Overview and Features |
To make useful settings/adjustments
Adjustment menu (Refer to page 10 for operation) |
|
|
|
Power-save Settings |
|
[At analog signal input] |
Page 19 |
|
|
|
[At digital signal input]
Information |
Page 23 |
● To check settings, usage time, etc. [Information]
Language |
Page 23 |
● To set a language to be displayed [Language]
EIZO Logo Display Setting
●To display EIZO logo [EIZO Logo Appearing Function] ……………………………… see page 21
Locking Adjustment
●To lock operation [Adjustment Lock]… see page 21
Disabling DDC/CI Communication
●To disable DDC/CI communication … see page 22
Connecting Signal Cables
●Connecting Two PCs to the Monitor… see page 25
●Connecting Peripheral USB Devices… see page 26
●To set monitor power-saving [VESA DPMS/DVI DMPM]
Set the off timer
● To set monitor power-off time [Off Timer]
………………………………………see page 18
Change the screen size
●To change screen size [Screen Size]
………………………………………see page 20
●To adjust brightness of non-display area [Border Intensity] ……………………see page 20
BrightRegulator Setting
●To set automatic brightness adjustment [BrightRegulator] ……………………see page 24
Orientation Setting
●To set the orientation of the Adjustment menu [Orientation] …………………………see page 23
Power Indicator Setting
● To turn off the Power indicator while a screen is displayed [Power Indicator] ………see page 21
Adjustment menu settings
●To update menu settings [Menu Size/Menu Position/Menu Off Timer/
Translucent] …………………………see page 22
Resume the factory default settings
● To reset all settings [Reset] ………see page 24
Setting Input Signal Selection
● To set input signal selection [Input Signal]
………………………………………see page 26
Chapter 1 Overview and Features |
9 |

Basic operation of Adjustment menu
[Displaying Adjustment menu and selecting function]
(1)Press  . The Main menu appears.
(2)Select a function with  /
/  /
/  /
/  , and press
  . The Sub menu appears.
(3)Select a function with  /
/  /
/  /
/  , and press
  . The adjustment/setting menu appears.
(4)Adjust the selected item with  /
/  /
/  /
/  , and press
  . The setting is saved.
[Exiting Adjustment menu]
(1)Choose <Return> from the Sub menu and press  . The Main menu appears.
(2)Choose <Exit> from the Main menu and press  . TheAdjustment menu quits.
NOTE
•TheAdjustment menu can also be exited by pressing  twice quickly.
•<Exit> or <Return> can also be selected by pressing  twice in the Main menu or Sub menu.
10 Chapter 1 Overview and Features

Chapter 2 Settings and Adjustments
2-1 Utility Disk
An “EIZO LCD Utility Disk” (CD-ROM) is supplied with the monitor. The following table shows the disk contents and the overview of the application software programs.
● Disk contents and software overview
The disk includes color profiles, application software programs for adjustment, and User’s Manual. Refer to “Readme. txt” or the “read me” file on the disk for software startup procedures or file access procedures.
Item |
Overview |
For Windows |
For Macintosh |
A “Readme.txt” or “read me” file |
|
|
|
|
|
|
|
Color Profiles (ICC Profiles) |
A specific file including the color |
|
|
|
characteristic information for the monitor. |
||
|
|
|
|
Screen Adjustment Program |
Available for easy adjustments of the |
|
|
|
monitor screen following adjustment |
|
|
|
patterns and procedures on the screen. |
|
|
ScreenManager Pro for LCD |
A utility software program to control |
|
|
(for Windows) |
monitor adjustments from a PC using its |
|
|
|
mouse and keyboard. |
|
|
|
(A PC must be connected to the monitor |
|
|
|
with the supplied USB cable.) Refer to |
|
− |
|
the description later. |
|
|
WindowMovie Checker Software |
WindowMovie is a function of |
|
|
|
ScreenManager Pro for LCD. |
|
|
|
For more information, refer to the User’s |
|
|
|
Manual of ScreenManager Pro for LCD |
|
|
|
on the disk. |
|
|
User’s Manual of this monitor (PDF file)
● To use ScreenManager Pro for LCD
For the installation and use of ScreenManager Pro for LCD, refer to its User’s Manual on the disk.
To adjust the monitor using ScreenManager Pro for LCD, connect a PC to the monitor with the supplied USB cable. For more information, refer to the “Chapter 3 3-2 Connecting Peripheral USB Devices”.
Chapter 2 Settings and Adjustments 11
2-2 Screen Adjustment
Digital Input
When digital signals are input, images are displayed correctly based on the preset data of the monitor. No screenAdjustment is required.
Analog Input
The monitor screen adjustment is used to suppress flickering of the screen or adjust screen position and screen size correctly according to the PC to be used. To use the monitor comfortably, adjust the screen when the monitor is set up for the first time or when the settings of the PC in use are updated.
The auto-adjustment function works in the following cases:
•When a signal is input into the monitor for the first time
•When a signal is input into the monitor for the first time after the resolution or refresh rate of input signals is changed
[Adjustment Procedure]
 Automatic Adjustment
1To adjust screen automatically [Screen]
(1)Choose <Screen> from the <AutoAdjustment> menu, and press  .
.
(2)Choose <Execute> with  or
or  , and press
  .
.
Flickering, screen position, and screen size are corrected by the autoadjustment function.
If satisfactory adjustment cannot be obtained with the autoadjustment function, perform the adjustment following the procedure below. When the screen is displayed correctly, go to step 4 “Range Adjustment”.
 Advanced Adjustment
2Run the Screen Adjustment Program.
Load the EIZO LCD Utility Disk on the PC, and start the Screen Adjustment Program compatible with the PC in use.
After the program starts up, perform the adjustment in step 3 following the instructions of the program.
Attention
•Wait 30 minutes or more from monitor power on before starting adjustments.
NOTE
•Use “ScreenAdjustment Program” on the supplied EIZO LCD Utility Disk.
Attention
•Auto-adjustment function does not work for the images under the resolution of 800 to 600 (SVGA).
Attention
•This function works correctly when an image is fully displayed over the Windows or Macintosh display area. It does not work properly when an image is displayed only on a part of the screen (DOS prompt window, for example) or when a black background (wallpaper, etc.) is in use.
•This function does not work correctly with some graphics boards.
•“Auto in Progress” appears on the screen during auto adjustment.
NOTE
•For how to start the Screen Adjustment Program, refer to “Readme.txt” or the “read me” file. When you are using a Windows PC, you can run the program directly from the start menu of the disk.
•If no adjustment program is available for your PC, display a checkerboard pattern on the screen (see below) and go to the following steps.
12 Chapter 2 Settings and Adjustments
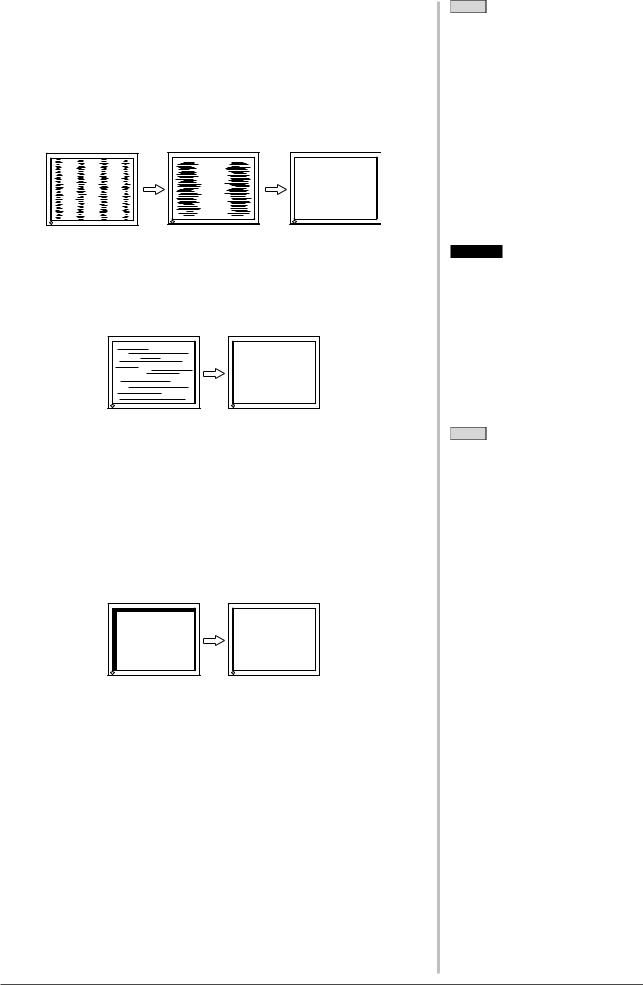
3Perform advanced adjustments for the following using the <Screen> menu of the Adjustment menu.
●To eliminate vertical bars [Clock]
(1)Choose <Clock> from the <Screen> menu, and press  .
.
The <Clock> menu appears.
(2)Adjust the clock with  or
or  , and press
  .
.
The adjustment is completed.
●To remove flickering or blurring [Phase]
(1)Choose <Phase> from the <Screen> menu, and press  .
.
The <Phase> menu appears.
(2)Adjust the phase with  or
or  , and press
  .
.
The adjustment is completed.
●To correct screen position [Position]
Since the number of pixels and the pixel positions are fixed on the LCD monitor, only one position is provided to display images correctly. The position adjustment is made to shift an image to the correct position.
(1)Choose <Position> from the <Screen> menu, and press  .
.
The <Position> menu appears.
(2)Adjust the position with  /
/  /
/  /
/  to display the image properly in the display area of the monitor.
NOTE
•Press the control button slowly so as not to miss the adjustment point.
•When blurring, flickering or bars appear on the screen after adjustment, proceed to [Phase] to remove flickering or blurring.
Attention
•Flickering or blurring may not be eliminated depending on your PC or graphics board.
NOTE
•When vertical bars appear on the screen after adjustment, go back to “To eliminate vertical bars [Clock].” (Clock → Phase → Position)
Chapter 2 Settings and Adjustments 13
 Loading...