


Setup Manual
Important: Please read PRECAUTIONS, this Setup Manual and the User’s Manual stored on the CD-ROM carefully to familiarize yourself with safe and effective usage. Please retain this manual for future reference.
Installationshandbuch
Wichtig: Lesen Sie die VORSICHTSMASSNAHMEN, dieses Handbuch zur Einrichtung und das Benutzerhandbuch (auf der CD-ROM) aufmerksam durch, um sich mit der sicheren und effizienten Bedienung vertraut zu machen. Bewahren Sie dieses Handbuch zum späteren Nachschlagen auf.
Manuel d’installation
Important : Veuillez lire attentivement les PRECAUTIONS, ce Manuel d’installation ainsi que le Manuel d’utilisation inclus sur le CD-ROM, afin de vous familiariser avec ce produit et de l’utiliser efficacement et en toute sécurité. Veuillez conserver ce manuel pour référence ultérieure.
Manual de instalación
Importante: Lea detenidamente el apartado PRECAUCIONES, el Manual de instalación y el Manual del usuario que encontrará en el CD-ROM para familiarizarse con las normas de seguridad y los procedimientos de uso. Conserve este manual para consultas posteriores.
Manuale di installazione
Importante: leggere attentamente la sezione PRECAUZIONI, il presente Manuale di installazione e il Manuale dell’utente memorizzati sul CD-ROM per utilizzare il prodotto in modo efficace e sicuro. Conservare il manuale per consultazioni future.
Installationshandboken
Viktigt: Läs försiktighetsåtgärderna, den här installationshandboken och användarhandboken som finns på CD-skivan noggrant så att du känner dig säker och får ett effektivt användande av produkten. Behåll manualen för framtida behov.
Εγχειρίδιο εγκατάστασης
Σημαντικό: Διαβάστε προσεκτικά τις ΠΡΟΦΥΛΑΞΕΙΣ, το Εγχειρίδιο εγκατάστασης και το Εγχειρίδιο χρήστη που θα βρείτε στο CD-ROM προκειμένου να εξοικειωθείτε με την ασφαλή και αποτελεσματική χρήση της συσκευής. Διατηρήστε αυτό το εγχειρίδιο για μελλοντική χρήση.
Руководство по установке
Важно! Внимательно прочитайте МЕРЫ ПРЕДОСТОРОЖНОСТИ, настоящее Руководство по установке и Руководство пользователя на CD-ROM для получения сведений о безопасной и эффективной эксплуатации. Сохраните это руководство для справки.
全、有效地使用本产品。请保留本手册、以便今后参考。
Greece Svenska Italiano Español Français Deutsch English
Russia

Compatible Resolutions/Frequencies |
Kompatibla upplösningar/frekvenser |
||||
KompatibleAuflösungen/Bildwiederholfrequenzen |
Συμβατές αναλύσεις/Συχνότητες |
||||
Résolutions/Fréquences compatibles |
Поддерживаемые разрешения/частоты |
||||
Frecuencias y resoluciones compatibles |
|
|
|||
Risoluzioni/Frequenze compatibili: |
|
|
|||
The monitor supports the following resolutions. |
Skärmen stöder följande upplösningar. |
||||
Der Monitor unterstützt die nachfolgend aufgeführtenAuflösungen. |
Η οθόνη υποστηρίζει τις παρακάτω αναλύσεις. |
||||
Le moniteur est compatible avec les résolutions suivantes. Монитор поддерживает следующие разрешения. |
|||||
El monitor admite las siguientes resoluciones. |
|
|
|||
Il monitor supporta le seguenti risoluzioni. |
|
|
|||
Analog Input |
|
|
|
|
|
Resolution |
Frequency |
|
Mode |
Dot Clock |
|
640 |
× 480 |
67 Hz |
|
Apple Macintosh |
|
640 |
× 480 |
~85 Hz |
|
VGA, VESA |
|
720 |
× 400 |
70 Hz |
|
VGA TEXT |
|
800 |
× 600 |
~85 Hz |
|
VESA |
|
832 |
× 624 |
75 Hz |
|
Apple Macintosh |
|
1024 |
× 768 |
~85 Hz |
|
VESA |
|
1152 |
× 864 |
75 Hz |
|
VESA |
202.5 MHz (Max.) |
1152 |
× 870 |
75 Hz |
|
Apple Macintosh |
|
|
|
||||
1280 |
× 960 |
60 Hz |
|
VESA |
|
1280 |
× 960 |
75 Hz |
|
Apple Macintosh |
|
1280 |
× 1024 |
~85 Hz |
|
VESA |
|
1600 |
× 1200 |
~75 Hz |
|
VESA |
|
*2 1680 |
× 1050 |
60 Hz |
|
VESA CVT, VESA CVT RB |
|
*1 *2 1920 |
× 1200 |
60 Hz |
|
VESA CVT, VESA CVT RB |
|
Digital Input |
|
|
|
|
|
Resolution |
Frequency |
|
Mode |
Dot Clock |
|
640 |
× 480 |
60 Hz |
|
VGA |
|
720 |
× 400 |
70 Hz |
|
VGA TEXT |
|
800 |
× 600 |
60 Hz |
|
VESA |
|
1024 |
× 768 |
60 Hz |
|
VESA |
|
1280 |
× 960 |
60 Hz |
|
VESA |
162 MHz (Max.) |
1280 |
× 1024 |
60 Hz |
|
VESA |
|
|
|
||||
1600 |
× 1200 |
60 Hz |
|
VESA |
|
*2 1680 |
× 1050 |
60 Hz |
|
VESA CVT, VESA CVT RB |
|
*1 *2 1920 |
× 1200 |
60 Hz |
|
VESA CVT RB |
|
1920 |
× 1080p |
50, 60 Hz |
|
1080p |
|
*1 Recommended resolution (Set this resolution)
*1 Empfohlene Auflösung (diese Auflösung festlegen)
*1 Résolution recommandée (Réglez votre appareil sur cette résolution) *1 Resolución recomendada (ajuste esta resolución)
*1 Risoluzione consigliata (impostare questo valore di risoluzione) *1 Rekommenderad upplösning (Ställ in den här upplösningen) *1 Προτεινόμενη ανάλυση (Επιλέξτε αυτή την ανάλυση)
*1 Рекомендованное разрешение (Установите данное разрешение)
*1 ( )
*2 When displaying the wide format input signal, a graphics board in conformance with VESA CVT standard is required. *2 ZurAnzeige des Eingangssignals für das Breitbild ist eine Grafikkarte erforderlich, die dieAnforderungen des Standards VESACVTerfüllt. *2 Lors de l’affichage du signal d’entrée format large, une carte vidéo conforme à la norme VESA CVT est requise.
*2 Se necesita una tarjeta gráfica compatible con el estándar VESACVT para visualizar la señal de entrada con formato panorámico. *2 Per visualizzare il segnale di ingresso in formato ampio, è necessaria una scheda grafica conforme allo standard VESACVT.
*2 Vid visning med ingångssignalen för bredbildsformat, krävs ett grafikkort som uppfyller VESA CVT-standard.
*2 Όταν εμφανίζεται το σήμα εισόδου οθόνης μεγάλου μεγέθους, απαιτείται κάρτα γραφικών συμβατή με το πρότυπο VESACVT.
*2 Для отображения широкоформатного входного сигнала графическая карта должна соответствовать стандарту VESACVT.
*2 VESA CVT
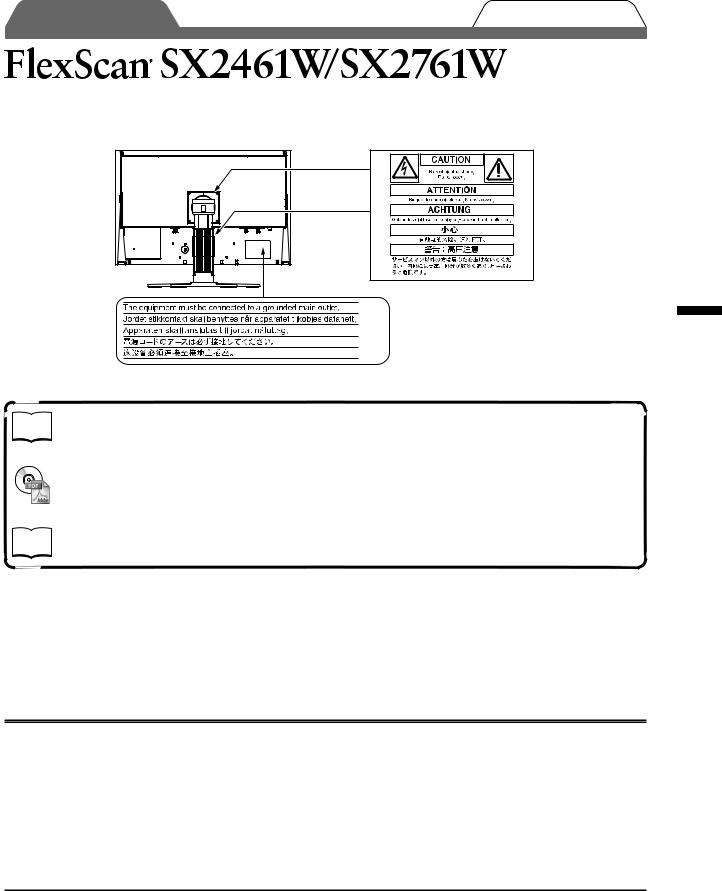
Prior to use
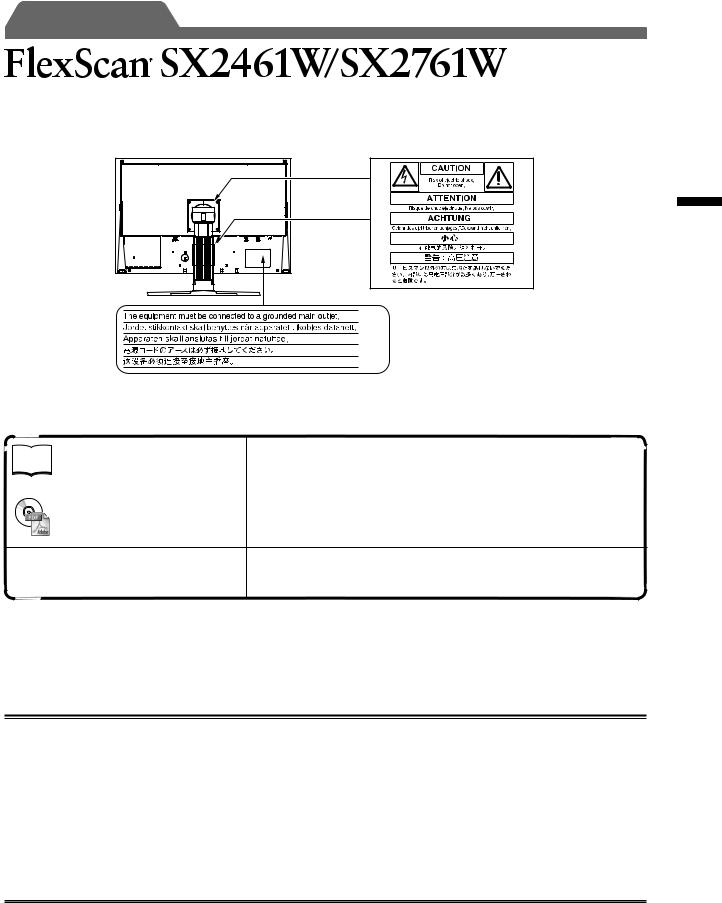
Color LCD Monitor
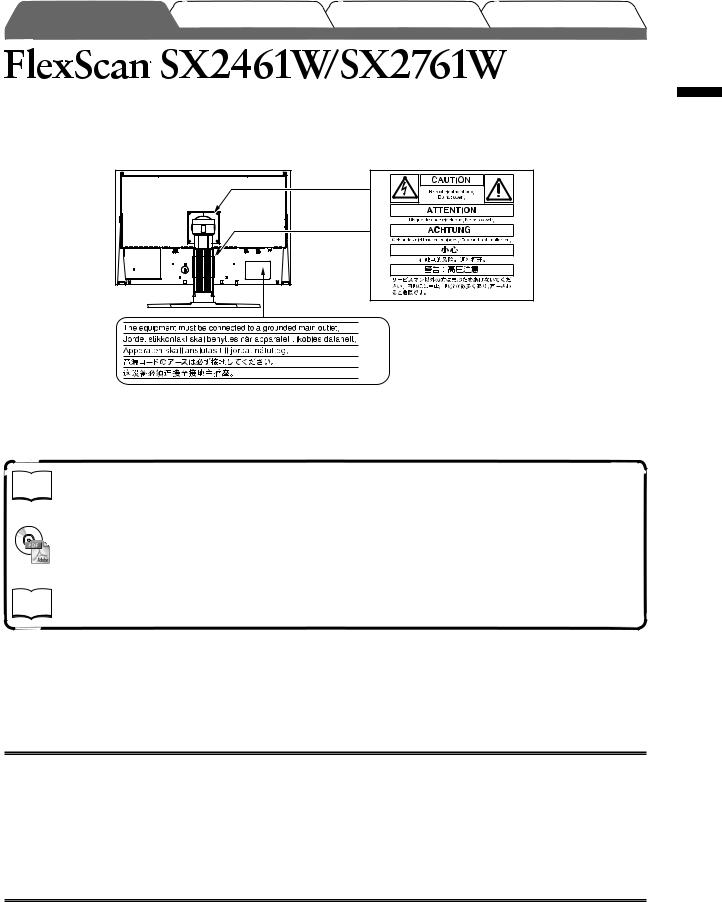
[Location of Caution Statement]
(SX2461W)
(SX2761W)
About Setup Manual and User’s Manual
|
Setup Manual |
Describes basic information ranging from connection of the monitor to a |
|
||
|
(this manual) |
PC to using the monitor. |
|
|
|
|
User’s Manual |
Describes application information such as screen adjustments, settings, |
|
(PDF file on the EIZO LCD |
|
|
and specifications. |
|
|
Utility Disk (CD-ROM)*) |
|
|
PRECAUTIONS |
Describes how to use the monitor safely. |
|
||
|
|
|
*Installation of Adobe Reader is required.
• Product specifications vary with sales areas. Confirm that the manual is written in the language of the area of purchase.
Copyright© 2007 EIZO NANAO CORPORATION All rights reserved.
No part of this manual may be reproduced, stored in a retrieval system, or transmitted, in any form or by any means, electronic, mechanical, or otherwise, without the prior written permission of EIZO NANAO CORPORATION. EIZO NANAO CORPORATION is under no obligation to hold any submitted material or information confidential unless prior arrangements are made pursuant to EIZO NANAO CORPORATION’s receipt of said information.
Although every effort has been made to ensure that this manual provides up-to-date information, please note that EIZO monitor specifications are subject to change without notice.
ENERGY STAR is a U.S. registered mark.
Apple and Macintosh are registered trademarks of Apple Inc.
VGA is a registered trademark of International Business Machines Corporation.
DPMS is a trademark and VESA is a registered trademark of Video Electronics Standards Association. Windows and UniColor Pro are trademarks of Microsoft Corporation.
PowerManager is a trademark of EIZO NANAO CORPORATION.
FlexScan, ScreenManager, i•Sound and EIZO are registered trademarks of EIZO NANAO CORPORATION in Japan and other countries.
1
English
English
Prior to use
Package Contents
Check that all the following items are included in the packaging box. If any items are missing or damaged, contact your local dealer.
NOTE
• Please keep the packaging box and materials for future movement or transport of the monitor.
□Monitor
□Power cord
□Digital signal cable: FD-C39
□Analog signal cable: FD-C16
□EIZO USB cable: MD-C93
□EIZO LCD Utility Disk (CD-ROM)
•User’s Manual of this monitor
□UniColor Pro (CD-ROM)
•UniColor Pro User’s Manual
□Setup Manual (this manual)
□PRECAUTIONS
□Limited warranty
□Recycling Information
□Mounting Screws (M4 x 12mm, 4 pcs)
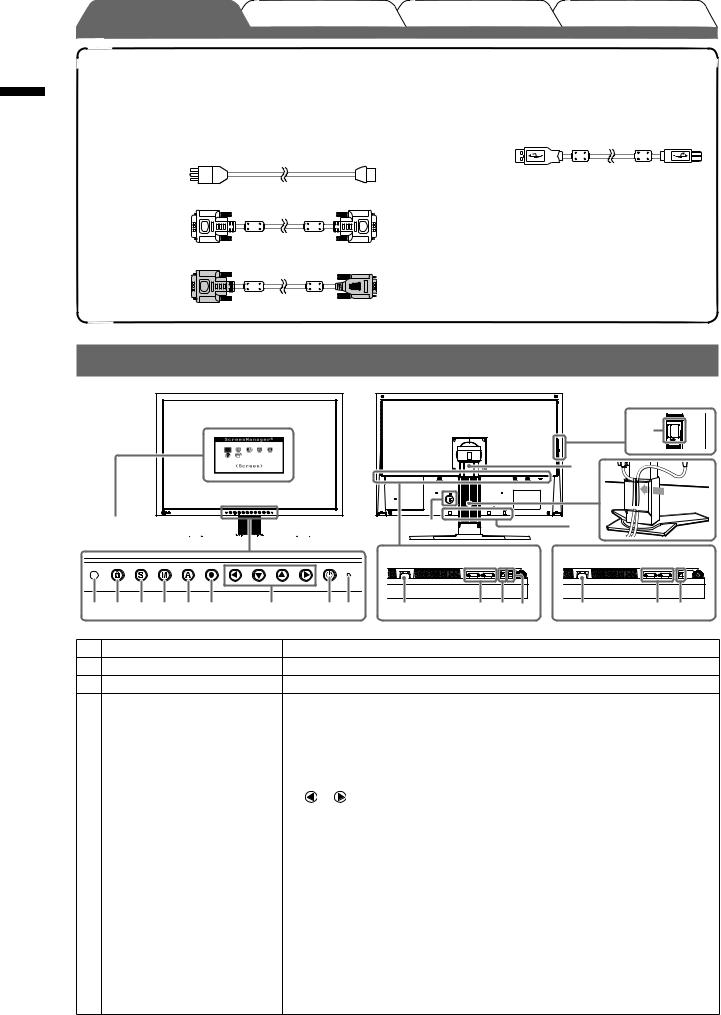
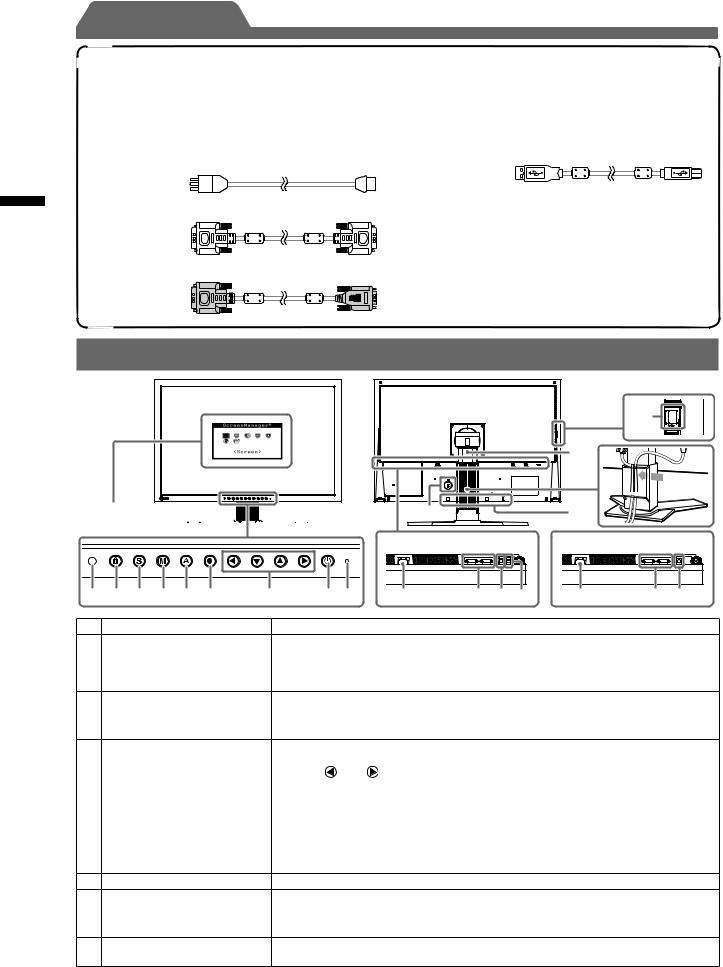
Controls and Functions
Adjustment menu  (*ScreenManager ®)


1 |
2 |
3 |
4 |
5 |
6 |
7 |
8 |
9 |
|
(SX2761W only) |
|
14 |
|
15 |
|
16 |
10 |
17 |
[SX2461W] |
[SX2761W] |
11 |
12 13 14 |
11 |
12 13 |
1 Sensor |
Detects ambient brightness. BrightRegulator function (page 5). |
2Adjustment Lock button Locks the buttons to retain the display mode or the status adjusted or set.
3Input Signal Selection button Switches input signals for display when two PCs are connected to the monitor.
4 |
Mode button |
Allows you to switch the display mode. |
|
|
5 |
Auto button |
Performs the function to adjust the screen automatically. (analog input only) |
||
6 |
Enter button |
Displays the Adjustment menu, determines an item on the menu screen, and |
||
|
|
saves values adjusted. |
|
|
7 |
Control buttons (Left, Down, |
• Chooses an adjustment item or increases/decreases adjusted values for |
||
|
Up, Right) |
advanced adjustments using the Adjustment menu (page 5). |
||
|
|
• or button: Displays the brightness adjustment window (page 5). |
||
8 |
Power button |
Turns the power on or off. |
|
|
9 |
Power indicator |
Indicates monitor’s operation status. |
|
|
|
|
Blue: Operating |
Orange: Power saving |
Off: Power off |
10 |
Security lock slot |
Complies with Kensington’s MicroSaver security system. |
||
11 |
Power connector |
Connects the power connector. |
|
|
12 |
Input signal connectors |
Left: Signal 1 (DVI-I connector), Right: Signal 2 (DVI-I connector) |
||
13 |
USB port (Up) |
Connect the PC to the monitor with a USB cable. |
|
|
14 |
USB Port (Down) |
Connects a peripheral USB device. |
|
|
15 |
Stand |
Used to adjust the height and angle of the monitor screen. |
||
16 |
Cable holder |
Covers the monitor cables. |
|
|
17 |
Option speaker (i·Sound L3) |
Used to attach the option speaker (i·Sound L3). (May not allowed to attach the |
||
|
mounting holes |
option speaker depending on the stand type.) |
|
|
* ScreenManager ® is an EIZO’s nickname of the Adjustment menu. (For how to use ScreenManager, refer to the User’s Manual on the EIZO LCD Utility Disk (CD-ROM).)
2
Attention
•When replacing the current monitor with a SX2461W/SX2761W monitor, be sure to change the PC settings for resolution and vertical frequency to those which are available for the SX2461W/SX2761W monitor referring to the resolution table (back of cover page) before connecting the PC.
NOTE
• When connecting two PCs to the monitor, refer to the User’s Manual on the EIZO LCD Utility Disk (CD-ROM).
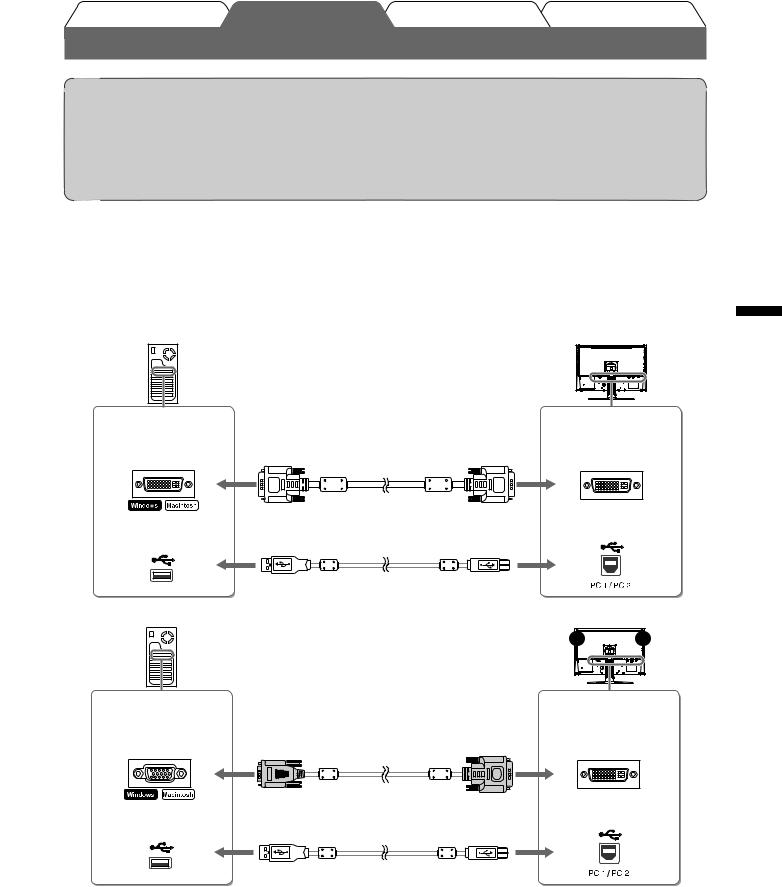
1 Check that the monitor and the PC are powered off.
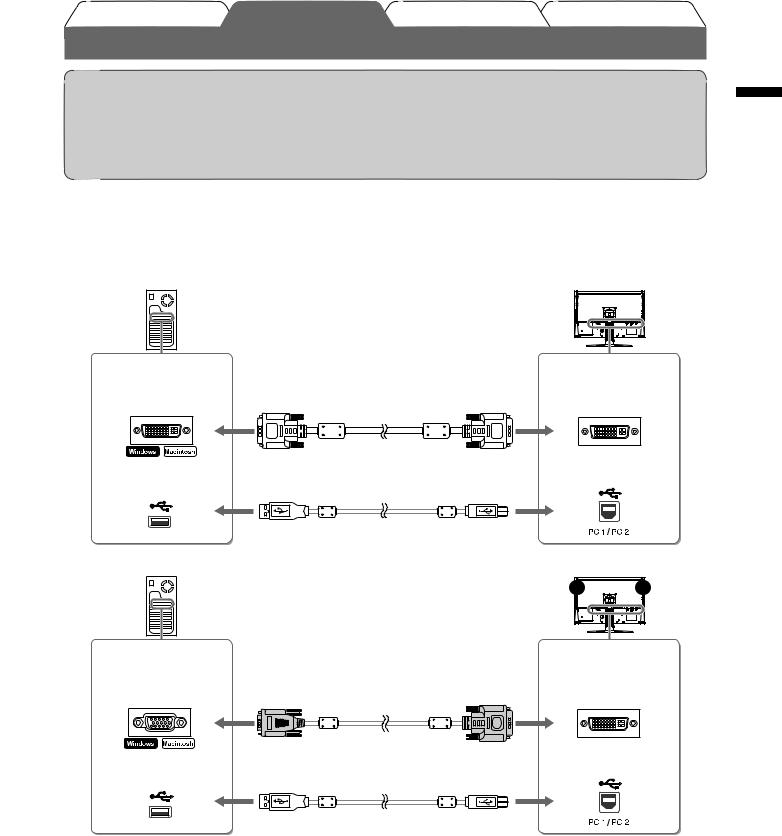
2 Connect the monitor to the PC with a signal cable that matches the connectors.
After connecting the cable connectors, tighten the screws of the connectors to secure the coupling.
Digital connection
Connectors on |
|
Connectors on |
the PC |
|
the monitor |
DVI connector |
Signal cable FD-C39 (supplied) |
DVI-I connector |
|
||
USB Downstream |
EIZO USB cable MD-C93 (supplied)* |
USB Upstream |
|
|
Analog connection |
|
|
Connectors on |
|
Connectors on |
|
the PC |
|
the monitor |
|
D-Sub mini 15-pin |
Signal cable FD-C16 (supplied) |
DVI-I connector |
|
connector |
|||
|
|||
USB Downstream |
EIZO USB cable MD-C93 (supplied)* |
USB Upstream |
|
|
*Required when using the UniColor Pro software and the ScreenManager Pro for LCD software. (Refer to the User’s Manual on the UniColor Pro (CD-ROM) or the EIZO LCD Utility Disk (CD-ROM).)
3 Plug the power cord into a power outlet and the Power connector on the monitor.
3
Setting/Adjustment
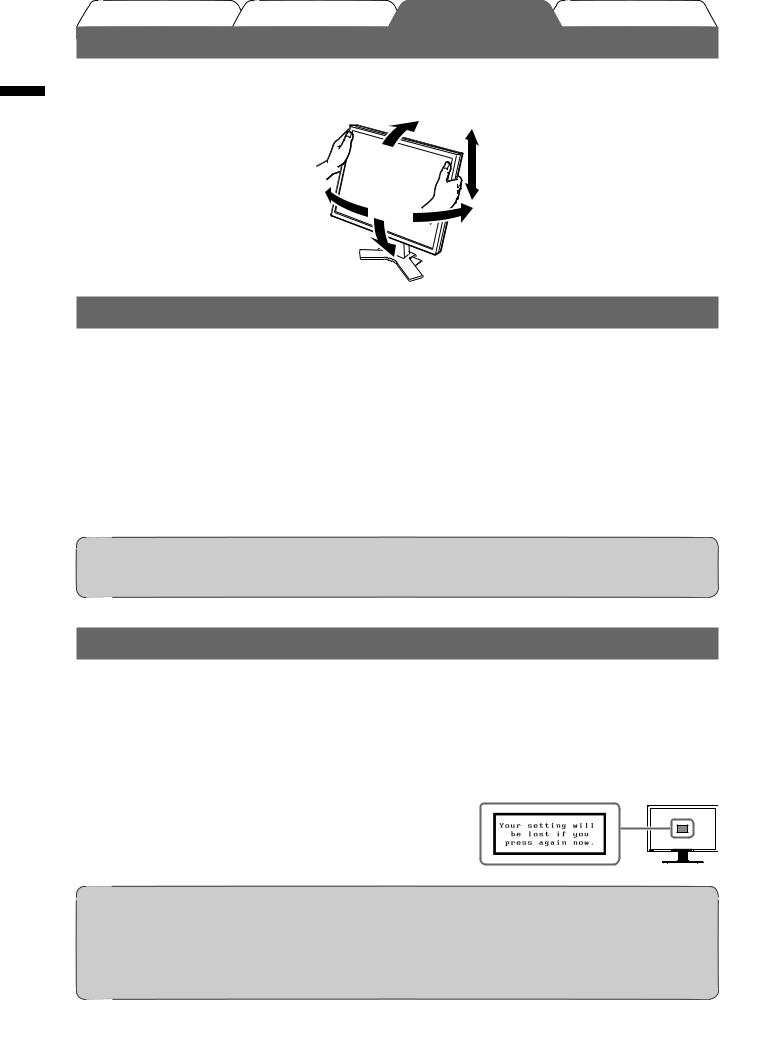
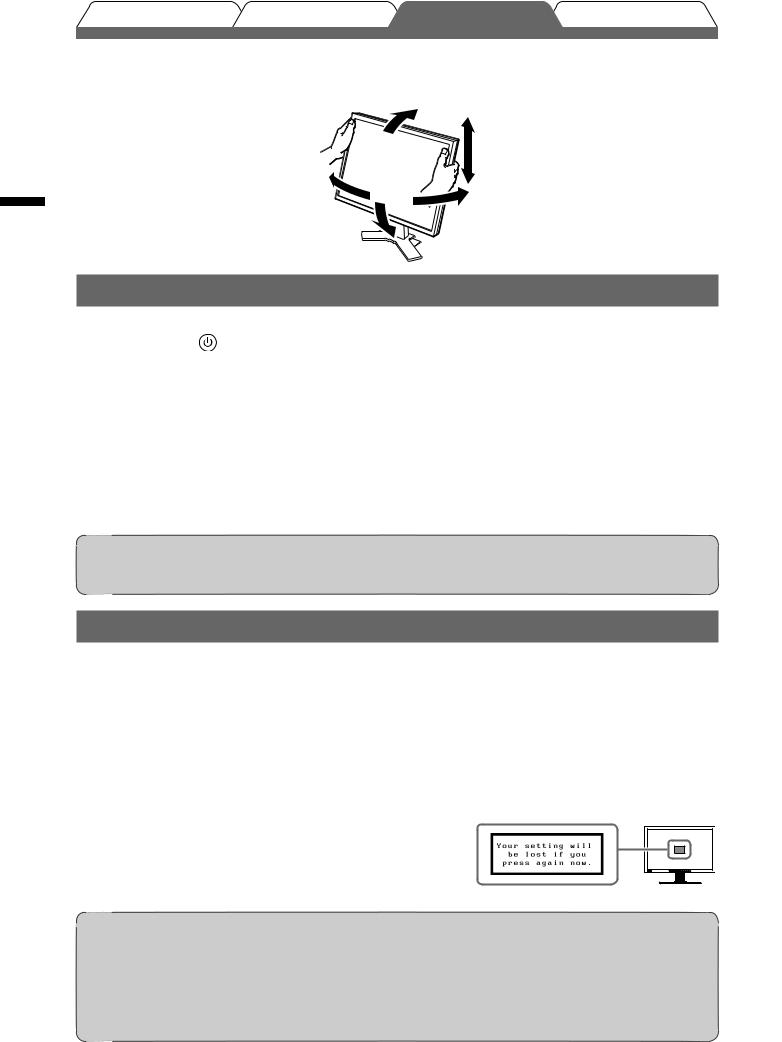
Adjusting Screen Height and Angle
Hold left and right edge of the monitor with both hands, and adjust the screen height, tilt and swivel of the screen to the best condition for working.
English
Displaying the Screen
1 to turn on the monitor.
The monitor’s power indicator lights up blue.
2 Turn on the PC.
The screen image appears.
3 When using analog input signals, perform the Auto Adjustment function. (Refer
Attention
•Turn off the monitor and PC after using them. Unplugging the power cord completely shuts off power supply to the monitor.
Performing Auto Adjustment Function (Analog input only)
When analog signals are input, the Auto Adjustment function enables the automatic adjustment of clock, phase, screen position, and resolution.
For details of the Auto Adjustment function, refer to the User’s Manual on the EIZO LCD Utility Disk (CD-ROM).
1 .
.
A message window appears.
2 again while the message is displayed.
Attention
•The Auto Adjustment function works correctly when an image is fully displayed over the display area of a PC screen.
It does not work properly when an image is displayed only on a part of the screen (DOS prompt window, for example) or when a black background (wallpaper, etc.) is in use.
•The Auto Adjustment function may not work properly with some graphics boards.
4
Setting/Adjustment
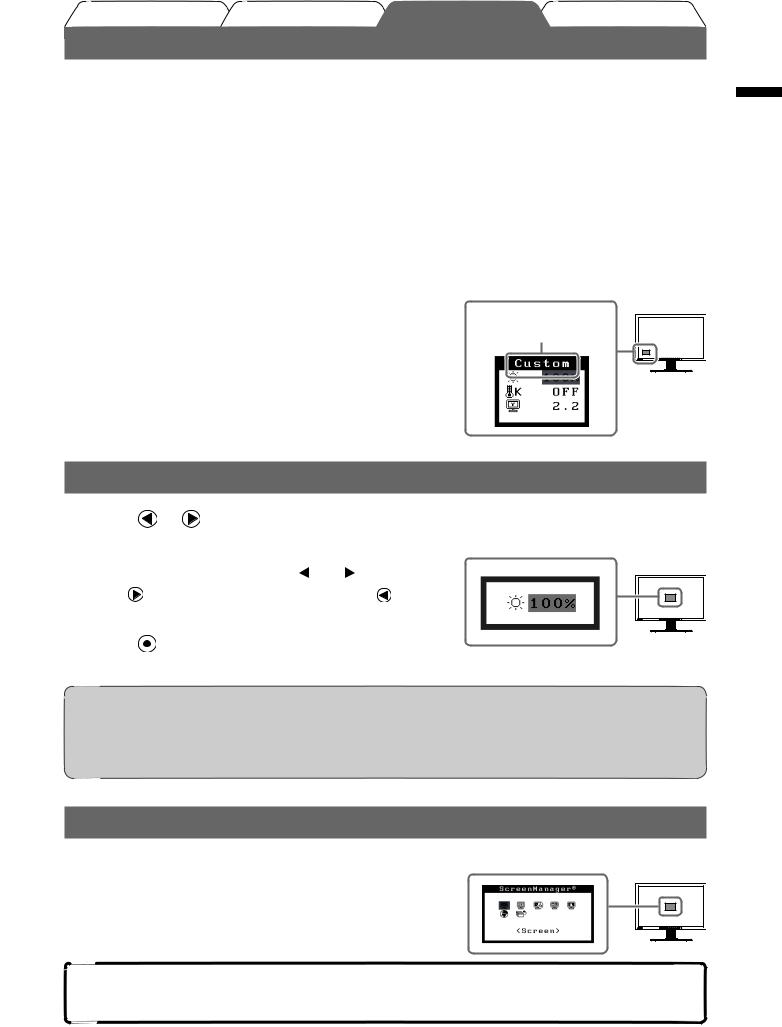
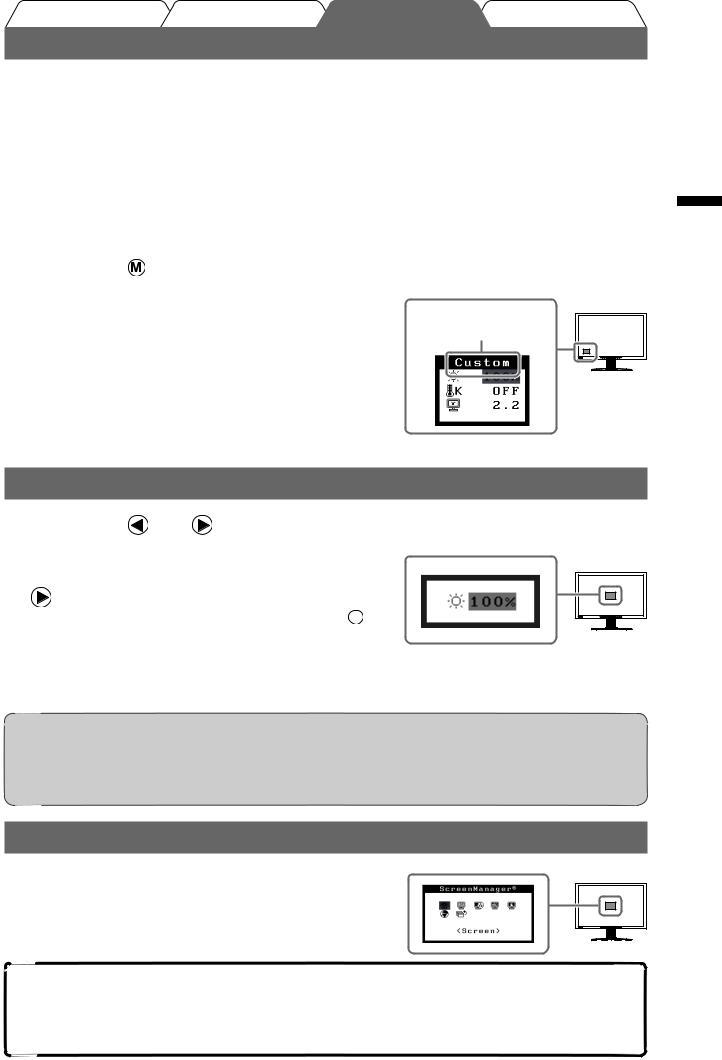
Selecting Display Mode
FineContrast allows you to select the best display mode easily according to monitor’s application. For details of FineContrast, refer to the User’s Manual on the EIZO LCD Utility Disk (CD-ROM).
FineContrast Mode
Custom |
Available for making desired setting. |
sRGB |
Suitable for color matching with sRGB compatible peripherals. |
Text |
Suitable for displaying texts for word processing or spreadsheets. |
Picture |
Suitable for displaying images such as photos or picture images. |
Movie |
Suitable for playing back animated images. |
1 Press  .
.
The FineContrast menu appears.
2Press  again while the FineContrast menu is displayed.
Each time you press the button, the mode is switched to the other mode. (Refer to the FineContrast Mode table.)
3 Press  at the desired mode.
The selected mode is set.
FineContrast menu name
Displays the current mode.
Adjusting Brightness
1 Press |
or . |
|
The brightness adjustment screen appears |
Brightness adjustment screen |
|
2the brightness with  or
or  .
.
to increase screen brightness or |
to |
NOTE
•Screen will be adjusted automatically to the appropriate brightness that accepted environment as the sensor on the lower side of the monitor detects the surrounding brightness with the BrightRegulator function.
For details, refer to the User’s Manual on the EIZO LCD Utility Disk (CD-ROM).
Performing Advanced Settings/Adjustments
Advanced adjustments for the screen or color and various settings are |
Adjustment menu |
available using the Adjustment menu. |
|
For details of each adjustment function, refer to the User’s Manual on |
|
the EIZO LCD Utility Disk (CD-ROM). |
|
The basic settings and adjustments are completed. For advanced settings/adjustments, refer to the User’s Manual on the EIZO LCD Utility Disk (CD-ROM).
English
5
English
Troubleshooting
No-Picture Problem
Symptom |
Status |
Possible cause and remedy |
No picture |
Power indicator does not light. |
Check whether the power cord is connected |
|
|
correctly. If the problem persists, turn off the |
|
|
monitor, and then turn it on again a few minutes |
|
|
later. |
|
|
Press . |
|
|
|
|
Power indicator is lighting blue. |
Set each RGB adjusting value in <Gain> to |
|
|
higher level. |
|
Power indicator is lighting |
Switch the input signal with . |
|
orange. |
|
|
Operate the mouse or keyboard. |
|
|
|
|
|
|
Check whether the PC is turned on. |
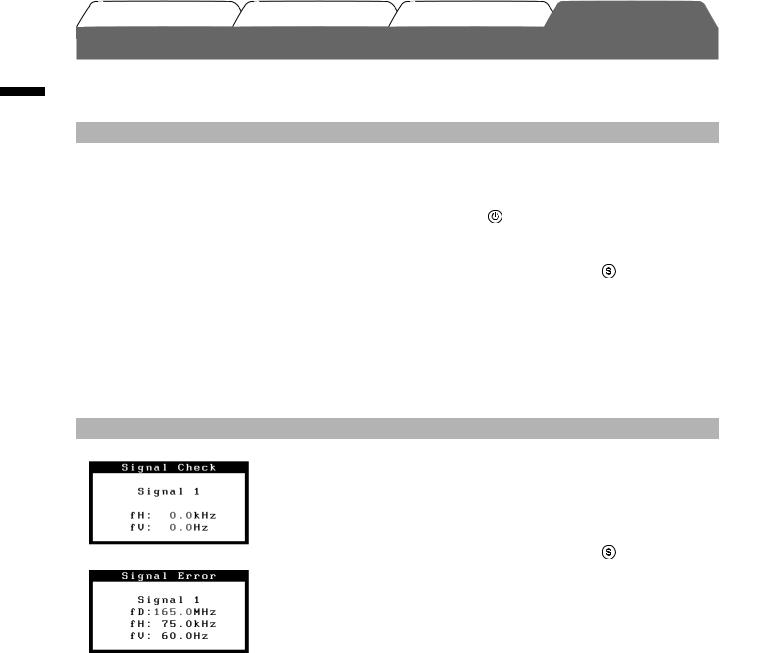
2. Check the error message on the screen.
These messages appear when the input signal is incorrect even if the monitor is functioning.
Symptom |
Status |
Possible cause and remedy |
|
No signal is input. |
The message shown left may appear, because |
|
|
some PCs do not output the signal soon after |
|
|
power-on. |
|
|
Check whether the PC is turned on. |
|
|
|
|
|
Check whether the signal cable is connected |
|
|
properly. |
|
|
Switch the input signal with . |
|
The input signal is out of the |
Reboot the PC. |
|
specified frequency range. |
|
|
Select an appropriate display mode using the |
|
|
(Such signal frequency is |
|
|
graphics board’s utility software. Refer to the |
|
|
displayed in red.) |
|
|
manual of the graphics board for details. |
|
|
|
|
|
|
|
6
Vor der Benutzung 

LCD-Farbmonitor
[Anbringung der Vorsichtshinweise]
(SX2461W)
(SX2761W)
Deutsch
Über das Installationshandbuch und das Benutzerhandbuch
|
Installationshandbuch |
Informationen zum Verbinden des Monitors mit dem Computer und zur |
|
||
|
(das vorliegende Handbuch) |
Inbetriebnahme. |
|
||
|
|
|
|
Benutzerhandbuch |
Anwendungsinformationen, beispielsweise zu Bildschirmeinstellungen, |
|
(PDF-Datei auf der „EIZO LCD |
-justierungen und technischen Daten. |
|
Utility Disk“ (CD-ROM)*) |
|
 VORSICHTSMASSNAHMEN Informationen zur sicheren Verwendung des Monitors.
*Erfordert die Installation von Adobe Reader.
•Die Produktspezifikationen variieren in den einzelnen Absatzgebieten. Überprüfen Sie, dass das Handbuch in der Sprache des jeweiligen Absatzgebietes geschrieben ist.
Copyright© 2007 EIZO NANAO CORPORATION. Alle Rechte vorbehalten.
Kein Teil dieses Handbuchs darf ohne die vorherige schriftliche Zustimmung von EIZO NANAO CORPORATION in irgendeiner Form oder mit irgendwelchen Mitteln – elektronisch, mechanisch oder auf andere Weise – reproduziert, in einem Suchsystem gespeichert oder übertragen werden.
Es besteht keine Verpflichtung seitens der EIZO NANAO CORPORATION, zur Verfügung gestelltes Material oder Informationen vertraulich zu behandeln, es sei denn, es wurden vor dem Erhalt solcher Informationen entsprechende Vereinbarungen mit der EIZO NANAO CORPORATION getroffen. Obwohl größte Sorgfalt aufgewendet wurde, um zu gewährleisten, dass die Informationen in diesem Handbuch dem neuesten Stand entsprechen, ist zu beachten, dass die Spezifikationen der Monitore von EIZO ohne vorherige Ankündigung geändert werden können.
ENERGY STAR ist eine eingetragene Marke in den USA. Apple und Macintosh sind eingetragene Marken der Apple Inc.
VGA ist eine eingetragene Marke der International Business Machines Corporation.
DPMS ist eine Marke und VESA ist eine eingetragene Marke von Video Electronics Standards Association. Windows ist eine eingetragene Marke der Microsoft Corporation.
PowerManager und UniColor Pro sind Marken der EIZO NANAO CORPORATION.
FlexScan, ScreenManager, i•Sound und EIZO sind eingetragene Marken der EIZO NANAO CORPORATION in Japan und anderen Ländern.
1
Deutsch
Vor der Benutzung 

Lieferumfang
Prüfen Sie, ob sich alle der folgenden Gegenstände in der Verpackung befinden. Sollte einer der Gegenstände fehlen oder beschädigt sein, wenden Sie sich an Ihren Fachhändler.
HINWEIS
• Heben Sie die Verpackung sowie die Verpackungsmaterialien für evtl. Transporte des Monitors gut auf.
□Monitor
□Netzkabel
□Digitales Signalkabel: FD-C39
□Analoges Signalkabel: FD-C16
□EIZO USB-Kabel: MD-C93
□EIZO LCD Utility Disk (CD-ROM)
•Benutzerhandbuch zu diesem Monitor
□UniColor Pro (CD-ROM)
•Benutzerhandbuch zu „UniColor Pro“
□Installationshandbuch (das vorliegende Handbuch)
□VORSICHTSMASSNAHMEN
□Beschränkte Garantie
□Informationen zum Thema Recycling
□Befestigungsschrauben (M4 x 12 mm, 4 Stck.)
Bedienelemente und Funktionen
Justierungsmenü (*ScreenManager ®) 


1 |
2 |
3 |
4 |
5 |
6 |
7 |
8 |
9 |
|
(SX2761W nur) |
|
14 |
|
15 |
|
16 |
10 |
17 |
[SX2461W] |
[SX2761W] |
11 |
12 13 14 |
11 |
12 13 |
1 Sensor |
Erkennt die Umgebungshelligkeit. Funktion zur BrightRegulator (Seite 5). |
2Taste für die Justiersperre Sperrt die Tasten, um den Anzeigemodus oder den justierten oder eingestellten
|
Status beizubehalten. |
3 Taste zur Auswahl des |
Schaltet zwischen den Signalen zweier angeschlossener Computer um. |
Eingangssignals |
|
4Taste zur Modusauswahl Mithilfe dieser Taste wechseln Sie den Anzeigemodus.
5 |
Automatiktaste |
Führt eine automatische Justierung des Bildschirms durch. (nur Analogeingang) |
6 |
Eingabetaste |
Zeigt das Justierungsmenü an, wählt ein Element im Menübildschirm und speichert geänderte Werte. |
7Steuertasten (Links, Unten, • Wählt ein Einstellungselement oder erhöht/reduziert justierte Werte erweiterter
|
Oben, Rechts) |
Einstellungen mithilfe des Justierungsmenüs (Seite 5). |
|
|
|
• Taste oder |
: Zeigt den Bildschirm für die Helligkeitseinstellung an (Seite 5). |
8 |
Netzschalter |
Zum Einund Ausschalten. |
|
9 |
Betriebsanzeige |
Zeigt den Betriebsstatus des Monitors an. |
|
|
|
Blau: In Betrieb |
Orange: Energiesparmodus Aus: Hauptstromversorgung getrennt |
10 |
Öffnung für Diebstahlsicherung |
Kompatibel mit dem Kensington MicroSaver-Sicherheitssystem. |
|
11 |
Netzstecker |
Zum Anschließen an eine Netzsteckdose. |
|
12 |
Signaleingänge |
Links : Signal 1 (DVI-I-Anschluss), Rechts : Signal 2 (DVI-I-Anschluss) |
|
13USB-Anschluss (hinten) Verbindet den PC mithilfe eines USB-Kabels mit dem Monitor.
14USB-Anschluss (seitlich) Stellt eine Verbindung zu einem USB-Peripheriegerät her.
15 |
Fuß |
Zum Einstellen der Höhe und Neigung des Bildschirms. |
16 |
Kabelabdeckung |
Verdeckt die Anschlusskabel. |
17Befestigungslöcherfüroptionale Zum Befestigen der optionalen Lautsprecher (i•Sound L3). (Die optionalen Lautsprecher Lautsprecher (i•Sound L3) können je nach Art des Standfußes möglicherweise nicht angebracht werden.)
*ScreenManager ® ist der Name des Justierungsmenüs von EIZO. (Informationen zur Verwendung von ScreenManager entnehmen Sie dem Benutzerhandbuch auf der EIZO LCD Utility Disk (CD-ROM).)
2
Hinweis
•Um einen bereits vorhandenen Monitor durch einen Monitor des Typs SX2461W/SX2761W zu ersetzen, stellen Sie die PC-Einstellungen für Auflösung und vertikale Bildwiederholfrequenz auf die für SX2461W/ SX2761W-Monitore verfügbaren Werte ein. Diese entnehmen Sie bitte der Auflösungstabelle (Rückseite der
ersten Seite), bevor Sie den Monitor anschließen.
HINWEIS
•Lesen Sie im Benutzerhandbuch auf der EIZO LCD Utility Disk (CD-ROM) nach, wenn Sie zwei PCs an den Monitor anschließen möchten.
1 Stellen Sie sicher, dass Computer und Monitor ausgeschaltet sind.
2 Verbinden Sie Monitor und Computer mithilfe eines passenden Signalkabels.
Ziehen Sie nach dem Anschließen der Kabel die Schrauben der Verbinder an, um ein versehentliches Ausstecken zu verhindern.
Digitale Varbindung
Anschlüsse am |
|
Anschlüsse am |
PC |
|
Monitor |
DVI-Anschluss |
Signalkabel FD-C39 (mitgeliefert) |
DVI-I-Anschluss |
Nachgeschalteter |
|
Vorgeschalteter |
|
USB-Anschluss |
|
USB-Anschluss |
EIZO USB-Kabel MD-C93 (mitgeliefert)* |
|
Analoge Verbindung
Anschlüsse am |
|
Anschlüsse am |
|
PC |
|
Monitor |
|
15-poliger Mini- |
Signalkabel FD-C16 (mitgeliefert) |
DVI-I-Anschluss |
|
D-Sub-Anschluss |
|||
|
|
||
Nachgeschalteter |
|
Vorgeschalteter |
|
|
USB-Anschluss |
||
USB-Anschluss |
EIZO USB-Kabel MD-C93 (mitgeliefert)* |
|
*Erforderlich bei der Verwendung der Software UniColor Pro und ScreenManager Pro for LCD. (Weitere Informationen finden Sie im Benutzerhandbuch zu UniColor Pro (CD-ROM) oder der EIZO LCD Utility Disk (CD-ROM).)
3Verbinden sie mithilfe des Netzkabels den Netzanschluss des Monitors mit einer Steckdose.
Deutsch
3
Deutsch
Vor der Benutzung |
Installation |
Einstellungen/Justierung Fehlerbeseitigung |
|
||
Höhe und Neigung des Bildschirms einstellen |
||
Halten Sie den Monitor mit beiden Händen |
fest, und stellen Sie die für IhrenArbeitsplatz |
|
optimale Höhe, Neigung und Drehung des |
|
|
Bild wiedergeben
1 Drücken |
, um den Monitor einzuschalten. |
Die Betriebsanzeige des Monitors leuchtet auf (blau).
2 Schalten Sie den Computer ein.
Das Bild wird angezeigt.
3Falls Sie den analogen Eingang verwenden, führen Sie die „automatische Einstellung“ durch. (Siehe „Automatische Einstellung durchführen“.)
Hinweis
•Schalten Sie Computer und Monitor aus, wenn Sie sie nicht mehr benötigen. Wenn Sie das Netzkabel abziehen, wird die Stromzufuhr zum Monitor vollständig unterbrochen.
Automatische Einstellung durchführen (nur analoger Eingang)
Falls Sie den analogen Eingang verwenden, können Sie Takt, Phase, Bildlage und Auflösung mithilfe der Automatikfunktion automatisch einstellen lassen.
Weitere Einzelheiten zur automatischen Einstellung entnehmen Sie dem Benutzerhandbuch auf der EIZO LCD Utility Disk (CD-ROM).
1 Drücken Sie  .
.
Ein Fenster mit einer Meldung wird angezeigt.
2 Drücken Sie  erneut, während die Meldung angezeigt wird.
Daraufhin wird die automatische Einstellung für Takt, Phase und Bildlage durchgeführt.
Hinweis
•Die automatische Einstellung funktioniert korrekt, wenn das Bild vollständig auf dem gesamten PCBildschirm angezeigt wird.
Die Einstellung funktioniert möglicherweise nicht korrekt, wenn das Bild nur auf einem Teilbereich des Bildschirms angezeigt wird, z. B. wenn Sie ein DOS-Befehlsfenster verwenden oder falls Sie Schwarz als Desktop-Hintergrundfarbe gewählt haben.
•Die automatische Einstellung funktioniert möglicherweise nicht mit bestimmten Grafikkarten.
4
Vor der Benutzung Installation Einstellungen/Justierung Fehlerbeseitigung
Anzeigemodus auswählen
Mithilfe des Modus FineContrast können Sie den optimalenAnzeigemodus schnell und einfach wählen.
Weitere Einzelheiten zu FineContrast entnehmen Sie dem Benutzerhandbuch auf der EIZO LCD Utility Disk (CD-ROM).
Modus FineContrast
Custom (Benutzerdefiniert) |
Zum wunschgemäßen Einstellen der Farben. |
sRGB |
Einstellung für Farbabgleich mit Peripheriegeräten, die sRGB unterstützen. |
Text |
Einstellung für Textverarbeitungen und Tabellenkalkulationen. |
Picture (Bild) |
Einstellung für Fotos und Bilder. |
Movie (Film) |
Einstellung für animierte Bilder. |
1 |
Drücken Sie . |
|
Der menü „FineContrast“ wird angezeigt. |
2Drücken Sie erneut die Taste  , während der menü „FineContrast“ angezeigt wird.
Bei jedem Drücken der Taste wechselt der Modus. (siehe Tabelle „FineContrast-Modus“.)
3Ist der gewünschte Modus eingestellt, drücken Sie  .
.
Dadurch wird die Einstellung gespeichert.
Name des FineContrast-menü
Zeigt den aktuellen Modus an.
Bildschirmhelligkeit einstellen
1 |
Drücken Sie |
oder . |
Bildschirm zur Helligkeitseinstellung |
|
Der Bildschirm zur Helligkeitseinstellung wird angezeigt. |
||
2 Stellenein. Sie die Helligkeit mit der Taste  oder
oder
Drücken Sie zum Aufhellen des Bildschirms die Taste  ; zum Abdunkeln drücken Sie die Taste
  .
.
3 Ist die gewünschte Helligkeit eingestellt, drücken Sie  .
.
Damit wird der eingestellte Wert gespeichert.
HINWEIS
•Die Bildschirmhelligkeit wird mithilfe des unten am Bildschirm angebrachten Sensors, der die Umgebungshelligkeit mit der Funktion zur BrightRegulator erkennt, automatisch an die Umgebung angepasst.
Einzelheiten entnehmen Sie dem Benutzerhandbuch auf der EIZO LCD Utility Disk (CD-ROM).
Erweiterte Einstellungen/Justierung vornehmen
Justierungsmenü
Im Justierungsmenü können erweiterte Justierungen des Monitors und der Farben sowie verschiedene andere Einstellungen vorgenommen werden.
Weitere Einzelheiten zu den einzelnen Justierungsfunktionen entnehmen Sie dem Benutzerhandbuch auf der EIZO LCD Utility Disk (CD-ROM).
Die grundlegenden Einstellungen und Justierungen sind damit beendet. Weitere Einzelheiten zu erweiterten Einstellungen/Justierungen entnehmen Sie dem Benutzerhandbuch auf der EIZO LCD Utility Disk (CD-ROM).
Deutsch
5

Vor der Benutzung |
Installation |
Einstellungen/Justierung |
Fehlerbeseitigung |
Problem: Kein Bild
Deutsch
Symptom |
Status |
Mögl. Ursache und Lösung |
|
Kein Bild |
Betriebsanzeige: Aus. |
Prüfen Sie, ob das Netzkabel richtig eingesteckt |
|
|
|
ist. Besteht das Problem weiterhin, schalten Sie |
|
|
|
den Monitor aus und nach wenigen Minuten |
|
|
|
wieder ein. |
|
|
|
Drücken Sie . |
|
|
|
|
|
|
Betriebsanzeige leuchtet blau. |
Erhöhen Sie alle RGB-Justierungswerte unter |
|
|
|
<Gain-Einstellung>. |
|
|
Anzeigenstatus leuchtet |
Wechseln Sie durch Drücken der Taste |
den |
|
orange. |
Signaleingang. |
|
|
|
Bewegen Sie die Maus oder drücken Sie eine |
|
|
|
Taste. |
|
|
|
Prüfen Sie, ob der Computer eingeschaltet ist. |
|
2. Überprüfen Sie die Fehlermeldung auf dem Bildschirm.
Diese Meldungen werden angezeigt, wenn das Eingangssignal nicht ordnungsgemäß übertragen wird, der Monitor jedoch korrekt funktioniert.
Symptom |
Status |
Mögl. Ursache und Lösung |
|
|
Kein Signaleingang. |
Die links stehende Meldung wird angezeigt, |
|
|
|
wenn PCs das Signal nicht gleich nach dem |
|
|
|
Einschalten übertragen. |
|
|
|
Prüfen Sie, ob der Computer eingeschaltet ist. |
|
|
|
Prüfen Sie, ob das Signalkabel richtig |
|
|
|
eingesteckt ist. |
|
|
|
Wechseln Sie durch Drücken der Taste |
den |
|
|
Signaleingang. |
|
|
Das Eingangssignal befindet |
Starten Sie den PC neu. |
|
|
sich außerhalb des |
|
|
|
Wählen Sie mithilfe des zur Grafikkarte |
|
|
|
angegebenen Frequenzbereichs. |
|
|
|
gehörenden Dienstprogramms einen geeigneten |
||
|
(Diese Signalfrequenz wird rot |
Anzeigemodus. Weitere Informationen hierzu |
|
|
angezeigt.) |
||
|
entnehmen Sie dem Handbuch der Grafikkarte. |
||
|
|
||
|
|
|
|
6
Avant l’utilisation  Guide de dépannage
Moniteur couleur LCD
[Emplacements des étiquettes de sécurité]
(SX2461W)
(SX2761W)
A propos du manuel d’installation et du manuel d’utilisation
|
Manuel d’installation |
Décrit les informations de base depuis la connexion du moniteur à |
|
||
|
(Ce manuel d’installation) |
l’ordinateur jusqu’à l’utilisation du moniteur. |
|
|
|
|
Manuel d’utilisation |
Décrit les informations d’application telles que les ajustages d’écran, les |
|
(Fichier PDF inclus sur le CD-ROM |
|
|
réglages et les spécifications. |
|
|
« EIZO LCD Utility Disk »*) |
|
|
PRECAUTIONS |
Décrit la façon d’utiliser le moniteur en toute sécurité. |
|
||
|
|
|
*Installation du logiciel Adobe Reader nécessaire.
•Les caractéristiques techniques du produit varient en fonction des régions de commercialisation. Vérifiez que le manuel est bien écrit dans la langue de la région d’achat de l’appareil.
Copyright© 2007 EIZO NANAO CORPORATION. Tous droits réservés.
Aucune partie de ce manuel ne peut être reproduite, enregistrée dans un système documentaire ou transmise sous quelque forme et par quelque moyen que ce soit, électronique, mécanique ou autre, sans l’autorisation préalable écrite de EIZO NANAO CORPORATION.
EIZO NANAO CORPORATION n’est tenu à aucun engagement de confidentialité vis-à-vis des informations ou documents soumis, sauf en cas d’accord préalable passé avant réception de ces informations par EIZO NANAO CORPORATION. Malgré tous les efforts déployés pour garantir la mise à jour des informations contenues dans ce manuel, veuillez noter que les caractéristiques techniques du moniteur EIZO sont sujettes à modifications sans préavis.
ENERGY STAR est une marque déposée aux Etats-Unis.
Apple et Macintosh sont des marques déposées de Apple Inc.
VGA est une marque déposée de International Business Machines Corporation.
DPMS est une marque commerciale et VESA une marque déposée de Video Electronics Standards Association. Windows est une marque déposée de Microsoft Corporation.
PowerManager et UniColor Pro sont des marques commerciales de EIZO NANAO CORPORATION.
FlexScan, ScreenManager, i•Sound et EIZO sont des marques déposées de EIZO NANAO CORPORATION au Japon et dans d’autres pays ou régions.
Français
1

Français
Avant l’utilisation  Guide de dépannage
Contenu de l’emballage
Vérifiez que tous les éléments indiqués ci-dessous sont inclus dans le carton d’emballage. Contactez votre revendeur local si l’un des éléments est manquant ou abîmé.
REMARQUE
• Veuillez conserver le carton et les matériaux d’emballage pour les réutiliser lors d’un déplacement ultérieur du moniteur.
□Moniteur
□Cordon d’alimentation
□Câble de signal numérique : FD-C39
□Câble de signal analogique : FD-C16
Commandes et fonctions
□Câble EIZO USB : MD-C93
□EIZO LCD Utility Disk (CD-ROM)
•Manuel d’utilisation de ce moniteur
□UniColor Pro (CD-ROM)
•Manuel d’utilisation UniColor Pro
□Manuel d’installation (ce manuel)
□PRECAUTIONS
□Garantie limitée
□Informations sur le recyclage
□Vis de montage (M4 x 12mm, 4 pièces)
MenuAjustage

 (*ScreenManager ®)


|
(SX2761W entrée) |
|
14 |
|
15 |
|
16 |
10 |
17 |
[SX2461W] |
[SX2761W] |
1 |
2 |
3 |
4 |
5 |
6 |
7 |
8 |
9 |
11 |
12 13 14 |
11 |
12 13 |
1 Capteur |
Détecte la luminosité ambiante. Fonction BrightRegulator (page 5). |
2Touche de verrouillage des Permet de verrouiller les touches pour conserver le mode d’affichage ou l’état réglé ou défini. réglages
3Touche de sélection du Pour commuter les signaux d’entrée de l’affichage lors de la connexion de 2 PC au moniteur. signal d’entrée
4 |
Touche Mode |
Permet de changer le mode d’affichage. |
5 |
Touche Auto |
Pour ajuster automatiquement l’écran. (entrée analogique uniquement) |
6 |
Touche de validation |
Pour afficher le menu Ajustage, pour sélectionner un élément de l’écran de menu et sauvegarder |
|
|
les valeurs ajustées. |
7Touches de commande • Pour sélectionner un élément d’ajustage ou augmenter/diminuer les valeurs ajustées pour des
(Gauche, Bas, Haut, |
ajustages avancés à l’aide du menu Ajustage (page 5). |
||
Droite) |
• Touche |
ou |
: Permet d’afficher l’écran de réglage de la luminosité (page 5). |
8 Touche d’alimentation |
Pour mettre sous/hors tension. |
||
9Voyant d’alimentation Pour indiquer l’état de fonctionnement du moniteur.
Bleu : En fonctionnement |
Orange : Economie d’énergie |
Eteint : Hors tension |
10Fente pour le verrouillage Compatible avec le système de sécurité MicroSaver de Kensington. de sécurité
11Connecteur d’alimentation Permet de raccorder le connecteur d’alimentation.
12Connecteurs de signal d’entrée Gauche : Signal 1 (Connecteur DVI-I), Droite : Signal 2 (Connecteur DVI-I)
13 |
Port USB (amont) |
Permet de raccorder l’ordinateur au moniteur à l’aide d’un câble USB. |
14 |
Port USB (aval) |
Permet de raccorder un périphérique USB. |
15 |
Pied |
Utilisé pour ajuster la hauteur et l’angle de l’écran du moniteur. |
16 |
Enveloppe de câbles |
Protège les câbles du moniteur. |
17Orifices de montage pour haut- Permettent de fixer les haut-parleurs en option (i•Sound L3). (Selon le type de pied, il est parleurs (i•Sound L3) en option possible qu’il ne soit pas possible de raccorder le haut-parleur en option.)
*ScreenManager ® est un alias choisi par EIZO pour le menu Ajustage. (Consultez le manuel d’utilisation sur le EIZO LCD Utility Disk (CD-ROM) si vous désirez de plus amples détails sur l’utilisation de ScreenManager.)
2
Avant l’utilisation |
Installation |
Réglage/Ajustage |
Guide de dépannage |
Attention
•Lorsque vous remplacez ce moniteur par un moniteur SX2461W/SX2761W, veillez à configurer votre ordinateur en fonction des paramètres de résolution et de fréquence du balayage vertical propres au moniteur SX2461W/ SX2761W, en vous référant au tableau de résolution (voir verso de la page de couverture), avant de raccorder l’ordinateur.
REMARQUE
• Pour connecter deux PC au moniteur, consultez le Manuel d’utilisateur inclus sur le EIZO LCD Utility Disk (CD-ROM).
1 Vérifiez que le moniteur et le PC sont hors tension.
2Connectez le moniteur au PC à l’aide d’un câble de signal correspondant aux connecteurs.
Une fois que les connecteurs de câble sont connectés, serrez les vis des connecteurs pour assurer le couplage.
Connexion numérique
Connecteurs de |
|
Connecteurs du |
l’ordinateur |
|
moniteur |
Connecteur DVI- |
Câble de signal FD-C39 (fourni) |
Connecteur DVI-I |
|
|
Port USB (amont) |
Port USB (aval) |
Câble USB EIZO MD-C93 (fourni)* |
|
Connexion analogique
Connecteurs de |
|
Connecteurs du |
|
l’ordinateur |
|
moniteur |
|
Connecteur D-Sub |
Câble de signal FD-C16 (fourni) |
Connecteur DVI-I |
|
mini à 15 broches |
|||
|
|
||
Port USB (aval) |
Câble USB EIZO MD-C93 (fourni)* |
Port USB (amont) |
|
|
*Nécessaire lors de l’utilisation des logiciels Unicolor Pro et ScreenManager Pro for LCD. (Consultez le manuel d’utilisation inclus sur le CD-ROM « EIZO LCD Utility Disk » ou « UniColor Pro ».)
3Branchez le cordon d’alimentation dans une prise secteur et dans le connecteur d’alimentation du moniteur.
Français
3

Français
Avant l’utilisation Installation Réglage/Ajustage Guide de dépannage
Ajustage de la hauteur et de l’angle de l’écran
Placez vos mains des deux côtés du |
et l’orientation de l’écran dans une |
position agréable et confortable pour |
|
Affichage de l’écran
1 Appuyez |
pour mettre le moniteur sous tension. |
Le voyant d’alimentation du moniteur s’éclaire en bleu.
2 Mettez le PC sous tension.
L’image affichée apparaît.
3Lorsqu’un signal d’entrée analogique est utilisé, activez la fonction Ajustage automatique. (Consultez « Activation de la fonction Ajustage automatique » cidessous.)
Attention
•Mettez le moniteur et le PC hors tension lorsque vous ne les utilisez plus. L’alimentation du moniteur est coupée en débranchant le cordon d’alimentation.
ActivationdelafonctionAjustageautomatique(entréeanalogiqueuniquement)
Lorsque des signaux analogiques sont entrés, la fonction Ajustage automatique permet d’ajuster automatiquement l’ horloge, la phase, la position de l’écran et la résolution.
Consultez le manuel d’utilisation inclus sur le EIZO LCD Utility Disk (CD-ROM) si vous désirez de plus amples détails sur la fonction Ajustage automatique.
1 Appuyez sur  .
.
Un message s’affiche.
2 Appuyez de nouveau sur  lorsque le message est affiché.
La fonction de réglage automatique est activée et les réglages d’horloge, de phase et de position de l’écran sont effectués automatiquement.
Attention
•La fonction de réglage automatique fonctionne correctement lorsqu’une image s’affiche complètement sur la zone d’affichage d’un écran d’ordinateur.
Elle ne fonctionne pas correctement lorsqu’une image ne s’affiche que sur une partie de l’écran (fenêtre de commande DOS, par exemple) ou lorsqu’un arrière-plan noir (papier peint, etc.) est utilisé.
•La fonction Ajustage automatique peut ne pas fonctionner correctement avec certaines cartes vidéo.
4
 Loading...