


CH 2850 G
®
Art.-Nr.: 23.361.00
Art.-Nr.:23.361.50
Art.-Nr.: 23.362.00
Bedienungsanleitung
Comfort-Heizgeräte
Operating Instructions
Comfort Heater
Mode d’emploi
Appareils de chauffage de confort
Gebruiksaanwijzing
Comfort-verwarmingstoestel
Manual de instrucciones
Aparato calefactor de alto confort
Bruksanvisning
Comfort-värmeapparat
Istruzioni per l’uso della
Apparecchi calorifici comfort
CH 2750
CH 2850 G
CH 3600 GC
Anleitung Comfort-Heizgeräte 31.10.2001 14:24 Uhr Seite 1

Inhaltsverzeichnis
Wichtige Hinweise 3
1. Vorwort 4
2. Technische Daten 4
3. Beschreibung des Ölofens 5
4. Brennstoff 4
5. Auspacken und Montage 5
6. Brennstoff einfüllen 6
7. Anzündautomatik 7
8. Ölofen abschalten Dochtwartung 8
9. Docht reinigen (Ruß- und Kohleablagerungen) 8
10.Anzündautomatik überprüfen 9
11.Abschaltautomatik kontrollieren 9
12.Einlagerung des Ölofens bei längerer 9
Betriebsunterbrechung
13.Besondere Sicherheitsmaßnahmen 10
14.Ratschläge im Pannenfall 11
Contents
Important information 12
1. Preface 13
2. Technical data 13
3. Description of the oil heater 14
4. Fuel 14
5. Unpacking and setting up 14
6. Filling in the fuel 15
7. Automatic ignition 16
8. Turning off the oil heater, servicing the wick 17
9. Cleaning the wick (soot and carbon deposits) 17
10. Checking the automatic ignition 18
11. Checking the automatic cut-out 18
12. Storing the oil heater for extended
periods of time 18
13. Special safety precautions 19
14. What to do in case of a trouble 20
Table des matières
Instructions importantes 21
1. Préface 22
2. Caractéristiques techniques 22
3. Description du poêle 23
4. Combustible 23
5. Déballage et montage 23
6. Remplissage du combustible 24
7. Système d’allumage automatique 25
8. Mise hors service du poêle,
entretien de la mèche 26
9. Nettoyage de la mèche (dépôts de suie et de
charbon) 26
10. Contrôle de l’allumage automatique 27
11. Contrôle de l’arrêt automatique 27
12. Stockage du poêle en cas de
durée d’arrêt prolongée 27
13. Mesures de sécurité spéciales 28
14. Conseils en cas de panne 29
Inhoudsopgave
Belangrijke aanwijzingen 30
1. Voorwoord 31
2. Technische gegevens 31
3. Beschrijving van de oliekachel 32
4. Brandstof 32
5. Uitpakken en montage 32
6. Brandstof ingieten 33
7. Automatische ontsteking 34
8. Oliekachel uitschakelen, onderhoud van de pit 35
9. Pit schoonmaken (roet- en koolafzetsels) 35
10. Automatische ontsteking controleren 36
11. Automatische uitschakeling controleren 36
12. Opslaan van de oliekachel bij vrij lange
bedrijfsonderbreking 36
13. Bijzondere veiligheidsmaatregelen 37
14. Raadgeving in geval van een defect 38
Indice de contenido
Advertencias importantes 39
1. Prefacio 40
2. Características técnicas 40
3. Descripción de aparato calefactor de gasoil 41
4. Carburante 41
5. Desempaquetar y montar 41
6. Llenar el combustible 42
7. Dispositivo de encendido automático 43
8. Apagar el calefactor, cuidado de la mecha 44
9. Limpieza de la mecha (residuos de
hollín y negro de carbono) 44
10. Comprobar el encendido automático 45
11. Comprobar el apagado automático 45
12. Almacenaje del calefactor en caso de
uso esporádico 45
13. Medidas de seguridad especiales 46
14. Consejos en caso de avería 47
Innehållsförteckning
Viktiga upplysningar 48
1. Förord 49
2. Tekniska uppgifter 49
3. Beskrivning av oljekaminen 50
4. Bränsle 50
5. Uppackning och montering 50
6. Ifyllning av bränsle 51
7. Antändningsautomatik 52
8. Avstängning av oljekaminen: skötsel av veke 53
9. Rengöring av veken (sot- och kolavlagringar) 53
10. Kontroll av antändningsautomatiken 54
11. Kontroll av avstängningsautomatiken 54
12. Lagring av oljekaminen under ett längre
driftsavbrott 54
13. Speciella säkerhetsåtgärder 55
14. Råd vid driftstörningar 56
Indice
Avvertenze importanti 57
1 Introduzione 58
2. Caratteristiche tecniche 58
3. Descrizione della stufa ad olio 58
4. Combustibile 59
5. Disimballo e montaggio 59
6. Riempire di combustibile 60
7. Accensione automatica 61
8. Spegnimento della stufa per regolare lo stoppino 62
9. Pulizia dello stoppino (depositi di fuliggine e
carboniosi) 62
10. Controllo dell’accensione automatica 63
11. Controllo dello spegnimento automatico 63
12. Deposito della stufa in caso di pause
prolungate nell’uso 64
13. Misure particolari di sicurezza 64
14. Suggerimenti in caso di problemi 65
2
Anleitung Comfort-Heizgeräte 31.10.2001 14:24 Uhr Seite 2

D
3
Lesen Sie die Bedienungsanleitung vor der
ersten Inbetriebnahme Ihres Comfort-Heizgerätes
aufmerksam durch. Sie erfahren darin, wie Ihr
Ofen montiert, bedient und gewartet wird, und –
was am wichtigsten ist – wie Sie ihn effizient und
sicher benutzen. Bewahren Sie die Bedienungsanleitung im Hinblick auf eventuelle Betriebspannen sorgfältig auf.
Wichtige Hinweise
Achtung!
Explosionsgefahr! Brandgefahr!
Niemals einen anderen Brennstoff benutzen, als
Flüssigbrennstoff für mobile Heizöfen, die laut
Erlaß vom 8.1.98 zulässig sind.
Keinesfalls Kraftstoffe wie Benzin, Benzol, Löse-
mittel oder andere Substanzen in diesen Ölofentyp füllen.
Den Ölofen nie mit Flüssigbrennstoff nachfüllen,
wenn er in Betrieb oder noch warm ist.
Den Ölofen keinesfalls in Räumen benutzen, in
denen Entzündungs- oder Gasexplosionsgefahr
besteht.
Den Ölofen keinesfalls in einem geschlossenen
Raum, sondern immer im Freien nachfüllen.
Brennstoff ausschließlich in Metall- oder
Plastikkanistern lagern oder transportieren, die...
– speziell für den Brennstoff geeignet sind.
– gemäß dem Erlaß vom 8.1.98 die Aufschrift
Flüssigbrennstoff für mobile Heizöfen tragen.
Brennstoff niemals in einem Wohnraum lagern.
Der Brennstoff muß an einem kühlen Ort
außerhalb des Wohnbereiches gelagert werden.
Der Ölofen wird bei Betrieb extrem heiß. Kinder,
Kleidung, Mobiliar und andere Gegenstände
mindestens 1 Meter entfernt halten.
Niemals Benzin benutzen (Brandgefahr).
Brand- und Luftverschmutzungsgefahr. Benutzen
Sie den Ölofen ausschließlich in gut durchlüfteten
Räumen. Den Ölofen nicht in kleinen oder
fensterlosen Räumen benutzen.
Jeder Raum, in dem der Ölofen benutzt wird, muß
einen ausreichenden Lufteinlaß und Luftauslaß
besitzen (eine Einlaß- und Auslaßöffnung mit
einem Mindestquerschnitt von 50 cm2).
Den Ölofen niemals in unzureichend gelüfteten
Räumen oder in Untergeschossen benutzen.
Den Ölofen niemals zum Wärmen oder Kochen
von Wasser bzw. zum Kochen von Speisen benutzen.
Den Nachfülltank niemals herausnehmen, wenn
der Ofen heizt bzw. noch warm ist. Die Patrone
keinesfalls für den Transport oder die Lagerung
von Brennstoff oder anderen entzündlichen
Stoffen benutzen.
Bei der Inbetriebnahme kann es vorkommen, daß
der Nachfülltank ein Geräusch macht: Brennstoff
läuft aus dem Tank, um den Bodenbehälter zu
füllen, der zur Durchfeuchtung des Dochtes dient.
Dieses Geräusch ist normal.
Achtung!
Bei Nichtbeachtung der Installations-, Wartungsoder Bedienungsanweisungen kann es zu Verbrennungen und/oder Körperverletzungen
kommen. Der Hersteller übernimmt in diesem Fall
keine Haftung.
HINWEIS: Die Warnhinweise und Anweisungen, die
in dieser Anleitung gegeben werden, decken
keinesfalls alle möglichen Situationen ab. Die
Benutzung jeder Heizung und insbesondere eines
Ölofens setzt Vernunft, Sorgfalt und die Einhaltung
der Vorsichtsmaßnahmen voraus. Nur bei Beachtung
dieser Regeln kann die Heizung risikolos benutzt
werden.
Bei Auftreten von Problemen müssen Sie ihren
Fachhändler, Verkäufer oder Kundendienst
verständigen.
Lassen Sie den Ölofen niemals an, wenn Sie für
längere oder auch nur für kürzere Zeit weggehen.
Überprüfen Sie in jedem Fall, ob die Heizung
funtionsfähig und sicher ist. Überprüfen Sie, ob
der Ofen wirklich abgestellt ist, bevor Sie den
Raum verlassen.
Den Ofen bei Betrieb niemals unbeaufsichtigt
lassen.
Den Ofen niemals zum Trocknen von Gegen-
ständen benutzen.
Niemals Gegenstände vor oder auf den Ofen
stellen.
Den Konvektionsofen niemals auf einem Boot, in
einem Campingwagen oder einem Führerhaus
benutzen.
Achtung! Verbrennungsgefahr!
Den Ofen nur dann benutzen, wenn das Gitter
vollkommen geschlossen ist. Zu diesem Zweck den
Stift in den Gehäuserahmen setzen.
Anleitung Comfort-Heizgeräte 31.10.2001 14:24 Uhr Seite 3

D
4
Raumtemperaturregelung
Die Raumtemperaturregelung muss angenehm sein.
Wird es zu warm, den Raum lüften, indem ein
Fenster geöffnet wird. Keinesfalls den Dochtknauf
verdrehen. Die Reduzierung der Heizung durch
Verstellen des Dochtes führt zu einer ungenügenden
Verbrennung, unangenehmen Gerüchen und
eventuellen Gesundheitsschäden.
BEWAHREN SIE DIE BEDIENUNGSANLEITUNG SORGFÄLTIG AUF!!!
1. VORWORT
Lesen Sie die Bedienungsanleitung aufmerksam
durch. Sie liefert Ihnen alle Hinweise für die
richtige Bedienung sowie die effiziente und
sichere Montage des Ölofens. Nur bei genauer
Kenntnis der Bedienungsanleitung können Sie
sämtliche Vorteile des Gerätes optimal
ausnutzen.
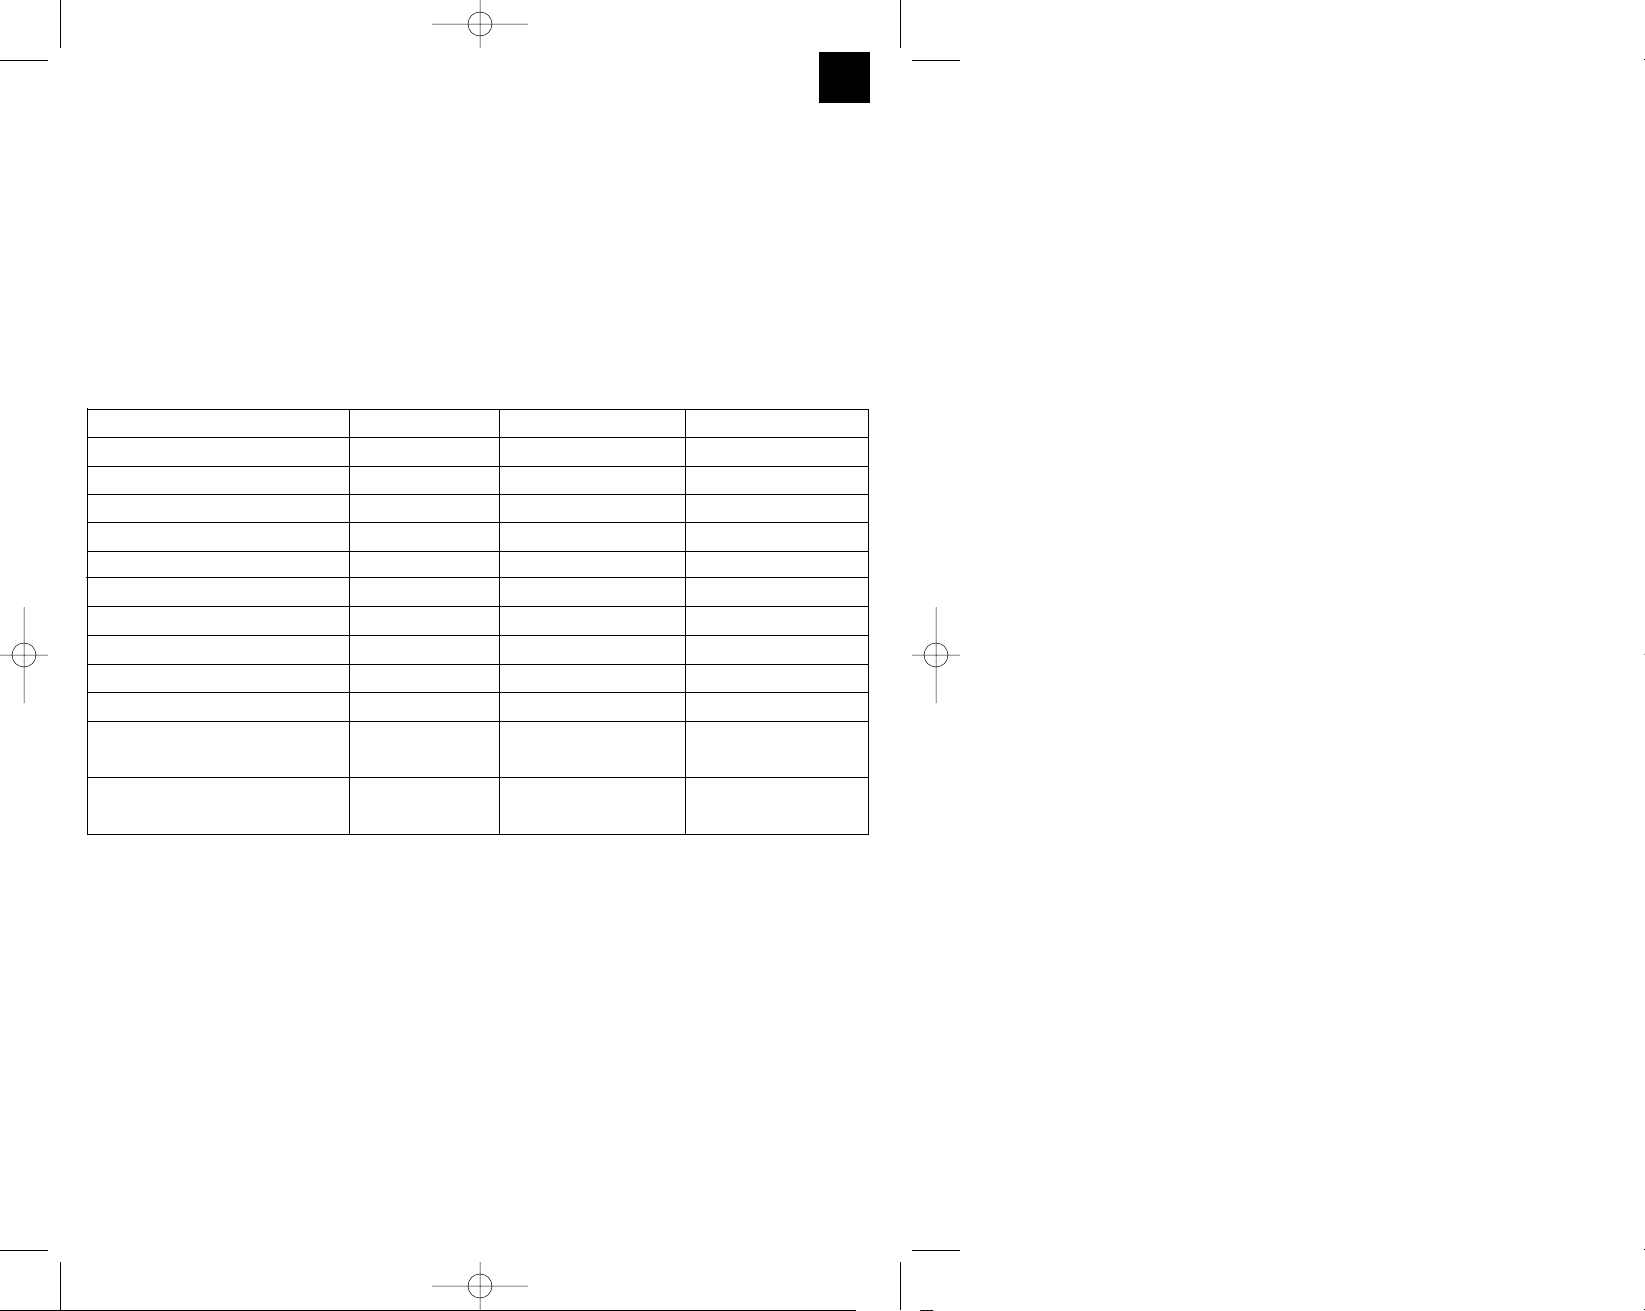
2. TECHNISCHE DATEN
Modellnummer CH 2750 CH 2850 G CH 3600 GC
Konvektortyp Heizstrahler Heizstrahler Heizstrahler
Heizleistung 2750 W 2850 W 3600 W
Brennstoffverbrauch 230 g/h 235 g/h 300 g/h
Tageskapazität Ca. 12 Stunden ca. 12 Stunden ca. 12 Stunden
Brennstofftank herausnehmbarer herausnehmbarer herausnehmbarer
Brennstofftank Brennstofftank Brennstofftank
Fassungsvermögen
des Brennstofftanks 3,81 Liter 3,81 Liter 3,81 Liter
Zündung 2 x R20 Batterien 2 x R 20 Batterien 2 x R 20 Batterien
Luftaustrittskontrolle inklusiv inklusiv inklusiv
Abmessungen 48 x 32 x 53 cm 48 x 32 x 53 cm 67 x 33 x 53 cm
Gewicht 11 kg 11,5 kg 13,5 kg
Raumgröße Min. 30 m
2
Min. 32 m
2
Min. 42 m
2
Max. 36 m
2
Max. 38 m
2
Max. 50 m
2
Raumvolumen Min. 75 m
3
Min. 75 m
3
Min. 105 m
3
Max. 90 m
3
Max. 95 m
3
Max. 120 m
3
Anleitung Comfort-Heizgeräte 31.10.2001 14:24 Uhr Seite 4
D
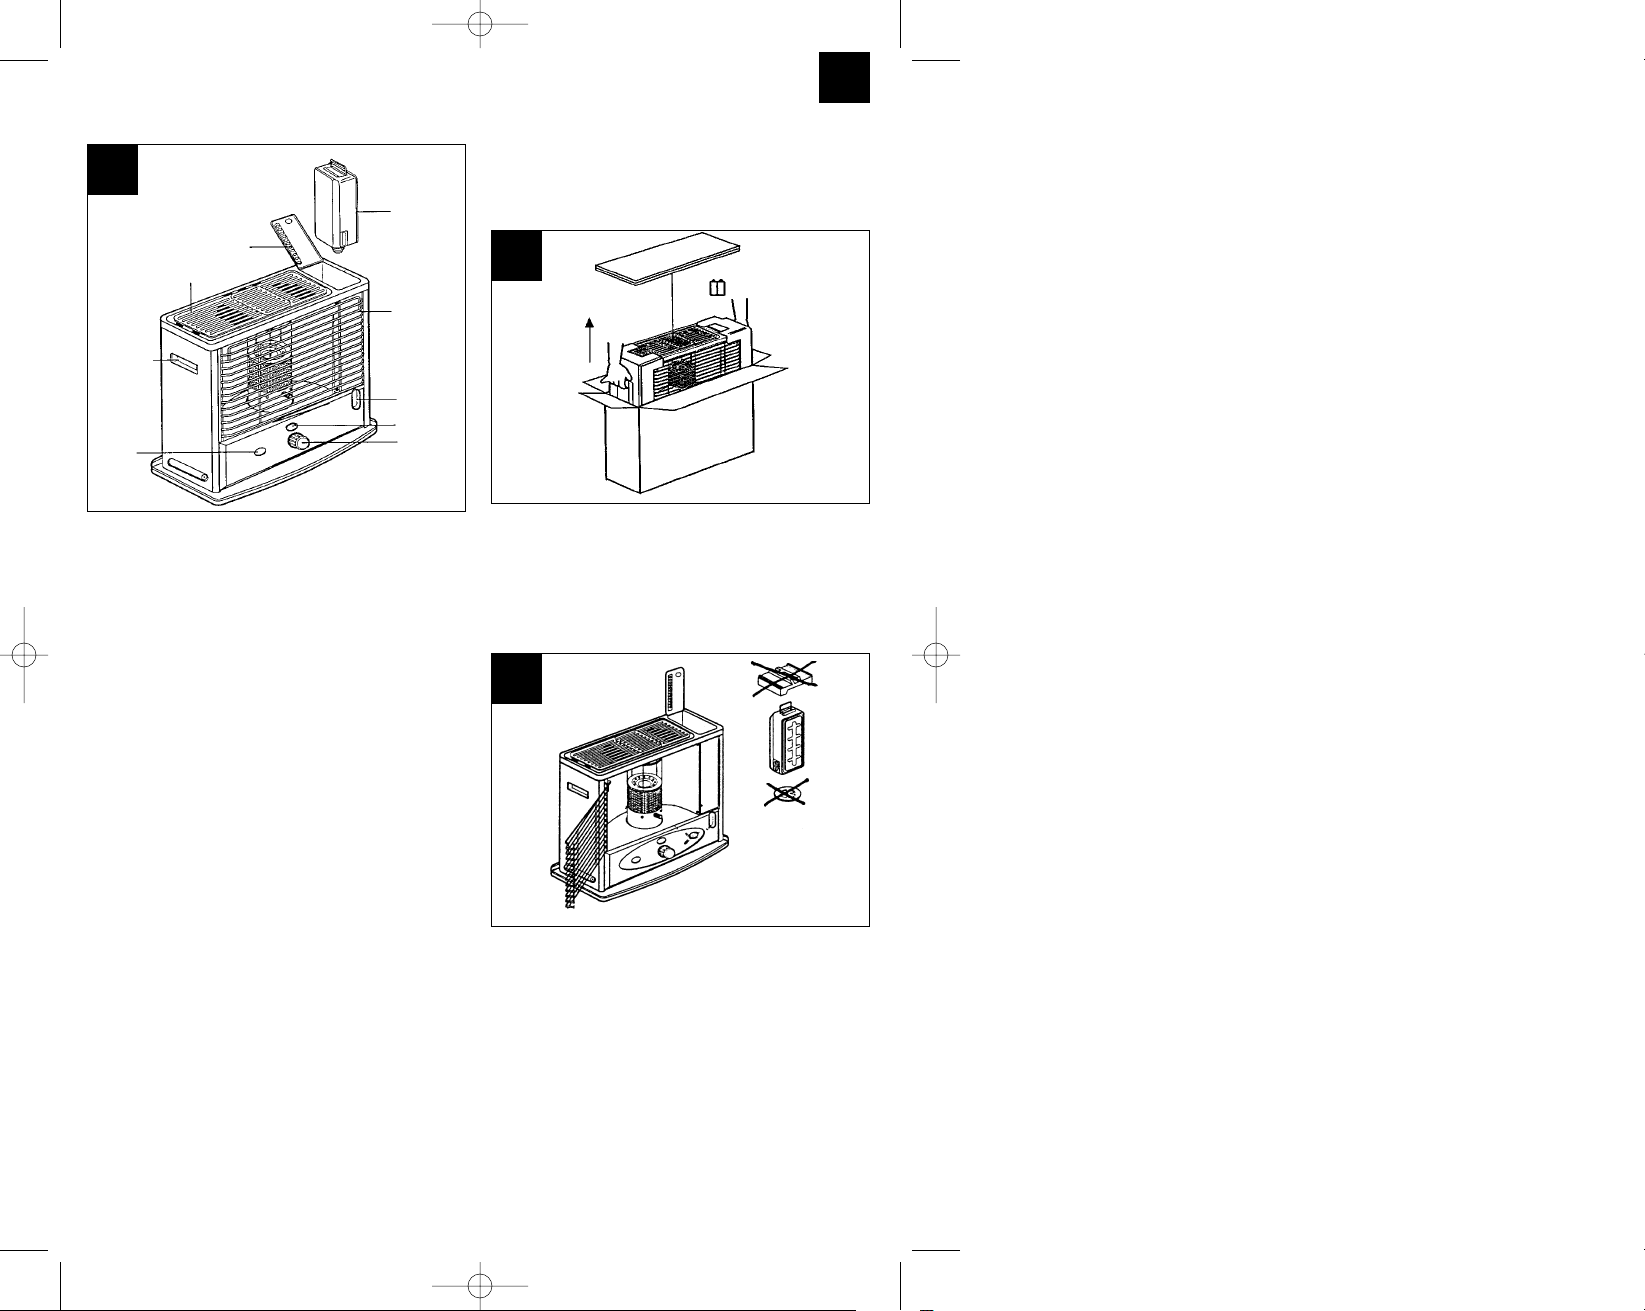
3. BESCHREIBUNG DES ÖLOFENS
4. BRENNSTOFF
Ausschließlich Flüssigbrennstoff für Ölheizöfen
verwenden, der laut Erlaß vom 8.1.98 zulässig ist.
Den Brennstoff niemals in einem geschlossenen
Raum, sondern an einem gut belüfteten Ort
lagern.
Niemals Kraftstoffe, wie z. B. Benzin, Benzol,
Alkohol, Campinggas, Lösemittel oder sonstige
Substanzen benutzen. Es handelt sich um
flüssige Substanzen, die Explosionen oder
Flammenbildung verursachen können. Bei der
Inbetriebnahme bzw. beim Ausschalten des
Heizgerätes riecht es nach Brennstoff. Diese
Erscheinung ist völlig normal.
Wenn der Ölofen in Betrieb ist und Raum-
temperatur erreicht (nach ca. 5 bis 10 Minuten, je
nach Raumgröße) kann vorübergehend ein
leichter Brennstoffgeruch entstehen.
Den Brennstoff niemals neben einer Wärmequelle
oder an einem sonnigen Ort lagern.
Den Brennstoff nicht länger als ein Jahr aufbe-
wahren, da sich seine Qualität mit der Zeit
verschlechtert. Alter Brennstoff führt zu einer
unsauberen Verbrennung im Ofen.
Die Benutzung von minderwertigem Brennstoff
kann zu folgenden Erscheinungen führen: Rauchund Geruchsbildung, kleine Flammen, schwierige
Zündung, schwieriges Löschen, Verlöschen der
Flamme, übermäßige Flammenbildung am Docht,
verminderte Dochtlebensdauer, Versinken des
Dochtes und Kohlenstoffablagerung auf dem
Docht. Bei Auftreten eines dieser Probleme, den
Brennstoff überprüfen und den Fachhändler
verständigen.
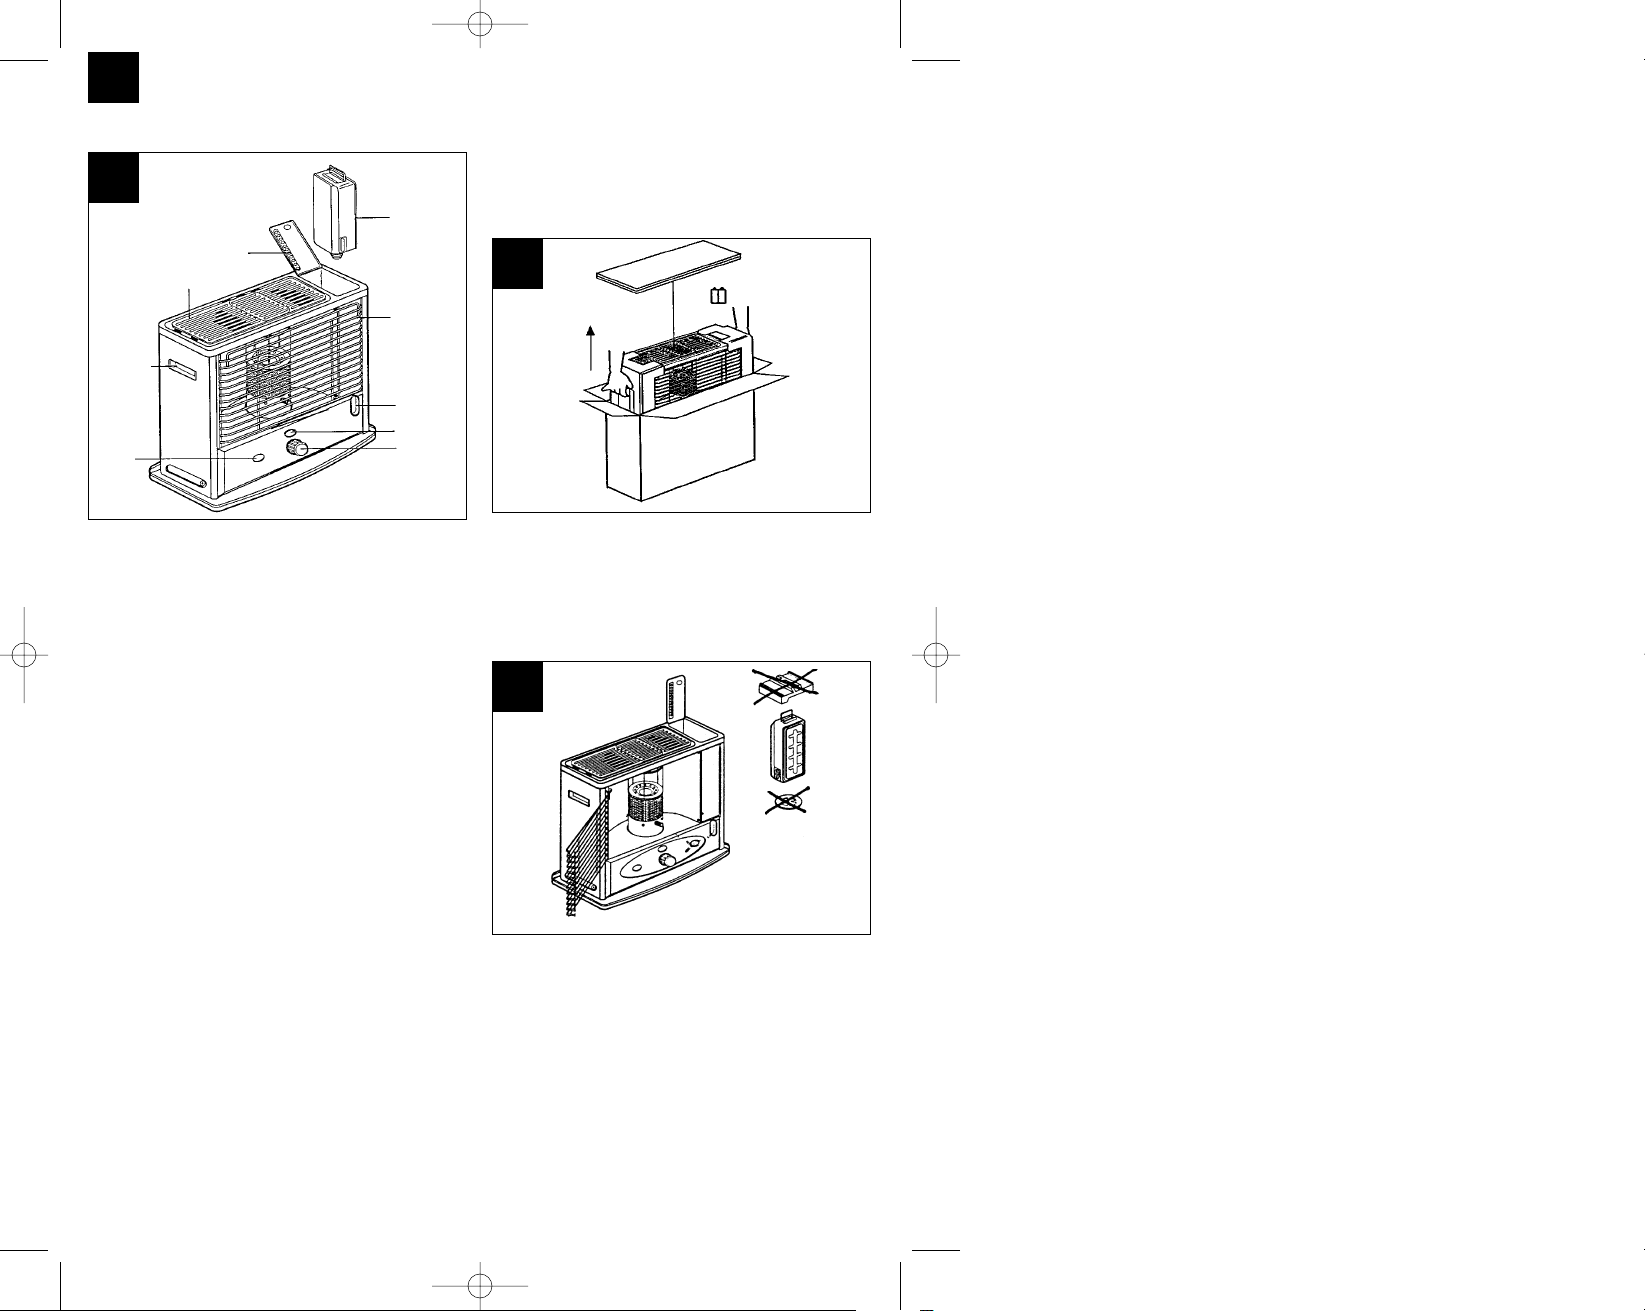
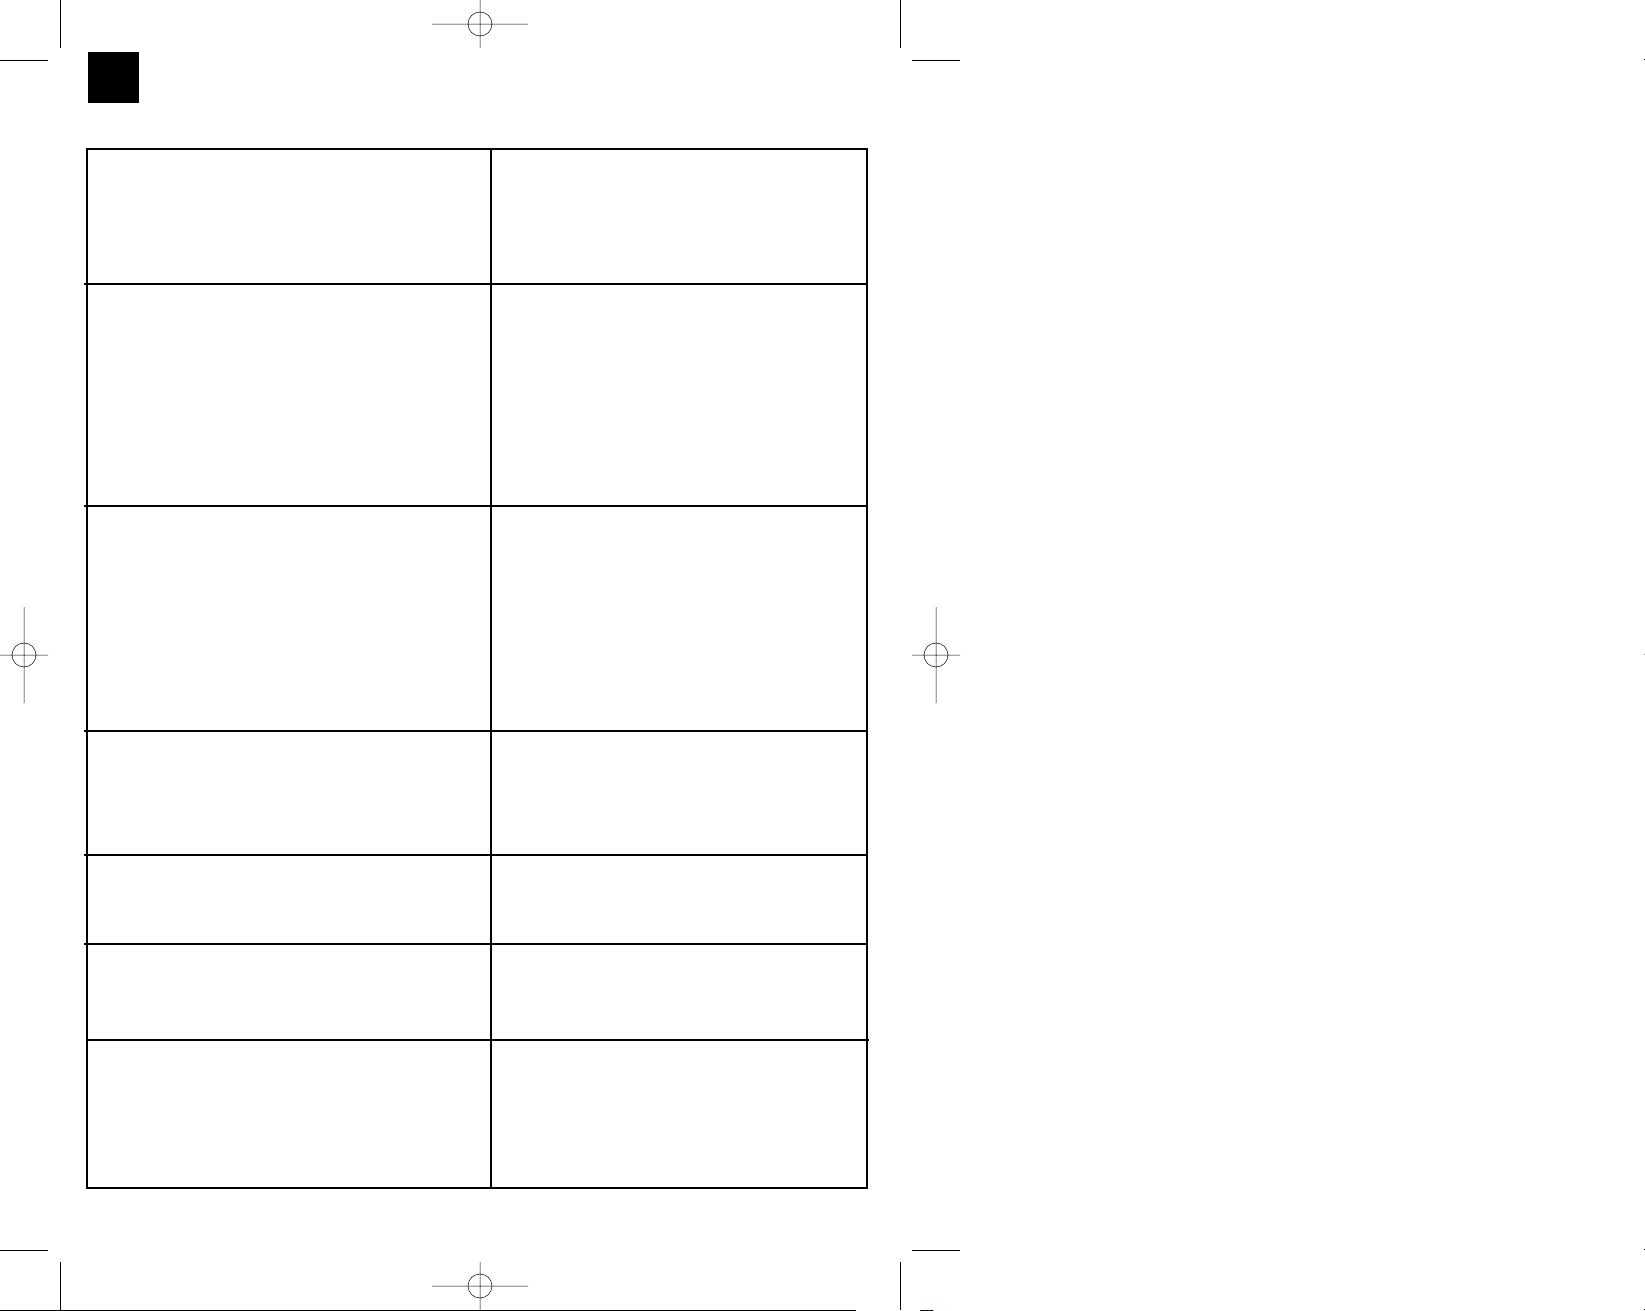
5. AUSPACKEN UND MONTAGE DES
ÖLOFENS
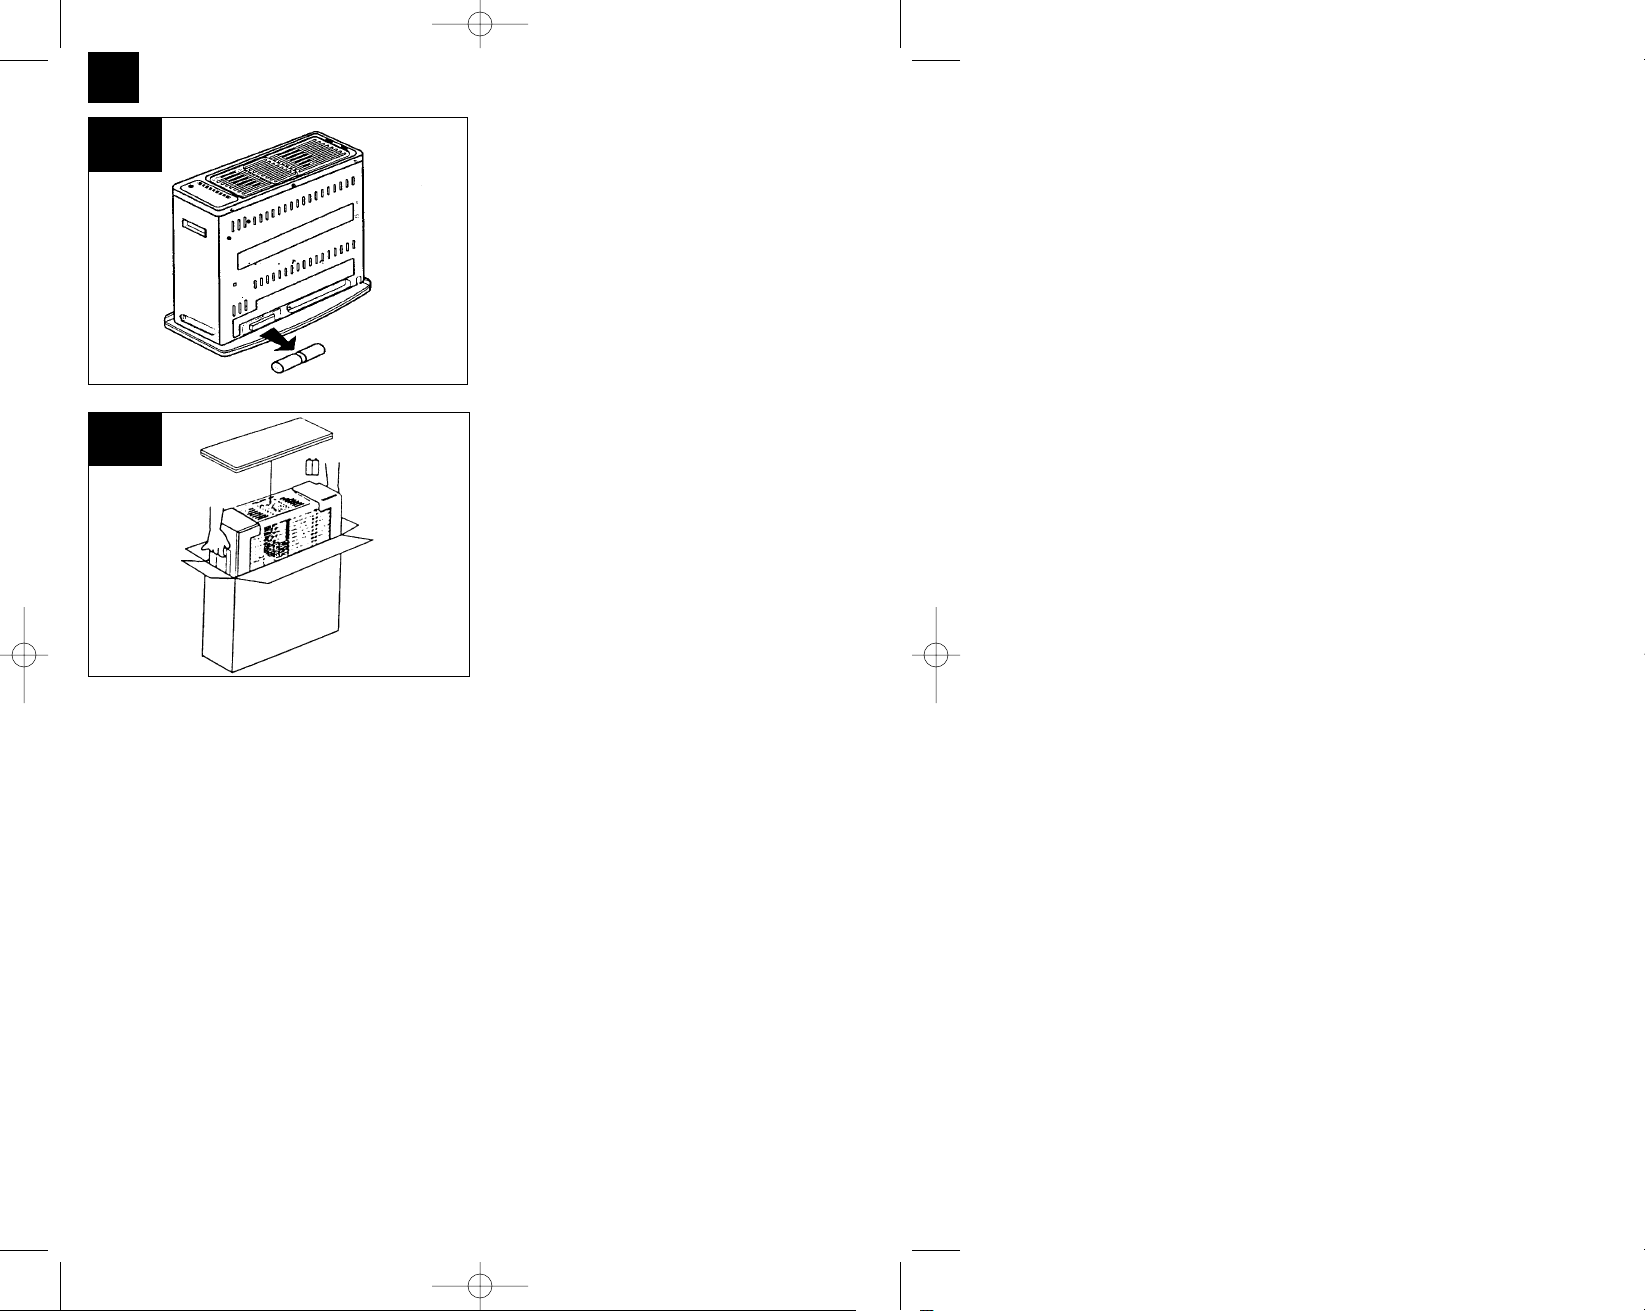
a) Den Ölofen und die verpackten Teile aus dem
Karton nehmen (Abb. 2).
HINWEIS: Karton und Verpackungsmaterial für
spätere Einlagerungen aufbewahren.
b) Das Gitter auf der rechten Seite öffnen
(hochheben und nach vorne ziehen).
Den Brenner aus den Schutzverpackungen
nehmen (Abb. 3).
c) Den Deckel des Brennstofftankfaches an der
Geräteoberseite öffnen und den Schutzschaumstoff an der Oberseite sowie den Schutzkarton an der Unterseite entfernen (Abb.3).
d) Das Verpackungsmaterial im Originalkarton
aufbewahren.
e) Zum Schließen das Gitter zunächst in die oberen
und dann in die unteren Spalten einsetzen. Das
Gerät niemals in Betrieb nehmen, wenn das
Gitter nicht korrekt eingerastet und geschlossen
ist.
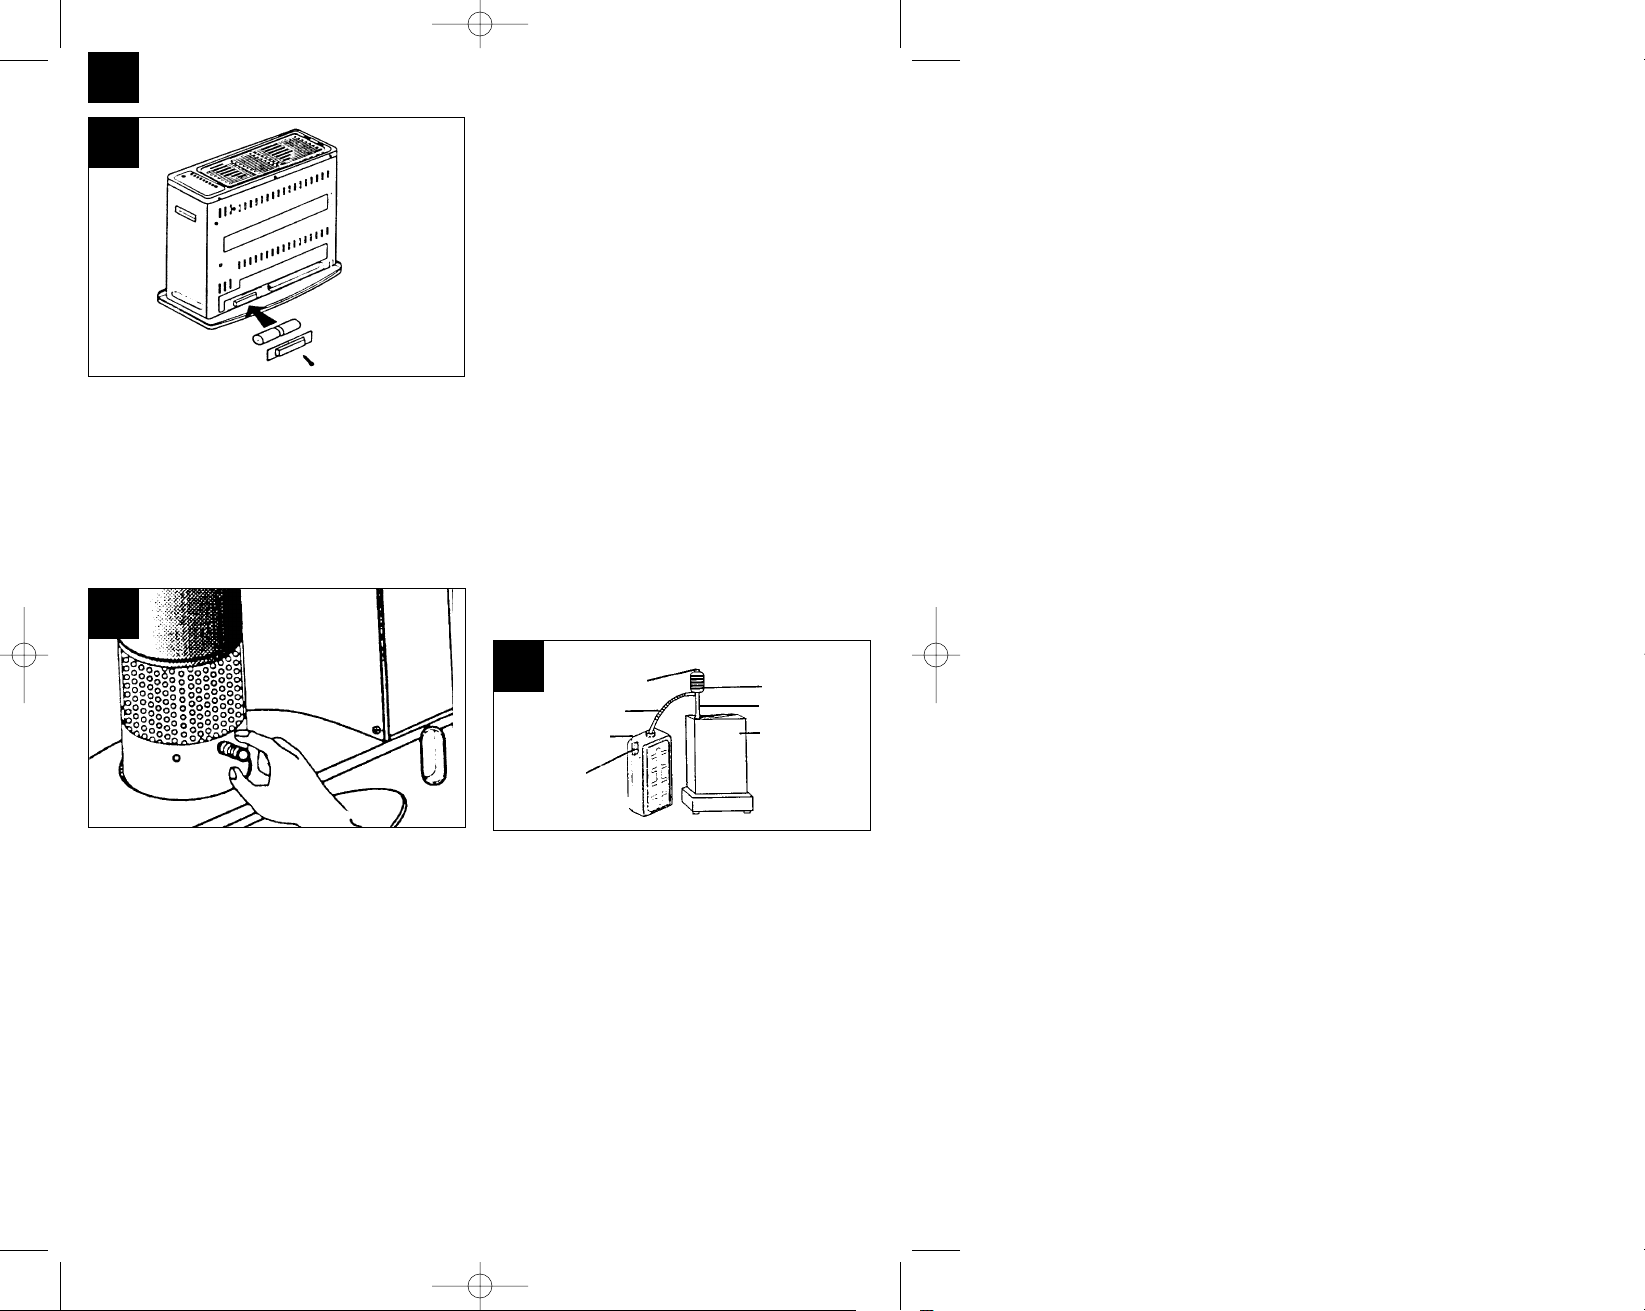
f) Einlegen der Batterien an der Rückseite (siehe
Abb. 4).
5
Griff
AusSchalter
Abdeckplatte
Brennstofftank
Frontschutzgitter
Dochtregler
Brennstoffschauglas
Zündknopf
1
2
3
Anleitung Comfort-Heizgeräte 31.10.2001 14:24 Uhr Seite 5
D
6
Kreuzschlitzschraube herausdrehen und
Batteriefachdeckel abnehmen.
– Die beiden mitgelieferten R 20 Batterien in das
Batterienfach an der Gerätehinterseite einlegen. Die Polungen (+) und (-) der Batterien
beachten.
– Wenn das Gerät nicht benutzt wird bzw. bei
einer längeren Betriebsunterbrechung, die
Batterien herausnehmen
g) Brennerposition (siehe Abb. 5)
– Den Brenner auf den Dochtregler
positionieren.
– Um sicher zu gehen, daß der Brenner richtig
plaziert ist, den Brennerknopf drei oder vier
Mal hin- und herdrehen, bis sich der Brenner
richtig auf dem Dochtregler plaziert.
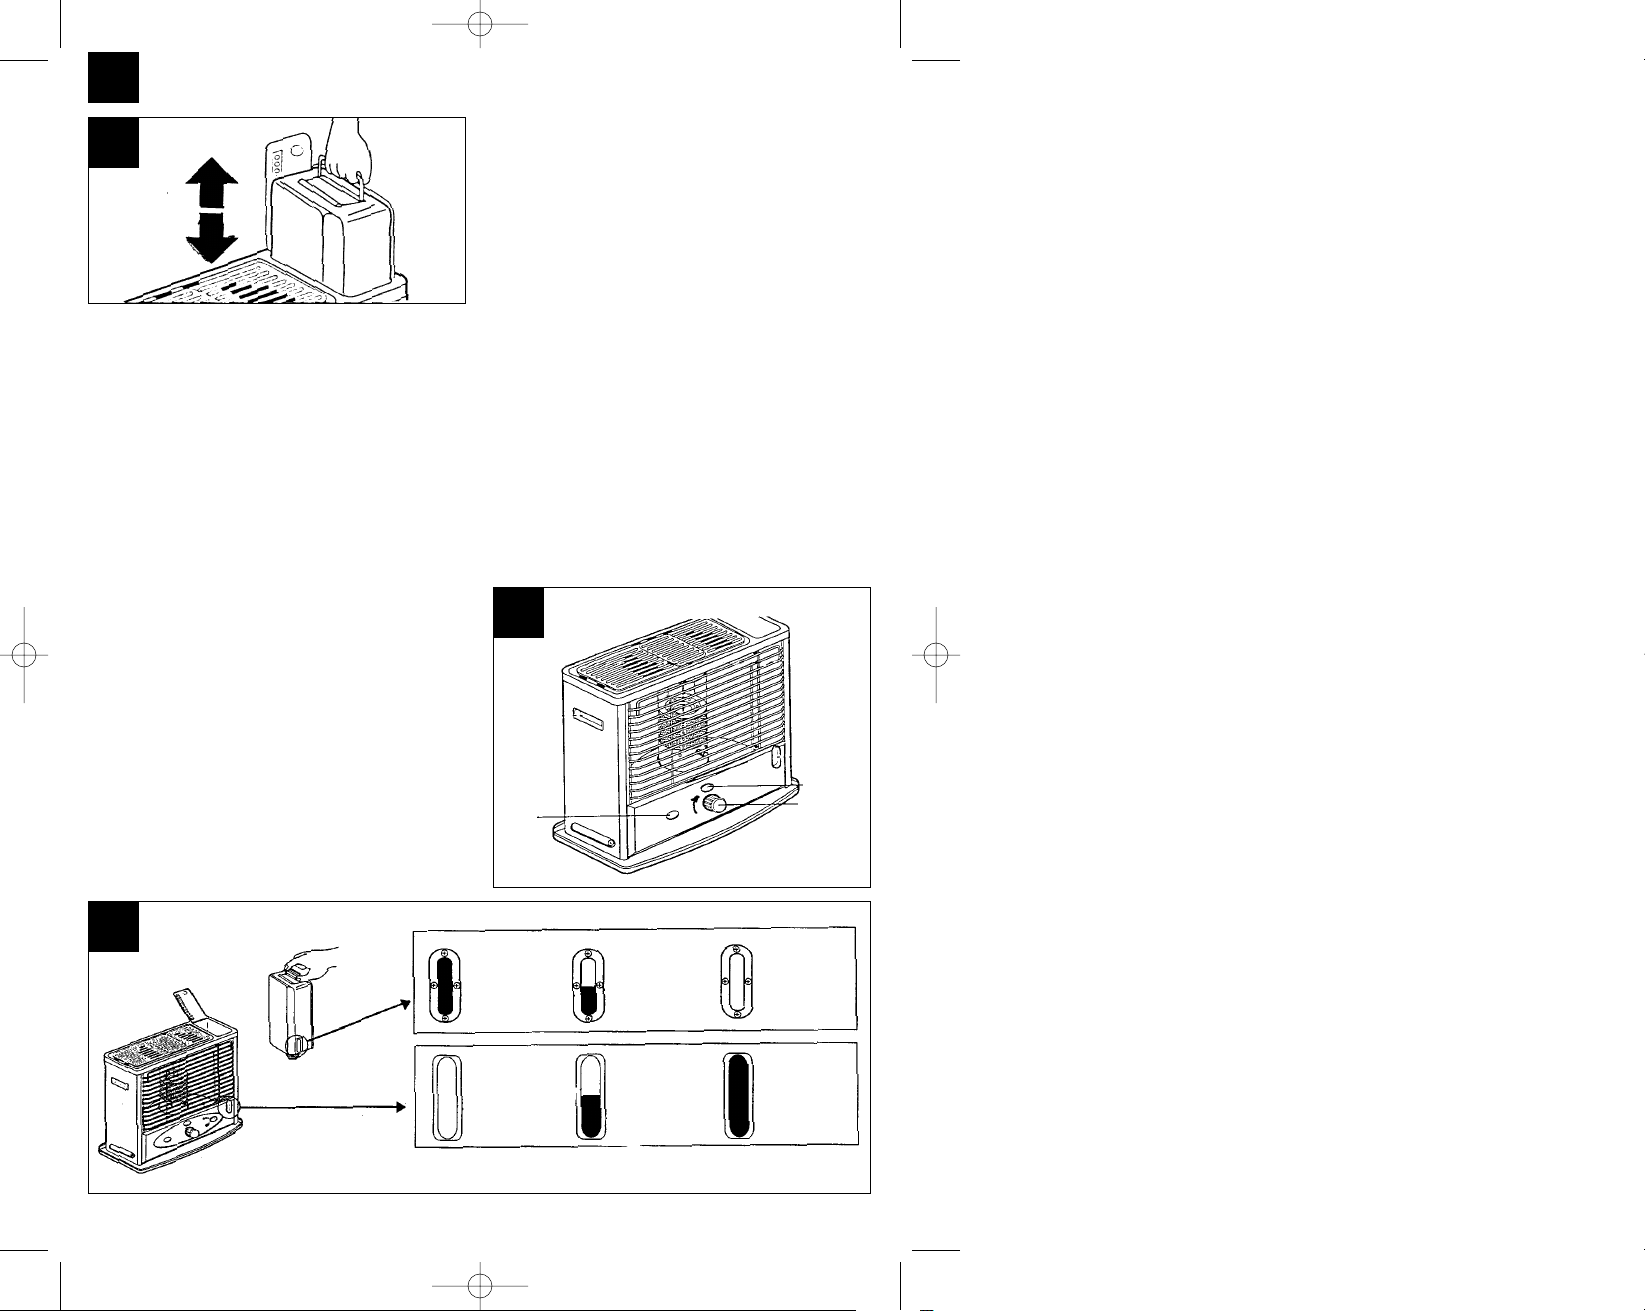
h) Abschaltautomatik kontrollieren
– Den Docht mit dem Dochtregler ganz nach
oben stellen.
– Auf den AUS-Knopf drücken. Der Docht muß
ganz nach unten gehen.
– Zur Überprüfung, ob der Docht wirklich ganz
nach unten gegangen ist, versuchen, ob sich
der Docht über den Dochtregler noch weiter
nach unten schieben läßt. Kann der Docht
nicht noch weiter nach unten geschoben
werden, funktioniert die Abschaltautomatik
einwandfrei. Das Gerät nicht in Betrieb
nehmen, wenn dieses Sicherheitssystem nicht
richtig funktioniert.
6. BRENNSTOFF EINFÜLLEN
ACHTUNG: Den Brennstofftank niemals herausnehmen bzw. mit Brennstoff füllen, wenn der
Ofen heizt bzw. noch warm ist.
Den Brennstofftank niemals innerhalb des
Wohnbereiches füllen, sondern im Freien. Bevor der
Ölofen mit Brennstoff versorgt wird, den
herausnehmbaren Tank, den Brennstoff und die
manuelle Handpumpe ins Freie tragen.
Verwendung der Handpumpe: Den steifen
Schlauch in den Brennstoffvorratskanister und den
biegsamen Schlauch in die Öffnung des Tanks
stecken (siehe Abb. 6). Durch Drücken des
Handpumpenbalges wird der Brennstoff vom
Kanister in den Tank umgefüllt. Kontrollieren Sie bei
der Füllung stets den Füllstand über dem
Brennstoffvorratsanzeiger. Wenn der Tank voll ist,
den Verschluß auf der Heberpumpe aufmachen.
Hierdurch wird der Brennstofffluß unterbrochen.
Anschließend wieder zudrehen.
Den Brennstofftank nicht überlaufen lassen.
Die Handpumpe muß sich vollständig leeren,
bevor die Schläuche aus dem Tank und dem
Brennstoffvorratskanister gezogen werden.
Darauf achten, daß der Verschluß des Tanks
und des Brennstoffvorratskanisters richtig
geschlossen ist.
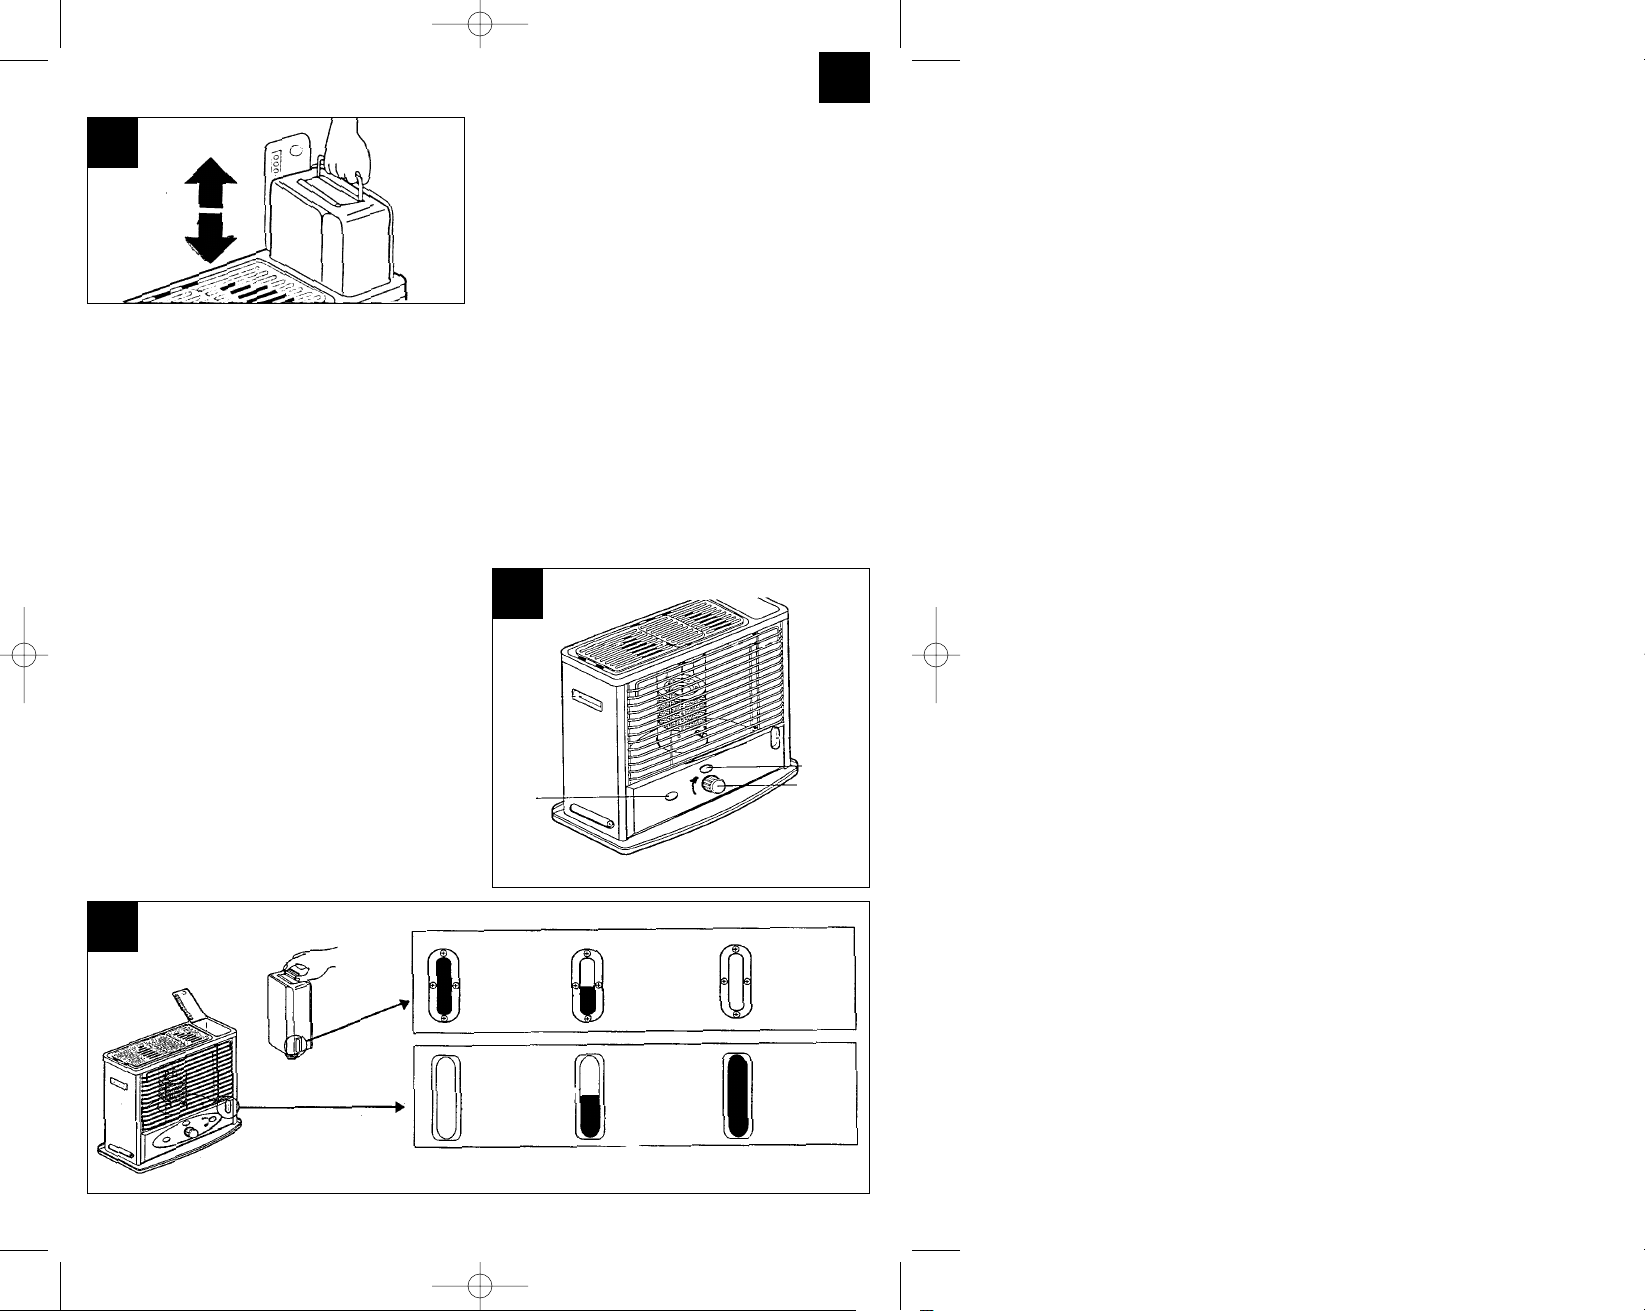
Den Tank in das Brennstoffach einsetzen. Der
Brennstoffvorratsanzeiger muß an der
Vorderseite des Gerätes sichtbar sein. (Wenn
der Tank nicht richtig eingesetzt ist, läßt sich der
Tankfach-Deckel nicht schließen. Abb. 7)
HINWEIS: Mit dem Nachfüllen des Tanks nicht
warten, bis er völlig leer ist. Den Tank nicht zum
Füllen herausnehmen, wenn der Ofen heizt oder
noch warm ist.
4
5
6
Brennstoffvorratsbehälter
Handpumpe
Pumpenrohr
Pumpenventil
Brennstofftank
Pumpenventil
Pumpenrohr flexibel
Anleitung Comfort-Heizgeräte 31.10.2001 14:24 Uhr Seite 6
D
7
Wichtiger Hinweis bei der erstmaligen
Brennstoffüllung:
Bei der ersten Inbetriebnahme ist darauf zu
achten, daß zwischen der Füllung und dem
Anzünden des Ofens mindestens 2 Stunden
liegen. Diese Wartezeit ist notwendig, damit sich
der Docht mit Brennstoff vollsaugen kann.
Wichtiger Hinweis beim erstmaligen
Anzünden des Konvektionsofens:
Die erste Inbetriebnahme des Konvektionsofens
sollte im Freien stattfinden, damit die bei der
Fabrikation verwendeten Öle im Freien und nicht
im Wohnbereich verbrennen.
HINWEIS: Den Ofen ausschalten und den Tank
nachfüllen, bevor er völlig leer ist.
7. ANZÜNDAUTOMATIK
Aus Sicherheits- und Komfortgründen ist der
Konvektionsofen mit einer Anzündautomatik
ausgestattet.
Zwei (2) mitgelieferte R 20 Batterien liefern dem
Zünder die notwendige Leistung zum anzünden des
Dochtes. Der Docht muß sich zu diesem Zweck in
oberster Stellung befinden.
Inbetriebnahme
– Überprüfen, ob die Batterien richtig eingelegt
sind. (Abb. 4)
– Den Dochtregler im Uhrzeigersinn drehen, bis
der Docht maximal hochgedreht ist. (Abb. 9)
– Den Zündknopf drücken, damit der Anzünder
den Docht berührt und zündet.
– Sobald der Docht brennt, den Anzündknopf
loslassen, wodurch sich die Brennkammer
automatisch auf den Docht senkt.
– Den Brenner mehrmals hin- und herdrehen,
um sicherzugehen, daß der Brenner richtig auf
dem Docht sitzt. (Abb. 5)
– Befolgen Sie anschließend die im nach-
folgenden Abschnitt aufgeführten Etappen.
7
8
9
AusSchalter
Dochtregler
Zündknopf
voll
halb voll
leer
voll
halb voll
leer
Anleitung Comfort-Heizgeräte 31.10.2001 14:24 Uhr Seite 7

D
8
8. ABSCHALTEN DES ÖLOFENS
Zum Abschalten den linken Knopf drücken (Abb. 9),
wodurch der Docht abgesenkt wird. Wenn dies nicht
vollständig geschehen ist, den Docht über den
Dochtregler gegen den Uhrzeigersinn ganz nach
unten drehen. Nach 2 bis 3 Minuten den Brennertopf
mit dem Brennergriff nach oben heben und
überprüfen, ob der Brenner wirklich aus ist.
Kontrolle und regelmäßige Wartung Ihres
Heizofens
Achtung! An folgenden Teilen keinesfalls
Eingriffe vornehmen:
- Abschaltautomatik
- Brennstoffvorratsanzeiger
– Überprüfen, ob der Ölofen sauber ist.
Alle Teile des Ölofens müssen von Schmier- und
Ölrückständen gesäubert werden. Brennstoffreste, die beim Einsetzen des Brennstofftanks zu
Verschmutzungen geführt haben, entfernen,
damit keine Gerüche entstehen.
– Den Brennstofftank regelmäßig kontrollieren.
Den Tank herausziehen und überprüfen, ob er
nicht verbeult, leckstellenfrei und in einwandfreiem Zustand ist. Auf Roststellen überprüfen. Ist
der Tank beschädigt, muß dieser sofort ausgewechselt werden.
– Das Dochtregelungssystem auf Rußablage-
rungen überprüfen.
Eventuelle Ruß- oder Kohleablagerungen auf
dem Dochtring mit einem flachen Schraubenzieher abkratzen. Kohleablagerungen nicht auf
den Brenner fallen lassen.
– Die Anzündautomatik überprüfen.
Wenn die Anzündautomatik nicht funktioniert,
überprüfen Sie, ob der Zünddraht gerissen oder
verformt ist. Eine leichte Verformung kann mit
einem kleinen Nagel behoben werden. Wenn er
auseinandergezogen oder gerissen ist, muß der
Zünddraht ausgewechselt werden.
ACHTUNG: Vor dem Auswechseln die Batterien
herausnehmen.
– Die Batterien überprüfen.
Wenn der Zünddraht beim Anzünden des
Dochtes nicht genügend heizt um eine normale
Flamme zu erzeugen, die Batterien auswechseln.
– Den Dochtring überprüfen.
Den Docht vor jeder Benutzung kontrollieren.
Darauf achten, daß der Docht frei von Ruß- oder
Kohleablagerungen ist. Ist der Docht mit Ruß
oder Kohle verschmutzt, unbedingt reinigen.
Bei sämtlichen Problemen mit dem Docht:
VERSTÄNDIGEN SIE SOFORT IHREN
FACHHÄNDLER!
9. DOCHT REINIGEN (RUSS- UND
KOHLEABLAGERUNGEN)
Nach einer bestimmten Betriebszeit kommt es oben
am Dochtring zu Kohle- und Rußablagerungen.
Diese Ablagerungen müssen im Hinblick auf eine
gute Verbrennung und auf richtiges Löschen
beseitigt werden.
Wenn der Ofen 2 bis 3 Brennstofftanks verbrannt
hat, den oberen Dochtteil überprüfen. Ist er steif und
brüchig, liegen Kohleablagerungen vor. Manchmal
hat sich auch Ruß auf der Dochtspitze abgelagert.
Der Dochtzustand ist einwandfrei, wenn die
obere Dochtspitze biegsam ist.
Weitere Hinweise für eine Ablagerung von Kohle auf
dem Docht sind:
– der Dochtregelknopf läßt sich schwer drehen
– der Ofen läßt sich schwer anzünden
ACHTUNG: Die Reinigung von Kohleablagerung
muß im Freien durchgeführt werden.
Der Ölofen funktioniert nur bei regelmäßiger
Dochtpflege einwandfrei. Zu diesem Zweck muß die
am oberen Dochtteil abgelagerte Kohle entfernt
werden.
Bei der Reinigung des Dochtes entsteht ein
unangenehmer Geruch. Aus diesem Grund muß das
Gerät ins Freie, z. B. unter ein Vordach oder an
einem gut gelüfteten Ort gebracht werden.
Reinigung der Kohleablagerung
Den Ölofen in Betrieb lassen, auch wenn der
Tank praktisch leer ist. Man kann ebenfalls die
Tankpatrone herausnehmen und das im Dochtbehälter verbleibende Öl verbrennen lassen.
Wenn der Dochtbehälter völlig leer ist, verlöschen
die Flammen langsam. Den Docht jetzt auf
maximale Höhe stellen und bis zum vollständigen
Verlöschen brennen lassen.
Nach der kompletten Verlöschung 30 Minuten
warten. Danach den Docht erneut anzünden und
wiederum bis zum vollständigen Verlöschen
brennen lassen.
Wenn der Docht völlig kalt ist, mit einer kleinen
Bürste oder einer alten Zahnbürste die Restasche
entfernen
Durch dieses Bürsten wird die auf dem Docht
angesammelte Kohle vollständig entfernt. Der
Docht muß nach dem Bürsten wie neu aussehen
und wieder biegsam sein. Wenn einige Stellen am
oberen Dochtteil weiterhin steif sind, den Docht
an diesen Stellen mit einer Zange biegen,
wodurch die verbleibende Kohle in kleine Partikel
zerbrochen wird. Wenn die Reinigung einmal
Anleitung Comfort-Heizgeräte 31.10.2001 14:24 Uhr Seite 8
D
9
durchgeführt wurde, überprüfen Sie, ob eine
Wiederholung des Reinigungsvorganges
erforderlich ist um die Kohleablagerungen
komplett zu entfernen. Sollte sich eine Wiederholung als erforderlich erweisen, ein wenig Brennstoff in den Behälter füllen und den Vorgang
wiederholen. Ist die Reinigung abgeschlossen,
den Tank füllen und 30 Minuten warten, bevor der
Ofen wieder eingeschaltet wird.
Sie können die Reinigung eine Woche nach der
ersten Benutzung vornehmen.
Anschließend muß diese Reinigung regelmäßig
wiederholt werden, um zu vermeiden, daß der
Docht wieder hart wird und sich erneut Kohle
ablagert.
Im Winter während der Heizsaison sollte die
Reinigung des Dochtes möglichst einmal pro
Woche vorgenommen werden.
Den Docht häufig kontrollieren, damit eine
eventuell notwendige Reinigung nicht übersehen
wird.
10. ANZÜNDAUTOMATIK ÜBERPRÜFEN
Für einwandfreies Funktionieren folgende
Anweisungen befolgen:
Batterien R 20: Das Batteriefach befindet sich an
der Ofenrückseite. Die Batterien auswechseln.
Flammzündkerze: Wenn die Anzündautomatik
nach Auswechseln der Batterien immer noch
nicht funktioniert, die Flammzündkerze
herausnehmen.
Wenn der Draht gerissen oder verbogen ist bzw.
nicht zündet, wenn der Anzündknopf gedrückt
wird, muß die Zündkerze ausgewechselt werden.
Achtung: Es muß sich um eine Zündkerze mit
2.5 V DC, 1 A handeln.
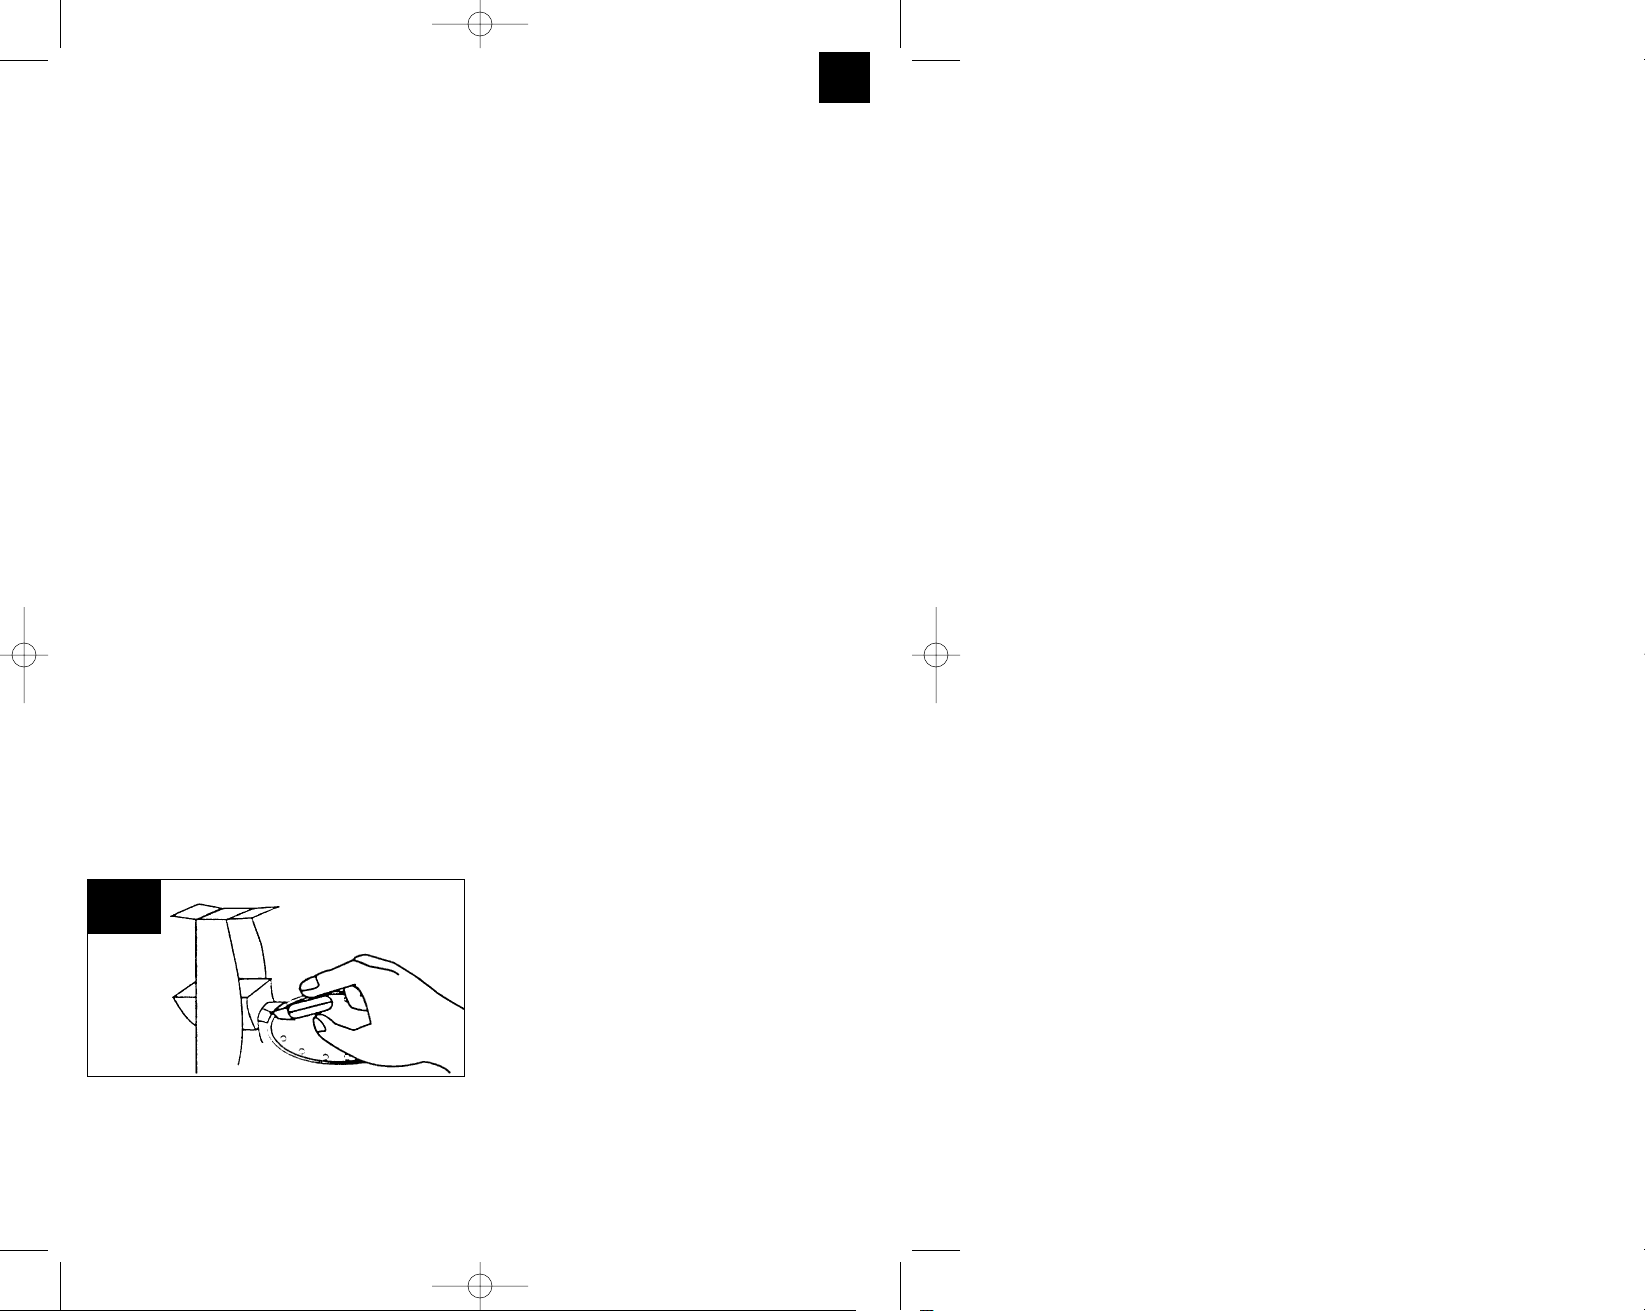
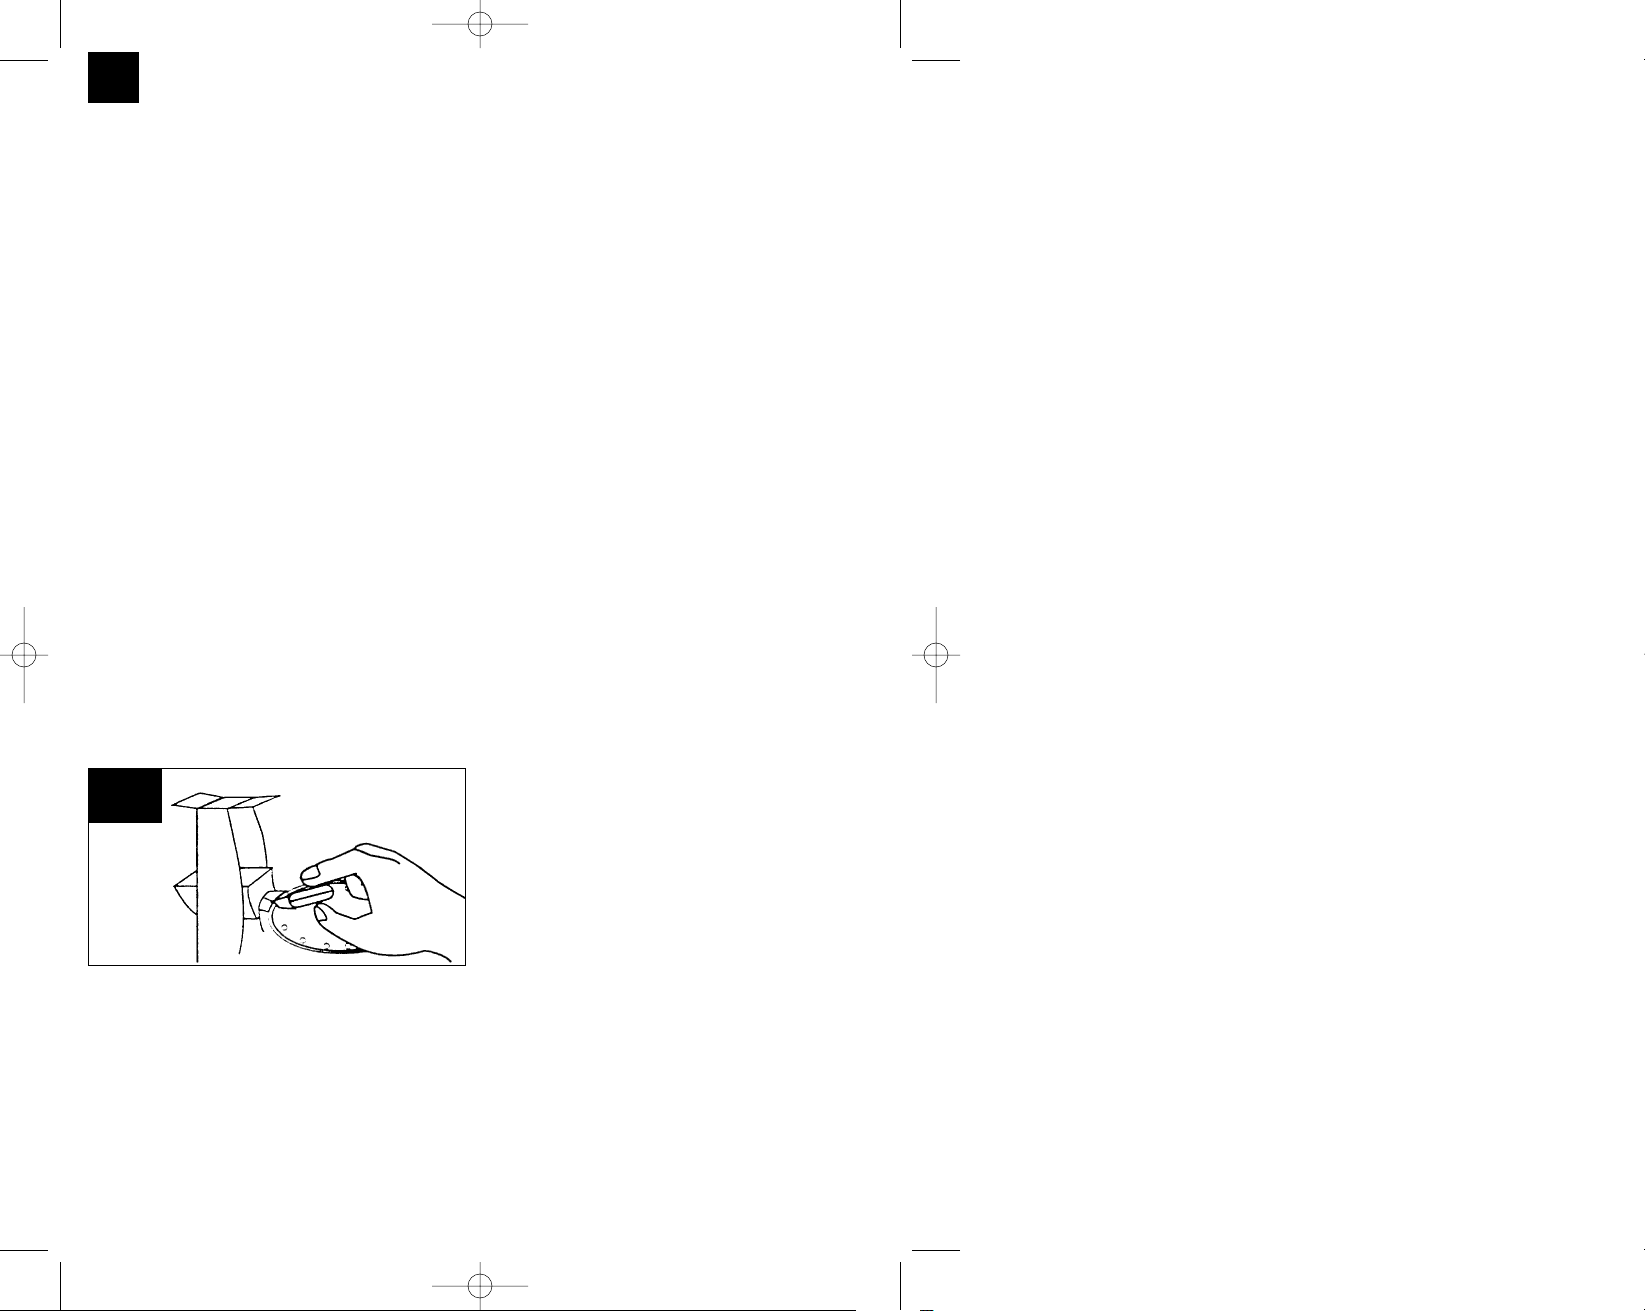
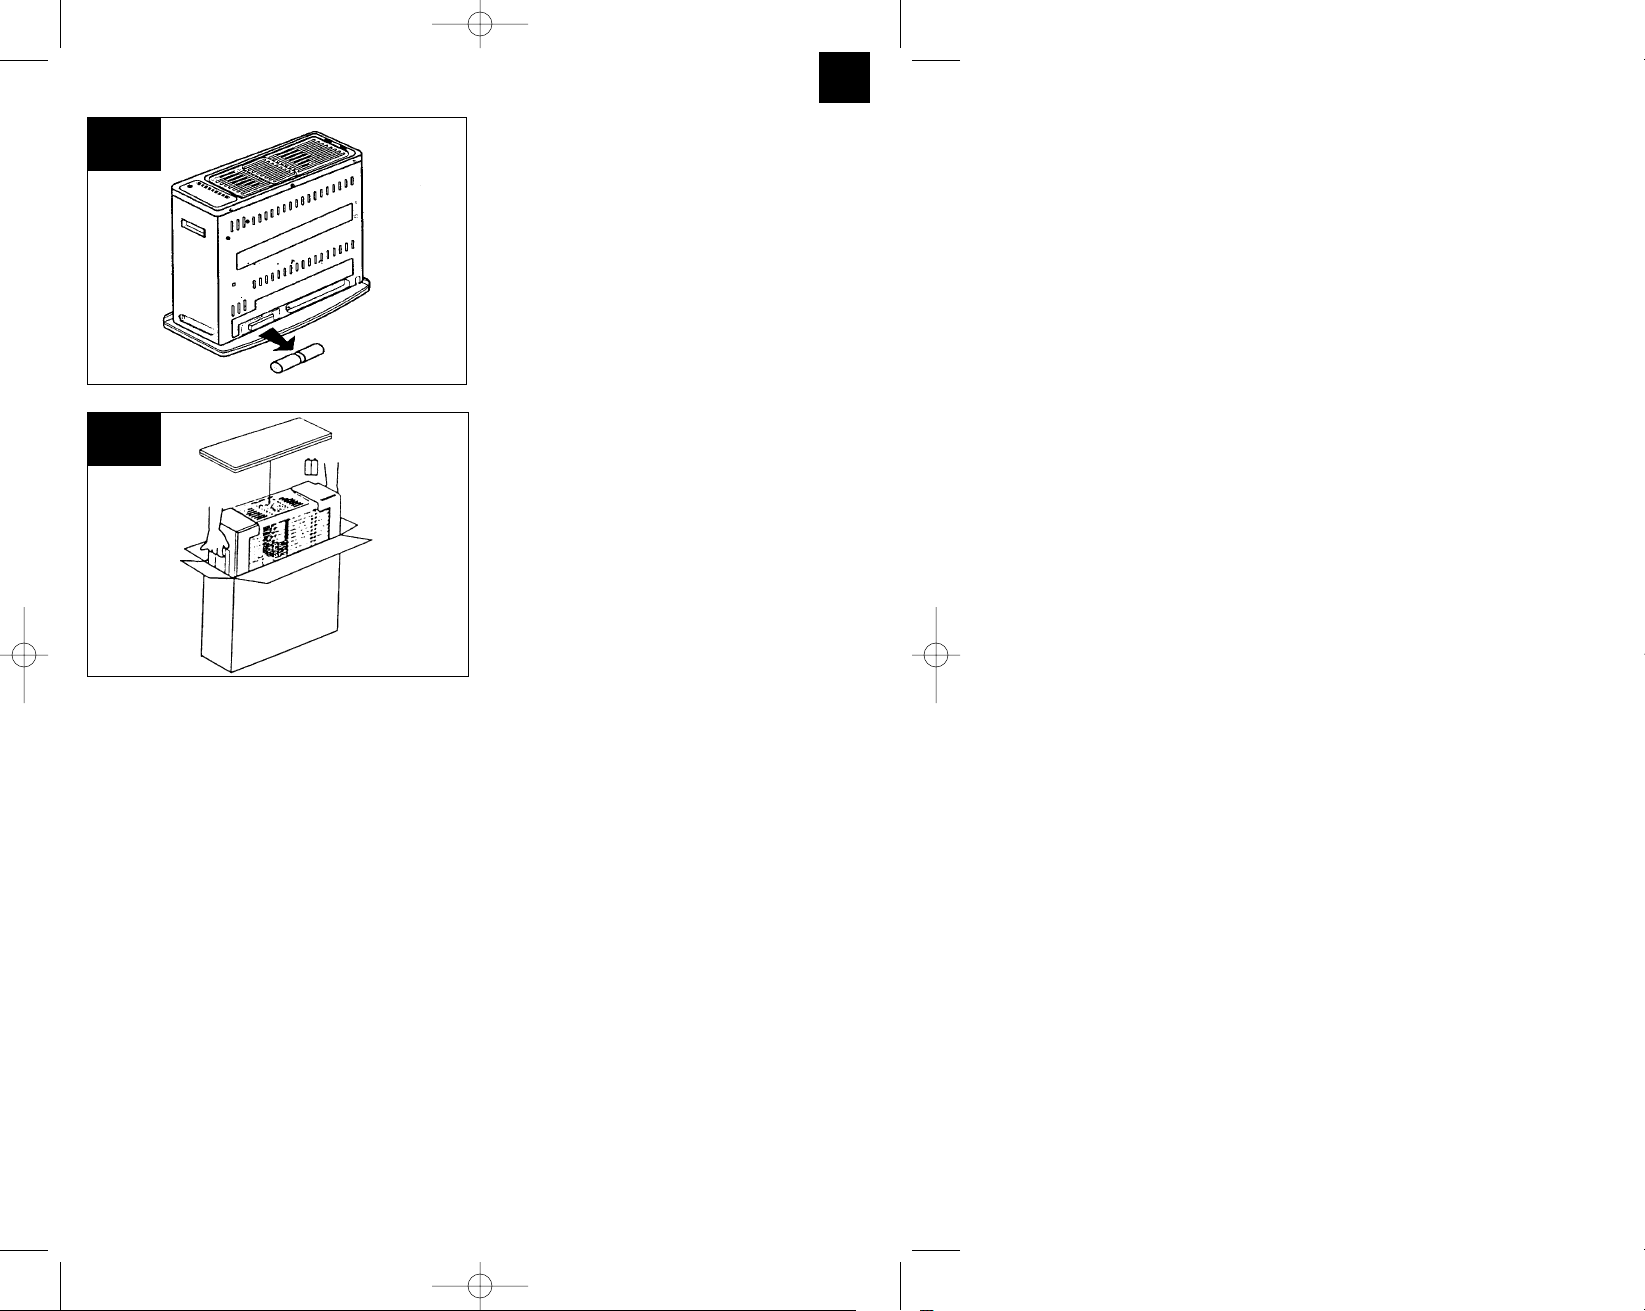
Auswechseln der Flammzündkerze (Abb. 10)
Batterien entfernen.
Das Schutzgitter öffnen und den Brenner
herausnehmen.
Den Anzündknopf drücken, damit die Flamm-
zündkerze angehoben wird.
Die Flammzündkerze drücken und gegen den
Uhrzeigersinn drehen.
Eine neue Zündkerze (2.5 V DC, nur 1 A) nach
innen schieben und im Uhrzeigersinn drehen.
Den Brenner wieder einsetzen, das Schutzgitter
schließen und die Batterien wieder einlegen.
Absenken des Dochtes von Hand
Wenn Sie den Abschaltknopf drücken und
gleichzeitig den Dochtregelknopf halten und diesen
anschließend langsam loslassen, wird die
Verbrennungsgeschwindigkeit des Dochtes
verlangsamt.
Auf diese Weise lassen sich eventuelle
Brennstoffgerüche vermeiden, wenn der
Abschaltknopf des Ölofens ungewollt betätigt wird.
11. ABSCHALTAUTOMATIK
KONTROLLIEREN
Während der Betriebssaison des Ölofens muß die
Abschaltautomatik mindestens einmal pro Woche
kontrolliert werden. Wenn der Ofen ausgeschaltet ist,
den Docht über den Dochtregler ganz nach oben
drehen. Den Ofen am Schutzgitter nehmen und
kräftig schütteln. Wenn die Abschaltautomatik richtig
funktioniert, vernimmt man ein lautes Geräusch, da
die Haltevorrichtung ausschnappt und die Spannfeder den Docht in das Gerätegehäuse absenkt. Zur
Überprüfung, ob sich der Docht wirklich ganz unten
befindet, den Dochtregler im Uhrzeigersinn drehen.
Wenn das System richtig funktioniert, muß der Docht
ganz unten sein. Wenn der Docht über den Dochtregler nicht mehr weiter abgesenkt werden kann,
muß er von Ihrem Fachhändler ausgewechselt
werden.
12. EINLAGERUNG DES ÖLOFENS BEI
LÄNGERER BETRIEBSUNTERBRECHUNG
Wenn die nachfolgenden Anweisungen genau
befolgt werden, bleibt der Ölofen für die kommende
Heizsaison genauso effizient und zuverlässig (Abb.
11/Abb. 12).
Den Tank mit ein wenig Brennstoff ausschwenken
und ausspülen. Niemals Wasser mit dem Brennstoff vermischen, da sich hierdurch im Tankinneren Roststellen bilden würden. Leeren Sie
den im Ofen verbleibenden Brennstoff bis auf den
letzten Rest aus (durch Ausbrennen).
Wenn der Tank leer ist, den Ofen nochmals
anzünden. Den Docht ganz nach oben drehen
und vollständig verbrennen lassen (ca. 1 Stunde).
Dieser Vorgang muß im Freien stattfinden.
10
Anleitung Comfort-Heizgeräte 31.10.2001 14:24 Uhr Seite 9
D
10
Die Batterien herausnehmen. Den Brennstofftank
innen gut trocknen. Sämtliche Kohle- oder
Rußspuren, die sich eventuell auf dem Dochregler, der Dochtführung oder am Brenner angesammelt haben, mit einem Schraubenzieher
und/oder einer Bürste entfernen.
Aus Korrosionsschutzgründen die Batterien vor
der Einlagerung des Ölofens entfernen.
Bei der Einlagerung darauf achten, daß der Docht
in seiner niedrigsten Stellung und die Abschaltautomatik entriegelt ist.
Den Ölofen mit dem Originalverpackungsmaterial
im Originalkarton einlagern. Die Bedienungsanleitung sorgfältig aufbewahren. Der Ölofen muß
in einem gut gelüfteten Raum gelagert werden.
13.BESONDERE SICHERHEITSMASSNAHMEN
Wo darf das Komfortheizgerät eingesetzt
werden?
Der Ölofen darf nur auf eine ebene, waagrechte
Fläche gestellt werden.
Den Ölofen nicht in Durchgangsbereichen, wie
z. B. Ein- oder Ausgängen, aufstellen und keinem
Zug aussetzen.
Den Ölofen nicht unter einem Kamin aufstellen.
Den Ofen nicht in Räumen benutzen, in denen es
bereits wärmer als 30°C ist.
Nicht in der Nähe von Vorhängen oder
brennbaren Gegenständen jeder Art benutzen.
Nicht in Wohnwägen, auf Booten oder Führer-
häusern verwenden.
Den Ölofen bei Betrieb nie unbeaufsichtigt lassen.
Wie wird das Komfortheizgerät bedient?
Vor Gebrauch die Bedienungsanleitung
sorgfältig durchlesen.
Nachdem der Docht entsprechend den
Anweisungen der Bedienungsanleitung
angezündet wurde, überprüfen Sie, ob er normal
brennt. Ein zu hoher Docht bzw. ein angehobener
Brenner können zu einer anomalen Verbrennung
führen, die gefährlich sein kann. Ein falsch
eingestellter Docht kann zur Bildung von Rauch,
Gerüchen, einer schlechten Verbrennung, der
Ablagerung von Kohle auf dem Docht und einer
verkürzten Lebensdauer des Dochtes führen..
Den Ofen in Räumen mit guter Lüftung benutzen.
Den Ofen niemals in Räumen mit entzündbaren
Dampfen oder Gasen benutzen.
Den Ofen niemals zum Trocknen von Kleidung
benutzen.
Den Ofen niemals transportieren, wenn er in
Betrieb ist.
Den Ofen niemals zum Wärmen oder Kochen von
Speisen verwenden.
Niemals die obere Platte oder das Frontgitter
berühren, wenn der Ofen heizt, da diese Flächen
brennend heiß werden.
Den Ofen bei Betrieb niemals unbeaufsichtigt
lassen. Vor dem Schlafengehen muß unbedingt
überprüft werden, ob der Ofen wirklich aus ist.
Wenn der Ofen nicht über die Abschaltautomatik
ausgemacht werden kann, sofort den Tank
herausnehmen. Brennt die Flamme normal
weiter, kann der Ofen in Betrieb bleiben bis der
Brennstoff völlig ausgebrannt ist und die Flamme
verlischt. Sollte der Brenner kein normales
Flammenbild haben, so daß die Flammen darüber
hinausschlagen und der Brenner nicht über die
Abschaltautomatik abgeschaltet werden kann,
muß dieser mit einem Feuerlöscher “A-B-C”Pulver gelöscht werden. Nach einem solchen
Einsatz darf das Gerät nicht mehr in Betrieb
genommen werden, bevor es von einer
Fachwerkstätte überprüft oder repariert wurde.
Es darf ausschließlich Brennstoff verwendet
werden, der laut Erlaß vom 08.01.98 zulässig ist.
Den Brenner niemals in Wasser legen
(Rostgefahr).
Überprüfung und Wartung des
Komfortheizgeräts.
Fragen Sie Ihren Fachhändler, wenn irgend-
welche Probleme auftreten!
12
11
Anleitung Comfort-Heizgeräte 31.10.2001 14:24 Uhr Seite 10
D
11
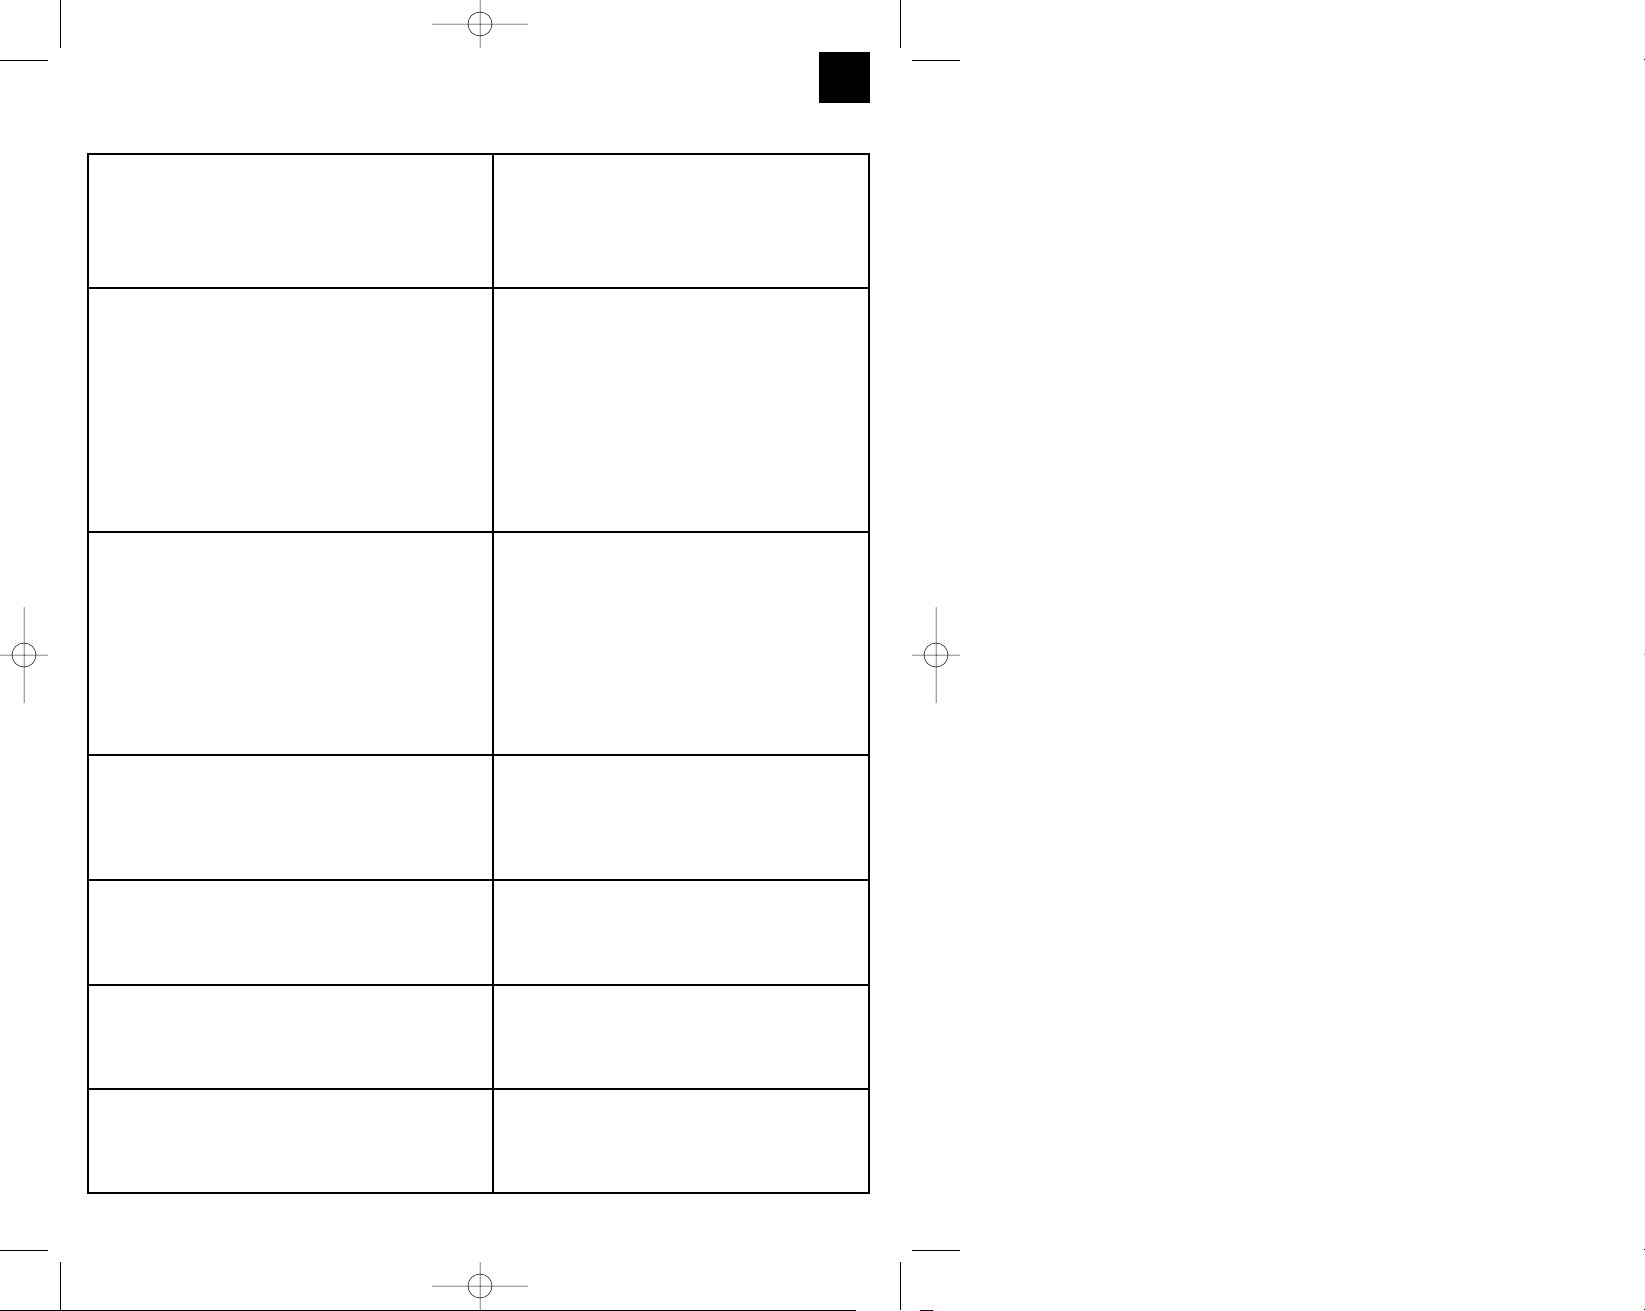
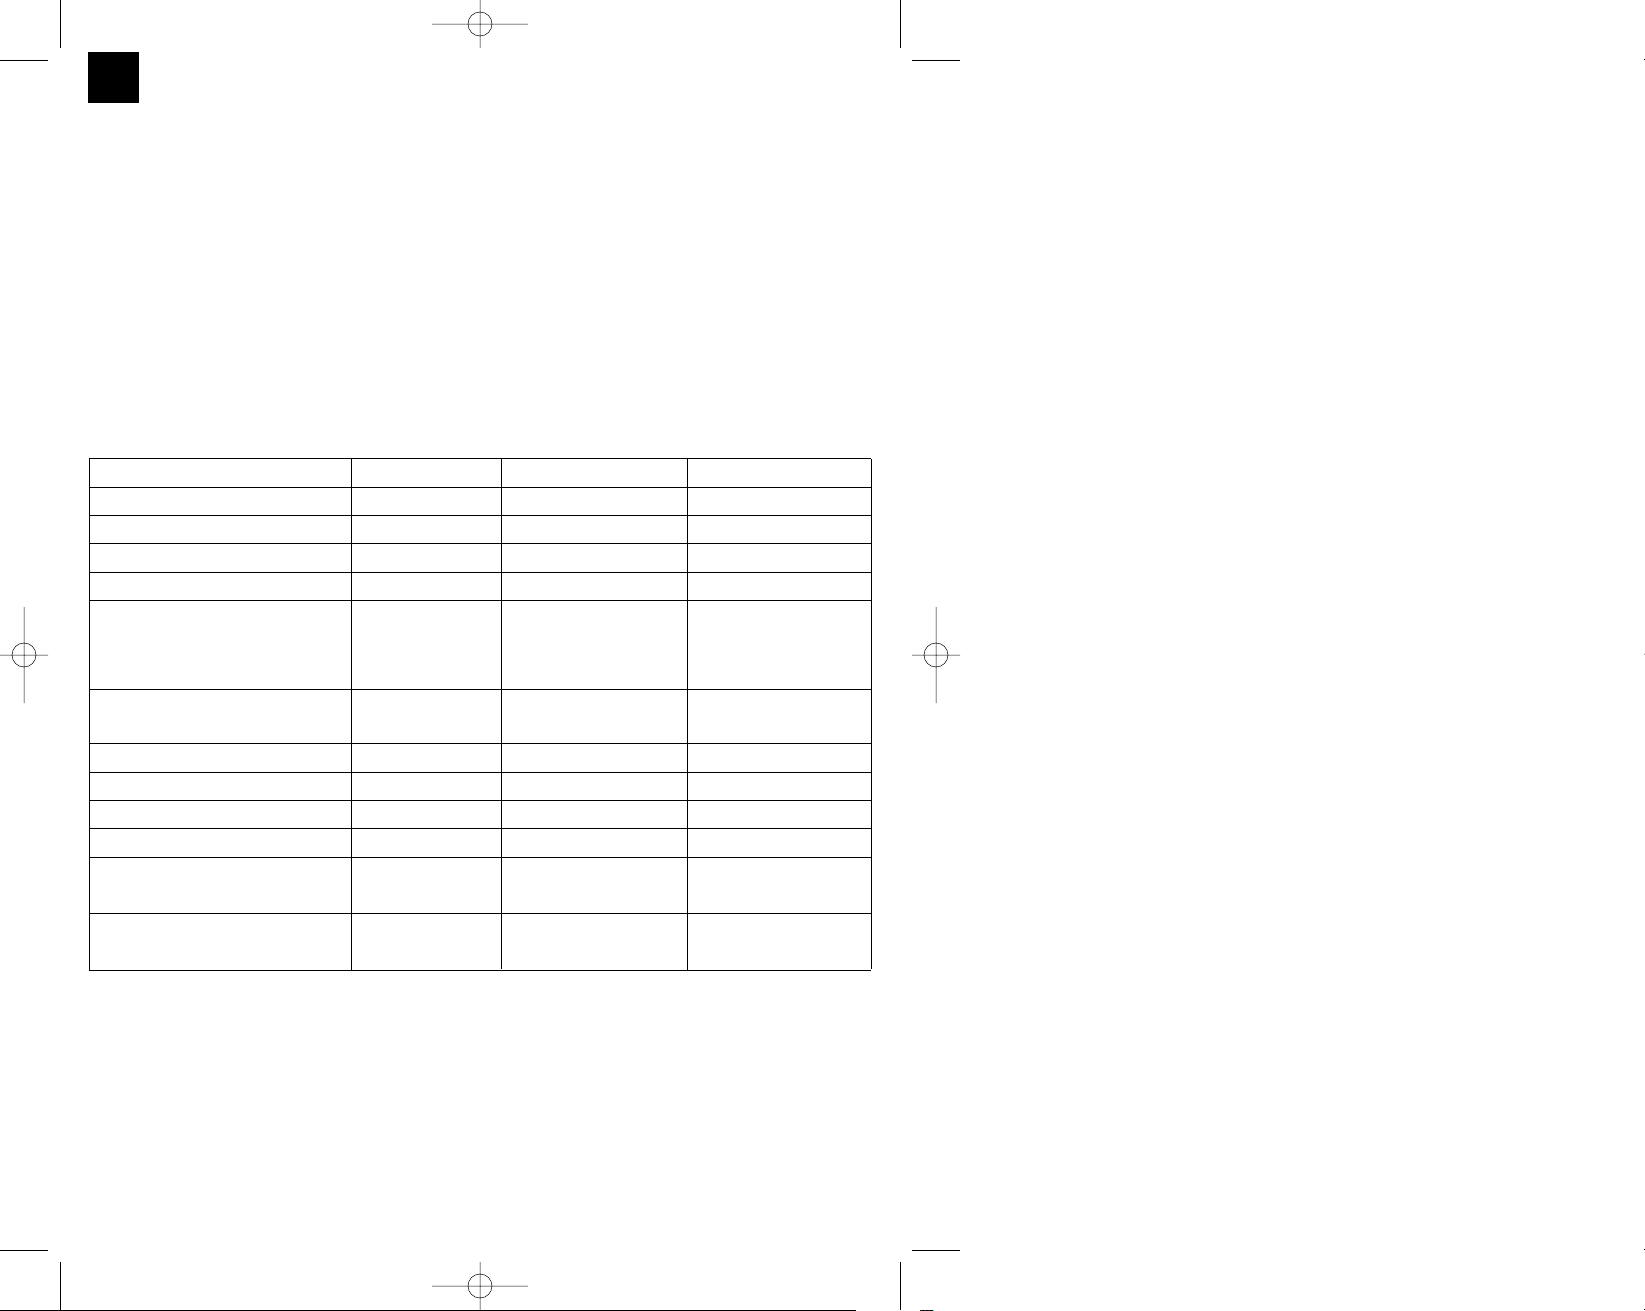
14. RATSCHLÄGE IM PANNENFALL
PROBLEM LÖSUNG
Der Ofen heizt plötzlich nicht mehr. Den Raum lüften und die Raumtemperatur
senken. Ca. 10 bis 15 Min. warten und dann den
Ofen erneut einschalten.
Die Abschaltautomatik ist aktiviert. Versuchen Sie niemals, den Ofen sofort nach
dem Abschalten wieder einzuschalten.
Der Ofen geht nicht an:
1. Der Tank ist leer. 1. Den Tank mit zulässigem Brennstoff füllen.
2. Im Brennstoff ist Wasser vorhanden. 2. Tank leeren. Ihr Fachhändler muß den Docht
auswechseln. Anschließend den Tank mit
zulässigem Brennstoff füllen.
3. Die Anzündautomatik funktioniert nicht 3. Batterien auswechseln. Die Flammzündkerze
auswechseln. Überprüfen, ob der Zünddraht
gerissen oder nicht angeschlossen ist. Vgl.
Punkt 12.
4. Der Anzünder berührt die Dochtseite. 4. Den Docht über den Dochtregler nach unten
drehen, bis die Zündkerze die Dochtspitze
berührt.
Rauch- und Geruchsbildung:
1. Die Flamme brennt zu hoch. 1. Den Docht über den Dochtregler nach unten
drehen, um die Flamme zu reduzieren.
2. Zu starker Lufteintritt im Ofen. 2. Den Ofen aus dem Zugbereich entfernen.
3. Der Brenner ist nicht richtig horizontal. 3. Den Brenner über den Brennerknopf hin- und
herdrehen, bis er sich richtig horizontal über
dem Docht plaziert.
4. Ruß- oder Teerablagerung auf dem Docht. 4. Siehe Punkt 11.
5. Abgelagerter Brennstoff. 5.Den Tank leeren. Den Docht von Ihrem
Fachhändler auswechseln lassen. Dann den
Tank mit zulässigem Brennstoff füllen.
Die Flamme flackert oder geht aus:
1. Im Brennstoff ist Wasser vorhanden. 1. Den Tank leeren. Den Docht von Ihrem
Fachhändler auswechseln lassen. Dann den
Tank mit zulässigem Brennstoff füllen.
2. Ruß- oder Teerablagerung auf dem Docht. 2. Lassen Sie den Docht von Ihrem Fachhändler
warten. Vgl. Punkt 11.
Der Docht verbrennt schnell:
1. Achtung! Der Brennstoff ist mit NICHT zulässigem, 1. Den Tank leeren und reinigen.
flüssigem und gefährlichem Kraftstoff vermischt.
Den Docht von Ihrem Fachhändler
auswechseln lassen.
Den Tank mit zulässigem Brennstoff füllen.
Der Docht läßt sich schwer regeln:
1. Im Brennstoff ist Wasser vorhanden. 1. Den Tank leeren. Den Docht von Ihrem
Fachhändler auswechseln lassen.
2. Kohle- oder Teerablagerung. 2. Die Anweisungen der Bedienungsanleitung
befolgen.
Der Ofen brennt:
Die Feuerwehr verständigen.
Die Flammen mit einem Feuerlöscher löschen.
Ansonsten Decken benutzen und Wasser auf
die Decken schütten. Niemals direkt Wasser
auf den Ofen schütten.
Anleitung Comfort-Heizgeräte 31.10.2001 14:24 Uhr Seite 11

Read the operating instructions carefully before
starting up your Comfort Heater for the first time.
The instructions will tell you
how to set up, operate, and service your heater,
and - most importantly - how to use it safely and
efficiently. Keep the operating
instructions in a safe place to have them handy
in case of any trouble.
Important information
Caution !
Risk of explosion! Risk of fire!
Never use any fuel other than liquid fuel for
mobile heaters authorized by your country’s
national standards.
Never fill this type of oil heater with fuels such as
gasoline, benzene, solvents, or other substances.
Never refill your oil heater with liquid fuel while it
is still in operation or while it is still hot.
Never use the oil heater in rooms which pose a
fire or gas explosion hazard.
Never refill the oil heater in closed rooms. Always
refill it outdoors.
Store and transport the fuel only in metal or
plastic canisters which...
- are specially designed for fuels.
- are marked with a label identifying the contents
as „Liquid Fuel for Mobile Heaters“ in
accordance with your country’s national
standards.
Never store fuel in your living quarters. All fuel
must be stored in a cool place outside any living
quarters. The oil heater gets extremely hot during
operation. Keep children, clothes, furniture and
other objects away at a distance of at least 1
meter.
Never use gasoline (fire hazard).
Beware of fires and air pollution. Restrict your use
of the oil heater to rooms with good air circulation.
Never use the oil heater in small or windowless
rooms.
Each room in which the oil heater will be used
must have sufficient air inflow and outflow (an
inlet and an outlet opening with a minimum cross
section of 50 cm
2
).
Never use the oil heater in rooms with insufficient
air circulation or in basement rooms.
Never use the oil heater for heating or boiling
water or for cooking food.
Never lift out the refill tank while the heater is still
in operation or while it is still hot. Never use the
cartridge to transport or store fuel or other
flammable substances.
During start-up, you may notice an odd sound
coming from the refill tank: This sound is caused
by fuel running from the tank into the bottom
container to saturate the wick. This sound is
perfectly normal.
Important!
Failure to comply with the installation,
maintenance or operating instructions may lead
to burns and/or injuries. In this case, the
manufacturer shall not be held liable for any
damages.
N.B.: The warnings and instructions contained in this
operating manual cannot possibly cover all situations
imaginable. The use of any type of heater, especially
oil heaters, requires a sensible and careful approach
and compliance with the safety precautions. Riskfree operation
of this heater is subject to the observation of these
rules.
In the event of problems, we advise you to notify
your specialist dealer, salesperson, or customer
service department.
Never leave the oil heater burning if you plan on
leaving for longer or even brief periods of time.
Make sure that the heater is really turned off
before leaving the room.
Never leave the heater unsupervised during
operation.
Never use the heater to dry objects.
Never place objects on top or in front of the
heater.
Never use the convection heater on a boat, in a
camping trainer, or a cockpit.
Caution! Risk of burns!
Do not use the heater unless the safety grille is
completely closed. To close the grille, insert the pin
in the housing frame.
Room temperature control
The room temperature should be comfortable. If it
gets too warm, ventilate the room by opening a
window. Do not manipulate the wick knob. Trying to
reduce the heat by manipulating the wick knob will
only lead to insufficient combustion which may cause
unpleasant odors and health hazards.
KEEP THE OPERATING
INSTRUCTIONS IN A SAFE PLACE!!!
GB
12
Anleitung Comfort-Heizgeräte 31.10.2001 14:24 Uhr Seite 12
GB
13
1. PREFACE
Read the operating instructions carefully. They
contain all the information you need for correct
operation and safe and efficient
set-up of the oil heater. Only a thorough
knowledge of the operating instructions will
allow you to enjoy all the advantages this heater
has to offer.
2. TECHNICAL DATA
Model number CH 2750 CH 2850 G CH 3600 GC
Convector type Reflector Reflector Reflector
Filament wattage 2,750 W 2,850 W 3,600 W
Fuel consumption 230 g/h 235 g/h 300 g/h
Daily capacity approx. 12 hours approx. 12 hours approx. 12 hours
Fuel tank removable removable removable
Fuel tank capacity 3.81 liters 3.81 liters 3.81 liters
Ignition 2 x R20 batteries 2 x R 20 batteries 2 x R 20 batteries
Air exhaust control included included included
Dimensions 48 x 32 x 53 cm 48 x 32 x 53 cm 67 x 33 x 53 cm
Weight 11 kg 11.5 kg 13.5 kg
Area of room min. 30 m
2
min. 32 m
2
min. 42 m
2
max. 36 m
2
max. 38 m
2
max. 50 m
2
Volume of room min. 75 m
3
min. 75 m
3
min. 105 m
3
max. 90 m
3
max. 95 m
3
max. 120 m
3
Anleitung Comfort-Heizgeräte 31.10.2001 14:24 Uhr Seite 13
3. DESCRIPTION OF THE OIL HEATER
4. FUEL
Use only liquid fuel for oil heaters authorized by
your country’s national standards.
Never store fuel in closed rooms. Store only in a
well ventilated place.
Never use fuels such as gasoline, benzene,
alcohol, camping gas, solvents, or other
substances. These are all liquid substances which
may cause explosions or fires. When starting up
or turning off the heater, there will be a smell of
fuel. This is perfectly normal.
When the oil heater is running and room
temperature has been reached (after approx. 5 to
10 minutes, depending on room size), there may
be a faint, temporary smaell of fuel.
Never store the fuel next to a heat source or in a
sunny place.
Do not keep fuel for more than a year as lengthy
storage is detrimental to fuel quality. Old fuel will
cause improper combustion in the burner.
The use of low-grade fuel may have the following
effects: Smoke and smells, small flames, ignition
difficulties, extinguishing difficulties, quenching of
the wick, short wick life, sinking of the wick, and
carbon deposits on the wick. Should any of these
problems occur, check the fuel and notify your
specialist dealer.
5. UNPACKING AND SETTING UP THE
OIL HEATER
a) Take the oil heater and the packed parts out of
the box (Figure 2).
N.B.: Keep the box and packaging materials for
later storage.
b) Open the safety grille at the right hand side of the
heater (lift it up and pull it towards you). Take the
burner out of the protective packaging (Figure 3).
c) Open the lid of the fuel tank compartment on top
of the heater and remove the protective foam
rubber from the top and the protective carton from
the bottom (Figure 3).
d) Keep the packaging materials in the original box.
e) To close the heater, first insert it in the slots at the
top and then in the slots at the bottom. Never start
up the heater if the grille is not properly locked in
place and closed.
f) Insert the batteries at the rear side of the heater
(Figure 4).
GB
14
1
2
3
handle
OFF
switch
cover plate
fuel tank
protective
front
wick
controller
fuel sightglass
ignition button
Anleitung Comfort-Heizgeräte 31.10.2001 14:24 Uhr Seite 14
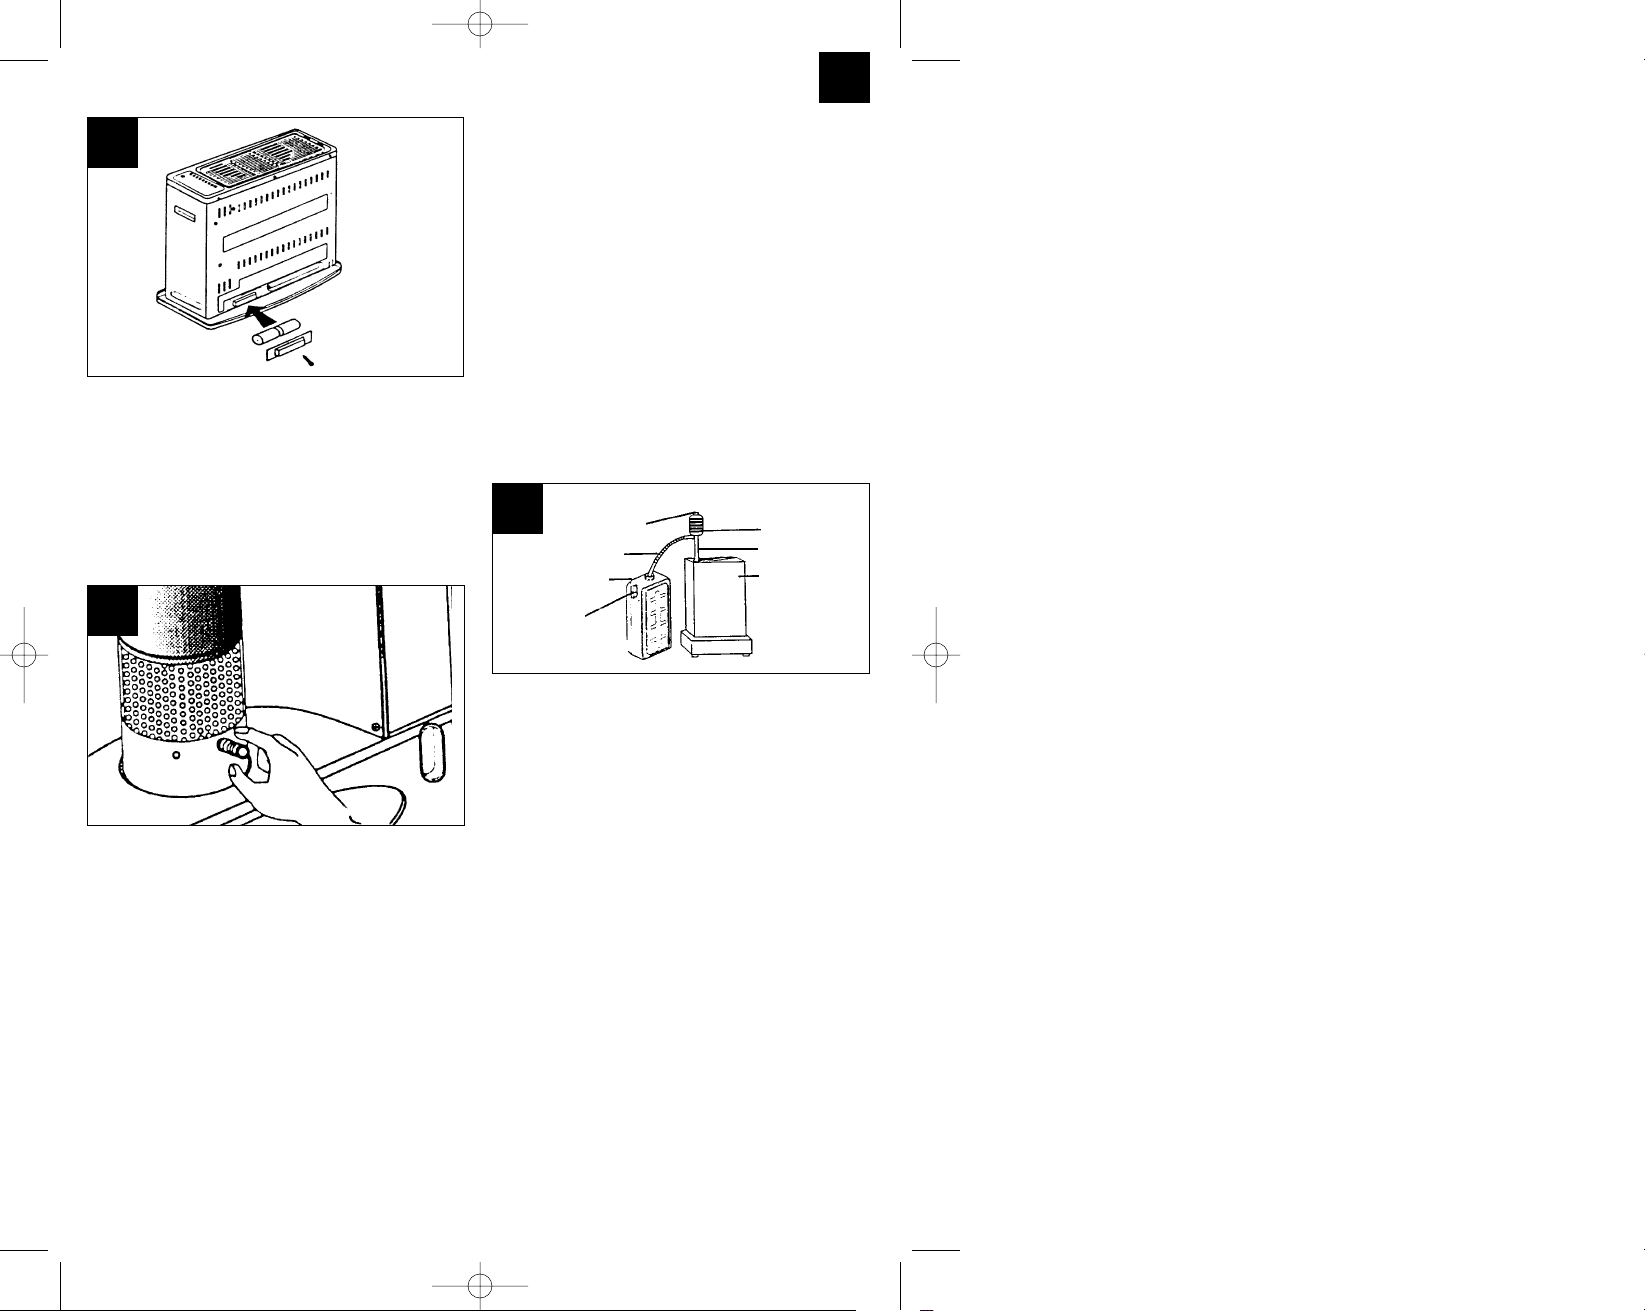
Unscrew the recessed head screw and remove
the battery compartment lid.
– Insert the two R 20 batteries (supplied with the
heater) in the battery compartment located on
the rear side of the appliance. Watch out for the
(+) and (-) polarities of the batteries.
– Whenever the heater is not in use, or when its
operation is interrupted for an extended period
of time, be sure to take out the batteries.
g) Burner position (Figure 5)
- Position the burner on top of the wick controller.
- To make sure that the burner is in the right
place, turn the burner knob back and forth three
or four times until the burner settles properly on
the wick controller.
h) Check the automatic cut-out
- Using the wick controller, turn the wick all the
way to the top.
- Press the OFF button. The wick must now
move all the way to the bottom.
- To check if the wick has really gone all the way
down, test whether the wick can be lowered
any further with the wick controller. The
automatic cut-out is working correctly if it is
impossible to move the wick down any further.
Never start up the heater if this safety system is
not working properly.
6. FILLING THE HEATER WITH FUEL
CAUTION: Never lift out the fuel tank or fill it
while the heater is in operation or still hot.
Never fill the fuel tank in your living quarters. This
should be done strictly out of doors. To fill the oil
heater with fuel, first take the removable tank, the
fuel, and the manual pump outdoors.
How to use the manual pump: Insert the rigid tube in
the fuel storage canister and the flexible tube in the
tank opening (Figure 6). Squeezing the bellows of
the manual pump will transport the fuel from the
canister into the tank. During the filling operation,
always keep an eye on the fuel gauge to check the
fuel level. When the tank is full, unscrew the cap
on the siphon pump. This will interrupt the fuel flow.
Then re-close.
Do not allow the fuel tank to overflow. The manual
pump must be completely drained before pulling
the pipes out of the tank and fuel canister. Make
sure that the screw caps of the tank and fuel
storage canister are properly closed.
Insert the tank into the fuel compartment. The fuel
gauge must be visible at the front side of the
heater. (If the tank is not inserted correctly, the
tank compartment lid will not close. Figure 7)
N.B.: Do not wait until the tank is completely
empty before refilling it. Do not take the tank out
for refilling if the heater is still in operation or while
it is still hot.
GB
15
4
6
fuel storage
container
manual pump
pump tube
pump valve
fuel tank
pump valve
flexible pump tube
5
Anleitung Comfort-Heizgeräte 31.10.2001 14:24 Uhr Seite 15
Important note for filling in fuel for the first time:
When starting up the heater for the first time,
make sure that at least two hours elapse between
filling in the fuel and igniting the heater. This
waiting period is necessary to allow the wick to be
become saturated with fuel.
Important note for igniting the convection
heater for the first time:
We strongly advise you to start up the convection
heater for the first time outdoors so that the oils
used during the manufacturing process are
combusted out of doors and not inside your living
quarters.
N.B.: Switch off the heater and refill the tank
before it is completely empty.
7. AUTOMATIC IGNITION
The convection heater is equipped with an automatic
ignition system for added safety and comfort.
Two (2) R 20 batteries are included with the heater to
supply the automatic ignition system with the power
required to light up the wick. For this purpose, the
wick must be in its uppermost position.
Start-up
- Make sure that the batteries are properly in
place. (Figure 4)
- Turn the wick controller in clockwise direction
until the wick has moved all the way to the top.
(Figure 9)
- Press the ignition button so that the ignition
touches the wick and lights it.
- Once the wick starts to burn, release the ignition
button. This will cause the combustion chamber
to be lowered automatically onto the wick.
- Turn the burner back and forth a few times to
ensure that the burner is seated correctly on top
of the wick. (Figure 5)
- Then follow the steps outlined in the next
section.
GB
16
8
full
half full
empty
full
half full
empty
7
9
OFF
switch
wick
controller
ignition
button
Anleitung Comfort-Heizgeräte 31.10.2001 14:24 Uhr Seite 16

8. TURNING OFF THE OIL HEATER
To turn off the heater, press the left-hand button
(Figure 9). This will cause the wick to be lowered. If
this fails to lower the wick completely, turn the wick in
counterclockwise direction with the wick controller
until it is fully lowered. After about 2 or 3 minutes, lift
the burner by the burner handle and check that the
burner has indeed gone out.
Inspection and regular maintenance of your
heater
Important! Never manipulate any of the following
parts:
- Automatic cut-out
- Fuel gauge
- Check to make sure that the oil heater is
clean.
All parts of the oil heater must be cleaned of
lubricants and oil residues. To avoid smells, be
sure to remove any fuel residues spilled when
inserting the fuel tank.
- Inspect the fuel tank on a regular basis.
Lift out the tank and check it to make sure that it
is not dented or leaking and that it is in perfect
condition. Also, inspect the tank for rust spots. If
the tank is damaged in any way, it must be
replaced immediately.
- Inspect the wick control system for soot
deposits.
Scrape off any soot or carbon deposits on the
wick ring with a flat screwdriver. Do not allow any
carbon deposits to drop onto the burner.
- Check the automatic ignition system.
If the automatic ignition system fails to work
correctly, check to see whether the ignition wire is
fractured or bent. Minor deformations can be
corrected with a small nail. If the ignition wire is
pulled apart or fractured, it must be replaced.
CAUTION: Take out the batteries prior to
replacing the wire.
- Check the batteries.
If, during ignition of the wick, the ignition wire fails
to heat up sufficiently to produce a normal flame,
the batteries must be replaced.
- Check the wick ring.
Check the wick prior to every use. Make sure that
the wick is free of soot and carbon deposits. If the
wick is soiled with soot or carbon, it must be
cleaned promptly.
If you encounter any problems with the wick:
NOTIFY YOUR SPECIALIST DEALER
IMMEDIATELY!
9. CLEANING THE WICK (SOOT AND
CARBON DEPOSITS)
Carbon and soot deposits accumulate on the top of
the wick ring when the heater has been in operation
a certain time. It is important to remove these
deposits in order to ensure good combustion and
correct extinguishing.
Check the upper part of the wick once the heater has
consumed 2 or 3 tanks of fuel. If it is rigid and brittle,
this is a sign of carbon deposits. In some instances,
soot will also have accumulated on the wick’s tip.
The wick is in perfect condition if its upper tip is
flexible.
Other signs indicating carbon deposits on the wick:
- the wick control knob is hard to turn
- the heater is difficult to start up
IMPORTANT: Carbon deposits must be removed
out of doors.
The oil heater will not function perfectly unless the
wick is tended to on a regular basis. For this
purpose, the carbon deposits which accumulate on
the upper part of the wick must be removed.
Cleaning the wick is accompanied by an unpleasant
smell. It is essential, therefore, to take the heater out
of doors, e.g. under a canopy or a similar well
ventilated place.
Removing the carbon deposits
Keep the oil heater going, even if the tank is
practically empty. Alternatively you can remove
the tank cartridge and let the residual oil in the
wick container burn away completely. Once the
wick container is completely empty, the flames
will go out slowly. Now turn the wick up all the
way and let it continue to burn until it goes out
completely.
Wait for 30 minutes after the flame has gone out.
Re-light the wick and again let it burn until it goes
out completely.
Once the wick has cooled down completely,
remove any residual ash using a small brush or
an old toothbrush.
All the carbon deposits which have accumulated
on the wick will be removed by this brushing.
When you are finished brushing, the wick should
have regained its original flexibility and look like
new. If you find that certain areas on the upper
part of the wick are still rigid, bend these areas of
the wick with pliers, which will break up the
residual carbon into small particles. After you
have cleaned the wick once, check to see if you
need to repeat the cleaning procedure in order to
get completely rid of all the carbon deposits. If it
turns out that the wick needs to be cleaned
another time, fill the container with a small
GB
17
Anleitung Comfort-Heizgeräte 31.10.2001 14:25 Uhr Seite 17
amount of fuel and repeat the above procedure.
When you are finished with the cleaning, fill the
tank and wait another 30 minutes before turning
the heater back on.
We recommend you to clean the heater one week
after starting it pu for the first time.
Thereafter you should repeat this cleaning
procedure on a regular basis to prevent the wick
from getting hard again and to avoid new carbon
deposits.
During the winter heating season, the wick should
be cleaned at least once a week, if possible.
Be sure to inspect the wick frequently in order not
to miss an essential cleaning interval.
10. CHECKING THE AUTOMATIC
IGNITION SYSTEM
Observe the following instructions to ensure
proper operation:
R 20 batteries: The battery compartment is
located on the rear side of the heater. Replace
the batteries.
Flame spark plug: Should the automatic ignition
still not work, even after the batteries have been
replaced, take out the flame spark plug.
If the wire is fractured or bent, or if it does not
ignite while the ignition button is being pushed,
the spark plug needs to be replaced.
IMPORTANT: Be sure to use a 2.5 V DC, 1 A
spark plug.
Replacing the flame spark plug (Figure 10)
Remove the batteries.
Open the safety grille and take out the burner.
Press the ignition button in order to raise the
flame spark plug.
Press the flame spark plug and turn it in
counterclockwise direction.
Insert a new spark plug (2.5 V DC, 1 A only) and
turn it in clockwise direction.
Reinsert the burner, close the saftey grille, and
replace the batteries.
Lowering the wick by hand
Pressing the OFF button while holding the wick
control knob and then releasing it slowly will
decrease the combustion speed of the wick.
This way, fuel smells can be avoided if the OFF
button of the oil heater was pushed inadvertently.
11. CHECKING THE AUTOMATIC
CUT-OUT
During the oil heater’s main season in use, the
automatic cut-out must be checked at least once a
week. After turning off the heater, use the wick
controller to turn the wick all the way to the top. Take
the heater by the safety grille and shake it vigorously.
If the automatic cut-out is working correctly, you will
hear a loud sound as the clamping device unsnaps
and the tension spring lowers the wick into the
housing. To make sure that the wick is fully lowered,
turn the wick controller in clockwise direction. If the
system is working properly, the wick must be fully
lowered. If it is not possible to lower the wick any
further with the wick controller, you need to have it
replaced by your specialist dealer.
12. STORING THE OIL HEATER FOR
EXTENDED PERIODS OF TIME
If you follow the following instructions exactly, your
oil heater will continue to work just as efficiently and
reliably during the next heating season (Figure 11 /
Figure 12).
Swill a small amount of fuel around in the tank
and rinse it out. Never mix any water with the fuel
as this will cause the tank to rust on the inside.
Remove the last traces of fuel from the heater (by
burning away the fuel).
Once the tank is empty, re-light the heater. Turn
the wick all the way to the top and allow it to burn
down completely (this takes about 1 hour). This
procedure must be done outdoors.
Take out the batteries. Allow the fuel tank to dry
well on the inside. Remove any traces of carbon
or soot which may have accumulated on the wick
controller, the wick guide or the burner with a
screwdriver and/or a small brush.
To avoid corrosion, remove the batteries before
putting the oil heater away for storage.
Before putting the heater away for storage, make
sure that the wick is in the lowest possible
position and that the automatic cut-out is
unlocked.
GB
18
10
Anleitung Comfort-Heizgeräte 31.10.2001 14:25 Uhr Seite 18
Always store the oil heater in the original box,
using the original packaging materials. Keep the
operating instructions in a safe place. The oil
heater must be stored in a well ventilated room.
13. SPECIAL SAFETY PRECAUTIONS
Where is it safe to use the comfort heater?
The oil heater must be set up only on level,
horizontal surfaces.
Do not set up the oil heater in passageways such
as entrances or exits, and do not expose it to
drafts.
Do not set up the oil heater underneath a
fireplace.
Do not use the heater in rooms which are already
warmer than 30°C.
Never place the heater in close proximity to
curtains or other flammable objects of any sort.
Do not use the heater in campers, on boats, or in
cockpits.
Never leave the oil heater unsupervised during
operation.
How to operate the comfort heater?
Read the operating instructions carefully before
using the heater.
After igniting the wick in accordance with the
operating instructions, inspect it to make sure that
it is burning properly. If the wick is too high or if
the burner is too far up, combustion may be
abnormal and even dangerous. An incorrectly
adjusted wick may cause the smoke, smells,
insufficient combustion and the accumulation of
carbon deposits on the wick, and it may even
shorten wick life.
Use the heater only in well ventilated rooms.
Never use the heater in rooms which contain
flammable vapors or gases.
Never use the heater to dry clothes.
Never transport the heater while it is still in
operation.
Never use the heater to heat up or cook food.
Never touch the top plate or the safety front grille
while the heater is still in operation as these
surfaces become burning hot.
Never leave the heater unsupervised during
operation. Make sure that the heater is really off
before retiring for the night.
If it is impossible to turn off the heater with the
automatic cut-out, take out the tank immediately.
If the flame keeps on burning in a normal way, the
heater can be kept going until the fuel has burned
away completely and the flame dies out. If the
flames in the burner appear abnormal, i.e. if they
are blazing out over the burner while it is
impossible to turn of the burner with the automatic
cut-out, the fire must be extinguished with an „AB-C“ powder fire extinguisher. After such an
incident, the heater must not be started up again
until it was inspected and repaired in a specialist
workshop.
Use only fuel types authorized by your country’s
national standards.
Never place the burner in water (risk of rusting).
Inspection and maintenance of the comfort
heater.
Consult your specialist dealer if you encounter
any problems!
GB
19
12
11
Anleitung Comfort-Heizgeräte 31.10.2001 14:25 Uhr Seite 19
14. WHAT TO DO IN CASE OF TROUBLE
PROBLEM SOLUTIONS
The heater suddenly stops generating heat. Ventilate the room and lower the room temperature.
Wait for about 10 or 15 minutes, then restart the
heater.
The automatic cut-out is activated. Never attempt to restart the heater immediately
after switching it off.
The heater does not start up:
1. The tank is empty. 1. Fill the tank with authorized fuel.
2. The fuel contains water. 2. Empty the tank. Have the wick replaced by your
specialist dealer. Then refill the tank with
authorized fuel.
3. The automatic ignition system is not working. 3. Replace the batteries. Replace the flame spark
plug. Check to see if the ignition wire is torn or
disconnected. See section 12.
4. The ignition is touching the side of the wick. 4. Turn the wick all the way down with the wick
controller until the spark plug touches the tip of
the wick.
Smoke and odor formation:
1. The flame is burning too high. 1. Turn the wick down with the wick controller to
reduce the flame.
2. Excessive air intake in the heater. 2. Remove the heater from the draft.
3. The burner is not completely horizontal. 3. Turn the burner back and forth with the burner
knob until it settles in a proper horizontal position
above the wick.
4. Soot or tar deposits on the wick. 4. See section 11.
5. Old fuel. 5. Empty the tank. Have the wick replaced by your
specialist dealer . Then refill the tank with
authorized fuel.
The flame is flickering or going out:
1. The fuel contains water. 1. Empty the tank. Have the wick replaced by your
specialist dealer . Then refill the tank with
authorized fuel.
2. Soot or tar deposits on the wick. 2. Have the wick replaced by your specialist dealer.
See section 11.
The wick is burning down too fast:
1. Caution! The fuel you are using is mixed with 1. Empty the tank and clean it out.
unauthorized, liquid, and dangerous fuel.
Have the wick replaced by your specialist dealer.
Fill the tank with authorized fuel.
The wick is difficult to adjust:
1. The fuel contains water. 1. Empty the tank. Have the wick replaced by your
specialist dealer.
2. Carbon or tar deposits. 2. Follow the instructions in the operating manual.
The heater is on fire: Empty the tank. Have the wick replaced by your
specialist dealer.
Call the fire brigade.
Extinguish the flames with a fire extinguisher.
Altenatievly, use blankets and pour water on top
of the blankets. Never pour water directly onto
the heater.
GB
20
Anleitung Comfort-Heizgeräte 31.10.2001 14:25 Uhr Seite 20

Lisez attentivement le mode d’emploi de votre
appareil de chauffage de confort avant la
première mise en service. Le mode d’emploi
vous familiarise avec le montage, le maniement
et l’entretien de votre poêle et - ce qui est le plus
important - vous renseigne sur la manière de le
rendre plus efficace et plus sûr. Conservez
soigneusement ce mode d’emploi pour y avoir
recours en cas d’éventuelles pannes de
fonctionnement.
Instructions importantes
Attention!
Risque d’explosion! Risque d’incendie!
N’utilisez jamais d’autre combustible que celui
liquide destiné aux appareils de chauffage
mobiles et qui correspond aux normes de votre
pays relatives aux combustibles liquides.
Ne remplissez en aucun cas ce type de poêle
avec des carburants comme de l’essence, du
benzène, des solvants ou autres substances.
Ne remplissez jamais le poêle de combustible
liquide lorsqu’il est en service ou encore chaud.
N’utilisez le poêle en aucun cas dans des locaux
dans lesquels un risque d’inflammation ou
d’explosion de gaz existe.
Ne remplissez jamais le poêle dans un local
fermé mais toujours à l’extérieur.
Stockez et transportez le combustible
exclusivement dans des bidons métalliques ou en
plastique
- convenant spécialement au combustible
- portant l’inscription „combustible liquide pour les
appareils de chauffage
mobiles“ et qui correspondent aux normes de
votre pays relatives aux combustibles liquides.
Ne stockez jamais le combustible dans un local
d’habitation. Il faut absolument stocker le
combustible dans un endroit frais en dehors des
locaux d’habitation. Le poêle devient
extrêmement chaud lorsqu’il fonctionne. Tenez
les enfants, les vêtements, les meubles et autres
objets à au moins 1 mètre de distance.
N’employez jamais d’essence (risque d’incendie).
Risque d’incendie et de pollution atmosphérique.
Utilisez le poêle uniquement dans des locaux bien
aérés. Ne l’employez ni dans de petits locaux ni
dans des locaux sans fenêtres.
Chaque local dans lequel le poêle est utilisé doit
disposer d’une entrée et d’une sortie d’air
suffisante (une ouverture d’entrée et de sortie à
une section transversale minimale de 50 cm
2
).
N’utilisez jamais le poêle dans des locaux
insuffisamment aérés ou dans des sous-sols.
N’employez jamais le poêle pour chauffer ou faire
bouillir de l’eau et/ou pour préparer des repas.
Ne retirez jamais le réservoir à combustible
lorsque le poêle chauffe et/ou est encore chaud.
N’utilisez le réservoir en aucun cas pour
transporter ou stocker du combustible ou d’autres
substances inflammables.
Lors de la mise en service vous vous apercevrez
éventuellement d’un petit bruit dans le réservoir à
combusible: Le combustible sort du réservoir pour
remplir le récipient de fond qui sert à humidifier la
mèche. Ce bruit est normal.
Attention!
Si vous ne respectez pas les instructions
d’installation, d’entretien ou de maniement, vous
risquez des brûlures et/ou des blessures
corporelles. Dans ce cas, le fabricant décline
toute responsabilité.
NOTE: Les avertissement contenus dans ce mode
d’emploi ne couvrent aucunement toutes les
situations éventuelles. L’utilisation d’un appareil de
chauffage et en particulier d’un poêle exige de
procéder raisonnablement, soigneusement et en
respectant les mesures de précaution. Seul le
respect de ces règles permet d’utiliser l’appareil de
chauffage sans risques.
En cas de problèmes, il faut absolument contacter
votre spécialiste, vendeur ou service après-vente.
Ne laissez jamais le poêle allumé si vous vous
éloignez pour un temps assez long ou même une
période brève. Vérifiez en tout cas que l’appareil
de chauffage soit capable de fonctionner et en
toute sûreté. Contrôlez si le poêle est bien arrêté
avant de sortir de la salle.
Ne laissez jamais le poêle sans surveillance
pendant son fonctionnement.
N’utilisez jamais le poêle pour sécher des objets.
Ne placez jamais d’objets devant ou sur le poêle.
N’employez jamais le poêle à convection sur un
bateau, dans une caravane ou dans une cabine
de conducteur.
Attention! Risque de brûlures!
Utilisez le poêle uniquement lorsque la grille est
complètement fermée. A cet effet, mettez la tige
dans le cadre du boîtier.
F
21
Anleitung Comfort-Heizgeräte 31.10.2001 14:25 Uhr Seite 21
Réglage de la température ambiante
La température ambiante doit être agréable. Si la
salle devient trop chaude, aérez-la en ouvrant une
fenêtre. Ne déréglez en aucun cas le bouton de
mèche. Une réduction du chauffage à la suite d’un
dérèglement de la mèche provoque une combustion
insuffisante, une odeur désagréable et des effets
nuisibles à la santé.
CONSERVEZ SOIGNEUSEMENT CE
MODE D’EMPLOI !
1. Préface
Lisez attentivement ce mode d’emploi. Il vous
fournit toutes les instructions nécessaires à un
maniement correct et un montage efficace et sûr
du poêle. Ce n’est qu’en connaissant exactement
ce mode d’emploi que vous pouvez profiter de
manière optimale de tous les avantages de
l’appareil.
F
22
2. Caractéristiques techniques
N° du modèle CH 2750 CH 2850 G CH 3600 GC
Type de convecteur Radiateur Radiateur Radiateur
Puissance de chauffage 2750 W 2850 W 3600 W
Consommation de combustible 230 g/h 235 g/h 300 g/h
Capacité par jour env. 12 heures env. 12 heures env. 12 heures
Réservoir à combustible Réservoir à Réservoir à Réservoir à
combustible combustible combustible
détachable détachable détachable
Contenance du réservoir
à combustible 3,81 litres 3,81 litres 3,81 litres
Allumage 2 x batteries R 20 2 x batteries R 20 2 x batteries R 20
Contrôle de sortie d’air y compris y compris y comprisv
Dimensions 48 x 32 x 53 cm 48 x 32 x 53 cm 67 x 33 x 53 cm
Poids 11 kg 11,5 kg 13,5 kg
Superficie chauffée Min. 30 m
2
Min. 32 m
2
Min. 42 m
2
Max. 36 m
2
Max. 38 m
2
Max. 50 m
2
Volume chauffé Min. 75 m
3
Min. 75 m
3
Min. 105 m
3
Max. 90 m
3
Max. 95 m
3
Max. 120 m
3
Anleitung Comfort-Heizgeräte 31.10.2001 14:25 Uhr Seite 22
 Loading...