


A6M5

Instruction Manual
Bedienungsanleitung
Manuel d’utilisation
Manuale di Istruzioni
A6M5 Zero 300

2
EN
WARNING: Read the ENTIRE instruction manual to become familiar with the features of the
product before operating. Failure to operate the product correctly can result in damage to the product,
personal property and cause serious injury.
This is a sophisticated hobby product. It must be operated with caution and common sense and requires
some basic mechanical ability. Failure to operate this product in a safe and responsible manner could
result in injury or damage to the product or other property. This product is not intended for use by
children without direct adult supervision. Do not use with incompatible components or alter this product
in any way outside of the instructions provided by Horizon Hobby, Inc. This manual contains instructions
for safety, operation and maintenance. It is essential to read and follow all the instructions and warnings
in the manual, prior to assembly, setup or use, in order to operate correctly and avoid damage or serious
injury.
Meaning of Special Language:
The following terms are used throughout the product literature to indicate various levels of potential
harm when operating this product:
NOTICE: Procedures, which if not properly followed, create a possibility of physical property damage AND
little or no possibility of injury.
CAUTION: Procedures, which if not properly followed, create the probability of physical property damage
AND a possibility of serious injury.
WARNING: Procedures, which if not properly followed, create the probability of property damage,
collateral damage, and serious injury OR create a high probability of superfi cial injury.
NOTICE
All instructions, warranties and other collateral documents are subject to change at the sole discretion
of Horizon Hobby, Inc. For up-to-date product literature, visit www.horizonhobby.com and click on the
support tab for this product.
Age Recommendation: Not for children under
14 years. This is not a toy.
Safety Precautions and Warnings
• Always keep a safe distance in all directions
around your model to avoid collisions or injury.
This model is controlled by a radio signal subject
to interference from many sources outside your
control. Interference can cause momentary loss
of control.
• Always operate your model in open spaces away
from full-size vehicles, traffi c and people.
• Always carefully follow the directions and
warnings for this and any optional support equip-
ment (chargers, rechargeable battery packs, etc.).
• Always keep all chemicals, small parts and
anything electrical out of the reach of children.
• Always avoid water exposure to all equipment
not specifi cally designed and protected for this
purpose. Moisture causes damage to electronics.
• Never place any portion of the model in your
mouth as it could cause serious injury or even
death.
• Never operate your model with low transmitter
batteries.
• Always keep aircraft in sight and under control.
• Always use fully charged batteries.
• Always keep transmitter powered on while
aircraft is powered.
• Always remove batteries before disassembly.
• Always keep moving parts clean.
• Always keep parts dry.
• Always let parts cool after use before touching.
• Always remove batteries after use.
• Always ensure failsafe is properly set
before fl ying.
• Never operate aircraft with damaged wiring.
• Never touch moving parts.

3
EN
Thank you for purchasing the E-fl ite
®
A6M5 Zero 300 BNF-Basic. E-fl ite has captured the character of the
infamous Japanese WWII fi ghter in a fun-to-fl y RC warbird modeled after Zeros stationed at the Genzan Air
Base in Korea in 1945. Molded in a smooth and durable foam material, its outline, detail and markings have
been faithfully duplicated and very few design liberties were taken to achieve excellent fl ight performance.
This allows the stunning scale appearance to shine through both on the ground and in fl ight. In fact, the
fi t and fi nish of this electric powered, 4-channel warbird is so impeccable that it can also serve as an
impressive display model when mounted on the included static display stand. Please be sure to read
through this manual carefully so that you can successfully enjoy all the benefi ts this outstanding E-fl ite
model has to offer.
To register your product online, go to www.e-fl iterc.com
Table of Contents
Prefl ight Checklist ................................................... 4
Transmitter and Receiver Binding ...........................4
Low Voltage Cutoff (LVC) .........................................4
Installing the Flight Battery ....................................5
Arming the ESC ......................................................5
Installing the Wing ..................................................6
Control Centering .................................................... 7
Settings for Control Horns .......................................7
Control Direction Test .............................................7
Dual Rates and Expos .............................................8
Adjusting Center of Gravity (CG) ..............................8
Flying Tips and Repairs ........................................... 9
Using the Display Stand ........................................10
Service of Power Components ..............................11
Troubleshooting Guide ..........................................12
Limited Warranty ..................................................13
Warranty and Service Information .........................14
Compliance Information for the European Union .... 14
Replacement Parts ................................................ 54
Optional Parts and Accessories .............................55
Parts Contact Information .....................................55
Motor: BL300 Brushless Outrunner,
1400Kv (EFLM7000)
BL Controller, 10A (EFLA7300)
AR6310 DSMX Nanolite 6Ch Rx,Air
(SPMAR6310)
(3) 3.5 g Digital Servo (EFLR7100)
Needed to Complete
Recommended Battery: 430mAh 2S
20C Li-Po (EFLB4302SJ)
Recommended Battery Charger:
Celectra
™
80W AC/DC Multi-Chemistry
Battery Charger (EFLC3025)
Recommended Transmitter:
Full Range DSM2
®
/DSMX
®
(DX4e and up)
Installed
21.6 in (550mm)
25.5 in (650mm)
8.20–8.70 oz
(232–246 g)
Box Contents
4
EN
Prefl ight Checklist
9
1. Charge fl ight battery.
2. Install fl ight battery in aircraft
(once it has been fully charged).
3. Bind aircraft to transmitter.
4. Make sure linkages move freely.
5. Perform Control Direction Test with
transmitter.
6. Adjust center of gravity.
7. Perform a radio system Range Check.
8. Find a safe and open area.
9. Plan fl ight for fl ying fi eld conditions.
Low Voltage Cutoff (LVC)
When a Li-Po battery is discharged below 3V per
cell, it will not hold a charge. The aircraft’s ESC
protects the fl ight battery from over-discharge
using Low Voltage Cutoff (LVC). Once the battery
discharges to 3V per cell, the LVC will reduce the
power to the motor in order to leave adequate power
to the receiver and servos to land the airplane.
When the motor power reduces, land the aircraft
immediately and replace or recharge the
fl ight battery.
Always disconnect and remove the Li-Po battery
from the aircraft after each fl ight. Charge your
Li-Po battery to about half capacity before storage.
Make sure the battery charge does not fall below
3V per cell. A connected battery will result in trickle
discharge.
For your fi rst fl ights, set your transmitter timer or a
stopwatch to 4 minutes. Adjust your timer for longer
or shorter fl ights once you have fl own the model.
Flights of 6 minutes or more are achievable if using
proper throttle management.
NOTICE: Repeated fl ying to LVC will damage
the battery.
Transmitter and Receiver Binding
Binding is the process of programming the receiver of the control unit to recognize the GUID (Globally
Unique Identifi er) code of a single specifi c transmitter. You need to ‘bind’ your chosen Spektrum
TM
DSM2
®
/
DSMX
®
technology equipped aircraft transmitter to the receiver for proper operation.
Any full range Spektrum DSM2/DSMX transmitter can bind to the DSM2/DSMX receiver. Please visit www.
bindnfl y.com for a complete list of compatible transmitters.
NOTICE: When using a Futaba
®
transmitter with a Spektrum DSM module, reversing the throttle channel
is required.
9
Binding Procedure
1. Refer to your transmitter’s unique instructions for binding to
a receiver (location of transmitter’s Bind control).
2. Make sure the fl ight battery is disconnected from the
aircraft.
3. Power off the transmitter.
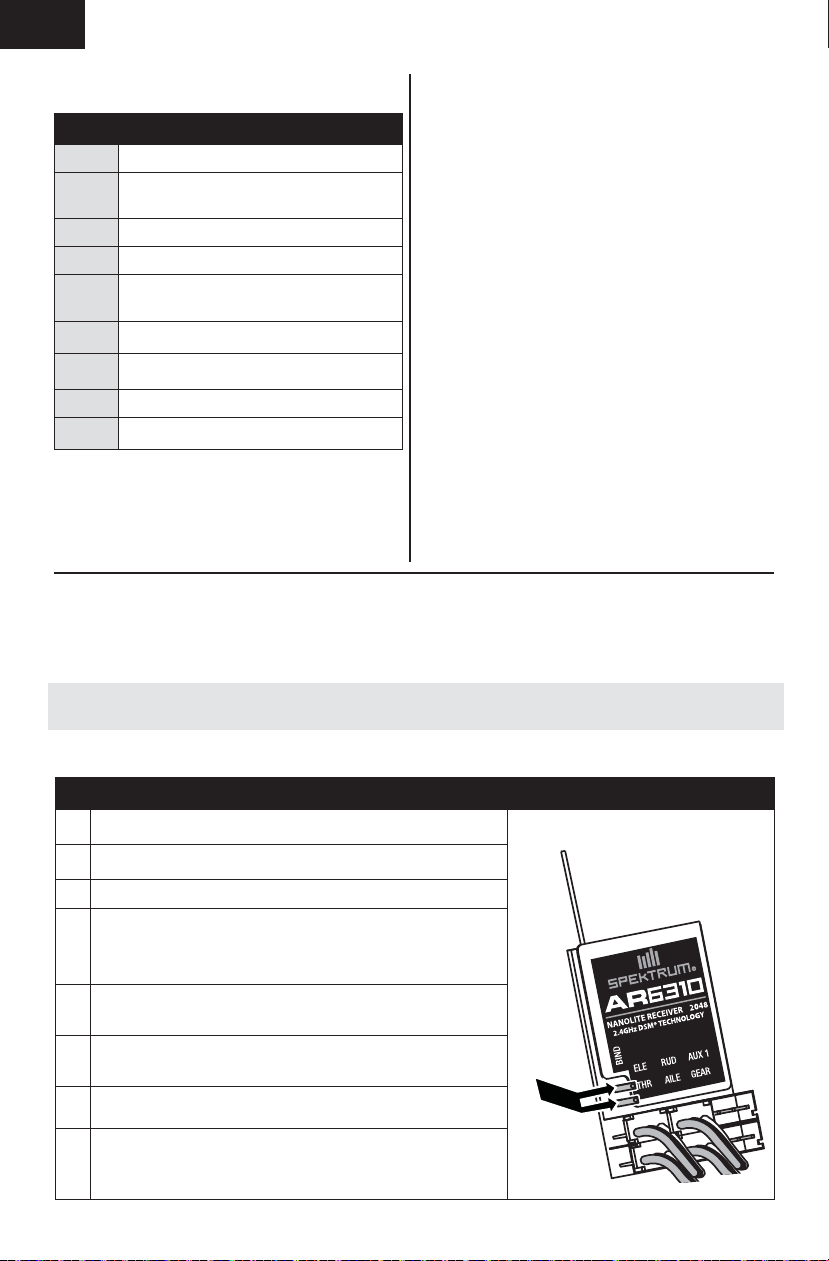
4. Bind the AR6310 receiver to a DSM2 transmitter by shorting
the bind pins (A) together with tweezers, a hemostat or
small needle-nose pliers. Metal to metal contact is needed to
complete the circuit. Do not bend the bind pins.
5. Connect the fl ight battery to the aircraft. Short the pins until
the receiver LED begins to fl ash rapidly (typically after 5
seconds).
6. Ensure that control surface trims are centered and the
throttle and throttle trim are in the low position to correctly
set failsafe.
7. Put your transmitter into bind mode. Refer to your transmit-
ter’s manual for binding button or switch instructions.
8. After 5 to 10 seconds, the receiver status LED will become
solid, indicating that the receiver is bound to the transmitter.
If the LED does not turn solid, refer to the Troubleshooting
Guide at the back of the manual.
A
5
EN
1 2
3
Tip: If the ESC sounds a continuous double beep
after the fl ight battery is connected, recharge or
replace the battery.
If you accidentally connect the battery while
the throttle is fully opened, a musical tone will
sound after 5 seconds. Disconnect the battery
immediately.
CAUTION: Always keep hands away from the
propeller. When armed, the motor will turn the
propeller in response to any throttle movement.
Arming the ESC
Arming the ESC also occurs after binding as previously described, but subsequent connection of a fl ight
battery requires the steps below.
Lower throttle and throttle
trim to lowest settings.
Power on the Transmitter,
then wait 5 seconds
Install fl ight battery and
connect it to the ESC.
Series of tones
Continuous LED
Installing the Flight Battery
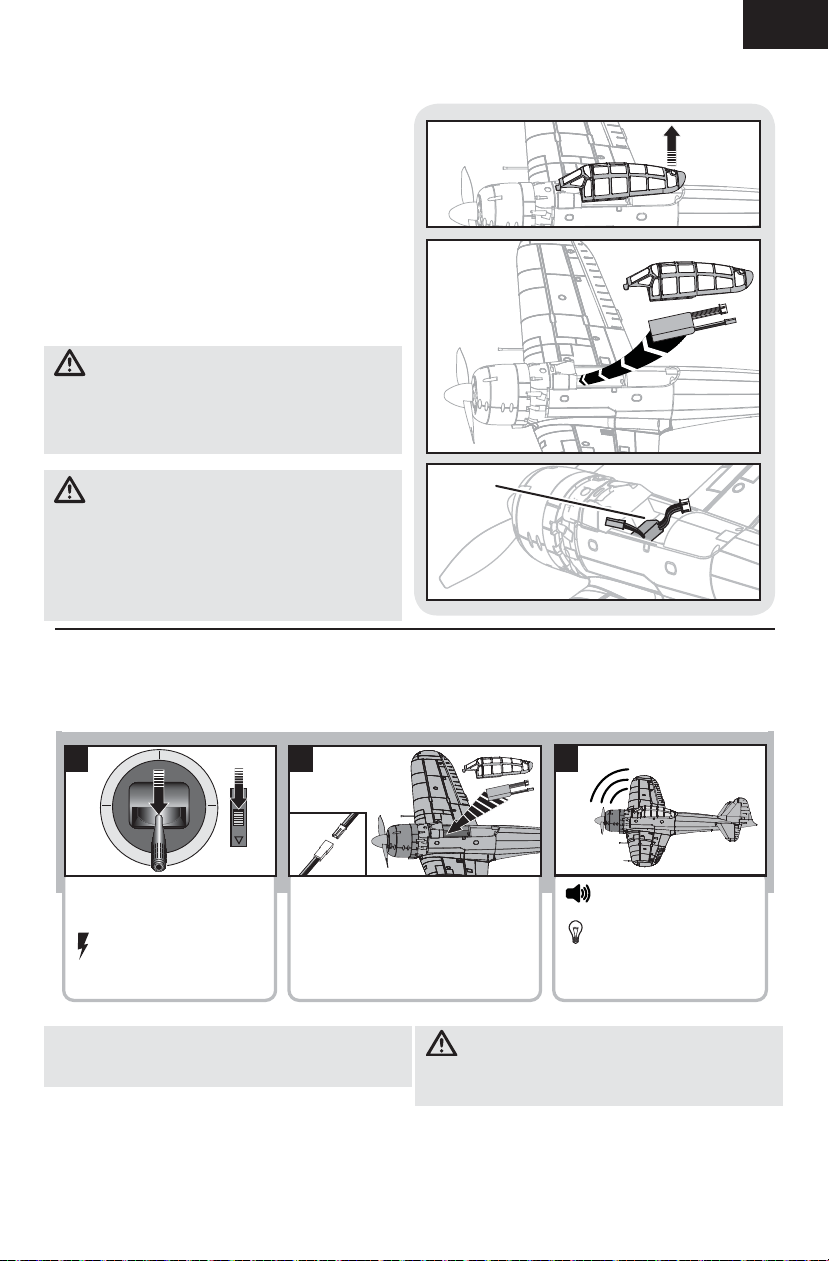
1. Remove the canopy by gripping near the rear
and pulling up, then back to disengage the
canopy’s front tab from the fuselage.
2. Place the flight battery in the battery
compartment. Slide the battery into the battery
cavity (A) towards the front of the fuselage.
See the Adjusting the Center of Gravity
instructions for the battery’s position.
3. Connect the fully charged flight battery to
the ESC connector. See the Arming the ESC
instructions for correct connection of the
battery to the ESC.
4. Replace the canopy on the fuselage.
CAUTION: Always disconnect the Li-Po
battery from the ESC when not fl ying to eliminate
power supplied to the motor. The ESC does not have
an arming switch, and will respond to any
transmitter input when a signal is present.
CAUTION: Always disconnect the Li-Po
battery from the ESC when not fl ying to avoid
over-discharging the battery. Batteries discharged
to a voltage lower than the lowest approved voltage
may become damaged, resulting
in loss of performance and potential fi re when
batteries are charged.
A
6
EN
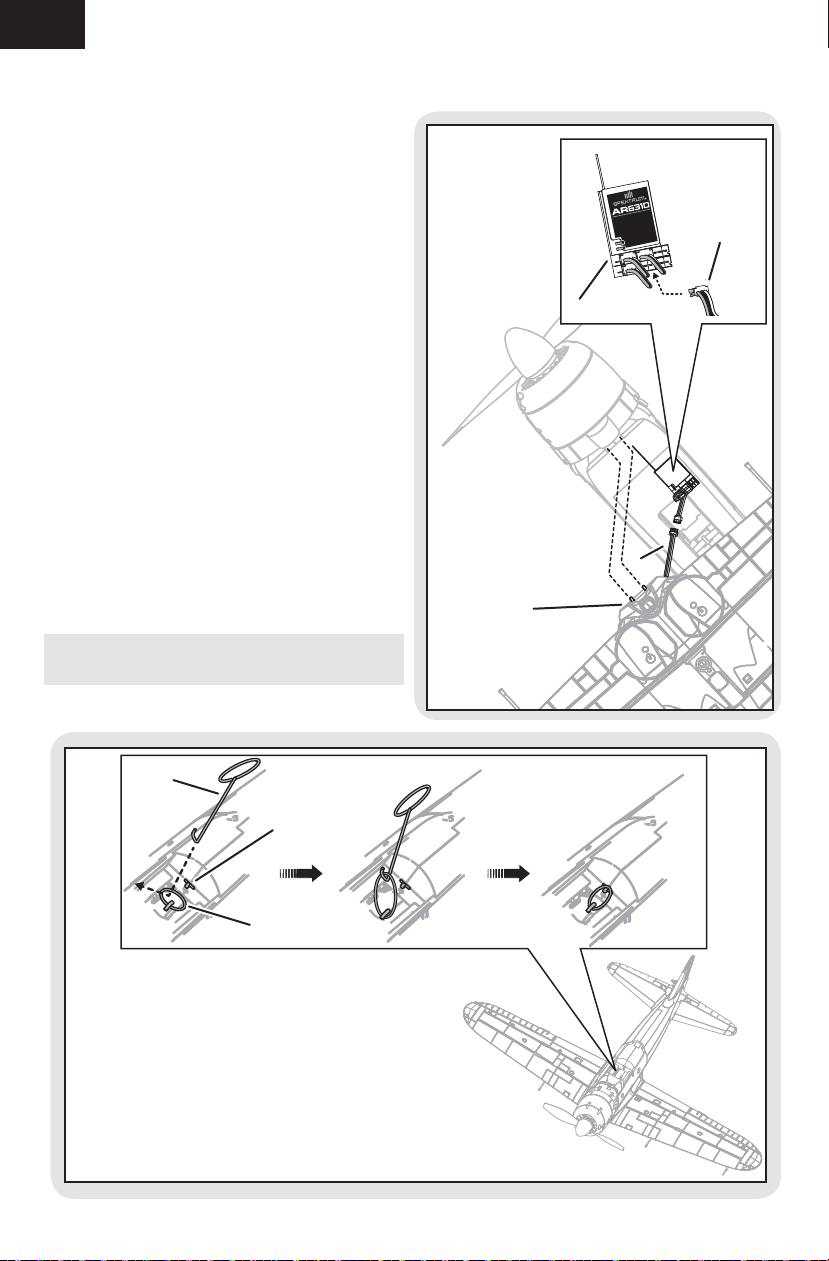
1. Turn over the model so the bottom of the
fuselage faces up.
2. Carefully install the micro connector of the
aileron servo (A) into the AIL port of the
receiver (B).
NOTICE: When disconnecting the servo connectors,
do not pull on the servo wires. Use a screwdriver
or pliers to break the friction fi t of the servo
connectors. Failure to do so could result in damage
to the servo wiring.
3. Insert the 2 wing pins (C) into the holes in the
front of the fuselage. Connect the back of the
wing to the fuselage.
NOTICE: DO NOT crush or otherwise damage wiring
when installing the wing on the fuselage.
4. Turn the aircraft right side up. Carefully use the
o-ring tool (D) to pull the o-ring (E) over the
hook in the fuselage (F).
NOTICE: Pulling too much on the O-ring can
damage the O-ring connector in the wing, requiring
replacement of the wing.
Tip: Before fl ying, always ensure the O-ring is in
good condition. Replace a worn or infl exible O-ring.
5. Install the canopy on the fuselage.
Installing the Wing
ELE
RUD
AUX 1
THR AILE
GEAR
NANOLITE RECEIVER 2048
2.4GHz DSM® TECHNOLOGY
BIND
A
A
B
C
D
E
F
 Loading...