


 Loading...
Warnings and caution signs, illustrated below, are posted throughout this manual as well as on the AVN5435. They show safe and correct ways to handle the product so as to prevent personal injury to you and others and avoid damage to property.Before reading through the manual, take time to read through and learn the important information listed in this section.
Cautions for use
*The illustrations of screens shown in this manual may differ from the actual screens of the product.
 Warning
 Caution
This sign indicates a situation in which incorrect handling through disregard of a sign might result in death or serious personal injury.
This sign indicates a situation in which incorrect handling through disregard of a sign might result in personal injury or may result solely in damage to property.
The symbol shown below indicates that you should know about the information in order to carefully follow it or you should remember the information for its helpfulness.
A point it will be helpful to remember.
Information you should know
•Please read all materials such as manuals and warranties that have come with the product.
•Fujitsu Ten will not be responsible for unsatisfactory product performance due to failure to follow these instructions.
•Changes to product specifications may result in differences between content of the manual and features of the product.
Please use care in handling the manual.
Forcefully spreading or pulling on pages may result in falling out of the binding.
Use the manual carefully.
1

Table of Contents
Introduction
How to use this manual . . . . . . . . . . . . . . . . . . . . . . . . . . . . 10 Features . . . . . . . . . . . . . . . . . . . . . . . . . . . . . . . . . . . . . . . . . 12 Before using the deck . . . . . . . . . . . . . . . . . . . . . . . . . . . . . 15
About playable discs . . . . . . . . . . . . . . . . . . . . . . . . . . . . . . . . . 17 About discs. . . . . . . . . . . . . . . . . . . . . . . . . . . . . . . . . . . . . . . . . . . . . . 17 About handling discs . . . . . . . . . . . . . . . . . . . . . . . . . . . . . . . . . 18 About new discs. . . . . . . . . . . . . . . . . . . . . . . . . . . . . . . . . . . . . 18 About rental discs . . . . . . . . . . . . . . . . . . . . . . . . . . . . . . . . . . . 19 About specially shaped discs. . . . . . . . . . . . . . . . . . . . . . . . . . . 19 About disc accessories . . . . . . . . . . . . . . . . . . . . . . . . . . . . . . . 19 About the LCD panel . . . . . . . . . . . . . . . . . . . . . . . . . . . . . . . . . . . . . . 19
Basic operation
Switching the mode . . . . . . . . . . . . . . . . . . . . . . . . . . . . . . . 20
Switching the mode . . . . . . . . . . . . . . . . . . . . . . . . . . . . . . . . . . . . . . . 20 Displaying operation screen. . . . . . . . . . . . . . . . . . . . . . . . . . . . 20
Operation screen of each mode . . . . . . . . . . . . . . . . . . . . . 21 Adjusting the volume . . . . . . . . . . . . . . . . . . . . . . . . . . . . . . 22
Adjusting main volume . . . . . . . . . . . . . . . . . . . . . . . . . . . . . . . . . . . . . 22
Adjusting sound quality . . . . . . . . . . . . . . . . . . . . . . . . . . . . 23
Setting DSP (acoustics) . . . . . . . . . . . . . . . . . . . . . . . . . . . . . . . . . . . . 24 DSP mode setting . . . . . . . . . . . . . . . . . . . . . . . . . . . . . . . . . . . 24 Adjusting, saving DSP (acoustics) . . . . . . . . . . . . . . . . . . . . . . . 24 Resetting DSP (acoustics) levels. . . . . . . . . . . . . . . . . . . . . . . . 25 Adjusting EQ (equalizer) . . . . . . . . . . . . . . . . . . . . . . . . . . . . . . . . . . . 26 Setting sound quality . . . . . . . . . . . . . . . . . . . . . . . . . . . . . . . . . 26 Resetting EQ patterns . . . . . . . . . . . . . . . . . . . . . . . . . . . . . . . . 27 Setting POS (position selector) . . . . . . . . . . . . . . . . . . . . . . . . . . . . . . 28 Adjusting volume balance . . . . . . . . . . . . . . . . . . . . . . . . . . . . . . . . . . 29 Setting the BEEP tone . . . . . . . . . . . . . . . . . . . . . . . . . . . . . . . . . . . . . 30 Muting sound . . . . . . . . . . . . . . . . . . . . . . . . . . . . . . . . . . . . . . . . . . . . 30
2

Setting LOUDNESS . . . . . . . . . . . . . . . . . . . . . . . . . . . . . . . . . . . . . . . 31 Setting subwoofer level . . . . . . . . . . . . . . . . . . . . . . . . . . . . . . . . . . . . 31
Setting background screen . . . . . . . . . . . . . . . . . . . . . . . . . 32
Setting the wallpaper . . . . . . . . . . . . . . . . . . . . . . . . . . . . . . . . . . . . . . 32 Changing the wallpaper . . . . . . . . . . . . . . . . . . . . . . . . . . . . . . . 32
Adjusting/setting the screen . . . . . . . . . . . . . . . . . . . . . . . . 33
Displaying the image adjustment screen . . . . . . . . . . . . . . . . . . . . . . . 33 How to switch to daytime display when the lights are ON . . . . . 34 Turning off the screen . . . . . . . . . . . . . . . . . . . . . . . . . . . . . . . . 34 Adjusting image quality . . . . . . . . . . . . . . . . . . . . . . . . . . . . . . . 35 Switching screen mode . . . . . . . . . . . . . . . . . . . . . . . . . . . . . . . . . . . . 35
How to operate the tuner
Operating the AM/FM radio . . . . . . . . . . . . . . . . . . . . . . . . . 38
Listening to the AM/FM radio . . . . . . . . . . . . . . . . . . . . . . . . . . . . . . . . 38 Selecting radio stations . . . . . . . . . . . . . . . . . . . . . . . . . . . . . . . . . . . . 39 Manual selection . . . . . . . . . . . . . . . . . . . . . . . . . . . . . . . . . . . . 39 Automatic selection . . . . . . . . . . . . . . . . . . . . . . . . . . . . . . . . . . 39 Selection using preset switches. . . . . . . . . . . . . . . . . . . . . . . . . 39 Saving radio stations . . . . . . . . . . . . . . . . . . . . . . . . . . . . . . . . . . . . . . 40 Saving manually. . . . . . . . . . . . . . . . . . . . . . . . . . . . . . . . . . . . . 40 Saving with AUTO.P . . . . . . . . . . . . . . . . . . . . . . . . . . . . . . . . . 40 Changing stations saved by AUTO.P . . . . . . . . . . . . . . . . . . . . 40 Turning off the radio . . . . . . . . . . . . . . . . . . . . . . . . . . . . . . . . . . . . . . . 42
Operation when an HD RADIO (IBOC) tuner has
been connected. . . . . . . . . . . . . . . . . . . . . . . . . . . . . . . . . . . 43
Listening to HD RADIO (IBOC) . . . . . . . . . . . . . . . . . . . . . . . . . . . . . . 43 Selecting radio stations . . . . . . . . . . . . . . . . . . . . . . . . . . . . . . . . . . . . 44 Manual selection . . . . . . . . . . . . . . . . . . . . . . . . . . . . . . . . . . . . 44 Automatic selection . . . . . . . . . . . . . . . . . . . . . . . . . . . . . . . . . . 44 Selection using preset switches. . . . . . . . . . . . . . . . . . . . . . . . . 44 Saving radio stations . . . . . . . . . . . . . . . . . . . . . . . . . . . . . . . . . . . . . . 45 Saving manually. . . . . . . . . . . . . . . . . . . . . . . . . . . . . . . . . . . . . 45 Saving with AUTO.P . . . . . . . . . . . . . . . . . . . . . . . . . . . . . . . . . 45 Changing stations saved by AUTO.P . . . . . . . . . . . . . . . . . . . . 45
3

Displaying information about the current broadcast. . . . . . . . . . . . . . . 45 Turning off the radio . . . . . . . . . . . . . . . . . . . . . . . . . . . . . . . . . . . . . . . 45
Operation when a SIRIUS satellite radio tuner has
been connected. . . . . . . . . . . . . . . . . . . . . . . . . . . . . . . . . . . 46
Listening to SIRIUS satellite radio . . . . . . . . . . . . . . . . . . . . . . . . . . . . 46 Check the SIRIUS ID . . . . . . . . . . . . . . . . . . . . . . . . . . . . . . . . . . . . . . 46 Changing the SIRIUS band . . . . . . . . . . . . . . . . . . . . . . . . . . . . . . . . . 47 Selecting the channel you want to listen to . . . . . . . . . . . . . . . . . . . . . 47 Selecting from the available categories . . . . . . . . . . . . . . . . . . . 47 Selecting a channel by direct input . . . . . . . . . . . . . . . . . . . . . . 47 Displaying information about the current broadcast. . . . . . . . . . . . . . . 48 Turning off the SIRIUS . . . . . . . . . . . . . . . . . . . . . . . . . . . . . . . . . . . . . 48
How to operate the CD player
How to use the CD player. . . . . . . . . . . . . . . . . . . . . . . . . . . 50
Listening to a CD . . . . . . . . . . . . . . . . . . . . . . . . . . . . . . . . . . . . . . . . . 50 Selecting a song. . . . . . . . . . . . . . . . . . . . . . . . . . . . . . . . . . . . . . . . . . 50 Fast-forwarding/rewinding . . . . . . . . . . . . . . . . . . . . . . . . . . . . . . . . . . 51 Searching for a song . . . . . . . . . . . . . . . . . . . . . . . . . . . . . . . . . . . . . . 51 Repeating a song . . . . . . . . . . . . . . . . . . . . . . . . . . . . . . . . . . . . . . . . . 51 Playing songs in random order . . . . . . . . . . . . . . . . . . . . . . . . . . . . . . 51 Turning off the CD player . . . . . . . . . . . . . . . . . . . . . . . . . . . . . . . . . . . 51
How to operate the MP3 player
How to use the MP3 player . . . . . . . . . . . . . . . . . . . . . . . . . 52
Playing MP3 . . . . . . . . . . . . . . . . . . . . . . . . . . . . . . . . . . . . . . . . . . . . . 53 Selecting a music file . . . . . . . . . . . . . . . . . . . . . . . . . . . . . . . . . . . . . . 53 Selecting with file change switch . . . . . . . . . . . . . . . . . . . . . . . . 53 Selecting with TUNE/TRACK button . . . . . . . . . . . . . . . . . . . . . 53 Fast-forwarding/rewinding . . . . . . . . . . . . . . . . . . . . . . . . . . . . . . . . . . 54 Changing display of the current level . . . . . . . . . . . . . . . . . . . . . . . . . . 54 Displaying the current level . . . . . . . . . . . . . . . . . . . . . . . . . . . . . . . . . 54 Searching for a music file. . . . . . . . . . . . . . . . . . . . . . . . . . . . . . . . . . . 54 Repeating the same music file . . . . . . . . . . . . . . . . . . . . . . . . . . . . . . . 55 Playing songs in random order . . . . . . . . . . . . . . . . . . . . . . . . . . . . . . 55
4

About display of file information . . . . . . . . . . . . . . . . . . . . . . . . . . . . . . 56 Displaying folder/file names . . . . . . . . . . . . . . . . . . . . . . . . . . . . 56 Displaying file information . . . . . . . . . . . . . . . . . . . . . . . . . . . . . 56 Turning off the MP3 player. . . . . . . . . . . . . . . . . . . . . . . . . . . . . . . . . . 56 About MP3 . . . . . . . . . . . . . . . . . . . . . . . . . . . . . . . . . . . . . . . . . . . . . . 57 Playable MP3 file standards . . . . . . . . . . . . . . . . . . . . . . . . . . . 57 ID3 tags . . . . . . . . . . . . . . . . . . . . . . . . . . . . . . . . . . . . . . . . . . . 57 Media . . . . . . . . . . . . . . . . . . . . . . . . . . . . . . . . . . . . . . . . . . . . . 57 Format of discs . . . . . . . . . . . . . . . . . . . . . . . . . . . . . . . . . . . . . 58 File names . . . . . . . . . . . . . . . . . . . . . . . . . . . . . . . . . . . . . . . . . 59 Multi-sessions . . . . . . . . . . . . . . . . . . . . . . . . . . . . . . . . . . . . . . 59 Playing MP3. . . . . . . . . . . . . . . . . . . . . . . . . . . . . . . . . . . . . . . . 59 MP3 playing time display . . . . . . . . . . . . . . . . . . . . . . . . . . . . . . 59 Display order of MP3 file/folder names . . . . . . . . . . . . . . . . . . . 59
Making and playing MP3 files . . . . . . . . . . . . . . . . . . . . . . . . . . . . . . . 60 Downloading from Internet MP3 music sites . . . . . . . . . . . . . . . 60 Converting CD music to MP3 files . . . . . . . . . . . . . . . . . . . . . . . 60 Writing to CD-R/CD-RW . . . . . . . . . . . . . . . . . . . . . . . . . . . . . . 60 When playing back CD-R/RW . . . . . . . . . . . . . . . . . . . . . . . . . . 60
How to operate the CD changer
How to use the CD changer . . . . . . . . . . . . . . . . . . . . . . . . . 62
Listening to a CD . . . . . . . . . . . . . . . . . . . . . . . . . . . . . . . . . . . . . . . . . 62 Selecting a song. . . . . . . . . . . . . . . . . . . . . . . . . . . . . . . . . . . . . . . . . . 62 Fast-forwarding/rewinding . . . . . . . . . . . . . . . . . . . . . . . . . . . . . . . . . . 62 Selecting a CD . . . . . . . . . . . . . . . . . . . . . . . . . . . . . . . . . . . . . . . . . . . 63 Searching for a song or CD from all CDs in changer . . . . . . . . . . . . . . 63
Searching for a song . . . . . . . . . . . . . . . . . . . . . . . . . . . . . . . . . 63 Searching for a CD . . . . . . . . . . . . . . . . . . . . . . . . . . . . . . . . . . 63 Repeating a song or CD. . . . . . . . . . . . . . . . . . . . . . . . . . . . . . . . . . . . 63 Repeating the current song . . . . . . . . . . . . . . . . . . . . . . . . . . . . 63 Repeating the current CD . . . . . . . . . . . . . . . . . . . . . . . . . . . . . 63 Playing songs in random order . . . . . . . . . . . . . . . . . . . . . . . . . . . . . . 64 Playing songs on current CD in random order. . . . . . . . . . . . . . 64 Playing songs on all CDs in random order. . . . . . . . . . . . . . . . . 64 Turning off the CD player . . . . . . . . . . . . . . . . . . . . . . . . . . . . . . . . . . . 64
5

How to operate the DVD player
Before using the DVD player . . . . . . . . . . . . . . . . . . . . . . . . 66
DVD video characteristics . . . . . . . . . . . . . . . . . . . . . . . . . . . . . . . . . . 66 About Multiple Languages . . . . . . . . . . . . . . . . . . . . . . . . . . . . . 66 About Multiple Angles . . . . . . . . . . . . . . . . . . . . . . . . . . . . . . . . 66 About Subtitles. . . . . . . . . . . . . . . . . . . . . . . . . . . . . . . . . . . . . . 67 About discs. . . . . . . . . . . . . . . . . . . . . . . . . . . . . . . . . . . . . . . . . . . . . . 67 About playable discs . . . . . . . . . . . . . . . . . . . . . . . . . . . . . . . . . 67 About region codes of playable discs . . . . . . . . . . . . . . . . . . . . 68 About marks displayed on discs . . . . . . . . . . . . . . . . . . . . . . . . 69 About DVD disc structure. . . . . . . . . . . . . . . . . . . . . . . . . . . . . . 70 About flow of operations. . . . . . . . . . . . . . . . . . . . . . . . . . . . . . . . . . . . 71
How to use the DVD player . . . . . . . . . . . . . . . . . . . . . . . . . 72
Watching a DVD. . . . . . . . . . . . . . . . . . . . . . . . . . . . . . . . . . . . . . . . . . 72 Operating the video . . . . . . . . . . . . . . . . . . . . . . . . . . . . . . . . . . . . . . . 73 Playing the video . . . . . . . . . . . . . . . . . . . . . . . . . . . . . . . . . . . . 73 Fast-forwarding/rewinding . . . . . . . . . . . . . . . . . . . . . . . . . . . . . 73 Pausing the video . . . . . . . . . . . . . . . . . . . . . . . . . . . . . . . . . . . 74 Stopping the video . . . . . . . . . . . . . . . . . . . . . . . . . . . . . . . . . . . 74 Operating the disc menu . . . . . . . . . . . . . . . . . . . . . . . . . . . . . . . . . . . 75 Turning off the DVD . . . . . . . . . . . . . . . . . . . . . . . . . . . . . . . . . . . . . . . 75 Searching for a desired chapter . . . . . . . . . . . . . . . . . . . . . . . . . . . . . . 76 Searching by chapter . . . . . . . . . . . . . . . . . . . . . . . . . . . . . . . . . 76 Searching by title number . . . . . . . . . . . . . . . . . . . . . . . . . . . . . 76 Searching by menu number. . . . . . . . . . . . . . . . . . . . . . . . . . . . 77 Changing the touch switch display. . . . . . . . . . . . . . . . . . . . . . . . . . . . 78 Turning off the touch switches . . . . . . . . . . . . . . . . . . . . . . . . . . 78 Changing the touch switch display locations . . . . . . . . . . . . . . . 78 Switching between screen display and audio . . . . . . . . . . . . . . . . . . . 79 Switching the video angle . . . . . . . . . . . . . . . . . . . . . . . . . . . . . 79 Switching subtitle languages . . . . . . . . . . . . . . . . . . . . . . . . . . . 80 Switching dubbed audio language . . . . . . . . . . . . . . . . . . . . . . . 81 Setting the DVD player. . . . . . . . . . . . . . . . . . . . . . . . . . . . . . . . . . . . . 82 Setting the audio language . . . . . . . . . . . . . . . . . . . . . . . . . . . . 83 Subtitle language setting . . . . . . . . . . . . . . . . . . . . . . . . . . . . . . 84 Menu language setting. . . . . . . . . . . . . . . . . . . . . . . . . . . . . . . . 85 Setting display of multi-angle mark (angle selection mark) . . . . 86 Viewer restriction setting . . . . . . . . . . . . . . . . . . . . . . . . . . . . . . 87 Changing video output . . . . . . . . . . . . . . . . . . . . . . . . . . . . . . . . 88
6

Table of language codes . . . . . . . . . . . . . . . . . . . . . . . . . . . . . . . . . . . 89
How to use the VTR . . . . . . . . . . . . . . . . . . . . . . . . . . . . . . . 90
Viewing the VTR . . . . . . . . . . . . . . . . . . . . . . . . . . . . . . . . . . . . . . . . . 90 Turning off the VTR mode . . . . . . . . . . . . . . . . . . . . . . . . . . . . . . . . . . 90
How to use the steering wheel switch
About the steering wheel switches . . . . . . . . . . . . . . . . . . . 92
Function names and summaries . . . . . . . . . . . . . . . . . . . . . . . . . . . . . 92 Common operations. . . . . . . . . . . . . . . . . . . . . . . . . . . . . . . . . . 92 Radio operations . . . . . . . . . . . . . . . . . . . . . . . . . . . . . . . . . . . . 93 CD/MP3 player operations. . . . . . . . . . . . . . . . . . . . . . . . . . . . . 93 DVD operations . . . . . . . . . . . . . . . . . . . . . . . . . . . . . . . . . . . . . 93 CD changer operation . . . . . . . . . . . . . . . . . . . . . . . . . . . . . . . . 93
How to use an optional remote control
How to use an optional remote control (1602) . . . . . . . . . . 94
Turning the power on/off . . . . . . . . . . . . . . . . . . . . . . . . . . . . . . . . . . . 95 Adjusting the audio volume . . . . . . . . . . . . . . . . . . . . . . . . . . . . . . . . . 95 Muting the volume . . . . . . . . . . . . . . . . . . . . . . . . . . . . . . . . . . . 95 Switching playback modes. . . . . . . . . . . . . . . . . . . . . . . . . . . . . . . . . . 96 How to play the tuner . . . . . . . . . . . . . . . . . . . . . . . . . . . . . . . . . . . . . . 96 Selecting a station (manually or automatically) . . . . . . . . . . . . . 96 Selecting preset stations . . . . . . . . . . . . . . . . . . . . . . . . . . . . . . 97 How to play CDs . . . . . . . . . . . . . . . . . . . . . . . . . . . . . . . . . . . . . . . . . 98 Switching disc modes . . . . . . . . . . . . . . . . . . . . . . . . . . . . . . . . 98
Advancing to the next track or returning to the beginning of the track being played . . . . . . . . . . . . . . . . . . . . . . . . . . . . . . . . . . . 98
Skipping to the next or previous disc . . . . . . . . . . . . . . . . . . . . . 98 Replacing the battery . . . . . . . . . . . . . . . . . . . . . . . . . . . . . . . . . . . . . . 99
How to use an optional remote control (RMC105). . . . . . 100
Turning the power on/off . . . . . . . . . . . . . . . . . . . . . . . . . . . . . . . . . . 101 Adjusting the audio volume . . . . . . . . . . . . . . . . . . . . . . . . . . . . . . . . 101 Muting the Volume . . . . . . . . . . . . . . . . . . . . . . . . . . . . . . . . . . 101 Switching playback modes. . . . . . . . . . . . . . . . . . . . . . . . . . . . . . . . . 102 How to play the tuner . . . . . . . . . . . . . . . . . . . . . . . . . . . . . . . . . . . . . 102
7

Selecting the AM/FM band. . . . . . . . . . . . . . . . . . . . . . . . . . . . 102 Selecting a station (manually or automatically) . . . . . . . . . . . . 103 Selecting preset stations . . . . . . . . . . . . . . . . . . . . . . . . . . . . . 103 How to play CDs . . . . . . . . . . . . . . . . . . . . . . . . . . . . . . . . . . . . . . . . 103 Switching disc modes . . . . . . . . . . . . . . . . . . . . . . . . . . . . . . . 103
Advancing to the next track or returning to the beginning of the track being played . . . . . . . . . . . . . . . . . . . . . . . . . . . . . . . . . . 104
Skipping to the next or previous disc . . . . . . . . . . . . . . . . . . . . 104 Replacing the battery . . . . . . . . . . . . . . . . . . . . . . . . . . . . . . . . . . . . . 105
For reference
Information you should know . . . . . . . . . . . . . . . . . . . . . . 106
If one of these messages appears . . . . . . . . . . . . . . . . . . . . . . . . . . . 106 Before asking for repairs . . . . . . . . . . . . . . . . . . . . . . . . . . . . . . . . . . 108
Others . . . . . . . . . . . . . . . . . . . . . . . . . . . . . . . . . . . . . . . . . 109
Products equipped with Dolby Digital. . . . . . . . . . . . . . . . . . . . . . . . . 109 Products equipped with Macrovision . . . . . . . . . . . . . . . . . . . . . . . . . 109
Glossary. . . . . . . . . . . . . . . . . . . . . . . . . . . . . . . . . . . . . . . . 110 Index by topic . . . . . . . . . . . . . . . . . . . . . . . . . . . . . . . . . . . 112
About screen and sound adjustment . . . . . . . . . . . . . . . . . . . . . . . . . 112 Using AM/FM radio . . . . . . . . . . . . . . . . . . . . . . . . . . . . . . . . . . . . . . 112 Usage when an HD RADIO (IBOC) tuner is connected . . . . . . . . . . . 113 Usage when a SIRIUS satellite radio tuner is connected. . . . . . . . . . 113 About using the CD player/CD changer . . . . . . . . . . . . . . . . . . . . . . . 113 About using the MP3 player . . . . . . . . . . . . . . . . . . . . . . . . . . . . . . . . 114 About using the DVD player. . . . . . . . . . . . . . . . . . . . . . . . . . . . . . . . 115 About using the VTR . . . . . . . . . . . . . . . . . . . . . . . . . . . . . . . . . . . . . 116 Useful functions . . . . . . . . . . . . . . . . . . . . . . . . . . . . . . . . . . . . . . . . . 116 When something isn't clear . . . . . . . . . . . . . . . . . . . . . . . . . . . . . . . . 116
The Index by Topic simplifies searches for explanations about individual features. When confused by an operation, use the Index by Topic to search for information about the operation.
8

9

Introduction
How to use this manual
Section title
A title is assigned for each section.
Item title
A number and title is assigned for each item.
Operation title
A title is assigned for each operation purpose.
Operation screen
A screen showing the operation will appear.
Detailed operation title
A title is assigned for each detailed operation purpose.
Operation procedure
Describes the operation. Proceed with the
operation as per the numerical order.
10

Introduction
Section side heading
Only the section side heading will appear.
Attention
Additional points regarding the operations are given here.
11
Introduction
Features
DVD player with sharp video and dynamic sound (Page 66)
Plays DVD Video recorded with high quality images and sound.
(DVD media is able to record a movie with high quality video and digital sound that exceeds the quality of CD media.)
MP3 player for music discs having 1/10 compression (Page 52)
Plays CD-R (recordable) discs that have been compiled in MP3 format. (MP3 is a format that enables recording of the songs of several albums onto a single CD-R.)
DSP effects for simulating acoustics of various performance environments (Page 24)
Provides ability to simulate the sensation of various performance environments for matching to the genre and source of a song.
12
Selection and display of favorite wallpaper (screen backgrounds) (Page 32)
Wallpaper of your choice can be switched and displayed for use as the background of the information screen and audio playback screens.
The screen from a navigation unit can also be linked and selected.
● Setting wallpaper for the information screen and audio operations screen

 Radio tuner for receiving various broadcasts
•AM/FM tuner (Page 38)
Enables reception of analog AM/FM radio broadcasts.
Introduction
● AM radio operation screen
•HD RADIO (IBOC) tuner (Page 43)
Enables reception of HD RADIO (High Definition Radio) broadcasts.
● HD RADIO (IBOC) AM operation screen
13
Introduction
Features
•SIRIUS tuner (Page 46)
SIRIUS is a satellite broadcasting service offering music, news, sports and other programming with CD-quality sound; it is available on paying a subscription.
● SIRIUS operation screen

 System additions
•CD changer (Page 62)
A CD changer enables non-stop playing of multiple discs, for convenience at times such as taking a long drive.
It is easy to search for and play a song from among the discs on a changer.
•VTR (Page 90)
Connecting a VTR deck enables watching of video tapes.
Easy-access audio controls on the steering wheel (Page 92)
You can select the radio channel and perform CD and DVD operations using the easyaccess switches on the steering wheel. (This function is only available on vehicles fitted with steering wheel switches.)
14
Introduction
Before using the deck
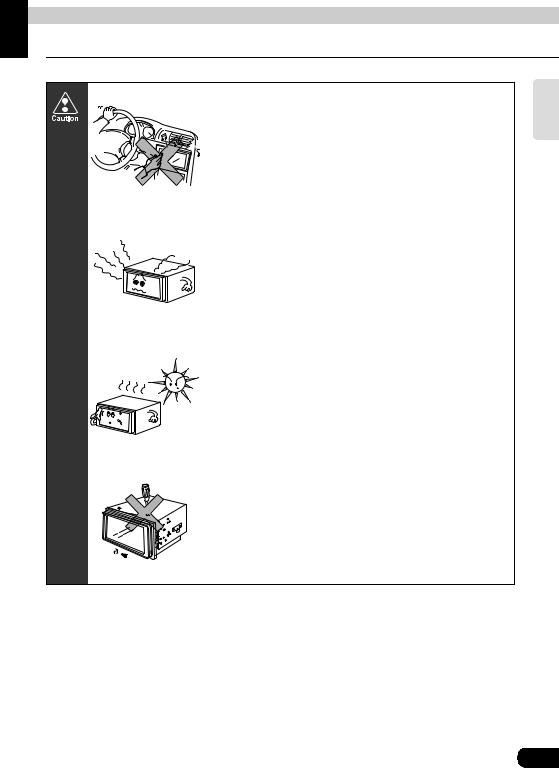
• Be very careful and pay full attention to safety when operating the audio controls while driving, otherwise accidents may occur. Also be sure to set volume so that you can still adequately hear sounds outside the vehicle. Improper use can contribute to occurrence of a traffic accident.
• Never continue to use the system if it is malfunctioning in any way. If smoke, abnormal noises or abnormal odors are noticed, turn off the power immediately.
Immediately turn off audio in such situations.
• Exercise caution as to the temperature inside the vehicle. The temperature inside the vehicle can increase during hot weather. Wait for the temperature inside the vehicle to drop before using the unit.
Damage could result.
• Do not disassemble or modify the deck.
The deck has a precisely designed structure, so consult your retailer in the event of any unsatisfactory performance.
Introduction
15
Introduction
Before using the deck
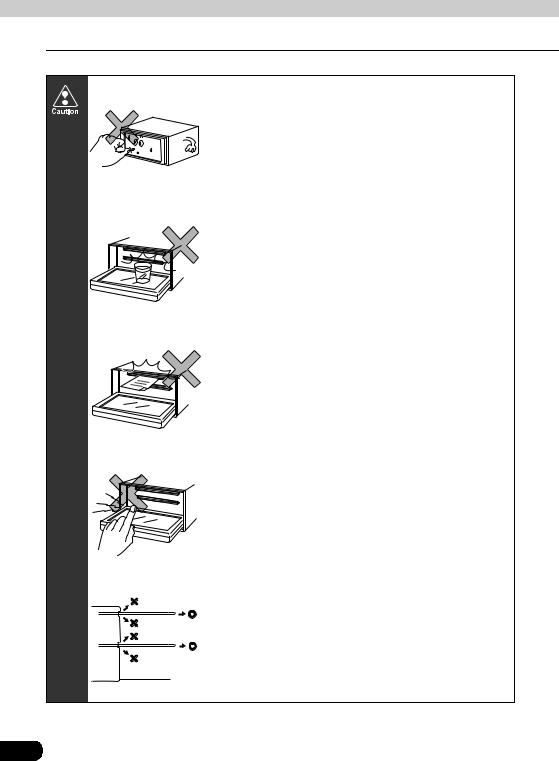
• Do not apply excessive force to the monitor. Damage could result.
• Do not place items such as cups or cans on top of the monitor, and do not leave the monitor tilted down when not in use.
Damage could result.
• Do not insert any objects other than discs into the disc slot.
Damage could result.
• Be careful not to get fingers or other objects behind monitor when it is being retracted into place. Interference can cause an injury or damage the deck.
• When removing a disc from the deck, remove it in the horizontally level direction.
Do not pull them up forcibly or press down on them strongly while removing them.
Improper removal can scratch the disc, cause deck noise or result in other damage.
16

 About discs
•Water droplets can form on the inside of the unit during cold or rainy weather in the same way car windows can fog up. (This is condensation.) When this happens, the audio can jump and playback can stop, so ventilate or dehumidify the vehicle for a short time before operating the equipment.
•To safeguard the components of the player, the unit will automatically stop when a malfunction occurs. If the player will not operate even when messages displayed on the screen are followed, consult with your equipment retailer because it is possible that the unit has been damaged.
•It is possible that the sound will skip if the vehicle experiences violent motion on rough roads.
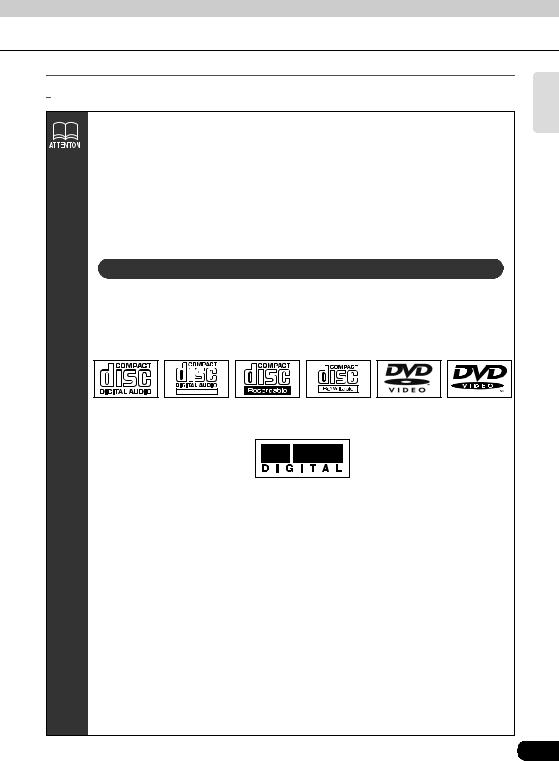
About playable discs
•An audio disc or DVD video disc bearing one of the marks below can be played. When using DVDR/RW (DVD-Recordable/ReWritable) and DVD+R/RW (DVD+Recordable/ReWritable) discs, note that only those whose contents were recorded in the video mode can be played. Discs whose contents were recorded in the video recording (VR) mode cannot be played.
TEXT
•Discs that are compatible with Dolby Digital and bear the indication below can be used.
Manufactured under license from Dolby Laboratories, Inc. "Dolby" and the double-D symbol are trademarks of Dolby Laboratories.
•It is possible that a CD-R (CD-Recordable) or CD-RW (CD-ReWritable) disc will not play on the unit due to the circumstances of the recording, special disc characteristics, scratches, dirt or deterioration caused by long storage in the vehicle. In addition, a CD-R or CD-RW disc written with CD-R, CD-RW or UDF format that has not been finalized will not play on the unit.
•It is possible that a DVD-R/RW (DVD-Recordable/ReWritable) or DVD+R/RW (DVD+Recordable/ReWritable) disc will not play on the unit due to the circumstances of the recording, special disc characteristics, scratches, dirt or deterioration caused by long storage in the vehicle. DVDR/RW or DVD+R/RW discs that have not been finalized will not play on the unit. It may not be possible to play a disc that has been recorded on a personal computer, depending on the application setting and the environment.
•The CD-TEXT function can be used only with the CD-TEXT-compatible compact discs available on the market. If it is used with CD-R or CD-RW discs, characters may not be displayed normally.
•Do not use discs with transparent or semi-transparent portions within the recording area, or C-thru discs, since they may not be accepted and ejected properly and may not play properly.
Introduction
17
Introduction
Before using the deck
About handling discs
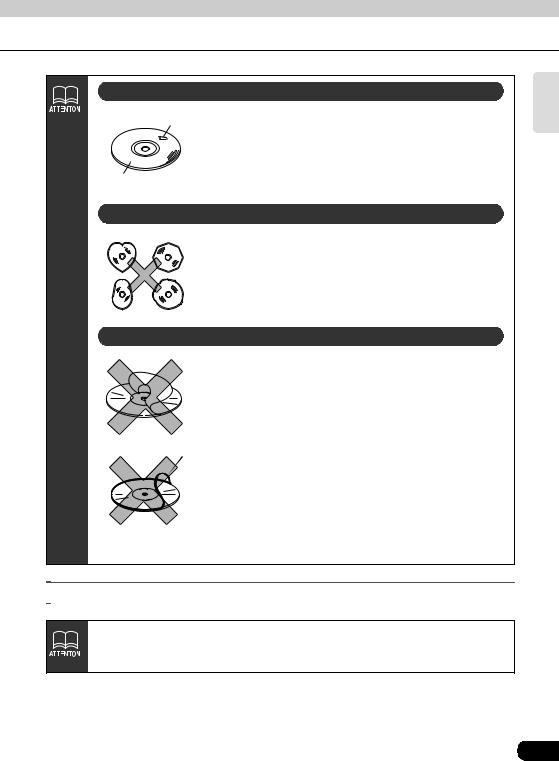
Rough Edges
Ballpoint pen
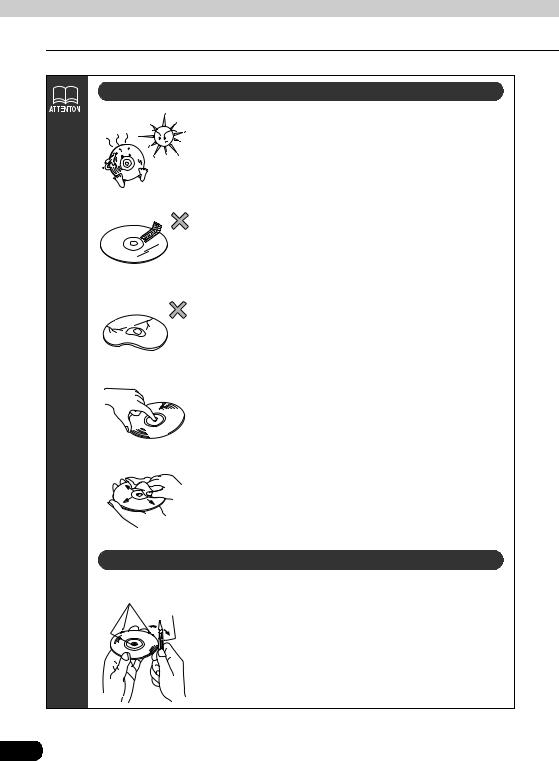
•Be sure to store discs in their cases and keep them out of direct sunlight. Discs can warp and become unusable.
•Do not apply paper-based tape to either the recording side or label side of a disc. Damage could result.
•Do not use discs on which there are cracks or large warps. Damage could result.
•Do not touch the recorded side of a disc when handling it. (This is the side with the rainbow-colored reflection.) The disc may become dirty and that could cause sound jumping.
•Using a disc that has become dirty can scratch the disc and result in sound jumping. Use a commercially available compact disc cleaner to clean a CD, wiping lightly from the center to the edge.
About new discs
•You may notice that some brand new discs are rough around the center hole or outside edge. Remove the rough edges with the side of a ballpoint pen, etc. Flakes from the rough edges may stick to the recorded surface and interfere with playback.
18
About rental discs
Cellophane tape • Do not use CD discs with attached cellophane tape,
rental CD discs with glue protruding from labels or discs with the residue of peeled adhesives. Using discs with those conditions can prevent the player from properly
Recorded surface |
opening and closing as well as cause other damage. |
|
|
|
|
About specially shaped discs |
|
|
|
• Specially-shaped or octagonal CDs, like heart-shaped |
|
|
|
|
|
|
|
cannot be played. Do not attempt to play them, even with |
|
|
|
an adapter, since they may damage the player. |
|
|
|
|
|
|
|
• Please do not use a commercially available lens cleaner |
|
|
|
because it may cause damage to the pickup of the player. |
|
|
|
About disc accessories |
|
|
|
|
|
|
|
• Do not use accessories (stabilizers, protective seals, |
|
|
|
laser lens cleaners, etc.) sold for "improving sound |
|
|
|
performance" or "protecting CDs." The changes in CD |
|
|
|
thickness or outside dimensions made by these |
|
|
|
accessories may cause problems in the player. |
|
CD ring |
• Please be sure NOT to attach any ring-shape protector (or |
|
|
|
|
|
|
|
|
other accessory) to your discs. Those protectors are |
commercially available and said to protect discs and to improve sound quality (and antivibration effect), but they can do more harm than good in regular uses. The most common problems are Insert/Eject related problems and "No playback" problems due to the protector ring that may come off in the disc mechanism.

 About the LCD panel
•The LCD panel can appear to be white or black when seen from certain angles.
•The screen will be difficult to read when external light such as sunlight falls on the display.
Introduction
19
Basic operation
Switching the mode
The deck can be used when the vehicle's ignition switch is on or in the ACC position.
•This deck supports use of a remote control. The optional remote control is sold separately and can be purchased at your local retailer. Refer to page 94 for instructions on operation of the remote control.

 Switching the mode
Press (SOURCE) MENU .
• The AUDIO MENU screen will be displayed.
Touch FM .
•The various audio modes can be selected by touching the corresponding touch switches.
•When the navigation screen is being displayed before pressing
(SOURCE) MENU , the selected mode will be displayed on-screen over the background.
On-screen display
Displaying operation screen
Press CONT .
20
Basic operation
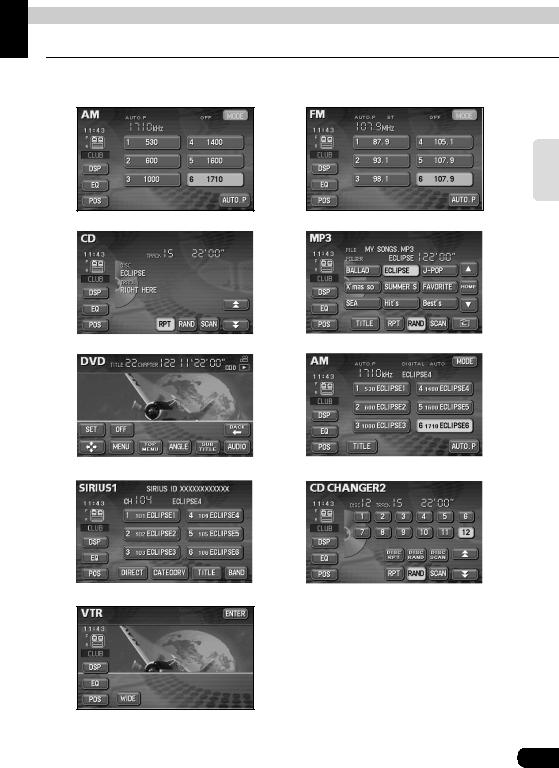
Operation screen of each mode
The operation screen for each mode will appear as shown below.
● AM radio operation screen |
● FM radio operation screen |
Basic operation
● CD player operation screen |
● MP3 player operation screen |
||
|
|
|
|
|
|
|
|
● DVD player operation screen |
● HD RADIO (IBOC) operation screen |
||
|
|
|
|
|
|
|
|
● SIRIUS operation screen (optional) |
● CD changer operation screen (optional) |
||
|
|
|
|
● VTR operation screen (optional)
When the operation screen for DVD or video (VTR) has not been operated for 6 seconds or more, the operation screen will automatically be canceled.
21

Basic operation
Adjusting the volume

 Adjusting main volume
Press the VOLUME switch.
Pressing  will increase volume.
Pressing |
will decrease volume. |
VOLUME switch |
• Each press of the switch will change |
|
|
the volume by two steps. When the |
|
|
volume reaches 50 or higher, the |
|
|
switch will change the volume by one |
|
|
step. Holding the switch will continue |
|
|
to change the volume. |
|
|
22
Basic operation
Adjusting sound quality
To adjust sound quality, touch the DSP, EQ or POS switch while the operation screen for a mode is displayed. Adjustments made in any mode will be saved and applied to all modes.
|
|
|
|
|
|
|
|
|
|
|
DSP |
|
|
|
|
|
EQ |
|
|
|
|
|
|
|
|
|
|
|
|
|
|
|
|
|
|
|
|
|
|
|
|
|
|
|
|
|
|
|
|
|
|
|
|
|
|
|
|
|
|
|
|
|
|
|
|
|
|
|
|
POS
Basic operation
In the DVD mode, display the sound quality adjustment switches by pressing  from the operation modes, and then SET . In the VTR mode display them
either by pressing CONT or by touching the screen.
23
Basic operation
Adjusting sound quality

 Setting DSP (acoustics)
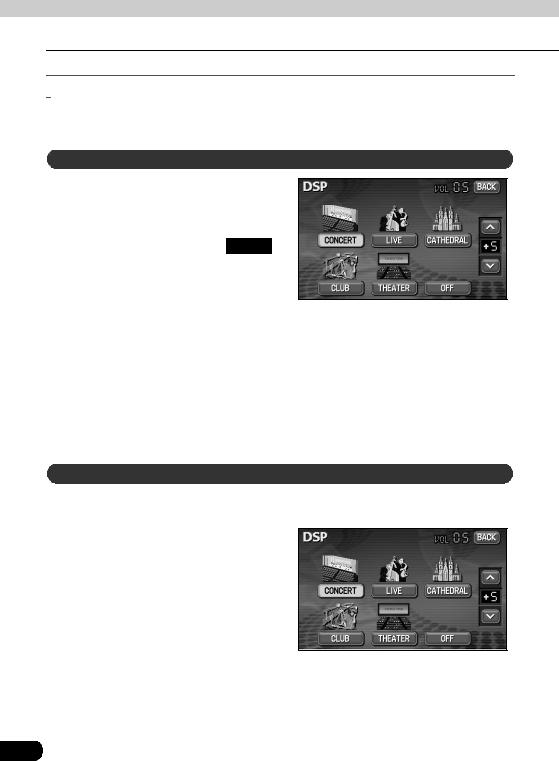
The DSP function reproduces the sensation of various factory set performance environments by adding reverberation to the music being played.
DSP mode setting
Touching the DSP touch switch
brings up the acoustics mode screen as shown.
•After making settings, touch BACK . The acoustics mode adjustments will be saved and the system will return to the previous operation screen.
|
Touch switch |
DSP Environment |
|
Touch switch |
DSP Environment |
||
|
|
|
|
|
|
|
|
|
|
Concert hall |
|
|
|
Disco, Club |
|
|
CONCERT |
|
|
CLUB |
|
||
|
|
|
|
|
|
|
|
|
|
|
Live performance |
|
|
|
Movie theater |
|
LIVE |
|
|
THEATER |
|
||
|
|
arena |
|
|
|||
|
|
|
|
|
|
|
|
|
|
|
|
|
|
|
|
|
|
Church with echo |
|
|
DSP OFF |
||
|
CATHEDRAL |
|
|
OFF |
|
||
|
|
|
|
|
|
|
|
Adjusting, saving DSP (acoustics)
The factory set DSP (acoustics) level for each mode can be adjusted to preference and saved.
Touch  or
or  at the right of the screen while in the acoustics mode to be adjusted.
•There are five + side and five - side adjustment levels available.
Touch the switch for the acoustics
mode that has been adjusted until a beep is heard.
24

Resetting DSP (acoustics) levels
Default settings for the currently adjusted and saved DSP (acoustics) level can be reset.
Touch OFF until a beep is heard.
• The acoustics level will be returned to default value.
• Only THEATER has a default value of +5, in order to increase the sound effects of products such as DVD videos.
•When adjusting the level for the currently selected DSP (acoustics) mode, the level will not be saved for other acoustics modes.
Basic operation
25
Basic operation
Adjusting sound quality

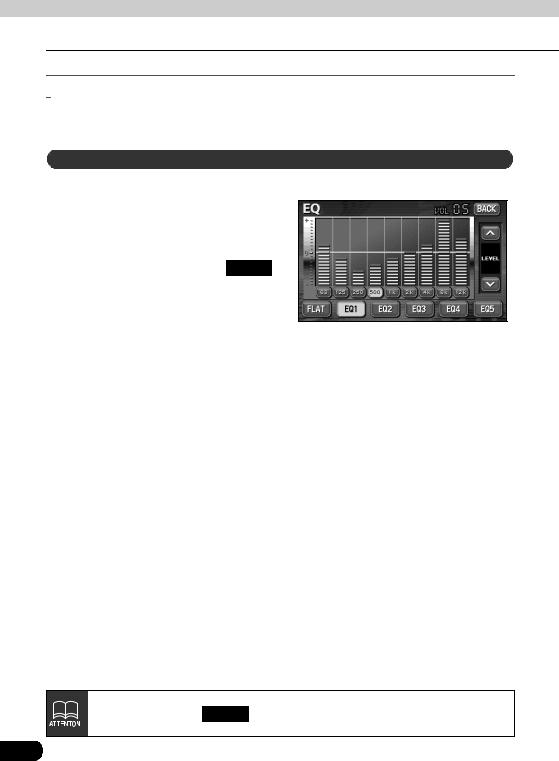
 Adjusting EQ (equalizer)
Adjusts sound quality to preferred characteristics according to the music genre and audio source.
Setting sound quality
Each factory set equalizer pattern can be selected and adjusted to preference.
Touching the touch switch brings
up the equalizer mode screen as shown in the table.
•After making settings, touch BACK . The equalizer mode adjustments will be saved and the system will return to the previous operation screen.
Touch switch |
Equalizer mode types |
||
|
|
No EQ correction |
|
|
FLAT |
|
|
|
|
|
|
|
|
Effective pattern for POPS |
|
|
EQ1 |
|
|
|
|
|
|
|
|
Effective pattern for ROCK |
|
|
EQ2 |
|
|
|
|
|
|
|
|
Effective pattern for JAZZ |
|
|
EQ3 |
|
|
|
|
|
|
|
|
Effective pattern for CLASSIC |
|
|
EQ4 |
|
|
|
|
|
|
|
|
Effective pattern for VOCAL |
|
|
EQ5 |
|
|
|
|
|
|
The default setting is EQ3 .
26

Adjusting and saving equalizer (EQ) patterns
Apart from these preset equalizer patterns, you can adjust and record other equalizer patterns to suit your own sound preferences.
Touch the screen and slowly draw
the image of the preferred equalizer curve with your finger.
To make fine adjustments, touch
the switch for the frequency to be adjusted.
Touch  or
or  at the right of the screen to adjust.
Choose from touch switches EQ1 to EQ5 for saving the settings and then touch and hold the switch until a beep is heard.
•The saved equalizer curve can be used for other settings.
•After making settings, touch BACK . The equalizer mode adjustments will be saved and the system will return to the previous operation screen.
Resetting EQ patterns
Currently saved equalizer patterns and factory set equalizer patterns can be returned to the default values.
Touch FLAT until a beep is heard.
•The equalizer pattern will be reset to default values.
Basic operation

 The default setting is EQ3 .
27

Basic operation
Adjusting sound quality

 Setting POS (position selector)
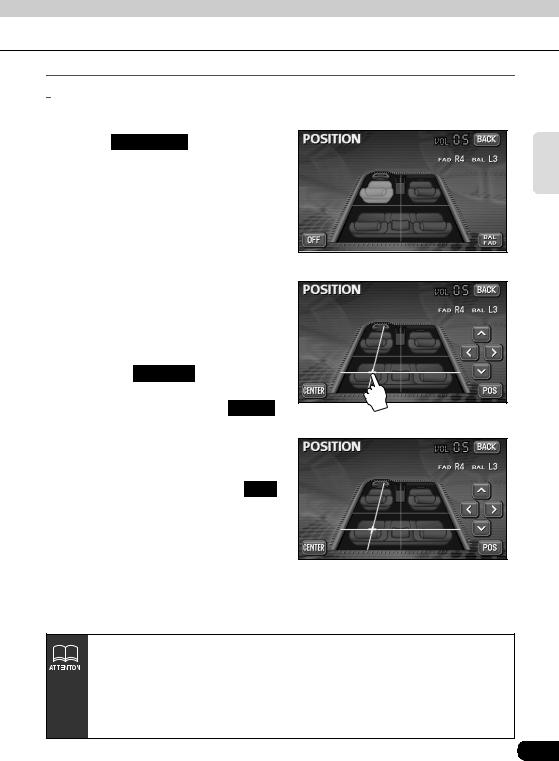
The stereophonic position for obtaining optimum acoustic effects can be adjusted to match the number and position of passengers.
In addition, front-to-back, right-to-left volume balance can be adjusted for the selected position.
Touching the image of a seat
shown on the POS setting screen will change the position.
•The selected position will change its color to orange. Touching the seat again will cancel the selection. The four positions shown by the table below can be set.
•Touching OFF will cancel all settings.
•After making settings, touch BACK . The position will be saved and the system will return to the previous operation screen.
Touch switch |
Function |
Touch switch |
Function |
|
|
|
|
|
Acoustics optimized for |
|
Acoustics optimized for |
|
driver's seat |
|
both front seats |
|
|
|
|
|
Acoustics optimized for |
|
Acoustics optimized for |
|
passenger's seat |
|
rear seats |
|
|
|
|
•This setting cannot be done at the same time as adjustment of the volume balance (see next page).
•This product is configured for vehicles with a left-side driver's position.
28

 Adjusting volume balance
The set position for front-to-back, right-to-left volume balance can be adjusted.
Touch BAL  FAD on the
POSITION setting screen to display the volume balance adjustment screen.
Touch the screen at the preferred balance point.
•To make fine adjustments, touch  ,
,  ,
,  ,
,  .
.
•Touching CENTER will set the volume balance to the center position.
•After making settings, touch BACK .
•The set volume balance will be saved and the system will return to the previous operation screen.
•To set the position again, touch POS and repeat the steps above.
•Adjustments to volume balance and position are saved separately. Activating each position and then displaying volume balance adjustment screen will show the volume balance for each position.
•This setting cannot be done at the same time as POS (position selector) adjustment, described on the previous page.
•Touching and holding  ,
,  ,
,  or
or  while making fine adjustments will adjust values in a continuous action. However, adjustment will lock when it
reaches the center value, and  ,
,  ,
,  or
or  must be pressed again to continue adjustment.
Basic operation
29
Loading...