


INSTRUCTION MANUAL
CXA160 / CXA80
Integrated Amplifiers
CAUTION AVIS
RISK OF ELECTRIC SHOCK • DO NOT OPEN
RISQUE DE CHOC ELECTRIQUE
NE PAS OUVRIR
CAUTION: TO REDUCE THE RISK OF ELECTRIC SHOCK
DO NOT REMOVE COVER (OR BACK)
NO USER-SERVICEABLE PARTS INSIDE
REFER SERVICING TO QUALIFIED PERSONNEL
ATTENTION: POUR EVITER LES RISQUES DE CHOC
ELECTRIQUE, NE PAS ENLEVER LE COUVERCLE. AUCUN
ENTRETIEN DE PIECES INTERIEURES PAR L'USAGER. CONFIER
L'ENTRETIEN AU PERSONNEL QUALIFIE.
AVIS: POUR EVITER LES RISQUES D'INCENDIE OU
D'ELECTROCUTION, N'EXPOSEZ PAS CET ARTICLE
A LA PLUIE OU A L'HUMIDITE
The lightning flash with arrowhead symbol within an equilateral triangle is intended to alert the user to the presence of uninsulated "dangerous voltage" within the product's enclosure, that may be of sufficient magnitude to constitute a risk of electric shock to persons.
Le symbole éclair avec point de flèche à l'intérieur d'un triangle équilatéral est utilisé pour alerter l'utilisateur de la présence à l'intérieur du coffret de "voltage dangereux" non isolé d'ampleur suffisante pour constituer un risque d'éléctrocution.
The exclamation point within an equilateral triangle is intended to alert the user of the presence of important operating and maintenance (servicing) instructions in the literature accompanying the appliance.
Le point d'exclamation à l'intérieur d'un triangle équilatéral est employé pour alerter les utilisateurs de la présence d'instructions importantes pour le fonctionnement et l'entretien (service) dans le livret d'instruction accompagnant l'appareil.
1. SAFETY INSTRUCTIONS
1.Read these instructions.
2.Keep these instructions.
3.Heed all warnings.
4.Follow all instructions.
5.Do not use this apparatus near water.
6.Clean only with a dry cloth.
7.Do not block any ventilation openings. Install in accordance with the manufacturer’s instructions.
8.Do not install near any heat sources such as radiators, heat registers, stoves, or other apparatus (including amplifiers) that produce heat.
9.Do not defeat the safety purpose of the polarized or grounding-type plug. A polarized plug has two blades with one wider than the other. A grounding-type plug has two blades and a third grounding prong. The wide blade or the third prong are provided for your safety. If the provided plug does not fit into your outlet, consult an electrician for replacement of the obsolete outlet.
10.Protect the power cord from being walked on or pinched particularly at plugs, convenience receptacles, and the point where they exit from the apparatus.
11.Only use attachments/accessories specified by the manufacturer.
12.Use only with a cart, stand, tripod, bracket, or table specified by the manufacturer, or sold with the apparatus. When a cart is used, use caution when moving the cart/apparatus combination to avoid injury from tip-over.
13.Unplug this apparatus during lightning storms or when unused for long periods of time.
14.Refer all servicing to qualified service personnel. Servicing is required when the apparatus has been damaged in any way, such as power-supply cord or plug is damaged, liquid has been spilled or objects have fallen into the apparatus, the apparatus has been exposed to rain or moisture, does not operate normally, or has been dropped.
15.This apparatus shall not be exposed to dripping or splashing, and no object filled with liquids, such as vases or beer glasses, shall be placed on the apparatus.
16.Servicing — The user should not attempt to service the Component beyond those means described in this operating manual. All other servicing should be referred to the EAW Commercial Service Department.
Part No. 0022185 Rev. B 03/07
© 2007 LOUD Technologies Inc. All Rights Reserved. Printed in China.
– CXA160 / CXA80
17.To prevent electric shock, do not use this polarized plug with an extension cord, receptacle or other outlet unless the blades can be fully inserted to prevent blade exposure.
Pour prévenir les chocs électriques ne pas utiliser cette fiche polariseé avec un prolongateur, un prise de courant ou une autre sortie de courant, sauf si les lames peuvent être insérées à fond sans laisser aucune pariie à découvert.
18.Grounding or Polarization — Precautions should be taken so that the grounding or polarization means of the unit is not defeated.
19.This apparatus does not exceed the Class A/Class B (whichever is applicable) limits for radio noise emissions from digital apparatus as set out in the radio interference regulations of the Canadian Department of Communications.
ATTENTION —Le présent appareil numérique n’émet pas de bruits radioélectriques dépassant las limites applicables aux appareils numériques de class A/de class B (selon le cas) prescrites dans le règlement sur le brouillage radioélectrique édicté par les ministere des communications du Canada.
WARNING! This equipment has been designed to be installed by qualified professionals only! There are many factors to be considered when installing professional sound reinforcement systems, including mechanical and electrical considerations, as well as acoustic coverage and performance. EAW Commercial strongly recommends that this equipment be installed only by a professional sound installer or contractor.
TABLE OF CONTENTS |
|
1. SAFETY INSTRUCTIONS.................................................... |
2 |
2. INTRODUCTION................................................................... |
3 |
FEATURES ........................................................................... |
3 |
APPLICATIONS.................................................................... |
3 |
3. FRONT PANEL FEATURES.................................................. |
4 |
4. REAR PANEL FEATURES.................................................... |
5 |
5. THERMAL CONSIDERATIONS......................................... |
10 |
6. CONNECTIONS.................................................................. |
10 |
7. TYPICAL HOOKUP DIAGRAM.......................................... |
11 |
8. SPECIFICATIONS............................................................... |
12 |
BLOCK DIAGRAM.............................................................. |
13 |
9. SERVICE INFORMATION.................................................. |
14 |
10. WARRANTY..................................................................... |
15 |

2. INTRODUCTION
The CXA160 and CXA80 amplifiers are designed for continuous duty in speech, music, paging and sound reinforcement applications in churches, schools, offices, arenas, hotel meeting rooms, convention centers, recreation facilities and other venues demanding high performance, flexible features and rugged dependability.
The CXA160 has a 160 watt power amplifier, and the CXA80 has 80 watts. Apart from this difference in power output, the two models are identical in details and operation.
The main line-level input is actively balanced, with a sensitivity control and selection switches for enabling the parallel output, a 10 dB pad, and high-pass filtering. The input and priority input have XLR, TRS, screw-terminal and Phoenix euroblock connectors.
The priority input is actively balanced, with a sensitivity control and selection switches for line-level input, mic-level input, mic-level input with 24 VDC phantom power, 10 dB pad, and high-pass filtering.
When an audio signal greater than -20 dB is present at the priority input, or when an external priority switch is pressed, the main input is automatically muted, and the priority input will play.
A parallel output allows the line-level input signal to be daisy-chained to feed other amplifiers or parts of your system.
Output modes include 4 ohm constant impedance, and constant voltage 25 V, 70 V and 100 V. The smart output stage is fully protected against permanent damage caused by overloading, shorts, and extreme temperatures.
The universal power supply will operate from 100 VAC to 240 VAC, 50/60Hz, supplied by a detachable IEC power cord.
Rear panel terminals are provided for connecting an external 24 VDC backup battery, with automatic switching if the AC mains fails.
The front panel provides power on/off, a master volume control, and bass and treble controls. Status LEDs indicate signal present, signal overload, fault and power on.
FEATURES
•Line input with combination XLR/TRS connector, euro connector, and screw terminals
•Priority mic/line input with combination XLR/TRS connector, euro connector, and screw terminals
•Parallel output (switch defeatable) for daisy-chaining input signal to other amplifiers or parts of your system (XLR, TRS, euro connector, and screw terminals)
•Input is switch-configurable for parallel output on/off, high pass filter on/off, and 10 dB pad in/out
•Priority input is switch-configurable for mic or line, phantom power on/off, high pass filter on/off, and 10 dB pad in/out
•Priority terminals for manual ducking of main input, as well as automatic ducking when priority signal present
•Trim control and level-setting LED on input and priority input
•Front panel EQ adjustment of bass and treble
•Front panel master level control
•Front panel overload, signal, fault and power-on LEDs
•Front panel power switch
•External volume control (with user-supplied 10k pot)
•External fault relay terminals
•CXA160: 160 watt rms, convection cooled
•CXA80: 80 watt rms, convection cooled
•4 ohm - 25 V - 70 V - 100 V screw terminal outputs
•Global high-pass filter
•Universal power supply, 100 VAC–240 VAC, 50–60 Hz
•Automatic switching to 24 VDC backup power input
•2 RU rack-mountable
APPLICATIONS
•Foreground/background music systems
•Paging systems
•Continuous-duty applications
•Sound reinforcement systems
CXA160 / CXA80 –
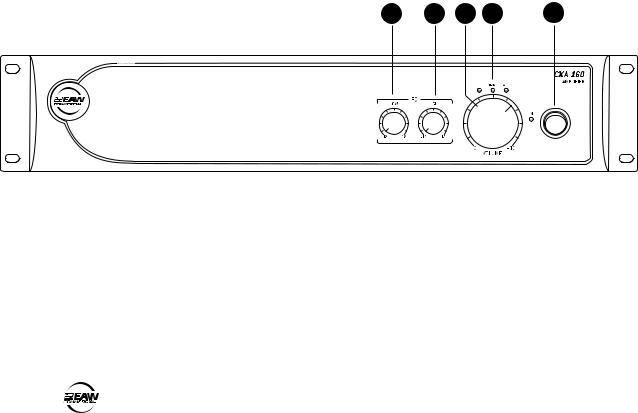
3. FRONT PANEL FEATURES
1. EQ-LOW
Turn this clockwise to boost the level of the low-frequency range below 100 Hz. Turn it counter-clockwise to cut the level. In the detented center position, there is no change in level. The maximum boost and cut is 12 dB.
2. EQ-HIGH
Turn this clockwise to boost the level of the high-frequency range above 10 kHz. Turn it counter-clockwise to cut the level. In the detented center position, there is no change in level. The maximum boost and cut is 12 dB.
3. VOLUME
Use this volume control to adjust the sound output level to your speakers.
4. STATUS LEDS
These LEDs show: OVERLOAD (RED)
SIGNAL PRESENT (AMBER) FAULT (RED)
POWER ON (GREEN)
5. POWER
Use this switch to turn the unit on or off. The power is on when the top of the switch is pressed, and off when the bottom is pressed. Turn it off if you are not using the unit for long periods of time.
1 |
2 |
3 |
4 |
5 |
– CXA160 / CXA80
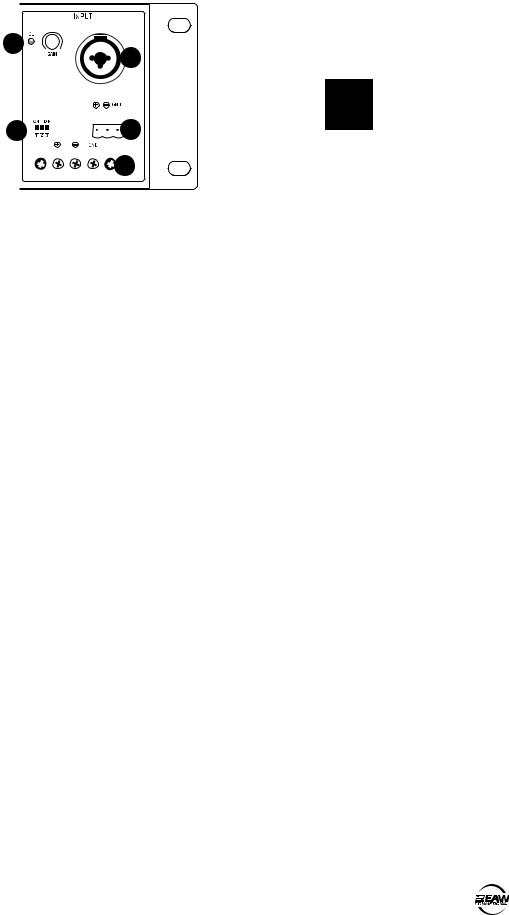
4. REAR PANEL FEATURES
9 |
6 |
|
|
10 |
7 |
|
8 |
INPUT CONNECTORS
The Input section has four different styles of input connections for line-level audio signals. Choose one which suits your system the best:
6.Combination XLR/TRS connector. This can accept a male balanced XLR connector, a balanced TRS or unbalanced TS 1/4" connector.
7.Phoenix (Euroblock) connector. This three-pin connector accepts the positive, negative and ground terminals of a balanced audio line. It accepts a push-in connector for easy installation.
8.Terminal strip. This three-terminal connector accepts the positive, negative and ground terminals of a balanced audio line. Secure the connections with the screws.
Each input style is designed to accept balanced or unbalanced line-level signals. The input can be configured by means of the DIP-switch (see below).
9. GAIN pot and OL (overload) LED
This screwdriver-adjustable rotary potentiometer acts as a trim control, and a red indicator LED will light 3 dB before clipping. With normal source material playing, adjust the pot until the LED lights only occasionally during the loudest moments of your program.
10. Input DIP switch
This three-pole DIP-switch allows you to configure all four input types, as shown in this table and the details below.
|
|
|
|
|
|
|
|
|
|
|
|
|
|
|
|
|
|
|
|
|
|
|
|
|
|
|
|
|
|
|
|
|
|
|
|
|
|
|
|
|
|
|
|
|
|
|
|
|
|
|
|
|
|
|
|
|
|
|
|
|
|
|
|
|
|
DIP # |
Purpose |
DOWN |
UP |
|||||||
1 |
Parallel Enable |
OFF |
Enabled |
|||||||
2 |
High Pass Filter |
Enabled |
OFF |
|||||||
3 |
–10 dB Pad Enable |
OFF |
Enabled |
|||||||
DIP switch details:
1.Parallel Enable. Select UP if you want there to be an output from the Parallel Output. This allows you to send a line-level copy of the audio input signals to other components or amplifiers in your system. Select DOWN if you are not using the Parallel Outputs.
2.High-pass filter enable. The default position is enabled (DOWN). This rolls off the low frequencies below 120 Hz, at a rate of 12 dB per octave. Use this to reduce low frequencies, such as from low bass notes, microphone handling and stage noise. It is useful when using smaller speakers that do not reproduce the low frequencies well.
3.10 dB pad enable. Select UP to reduce the input level by 10 dB.
CXA160 / CXA80 –
 Loading...