


 Loading...
Instruction Manual
POWER
Multiple Copies
CLEAR
LANG |
|
|
|
|
SIZE |
UNITS |
FEED |
|
CAPS |
|
STYLE |
SAVE |
||
|
|
|
||
|
|
BOX/UL |
RECALL |
SERIAL |
|
|
|
|
|
NORMAL |
WRAP |
|
|
|
L |
FLAG |
HWRAP |
FIXED |
VERT |
O |
||||
C |
|
|
|
|
A |
|
|
|
|
T |
|
|
|
|
I |
AUDIO |
VOICE |
|
|
O |
SEC |
PANEL |
||
N |
VIDEO |
DATA |
||
[ |
] |
/ |
= |
: |
1 |
2 |
3 |
4 |
5 |
— |
||||
+ |
- |
. |
% |
| |
6 |
7 |
8 |
9 |
0 |
— |
— |
|||
A |
B |
C |
D |
E |
G |
H |
I |
J |
K |
M |
N |
O |
P |
Q |
S |
T |
U |
V |
W |
ESC
F
U
N
C
T
I
O
N
E
N
T
E
R
F
L
R
X
SYMBOLS
Y  Z
Z
S PAC E
www.dymo.com/industrial |
q |
Tape Exit
AC Power Connector |
LCD Display |
 Cutter Lever
Power
POWER |
|
|
|
|
|
|
|
|
|
Multiple Copies |
|
|
Navigation |
||
|
|
|
|
|
|
|
|
|
CLEAR |
|
|
|
|
Thumb Latch for Tape |
|
Backspace/Clear All |
LANG |
|
|
|
|
||
|
|
|
|
|
Compartment |
||
|
|
UNITS |
|
|
|
||
|
SIZE |
|
CAPS |
|
|
||
|
|
STYLE |
FEED |
SAVE |
ESC |
Escape/Backlighting |
|
|
|
BOX/UL |
|
SERIAL |
|
||
|
|
|
|
|
|
|
|
RECALL
Hot Keys
Numeric Keys
Alpha Keys
|
NORMAL |
WRAP |
|
|
|
L |
FLAG |
HWRAP |
FIXED |
VERT |
F |
O |
U |
||||
C |
|
|
|
|
N |
A |
|
|
|
|
C |
T |
|
|
|
|
T |
I |
AUDIO |
VOICE |
|
|
I |
O |
SEC |
PANEL |
O |
||
N |
VIDEO |
DATA |
N |
||
[ |
] |
/ |
= |
: |
|
1 |
2 |
3 |
4 |
5 |
E |
— |
N |
||||
+ |
- |
. |
% |
| |
E |
|
T |
||||
6 |
7 |
8 |
9 |
0 |
R |
— |
— |
|
|||
A |
B |
C |
D |
E |
F |
G |
H |
I |
J |
K |
L |
M |
N |
O |
P |
Q |
R |
S |
T |
U |
V |
W |
X |
SYMBOLS
Y  Z
Z
S PAC E
Thumb Latch for
 Battery Compartment
Function
 Enter/OK
Space Bar/
Symbols
Figure 1 RhinoPRO 3000 Printer
About Your New Printer
With your new DYMO RhinoPRO™ 3000 label printer, you can create a wide variety of highquality, self-adhesive labels. You can choose to print your labels in many different sizes and styles. The printer uses DYMO RhinoPRO Industrial label cassettes in widths of 3/8” (9 mm), or 1/2” (12 mm). RhinoPRO label cassettes are also available in a wide range of materials.
Visit www.dymo.com/industrial for information on obtaining tapes and accessories for your printer.
Warranty Registration
Please complete the warranty registration card and return it to the appropriate address, or you can register online at www.dymo.com/industrial.
Getting Started
Follow the instructions in this section to print your first label.
Power Supply
The printer is powered by standard batteries or an AC power adapter. To save power, the printer will automatically turn off after five minutes of inactivity.
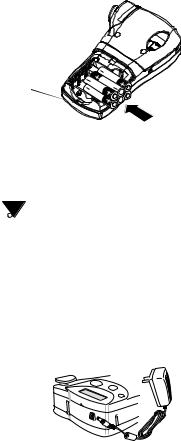
Inserting the Batteries
The printer uses six 1.5 volt AA alkaline batteries.
To insert the batteries
1.Press the thumb latch on the bottom of the printer to open the battery compartment door. See Figure 2.
Press thumb latch 
Figure 2
2.Insert the batteries following the polarity markings (+ and –).
3.Close the battery compartment door.
 Remove the batteries if the printer will not be used for a long period of time.
Connecting the AC Adapter
You can also use an optional AC power adapter to power the printer. Connecting the AC adapter disconnects the batteries as a power source.
To connect the AC adapter
1.Plug the power adapter into the power connector on the top of the printer.
Figure 3
2.Plug the other end of the power adapter into a power outlet.
3

Inserting the Tape Cassette
Your printer comes with one label tape cassette. Visit www.dymo.com/industrial for information about purchasing additional label cassettes.
To insert the tape cassette
1.Press the thumb catch on the right side of the printer to open the tape cassette door.
2.Make sure that the tape cassette switch is set to 9/12 mm. See Figure 4. A notch in the cassette fits over the switch when the cassette is in the correct position.
 The first time you use the printer, remove the protective cardboard insert from between the print head and pinch roller. See Figure 4.
Remove cardboard 
 insert
Tape cassette switch


 = 6 mm


 = 9/12 mm
Figure 4
3.Make sure the tape and ribbon are taut across the mouth of the cassette and that the tape passes between the guideposts.
4.Insert the cassette with the tape and ribbon positioned between the print head and pinch roller. See Figure 5.
Click!
Figure 5
5.Press firmly until cassette clicks into place. Make sure tape and ribbon are positioned correctly.
6.Close the tape cassette door and press Ato turn on the power.
Settings
You can select the language and corresponding units of measure you want the printer to use.
Selecting a Language
Several language-related features are determined by the language setting, such as availability of special characters. Three languages are available: English (default), Spanish, and French.
See Using International Characters on page 6 for information about international characters.
To select a language
1.Press  + SIZE .
2.Use the arrow keys to select the language.
3.Press  to set the language.
Selecting Units of Measure
You can set the units of measure to display as inches (default) or millimeters.
To set the units of measure
1.Press  + STYLE .
2.Use the arrow keys to select inches or mm.
3.Press  to set the units of measure.
4

Printing Your First Label
You are now ready to print your first label.
To print a label
1.Enter text to create a simple label.
2.Press  .
.
3.Cut the label by pressing the cutting lever towards the back of the printer. See Figure 6.
Figure 6
4. Remove the label.
Congratulations! You have printed your first label. Continue reading to learn more about the options available for creating labels.
Getting to Know Your Printer
Become familiar with the location of the feature and function keys on your printer. See Figure 1 on the inside front cover of this manual. The following sections describe each feature in detail.
Power
The Abutton turns the power on and off. If no keys are pressed after five minutes, the power is switched off automatically.
LCD Display
The printer’s LCD display typically shows a row of thirteen characters. However, you can enter up to 99 characters and/or spaces.
Feature and function indicators appear on the top, side, and bottom of the display to indicate that a feature or function is selected. See Figure 7.
SIZE XL FLAG HWRAP |
FIXED VERT PANEL |
||
|
A A |
; |
|
|
|
|
|
|
Abc |
|
|
SERIAL |
|
||
CAPS |
: |
||
|
|
|
|
Figure 7
Backlighting
When the printer is used in a low-light environment, the display may become difficult to read. The backlighting feature lights the display.
♦ Press  + ESC to turn backlighting on and off.
Caps Key
The Caps key toggles capitalization on and off. When Caps mode is turned on, the Caps indicator is shown on the display and all letters that you enter will be capitalized. The default setting is Caps mode on. When Caps mode is off, all letters entered appear in lower case.
♦ Press  + SERIAL to turn CAPS mode on and off.
Function Key
The Function key  is used to select the function or symbol printed above a key. For example, when you press SIZE , the Font size menu appears in the
display; however, if you press |
+ SIZE together, |
the Language menu appears. |
|
Backspace Key
The Backspace key  removes the character to the left of the cursor. Pressing
  +
+  clears the current label text. Text size and other settings remain unchanged.
5
Loading...