


User Guide
DYMO LabelTM v.8

Copyright
© 2012 Sanford, L.P. All rights reserved. Revised 1/25/2013.
No part of this document or the software may be reproduced or transmitted in any form or by any means or translated into another language without the prior written consent of Sanford, L.P.
QR Code used in this application is under the GNU Lesser General Public License 2.1.
Trademarks
DYMO, DYMO Label, and LabelWriter are registered marks in the US and other countries.
All other trademarks are the property of their respective holders.

Contents |
|
|
|
Introduction |
1 |
What's New in DYMO Label |
1 |
What's New in v.8.5 |
1 |
What's New in v.8.4.2 |
1 |
What's New in v.8.4.1 |
1 |
What's New in v.8.4 |
1 |
Supported Label Printers |
2 |
What's In This User Guide |
2 |
What Version 7 Users Need to Know |
5 |
Upgrading to DYMO Label v.8 (Windows) |
5 |
Upgrading to DYMO Label v.8 (Mac) |
5 |
Label Files |
5 |
Address Book |
5 |
Label and Tape Editors |
6 |
Choosing a Label |
6 |
Design Toolbar |
6 |
Choosing a Printer |
6 |
LabelWriter Twin Turbo Users |
7 |
Helping to Improve DYMO Products (Windows Only) |
9 |
Tour DYMO Label v.8 |
11 |
Labels Tab |
11 |
Tape Labels |
13 |
Insert Tab |
13 |
Label Objects |
15 |
Clip Art |
15 |
Address Book Tab |
16 |
Edit Area |
16 |
Edit Area - LabelWriter Label |
17 |
Edit Area - Tape Label |
17 |
Print Area |
17 |
Zooming the Workspace (Windows) |
18 |
Zooming the Workspace (Mac) |
19 |
Getting Started |
21 |
Adding My Return Address |
21 |
iii
Adding My Logo |
21 |
Finding Your Label Type |
22 |
Choosing a Layout |
23 |
Printing Your First Label |
23 |
Printing from the Desktop (Windows) |
23 |
Using the QuickPrint Widget (Mac) |
24 |
For Sheet Label Users |
25 |
How To... |
27 |
Add Style to Your Labels |
27 |
Print Multiple Labels Quickly with Smart Paste |
27 |
Print Quickly from Anywhere (Windows) |
28 |
Print Quickly from Anywhere (Mac) |
28 |
Print a Large Mailing List Continuously |
28 |
Create a Multi-Line CD Label |
29 |
Create a Two-Sided Label |
29 |
Add Your Own Logo |
30 |
Frequently Asked Questions |
31 |
Moving Your Files to Another Computer |
31 |
Sharing Label Files |
31 |
Removing the Sample Address Book |
32 |
Finding Your Version 7 Labels (Windows Only) |
32 |
Viewing the Status of Your Label Maker |
32 |
Printing Labels |
35 |
Printing a Single Label |
35 |
Printing from the Address Book |
35 |
Printing from the Desktop (Windows) |
36 |
Using the QuickPrint Widget (Mac) |
36 |
Printing Directly from Other Programs |
36 |
Printing Directly from Microsoft Word |
37 |
Printing Multiple Labels |
37 |
Printing Multiple Copies |
38 |
Printing Multiple Addresses |
38 |
Printing Multiple Labels Quickly with Smart Paste |
38 |
Importing and Printing Data |
39 |
About Smart Paste |
39 |
Printing Multiple Labels Quickly with Smart Paste |
40 |
Printing from a Spreadsheet Using Smart Paste |
40 |
iv

Printing from a Text File Using Smart Paste |
41 |
Printing from a Word Processor Using Smart Paste |
42 |
Choosing a Printer |
43 |
Printing to a LabelWriter Twin Turbo Printer |
44 |
Using Both Label Rolls |
44 |
Adjusting the Print Quality |
45 |
Changing the Tape Label Alignment |
45 |
Printing Cut Marks Between Labels |
46 |
Setting the Default Copies to Print |
46 |
Designing a Layout |
47 |
Creating a New Layout |
47 |
Modifying a Sample Layout |
48 |
Saving a Layout |
48 |
Adding Design Objects |
48 |
Adding an Address Object |
49 |
Adding a Text Object |
51 |
Adding a Circular Text Object |
53 |
Adding an Image Object |
56 |
Adding a Shape Object |
57 |
Adding a Barcode Object |
58 |
Adding a Counter Object |
60 |
Adding a Date and Time Object |
61 |
Using Clip Art |
62 |
Adding Clip Art to Your Label |
63 |
Adding an Image to the Clip Art Library |
63 |
Deleting an Image from the Clip Art Library |
63 |
Adding a Screen Grab to Your Label |
64 |
Changing the Font |
64 |
Inserting a Symbol |
64 |
Aligning Text |
64 |
Creating Vertical Text |
65 |
Aligning Objects |
65 |
Rotating Objects |
65 |
Resizing Objects |
66 |
Adding a Border to an Image |
66 |
Adding a Border to a Tape Label |
66 |
Adding Shading to Objects |
66 |
Creating a Variable Text Object |
67 |
v

Using the Address Book |
69 |
Creating a New Address Book |
69 |
Adding an Address |
70 |
Adding an Address from a Label |
70 |
Editing an Address |
70 |
Deleting an Address |
71 |
Using Outlook Contacts |
71 |
Using the Mac Address Book |
71 |
Switching Address Books |
72 |
Searching the Address Book |
72 |
Filtering the Address Book |
73 |
Exporting an Address Book |
73 |
Importing Data to an Address Book |
74 |
Editing Address Book Keywords (Windows Only) |
75 |
Printing Labels from Other Programs |
77 |
Using the Word Add-In (Windows) |
77 |
Using the Word Add-In (Mac) |
78 |
Using the Outlook Add-In (Windows Only) |
78 |
Using the Mac Address Book Add-In (Mac Only) |
79 |
Using the Excel Add-In (Windows) |
79 |
Using the Excel Add-In (Mac) |
80 |
Using the ACT! Add-In (Windows Only) |
81 |
Printing Directly from Other Applications |
81 |
Customizing DYMO Label |
83 |
Adding My Return Address |
83 |
Adding My Logo |
83 |
Changing the Language (Windows Only) |
84 |
Changing the Units of Measure |
84 |
Hiding the Rulers |
84 |
Changing the Default Font |
85 |
Choosing the Startup Label |
85 |
Setting the Default Folders |
85 |
Setting Other Options |
86 |
Suppressing the File Save Prompt |
86 |
Suppressing the Check Label Size Warning |
86 |
Setting the Paste Button to Automatically Print |
87 |
About Labels |
89 |
vi

Label Rolls |
89 |
Label Cassettes |
89 |
About Label Rolls |
89 |
About Label Cassettes |
90 |
Finding Your Label Type |
90 |
Buying Labels |
91 |
LabelManager 500TS Label Maker |
93 |
Importing Data and Downloading Labels |
93 |
Downloading Clip Art |
93 |
Managing Files |
94 |
Managing Labels |
94 |
Managing Clip Art |
95 |
Adding a Wireless Network Printer |
97 |
Updating the Software |
99 |
Developer and SDK Information |
101 |
Contacting DYMO |
103 |
Internet Support |
103 |
Contact Information |
103 |
Glossary |
105 |
vii
This page intentionally left blank for double-sided printing.
viii
Chapter 1
Introduction
DYMO Label v.8 has been completely redesigned to make it easier than ever to design and print labels.
Review the following topics to learn about what's new and what's changed in DYMO Label v.8.
What's New in DYMO Label
Tour DYMO Label Software
What Version 7 Users Need to Know
What's New in DYMO Label
DYMO Label v.8 now makes it even easier for you to design and print labels. In addition to all the features you are familiar with, this topic lists the new features added to each release.
What's New in v.8.5
n Support for the LabelManager Wireless PnP label maker.
What's New in v.8.4.2
nSupport for the LabelManager LM280 label maker.
nSupport for Windows 8.
What's New in v.8.4.1
nSupport for QR and PDF417 barcode types.
nPrint mulitple labels from a database or CSV file with Import Data and Print on the Mac.
nAddition of the Adult Patient Identification Wristband label type under Specialty/Retail Labels. For use with LabelWriter 450 Twin Turbo label printers.
What's New in v.8.4
nSupport for the latest versions of ACT!.
nUser Guides for label printers installed on your computer can now be viewed from the Help menu.
nSupport for the LabelManager 500TS label maker.
•Import data and download labels.
•Download custom clip art.
•Manage labels and clip art on the label maker.
1
Introduction
Supported Label Printers
DYMO Label v.8.5 supports the following printer models:
nLabelManager Wireless PnP
nLabelManager 280
nLabelManager 500TS
nLabelManager PnP
nLabelManager 420P
nLabelWriter 4XL
nLabelWriter 450 series
nLabelWriter 400 series
nLabelWriter 300 series (most models)
See the Read Me file for a complete list of supported printers..
What's In This User Guide
This User Guide contains the same information as the Help included with DYMO Label v.8. In this User Guide you will find the following chapters:
2
What's In This User Guide
Tour DYMO Label v.8 |
Gives an overview of the DYMO Label v.8 |
|
software main work areas. |
||
|
||
Getting Started |
Contains topics to help new users start |
|
printing labels right away. |
||
|
||
|
Gives you some ideas about how you can do |
|
How To |
more with your labels and get the most out of |
|
|
DYMO Label software. |
|
Frequently Asked |
Contains answers to commonly asked |
|
Questions |
questions. |
|
|
Describes all the options for quickly printing |
|
Printing Labels |
labels from within DYMO Label v.8, from |
|
|
the desktop, and from other applications. |
|
|
Describes how to create or modify label |
|
Designing a Layout |
layouts to create your own custom label |
|
|
designs. |
|
|
Describes how to use the DYMO Address |
|
Using the Address Book |
Book and how to print labels from your |
|
|
Outlook Contacts or Mac Address Book. |
|
Printing Labels from Other |
Describes how to print labels using |
|
DYMO Add-Ins for Microsoft Office |
||
Programs |
||
applications, ACT!, and Mac Address Books. |
||
|
||
|
Describes various options for customizing the |
|
Customizing DYMO Label |
software so you can use the software the way |
|
|
you want. |
|
|
Describes thermal printing and the different |
|
About Labels |
types of labels available for DYMO label |
|
|
printers. |
|
Updating the Software |
Describes how to obtain software updates as |
|
they become available. |
||
|
3

This page intentionally left blank for double-sided printing.
4
Chapter 2
What Version 7 Users Need
to Know
If you are used to working in DYMO Label software Version 7.8 and earlier, this chapter offers some important information you need to know when working in DYMO Label v.8.
Upgrading to DYMO Label v.8 (Windows)
The first time you start DYMO Label v.8, the DYMO Label First Run wizard guides you through the following procedures:
nImporting your settings from an earlier version of the software
Many of your previous settings can be imported; including your default font, default return address, and your startup label settings. In addition, all of the LabelWriter label files in your default label file folder are automatically converted to the new label format and copied into the new default Labels folder. Also, all of your Address Books are automatically converted to the new Address Book format and copied into the new default Address Books folder.
nChoosing to participate in the DYMO Product Improvement Program
nRegistering your DYMO label printer
Upgrading to DYMO Label v.8 (Mac)
Many of your previous settings are imported when you install DYMO Label v.8. Some of the settings that are imported from earlier versions of the software include: your default font, default label file folder, default return address, and your startup label settings.
Label Files
Label Files that you create are now stored in the following default folder:
Windows: ...\Libraries\Documents\DYMO Label\Labels
Mac: Documents/DYMO Label Software/Labels
 You can open all of your Version 7 LabelWriter label files with DYMO Label v.8. However, DYMO Label v.8 cannot open tape labels created in earlier versions of the software.
Address Book
Address Books are now stored in the following folder:
5
What Version 7 Users Need to Know
Windows: ...\Libraries\Documents\DYMO Label\Address Books
Mac: Documents/DYMO Label Software/Address Books
 You can open all your Version 7 Address Books with DYMO Label v.8.
Label and Tape Editors
The Label and Tape editors from Version 7 are combined into one editor in DYMO Label v.8. You now design tape labels in the same manner and using the same label objects as die-cut paper labels.
Choosing a Label
The Label Files list in Version 7 has been replaced with the Labels tab in DYMO Label v.8. On this tab, you can visually choose the label type you want to use by shape and size. You can also choose from several different layouts for each label. You can find your most recently printed labels by clicking Recently Printed Labels at the bottom of the tab.
Design Toolbar
The design objects that were located on the Design toolbar are now located on the Insert tab. Double-click or drag an object to place the object on the current label. In addition, you can now choose from a wide selection of clip art to add to your labels.
Choosing a Printer
All the label printers that are installed on your computer are now accessed from the print area of the main window. Simply click the printer shown and the full list appears.
6

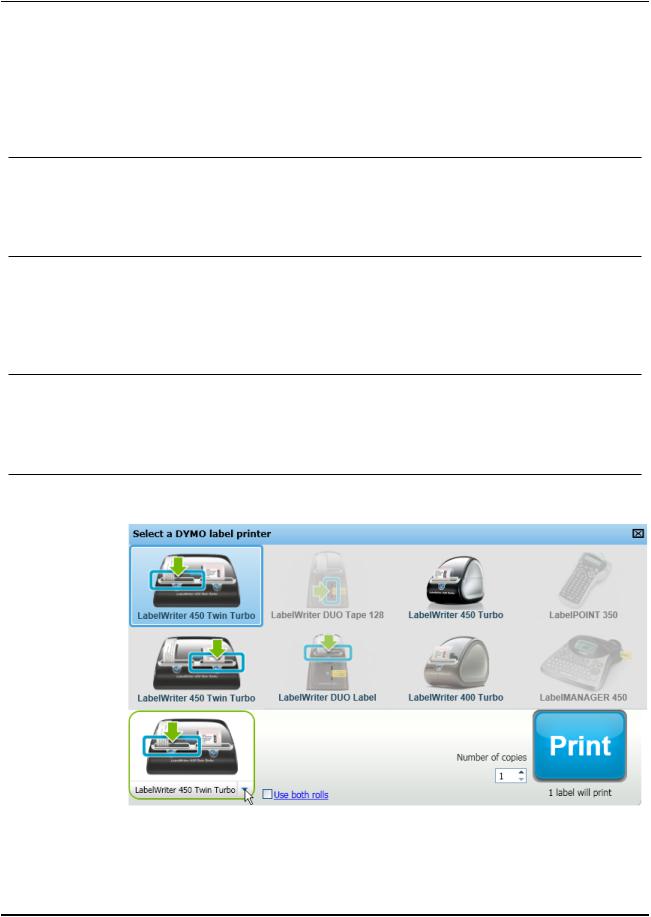
LabelWriter Twin Turbo Users
LabelWriter Twin Turbo Users
The Left and Right label rolls show up in the printer list as separate printers. The label roll that you will print to is indicated by a green arrow and is bordered in blue . For example:
Twin Turbo with
Left Roll selected
7

This page intentionally left blank for double-sided printing.
8

Chapter 3
Helping to Improve DYMO Products (Windows Only)
You can help improve DYMO Label software by allowing DYMO to collect anonymous information on how you use the product. The information collected will not be used to personally identify you and you can stop participating at any time. For more information about the DYMO Product Improvement Program, visit the DYMO Product Improvement Program Web site.
To participate in the DYMO Product Improvement Program
1.Choose Preferences from the Edit menu.
2.Select the General tab.
3.Select the Help improve DYMO products check box.
4.Click OK to close the Preferences dialog box and apply your changes.
9

This page intentionally left blank for double-sided printing.
10
Chapter 4
Tour DYMO Label v.8
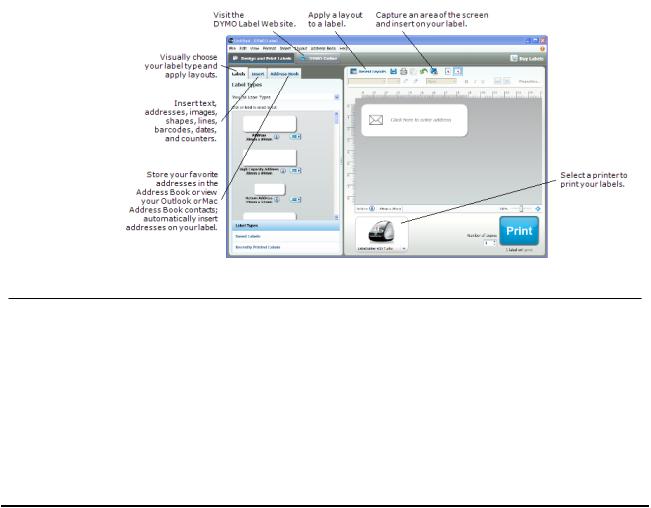
DYMO Label software includes the following features:
nToolbars - quickly access frequently used features.
nEdit Area - format your label and see a WYSIWYG preview of how your label will print.
nLabels tab - choose your label type and layout, or choose a previously created label.
nInsert tab - quickly insert a variety of design objects onto your label.
nAddress Book tab - manage your Address Book and easily insert entries onto your label.
nDYMO Online - quickly access the DYMO Label Web site for tips, how-tos, FAQs, and special offers.
Labels Tab
The Labels tab displays all of the available label types and the most recently saved and printed labels. You can choose a saved or recently printed label to print or edit, or you can choose a new label type and layout to begin creating a new label.
 The label types displayed are based on the type of label printer you have installed. If your label printer only prints LabelWriter labels, then only LabelWriter labels are displayed. If your label printer only prints D1 labels (for example, a LabelManager 420P or LabelManager PnP), then only Tape labels are displayed. If you have more than
11
Tour DYMO Label v.8
one type of label printer installed or if you have a LabelWriter Duo printer installed, both LabelWriter labels and Tape labels are displayed.
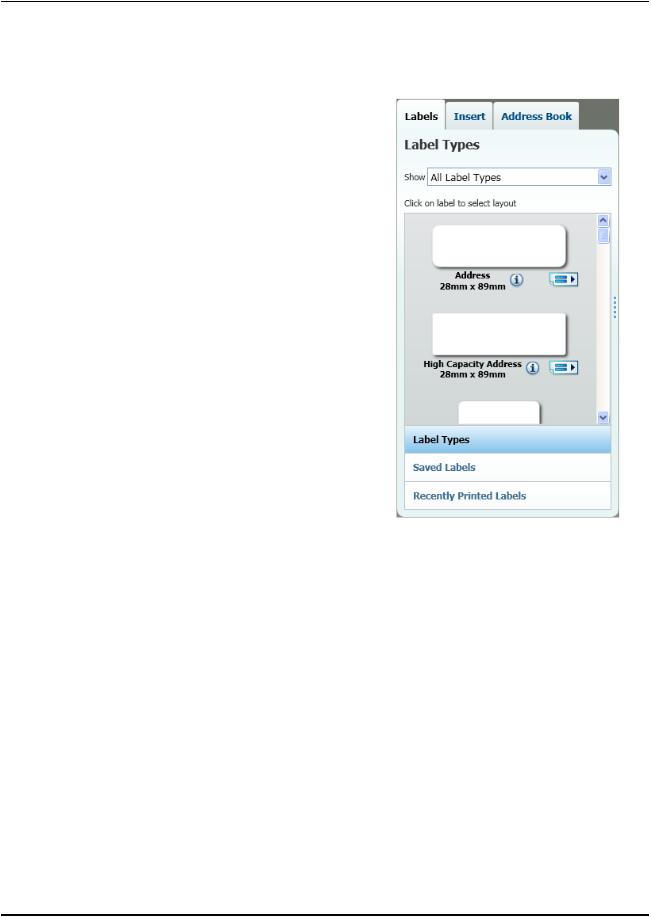
The Labels tab consists of the following:
n Label Types
Label Types displays a preview of all the available label types. You can visually choose your label type and then a label layout to begin creating a new label. You can filter the label types by category, such as Address, Shipping, and so on.
 The label types displayed are based on the Location preference setting.
nSaved Labels
Saved Labels displays all your recently saved labels, ready for you to use again.
nRecently Printed Labels
Recently Printed Labels displays the last 24 labels printed. Each time you print a label, that label is remembered under Recently Printed Labels. You can view your recently printed labels and choose one to print or edit.
12
Insert Tab
Tape Labels
For some DYMO label printers, the width of the inserted label cassette is displayed on the Labels tab along with the cassette width currently selected in the software. For these label printers, each label cassette width is indicated by a different icon so you can quickly select the label width that matches the inserted cassette.
The following DYMO label printers support this feature:
nLabelManager Wireless PnP
nLabelManager 420P
nLabelManager 280
The following table describes the icons associated with each label width.
Icon |
Label Width |
|
6 mm (1/4 inch) |
|
9 mm (3/8 inch) |
|
12 mm (1/2 inch) |
|
19 mm (3/4 inch) |
|
24 mm (1 inch) |
|
|
Insert Tab
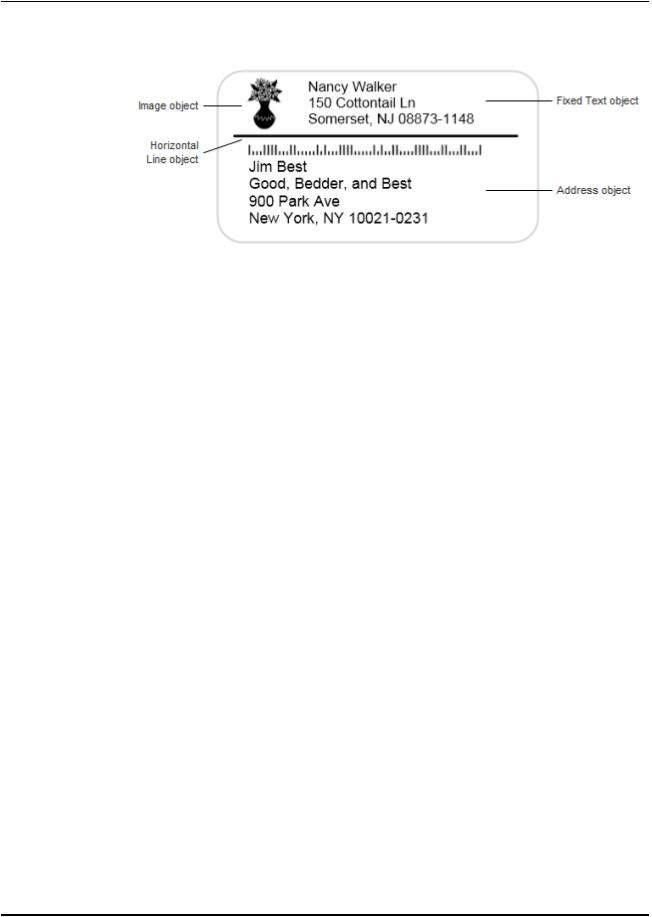
You create your own label design by adding objects to a new or existing label layout.
Each piece of information on a label is a separate object. For example, the logo is an Image object, the return address is a fixed Text object, a horizontal line is a shape object, and so on.
13
Tour DYMO Label v.8
14
Insert Tab
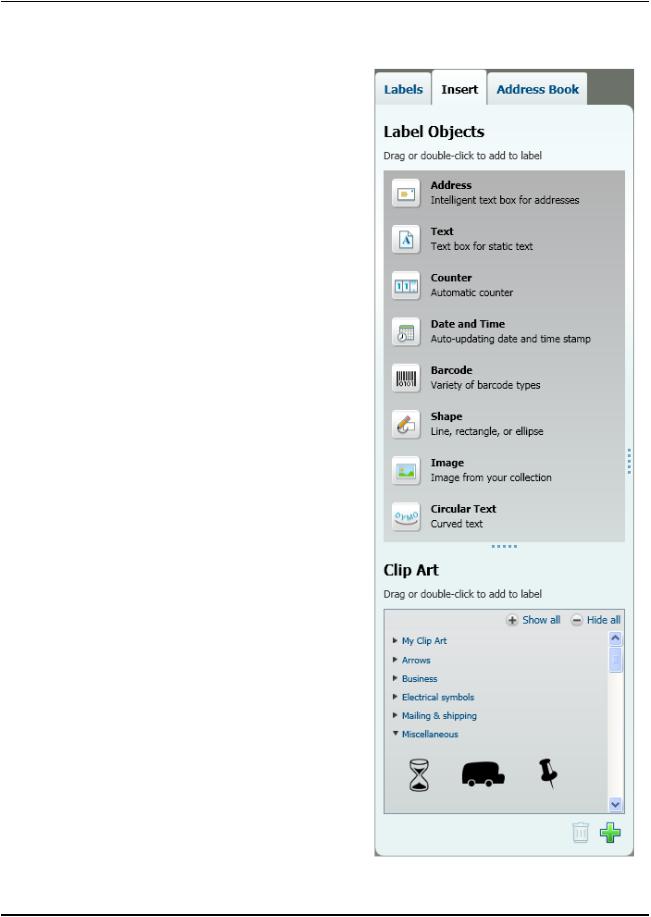
You can add the following types of design objects to your label from the Insert tab:
Label Objects
nAddress
nText
nCounter
nDate and Time
nBarcode
nShape, such as lines, rectangles, circles, and so on
nImage from your own collection
nCircular Text
Clip Art
DYMO Label software includes a variety of useful clip art images that you can quickly add to personalize your labels.
Images in the Clip Art library are organized into different categories, making it quick and easy to find the clip art image that you want to use.
You can also customize the Clip Art library by adding or deleting images.
15
Tour DYMO Label v.8
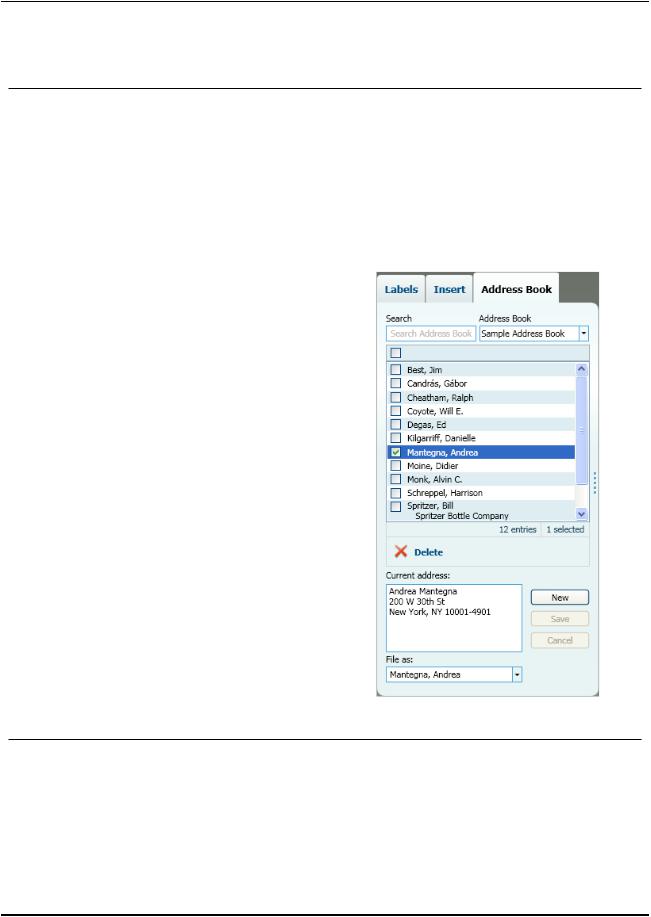
Address Book Tab
The Address Book tab displays a list of all the contacts in the current Address Book. DYMO Label software includes a sample address book for you to use as you learn how to work with the Address Book. You can add, delete, or edit entries in this sample Address Book. Or, you can create a new Address Book that contains only your contacts and with a name you prefer.
Alternatively, if you already have all your contacts saved in Outlook or the Mac Address Book, you can choose to display those contacts on the Address Book tab. You can also import addresses saved in a spreadsheet or text file to a new or existing DYMO Address Book.
From the Address Book tab, you can do the following:
nQuickly add an address to a label
nSelect multiple addresses to print
nAdd, delete, and edit addresses in a DYMO address book
nSwitch to a different Address Book
nView and print your Outlook or Mac Address Book contacts
nSearch for one or more addresses
nFilter the Address Book to view only the addresses you want to see
 To select or clear the check boxes for all addresses, choose Select All or Select None from the Address Book right-click menu.
Edit Area
The Edit area is the main workspace for creating labels. A WYSIWYG (what you see is what you get) preview of your label is displayed in the Edit area. As you add design objects to your label or change the formatting, you can immediately see how your label will print.
The Edit area includes the following features:
nA toolbar for quickly formatting your label text
nQuick access to label layouts
16

Print Area
n A preview of your label
The features available in the Edit are vary, depending on the type of label you have selected.
Edit Area - LabelWriter Label
Edit Area - Tape Label
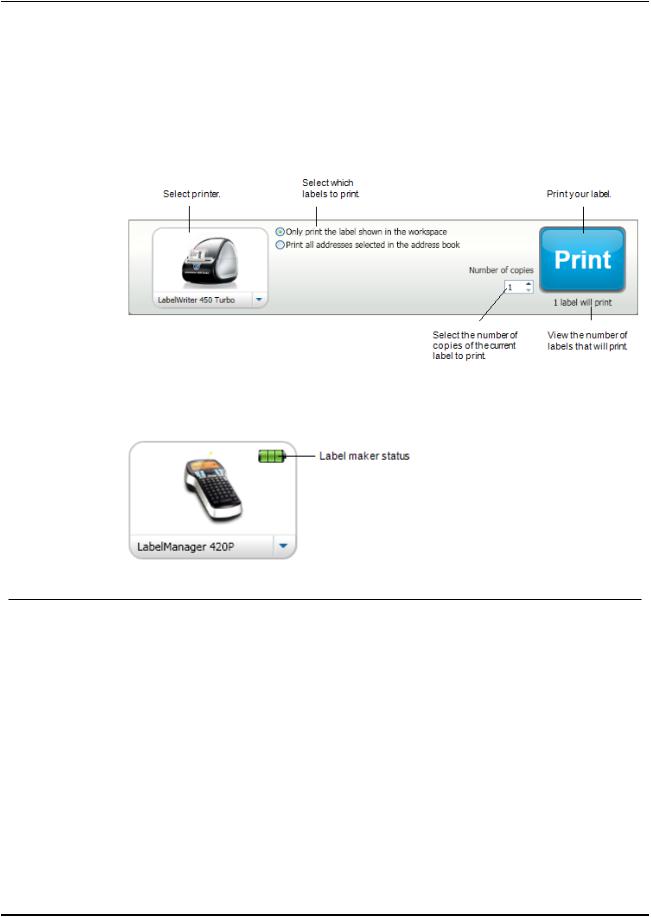
Print Area
The Print area includes several options for printing your labels. If you have more than one DYMO label printer installed, you can select which printer you want to print to.
From the Print area, you can do the following:
nChoose a label printer to print your labels to.
nSelect the number of copies of each label to print.
17
Tour DYMO Label v.8
nSee the total number of labels that will print.
nPrint your labels.
If you have more than one address selected in the Address Book, you can do the following:
nChoose to print all the addresses that you have selected in the Address Book.
nChoose to print only the label that is displayed in the Edit area.
For certain models of LabelManager label makers, the label maker status is displayed in the Print area. For more information on the possible states of the label maker, see Viewing the Status of Your Label Maker.
Zooming the Workspace (Windows)
Several options are available for zooming the workspace. You can zoom just the label in the Edit area, or you can zoom the entire DYMO Label window.
To zoom the label
 Do one of the following:
•Move the slider at the bottom-right of the Edit area.
•Click  at the bottom-right of the Edit area to zoom the label to fit the Edit area.
•From the View menu, point to Zoom Label, and then select a zoom level for the label.
To zoom the DYMO Label window
 From the View menu, point to Zoom Window, and then move the slider to set the zoom level.
18

Zooming the Workspace (Mac)
Zooming the Workspace (Mac)
Several options are available for zooming the label in the Edit area.
To zoom the label
 Do one of the following:
•Move the slider at the bottom-right of the Edit area.
•Click  at the bottom-right of the Edit area to zoom the label to fit the Edit area.
•From the Layout menu, point to Zoom Label, and then select a zoom level for the label.
19

This page intentionally left blank for double-sided printing.
20
Chapter 5
Getting Started
DYMO Label software includes many options for quickly and easily designing and printing labels. You can visually choose the label type and layout you want, select and insert your default logo and return address, and even print directly from the desktop without opening DYMO Label software.
Review the following topics to start using DYMO Label software.
nAdding My Return Address
nAdding My Logo
nFinding Your Label Type
nChoosing a Layout
nPrinting Your First Label
nPrinting from the Desktop (Windows)
nUsing the QuickPrint Widget (Mac)
Adding My Return Address
When you store a default return address, you can quickly insert this return address into an Address or Text object when needed. You can change your default return address at any time through the Preferences settings.
To change or add your return address
1. Do one of the following:
•For Windows, choose Preferences from the Edit menu.
•For Mac, choose Preferences from the DYMO Label menu. The Preferences dialog box appears.
2.If necessary, select the User information tab.
3.Enter your address in the Default return address box, and then click OK.
Adding My Logo
You can store an image file to use as your default logo. Once you have stored a default logo, you can quickly add that logo to any label you create. You can change your default logo at any time.
You can use the following types of image files for the logo:
BMP |
GIF |
PNG |
JPG |
TIF |
|
To add or change your default logo
21
Getting Started
1. Do one of the following:
•For Windows, choose Preferences from the Edit menu.
•For Mac, choose Preferences from the DYMO Label menu. The Preferences dialog box appears.
2.If necessary, select the User information tab.
3.Under Default logo, click Browse. The Open dialog box appears.
4.Navigate to and select the image file you want to use as your default logo, and then click Open.
A preview of the image is displayed in the dialog box.
5.Click OK.
Finding Your Label Type
A preview of each of the different label types is displayed in the Label Types section on the Labels tab. These previews help you to visually choose the label that matches the labels loaded in your label printer.
 The label types displayed are based on the type of label printer you have installed. If your label printer only prints LabelWriter labels, then only LabelWriter labels are displayed. If your label printer only prints D1 labels (for example, a LabelManager 420P or LabelManager PnP label maker), then only Tape labels are displayed. If you have more than one type of label printer installed or if you have a LabelWriter Duo printer installed, both LabelWriter labels and Tape labels are displayed.
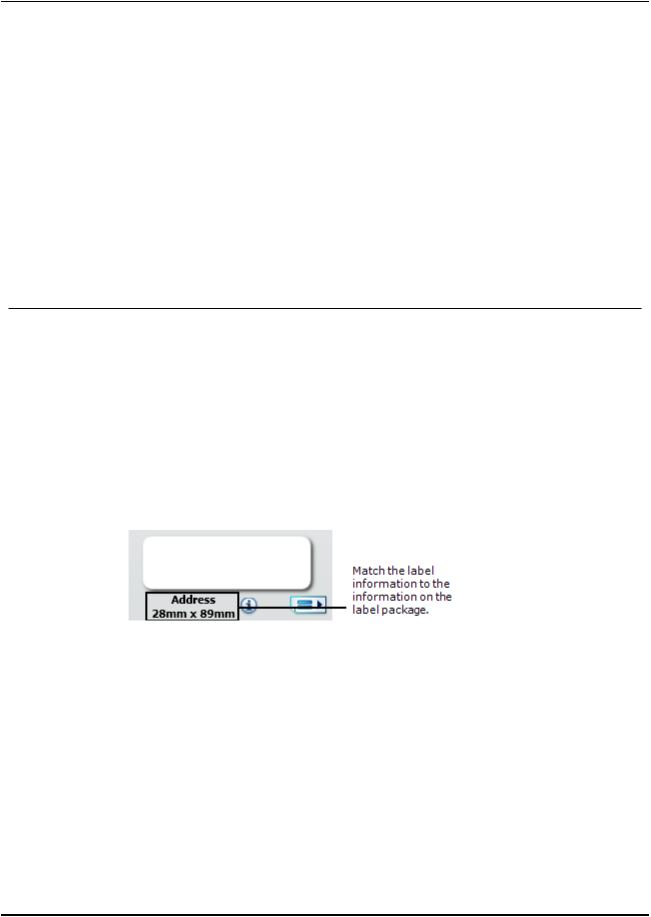
The name and dimensions for each label type are located under the preview for each label type.
To find your label type
1.Find the name and dimensions for your label type on the packaging that your labels came in.
2.Locate your label in the Label Types list and verify that the name and dimensions match those that appear on your label packaging.
3.To further confirm that you have located the correct label type, do the following:
a.Click  next to the label name or at the bottom of the Edit area. A list of DYMO part numbers for that label is displayed.
b.Locate the DYMO part number for your label on the label packaging.
c.Verify that the DYMO part number on your label packaging matches one of the part numbers in the list.
22
 Loading...