


AMB600W
INSTALLATION/OWNER'S MANUAL
AM/FM/CD Marine Receiver with Detachable Face
Front and Rear Inputs
AMB600W INSTALLATION
Preparation
Please read entire manual before installation.
Before You Start
•Disconnect negative battery terminal. Consult a qualified technician for instructions.
•Avoid installing the unit where it would be subject to high temperatures, such as from direct sunlight, or where it would be subject to dust, dirt or excessive vibration.
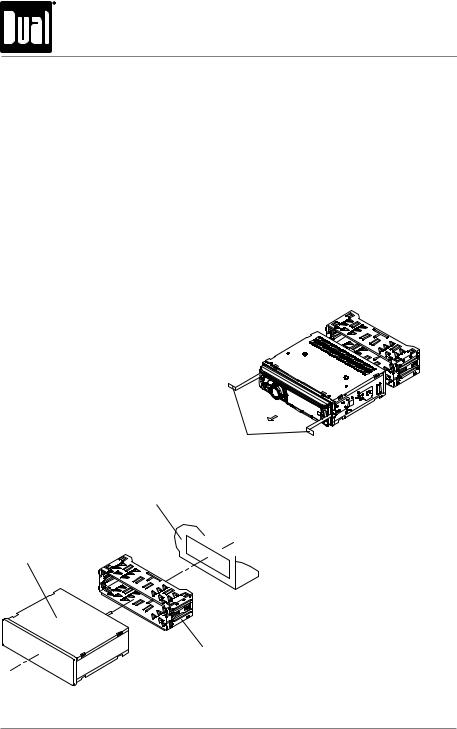
Getting Started
•Remove trim ring from unit.
•Remove 2 transit screws located on top of the unit.
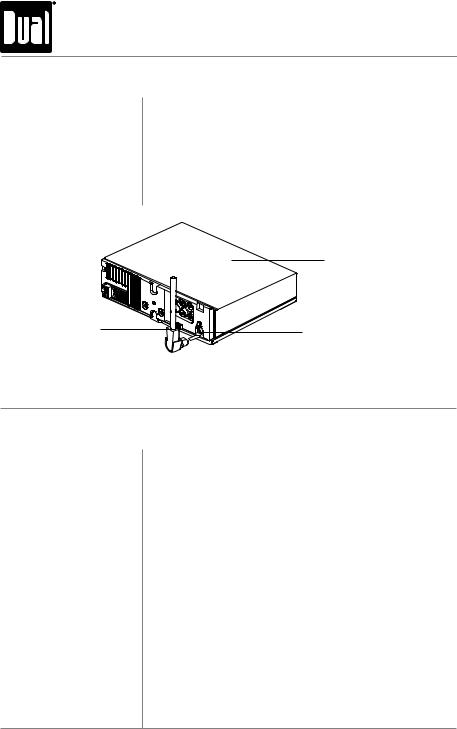
•Insert the supplied keys into the slots as shown, and slide the unit out of the mounting sleeve.
•Install mounting sleeve into opening, bending tabs to secure.
•Connect wiring harness and antenna. Consult a qualified technician if you are unsure.
•Certain vehicles may require an installation kit and/or wiring
harness adapter (sold separately).
• Test for correct operation and slide into mounting sleeve to secure.
• Snap trim ring into place.
Removal Keys
Dashboard or Installation Kit
Head Unit
Mounting Sleeve
TYPICAL FRONT-LOAD DIN MOUNTING METHOD
2

AMB600W INSTALLATION
Wiring Diagram
RCA Preamp Connections
REAR AUXILIARY INPUT
REAR/SUB
BLACK - Antenna Input
FRONT |
Connect the vehicle antenna |
|
 SiriusXM Vehicle Tuner Connection
(tuner sold separately)
Remote Control Input
(not used)
BLACK |
Bluetooth Microphone Input |
|
Connect the included |
|
Bluetooth microphone. |
|
Bluetooth Microphone |
|
(must be connected for Bluetooth functionality) |
FUSE
When replacing the fuse, make sure new fuse is the correct type and amperage. Using an incorrect fuse could
damage the radio. The AMB600W uses one 10 amp ATM fuse located beside the wiring connector.
3
AMB600W OPERATION
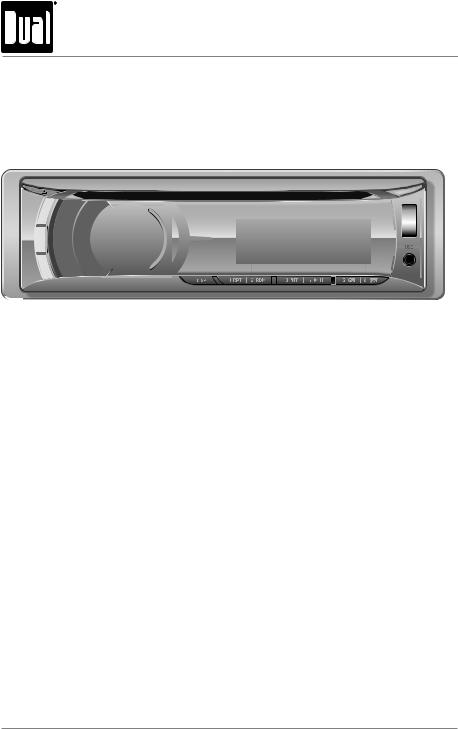
Control Locations - Receiver
1 |
2 |
3 |
4 |
5 |
6 |
7 |
8 |
9 |
|
|
|
10 |
11 |
12 |
|
22 |
21 |
20 |
|
|
19 |
18 |
17 |
16 |
15 |
14 |
13 |
|
|
1 |
Power |
12 |
Auxiliary Input |
2 |
Release |
13 |
Preset 6 / Folder Up |
3 |
Talk |
14 |
Preset 5 / Folder Down |
4 |
Tune / Track Down |
15 |
Preset 4 / Play / Pause |
5 |
Tune / Track Up |
16 |
Preset 3 / Intro |
6 |
Volume (turn) or Select / Tag (push) |
17 |
Preset 2 / Random |
7 |
Mode Up |
18 |
Preset 1 / Repeat |
8 |
Mode Down |
19 |
Display |
9 |
Mode Indicator |
20 |
Audio / Menu |
10 |
Eject |
21 |
Band / Escape |
11 |
USB Port |
22 |
End Call |
4
AMB600W OPERATION
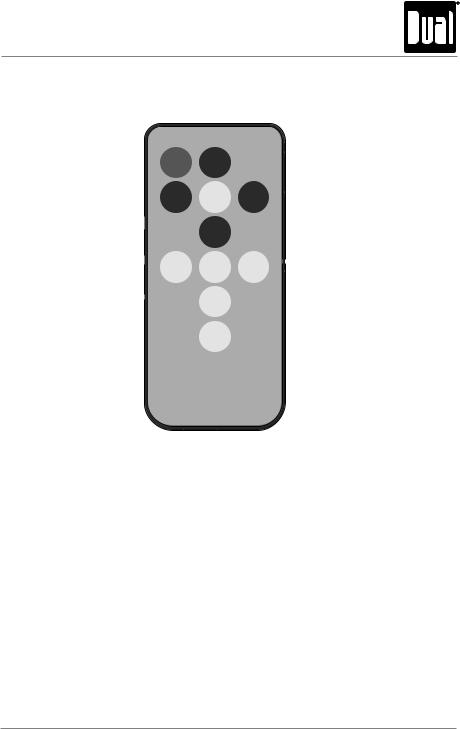
Control Locations - Remote
1 |
2 |
3 |
|
|
|
|
|
4 |
21 |
|
5 |
|
|
|
|
|
6 |
20 |
|
7 |
|
|
|
19 |
|
8 |
18 |
|
9 |
|
|
|
17 |
|
10 |
|
11 |
|
|
|
|
16 |
|
12 |
|
|
|
15 |
|
13 |
|
|
|
|
|
14 |
1 |
Mute / Power |
12 |
Key 8 |
|
2 |
Volume Up |
13 |
End Call |
|
3 |
Audio / Menu |
14 |
Key 0 / Display |
|
4 |
Select / Tag |
15 |
Talk |
|
5 |
Tune / Track Up |
16 |
Key 7 / Key * |
|
6 |
Volume Down |
17 |
Preset 5 / Folder Down |
|
7 |
Mode |
|
18 |
Preset 4 / Play / Pause |
8 |
Preset 3 |
/ Intro |
19 |
Preset 1 / Repeat |
9 |
Preset 2 |
/ Random |
20 |
Band / Escape |
10 |
Preset 6 |
/ Folder Up |
21 |
Tune / Track Down |
11 |
Key 9 / Key # |
|
|
|
5
AMB600W OPERATION
General Operation
Power On/Off Press  or any other button (except EJECT) to turn the unit on. Press to turn the unit off.
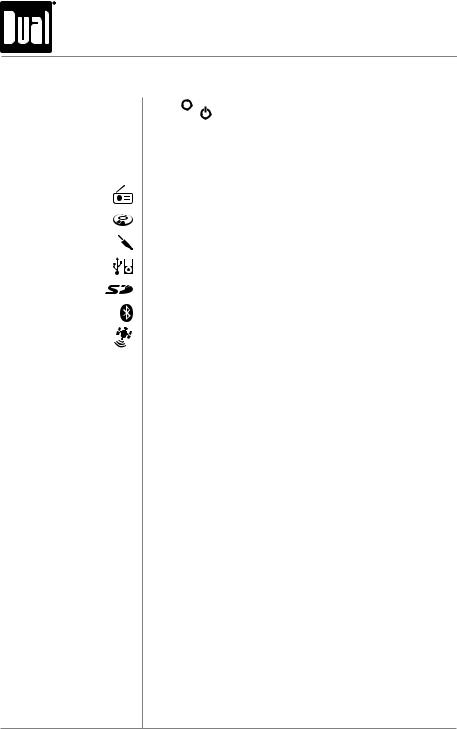
Changing Modes Press MODE DOWN to cycle down or press MODE UP to cycle up through the following operating modes. A mode indicator located to the left of the LCD will point to the current mode of operation.
AM/FM/WB Tuner Mode
CD Player Mode
Auxiliary Input (front/rear) Modes
USB and Operation of iPod®/iPhone® Modes
SD Card Mode
Bluetooth Mode
SiriusXM Satellite Radio Mode
Available Modes SiriusXM mode will not appear unless the SiriusXM Connect Vehicle Tuner (sold separately) is connected.
Operation of iPod mode will not appear unless an iPod device (sold separately) has been connected.
CD, USB and SD modes will not appear unless a CD, USB device or SD card (sold separately) have been connected.
Auxiliary Inputs The AMB600W offers two auxiliary input ports, a 3.5 mm port on the front panel and an RCA connection on the back of the unit. Use either connection to connect audio device, MP3 player, etc. Press MODE UP/DOWN to select AUX FRONT or AUX REAR modes.
Volume Adjust volume using volume knob (00-46).
Display Press DISP to select between clock and different types of information, such as radio frequency, CD track/elapsed time or MP3/WMA song information.
Reset Press RESET upon initial installation or if abnormal operation occurs. Reset button is located behind the front panel.
Set the Clock With the unit on, press and hold DISP until the clock begins to flash, then release. Press TUNE nnto adjust the hours and TUNE llto adjust the minutes. Press DISP momentarily to save the selected time.
6

|
|
AMB600W OPERATION |
|
|
|
|
|
General Operation - Setup Menu |
|||
|
|
|
|
Menu Function |
Options |
Action |
|
Auto Station |
AUTO PGM |
Press SELECT to seek and save 6 strong stations in the current |
|
Store |
STATIONS |
band. (Tuner mode only) |
|
Local/Distance |
LOCAL OFF |
Activates distance tuning (Tuner mode only). |
|
|
Activates local tuning for strong station reception only (Tuner mode |
||
Tuning |
LOCAL ON |
||
|
only). |
||
|
|
||
Tuner |
FREQ'NCY USA |
Programs the unit to USA tuner spacing. |
|
(200kHz for FM and 10kHz for AM). (Tuner mode only) |
|||
|
|||
Frequency |
|
|
|
|
Programs the unit to European tuner spacing. |
||
Spacing |
FREQ'NCY EURO |
||
|
(50kHz for FM and 9kHz for MW). (Tuner mode only) |
||
|
IPOD CNT |
Programs the head unit to advanced control of the iPod/iPhone |
|
Selectable iPod |
FULL |
device. |
|
Control |
IPOD CNT |
Programs the head unit to manual control of the iPod/iPhone device |
|
|
MANUAL |
and allows music to be controlled from the iPod/iPhone device. |
|
|
LOUD ON |
Enables the loudness feature, which enhances the bass and treble |
|
Loudness |
frequencies at low volumes. |
||
|
|||
|
LOUD OFF |
Disables the loudnes feature. |
|
Clock |
CLOCK OFF |
Programs unit to not display the clock when the power is off. |
|
Display |
CLOCK ON |
Programs unit to display the clock when the power is off. |
|
|
|||
Front Auxiliary |
AUX-FRNT ON |
Enables the front panel 3.5mm auxiliary input. |
|
Input |
AUX-FRNT OFF |
Disables the front panel 3.5mm auxiliary input. |
|
|
|||
Rear Auxiliary |
AUX-REAR ON |
Enables the rear RCA auxiliary input. |
|
Input |
AUX-REAR OFF |
Disables the rear RCA auxiliary input. |
|
|
|||
Rear/Sub |
SUBWFR SUB |
Programs the rear/sub RCA preamp output to subwoofer. |
|
RCA output |
SUBWFR REAR |
Programs the rear/sub RCA preamp output to rear. |
|
|
|||
Beep Confirmation |
BEEP OFF |
Disables the confirmation beep. |
|
BEEP ON |
Enables the confirmation beep. |
||
|
|||
Programmable |
PROG-VOL # |
Programs unit to always turn on at a specific volume |
|
Turn On Volume |
(default is OFF). Any volume level 1-46 can be selected. |
||
|
|||
|
|
|
|
Power on Message |
MESSAGE OFF |
Disables power on message. (example: GOOD MORNING) |
|
MESSAGE ON |
Enables power on message to be displayed. |
||
|
|||
|
SCROLL 15 SEC |
Programs unit to scroll information once every 15 seconds (default). |
|
Scrolling |
SCROLL ONCE |
Programs unit to scroll once, then show the first 8 characters on |
|
display. |
|||
|
|||
Option |
|
|
|
SCROLL ON |
Programs unit to scroll continuously. |
||
|
|||
|
SCROLL OFF |
Programs unit to show the first 8 characters on the display. |
|
Illumination |
DIMMER HIGH |
Programs unit to the brightest illumination level. |
|
DIMMER MEDIUM |
Programs unit to the middle illumination level. |
||
Dimmer |
|||
DIMMER LOW |
Programs unit to the dimmest illumination level. |
||
|
|||
Demonstration |
DEMO OFF |
Disables the demonstration mode. |
|
Mode |
DEMO ON |
Enables the demonstration message. |
|
|
|||
Bluetooth Options |
See page 31 for menu options. |
||
SiriusXM Setup |
(Press SELECT) |
See page 12 for menu options. |
|
|
|
|
|
|
|
7 |
|

AMB600W OPERATION
General Operation
12/24-hour Clock The clock will display 12-hour AM/PM time in USA frequency spacing mode (PM 10:00). In European frequency spacing mode, the clock will display 24-hour time (22:00).
Audio Press AUDIO momentarily to select between Bass, Treble, Balance, Fader, Equalizer, Subwoofer and Source Volume Level.

 BASS
BASS  TREBLE
  BALANCE
  FADER
FADER  EQ
EQ  SUBWOOFER
 SOURCE LEVEL
Bass Press AUDIO until BASS appears, then rotate volume knob left/right to adjust ( -6 minimum / +6 maximum).
Treble Press AUDIO until TREBLE appears, then rotate volume knob left/right to adjust ( -6 minimum / +6 maximum).
Balance Press AUDIO until BALANCE appears, then rotate volume knob left/right to adjust (BALANCE LEFT 12 - BALANCE RIGHT 12). BALANCE EVEN represents equal balance.
Fader Press AUDIO until FADER appears, then rotate volume knob left/right to adjust (FADER FRONT 12 - FADER REAR 12). FADER EVEN represents equal fader.
EQ Press AUDIO until EQ appears, then rotate volume knob to select from the following equalization curves: FLAT
(default), POP, JAZZ, CLASSIC, BEAT, ROCK and USER. Any manual adjustments to the bass and treble settings are automatically saved as USER.
Subwoofer Press AUDIO until SUBWFR appears, then rotate volume knob left/right to adjust (0 minimum / +12 maximum).
Note: Subwoofer option will not appear if the REAR/SUB option in the setup menu is set to REAR. Refer to page 7 for details.
Source Volume Level The source volume level control allows a gain adjustment for each audio source: AM, FM, WB, CD, AUX FRONT/REAR, operation of iPod, USB, SD card, Bluetooth and SiriusXM.
Set the source volume level for each mode, depending on the relative volume of each audio source.
To set the source volume level, press AUDIO until SOURCE LEVEL appears. After one second, the current mode will appear on the display. Turn the volume knob to adjust the audio level of the current source (-6 minimum/+6 maximum).
Note: Only the current mode will be available for adjustment. To adjust another mode of operation, press MODE UP/DOWN until the desired mode is selected, then set the source volume level for that mode.
8

AMB600W OPERATION
AM/FM Tuner Operation
Seek Tuning Press TUNE nnor TUNE llfor more than one second to seek to the next strong station. Press and hold to advance quickly.
Manual Tuning Press TUNE nnor TUNE llmomentarily to change radio frequency up or down one step at a time.
Band Press BAND to select between FM1, FM2, FM3, AM1, AM2 and WB bands.
Storing and Recalling Up to 18 FM stations and 12 AM stations can be stored. To Station Presets store a station, select the desired band and station. Press
and hold the desired preset button (1-6) for more than 2 seconds.
When stored, the preset number will appear in the display. The station can be recalled anytime by pressing the corresponding preset button.
Weather Band Tuner Operation
Band Press BAND to select weather band (WB).
Manual Tuning Press TUNE nnor TUNE llmomentarily to seek the next weather band station.
Storing and Recalling Up to 6 weather band stations can be stored. To store a Presets station, select the weather band and the desired station.
Press and hold the desired preset button (1-6) for more than 2 seconds.
When stored, the preset number will appear in the display. The station can be recalled anytime by pressing the corresponding preset button.
9
AMB600W OPERATION
SiriusXM Vehicle Tuner Connections
Connecting the SiriusXM Satellite Radio operation requires the connection of the SiriusXM Vehicle Tuner SiriusXM-Connect Vehicle Tuner (sold separately).
(sold separately)
Note: The SiriusXM-Connect Vehicle Tuner must have the SiriusXM logo to be compatible with the AMB600W.
To connect the SiriusXM Vehicle Tuner, follow the instructions provided with the tuner. When connecting the tuner to the AMB600W, the cable orientation should be connected as shown below.
AMB600W Head
Unit
SiriusXM Vehicle |
Tuner Cable |
SiriusXM-Ready
Input
Line up the connector with the pins on the cable. It can only be inserted as shown above. Push the cable into the head unit's connector until it clicks. Attempting to insert the cable differently from shown above may cause damage to the cable or head unit.
SiriusXM Vehicle Tuner Operation
SiriusXM Satellite Radio Everything worth listening to is on SiriusXM, getting over 130 Overview channels, including the most commercial-free music, plus the best
sports, news, talk and entertainment. A SiriusXM Vehicle Tuner (sold separately) and Subscription are required. For more information, visit www.siriusxm.com.
Sirius, XM and all related marks and logos are trademarks of Sirius XM Radio Inc. and its subsidiaries. All other marks and logos are the property of their respective owners. All rights reserved.
Tuner Activation To listen to SiriusXM Satellite Radio, a subscription is required. Activate the SiriusXM Vehicle Tuner using one of the two methods below:
•Online: Go to "www.siriusxm.com/activatenow" and choose ACTIVATE RADIO.
•Phone: Call 1-800-XM-RADIO (1-800-967-2346).
Activation typically takes 10-15 minutes, but may take up to an hour.
It is recommended to leave your vehicle on until the "Subscription
Updated" message appears.
10
AMB600W OPERATION
SiriusXM Vehicle Tuner Operation
Radio ID To view the Radio ID on the LCD, press TUNE llor TUNE nn until channel 0 appears. The 8 character Radio ID will appear on the display. The Radio ID is also printed on the underside of the SiriusXM Vehicle Tuner.
Note: The Radio ID does not use the letters I, O, S, F.
Listening to SiriusXM After installation of the SiriusXM Vehicle Tuner, press Satellite Radio SOURCE until SiriusXM mode appears to begin listening to
SiriusXM Satellite Radio.
Changing Channels Press TUNE llor TUNE nn to change SiriusXM channels. Press and hold to advance quickly.
Band Press BAND to select between the SXM1, SXM2 and SXM3 bands. Up to six presets can be programmed for each band, for a total of 18 SiriusXM Satellite Radio channel presets.
Setting Channel Presets To store a channel, choose a Band (SXM1-SXM3), then tune to the desired channel. Press and hold a preset button (1-6) on the front panel or remote control for more than two seconds. When stored, a beep sound will be heard and the preset number will appear in the display.
Recalling Channel The preset channel can be recalled by pressing the Presets corresponding preset button.
Note: Buttons 7,8,9,0 on the remote control are not associated with channel presets.
Channel List Press SELECT to enter the channel search menu. With "CHANNEL" highlighted, press SELECT to browse through a list of all available channels.
•Turn the volume knob to cycle through the list of channels.
•When the desired channel appears on the top line of the display, press SELECT to begin listening to that channel.
Note: Press DISP to change between the channel name, artist name, song title or content info.
Category Search Press SELECT to enter the channel search menu. With "CATEGORY" highlighted, press SELECT to browse through a list of all available channels.
•Turn the volume knob to cycle through the list of categories.
•Press SELECT to choose a category and display the channels in that category.
•Turn the volume knob to choose desired channel, then press SELECT to begin listening.
11

AMB600W OPERATION
SiriusXM Vehicle Tuner Operation
SiriusXM Setup Menu
To access the SiriusXM setup menu options, press and hold AUDIO/MENU for more than 3 seconds, press AUDIO/MENU to cycle through menu options until "SIRIUSXM SETUP" appears, then press SELECT. Press AUDIO/MENU to cycle through the list of submenu options.
Function |
Action |
Options |
Description |
|
|
|
|
|
|
|
|
EDIT |
Choose this option to program a new 4-digit code. Enter the |
|
|
|
CODE |
new code using the input method described below*. |
|
|
|
|
Allows channels to be locked, requiring the 4-digit code to be |
|
|
|
|
entered before the channel becomes available in the channel |
|
|
*Enter |
CHANNEL |
lineup. Once selected, the channel list will appear. |
|
Parental |
Code |
• Turn the volume knob to browse through the list of |
||
Controls |
(default: |
LOCK |
channels. |
|
|
0000) |
|
• Press SELECT to lock the desired channel. |
|
|
|
|
• Pressing SELECT on a locked channel will unlock it. |
|
|
|
CLEAR |
Choose this option to reset the locked channels back to the |
|
|
|
factory default. All currently subscribed channels will be |
||
|
|
ALL |
||
|
|
unlocked. |
||
|
|
|
||
Delete Tags |
Press SELECT to |
Deletes all Tags that are saved in memory. (Does not affect |
||
(iTunes |
||||
confirm |
Tags that have been transferred to an iPod device.) |
|||
Tagging) |
||||
|
|
|
||
SiriusXM Setup Menu Navigation
Press SELECT 
Parental
Controls
*To enter a 4 digit code, choose from the two options below:
•Enter the 4 digit code using the remote control, by pressing the numbers directly. The default code is "0000" if the code has not be changed with the "EDIT CODE" feature. Press SELECT to confirm.
•Turn the volume knob to select the first digit, then press SELECT. Continue with the remaining digits until all 4 digits have been entered. Press SELECT to confirm.
12
 Loading...