


GB |
Original instructions |
2 |
DA |
Oversættelse af betjeningsvejledning |
202 |
|
|
|
|
|
|
DE |
Übersetzung der Originalbedienungsanleitung |
34 |
SV |
Översättning av originalinstruktioner |
234 |
|
|
|
|
|
|
FR |
Traduction de la notice originale |
68 |
NO |
Oversettelse av originalinstruksjonene |
266 |
|
|
|
|
|
|
ES |
Traducción de las instrucciones originales |
102 |
FI |
Käännös alkuperäisistä ohjeista |
298 |
|
|
|
|
|
|
IT |
Traduzione delle istruzioni originali |
136 |
RU |
Перевод оригинальных инструкций |
330 |
|
|
|
|
|
|
NL |
Vertaling van de originele gebruiksaanwijzing |
170 |
AR |
|
364 |
Please note that the contents of the Quick Start Guide and Instruction Manual may change and evolve over time. You can access the most up-to-date version online at www.dremel3d.com.
1619PB2136 09/2017 |
All Rights Reserved |
GB |
|
|
ORIGINAL INSTRUCTIONS |
|
|
|
|
|
|
|
|
GENERAL SAFETY WARNINGS |
||
|
|
|
|
READ ALL |
|
|
|
! WARNING |
|
|
|
|
INSTRUCTIONS IN THIS |
|
|
|
|
MANUAL AND FAMILIARIZE YOURSELF |
|
|
|
|
WITH THE DREMEL 3D45 BEFORE SETUP |
|
|
|
AND USE. FAILURE TO COMPLY WITH THE |
||
|
|
WARNINGS AND INSTRUCTIONS MAY RESULT IN |
||
|
|
FIRE, EQUIPMENT DAMAGE, PROPERTY DAMAGE, |
||
|
|
OR PERSONAL INJURY. SAVE ALL WARNINGS AND |
||
|
|
INSTRUCTIONS FOR FUTURE REFERENCE |
||
WORK AREA SAFETY
a.Keep work area clean and well lit. Cluttered or dark areas invite accidents.
b.Do not operate Dremel 3D45 in the presence of flammable liquids, gases or dust. Dremel 3D45 creates high temperatures which may ignite the dust or fumes.
c.Store idle 3D45s out of reach of children and other untrained persons. Injury can occur in hands of untrained users.
ELECTRICAL SAFETY
a.Always use the Dremel 3D45 with a properly grounded outlet. Do not modify Dremel 3D45 plug. Improper grounding and modified plugs increase risk of electric shock.
b.Do not use Dremel 3D45 in damp or wet locations. Do not expose Dremel 3D45 to rain.
Presence of moisture increases risk of electric shock.
c.Do not abuse the cord. Never use the cord for pulling or unplugging the Dremel 3D45.
Keep cord away from heat, oil, sharp edges or moving parts. Damaged or entangled cords increase the risk of electric shock.
d.Avoid using this product during an electric storm. There may be a remote risk of a power surge from lightning that may result in an electric shock.
e.In case of emergency unplug Dremel 3D45 from outlet.
PERSONAL SAFETY
a.Stay alert, watch what you are doing and use common sense when operating a Dremel 3D45. Do not use Dremel 3D45 while you are tired or under the influence of drugs, alcohol or medication. A moment of inattention while operating Dremel 3D45 may result in personal injury.
b.Use personal protective equipment. The use of protective equipment such as heat resistant gloves and safety glasses will reduce the risk of personal injuries.
c.Dress properly. Do not wear loose clothing or Jewellery. Keep your hair, clothing and gloves away from moving parts. Loose clothes, Jewellery or long hair can be caught in moving parts.
DREMEL 3D45 USE AND CARE
a.Before every use check Dremel 3D45 for misalignment or binding of moving parts, breakage of parts and any other condition
that may affect the Dremel 3D45’s operation.
If damage is suspected then have the Dremel 3D45 repaired by an authorised Dremel service centre before use. Use of Dremel 3D45 when damaged may result in poor quality of object creation, further equipment damage, property damage or personal injury.
b.Do not touch the extruder tip or heated build platform during Dremel 3D45 operation or until it has cooled down to at least 60°C (140°F).
Contact with the extruder tip or heated build platform during or after operation before tip has cooled may result in personal injury.
c.Set up the Dremel 3D45 in a well-ventilated area. Place Dremel 3D45 printer on flat nonflammable surface and away from flammable material. Provide at least 8 inches of unobstructed spacing around Dremel 3D45.
Dremel 3D45 melts plastic during building. Plastic odours emitted during Dremel 3D45 operation may irritate eyes and airways. Locating Dremel 3D45 close to surrounding objects prevents proper ventilation.
d.Do not reach inside the Dremel 3D45 while it is in operation. Contact with Dremel 3D45 moving parts during operation may result in poor build quality, equipment damage or personal injury.
e.Always monitor the Dremel 3D45 during operation. Use of Dremel 3D45 by persons unfamiliar with these warnings and instructions may result equipment or property damage and personal injury.
f.Use only DREMEL filament. Use of filament not authorized by Dremel may result in equipment, property damage or personal injury.
g.Do not adjust extruder/nozzle setting to exceed the maximum rated temperature of the filament type being used. Heating filament above recommended range can cause emissions that may result in personal injury.
h.Ensure small objects created by Dremel 3D45 are not accessible to young children. Small objects are potential choking hazards for young children.
i.Do not create illegal or inappropriate objects using Dremel 3D45.
j.Do not use Dremel 3D45 to create objects intended for use with candles, liquid fuels, and other heat sources. Plastic may melt when exposed to fire or other heat sources. Such use of objects created by Dremel 3D45 may result in fire, property damage and personal injury.
k.Do not use Dremel 3D45 to create objects intended for food or drink applications such as preparation, decoration, storage, or consumption. Such use of objects created by Dremel 3D45 may result in illness or personal injury.
l.Do not use Dremel 3D45 to create objects intended with use with electrical components or housings of electrical components. Dremel filament is not suitable for electrical applications.
Such use of objects created by Dremel 3D45 may result in property damage and personal injury.
m.Do not put plastic objects in or around your mouth. Dremel filament is not suitable for food or drink preparation and food utensils. Such use of objects created by Dremel 3D45 may result in illness or personal injury.
n.Do not use Dremel 3D45 to create objects intended for chemical storage. Dremel filament is not suitable for chemical storage. Such use of
2

objects created by Dremel 3D45 may result in property damage and personal injury.
o.Do not modify Dremel 3D45 or alter factory settings. Modifications may result in equipment and property damage, and personal injury.
p.Do not expose Dremel 3D45 to temperatures exceeding 70°C (158°F). Dremel 3D45 may become damaged. Dremel 3D45 is intended to operate in temperature between 16-29° C
(60 - 85° F).
q.Do not move or bump Dremel 3D45 or the extruder during operation. The object may build incorrectly.
r.Do not change filament spool unless the building process is completed, stopped, or paused. Changing the filament during building will cancel the object and may damage the extruder.
s.Do not pull the filament out until instructed by the touch screen. Doing so may damage the extruder.
t.Use extra care not to damage the extruder tip when clearing debris. Dremel 3D45 will not work properly with damaged extruder tip and will require replacement.
u.Before every build make sure that the build platform is covered with Dremel specified glue.
Use of improper glue may result in equipment damage and poor object build quality.
v.Be aware of your body position when using hand tools to remove objects from the build platform. Sudden tool slip and improper body position during object removal from the build platform may result in personal injury.
w.Avoid scratching the build platform when removing objects. Scratches in the build platform will result in improper object creation.
x.Do not drop the build platform. Tempered glass plate may break and result in personal injury.
y.Do not remove tempered glass plate from plastic holder. Contact with tempered glass plate edge may result in personal injury.
z.Do not twist or bend the build platform while removing objects. Tempered glass plate may separate from plastic holder and result in personal injury.
aa.Dremel is not responsible for structural integrity or utility of objects created using Dremel
3D45. Structural models created by inexperienced designers may result in property damage and personal injury.
SERVICE
a.Always unplug Dremel 3D45 from its power before performing any service procedures.
Failure to do so may result in personal injury and equipment damage.
b.Have your Dremel 3D45 serviced only by an authorized Dremel service centre using only
Dremel replacement parts. This will ensure that proper operation and safety of Dremel 3D45 is maintained.
c.Use only Dremel approved materials and components. Use of filament, or 3D objects other than Dremel® approved filament and genuine
Dremel® components may void warranty.
TABLE OF CONTENTS |
|
General safety warnings....................................... |
2 |
Table of contents................................................... |
3 |
Used symbols........................................................ |
4 |
Information on Intellectual Property.................... |
4 |
Dremel Remote and Mobile Services.................. |
4 |
Functional Description and Specifications......... |
4 |
3D45 Resources..................................................... |
5 |
Glossary of Terms................................................. |
6 |
Getting to know your 3D45................................... |
7 |
Introduction............................................................ |
9 |
Kit Contents*.......................................................... |
9 |
Touch Screen....................................................... |
11 |
Touch Screen Icons............................................. |
16 |
Initial Setup........................................................... |
17 |
Printing Remote with Dremel............................. |
18 |
Getting Ready to Build........................................ |
19 |
Building................................................................. |
24 |
Removing Your Object........................................ |
27 |
Best Practices...................................................... |
28 |
Maintenance......................................................... |
28 |
Maintenance and Service.................................... |
30 |
Firmware & Open Source Software................... |
32 |
Dremel® Consumer Limited Warranty................ |
33 |
3
USED SYMBOLS
|
Symbol |
Name |
Designation/ |
||||
|
|
|
|
|
|
Explanation |
|
|
|
|
|
|
|
It is used to alert you |
|
|
|
|
|
|
|
to potential personal |
|
|
|
|
|
|
Safety alert |
injury hazards. Obey |
|
|
|
|
|
|
all safety messages |
||
|
|
|
|
|
symbol |
||
|
|
|
|
|
that follow this symbol |
||
|
|
|
|
|
|
||
|
|
|
|
|
|
to avoid possible |
|
|
|
|
|
|
|
injury or death. |
|
|
|
|
|
|
Read manual |
Alerts user to read |
|
|
|
|
|
|
symbol |
manual |
|
|
|
|
|
|
|
|
|
|
|
|
|
|
|
indicates a hazardous |
|
|
|
|
|
|
Danger symbol |
situation which, if not |
|
! |
DANGER |
||||||
avoided, will result in |
|||||||
|
|
|
|
|
|
||
|
|
|
|
|
|
death or serious injury |
|
|
|
|
|
|
|
indicates a hazardous |
|
|
|
|
|
|
|
situation which, if not |
|
! |
WARNING |
Warning symbol |
avoided, could result |
||||
|
|
|
|
|
|
in death or serious |
|
|
|
|
|
|
|
injury. |
|
|
|
|
|
|
|
indicates a hazardous |
|
|
|
|
|
|
|
situation which, if not |
|
! |
|
|
|
|
Caution symbol |
avoided, will result |
|
|
|
|
|
|
|
in minor or moderate |
|
|
|
|
|
|
|
injury. |
|
|
|
|
|
|
Hot surface |
Contact may cause |
|
|
|
|
|
|
burn. Allow to cool |
||
|
|
|
|
|
hazard symbol. |
||
|
|
|
|
|
before servicing. |
||
|
|
|
|
|
|
||
|
|
|
|
|
|
|
|
|
|
|
|
|
|
This symbol |
|
|
|
|
|
|
|
designates that |
|
|
|
|
|
|
|
this tool is listed |
|
|
|
|
|
|
UL US symbol |
by Underwriters |
|
|
|
|
|
|
|
Laboratories, to |
|
|
|
|
|
|
|
United States and |
|
|
|
|
|
|
|
Canadian Standards. |
|
! WARNING THIS IS A CLASS A PRODUCT. IN
A DOMESTIC ENVIRONMENT THIS PRODUCT MAY CAUSE RADIO INTERFERENCE IN WHICH CASE THE USER MAY BE REQUIRED TO TAKE ADEQUATE MEASURES.
INFORMATION ON INTELLECTUAL
PROPERTY
The Dremel 3D45 is intended for 3D printing objects from digital files that you create or own, or have the right to print using the Dremel 3D45. When making objects using the Dremel 3D45, it is your responsibility to ensure that you do not infringe any third party intellectual property rights or violate any applicable laws or regulations, such as U.S. or foreign intellectual property laws. The Dremel 3D45 may not be used to make objects protected by intellectual property rights owned by third parties without such third parties’ permission. Using the Dremel 3D45 to do any of the following may require the permission of third parties: to make a duplicate or facsimile (in whole or in part) of any object not created by you, to make an object from a digital file you do not own, or to make an object from a scan of a physical object that you did not create. It is your responsibility to obtain such permission. In some cases, you may not be able to obtain such permission.
Where such permission cannot be obtained, you should not 3D print such object, or you do so at your own risk. You may not modify, reverse engineer, decompile, or disassemble the Dremel 3D45 or its software or firmware, except as permitted by applicable law. If you use the Dremel 3D45 in any way other than as recommended and described in these Operating/ Safety Instructions, you do so at your own risk. Using the Dremel 3D45 to make objects that infringe any intellectual property rights owned by third parties could result in civil or criminal prosecution and penalties, and you could be liable for money damages, fines, or imprisonment.
DREMEL REMOTE AND MOBILE
SERVICES
Dremel remote and mobile services provide you with information and services regarding your Dremel 3D products. The type of information provided by Dremel remote and mobile services may change from time to time. All product information and services are provided for your convenience, “As is” and “As Available”.
NOTE: The availability of Remote and Mobile Services may depend on your region.
Dremel does not guarantee that the information or services will be available, accurate, or reliable, or that product information or services will provide safety in your home. You use all product information, services, and products at your discretion and risk. The product information and services are not intended as a substitute for direct means of obtaining information. Network connectivity requires an access point and high speed internet connection. Internet service provider charges may apply.
Mobile printing requires a compatible mobile device and data plan. Carrier charges may apply.
FUNCTIONAL DESCRIPTION AND
SPECIFICATIONS
BUILDING
Extruder: Single extrusion
Extruder temperature: Up to 280°C (536°F) Build Platform Temperature: Up to 100°C (212°F)
Operating Interface: 4.5” full color IPS touch screen
Maximum Build Volume: 10” x 6” x 6.7” (255mm x 155mm x 170mm)
Layer Thickness: 50 microns | 0.05 mm
Filament types and colors: See dremel3d.com
Internal Storage: 8GB
External Storage: USB Flash Drive
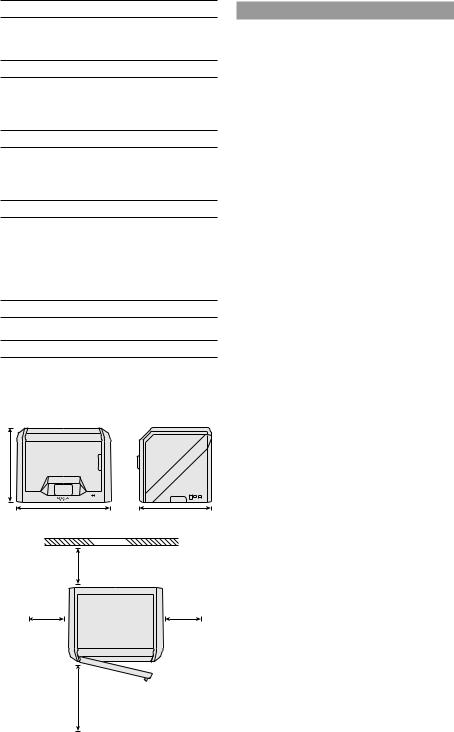
WEIGHT & DIMENSIONS
Weight (without spool): 19.4kg (42.8lbs)
Dimensions: 20.25” x 16” x 15.9” (515mm x 406mm x
394mm)
FILAMENT
ONLY works with Dremel 1.75mm filament
4
FILAMENT STORAGE
All polymers degrade with time. Do not unpack until filament is needed. Filament should be stored at room temperature: 16-29° C (60-85° F) and in dry conditions.
SOFTWARE
Dremel 3D45 comes with complimentary file slicing software for Windows and Mac OSX. This
application converts your 3D digital files into buildable files.
SUPPORTED OPERATING SYSTEMS
•Apple® Mac® OS® X v10.9 or later (Mavericks)
•Microsoft® Windows® 7 SP1
•Microsoft® Windows® Window 8, 8.1
•Microsoft® Windows® Window 10
MINIMUM SYSTEM SPECIFICATIONS
•CPU: 64-bit processor (32-bit not supported)
•Memory: 3 GB RAM (4 GB or more recommended)
•Disk space: ~2 GB free disk space for installation
•Display card: 1,024 MB GDDR RAM or more. Microsoft® Direct3D® 11 capable graphics card or higher
•Pointing device: Three-button mouse
ELECTRICAL REQUIREMENTS
3D45 input rating: 100-240V, 47-60Hz, 0.85-2.3Amps
OPERATING ENVIRONMENT
Room Temperature: 16-29° C (60 - 85° F)
Level workspace
Dry workspace environment
16” (406mm)
20.25” (515mm) 15.5” (394mm)
|
WALL |
|
8” (203mm) |
8” (203mm) |
8” (203mm) |
14” (356mm)
3D45 RESOURCES
Resource |
Description |
Location |
Quick Start |
Provides |
Printed version of |
Guide |
illustrated walk |
the Quick Start |
|
through of how to |
Guide is located in |
|
un-box your 3D45 |
the carton with the |
|
and start building |
printer. It is also |
|
out of the box. |
available on www. |
|
|
dremel3d.com |
Dremel 3D |
Provides the |
www.dremel3d.com |
Website |
latest 3D45 |
|
|
software, product |
|
|
information, |
|
|
customer support, |
|
|
and 3D model |
|
|
and project |
|
|
downloads. |
|
Dremel 3D |
Contact Dremel |
www.dremel3d.com |
Customer |
for product |
|
Support |
support, |
|
|
maintenance, and |
|
|
service. |
|
File Slicing |
Allows you to |
Install from www. |
Software |
upload, edit, and |
dremel3d.com or |
|
build 3D files. |
from USB flash |
|
|
drive provided with |
|
|
the Dremel 3D45. |
5

GLOSSARY OF TERMS
Term |
Definition |
|
|
Build Platform |
The flat surface used by your Dremel |
|
3D45 to build objects. The build |
|
platform is comprised of a tempered |
|
glass plate with a plastic holder. |
Build Platform |
Clips located at the front of the build |
Clips |
platform base that are used to secure |
|
the build platform in place. |
Build Volume |
The three dimensional (3D) amount of |
|
space that an object will use once it is |
|
completed. Your Dremel 3D45 has a |
|
maximum build volume which means |
|
that objects with a larger build volume |
|
cannot be built unless they are |
|
resized or broken into subobjects. |
Door |
Your Dremel 3D45 has a door located |
|
on the front panel. This allows for |
|
easy access to the build platform, |
|
extruder, filament, and your objects. |
|
This door is made with a transparent |
|
material so you can monitor the |
|
progress of your objects while keeping |
|
the build environment stable. |
ECO-ABS |
Natural thermoplastic that provides |
|
users with durable and impact |
|
resistant parts. |
Ethernet Port |
A local area wired networking |
|
technology that allow electronic |
|
devices to communicate. |
Extruder |
An assembly that uses gears to |
|
pull filament through the extruder |
|
intake, heat the filament to the build |
|
temperature, and push the heated |
|
filament out of the extruder tip. |
Extruder Fans |
Fans used to cool the outer assembly |
|
of the extruder and gear motor. |
Extruder Fan |
A plastic piece that directs air from the |
Baffle |
extruder fan onto the build platform to |
|
assist in cooling the active build. |
Extruder Intake An opening located at the top of the
|
extruder where filament is inserted for |
|
building. |
Extruder Lever |
A lever located on the side of the |
|
extruder that is used to loosen the |
|
grip of the extruder gear motor. |
Extruder Tip |
A nozzle located at the bottom of the |
|
extruder where heated filament is |
|
forced out for building. |
Filament |
A threadlike strand of plastic material. |
Filament Guide |
A plastic tube that guides the filament |
Tube |
from the spool holder to the extruder |
|
of the printer, preventing any snags. |
Filament |
A sensor in the extruder intake that |
Runout Sensor |
pauses your printer if it runs out of |
|
filament during a build. |
Filament Spool |
A cylindrical piece on which a long |
|
strand of filament is wound for storage |
|
and continuous use. |
.g, .gcode, |
A buildable file format compatible with |
.g3drem |
your Dremel 3D45. |
Glue Stick |
Non-toxic and acid-free stick of glue |
|
that is applied to the build platform to |
|
help prints stick. |
Leveling |
Knobs located under the base of |
Knobs |
the build platform that allow users to |
|
easily level the build platform before |
|
each print. |
Leveling |
A sensor that detects the height of the |
Sensor |
build platform and assists in proper |
|
leveling. |
Lid |
Your Dremel 3D45 has a pivoting |
|
lid on the top. This allows for more |
|
access to the build platform, extruder, |
|
filament, and objects when necessary. |
Needle Nose |
Common tool used to hold small |
Pliers |
objects and to grab excess material |
|
that may be too hot to touch directly. |
Nylon |
Synthetic polymer that provides strong |
|
and flexible prints with heavy wear |
|
resistance. |
OBJ File |
A common digital file format used in |
|
a wide range of 3D model software. |
|
This file is created in 3rd party |
|
3D software or downloaded from |
|
Dremel3d.com. |
Object |
A tool used to separate your objects |
Removal Tool |
from the build platform. |
PLA. |
A bioplastic derived from renewable |
|
resources such as corn starch |
Spool Holder |
A plastic piece located to the left of |
|
the build platform inside your Dremel |
|
3D45 build area that is designed to |
|
hold a filament spool. |
Spool Door |
A removable door which locks the |
|
filament spool to the spool holder. |
Stepper Motor |
A brushless DC electric motor used |
|
to drive the guide rails and extruder |
|
gears. |
.STL File |
A common digital file format used in |
|
a wide range of 3D model software. |
|
This file is created in 3rd party |
|
3D software or downloaded from |
|
Dremel3d.com. |
Touch Screen |
Full color display that is touch |
|
activated. It allows you to monitor |
|
your Dremel 3D45 and objects while |
|
also providing commands directly to |
|
your Dremel 3D45 without the use of |
|
a computer. |
USB Flash |
A portable memory card used on a |
Drive |
wide array of devices. |
WIFI |
A local area wireless networking |
|
technology that allow electronic |
|
devices to communicate. |
X-Axis Guide |
A set of rails on either side of the |
Rails |
extruder that allow a stepper motor to |
|
move the extruder to the left or right |
|
side of the build area. |
Y-Axis Guide |
A set of rails on either side of the |
Rails |
build area that allow a stepper motor |
|
to move the extruder to the front or |
|
back of the build area. |
Z-Axis Guide |
A set of rails located at the back of |
Rails |
the build area that allow a stepper |
|
motor to move the build platform up |
|
or down. |
6
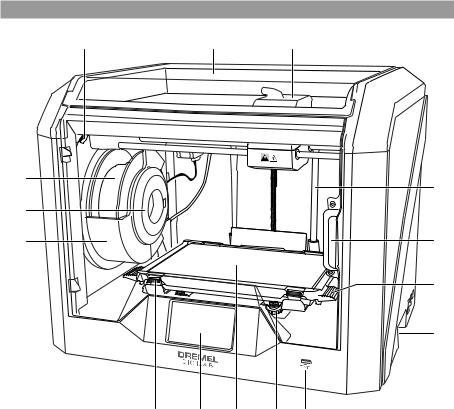
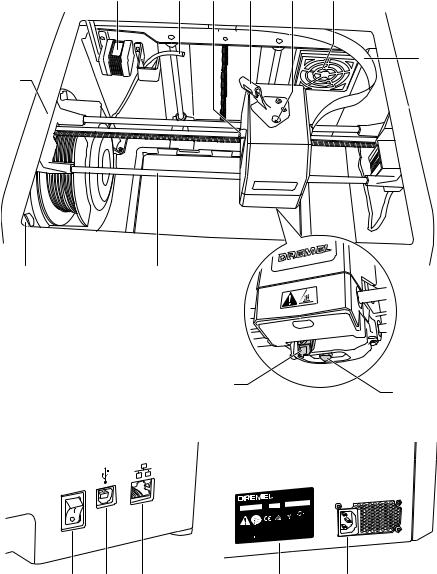
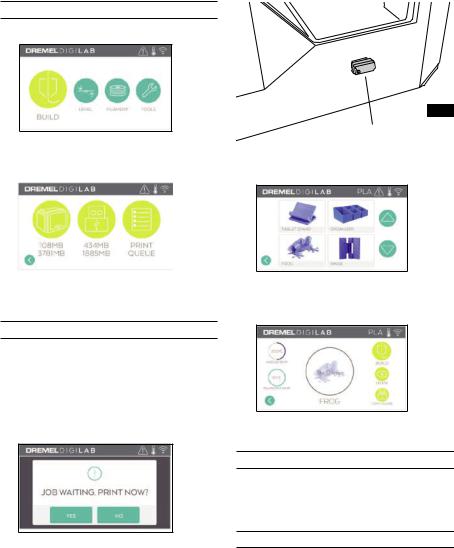
GETTING TO KNOW YOUR 3D45
15 |
1 |
2 |
14 |
3 |
|
|
13 |
|
12 |
4 |
|
5 |
|
6 |
|
11 |
10 |
9 |
8 |
7 |
1. |
Lid |
|
17. |
Stepper motor |
|
2. |
Extruder |
|
18. |
Filament Guide Tube |
|
3. |
Z-Axis Guide rail |
|
19. |
Extruder Lever |
|
4. |
Door |
|
20. |
Filament Guide Clip |
|
5. |
Build Platform Tabs |
|
21. |
Extruder Intake |
|
6. |
Gripping Handles |
|
22. |
Chamber Fan (With optional filtration hook-up) |
|
7. |
USB A Port |
|
23. |
Ribbon Cable |
|
8. |
Leveling Knobs |
|
24. |
X-Axis Guide Rail |
|
9. |
Build Platform |
|
25. |
Leveling Sensor |
|
10. |
Touch Screen |
|
26. |
Extruder Tip |
|
11. |
Build Platform Clips |
|
27. |
Power Switch |
|
12. |
Filament Spool Holder |
|
28. |
USB B Port |
|
13. |
RFID Reader |
|
29. |
Ethernet Port |
|
14. |
Filament Spool |
|
30. |
Nameplate |
|
15. |
Camera |
|
31. |
Power Input |
|
16. |
Y-Axis Guide Rail |
|
|
|
|
7
17 |
18 |
19 |
20 |
21 |
22 |
23
16
15 |
24 |
25 |
26 |
|
10M ode0 V–l 23 4D40 V5 |
~ F40 713– 36 D3 H4 5z 0 00 |
.8 – 1.8 A |
Ø 1.7 5 m m ( 0 |
.0 6 9 " ) |
|
S N
XXXX XX X X X |
M M / Y YY Y |
|
|
LIS TED |
3D |
PR INTER |
E |
46 93 1 1 |
1U1
Dre m M o u n Ma d e
e l |
P r o s p e c t , IL |
KO NIJ NE N B ER G 6 0 |
, |
t |
4 8 2 5 B D B RE DA -NL |
|
|
in C h in a |
|
|
|
27 |
28 |
29 |
30 |
31 |
8

INTRODUCTION
Welcome to the world of Dremel Digilab. Our mission is to mentor you through the digital fabrication process and share best practices for bringing your ideas to life. 3D building is a process that will involve experimentation and persistence. Thankfully, the Dremel experts are here to make your job easier with online tips and live support.
Dremel 3D45 brings new functionality, such as network connectivity and remote printing. To get started with 3D45 follow the initial setup routine on the touch screen to connect and register the printer. You can create a user profile by going to www.dremel3d.com. Your profile gives you access to high-quality models, support and software downloads, and remote printing services powered by Dremel3D cloud based software. Once setup and registration is complete you are ready to start building.
KIT CONTENTS*
|
|
IM P OR TANT |
|
IM P OR TANT |
|
|
||
|
R e a d B e fo re Us in g |
|
IM P OR TANTE |
|
||||
|
|
|
|
L ire a v a n t u s a g e |
|
|||
|
|
|
|
|
|
|
L e e r a n te s d e u s a r |
|
|
|
|
COopnesriagtninegs /dS’uatfielitsyatInsiontr/udcetsioéncs |
|
||||
|
|
|
Instrucciones |
|
|
urité |
|
|
|
|
|
|
|
de funcionamiento y seguridad |
|
||
|
3 D4 5 |
|
|
|
|
|
|
|
|
|
|
P. O. B o x 0 8 1 1 2 6 |
R a c ine , W I |
5 3 4 0 8 -1 1 2 6 |
|
|
|
|
1 -8 4 4 -4 DR M L 3 D (1 -8 4 4 -4 3 7 -6 5 3 3 ) |
w w w . d re m e l. c o m |
|
|||||
|
F o r En g lis h Ve rs io n |
Ve rs io n fra nç a is e |
|
|
|
|||
|
S e e p a g e 2 |
|
Ve rs ió n e n e s p a ñ o l |
|
||||
|
|
|
Vo ir p a g e 3 7 |
|
|
|||
|
|
|
|
|
|
Ve r |
la p á g in a 7 3 |
|
Dremel 3D45 |
Instruction Manual |
Quick Start Guide |
||||||
(2) Filament Spool** |
Power Cable |
USB Cable |
(2) Glue Stick |
Object Removal Tool |
USB Flash Drive |
* Quantities may vary depending on kit. **Do not store in moist or hot environment.
Unclog Tool
9

UNPACKING
1.Place box on table, cut tape, and open.
2.Remove top insert.
3.Remove 3D45 and place on table.
4.Open lid and remove top insert.
5. Raise build plate by lifting from both sides.
6. Open door and remove middle insert.
7. Remove bottom insert.
Tip: Keep packaging for future transportation and storage.
10
TOUCH SCREEN
Using your Dremel 3D45 without a computer is easy with the onboard software and full colour touch screen. Before building your model we want to familiarize you with the touch screen menu structure and options.
! WARNING |
OBSERVE ALL PROVIDED WARNINGS AND SAFETY INSTRUCTIONS WHEN USING THE |
DREMEL 3D45. FAILURE TO DO SO MAY RESULT IN FIRE, EQUIPMENT DAMAGE, |
PROPERTY DAMAGE OR PERSONAL INJURY.
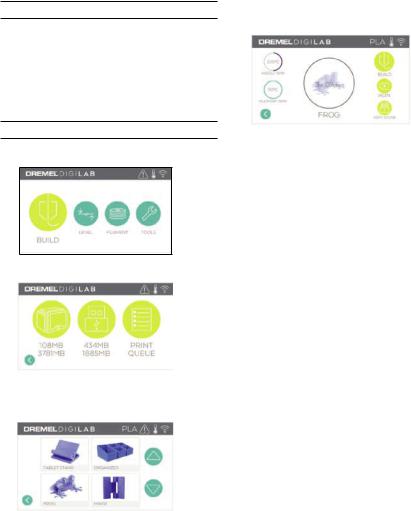
BUILD
Tap to select a 3D model and begin build process. (See page 24 for detailed build instructions)
BUILD MENU
Tap Printer, USB Flash Drive, or Print Queue to choose the destination of your desired file.
MODEL MENU
Tap to select the desired model or use arrows to scroll through pages to find your model.
FILE DETAILS
Nozzle and plate temperatures settings referenced for the current build. BUILD – Tap to begin build process.
DELETE – Tap to remove model file from onprinter storage or USB flash drive.
COPY TO PRINTER – From USB flash drive, tap to copy model file to on-printer storage.
BUILD STATUS
STOP – Tap to cancel the current build process. PAUSE/PLAY – Tap to pause or resume the current build process. Pause will allow you to access the filament button.
11
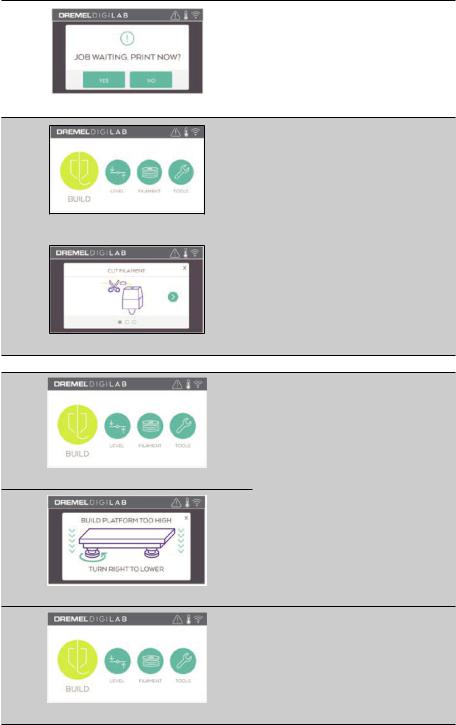
PRINT QUEUE NOTIFICATION
YES – Proceed to print file.
NO – Cancel printing of file.
FILAMENT
Tap to begin heating and start filament load/ change process. (See page 19 for instructions on filament load/change process)
LEVEL
Tap to begin build platform leveling process. (See page 23 for instructions on leveling the build platform)
TOOLS
Tap to access the following individual printer functions and settings.
12
SERVICE
Tap to enter service menu to see customer service contact information.
NETWORK
Tap to enter Network menu to connect or disconnect WiFi and Set Proxy. CONNECT WIFI – Tap to connect to WiFi. SET PROXY – Tap to set manual proxy.
SET STATIC IP – Tap to setup static IP.
13
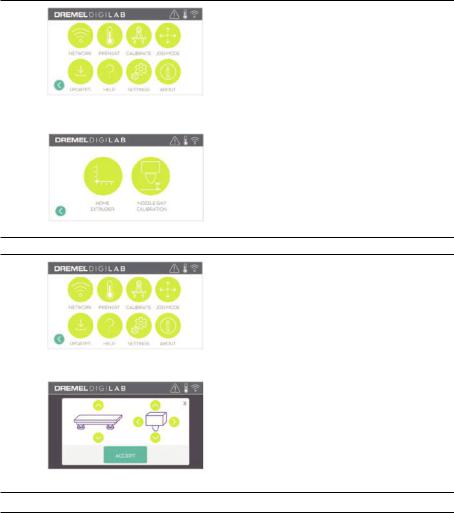
CALIBRATE
Tap to move extruder and build platform to zero position.
JOG MODE
Tap to display options to move extruder and build platform along the X, Y, and Z-axis.
14
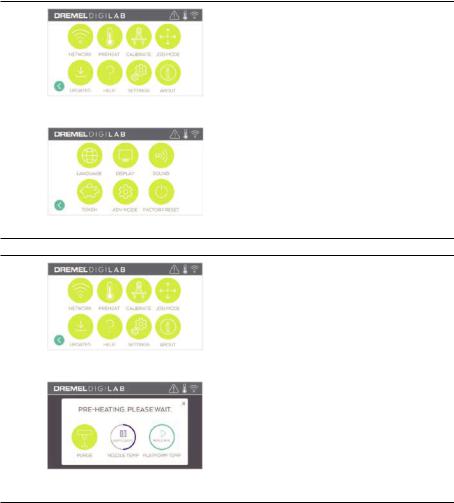
SETTINGS
LANGUAGE – Tap to pick alternate menu language.
DISPLAY – Tap to customize cabinet LEDs or main menu hotkeys.
SOUNDS – Tap to turn 3D45 sounds On/Off. TOKEN – Tap to release current token and get a new token when connected to Wifi or Ethernet.
ADVANCED MODE – Tap to manually prioritize GCode settings.
FACTORY RESET – Tap to remove all information stored on 3D45 and return it to factory defaults.
PREHEAT
Tap “Nozzle Temp” to automatically begin preheating the extruder for building or removing excess debris. Once your optimal temperature is achieved, tap “Platform Temp” to begin preheating the build platform.
PURGE – Once extruder is hot, tap to manually extrude filament.
15
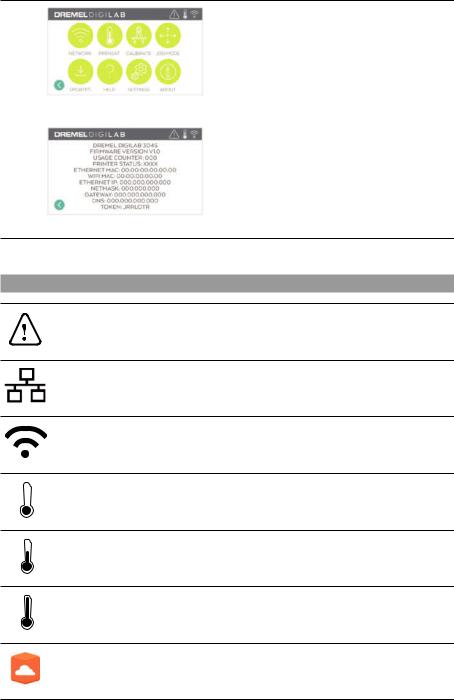
ABOUT
Tap to see 3D45 information such as firmware version, usage counter, printer status, MAC address, and token.
TOUCH SCREEN ICONS
Indicates that there is an error such as filament empty or door open.
Indicates that Ethernet is connected.
Indicates WiFi signal strength and if connected to WiFi symbol will be blue.
Indicates that the extruder and build platform are cool.
Indicates that the extruder and build platform are warm.
Indicates that the extruder and build platform are hot.
Indicates that the printer is connected to 3DPrinterOS printing services and that it can receive remote commands.
16
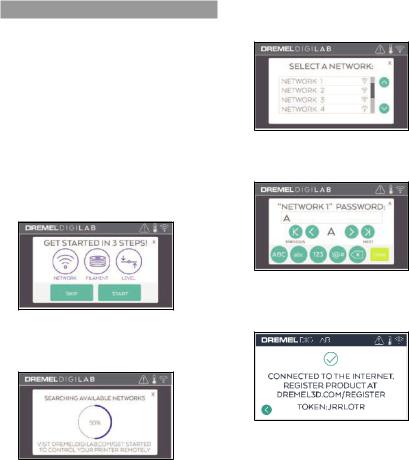
INITIAL SETUP
The first time you power on your Dremel 3D45 you will be prompted to perform an initial setup of network. Completing this process will give you access to features such as printing wirelessly from your PC
or Dremel3D cloud based program, printer sharing amongst your friends and family, notifications of firmware updates, and printer status monitoring. You will then be walked through how to loading your first roll of filament and how to properly level the build platform.
NOTE: Dremel 3D cloud based software can be accessed on www.dremel3d.com. The availability of the cloud based software may depend on your region.
1.To complete initial setup, tap “Start” when prompted on the initial setup screen. If you decline this setup you can always setup network later.
2.If you choose “Start”, 3D45 will automatically connect to your ethernet (if plugged into router skip to step 5) or search for available wireless networks.
3.Choose your wireless network using the touchscreen. Use the arrows to scroll through the list of available wireless networks. Tap on your network name to accept it.
4.Enter your wireless network password and tap “Done”.
5.Write down the token displayed at the bottom of the touchscreen. This token will be used to link your printer to your Dremel account.
6.Visit Dremel3d.com and follow the prompts to complete your user profile creation and printer registration.
17
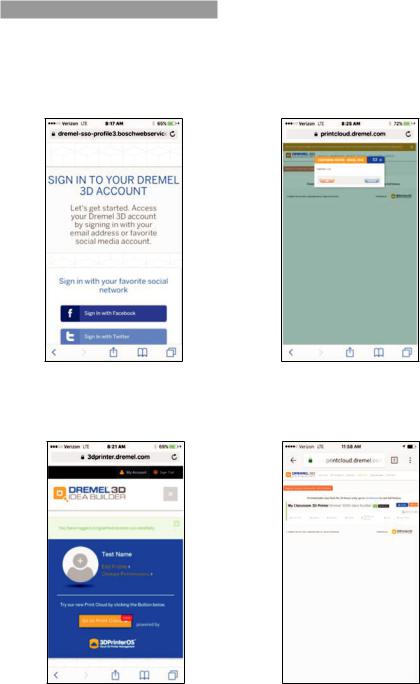
PRINTING REMOTE WITH DREMEL
Dremels cloud-based platform allows you to connect to your 3D45 from any mobile device. In the platform, you can view models and projects in the Dremel 3D library, send, pause and cancel builds, monitor build status, receive push notification updates, and more. Create
a user profile on dremel3d.com and follow the setup steps below to get started.
1.After launching the Dremel cloud platform in your mobile device browser you will need to Log In with your existing Dremel user information or Social Log In or Sign Up to create a new account.
2.Click on the “Go To Print Cloud” button to launch the new cloud platform.
3.When you enter the cloud platform, click on printers on the top toolbar to register your 3D45. Register your 3D45 by entering the token number where it says “Registration code” and clicking “OK”.
4.Your mobile device is now connected to your
3D45.
18
GETTING READY TO BUILD
! WARNING OBSERVE ALL PROVIDED
WARNINGS AND SAFETY INSTRUCTIONS WHEN USING THE DREMEL 3D45.
Failure to do so may result in fire, equipment damage, property damage or personal injury.
! WARNING |
DO NOT TOUCH THE EXTRUDER |
TIP OR HEATED BUILD |
PLATFORM DURING DREMEL 3D45 OPERATION OR UNTIL IT HAS COOLED DOWN TO AT LEAST 60°C (140°F). Contact with the extruder tip or build platform during or after operation before tip and build platform has cooled may result in personal injury.
! WARNING |
USE ONLY DREMEL FILAMENT. |
Use of filament not authorized by |
Dremel may result in equipment, property damage, or personal injury.
! WARNING |
DO NOT ADJUST EXTRUDER |
SETTING TO EXCEED THE |
MAXIMUM RATED TEMPERATURE OF THE FILAMENT TYPE BEING USED. Heating filament above recommended range can cause emissions that may result in personal injury.
!DO NOT PULL THE FILAMENT OUT. Doing so may damage the
extruder.
LOADING/CHANGING FILAMENT
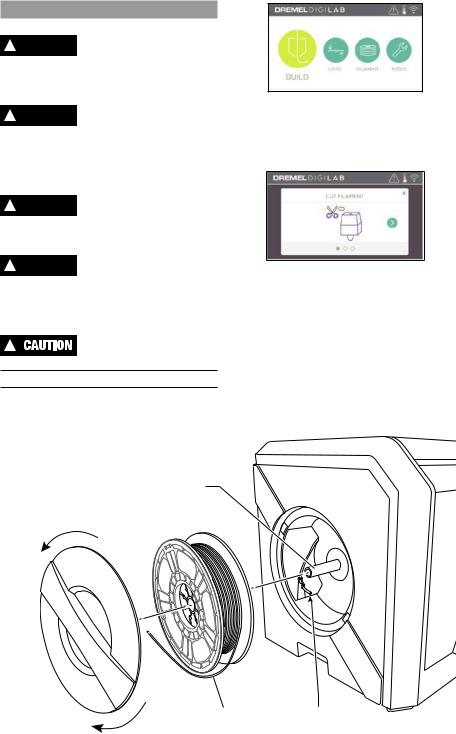
1.Start filament load/change process by tapping “Filament” button on touchscreen. Extruder will move to front right corner of print area and extruder tip will begin to heat.
2.After extruder stops moving, open the 3D45 Lid for better access to extruder.
3.If existing filament is loaded, cut existing filament near extruder intake and tap the arrow button on touchscreen.
4.Remove Spool door by rotating it counter clockwise and remove existing spool if one is present, see figure1.
|
Spool Holder |
FIG. 1 |
|
|
Open |
Filament Filament Guide Tube
Close
19
Guide Tube |
Filament |
Filament Guide |
Extruder intake |
FIG. 2
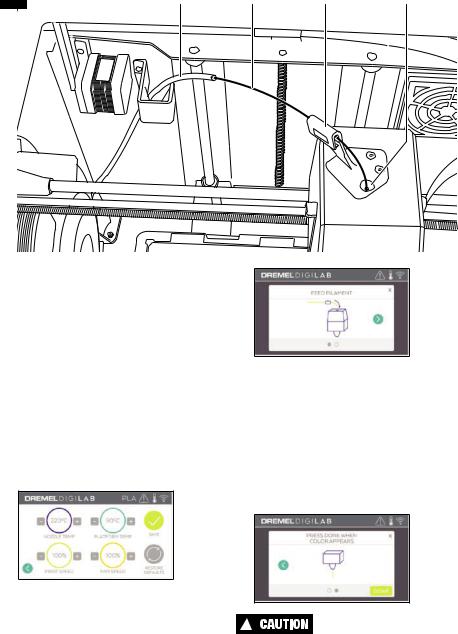
5.Thread tip of new filament through guide tube, place spool on spool holder, replace spool door by aligning locking tabs and rotating clockwise, see figure 1.
6.When you place a roll of Dremel filament into the spool holder, the printer will auto-recognize the filament type and adjust the printer settings to be optimized for the filament you are using. (This will bypass any print settings loaded in your sliced file).
NOTE: You have the option to enter advanced printer mode to manually alter print settings after you change filament. Please check all settings (if manually entered) as improper settings may cause prints to fail, property damage, or personal injury, see “Filament Type and Settings” chart on page 21. NOTE: You also have the option to enter advanced printer mode, which allows you to pull print settings from the saved sliced file. This will prevent the printer from altering its print settings. Please check all settings prior to printing as improper settings may cause prints to fail, property damage, or personal injury.
7.If changing existing filament, 3D45 will automatically purge existing filament.
8.When Feed Filament screen appears, tap the arrow on touchscreen and thread filament coming from guide tube into extruder intake until extruder feeds through on its own, see figure 2.
NOTE: Ensure the gears inside of the extruder have properly grabbed the filament before you finish the filament change. You will feel a tug and see the filament start to feed itself into the extruder when this occurs.
9.Filament will be drawn into the extruder and begin to exit from the hot extruder tip.
NOTE: Your Dremel 3D45 was tested by building objects before leaving the factory. These test objects may have been made with a different filament color than you are using. Therefore, a small amount of filament may be remaining in the extruder.
10.When new filament appears from extruder tip, tap “done” on touchscreen to complete filament load process, return to main menu, and calibrate extruder. Carefully remove excess filament without touching hot extruder tip. If necessary, carefully remove debris from extruder tip with needle nose pliers.
!USE EXTRA CARE NOT TO DAMAGE THE EXTRUDER TIP
WHEN CLEARING DEBRIS. DREMEL 3D45 WILL NOT WORK PROPERLY WITH A DAMAGED EXTRUDER TIP AND WILL REQUIRE REPLACEMENT.
11. Close 3D45 lid and door.
20
FILAMENT TYPE AND SETTINGS
Filament Type |
|
PLA |
ECO-ABS |
Nylon |
||
|
|
|
|
|
||
Nozzle Temperature Range |
190 - 230 ºC |
190 - 230 ºC |
220 |
– 280 ºC |
||
|
|
|
|
|
|
|
Optimal Nozzle Temperature |
|
220 ºC |
|
220 ºC |
255 ºC |
|
|
|
|
|
|
|
|
Build Platform Temperature Range |
0 |
– 60 ºC |
0 |
– 70 ºC |
0 – 100 ºC |
|
|
|
|
|
|
|
|
Optimal Build Platform Temperature |
|
35 ºC |
|
45 ºC |
100 ºC |
|
|
|
|
|
|
||
Print Speed Multiplier |
10 – 300% |
10 – 300% |
10 |
– 300% |
||
|
|
|
|
|
|
|
Recommended Speed Multiplier |
|
100% |
|
100% |
|
90% |
|
|
|
|
|
|
|
Fan Range |
0 |
– 100% |
0 |
– 100% |
0 – 100% |
|
|
|
|
|
|
|
|
Object cooling fan setting |
|
100% |
|
100% |
|
50% |
21
GETTING READY TO BUILD
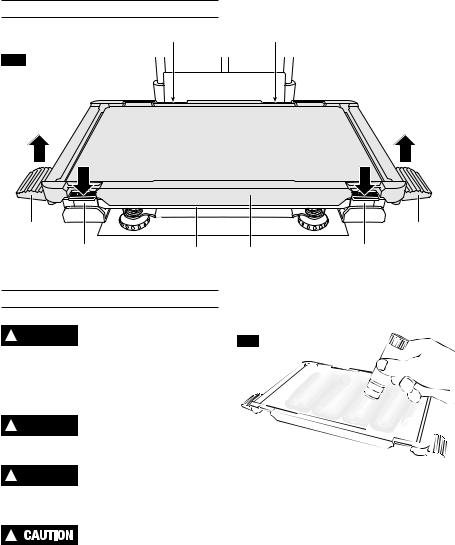
Rear Clip |
Rear Clip |
FIG. 3
Tab |
|
|
Tab |
Front Clip |
Base |
Build Platform |
Front Clip |
PREPARING BUILD PLATFORM
! WARNING |
DO NOT TOUCH THE EXTRUDER |
TIP OR HEATED BUILD |
PLATFORM DURING DREMEL 3D45 OPERATION OR UNTIL IT HAS COOLED DOWN TO AT LEAST 60°C (140°F). Contact with the extruder tip or build platform during or after operation before tip and build platform has cooled may result in personal injury.
! WARNING |
DO NOT DROP THE BUILD |
PLATFORM. Tempered glass plate |
may break and result in personal injury.
! WARNING DO NOT REMOVE TEMPERED
GLASS PLATE FROM PLASTIC HOLDER. Contacting with tempered glass plate edge may result in personal injury.
!BEFORE EVERY BUILD MAKE SURE THAT THE BUILD
PLATFORM IS COVERED WITH GLUE FROM THE SUPPLIED GLUE STICK. If glue is not used, it may cause poor object build quality.
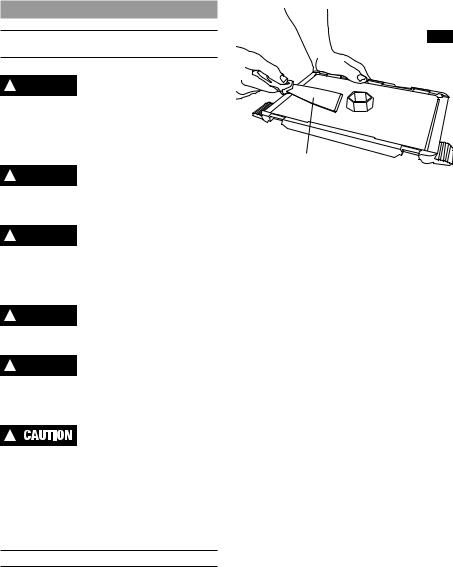
1.Remove build platform by first pressing down and releasing the two clips located at the front of the build platform, then lift the build platform off the base using the build platform tabs (figure 3).
2.For best results, apply a thin layer of glue with the provided glue stick to the build platform, figure 4.
FIG. 4 |
Glue stick |
|
NOTE: To clean the build platform, rinse the platform with warm water and dry with a towel.
3.Install the build platform by first inserting the rear of the platform onto the rear clips, then press down on the front of the platform until it snaps in place.
22
LEVELING BUILD PLATFORM
! WARNING |
DO NOT TOUCH THE EXTRUDER |
TIP OR HEATED BUILD |
PLATFORM DURING DREMEL 3D45 OPERATION OR UNTIL IT HAS COOLED DOWN TO AT LEAST 60°C (140°F). Contact with the extruder tip or build platform during or after operation before tip and build plate has cooled may result in personal injury.
It is important you level the build platform every time you reinstall the build platform to ensure that the build platform is evenly spaced from the extruder head. Not leveling the build platform may cause objects to not build properly.
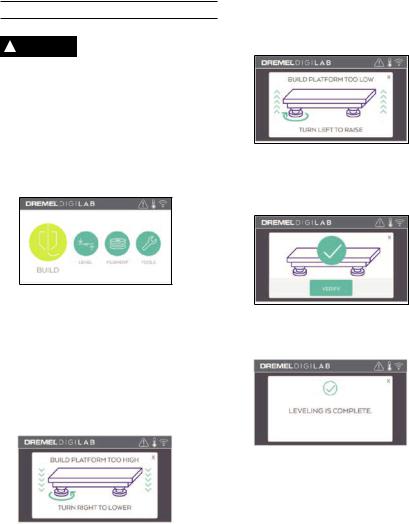
1. Tap “Level” on 3D45’s touchscreen.
2.The extruder and build platform will move into position to level the build platform. 3D45 will first check level at the back center of the build platform. The two knobs under the build platform are used to raise and lower the build platform on the left and right. The extruder contains a sensor that detects if the bed is level, no additional tools are necessary.
3.The touchscreen will indicate if your build platform is too high or too low. If the build platform is too high, adjust the appropriate knob by rotating right until you hear a “beep” and the touchscreen indicates that it is ready to verify that the bed is level.
4.If the build platform is too low, adjust the knob by rotating left until you hear a “beep” and the touchscreen indicates that it is ready to verify that the bed is level.
5.Tap “Verify” to check the bed level. If further adjustment is needed the touchscreen will indicate the direction, if the level is correct, the extruder will move to the next point and the level process can be repeated.
6.Repeat steps 3-5 for the second position, when the bed is fully level the extruder will automatically move to the calibration position and complete the leveling process.
23

CONNECTING USB CABLE
1.Ensure 3D45 power switch is in the off position.
2.Connect the included USB cable to your 3D45 and computer, figure 5.
3.Open software.
4.Turn your Dremel 3D45 on using the power switch to sync your computer to your Dremel 3D45.
CONNECTING ETHERNET
1.Ensure 3D45 power switch is in the off position.
2.Plug ethernet cable into your 3D45, figure 6.
3.Turn your Dremel 3D45 on using the power switch. Ethernet connection should be detected automatically. Tap “Accept” to confirm connection.
FIG. 5
USB
FIG. 6
Ethernet
BUILDING
! WARNING OBSERVE ALL PROVIDED
WARNINGS AND SAFETY INSTRUCTIONS WHEN USING THE DREMEL 3D45.
Failure to do so may result in fire, equipment damage, property damage or personal injury.
! WARNING |
DO NOT REACH INSIDE THE |
DREMEL 3D45 WHILE IT IS IN |
OPERATION. Contact with Dremel 3D45 moving parts during operation may result in poor build quality, equipment damage or personal injury.
NOTE: Your Dremel 3D45 will build test objects before leaving the factory. These test objects may have been made with a different filament color than you are using. Therefore, a small amount of filament may be remaining in the extruder. The start of your first object may have some of this filament color until it transitions over to your filament color.
You have several options when building on your 3D45:
1)On-Printer Storage
2)USB Flash Drive
3)Queue
4)Computer
24
BEFORE YOU BUILD
1.Ensure an adequate amount of filament is loaded (see page 19). If 3D45 runs out of filament during a build, it will pause until more filament is added.
2.Ensure glue is applied, build platform is level and clear of objects.
3.Ensure the extruder and build platform temperature is set according to the filament type used, see page 21 for details.
BUILDING FROM ON-PRINTER STORAGE
1. On the main menu tap “Build”.
2. On the build menu tap the printer icon.
3.Tap the model file you would like to build.
(Use arrows to scroll through pages)
4.In the model detail page tap “Build” to begin building process.
5.Your 3D45 will first align the extruder and build platform to their zero positions then the level sensor will lightly touch the build platform to complete alignment. Your extruder tip and build platform will begin to heat which may take a few minutes. Once the proper temperature is reached your model will begin to build.
6.Once your object is finished your 3D45 will automatically align the extruder and build platform to their calibration positions and cool the extruder tip and build platform.
7.Wait until the touch screen indicates that the extruder and build platform are “cool” to remove your object. See section “Removing Object from Build Platform” for object removal instructions.
25
BUILDING FROM USB FLASH DRIVE
1. On main menu tap “Build”.
2.Tap USB icon to access contents of USB flash drive.
3.Follow steps 3-7 from Build from On-Printer storage to complete build from USB flash drive.
BUILDING FROM PRINT QUEUE
If your 3D45 is registered and added to your Dremel3D profile, you can send Builds from your web browser at dremel3d.com or by using the Dremel3D cloud slicer (see page 18).
1.If your 3D45 is displaying the Print Queue notification tap “Yes” in the notification window to access the Print Queue. If you choose “No” you can later access your Print Queue by tapping “Build” then “Print Queue”.
FIG. 7
USB Flash Drive
2.In the Print Queue menu you can choose to “Build” the next model in the queue or “Delete” it and advance to the next model.
3.In Model Details tap “Build” to begin building process or “Delete” to remove the file.
BUILD FROM COMPUTER
Dremel 3D45 is compatible with Print Studio from Autodesk, Dremel’s cloud-based platform, and will included plug-ins for Cura and Simplified 3D. Follow the instructions that came with this software to complete a Build from your computer.
CANCELING YOUR BUILD ON 3D45
To cancel your object during preheating or building, tap
“Stop” on the touch screen. If you confirm “Yes” the extruder and build platform will move to their calibration positions.
26
REMOVING YOUR OBJECT
|
REMOVING YOUR OBJECT FROM THE BUILD |
FIG. 8 |
|
|
|
PLATFORM |
|
! |
WARNING |
DO NOT TOUCH THE EXTRUDER |
|
TIP OR HEATED BUILD |
|
||
PLATFORM DURING DREMEL 3D45 OPERATION OR |
|
||
UNTIL IT HAS COOLED DOWN TO AT LEAST 60°C |
|
||
(140°F). Contact with the extruder tip or build |
|
||
platform during or after operation before tip and build |
|
||
plate has cooled may result in personal injury. |
|
||
|
|
USE PERSONAL PROTECTIVE |
Removal Tool |
! |
WARNING |
|
|
EQUIPMENT. The use of |
|
||
protective equipment such as heat resistant gloves |
|
||
and safety glasses will reduce personal injuries. |
|
||
! |
WARNING |
BE AWARE OF YOUR BODY |
|
POSITION WHEN USING HAND |
|
||
TOOLS TO REMOVE OBJECTS FROM THE BUILD |
|
||
PLATFORM. Sudden tool slip and improper body |
|
||
position during object removal from the build |
|
||
platform may result in personal injury. |
|
||
! |
WARNING |
DO NOT DROP THE BUILD |
|
PLATFORM. Tempered glass plate |
|
||
may break and result in personal injury. |
|
||
! |
WARNING |
DO NOT TWIST OR BEND THE |
|
BUILD PLATFORM WHILE |
|
||
REMOVING OBJECTS. Tempered glass plate may separate from plastic holder and result in personal injury.
!AVOID SCRATCHING THE BUILD PLATFORM WHEN REMOVING
OBJECTS. SCRATCHES IN THE BUILD PLATFORM
WILL RESULT IN IMPROPER OBJECT CREATION.
1.Wait for the extruder to cool before removing your object.
2.With the object still attached, remove build platform from the build area.
3.Peel your object from the build platform. If needed, gently use the object removal tool to remove object from build platform (figure 8).
REMOVING SUPPORTS (IF REQUIRED)
Use needle nose pliers to remove supports that are inside your object or hard to reach.
27
BEST PRACTICES |
MAINTENANCE |
1.ALWAYS USE PROVIDED GLUE STICK.
2.Ensure your build platform is level before every print.
3.For proper adhesion of filament to the build platform, regularly wash the glue from the build platform with warm water, dry the build platform, re-apply a fresh layer of glue and re-level.
4.Ensure spool is installed properly and can rotate freely.
5.When using your Dremel 3D45 for the first time or after changing filament, allow Dremel 3D45 to
extrude until material is consistent with the installed filament color.
6.It is important to watch your Dremel 3D45 begin building objects. Your object is most likely to experience difficulty in the beginning. Thankfully, this is also the most convenient time to cancel the object, clean the build platform, and start your
object again. Remain near the Dremel 3D45 during the building process.
7.It is important to save your Dremel 3D45 packaging as it will make re-boxing and transporting your
Dremel 3D45 easier.
8.Ensure that you store filament spools in an environment that is not moist or too hot. It is recommended that you do not remove the filament spool from its airtight packaging until use.
9.Use object removal tool gently to avoid damaging the build platform or object.
10.Whenever possible, it is best to locate your object in the center of the build platform. Using the best orientation for your object is critical. Ensure that your object is located on the build platform and that you are using the best orientation for building.
11.For steep overhangs (Less than 45 degree angle) it is recommended to build with support.
12.Always remove the build platform before removing the object.
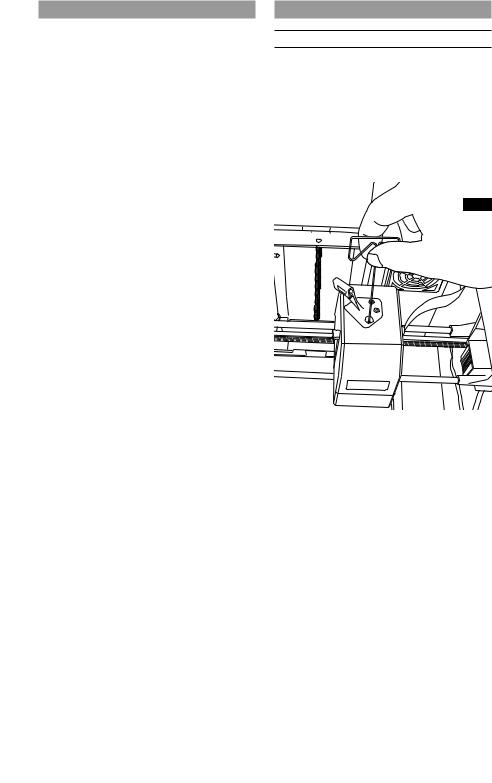
UNCLOGGING THE EXTRUDER
Use the unclogging tool to clean the extruder and unclog built up filament, fig 9.
1.Click on the filament change button on the screen and wait for extruder to heat up. As filament starts to purge, insert the unclog tool into the extruder intake (top).
2.Clogged debris will be pushed down and will extrude from the extruder tip. You should push the unclog too all the way down to ensure all filament is purged. You do not need to push with excessive force, as this may damage the extruder.
FIG. 9
28
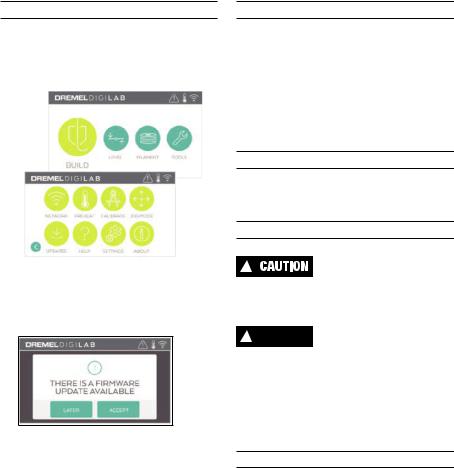
UPDATING FIRMWARE VIA NETWORK
If your 3D45 is registered and connected to WiFi, it should check for firmware updates each time it boots up. You can also update its firmware directly from the touchscreen. To update firmware:
1. Tap “Tools”, then tab “Updates”.
2.Your 3D45 will check to see if it has the latest firmware installed and ask if you would like to update if one is needed.
3.Choose accept to download and install the latest firmware.
4.When the 3D45 starts up and returns to the Home
Screen, firmware update is complete.
UPDATING FIRMWARE MANUALLY
If your 3D45 is not connected to a network, you can update firmware directly from a USB Flashdrive.
1.On your web browser go to www.dremel3d.com and download the latest 3D45 firmware file.
2.Add the 3D45 firmware file to an empty, FAT32 formatted, USB flashdrive.
3.Turn off your 3D45 using the ON/OFF switch.
4.Insert the USB flashdrive into the USB-A port.
5.Turn on your 3D45 and it should automatically detect and install the new firmware.
6.Turn your 3D45 OFF, remove the USB flashdrive, and turn ON again to complete the update.
CLEANING THE EXTERIOR
Clean the 3D45’s exterior with a lint free cloth. Clear the outer surfaces of any debris that is visible.
To avoid damaging your Dremel 3D45 do not use water, chemicals or other cleaners on the 3D45.
CLEANING THE EXTRUDER TIP
!USE EXTRA CARE NOT TO DAMAGE THE EXTRUDER TIP
WHEN CLEARING DEBRIS. DREMEL 3D45 WILL NOT WORK PROPERLY WITH DAMAGED EXTRUDER TIP AND WILL REQUIRE REPLACEMENT.
! WARNING |
DO NOT TOUCH THE EXTRUDER |
TIP OR HEATED BUILD |
PLATFORM DURING DREMEL 3D45 OPERATION OR UNTIL IT HAS COOLED DOWN TO AT LEAST 60°C (140°F). Contact with the extruder tip or build platform during or after operation before tip and build plate has cooled may result in personal injury.
Using small needle nose pliers, pull away any plastic debris from the extruder tip.
If the debris is stubborn, the extruder may need to be heated.
CLEANING THE TOUCH SCREEN
Wipe the touch screen with the soft, lint-free cloth. Do not spray cleaners on the touch screen.
29
MAINTENANCE AND SERVICE
Problem |
Cause |
Corrective Action |
Filament is not extruding or sticking to the build tape properly.
This can be caused by the build platform not being level with the extruder head.
Leveling the build platform will align the extruder head and ensure a better object quality. Cancel your object, clear build platform, level the build platform, and restart the object.
Dremel 3D45 froze before my |
Dremel 3D45 may have received |
Turn power switch off, wait 30 |
object started. |
conflicting commands. |
seconds, and turn power switch on. |
Support material does not break |
Orientation of the part is not |
Reorient the position of the 3D file |
away during cleaning and results |
optimized. |
in your slicing software to minimize |
in decreased quality of the final |
|
the support material or place the |
object. |
|
support material on a non-critical |
|
|
surface. |
Spaghetti mess at end of build.
A layer of your object did not stick |
Use the preview feature in your |
properly, model was saved with |
slicing software to see the first |
minimal surface area contacting the |
layer height and position. Build with |
build platform, or object was built |
supports when necessary. |
floating above the build platform |
|
with no support selected. |
|
Z-Gap offset may not be correct |
Contact customer service on how to |
and the extruder tip is not properly |
calibrate the Z-Gap Offset. |
spaced with the build platform. |
|
Part only built halfway. |
Filament ran out. |
Replace filament and resume build. |
|
Filament clogged during build. |
See “No filament coming out”. |
No filament coming out. |
Clogged extruder. |
Contact customer service. |
|
|
|
|
Filament not properly loaded. |
Try running a filament change |
|
|
again to ensure the extruder gears |
|
|
have properly caught the filament. |
Extruder will not home. |
|
Contact customer service. |
|
|
|
Stringy or fraying plastic layers on |
Object overhangs are too far apart |
Build with supports. |
steep overhangs. |
or too steep (<45 degree angle). |
|
|
|
|
3D45 will not find my Wi-Fi |
Printer too far from wireless router. |
Reposition 3D45 to be closer to |
network. |
|
your router. |
|
|
Connect to network with Ethernet. |
|
|
|
3D45 will not connect to my |
Printer too far from wireless router. |
Reposition 3D45 to be closer to |
network. |
|
your router. |
|
|
|
|
Network password or SSID |
Re-enter your password/SSID or |
|
incorrect. |
verify your password with your |
|
|
network owner. |
|
|
|
3D45 will not retrieve a token. |
Network password incorrect. |
Re-enter your password or verify |
|
|
your password with your network |
|
|
owner. |
|
|
|
|
Network has a firewall. |
Enter network proxy information. |
|
|
|
Cloud slicer will not connect to |
3D45 not connected to network. |
Check 3D45 network settings and |
3D45 or shows “printer offline”. |
|
retry connection. |
|
|
|
Token invalid. |
Verify the current 3D45 token using |
Use “Get new token” to generate a |
|
“Tools/About” and retry. |
new token and retry connection. |
|
|
Note this will remove any users that |
|
|
are sharing your printer. |
|
|
|
30
 Loading...