


Ram 1500 2006

TABLE OF CONTENTS
SECTION PAGE
1
INTRODUCTION
.............................................................3
2
THINGS TO KNOW BEFORE STARTING YOUR VEHICLE
..............................9
3
UNDERSTANDING THE FEATURES OF YOUR VEHICLE
.............................111
4
UNDERSTANDING YOUR INSTRUMENT PANEL
...................................213
5
STARTING AND OPERATING
.................................................289
6
WHAT TO DO IN EMERGENCIES
..............................................397
7
MAINTAINING YOUR VEHICLE
...............................................423
8
MAINTENANCE SCHEDULES
..................................................487
9
IF YOU NEED CONSUMER ASSISTANCE
.........................................509
10
INDEX
....................................................................517
1
2
3
4
5
6
7
8
9
10


INTRODUCTION
CONTENTS
䡵 Introduction ........................... 4
䡵 How To Use This Manual ..................4
䡵 Warnings And Cautions ................... 5
䡵 Van Conversions/Campers ................. 5
䡵 Vehicle Identification Number ............... 6
䡵 Vehicle Modifications / Alterations ........... 7
1

INTRODUCTION
This manual has been prepared with the assistance of
service and engineering specialists to acquaint you with
the operation and maintenance of your new vehicle. It is
supplemented by a Warranty Information Booklet and
various customer oriented documents. You are urged to
read these publications carefully. Following the instruc-
tions and recommendations in this manual will help
assure safe and enjoyable operation of your vehicle.
NOTE: After you read the manual, it should be stored
in the vehicle for convenient reference and remain with
the vehicle when sold, so that the new owner will be
aware of all safety warnings.
When it comes to service, remember that your dealer
knows your vehicle best, has the factory-trained techni-
cians and genuine Mopar威 parts, and is interested in
your satisfaction.
WARNING!
Engine exhaust, some of its constituents, and certain
vehicle components contain or emit chemicals
known to the State of California to cause cancer and
birth defects or other reproductive harm. In addition,
certain fluids contained in vehicles and certain prod-
ucts of component wear contain or emit chemicals
known to the State of California to cause cancer and
birth defects or other reproductive harm.
HOW TO USE THIS MANUAL
Consult the table of contents to determine which section
contains the information you desire.
The detailed index, at the rear of this manual, contains a
complete listing of all subjects.
4 INTRODUCTION

WARNINGS AND CAUTIONS
This manual contains WARNINGS against operating
procedures which could result in an accident or bodily
injury. It also contains CAUTIONS against procedures
which could result in damage to your vehicle. If you do
not read this entire manual you may miss important
information. Observe all Warnings and Cautions.
VAN CONVERSIONS/CAMPERS
The Manufacturer’s Warranty does not apply to body
modifications or special equipment installed by van
conversion/camper manufacturers/ body builders. See
the Warranty information book, Section 2.1.C. Such
equipment includes video monitors, VCRs, heaters,
stoves, refrigerators, etc. For warranty coverage and
service on these items, contact the applicable manufac-
turer.
Operating instructions for the special equipment in-
stalled by the conversion/camper manufacturer should
also be supplied with your vehicle. If these instructions
are missing, please contact your selling dealer for assis-
tance in obtaining replacement documents from the
applicable manufacturer.
INTRODUCTION 5
1
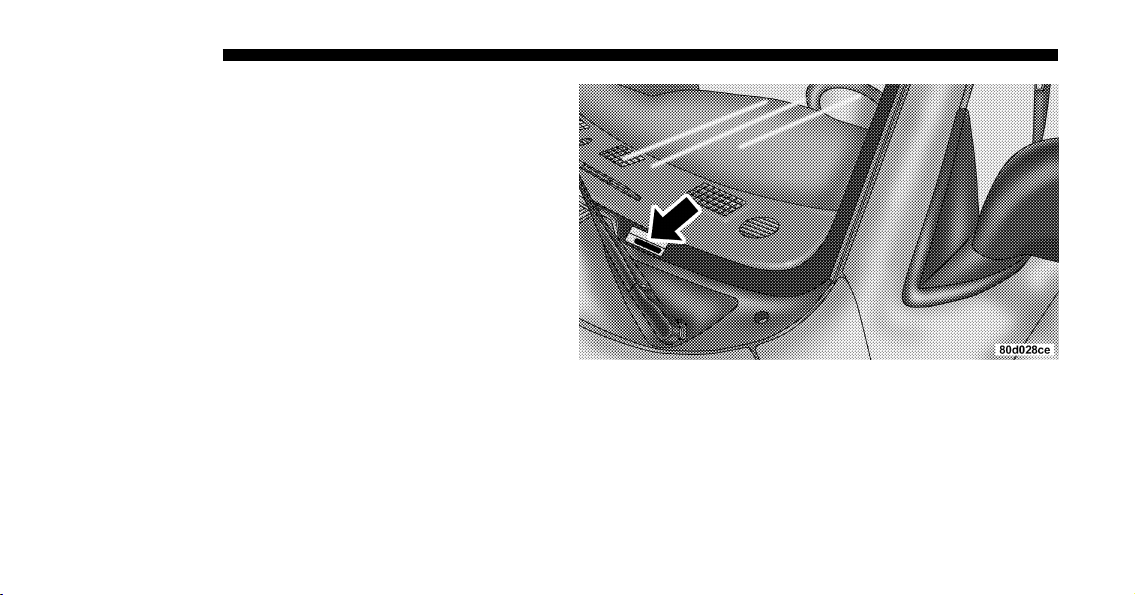
VEHICLE IDENTIFICATION NUMBER
The vehicle identification number (VIN) is found on a
stamped plate located on the left front corner of the
instrument panel pad, visible from outside of the vehicle
through the windshield. This number also appears on the
Automobile Information Disclosure Label affixed to a
window on your vehicle. Save this label for a convenient
record of your vehicle identification number and optional
equipment.
NOTE: It is illegal to remove the VIN plate.
Vehicle Identification Number
6 INTRODUCTION

VEHICLE MODIFICATIONS / ALTERATIONS
WARNING!
Any modifications or alterations to this vehicle
could seriously affect its roadworthiness and safety
and may lead to an accident resulting in serious
injury or death.
INTRODUCTION 7
1


THINGS TO KNOW BEFORE STARTING YOUR VEHICLE
CONTENTS
䡵 A Word About Your Keys ..................12
▫ Key-In-Ignition Reminder ................12
▫ Sentry Key — If Equipped ................12
䡵 Ignition And Steering Lock .................14
▫ Manual Transmissions ...................14
▫ Automatic Transmissions .................15
䡵 Door Key .............................16
䡵 Door Locks ............................17
▫ Manual Locks .........................17
▫ Power Door Locks — If Equipped ..........18
▫ Child Protection Door Lock ...............21
䡵 Remote Keyless Entry — If Equipped .........22
▫ To Unlock The Doors ...................23
▫ To Lock The Doors .....................23
▫ Using The Panic Alarm ..................24
▫ General Information ....................25
▫ Transmitter Battery Service ...............25
䡵 Security Alarm System — If Equipped .........26
2

▫ Rearming Of The System .................26
▫ To Set The Alarm ......................27
▫ To Disarm The System ...................27
䡵 Windows .............................28
▫ Power Windows—If Equipped .............28
▫ Power Sliding Rear Window—If Equipped ....29
▫ Sliding Rear Window—If Equipped .........30
▫ Wind Buffeting ........................30
䡵 Occupant Restraints (1500 Standard And Quad
Cab Only) .............................30
▫ Lap/Shoulder Belts .....................31
▫ Adjustable Upper Shoulder Belt Anchorage ....38
▫ Automatic Locking Retractors (ALR) Mode –
If Equipped ..........................39
▫ Center Lap Belts .......................40
▫ Seat Belt Pretensioners ...................40
▫ Enhanced Seat Belt Reminder System
(BeltAlert) ...........................41
▫ Seat Belts And Pregnant Women ............42
▫ Seat Belt Extender ......................42
▫ Driver And Right Front Passenger Supplemental
Restraint System (SRS)—Airbags ...........43
▫ Event Data Recorder (EDR) ...............54
▫ Child Restraint ........................56
䡵
Occupant Restraints (2500/3500/Mega Cab Only)
..67
▫ Lap/Shoulder Belts .....................68
▫ Adjustable Upper Shoulder Belt Anchorage ....76
10 THINGS TO KNOW BEFORE STARTING YOUR VEHICLE

▫ Automatic Locking Restraint (ALR) Mode –
If Equipped ..........................76
▫ Center Lap Belts .......................77
▫ Seat Belt Pretensioners ...................78
▫ Enhanced Driver Seat Belt Reminder System
(BeltAlert) ...........................78
▫ Seat Belts And Pregnant Women ............79
▫ Seat Belt Extender ......................80
▫ Driver And Right Front Passenger Supplemental
Restraint System (SRS)—Airbag ............80
▫ Event Data Recorder (EDR) ...............91
▫ Child Restraint ........................93
䡵 Engine Break-In Recommendations ..........106
䡵 Safety Tips ...........................107
▫ Transporting Passengers ................107
▫ Lock Your Vehicle .....................107
▫ Exhaust Gas .........................108
▫ Safety Checks You Should Make Inside The
Vehicle .............................109
▫ Safety Checks You Should Make Outside The
Vehicle .............................109
THINGS TO KNOW BEFORE STARTING YOUR VEHICLE 11
2

A WORD ABOUT YOUR KEYS
The double sided keys may be inserted into the locks
with either side up. The keys for your new vehicle are
enclosed in a plastic bag with a bar code label affixed to
the front. The bar code can be used to order duplicate
keys from your dealer or a locksmith. If you received
your keys without the bag, ask your dealer to give you
the number.
Key-In-Ignition Reminder
If you open the driver’s door when the key is in the
ignition switch, a chime will sound to remind you to
remove the key.
CAUTION!
An unlocked vehicle is an invitation to thieves.
Always remove the key from the ignition and lock
all the doors when leaving the vehicle unattended.
SENTRY KEY — IF EQUIPPED
With this system, an electronically coded ignition key
sends a signal to the vehicle electronics. If the electronics
recognizes the signal, the vehicle will start and continue
to run. If the system does not recognize the signal the
vehicle will start and run for a maximum of 2 seconds
after the initial key ON. After six unsuccessful attempts
at starting, the system will shut down until the correct
key is used.
NOTE: The Sentry Key Immobilizer System is not
compatible with remote starting systems. Use of these
systems may result in vehicle starting problems and a
loss of security protection. Additional Sentry Keys or
Mobil Speed-pass™ devices held against or immediately
adjacent to the ignition key when starting the engine may
cause vehicle starting problems. If a problem occurs,
remove the Sentry Key from the key-ring and attempt to
start the vehicle again. Pagers, cell phones, walkman, etc.
will have no effect on this system.
12 THINGS TO KNOW BEFORE STARTING YOUR VEHICLE

The ⬙Security Light⬙, located in the instrument cluster,
will illuminate for about 3 seconds when the ignition
switch is first turned to the ON position. If the vehicle
electronics do not receive a valid signal from the ignition
key, the ⬙Security Light⬙ will flash continuously to signal
that the vehicle has been immobilized. If the ⬙Security
Light⬙ remains on during vehicle operation, it indicates a
fault in the system electronics. If this option was ordered,
all of the keys provided with your new vehicle have been
programmed to the vehicle electronics.
Replacement Keys
NOTE: Only keys that have been programmed to the
vehicle electronics can be used to start the vehicle. Once
a Sentry Key has been programmed to a vehicle, it cannot
be programmed to any other vehicle.
At the time of purchase, the original owner is provided
with a four digit PIN. This number is required for dealer
replacement of keys. Duplication of keys may be per-
formed at an authorized dealer or by using the Customer
Key Programming procedure. This procedure consists of
programming a blank key to the vehicle electronics. A
blank key is one which has never been programmed and
needs to be cut.
NOTE: When having the Sentry Key System serviced,
bring all vehicle keys to the dealer.
Customer Key Programming
You can program new keys to the system if you have two
valid keys by doing the following:
1. Insert the first valid key into the ignition and turn the
ignition to the ON position for at least 3 seconds but no
longer than 15 seconds. Turn the ignition back to the OFF
position and remove the first key.
2. Insert the second valid key and switch the ignition to
the ON position within 15 seconds. After 10 seconds the
THINGS TO KNOW BEFORE STARTING YOUR VEHICLE 13
2

⬙Security Light⬙ will begin to flash. Turn the ignition back
to the OFF position and remove the second key.
3. Insert a blank Sentry Key into the ignition and switch
the ignition to the ON position within 60 seconds of
having removed the second key. After 10 seconds the
⬙Security Light⬙ will stop flashing, then turn on for 3
seconds; then turn off.
The new Sentry Key has been programmed. The Keyless
Entry Transmitter will also be programmed during this
procedure. Repeat this process to program up to an
additional 6 keys. A maximum of 8 keys can be pro-
grammed to the system, including the original keys
provided with the vehicle.
General Information
This device complies with part 15 of FCC rules and with
RS-210 of Industry Canada. Operation is subject to the
following conditions:
1. This device may not cause harmful interference.
2. This device must accept any interference that may be
received including interference that may cause undesired
operation.
NOTE: Changes or modifications not expressly ap-
proved by the party responsible for compliance could
void the user’s authority to operate the equipment.
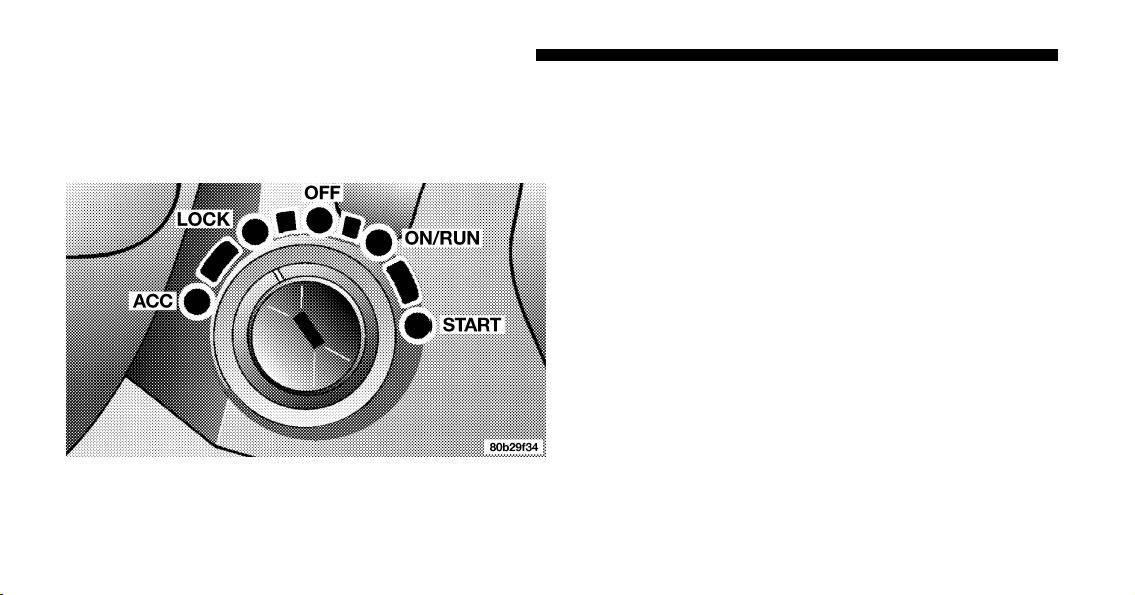
IGNITION AND STEERING LOCK
Insert the key fully, and then turn the switch to one of the
five illustrated positions. The key can be inserted or
withdrawn only in the LOCK position.
Manual Transmissions
When the steering wheel is in the LOCK position, the
steering and ignition systems are locked to provide
antitheft protection for your vehicle. It may be difficult to
turn the key from the LOCK position when starting your
vehicle. Move the steering wheel left and right while
14 THINGS TO KNOW BEFORE STARTING YOUR VEHICLE
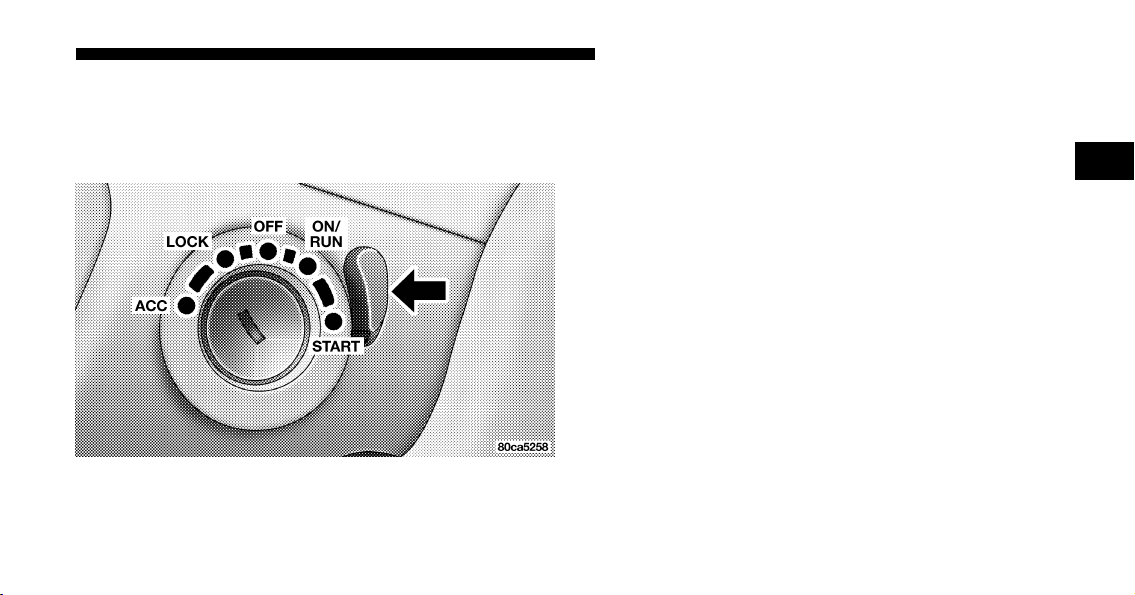
turning the key until it turns easily. To remove the key,
depress and hold the release button located between the
ignition switch and the instrument panel. Turn the igni-
tion key to LOCK and remove the key.
Automatic Transmissions
In the LOCK position, the steering and ignition systems
are locked to provide antitheft protection for your ve-
hicle. It may be difficult to turn the key from the LOCK
position when starting your vehicle. Move the steering
wheel left and right while turning the key until it turns
easily. The key can be inserted or withdrawn only in the
LOCK position. Push in on the key in the ignition lock
cylinder to rotate to the LOCK position.
Ignition Switch Positions
THINGS TO KNOW BEFORE STARTING YOUR VEHICLE 15
2
NOTE: The steering wheel will lock when the key is
removed, and the steering wheel is turned around 115
degrees from center clockwise and around 65 degrees
counterclockwise.
NOTE: On vehicles equipped with an automatic trans-
mission, the key cannot be turned to LOCK until the
selector is in the PARK position. Do not attempt to pull
the shift lever out of PARK after the key is in the LOCK
position.
DOOR KEY
The same key used to start the vehicle is also used to
unlock the doors. To unlock the vehicle doors, insert the
key into the lock and turn.
To lock the doors, insert the key and turn.
Ignition Switch Positions
16 THINGS TO KNOW BEFORE STARTING YOUR VEHICLE
DOOR LOCKS
Manual Locks
Front and Rear doors may be locked, by moving the lock
plunger up or down.
All doors may be opened with the inside door handle
without lifting the lock plunger. Doors locked before
closing will remain locked when closed.
The ignition key will unlock all the locks on your vehicle.
WARNING!
For personal security and safety in the event of an
accident, lock the vehicle doors when you drive as
well as when you park and leave the vehicle.
WARNING!
When leaving the vehicle always remove the key
from the ignition lock, and lock your vehicle. Do not
leave children unattended in the vehicle, or with
access to an unlocked vehicle. Unsupervised use of
vehicle equipment may cause severe personal inju-
ries and death.
THINGS TO KNOW BEFORE STARTING YOUR VEHICLE 17
2
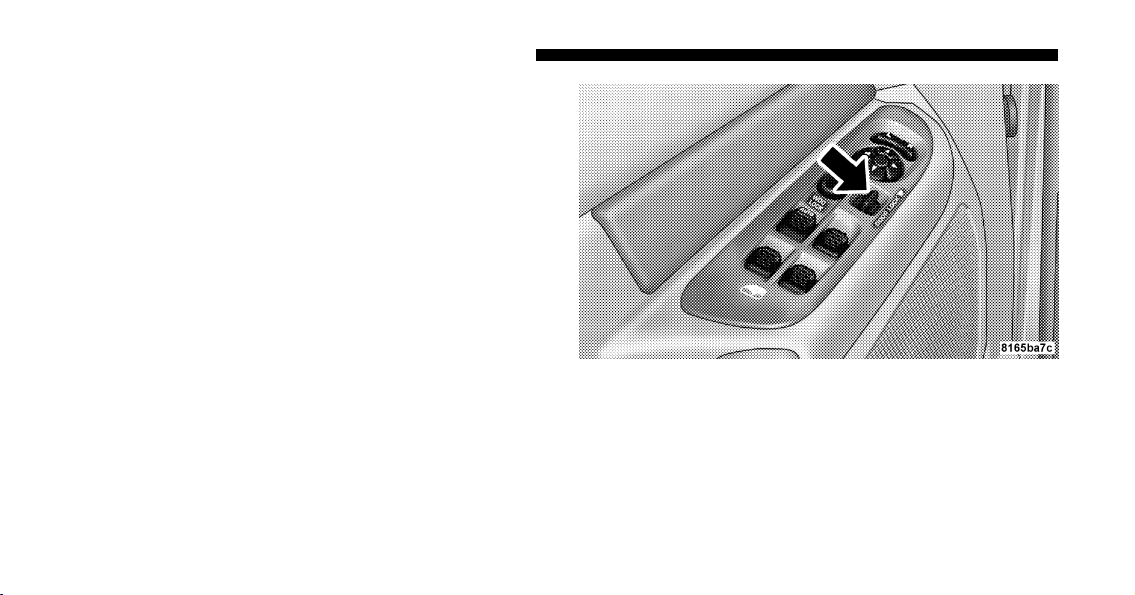
Power Door Locks — If Equipped
NOTE: Vehicles equipped with remote keyless entry do
not have a passenger side door lock cylinder.
Vehicles equipped with power door locks can be locked
or unlocked from inside by either the use of the door lock
switches located on the front doors or by pressing the
LOCK or UNLOCK buttons on the Remote Keyless Entry
key fob (if equipped).
As a safety feature the doors will not lock when using the
door lock switches during the following condition:
•
The driver’s door is open while the key is in the
ignition.
Power Door Lock Switch Location
18 THINGS TO KNOW BEFORE STARTING YOUR VEHICLE

Automatic Door Locks
If this feature is enabled, your door locks will lock
automatically when the vehicle’s speed exceeds 15 mph.
This feature is enabled when your vehicle is shipped
from the assembly plant and can be disabled by using the
following procedure:
1. Enter your vehicle and close all doors.
2. Fasten your seat belt (Fastening the seat belt will
cancel any chiming that may confuse you during this
programming procedure).
3. Place the key into the ignition.
4. Within 15 seconds cycle the key from the LOCK
position to the ON/RUN position a minimum of four
times; ending in the LOCK position ( Do not start the
engine ).
5. Within 30 seconds, press the driver’s door lock switch
in the LOCK direction.
6. A single chime will be heard to indicate the feature has
been disabled.
7. To reactivate this feature, repeat the above steps.
8. If a chime is not heard, program mode was canceled
before the feature could be disabled. If necessary, repeat
the above procedure.
Auto Unlock Feature
This feature unlocks all of the doors of the vehicle when
any door is opened. This will occur only after the vehicle
has been shifted into the Park position after the vehicle
has been driven (shifted out of Park and all doors closed).
This feature will not operate if there is any manual
operation of the power door locks (Lock or Unlock).
THINGS TO KNOW BEFORE STARTING YOUR VEHICLE 19
2

Auto Unlock Feature Programming
Customer Programming sequence to enable or disable
the Auto Unlock Feature:
1. Enter your vehicle and close all doors.
2. Fasten your seat belt (fastening the seat belt will cancel
any chimes that may be confusing during this program-
ming procedure).
3. Insert the key into the ignition.
4. Within 15 seconds, cycle the key from the LOCK
position to the ON/RUN position a minimum of four
times ending in the LOCK position (do not start the
engine).
5. Within 30 seconds, press the driver’s door lock switch
in the UNLOCK direction.
6. A single chime will sound to indicate the feature has
been changed.
7. Repeat the above steps to alternate the availability of
this feature.
8. If a chime is not heard, program mode was canceled
before the feature could be changed. If necessary repeat
the above procedure.
20 THINGS TO KNOW BEFORE STARTING YOUR VEHICLE
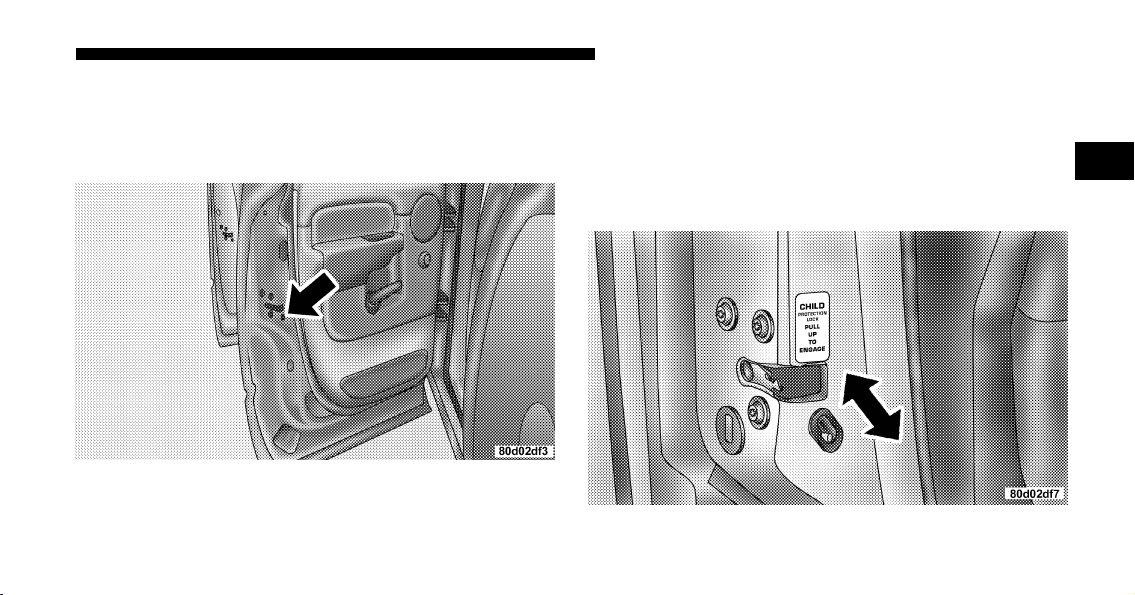
Child Protection Door Lock
To provide a safer environment for children riding in the
rear seat, the rear doors of your vehicle have the child-
protection door lock system.
To use the system, open each rear door and slide the
control UP to engage the locks and DOWN to disengage
the child-protection locks. When the system on a door is
engaged, that door can only be opened by using the
outside door handle even if the inside door lock is in the
unlocked position.
Child Protection Door Lock Location
Child Lock Control
THINGS TO KNOW BEFORE STARTING YOUR VEHICLE 21
2

WARNING!
Avoid trapping anyone in a vehicle in a collision.
Remember that the rear doors can only be opened
from the outside when the child protection locks are
engaged.
NOTE: After setting the child protection door lock
system, always test the door from the inside to make
certain it is in the desired position.
NOTE: For emergency exit with the system engaged,
move the door lock switch to the UNLOCK position, roll
down the window and open the door with the outside
door handle.
REMOTE KEYLESS ENTRY — IF EQUIPPED
This system allows you to lock or unlock the doors from
distances up to about 23 feet (7 meters) using a hand held
radio transmitter. The transmitter need not be pointed at
the vehicle to activate the system.
Three Button Transmitter
22 THINGS TO KNOW BEFORE STARTING YOUR VEHICLE

To unlock the doors:
Press and release the UNLOCK button on the key fob
once to unlock only the driver’s door or twice to unlock
all the doors. When the UNLOCK button is pressed, the
illuminated entry will initiate, the parking lights will
flash on twice and if installed, the cargo lamp will turn on
for 30 seconds.
The system can be programmed to unlock all the doors or
drivers door only upon the first UNLOCK button press
by using the following procedure:
1. Perform this operation while standing outside the
vehicle.
2. Press and hold the LOCK button on your key fob.
3. Continue to hold the LOCK button at least 4 seconds,
but no longer than 10 seconds, then press and hold the
UNLOCK button while still holding the LOCK button.
4. Release both buttons at the same time.
5. This will allow you to unlock all doors on the first
press of the UNLOCK button.
To lock the doors:
Press and release the LOCK button on the transmitter to
lock all doors. If the ignition is OFF, when the doors are
locked, the parking lights will flash on once and the horn
will chirp once.
The horn chirp feature will be shipped from the assembly
plants activated. If desired this feature can be disabled by
using the following procedure:
1. Perform this operation while standing outside the
vehicle.
2. Press and hold the LOCK button on a programmed
(i.e. functional) key fob.
THINGS TO KNOW BEFORE STARTING YOUR VEHICLE 23
2

3. Continue to hold the LOCK button, wait at least 4
seconds, but no longer than 10 seconds, then press and
hold the PANIC button. Release both buttons at the same
time.
4. To reactivate this feature, repeat the above steps.
Vehicles will be shipped from the assembly plants with
the park lamp flash feature activated. If desired, this
feature can be disabled by using the following procedure:
1. Perform this operation while standing outside the
vehicle.
2. Press and hold the UNLOCK button on a programmed
(i.e. functional) key fob.
3. Continue to hold the UNLOCK button, wait at least 4
seconds, but no longer than 10 seconds, then press and
hold the LOCK button. Release both buttons at the same
time.
4. To reactivate this feature, repeat the above steps.
Using the Panic Alarm
To activate the Panic mode while the ignition is OFF press
and release the PANIC button on the transmitter once.
When the Panic mode is activated, the interior lights will
illuminate, the headlamps and parking lights will flash,
and the horn will sound.
To cancel the Panic mode press and release the PANIC
button on the transmitter a second time. Panic mode will
automatically cancel after 3 minutes or if the vehicle is
started and exceeds 15 mph. During the Panic Mode, the
door locks and remote keyless entry systems will func-
tion normally. Panic mode will not disarm the security
system on vehicles so equipped.
24 THINGS TO KNOW BEFORE STARTING YOUR VEHICLE
General Information
This device complies with part 15 of FCC rules and with
RS-210 of Industry Canada. Operation is subject to the
following conditions:
1. This device may not cause harmful interference.
2. This device must accept any interference that may be
received including interference that may cause undesired
operation.
NOTE: Changes or modifications not expressly ap-
proved by the party responsible for compliance could
void the user’s authority to operate the equipment.
If your Keyless Entry Transmitter fails to operate from a
normal distance, check for these two conditions.
1. Weak batteries in transmitter. The expected life of the
batteries is from one to two years.
2. Closeness to a radio transmitter such as a radio station
tower, airport transmitter, and some mobile or CB radios.
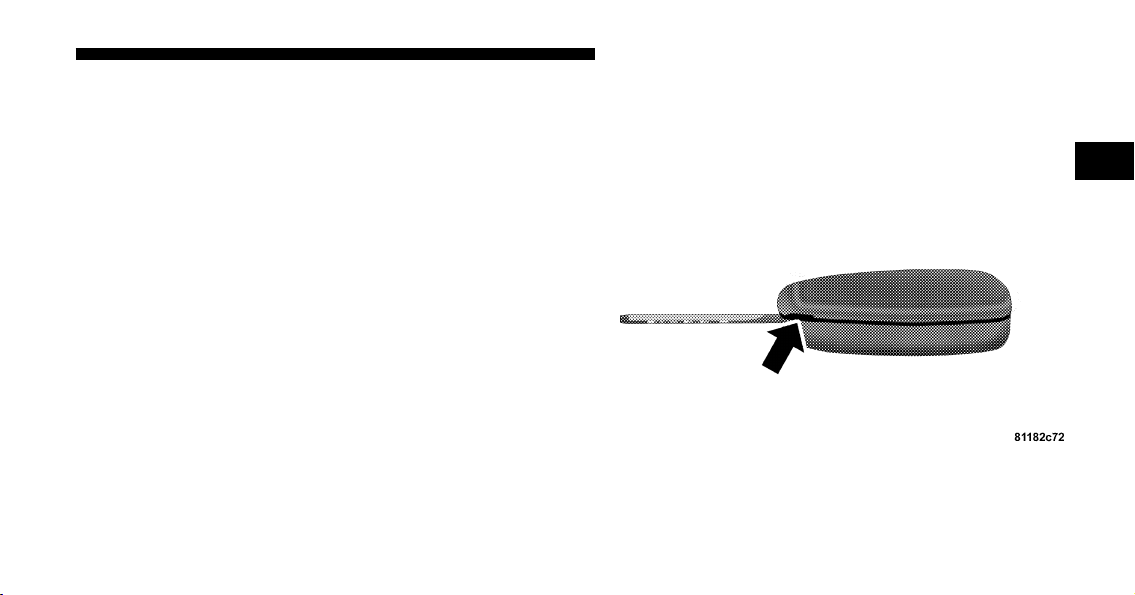
Transmitter Battery Service
The recommended replacement battery is a 3V lithium
2016 cell. This transmitter requires two batteries.
Transmitter Battery Replacement
THINGS TO KNOW BEFORE STARTING YOUR VEHICLE 25
2

NOTE: Do not touch the battery terminals that are on
the back housing or the printed circuit board.
1. With transmitter buttons facing down, use a flat blade
or dime to pry the two halves of the transmitter apart.
Make sure not to damage the rubber gasket during
removal.
2. Remove and replace the batteries. Be careful not to
disturb the metal terminal near the batteries. Install the
batteries with the positive terminal up, reference the note
⬙+ SIDE UP⬙ on the inside of the bottom half of the
transmitter case. Avoid touching the new batteries with
your fingers. Skin oils may cause battery deterioration. If
you touch a battery, clean it with rubbing alcohol.
3. To reassemble the transmitter case snap the two halves
together. Make sure there is an even gap between the two
halves. Test transmitter operation.
SECURITY ALARM SYSTEM — IF EQUIPPED
This system monitors the vehicle doors and ignition for
unauthorized operation. When the alarm is activated, the
system provides both audible and visual signals. For the
first 3 minutes the horn will sound and the headlights
and security telltale will flash repeatedly. For an addi-
tional 15 minutes only the headlights and security telltale
will flash. The engine will run only if a valid Sentry Key
is used to start the vehicle. Use of the Sentry Key will
disable the alarm.
Rearming of the System:
The security system will rearm itself after the 15 addi-
tional minutes of headlights and security telltale flashing,
if the system has not been disabled. If the condition
which initiated the alarm is still present, the system will
ignore that condition and monitor the remaining doors
and ignition.
26 THINGS TO KNOW BEFORE STARTING YOUR VEHICLE

To Set the Alarm:
The alarm will set when you use the power door locks, or
use the Keyless Entry transmitter to lock the doors. After
all the doors are locked and closed the SECURITY light in
the instrument cluster will flash rapidly to signal that the
system is arming. The security light in the instrument
panel cluster will flash rapidly for about 16 seconds to
indicate that the alarm is being set. After the alarm is set,
the security light will flash at a slower rate to indicate
that the system is armed.
NOTE: If the SECURITY light stays on continuously
during vehicle operation, have the system checked by
your dealer.
To Disarm the System:
Use the Keyless Entry transmitter to unlock the door. If
something has triggered the system in your absence, the
horn will sound three times when you unlock the doors
and the security lamp will flash for 30 seconds. Check the
vehicle for tampering.
The Security system will also disarm, if the vehicle is
started with a programmed Sentry Key. If an unpro-
grammed Sentry Key is used to start a vehicle, the engine
will run for 2 seconds and then the security alarm will be
initiated. To exit alarming mode, press the transmitter
Unlock button, or start the vehicle with a programmed
Sentry Key.
The Security Alarm System is designed to protect your
vehicle; however, you can create conditions where the
system will arm unexpectedly. If you remain in the
vehicle and lock the doors with the transmitter, the alarm
will sound when you pull the door handle to exit. The
door will be locked but the Security Alarm will not arm.
THINGS TO KNOW BEFORE STARTING YOUR VEHICLE 27
2
WINDOWS
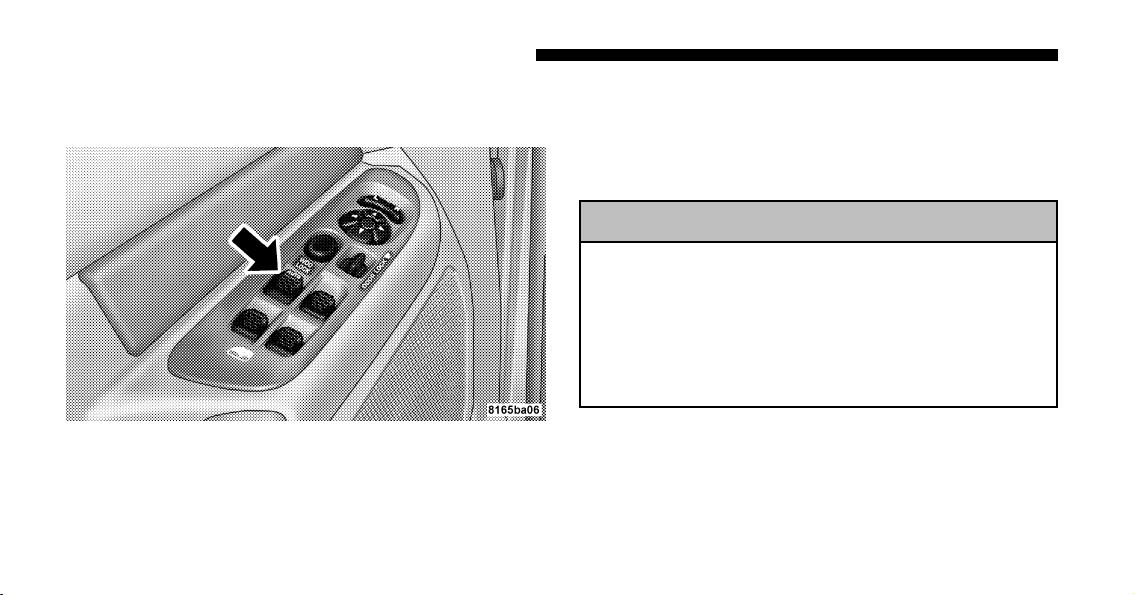
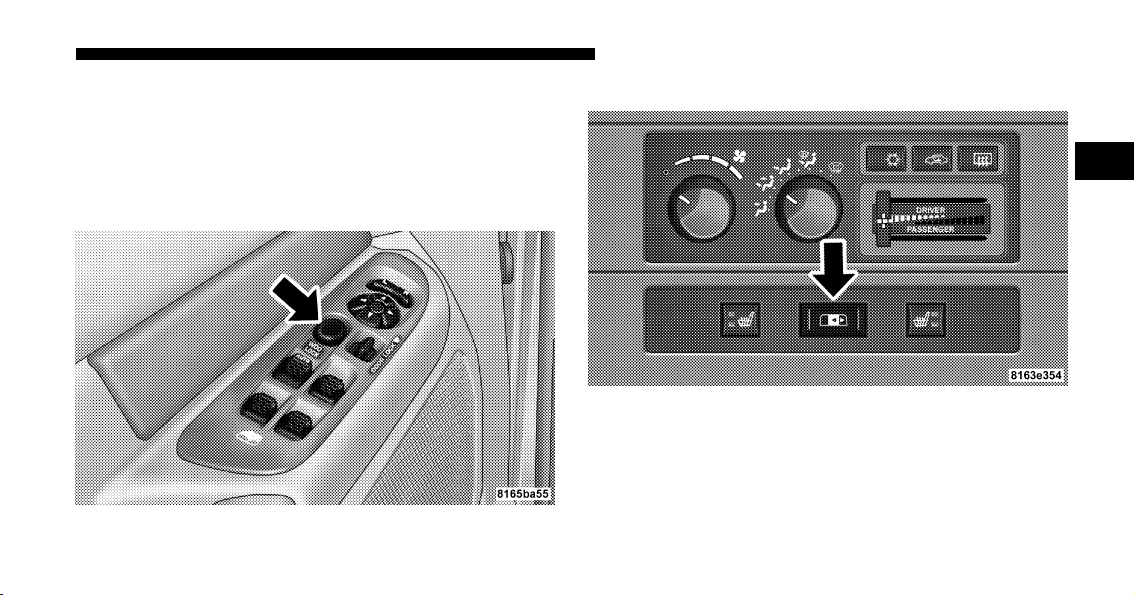
Power Windows—If Equipped
The control on the left front door panel has up-down
switches that give you fingertip control of all power
windows. There is a single opening and closing switch on
the front passenger door for passenger window control
and on the rear doors of Quad Cab and Mega Cab
models. The windows will operate only when the igni-
tion switch is turned to the ON or ACC (Accessory)
position.
WARNING!
Never leave children in a vehicle, with the keys in
the ignition switch. Occupants, particularly unat-
tended children, can become entrapped by the win-
dows while operating the power window switches.
Such entrapment may result in serious injury or
death.
Auto Down (Driver’s Side Only)
The driver’s window switch has an Auto Down feature.
Press the window switch past the detent, release, and the
window will go down automatically.
Power Window Switches
28 THINGS TO KNOW BEFORE STARTING YOUR VEHICLE
Window Lockout Switch (4 Door Models Only)
The window lockout switch on the driver’s door allows
you to disable the window control on the other doors. To
disable the window controls on the other doors, press the
window lock button. To enable the window controls,
press the window control button again.
Power Sliding Rear Window—If Equipped
The power sliding rear window switch is located on the
instrument panel below the climate controls. Press the
right side of the switch to open the glass and the left side
of the switch to close the glass.
Window Lockout Switch
Power Sliding Rear Window Switch
THINGS TO KNOW BEFORE STARTING YOUR VEHICLE 29
2

Sliding Rear Window—If Equipped
A locking device in the center of the window helps to
prevent entry from the rear of the vehicle. Squeeze the
lock to release the window.
Wind Buffeting
Wind buffeting can be described as the perception of
pressure on the ears or a helicopter type sound in the
ears. Your vehicle may exhibit wind buffeting with the
windows down or partially open positions. This is a
normal occurrence and can be minimized. If the buffeting
occurs with the rear windows open, open the front and
rear windows together to minimize the buffeting.
OCCUPANT RESTRAINTS (1500 STANDARD and
QUAD CAB ONLY)
Some of the most important safety features in your
vehicle are the restraint systems. These include the front
and rear seat belts for the driver and all passengers, front
airbags for both the driver and front passenger and, if so
equipped, window bags for the driver and passengers
seated next to a window. If you will be carrying children
too small for adult-size belts, your seat belts also can be
used to hold infant and child restraint systems.
Please pay close attention to the information in this
section. It tells you how to use your restraint system
properly to keep you and your passengers as safe as
possible.
30 THINGS TO KNOW BEFORE STARTING YOUR VEHICLE
 Loading...