

Page 1

Version 1.00 | 10/06/2020
User Manual
5G AC2600 Wi-Fi Router
DWR-978
Page 2

Preface
D-Link reserves the right to revise this publication and to make changes in thke content hereof without obligation to notify
any person or organization of such revisions or changes.
Manual Revisions
Revision Date Description
1.00 October 06, 2020 • Initial release
Trademarks
D-Link and the D-Link logo are trademarks or registered trademarks of D-Link Corporation or its subsidiaries in the United
States or other countries. All other company or product names mentioned herein are trademarks or registered trademarks of
their respective companies.
Copyright © 2020 by D-Link Corporation.
All rights reserved. This publication may not be reproduced, in whole or in part, without prior expressed written permission
from D-Link Corporation.
iD-Link DWR-978 User Manual
Page 3

Table of Contents
Table of Contents
Product Overview .............................................................. 1
Package Contents .........................................................................1
System Requirements ................................................................. 1
Hardware Overview ..................................................................... 2
Front View ................................................................................ 2
Side View ..................................................................................4
Installation ......................................................................... 5
Before You Begin ........................................................................... 5
Wireless Installation Considerations ......................................6
Conguration ..................................................................... 7
Getting Started .............................................................................. 7
Settings ............................................................................................ 8
SMS Device .............................................................................. 8
SMS (U)SIM .............................................................................. 9
SMS Settings .........................................................................10
USSD ........................................................................................11
Main Wi-Fi ..............................................................................12
Guest Wi-Fi ............................................................................14
Network (LAN) .....................................................................15
Network (WAN) IPv4 ..........................................................17
Network (WAN) IPv6 ..........................................................19
Management ................................................................................28
System Time ..........................................................................28
Schedule ................................................................................29
System Log ............................................................................30
Administration .....................................................................32
Firmware Upgrade ..............................................................33
Statistics .................................................................................34
Advanced Settings .....................................................................35
Firewall Settings ..................................................................35
IPv4 Rules ...............................................................................36
IPv6 Rules ...............................................................................38
Port Forwarding ..................................................................40
Virtual Server ........................................................................ 42
Website Filter ........................................................................ 44
Static Routes IPv4 ...............................................................45
Static Routes IPv6 ...............................................................47
Dynamic DNS .......................................................................49
Connect a Wireless Client to your Router ......................51
WPS Button ...................................................................................51
Windows® 10 ................................................................................52
Windows® 8 ...................................................................................54
WPA/WPA2 ............................................................................54
Windows® 7 ...................................................................................56
WPA/WPA2 ............................................................................56
WPS ..........................................................................................59
Windows Vista® ............................................................................63
WPA/WPA2 ............................................................................64
Windows® XP ................................................................................66
WPA/WPA2 ............................................................................67
System & Reboot .................................................................31
Troubleshooting .............................................................. 69
iiD-Link DWR-978 User Manual
Page 4

Table of Contents
Wireless Basics .................................................................73
What is Wireless? .........................................................................74
Tips ...................................................................................................76
Wireless Modes ............................................................................77
Networking Basics ........................................................... 78
Check your IP address ...............................................................78
Statically Assign an IP address ...............................................79
Wireless Security ............................................................80
What is WPA? ...................................................................80
Technical Specications .................................................. 81
Regulatory Information ..................................................83
iiiD-Link DWR-978 User Manual
Page 5

Section 1 - Product Overview
Product Overview
Package Contents
5G AC2600 Wi-Fi RouteR
DWR-978
12 V 4 A PoWeR ADAPteR
etHeRNet CABLe
QuiCK iNStALL GuiDe AND WARRANtY DoCuMeNtS
SiM CARD ADAPteR
System Requirements
• Computer or mobile device with 802.11ac/n/g wireless adapter
• Internet Explorer® 9, Firefox® 12, Chrome™ 20, or Safari 5
• Mini SIM card
• Subscription with a mobile Internet Service Provider
* Subject to services and service terms available from your carrier.
1D-Link DWR-978 User Manual
Page 6

Section 1 - Product Overview
Hardware Overview
Front View
1 2 3 4 5 6 7 8 9
1 Signal Strength LED Indicates Wi-Fi signal strength with bars. More bars indicates a stronger signal.
2 Power LED Will be lit green if the device is powered on and working. Turns red if there is an error.
3 WAN Will be lit if an Ethernet WAN connection is established, and will blink when data is being transferred.
4 Wi-Fi/WPS Will be lit if the wireless function is enabled, blinks when data is transferred or during WPS pairing.
5 Phone Will be lit if the phone function is enabled, blinks when data is transferred.
6 LAN Will be lit if an Ethernet LAN connection is established, and will blink when data is being transferred.
7 3G Will be lit if a 3G connection established.
8 4G/LTE+ Will be lit if a 4G/LTE+ connection is established.
9 5G Will be lit if a 5G connection is established.
2D-Link DWR-978 User Manual
Page 7

Section 1 - Product Overview
1 2
1 Power Connector Connects to the included power adapter.
2 Power Button Turns the device on or o.
3 Ethernet LAN Ports For connection to a network-enabled desktop or notebook computer.
4 Ethernet WAN Port For connection to a DSL/cable modem or router.
5 SIM card slot For mobile network connections.
6 WPS Button For WPS pairing with wireless devices.
3
4
5 6
3D-Link DWR-978 User Manual
Page 8
Section 1 - Product Overview
Side View
1
1 USB Port USB port 2.0 for media or external devices.
4D-Link DWR-978 User Manual
Page 9

Section 2 - Installation
Installation
This section will guide you through the installation process. Placement of the router is very important. Do not place the router in an enclosed area
such as a closet, cabinet, or in an attic or garage.
Before You Begin
Ensure that your DWR-978 5G AC2600 Wi-Fi Router is disconnected and powered o before performing the steps below..
1. Verify that your SIM/UICC card is installed and has been activated by your carrier.
Caution: Always unplug/power down the router before installing or removing the SIM/UICC card. Never insert or remove the SIM/UICC card while
the router is in use.
2. Attach the included antennas to the back of the router, screwing them in clockwise. Arrange them so that they point upward.
3. Connect the power adapter to the socket on the back panel of your DWR-978. Plug the other end of the power adapter into a wall outlet or
power strip. Make sure the power button is in the “On” position.
a. The Power LED will light up to indicate that power is being supplied to the router and the router is turned on.
b. The LEDs on the front panel will ash on and o as the DWR-978 Mobile Router performs initialization and Internet connection processes.
c. After a few moments, if a connection has been established, the following LEDs will turn solid green: Power, Network, WiFi (if enabled), LAN
(if connected), WAN (if connected), and Signal Strength.
Note: By default, the DWR-978 uses the mobile network as the sole Internet connection. If you wish to use your mobile connection as a backup to
a wired connection, or you wish to use a wired connection exclusively, you must use the Optional Advanced Setup procedure.
4. Connect via Wi-Fi using the SSID and password printed on the bottom of the router, or through Ethernet via one of the LAN ports on the back
of your DWR-978.
5D-Link DWR-978 User Manual
Page 10

Section 2 - Installation
Wireless Installation Considerations
The DWR-978 can be accessed using a wireless connection from anywhere within the operating range of your wireless network. Keep in mind that
the quantity, thickness, and location of walls, ceilings, or other objects that the wireless signals must pass through may limit the range of the wireless
signal. Ranges vary depending on the types of materials and background RF (radio frequency) noise in your home or oce. The key to maximizing
the wireless range is to follow these basic guidelines:
1. Minimize the number of walls and ceilings between the D-Link router and other network devices. Each wall or ceiling can reduce your adapter’s
range from 3 to 90 feet (1 to 30 meters).
2. Be aware of the direct line between network devices. A wall that is 1.5 feet thick (0.5 meters), at a 45-degree angle appears to be almost 3 feet
(1 meter) thick. At a 2-degree angle it looks over 42 feet (14 meters) thick. Position devices so that the signal will travel straight through a wall
or ceiling (instead of at an angle) for better reception.
3. Try to position access points, wireless routers, and computers so that the signal passes through open doorways and drywall. Materials such as
glass, metal, brick, insulation, concrete, and water can aect wireless performance. Large objects such as sh tanks, mirrors, le cabinets, metal
doors, and aluminum studs may also have a negative eect on range.
4. If you are using 2.4 GHz cordless phones, make sure that the 2.4 GHz phone base is as far away from your wireless device as possible. The base
transmits a signal even if the phone is not in use. In some cases, cordless phones, X-10 wireless devices, and electronic equipment such as ceiling
fans, uorescent lights, and home security systems may dramatically degrade wireless connectivity.
6D-Link DWR-978 User Manual
Page 11

Section 3 - Conguration
Conguration
Getting Started
To access the conguration utility, open a web browser such as Internet Explorer and
enter the address of the router (192.168.0.1 by default).
To log in to the conguration utility, the default password is left blank.
Note: If you get a Page Cannot be Displayed error, please refer to the Troubleshooting
section for assistance.
Once you have successfully logged in, you will see the Home page. On this page
you can view information about your Internet connection, the wireless/LAN status,
and system information.
At the top of the page is a menu. Clicking on one of these icons will take you to the
appropriate conguration section.
7D-Link DWR-978 User Manual
Page 12

Section 3 - Conguration
Settings
SMS Device
On the Short Messages Settings page you can organize, send and receive Short Message Service (SMS) messages by selecting between a Setup,
Inbox and Drafts tab. These messages can either be saved to the router’s internal memory or on the SIM/UICC card itself.
Send Message
Mobile: Enter the mobile number to send the message to.
Content: Enter the content you wish to send.
Click Send to send your message.
Inbox
Mobile: (Optional) Specify a password.
Content: (Optional) Should you have specied a password above, verify your
password one more time.
Time: Specify number to dial.
Click Submit to save your settings, or Cancel to revert to your previous settings.
8D-Link DWR-978 User Manual
Page 13

Section 3 - Conguration
SMS (U)SIM
Send Message
Mobile: Enter the mobile number to send the message to.
Content: Enter the content you wish to send.
Click Send to send your message.
Inbox
Mobile: (Optional) Specify a password.
Content: (Optional) Should you have specied a password above, verify your
password one more time.
Time: Specify number to dial.
Click Submit to save your settings, or Cancel to revert to your previous settings.
9D-Link DWR-978 User Manual
Page 14

Section 3 - Conguration
SMS Settings
SMS center: Enter the name of the SMS center.
SMS Settings
New SMS
Storage:
Click Submit to save your settings, or Cancel to revert to your previous settings.
Select the new SMS storage.
10D-Link DWR-978 User Manual
Page 15

Section 3 - Conguration
USSD
USSD Settings
Code: Enter USSD code.
Click Submit to save your settings, or Cancel to revert to your previous settings.
11D-Link DWR-978 User Manual
Page 16

Section 3 - Conguration
Primary 2.4G Advanced Setting
Status: Indicates whether the connection is Enabled or Disabled.
Main Wi-Fi
Wi-Fi Name
(SSID):
Password: Indicates the password of the connection.
Security
Mode:
802.11 Mode: Indicates the wireless mode of the connection. By default Mixed
Wi-Fi
Channel:
Transmission
Power:
Channel
Width:
Indicates the name of the connection.
Indicates the Security Mode of the connection. By default WPA/
WPA2-Personal is selected, you may also select None.
802.11b/g/n is selected, you may also select Mixed 802.11g/n or
802.11n only.
Select the Wi-Fi channel. By default Auto is selected, you can choose
manually between channel 1-13.
Indicates the Transmission Power of the connection. By default
High is selected, you may also select Medium or Low.
Indicates the Channel Width of the connection. By default Auto
20/40 MHz is selected, you may also select 20 MHz.
Coexistence: Indicates whether Coexistence is Enabled or Disabled.
Visibility
Status:
Schedule: Indicates whether the Wi-Fi network is part of a schedule. Click on
Click Submit to save your settings, or Cancel to revert to your previous settings.
Indicates whether the Wi-Fi network is Visible or Invisible.
Schedule to access the schedule menu “Schedule” on page 29.
12D-Link DWR-978 User Manual
Page 17

Section 3 - Conguration
Primary 5G Advanced Setting
Status: Indicates whether the connection is Enabled or Disabled.
Wi-Fi Name
(SSID):
Password: Indicates the password of the connection.
Security
Mode:
Wi-Fi
Channel:
Transmission
Power:
Channel
Width:
Visibility
Status:
Schedule: Indicates whether the Wi-Fi network is part of a schedule. Click
Indicates the name of the connection.
Indicates the Security Mode of the connection. By default WPA/
WPA2-Personal is selected, you may also select None.
Select the Wi-Fi channel. By default Auto is selected, you can choose
manually between channel 1-13.
Indicates the Transmission Power of the connection. By default
High is selected, you may also select Medium or Low.
Indicates the Channel Width of the connection. By default Auto
20/40 MHz is selected, you may also select 20 MHz.
Indicates whether the Wi-Fi network is Visible or Invisible.
on Schedule to access the schedule menu “Schedule” on page
29.
Click Submit to save your settings, or Cancel to revert to your previous settings.
13D-Link DWR-978 User Manual
Page 18

Section 3 - Conguration
Guest 2.4G/5G Advanced Setting
Status: Indicates whether the connection is Enabled or Disabled.
Guest Wi-Fi
Wi-Fi Name
(SSID):
Password: Indicates the password of the connection.
Security
Mode:
Visibility
Status:
Schedule: Indicates whether the Wi-Fi network is part of a schedule. Click on
Click Submit to save your settings, or Cancel to revert to your previous settings.
Indicates the name of the connection.
Indicates the Security Mode of the connection. By default WPA/
WPA2-Personal is selected, you may also select None.
Indicates whether the Wi-Fi network is Visible or Invisible.
Schedule to access the schedule menu “Schedule” on page 29.
14D-Link DWR-978 User Manual
Page 19

Section 3 - Conguration
Network Settings
Network (LAN)
LAN IP
Address:
Subnet Mask: Enter the subnet mask of the router. The default subnet mask is
Local Domain
Name:
Enable DNS
Relay:
Click Submit to save your settings, or Cancel to revert to your previous settings.
Enter the IP address you want to use for the router. The default
IP address is 192.168.0.1. If you change the IP address, you will
need to enter the new IP address in your browser to get into the
conguration utility.
255.255.255.0
Enter the local domain name for your network. (Optional)
Disable to transfer the DNS server information from your ISP to
your computers. If enabled, your computers will use the router
for a DNS server.
15D-Link DWR-978 User Manual
Page 20

Section 3 - Conguration
DHCP Server
Status: Indicates whether DHCP server is Enabled or Disabled.
DHCP IP
Address
Range:
DHCP Lease
Time:
Always
Broadcast:
Enter the DHCP IP Address Range of the router. The default is
192.168.0.50 - 192.168.0.199.
The lease time determines the period that the host retains the
assigned IP addresses before the IP addresses change.
Indicates whether Always Broadcast is Enabled or Disabled.
Advanced Settings
UPnP: Indicates whether UPnP is Enabled or Disabled.
IPv4 Multicast
Streams:
IPv6 Multicast
Streams:
Indicates whether IPv4 Multicast Streams is Enabled or
Disabled.
Indicates whether DHCP server is Enabled or Disabled.
16D-Link DWR-978 User Manual
Page 21

Section 3 - Conguration
Network (WAN) IPv4
Dual WAN Settings
Dual WAN: Indicates whether Dual WAN is Enabled or Disabled.
Primary WAN: Select connection type of the primary WAN.
Secondary
WAN:
Fail Over: Indicates whether Fail Over is Enabled or Disabled.
Click Submit to save your settings, or Cancel to revert to your previous settings.
Select connection type of the Secondary WAN.
17D-Link DWR-978 User Manual
Page 22

Section 3 - Conguration
Network Settings
Internet
Connection:
Dial-Up
Prole:
PDP Type: Select the PDP Type to be Auto, IPv4 or IPv6.
Pin Code: Indicates the Pin Code of the connection.
Reconnect
Mode:
Primary DNS
Server:
Secondary
DNS Server:
Keep Alive: Indicates whether Keep Alive is Enabled or Disabled.
Ping IP
Address:
Select the Internet Connection type of the IPv4 WAN.
Select the Dial-Up Prole to be Auto-Detection or Manual.
Select Reconnect Mode to be Auto or Manual.
Enter the primary DNS IP address that will be assigned to DHCP
clients.
Enter the secondary DNS IP address that will be assigned to
DHCP clients.
Enter Ping IP Address to ping test the connection.
Ping Interval: Indicates the Ping Interval.
Click Submit to save your settings, or Cancel to revert to your previous settings.
18D-Link DWR-978 User Manual
Page 23

Section 3 - Conguration
Network (WAN) IPv6
Local Connectivity Only IPv6 Advanced Setting
Internet
Connection:
Specify the type of IPv6 connection your ISP uses. Choose from
Local Connectivity Only, Static IPv6, Auto Conguration
(Stateless/DHCPv6), PPPoE, 6rd.
IPv6 ULA Settings
Enable ULA: Indicates whether Enable ULA is Enabled or Disabled.
Current IPv6 ULA Settings
Current ULA
Prex:
LAN IPv6
ULA:
Click Submit to save your settings, or Cancel to revert to your previous settings.
Indicates the Current ULA Prex.
Indicates the LAN IPv6 ULA.
19D-Link DWR-978 User Manual
Page 24

Section 3 - Conguration
Static IPv6 Advanced Setting
Internet
Connection:
Use Link-Local
Address:
IPv6 Address: If Use Link-Local Address is Disabled, enter the IPv6 Address.
Subnet Prex
Length:
Default Gateway: Enter the Default Gateway used by this connection.
Specify the type of IPv6 connection your ISP uses. Choose from
Local Connectivity Only, Static IPv6, Auto Conguration
(Stateless/DHCPv6), PPPoE, 6rd.
Indicates whether Use Link-Local Address is Enabled or
Disabled.
If Use Link-Local Address is Disabled, enter the Subnet Prex
Length.
IPv6 DNS Settings
Primary DNS
Server:
Secondary DNS
Server:
Enter the primary DNS IP address that will be assigned to DHCP
clients.
Enter the secondary DNS IP address that will be assigned to
DHCP clients.
LAN IPv6 Address Settings
LAN IPv6 Address: Specify the LAN IPv6 Address.
LAN IPv6 LinkLocal Address:
Indicates the LAN IPv6 Link-Local Address.
20D-Link DWR-978 User Manual
Page 25

Section 3 - Conguration
Address Autoconguration Settings
Enable Automatic
IPv6 Address
Assignment:
Autoconguration
Type:
Router
Advertisement
Lifetime:
Click Submit to save your settings, or Cancel to revert to your previous settings.
Indicates whether Enable Automatic IPv6 Address Assignment is
Enabled or Disabled.
Specify the Autoconguration Type. Choose from
SLAAC+RDNSS, SLAAC+Stateless DHCP or Stateful DHCPv6.
Specify the Router Advertisement Lifetime from minutes (1-
150).
21D-Link DWR-978 User Manual
Page 26

Section 3 - Conguration
Autoconguration (SLAAC/DHCPv6) Advanced Setting
Internet
Connection:
Specify the type of IPv6 connection your ISP uses. Choose from
Local Connectivity Only, Static IPv6, Auto Conguration
(Stateless/DHCPv6), PPPoE, 6rd.
IPv6 DNS Settings
DNS Type: Specify the DNS Type. Choose from Obtain a DNS server
address automatically or Use the following DNS address.
Primary DNS
Server:
Secondary DNS
Server:
Enter the primary DNS IP address that will be assigned to DHCP
clients.
Enter the secondary DNS IP address that will be assigned to
DHCP clients.
LAN IPv6 Address Settings
Enable DHCP-PD: Indicates whether Use Link-Local Address is Enabled or
Disabled.
LAN IPv6 LinkLocal Address:
Indicates the LAN IPv6 Link-Local Address.
22D-Link DWR-978 User Manual
Page 27

Section 3 - Conguration
Address Autoconguration Settings
Enable Automatic
IPv6 Address
Assignment:
Enable Automatic
DHCP-PD in LAN:
Autoconguration
Type:
Router
Advertisement
Lifetime:
Click Submit to save your settings, or Cancel to revert to your previous settings.
Indicates whether Enable Automatic IPv6 Address Assignment is
Enabled or Disabled.
Indicates whether Enable Automatic DHCP-PD in LAN is Enabled
or Disabled.
Specify the Autoconguration Type. Choose from
SLAAC+RDNSS, SLAAC+Stateless DHCP or Stateful DHCPv6.
Specify the Router Advertisement Lifetime from minutes (1-
150).
23D-Link DWR-978 User Manual
Page 28

Section 3 - Conguration
PPPoE Advanced Setting
Internet
Connection:
PPPoE Session: Select the PPPoE Session to create or edit.
Username: Specify the Username.
Password: Specify the Password.
Address Mode: Specify the Reconnect Mode. Choose from Dynamic IP or Static
Service Name: Specify the Service Name.
Reconnect Mode: Specify the Reconnect Mode. Choose from Always on or
MTU: Specify the MTU in bytes.
Specify the type of IPv6 connection your ISP uses. Choose from
Local Connectivity Only, Static IPv6, Auto Conguration
(Stateless/DHCPv6), PPPoE, 6rd.
I P.
Manual.
IPv6 DNS Settings
DNS Type: Specify the DNS Type. Choose from Obtain a DNS server
address automatically or Use the following DNS address.
Primary DNS
Server:
Secondary DNS
Server:
Enter the primary DNS IP address that will be assigned to DHCP
clients.
Enter the secondary DNS IP address that will be assigned to
DHCP clients.
24D-Link DWR-978 User Manual
Page 29

Section 3 - Conguration
LAN IPv6 Address Settings
Enable DHCP-PD: Indicates whether Use Link-Local Address is Enabled or
Disabled.
LAN IPv6 Link-Local
Address:
Indicates the LAN IPv6 Link-Local Address.
Address Autoconguration Settings
Enable Automatic
IPv6 Address
Assignment:
Enable Automatic
DHCP-PD in LAN:
Autoconguration
Type:
Router
Advertisement
Lifetime:
Indicates whether Enable Automatic IPv6 Address Assignment is
Enabled or Disabled.
Indicates whether Enable Automatic DHCP-PD in LAN is Enabled
or Disabled.
Specify the Autoconguration Type. Choose from
SLAAC+RDNSS, SLAAC+Stateless DHCP or Stateful DHCPv6.
Specify the Router Advertisement Lifetime from minutes (1-
150).
Click Submit to save your settings, or Cancel to revert to your previous settings.
25D-Link DWR-978 User Manual
Page 30

Section 3 - Conguration
6rd Advanced Setting
Internet
Connection:
Assign IPv6 Prex: Indicates the Assign IPv6 Prex.
Specify the type of IPv6 connection your ISP uses. Choose from
Local Connectivity Only, Static IPv6, Auto Conguration
(Stateless/DHCPv6), PPPoE, 6rd.
IPv6 DNS Settings
DNS Type: Specify the DNS Type. Choose from Obtain a DNS server
address automatically or Use the following DNS address.
Primary DNS
Server:
Secondary DNS
Server:
Enter the primary DNS IP address that will be assigned to DHCP
clients.
Enter the secondary DNS IP address that will be assigned to
DHCP clients.
LAN IPv6 Address Settings
Enable DHCP-PD: Indicates whether Use Link-Local Address is Enabled or
Disabled.
LAN IPv6 Link-Local
Address:
Indicates the LAN IPv6 Link-Local Address.
26D-Link DWR-978 User Manual
Page 31

Section 3 - Conguration
Address Autoconguration Settings
Enable Automatic
IPv6 Address
Assignment:
Autoconguration
Type:
Router
Advertisement
Lifetime:
Click Submit to save your settings, or Cancel to revert to your previous settings.
Indicates whether Enable Automatic IPv6 Address Assignment is
Enabled or Disabled.
Specify the Autoconguration Type. Choose from
SLAAC+RDNSS, SLAAC+Stateless DHCP or Stateful DHCPv6.
Specify the Router Advertisement Lifetime from minutes (1-
150).
27D-Link DWR-978 User Manual
Page 32

Section 3 - Conguration
Time Conguration
Time Zone: Specify Time Zone of your device.
Time: Specify Time of your device.
Automatic Time Conguration
Management
System Time
Update Time
Using an NTP
Server:
NTP Server: Specify NTP Server of your device.
Click Submit to save your settings, or Cancel to revert to your previous settings.
Indicates whether Update Time Using an NTP Server is Enabled
or Disabled.
28D-Link DWR-978 User Manual
Page 33

Section 3 - Conguration
Schedule
Name Indicates the name of the schedule.
Schedule: Indicates the schedule.
Edit: When a schedule is selected, click this button to edit the
schedule.
Delete: When a schedule is selected, click this button to delete the
schedule.
Click Save to save your settings, or Cancel to revert to your previous settings.
Create New Rule
Name Enter a name for your new schedule
Schedule: Drag and select the times that you wish to be included as part of
the new schedule.
Click Save to save your settings, or Cancel to revert to your previous settings.
29D-Link DWR-978 User Manual
Page 34

Section 3 - Conguration
System Log: Click this button to download the system log.
SysLog Settings
System Log
Enable
Logging to
Syslog Server:
Indicates whether Enable Logging to Syslog Server is Enabled or
Disabled.
E-mail Settings
Enable E-mail
Notication:
Indicates whether Enable E-mail Notication is Enabled or
Disabled.
E-mail Log When Full or On Schedule
Send When
Log Full:
Send on
Schedule:
Click Submit to save your settings, or Cancel to revert to your previous settings.
Indicates whether Send When Log Full is Enabled or Disabled.
Indicates whether Send on Schedule is Enabled or Disabled.
30D-Link DWR-978 User Manual
Page 35

Section 3 - Conguration
System
System & Reboot
Factory
Default:
Save
Conguration:
Restore
Conguration:
Click this button to reset this device back to Factory Default.
Click this button to Save Conguration
Click this button to select File to Restore Conguration
Auto Reboot Conguration
Reboot The
Device:
Auto Reboot Specify an Auto Reboot time of your device.
Click Submit to save your settings, or Cancel to revert to your previous settings.
Click this button to Reboot The Device
31D-Link DWR-978 User Manual
Page 36

Section 3 - Conguration
Administration Advanced Settings
Password: Specify Administration Password of your device.
Advanced Settings
Administration
Enable HTTPS
Server:
Enable
Remote
Management:
Remote
Admin Port:
Use HTTPS: Indicates whether Use HTTPS is Enabled or Disabled.
Click Submit to save your settings, or Cancel to revert to your previous settings.
Indicates whether Enable HTTPS Server is Enabled or Disabled.
Indicates whether Enable Remote Management is Enabled or
Disabled.
Specify Remote Admin Port of your device
32D-Link DWR-978 User Manual
Page 37

Section 3 - Conguration
Firmware Over The Air
Firmware Upgrade
Latest
Firmware
Version:
Firmware
Upgrade:
Indicates The Latest Firmware Version.
Click Check to begin the Firmware Over the Air (FOTA) upgrade
process. Note that this requires an active Internet connection.
Manual Firmware Upgrade
Current
Firmware
Version:
Upgrade
Firmware:
Indicates the Current Firmware Version.
After you have downloaded a new rmware, click Select File to
locate the rmware on your computer, then click Apply to start
the rmware upgrade.
Module Firmware Upgrade
Current
Firmware
Version:
Indicates the Current Firmware Version.
Upgrade
Firmware:
After you have downloaded a new rmware, click Select File to
locate the rmware on your computer, then click Apply to start
the rmware upgrade.
33D-Link DWR-978 User Manual
Page 38

Section 3 - Conguration
Internet/ LAN/ Wi-Fi 2.4GHz/ Wi-Fi 5GHz
Sent Displays the Sent Statistics of the connection.
Received Displays the Received Statistics of the connection.
Statistics
Total
Packets:
Total
KByte(s):
Click Clear to clear all Statistics.
Displays the Total Packets Statistics of the connection.
Displays the Total KByte(s) Statistics of the connection.
34D-Link DWR-978 User Manual
Page 39

Section 3 - Conguration
Advanced Settings
Firewall Settings
DMZ Settings
Enable DMZ: Indicates whether Enable DMZ is Enabled or Disabled.
Firewall Advanced Settings
Enable SPI
IPv4:
Enable
Anti-spoof
Checking:
IPv6 Simple
Security:
IPv6 Ingress
Filtering:
Indicates whether Enable SPI IPv4 is Enabled or Disabled.
Indicates whether Enable Anti-spoof Checking is Enabled or
Disabled.
Indicates whether IPv6 Simple Security is Enabled or Disabled.
Indicates whether IPv6 Ingress Filtering is Enabled or Disabled.
Application Level Gateway (ALG) Conguration
PPTP: Indicates whether PPTP is Enabled or Disabled.
IPSec (VPN): Indicates whether IPSec (VPN) is Enabled or Disabled.
RTSP: Indicates whether RTSP is Enabled or Disabled.
SIP: Indicates whether SIP is Enabled or Disabled.
Click Submit to save your settings, or Cancel to revert to your previous settings.
35D-Link DWR-978 User Manual
Page 40

Section 3 - Conguration
Status
Status: Select Turn IPv4 Filtering OFF, Turn IPv4 Filtering ON and
ALLOW rules listed. or Turn IPv4 Filtering ON and DENY rules
listed.
IPv4 Rules Table: (Max Limit: 24)
Name Indicates the name of the schedule.
Schedule: Indicates the schedule.
Edit: When a schedule is selected, click this button to edit the
schedule.
IPv4 Rules
Delete: When a schedule is selected, click this button to delete the
schedule.
36D-Link DWR-978 User Manual
Page 41

Section 3 - Conguration
Create New Rule
Name Indicates the name of the New Rule.
Source IP
Address
Range:
Destination
IP Address
Range:
Protocol &
Port Range:
Schedule: Indicates whether the Wi-Fi network is part of a schedule. Click
Click Submit to save your settings, or Cancel to revert to your previous settings.
Indicates the source IP or IP range to which the rule will apply.
Indicates the Destination IP or IP range to which the rule will
apply.
Indicates protocol types and port range aected by the lter.
on Schedule to access the schedule menu “Schedule” on page
29.
37D-Link DWR-978 User Manual
Page 42
Section 3 - Conguration
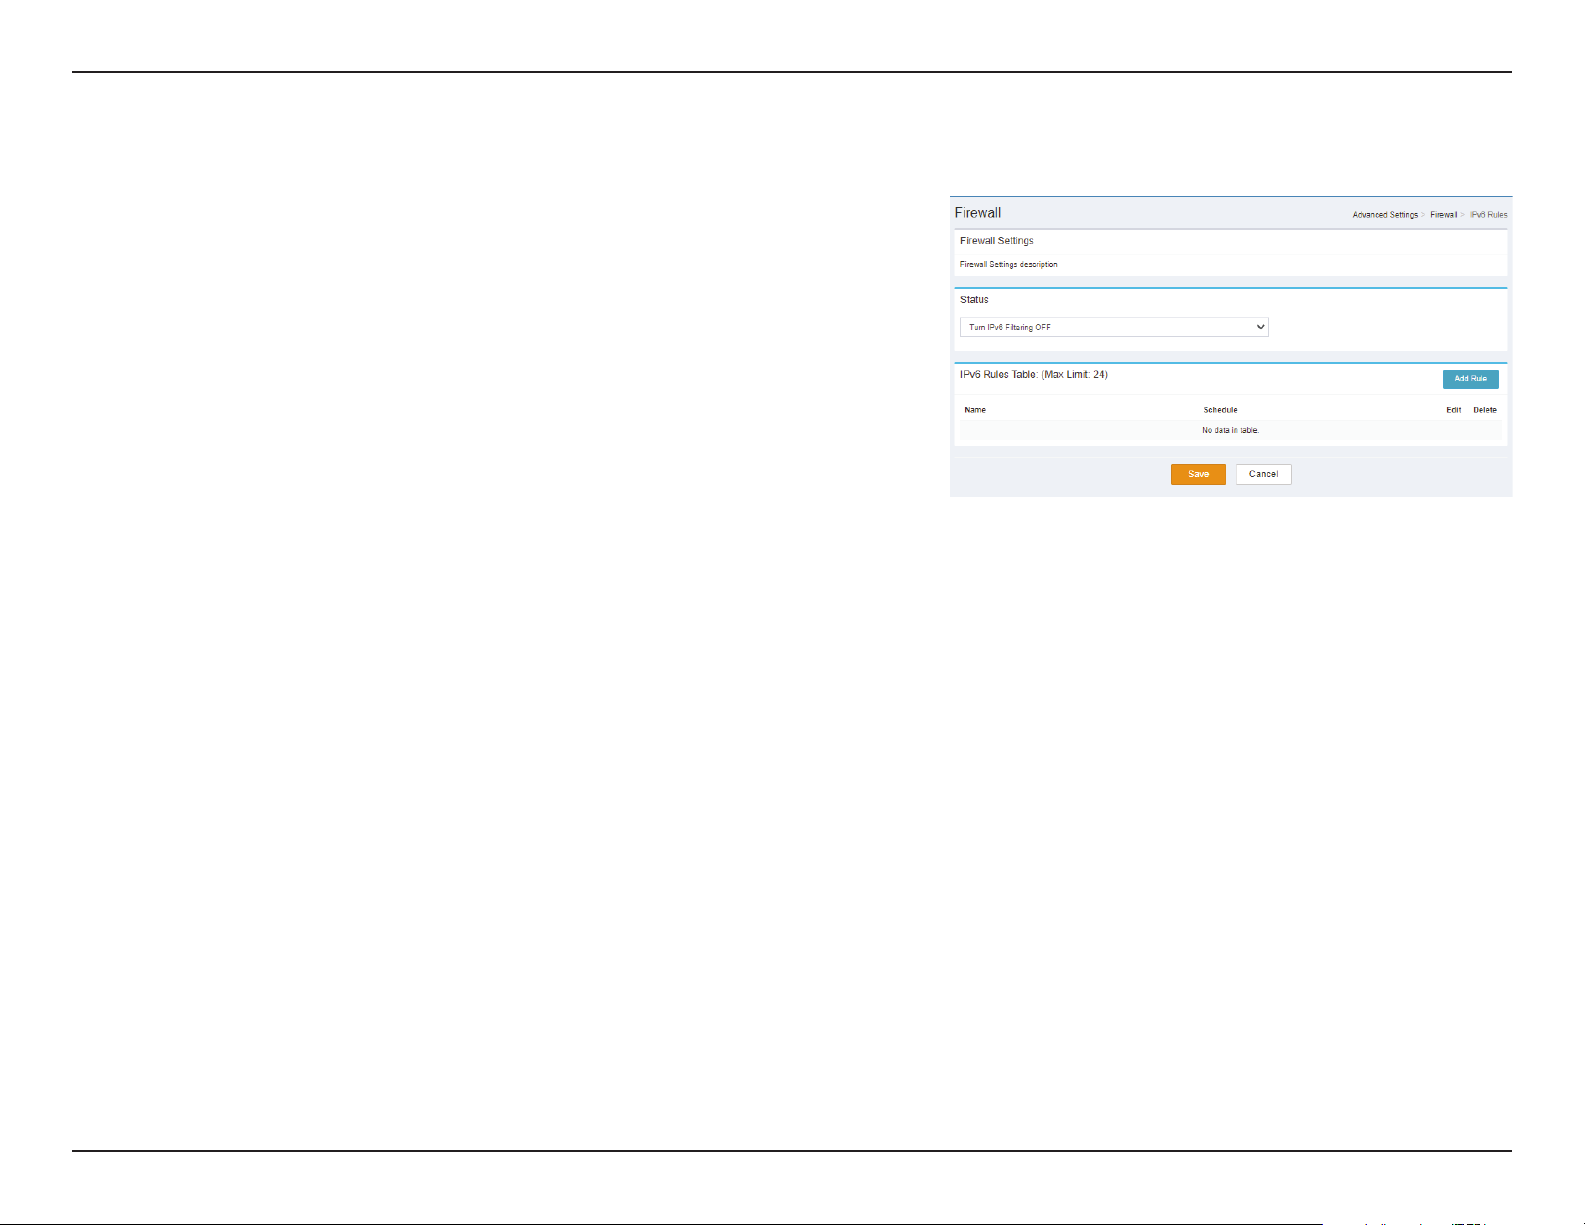
Status
Status: Select Turn IPv6 Filtering OFF, Turn IPv6 Filtering ON and
ALLOW rules listed. or Turn IPv6 Filtering ON and DENY rules
listed.
IPv4 Rules Table: (Max Limit: 24)
Name Indicates the name of the schedule.
Schedule: Indicates the schedule.
Edit: When a schedule is selected, click this button to edit the
schedule.
IPv6 Rules
Delete: When a schedule is selected, click this button to delete the
schedule.
38D-Link DWR-978 User Manual
Page 43

Section 3 - Conguration
Create New Rule
Name Indicates the name of the New Rule.
Source IP
Address
Range:
Destination
IP Address
Range:
Protocol &
Port Range:
Schedule: Indicates whether the Wi-Fi network is part of a schedule. Click
Click Submit to save your settings, or Cancel to revert to your previous settings.
Indicates the source IP or IP range to which the rule will apply.
Indicates the Destination IP or IP range to which the rule will
apply.
Indicates protocol types and port range aected by the lter.
on Schedule to access the schedule menu “Schedule” on page
29.
39D-Link DWR-978 User Manual
Page 44

Section 3 - Conguration
Port Forwarding Table: (Max Limit: 24)
Status: Indicates the Status.
Name: Indicates the Name.
Local IP: Indicates the Local IP.
TCP Port: Indicates the TCP Port.
UDP Port: Indicates the UDP Port.
Schedule: Indicates the schedule.
Edit: When a schedule is selected, click this button to edit the
schedule.
Port Forwarding
Delete: When a schedule is selected, click this button to delete the
schedule.
Click Save to save your settings, or Cancel to revert to your previous settings.
40D-Link DWR-978 User Manual
Page 45

Section 3 - Conguration
Create New Rule
Name Indicates the name of the New Rule.
Local IP: Indicates the Local IP of the New Rule.
TCP Port: Indicates the TCP Port of the New Rule.
UDP Port: Indicates the UDP Port of the New Rule.
Schedule: Indicates whether the Wi-Fi network is part of a schedule. Click
on Schedule to access the schedule menu “Schedule” on page
29.
Click Done to save your settings, or Cancel to revert to your previous settings.
41D-Link DWR-978 User Manual
Page 46

Section 3 - Conguration
Virtual Server Table: (Max Limit: 24)
Status: Indicates the Status.
Name: Indicates the Name.
Local IP: Indicates the Local IP.
Protocol: Indicates the Protocol type.
External Port: Indicates the External Port.
Internal Port: Indicates the Internal Port.
Schedule: Indicates the schedule.
Virtual Server
Edit: When a schedule is selected, click this button to edit the
schedule.
Delete: When a schedule is selected, click this button to delete the
schedule.
Click Save to save your settings, or Cancel to revert to your previous settings.
42D-Link DWR-978 User Manual
Page 47

Section 3 - Conguration
Create New Rule
Status: Indicates the status of the New Rule
Name Indicates the name and specify which Application Name of the
New Rule
Local IP: Indicates the Local IP and specify which Computer Name of the
New Rule
Protocol: Indicates the Protocol type of the New Rule.
External Port: Indicates the External Port of the New Rule.
Internal Port: Indicates the Internal Port of the New Rule.
Schedule: Indicates whether the Wi-Fi network is part of a schedule. Click
on Schedule to access the schedule menu “Schedule” on page
29.
Click Done to save your settings, or Cancel to revert to your previous settings.
43D-Link DWR-978 User Manual
Page 48

Section 3 - Conguration
Status
Status: Select DENY clients access to ONLY these sites or ALLOW clients
access to ONLY these sites.
Website Filter Table: (Max Limit: 24)
Website Filter
Website URL/
Domain:
Delete: Delete the selected Website URL/Domain.
Add Rule: Specify the website to be ltered.
Click Save to save your settings, or Cancel to revert to your previous settings.
Indicates the Website URL/Domain.
44D-Link DWR-978 User Manual
Page 49

Section 3 - Conguration
Static Routes Table: (Max Limit: 24)
Status: Indicates the Status.
Name: Indicates the name.
Static Routes IPv4
Destination
Network:
Mask: Indicates the Mask.
Gateway: Indicates the Gateway.
Metric: Indicates the Metric.
Interface: Indicates the Interface.
Edit: Delete the selected Static Route.
Delete: Delete the selected Static Route.
Click Save to save your settings, or Cancel to revert to your previous settings.
Indicates the Destination Network.
45D-Link DWR-978 User Manual
Page 50

Section 3 - Conguration
Create New Rule
Status: Indicates the status of the New Rule
Name Indicates the name and specify which Application Name of the
New Rule
Destination
Network
Mask: Indicates the Mask of the New Rule.
Gateway: Indicates the Gateway of the New Rule.
Metric: Indicates the Metric of the New Rule.
Interface: Indicates the Interface of the New Rule.
Click Done to save your settings, or Cancel to revert to your previous settings.
Indicates the Destination Network of the New Rule
46D-Link DWR-978 User Manual
Page 51

Section 3 - Conguration
Static Routes Table: (Max Limit: 24)
Status: Indicates the Status.
Name: Indicates the name.
Static Routes IPv6
Destination
Network:
Mask: Indicates the Mask.
Gateway: Indicates the Gateway.
Metric: Indicates the Metric.
Interface: Indicates the Interface.
Edit: Delete the selected Static Route.
Delete: Delete the selected Static Route.
Click Save to save your settings, or Cancel to revert to your previous settings.
Indicates the Destination Network.
47D-Link DWR-978 User Manual
Page 52

Section 3 - Conguration
Create New Rule
Status: Indicates the status of the New Rule
Name Indicates the name and specify which Application Name of the
New Rule
Destination
Network
PrexLen Indicates the PrexLen of the New Rule.
Gateway: Indicates the Gateway of the New Rule.
Metric: Indicates the Metric of the New Rule.
Interface: Indicates the Interface of the New Rule.
Click Done to save your settings, or Cancel to revert to your previous settings.
Indicates the Destination Network of the New Rule
48D-Link DWR-978 User Manual
Page 53

Section 3 - Conguration
Dynamic DNS
Enable
Dynamic
DNS:
Status: Indicates the status.
Indicates whether Enable Dynamic DNS is Enabled or Disabled.
IPv6 Dynamic DNS Table: (Max Limit: 10)
Status: Indicates the Status.
Host Name: Indicates the Host Name.
IPv6 Address: Indicates the IPv6 Address.
Dynamic DNS
Edit: Delete the selected IPv6 Dynamic DNS.
Delete: Delete the selected IPv6 Dynamic DNS.
Click Save to save your settings, or Cancel to revert to your previous settings.
49D-Link DWR-978 User Manual
Page 54

Section 3 - Conguration
Create New Rule
Status: Indicates the status of the New Rule.
Host Name: Indicates the Host Name of the New Rule.
IPv6 Address: Indicates the IPv6 Address and specify which Computer Name of
the New Rule.
Click Done to save your settings, or Cancel to revert to your previous settings.
50D-Link DWR-978 User Manual
Page 55

Section 4 - Connecting to a Wireless Network
Connect a Wireless Client to your Router
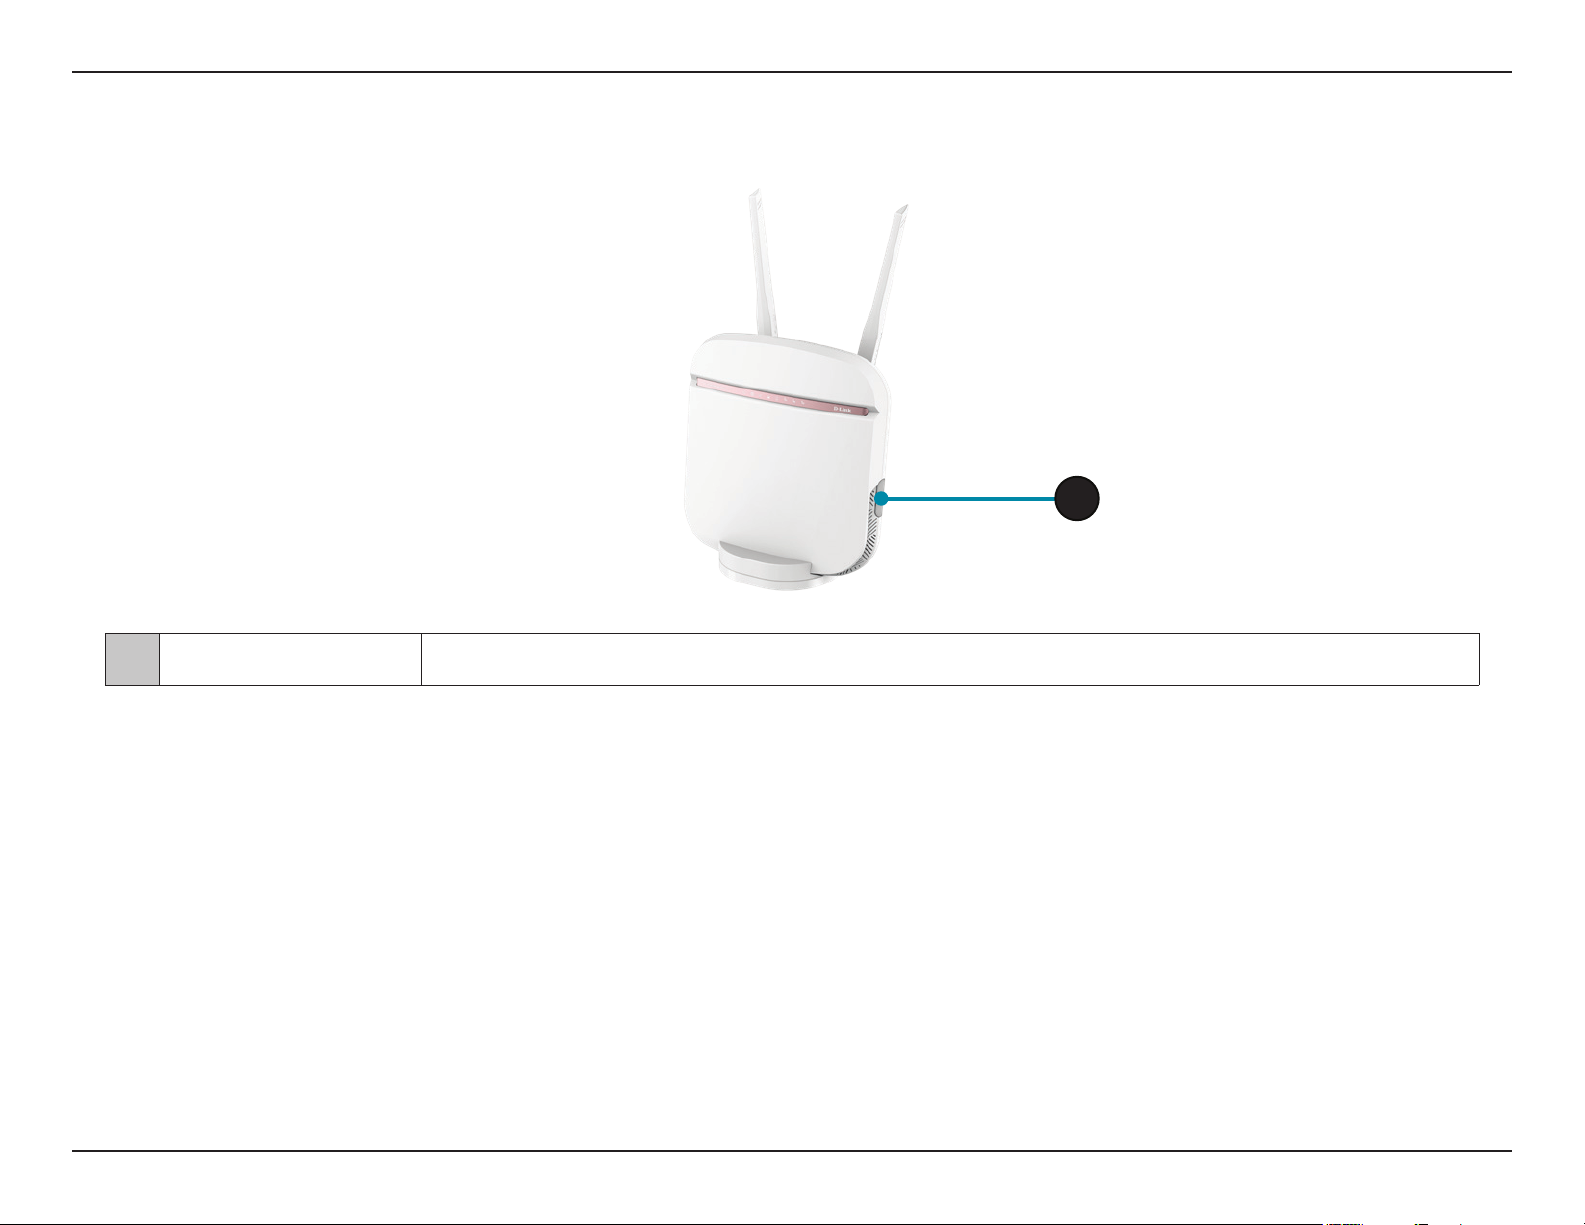
WPS Button
The easiest way to connect your wireless devices to the router is with WPS (Wi-Fi Protected Setup). Most wireless devices such as wireless adapters,
media players, Blu-ray DVD players, wireless printers and cameras will have a WPS button (or a software utility with WPS) that you can press to
connect to the DWR-978 router. Please refer to your user manual for the wireless device you want to connect to make sure you understand how to
enable WPS. Once you know, follow the steps below:
Step 1 - Press the WPS button on the DWR-978 for about 6 seconds. The WLAN LED on the front will start to blink.
WPS Button
Step 2 - Within 2 minutes, press the WPS button on your wireless client (or launch the software utility and start the WPS process).
Step 3 - Allow up to 1 minute for your connection to be congured. Once the Internet light stops blinking, you will be connected and your wireless
connection will be encrypted with WPA2.
51D-Link DWR-978 User Manual
Page 56

Section 4 - Connecting a Wireless Client
Connecting to a Wireless Network
Windows® 10
To connect to a wireless network using Windows 10, you will need to know the wireless network name (SSID) and Wi-Fi password
(security key) of the device you are connecting to.
To join an existing network, locate the wireless network icon in the taskbar,
next to the time display and click on it.
Wireless Icon
Clicking on this icon will display a list of wireless networks which are within
range of your computer. Select the desired network by clicking on its SSID.
52D-Link DWR-978 User Manual
Page 57

Section 4 - Connecting a Wireless Client
To connect to the network, click Connect.
To automatically connect when your device is in range, click the Connect
Automatically check box. Your computer will now automatically connect to
this wireless network whenever it is detected.
You will then be prompted to enter the Wi-Fi password (network security key)
for the wireless network. Enter the password into the box and click Next to
connect to the network.
You can also use Wi-Fi Protected Setup (WPS) to connect to the wireless network.
Press the WPS button on your device and you will be automatically connected.
It may take 20-30 seconds to connect to the wireless network. If the connection
fails, please verify that the security settings are correct. The key or passphrase
must be exactly the same as the one on the wireless router.
53D-Link DWR-978 User Manual
Page 58

Section 4 - Connecting to a Wireless Network
Windows® 8
WPA/WPA2
It is recommended that you enable wireless security (WPA/WPA2) on your wireless router or access point before conguring
your wireless adapter. If you are joining an existing network, you will need to know the security key (Wi-Fi password) being used.
To join an existing network, locate the wireless network icon in the
taskbar next to the time display.
Wireless Icon
Clicking on this icon will display a list of wireless networks that are within
connecting proximity of your computer. Select the desired network by
clicking on the network name.
54D-Link DWR-978 User Manual
Page 59

Section 4 - Connecting to a Wireless Network
You will then be prompted to enter the network security key (Wi-Fi
password) for the wireless network. Enter the password into the box
and click Next.
If you wish to use Wi-Fi Protected Setup (WPS) to connect to the router,
you can also press the WPS button on your router during this step to
enable the WPS function.
When you have established a successful connection to a wireless network,
the word Connected will appear next to the name of the network to
which you are connected to.
55D-Link DWR-978 User Manual
Page 60

Section 4 - Connecting to a Wireless Network
Windows® 7
WPA/WPA2
It is recommended that you enable wireless security (WPA/WPA2) on your wireless router or access point before conguring
your wireless adapter. If you are joining an existing network, you will need to know the security key or passphrase being used.
1. Click on the wireless icon in your system tray (lower-right corner).
Wireless Icon
2. The utility will display any available wireless networks in your area.
56D-Link DWR-978 User Manual
Page 61

Section 4 - Connecting to a Wireless Network
3. Highlight the wireless connection with Wi-Fi name (SSID) you would
like to connect to and click the Connect button.
If you get a good signal but cannot access the Internet, check your
TCP/IP settings for your wireless adapter. Refer to Networking Basics
on page 78 for more information.
4. The following window appears while your computer tries to connect
to the router.
57D-Link DWR-978 User Manual
Page 62

Section 4 - Connecting to a Wireless Network
5. Enter the same security key or passphrase (Wi-Fi password) that is on
your router and click Connect. You can also connect by pushing the
WPS button on the router.
It may take 20-30 seconds to connect to the wireless network. If the
connection fails, please verify that the security settings are correct. The
key or passphrase must be exactly the same as the one on the wireless
router.
58D-Link DWR-978 User Manual
Page 63

Section 4 - Connecting to a Wireless Network
WPS
The WPS feature of the DWR-978 can be congured using Windows® 7. Carry out the following steps to use Windows® 7 to
congure the WPS feature:
1. Click the Start button and select Computer from the Start menu.
2. Click Network on the left side.
59D-Link DWR-978 User Manual
Page 64

Section 4 - Connecting to a Wireless Network
3. Double-click the DWR-978.
4. Input the WPS PIN number (on the router label) in the Setup > Wireless
Setup menu in the Router’s Web UI) and click Next.
60D-Link DWR-978 User Manual
Page 65

Section 4 - Connecting to a Wireless Network
5. Type a name to identify the network.
6. To congure advanced settings, click the
Click Next to continue.
icon.
61D-Link DWR-978 User Manual
Page 66

Section 4 - Connecting to a Wireless Network
7. The following window appears while the router is being congured.
Wait for the conguration to complete.
8. The following window informs you that WPS on the router has been
set up successfully.
Make a note of the security key as you may need to provide this security
key if adding an older wireless device to the network in the future.
9. Click Close to complete WPS setup.
62D-Link DWR-978 User Manual
Page 67

Section 4 - Connecting to a Wireless Network
Windows Vista®
Windows Vista® users may use the built-in wireless utility. If you are using another company’s wireless utility, please refer to the
user manual of your wireless adapter for help connecting to a wireless network. Most wireless utilities will have a “site survey”
option similar to the Windows Vista® utility as seen below.
If you receive the Wireless Networks Detected bubble, click on the
center of the bubble to access the utility.
or
Right-click on the wireless computer icon in your system tray (lower-right
corner next to the time). Select Connect to a network.
The utility will display any available wireless networks in your area. Click
on a network (displayed using the SSID) and click the Connect button.
If you get a good signal but cannot access the Internet, check you
TCP/IP settings for your wireless adapter. Refer to the Networking Basics
section in this manual for more information.
63D-Link DWR-978 User Manual
Page 68

Section 4 - Connecting to a Wireless Network
WPA/WPA2
It is recommended that you enable wireless security (WPA/WPA2) on your wireless router or access point before conguring
your wireless adapter. If you are joining an existing network, you will need to know the security key or passphrase being used.
1. Open the Windows Vista® Wireless Utility by right-clicking on the
wireless computer icon in your system tray (lower right corner of
screen). Select Connect to a network.
2. Highlight the Wi-Fi name (SSID) you would like to connect to and
click Connect.
64D-Link DWR-978 User Manual
Page 69

Section 4 - Connecting to a Wireless Network
3. Enter the same security key or passphrase (Wi-Fi password) that is on
your router and click Connect.
It may take 20-30 seconds to connect to the wireless network. If the
connection fails, please verify that the security settings are correct. The
key or passphrase must be exactly the same as the one on the wireless
router.
65D-Link DWR-978 User Manual
Page 70

Section 4 - Connecting to a Wireless Network
Windows® XP
Windows® XP users may use the built-in wireless utility (Zero Conguration Utility). The following instructions are for Service
Pack 2 users. If you are using another company’s utility, please refer to the user manual of your wireless adapter for help with
connecting to a wireless network. Most utilities will have a “site survey” option similar to the Windows® XP utility as seen below.
If you receive the Wireless Networks Detected bubble, click on the
center of the bubble to access the utility.
or
Right-click on the wireless computer icon in your system tray (lower-right
corner next to the time). Select View Available Wireless Networks.
The utility will display any available wireless networks in your area. Click
on a Wi-Fi network (displayed using the SSID) and click the Connect
button.
If you get a good signal but cannot access the Internet, check you
TCP/IP settings for your wireless adapter. Refer to the Networking Basics
section in this manual for more information.
66D-Link DWR-978 User Manual
Page 71

Section 4 - Connecting to a Wireless Network
WPA/WPA2
It is recommended to enable WPA on your wireless router or access point before conguring your wireless adapter. If you are
joining an existing network, you will need to know the WPA key being used.
1. Open the Windows® XP Wireless Utility by right-clicking on the wireless
computer icon in your system tray (lower-right corner of screen). Select
View Available Wireless Networks.
2. Highlight the Wi-Fi network (SSID) you would like to connect to and
click Connect.
67D-Link DWR-978 User Manual
Page 72

Section 4 - Connecting to a Wireless Network
3. The Wireless Network Connection box will appear. Enter the WPA-
PSK Wi-Fi password and click Connect.
It may take 20-30 seconds to connect to the wireless network. If the
connection fails, please verify that the WPA-PSK settings are correct. The
Wi-Fi password must be exactly the same as on the wireless router.
68D-Link DWR-978 User Manual
Page 73

Section 5 - Troubleshooting
Troubleshooting
This chapter provides solutions to problems that can occur during the installation and operation of the DWR-978. Read the
following descriptions if you are having problems. The examples below are illustrated in Windows® XP. If you have a dierent
operating system, the screenshots on your computer will look similar to these examples.
1. Why can’t I access the web-based conguration utility?
When entering the IP address of the D-Link router (192.168.0.1 for example), you are not connecting to a website, nor do you
have to be connected to the Internet. The device has the utility built-in to a ROM chip in the device itself. Your computer must
be on the same IP subnet to connect to the web-based utility.
• Make sure you have an updated Java-enabled web browser. We recommend the following:
- Microsoft Internet Explorer® 7 or higher
- Mozilla Firefox 3.5 or higher
- Google™ Chrome 8 or higher
- Apple Safari 4 or higher
• Verify physical connectivity by checking for solid link lights on the device. If you do not get a solid link light, try using a
dierent cable, or connect to a dierent port on the device if possible. If the computer is turned o, the link light may not
be on.
• Disable any Internet security software running on the computer. Software rewalls such as ZoneAlarm, BlackICE, Sygate,
®
Norton Personal Firewall, and Windows
with your rewall software for more information on disabling or conguring it.
XP rewall may block access to the conguration pages. Check the help les included
69D-Link DWR-978 User Manual
Page 74

Section 5 - Troubleshooting
• Congure your Internet settings:
• Go to Start > Settings > Control Panel. Double-click the Internet Options Icon. From the Security tab, click
the button to restore the settings to their defaults.
• Click the Connection tab and set the dial-up option to Never Dial a Connection. Click the LAN Settings button.
Make sure nothing is checked. Click OK.
• Go to the Advanced tab and click the button to restore these settings to their defaults. Click OK three times.
• Close your web browser (if open) and open it.
• Access the web management. Open your web browser and enter the IP address of your D-Link router in the address bar. This
should open the login page for your web management.
• If you still cannot access the conguration, unplug the power to the router for 10 seconds and plug back in. Wait about 30
seconds and try accessing the conguration. If you have multiple computers, try connecting using a dierent computer.
2. What can I do if I forgot my password?
If you forgot your password, you must reset your router. This process will change all your settings back to the factory defaults.
To reset the router, locate the reset button (hole) on the rear panel of the unit. With the router powered on, use a paperclip
to hold the button down for 10 seconds. Release the button and the router will go through its reboot process. Wait about 30
seconds to access the router. The default IP address is 192.168.0.1. When logging in, leave the password box empty.
70D-Link DWR-978 User Manual
Page 75

Section 5 - Troubleshooting
3. Why can’t I connect to certain sites or send and receive emails when connecting through my router?
If you are having a problem sending or receiving email, or connecting to secure sites such as eBay, banking sites, and Hotmail,
we suggest lowering the MTU in increments of ten (Ex. 1492, 1482, 1472, etc).
To nd the proper MTU Size, you’ll have to do a special ping of the destination you’re trying to go to. A destination could be
another computer, or a URL.
• Click on Start and then click Run.
• Windows® 95, 98, and Me users type in command (Windows® NT, 2000, XP, Vista®, and 7 users type in cmd) and
press Enter (or click OK).
• Once the window opens, you’ll need to do a special ping. Use the following syntax:
ping [url] [-f] [-l] [MTU value]
Example: ping yahoo.com -f -l 1472
71D-Link DWR-978 User Manual
Page 76

Section 5 - Troubleshooting
You should start at 1472 and work your way down by 10 each time. Once you get a reply, go up by 2 until you get a fragmented
packet. Take that value and add 28 to the value to account for the various TCP/IP headers. For example, lets say that 1452 was the
proper value, the actual MTU size would be 1480, which is the optimum for the network we’re working with (1452+28=1480).
Once you nd your MTU, you can now congure your router with the proper MTU size.
To change the MTU rate on your router follow the steps below:
• Navigate to the conguration page.
• To change the MTU, enter the number in the MTU eld and click Apply to save your settings.
• Test your email. If changing the MTU does not resolve the problem, continue changing the MTU in increments
of ten.
72D-Link DWR-978 User Manual
Page 77

Appendix A - Wireless Basics
Wireless Basics
D-Link wireless products are based on industry standards to provide easy-to-use and compatible high-speed wireless
connectivity within your home, business, or public access wireless networks. Strictly adhering to the IEEE standard, the D-Link
wireless family of products will allow you to access the data you want, when, and where you want it. You will be able to enjoy
the freedom that wireless networking delivers.
A wireless local area network (WLAN) is a cellular computer network that transmits and receives data with radio signals instead
of wires. Wireless LANs are used increasingly in both home and oce environments, and public areas such as airports, coee
shops and universities. Innovative ways to utilize WLAN technology are helping people work, and communicate more eciently.
Increased mobility and the absence of cabling and other xed infrastructure have proven to be benecial for many users.
Wireless users can use the same applications they use on a wired network. Wireless adapter cards used on laptop and desktop
systems support the same protocols as Ethernet adapter cards.
Under many circumstances, it may be desirable for mobile network devices to link to a conventional Ethernet LAN in order to
use servers, printers or an Internet connection supplied through the wired LAN. A wireless router is a device used to provide
this link.
73D-Link DWR-978 User Manual
Page 78

Appendix A - Wireless Basics
What is Wireless?
Wireless or Wi-Fi technology is another way of connecting your computer to the network without using wires. Wi-Fi uses radio
frequency to connect wirelessly so you have the freedom to connect computers anywhere in your home or oce network.
Why D-Link Wireless?
D-Link is the worldwide leader and award winning designer, developer, and manufacturer of networking products. D-Link
delivers the performance you need at a price you can aord. D-Link has all the products you need to build your network.
How does wireless work?
Wireless works similarly to how cordless phones work, through radio signals that transmit data from one point A to point B.
But wireless technology has restrictions as to how you can access the network. You must be within the wireless network range
area to be able to connect your computer. There are two dierent types of wireless networks: Wireless Local Area Network
(WLAN), and Wireless Personal Area Network (WPAN).
Wireless Local Area Network (WLAN)
In a wireless local area network, a device called an Access Point (AP) connects computers to the network. The access point
has a small antenna attached to it, which allows it to transmit data back and forth over radio signals. With an indoor access
point the signal can travel up to 300 feet. With an outdoor access point the signal can reach out up to 30 miles to serve places
like manufacturing plants, industrial locations, university and high school campuses, airports, golf courses, and many other
outdoor venues.
74D-Link DWR-978 User Manual
Page 79

Appendix A - Wireless Basics
Wireless Personal Area Network (WPAN)
Bluetooth is the industry standard wireless technology used for WPAN. Bluetooth devices in WPAN operate in a range up to
30 feet away.
Compared to WLAN, the speed and wireless operation range are both less than WLAN, but in return it doesn’t use nearly as
much power. This makes it ideal for personal devices, such as mobile phones, PDAs, headphones, laptops, speakers, and other
devices that operate on batteries.
Who uses wireless?
Wireless technology as become so popular in recent years that almost everyone is using it, whether it’s for home, oce, business,
D-Link has a wireless solution for it.
Home Uses/Benets
• Gives everyone at home broadband access
• Surf the web, check email, instant message, etc.
• Gets rid of the cables around the house
• Simple and easy to use
Small Oce and Home Oce Uses/Benets
• Stay on top of everything at home as you would at oce
• Remotely access your oce network from home
• Share Internet connection and printer with multiple computers
• No need to dedicate oce space
75D-Link DWR-978 User Manual
Page 80

Appendix A - Wireless Basics
Where is wireless used?
Wireless technology is expanding everywhere, not just at home or oce. People like the freedom of mobility and it’s becoming
so popular that more and more public facilities now provide wireless access to attract people. The wireless connection in public
places is usually called “hotspots”.
Using a D-Link CardBus Adapter with your laptop, you can access the hotspot to connect to the Internet from remote locations
like: airports, hotels, coee shops, libraries restaurants, and convention centers.
Wireless network is easy to setup, but if you’re installing it for the rst time it could be quite a task not knowing where to start.
That’s why we’ve put together a few setup steps and tips to help you through the process of setting up a wireless network.
Tips
Here are a few things to keep in mind, when you install a wireless network.
Centralize your router or access point
Make sure you place the router/access point in a centralized location within your network for the best performance. Try to
place the router/access point as high as possible in the room, so the signal gets dispersed throughout your home. If you have
a two-story home, you may need a repeater to boost the signal to extend the range.
Eliminate interference
Place home appliances such as cordless telephones, microwaves, and televisions as far away as possible from the router/access
point. This would signicantly reduce any interference that the appliances might cause since they operate on same frequency.
76D-Link DWR-978 User Manual
Page 81

Appendix A - Wireless Basics
Security
Turn on WPA2 encryption on the router to help protect your wireless network from unwanted access by people close to your
network, such as neighbors or intruders. Refer to the product manual for detailed information on how to set it up.
There are basically two modes of networking:
• Infrastructure – All wireless clients will connect to an access point or wireless router.
• Ad hoc – Directly connecting to another computer for peer-to-peer communication using wireless network
adapters on each computer, such as two or more wireless network adapters.
An Infrastructure network contains an access point or wireless router. All the wireless devices, or clients, will connect to the
wireless router or access point.
An ad hoc network contains only clients, such as laptops with wireless adapters. All the adapters must be in ad hoc mode to
communicate.
Wireless Modes
77D-Link DWR-978 User Manual
Page 82

Appendix B - Networking Basics
Networking Basics
Check your IP address
After you install your new D-Link adapter, by default, the TCP/IP settings should be set to obtain an IP address from a DHCP
server (i.e. wireless router) automatically. To verify your IP address, please follow the steps below.
Click on Start > Run. In the run box type cmd and click OK. (Windows® 10/7/Vista® users type cmd in the Start Search box.)
At the prompt, type ipcong and press Enter.
This will display the IP address, subnet mask, and the
default gateway of your adapter.
If the address is 0.0.0.0, check your adapter installation,
security settings, and the settings on your router.
Some rewall software programs may block a DHCP
request on newly installed adapters.
78D-Link DWR-978 User Manual
Page 83

Appendix B - Networking Basics
Statically Assign an IP address
If you are not using a DHCP capable gateway/router, or you need to assign a static IP address, please follow the steps below:
Step 1
Windows® 7 - Click on Start > Control Panel > Network and Internet > Network and Sharing Center.
Windows Vista® - Click on Start > Control Panel > Network and Internet > Network and Sharing Center > Manage Network
Connections.
Windows® XP - Click on Start > Control Panel > Network Connections.
Windows® 2000 - From the desktop, right-click My Network Places > Properties.
Step 2
Right-click on the Local Area Connection which represents your network adapter and select Properties.
Step 3
Highlight Internet Protocol Version 4 (TCP/IPv4) and click Properties.
Step 4
Click Use the following IP address and enter an IP address that is on the same subnet as
your network or the LAN IP address on your router.
Example: If the router´s LAN IP address is 192.168.0.1, make your IP address 192.168.1.X
where X is a number between 2 and 99. Make sure that the number you choose is not in
use on the network. Set the Default Gateway the same as the LAN IP address of your router
(I.E. 192.168.0.1).
Set Primary DNS the same as the LAN IP address of your router (192.168.0.1). The Alternate
DNS is not needed or you may enter a DNS server from your ISP.
Step 5
Click OK twice to save your settings.
79D-Link DWR-978 User Manual
Page 84

Appendix B - Networking Basics
Wireless Security
This section will show you the dierent levels of security you can use to help protect your data from intruders. The DWR-978 oers the
following types of security:
• WPA2 (Wi-Fi Protected Access 2) • WPA2-PSK (Pre-Shared Key)
• WPA (Wi-Fi Protected Access) • WPA-PSK (Pre-Shared Key)
What is WPA?
WPA (Wi-Fi Protected Access), is a Wi-Fi standard that was designed to improve the security features of WEP (Wired Equivalent Privacy).
The 2 major improvements over WEP:
• Improved data encryption through the Temporal Key Integrity Protocol (TKIP). TKIP scrambles the keys using a hashing
algorithm and by adding an integrity-checking feature. WPA2 is based on 802.11i and uses Advanced Encryption Standard
(AES) instead of TKIP.
• User authentication, which is generally missing in WEP, which is encorporated through the extensible authentication
protocol (EAP). WEP regulates access to a wireless network based on a computer’s hardware-specic MAC address, which
is relatively simple to be snied out and stolen. EAP is built on a stronger public-key encryption system so that only
authorized network users should be able to access the network.
WPA-PSK/WPA2-PSK uses a passphrase or key to authenticate your wireless connection. The key is an alpha-numeric password between
8 and 63 characters long. The password can include symbols (!?*&_) and spaces. This key must be the exact same key entered on your
wireless router or access point. This is the technique typically used on home networks.
WPA/WPA2 incorporates user authentication through the Extensible Authentication Protocol (EAP). EAP is built on an even stronger key
encryption system to make it much more dicult for unauthorized network users to access the network. EAP is often used in corporate
or university environments.
80D-Link DWR-978 User Manual
Page 85

Appendix C - Technical Specications
General
Device Interfaces 4 x 10/100/1000 Gigabit Ethernet LAN Ports, 1 x 10/100/1000 Mbps Gigabit Ethernet WAN port,
LED Power, WAN, WLAN, Phone, LAN, 3G, 4G, LTE 5GNR
Antenna Type 2 x 2.4G WLAN Internal Antenna, 2 x 5G WLAN Internal Antenna, 2 x 2 LTE External Antenna, 2 x 2 LTE Internal Antenna
Wi-Fi Data Rate 2.4 GHz Up to 1732Mbps, 5 GHz Up to 800Mbps
Wireless IEEE Standard IEEE 802.11 ac/n/g/b/k/v/r
Data Signal Rate 5G NR/LTE to GE LAN max data rate up to 900Mbps, 5G NR/LTE to 2.4G WLAN max data
WAN Interface DHCP, Static IP, PPPoE (PPPoE Pass-through), PPTP, L2TP, IPsec (VPN Pass-through), DS-Lite, Support Dual Access
Functionality
Security Protocol WEP (128bits), 802.11i 128-bit TKIP/AES
Firewall DoS , Stateful Packet Inspection , Anti-spoofing Checking, IP/MAC Address Filtering , DMZ
Mesh D-Link EasyMesh
QoS D-Link Intelligent QoS Technology
SpeedTest Ookla SpeedTest
Software
Device Management
Physical
Hardware version A1
Size 234.5 x 245 x 55.25 mm (9.23 x 9.64 x 2.18 in)
Weight 920 g (2.03 lbs)
Power Input 12 V 4 A
Operating Temperature 0 to 40 °C (32 to 104 °F)
Storage Temperature -10 to 70 °C (14 to 158 °F)
Operating Humidity 10% to 90% non-condensing
Storage Humidity 5% to 95% non-condensing
Certifications CE , FCC , PTCRB, EMC, Safety , RoHS
Technical Specications
1 x USB 2.0 Port, 1 x LTE SIM/USIM Slot, 1 x Reset Button, 1 x WPS Button, 1 x Power Port
rate up to 500Mbps, 5G NR/LTE to 5Ghz WLAN max data rate up to 600Mbps, 2.4Ghz WLAN
to GE LAN max up to 600Mbps, 5Ghz WLAN to GE LAN max up to 1Gbps
PPPoE, L2TP, PPTP for Russia, Support 802.1p & 802.1p VLAN tagging and Priority bit, Concurrent session: 32000
Mobile app (iOS and Android), Web UI
81D-Link DWR-978 User Manual
Page 86

Appendix C - Technical Specications
Bandwidth
5GNR Sub6Ghz n1, n2, n3, n5, n7, n8, n12, n20, n28, n41, n66, n71,n77,n78, n79
LTE Cat20 FDD B1, B2, B3, B4, B5, B7, B8, B12, B13, B14, B17, B18, B19, B20, B25, B26, B28, B29, B30, B32, B66, B71
LTE Cat20 TDD B34, B38, B39, B40, B41, B42, B43, B46, B48
WCDMA B1, B2, B3/9, B4, B5/6/19, B8
1
Mobile broadband speeds will vary and are dependent on a range of factors including network conguration, network capacity, signal strength, and the conditions of your mobile broadband subscription. 2Maximum wireless signal rate derived from IEEE Standard 802.11 specications. Actual
data throughput will vary. Network conditions and environmental factors, including volume of network trac, building materials and construction, as well as network overhead, can lower actual data throughput rate. Environmental factors will adversely aect wireless signal range.
3
Requires subscription with a mobile Internet service provider (not included).
82D-Link DWR-978 User Manual
Page 87

Appendix D - Regulatory Information
Regulatory Information
Federal Communication Commission Interference Statement
This equipment has been tested and found to comply with the limits for a Class B digital device, pursuant to Part 15 of the FCC Rules. These limits
are designed to provide reasonable protection against harmful interference in a residential installation. This equipment generates, uses and
can radiate radio frequency energy and, if not installed and used in accordance with the instructions, may cause harmful interference to radio
communications. However, there is no guarantee that interference will not occur in a particular installation. If this equipment does cause harmful
interference to radio or television reception, which can be determined by turning the equipment o and on, the user is encouraged to try to
correct the interference by one of the following measures:
—Reorient or relocate the receiving antenna.
—Increase the separation between the equipment and receiver.
—Connect the equipment into an outlet on a circuit dierent from that to which the receiver is connected.
—Consult the dealer or an experienced radio/TV technician for help.
Non-modication Statement:
Any changes or modications not expressly approved by the party responsible for compliance could void the user’s authority to operate this
equipment.
Caution:
This device complies with Part 15 of the FCC Rules. Operation is subject to the following two conditions:
(1) This device may not cause harmful interference, and (2) this device must accept any interference received, including interference that
may cause undesired operation.
For product available in the USA/Canada market, only channel 1~11 can be operated. Selection of other channels is not possible.
Note:
The country code selection is for non-USA models only and is not available to all USA models. Per FCC regulations, all WiFi product marketed in
the USA must be xed to USA operational channels only.
83D-Link DWR-978 User Manual
Page 88

Appendix D - Regulatory Information
Important Notice:
FCC Radiation Exposure Statement
This equipment complies with FCC radiation exposure limits set forth for an uncontrolled environment. This equipment should be installed and
operated with minimum distance 20 cm between the radiator and your body.
84D-Link DWR-978 User Manual
 Loading...