


Table of Contents
Important Safety Instructions ......................... |
vii |
Introduction ........................................................ |
1 |
WELCOME ................................................................... |
2 |
HOW TO USE THIS USER GUIDE ................................... |
2 |
ABOUT YOUR DISH NETWORK ACCOUNT .................... |
4 |
WATCHING TV NOW .................................................... |
5 |
ADDITIONAL SERVICES ................................................ |
7 |
ABOUT SATELLITE TV RECEPTION ............................... |
7 |
WHY CONNECT TO A PHONE LINE OR BROADBAND ...... |
8 |
MOVING ON-SCREEN LOGO ......................................... |
8 |
TIPS ............................................................................ |
9 |
QUESTIONS ................................................................. |
9 |
Notes ........................................................................................ |
10 |
Receiver & Remote Controls ........................... |
11 |
SATELLITE RECEIVER OVERVIEW ............................... |
12 |
DUAL AND SINGLE MODES ........................................ |
12 |
REMOTE CONTROL .................................................... |
15 |
SATELLITE RECEIVER FRONT PANEL .......................... |
21 |
i

Table of Contents
SATELLITE RECEIVER BACK PANEL ........................... |
21 |
USING THE ON-SCREEN MENUS ................................. |
22 |
USING TEXT FIELDS .................................................. |
23 |
QUESTIONS ............................................................... |
24 |
TIPS .......................................................................... |
24 |
Finding Programs to Watch ............................ |
25 |
CHANGING CHANNELS ............................................... |
26 |
USING THE PROGRAM GUIDE ..................................... |
26 |
USING THE BROWSE BANNER .................................... |
28 |
USING THEMES AND SEARCH ..................................... |
29 |
USING PICTURE-IN-PICTURE ...................................... |
31 |
TIPS .......................................................................... |
31 |
QUESTIONS ............................................................... |
31 |
Pay-Per-Programs ............................................ |
33 |
PAY-PER-VIEW ......................................................... |
34 |
DISH ON DEMAND .................................................... |
34 |
DISHONLINE ............................................................ |
35 |
CONSIDERATIONS ...................................................... |
36 |
TIPS .......................................................................... |
37 |
QUESTIONS ............................................................... |
37 |
NOTES ...................................................................... |
38 |
Favorites Lists .................................................. |
39 |
WHAT ARE FAVORITES LISTS? .................................. |
40 |
CREATING OR CHANGING FAVORITES LISTS ............... |
41 |
NAMING FAVORITES LISTS ......................................... |
41 |
USING FAVORITES LISTS ........................................... |
41 |
TIPS .......................................................................... |
42 |
QUESTIONS ............................................................... |
42 |
ii

Table of Contents
Locks ................................................................. |
43 |
WHAT ARE LOCKS? .................................................. |
44 |
CREATING OR CHANGING A PASSWORD ..................... |
45 |
LOCKING AND UNLOCKING YOUR RECEIVER ............... |
45 |
CREATING OR CHANGING RATINGS LOCKS ................ |
46 |
CREATING OR CHANGING CHANNEL LOCKS ............... |
47 |
LOCKING OR UNLOCKING PAY-PER-VIEW CHANNELS .48 |
|
HIDING ADULT CONTENT OR LOCKED CHANNELS ....... |
48 |
LOCKING OR UNLOCKING THE FRONT PANEL ............. |
49 |
TIPS .......................................................................... |
49 |
QUESTIONS ............................................................... |
50 |
Interactive TV .................................................... |
51 |
DISHHOME INTERACTIVE TV .................................... |
52 |
CUSTOMER SERVICE ................................................. |
52 |
TIPS .......................................................................... |
52 |
Digital Video Recording ................................... |
53 |
WHAT IS DVR? ......................................................... |
54 |
PAUSING A PROGRAM ............................................... |
54 |
REVERSE, FAST FORWARD, AND SKIP ....................... |
55 |
SLOW MOTION AND FRAME-BY-FRAME ...................... |
55 |
RECORDING A LIVE PROGRAM ................................... |
56 |
PLAYING A RECORDED PROGRAM .............................. |
56 |
USING RECORD PLUS ................................................ |
56 |
USING RECORD LINK ................................................. |
57 |
RECORDING WHILE WATCHING DIFFERENT PROGRAMS 57 |
|
RECORDING OPTIONS ................................................ |
60 |
GROUPING AND SORTING RECORDED PROGRAMS ...... |
60 |
TIPS .......................................................................... |
60 |
QUESTIONS ............................................................... |
60 |
iii

Table of Contents
Record Future Programs ................................. |
61 |
TIMERS AND RECORDINGS ......................................... |
62 |
USING THE TIMERS LIST ............................................ |
65 |
USING THE DAILY SCHEDULE ..................................... |
65 |
SETTING UP AN AUTOMATIC TIMER ............................ |
66 |
SETTING UP A MANUAL TIMER ................................... |
66 |
SETTING UP A DISHPASS™ TIMER ........................... |
67 |
DELETING A TIMER .................................................... |
68 |
TIPS .......................................................................... |
69 |
QUESTIONS ............................................................... |
69 |
Notes ........................................................................................ |
70 |
Remote Control Setup ..................................... |
71 |
IMPROVING RECEIVER CONTROL ................................ |
72 |
CONTROLLING OTHER COMPONENTS ......................... |
76 |
THE RECOVER BUTTON ............................................. |
86 |
SENDING DISCRETE POWER ON AND OFF .................. |
87 |
TIPS .......................................................................... |
88 |
QUESTIONS ............................................................... |
88 |
Receiver Customization .................................. |
89 |
USING SHARED VIEW ................................................ |
90 |
MODULATOR SETUP .................................................. |
90 |
USING MULTIMEDIA ................................................... |
91 |
USING CALLER ID ..................................................... |
94 |
CUSTOMIZING THE GUIDE AND CHANNEL LISTS .......... |
95 |
CHANGING LANGUAGES ............................................. |
98 |
USING CLOSED CAPTIONING ...................................... |
99 |
USING DOLBY® DIGITAL SURROUND SOUND ............ |
100 |
RESETTING TO FACTORY DEFAULTS ........................ |
101 |
SCHEDULING RECEIVER UPDATES ............................ |
101 |
INACTIVITY STANDBY ............................................... |
102 |
iv

Table of Contents
TIPS ........................................................................ |
102 |
QUESTIONS ............................................................. |
102 |
Connections and Setup ................................. |
103 |
CONNECTING TO THE NEARBY TV (TV1) .................. |
104 |
CONNECTING TO THE REMOTE TVS (TV1 OR TV2) ... |
107 |
CONNECTING TO YOUR DISH ANTENNA .................... |
111 |
CONNECTING THE PHONE LINE ................................ |
112 |
CONNECTING A BROADBAND INTERNET CONNECTION 113 |
|
CONNECTING USING DISHCOMM ............................ |
114 |
CONNECTING A VCR TO THE REMOTE TV ................ |
116 |
CONNECTING AN OVER-THE-AIR ANTENNA ............... |
117 |
USING TROUBLESHOOTING TOOLS ........................... |
122 |
Notes ...................................................................................... |
124 |
Reference ........................................................ |
125 |
TROUBLESHOOTING TABLES .................................... |
126 |
REMOTE CONTROL DEVICE CODES .......................... |
137 |
Appendix ......................................................... |
143 |
RESIDENTIAL CUSTOMER AGREEMENT ..................... |
146 |
STAYING LEGAL ...................................................... |
151 |
FCC COMPLIANCE .................................................. |
152 |
v

Table of Contents
vi

Important Safety Instructions
1Read these instructions.
2Keep these instructions.
3Heed all warnings.
4Follow all instructions.
5Do not use this apparatus near water.
6Clean only with a dry cloth.
7Do not block any ventilation openings. Install in accordance with the manufacturer’s instructions.
8Do not install near any heat sources such as radiators, heat registers, stoves, or other apparatus (including amplifiers) that produce heat.
9Do not defeat the safety purpose of the polarized or grounding-type plug. A polarized plug has two blades with one wider than the other. A grounding-type plug has two blades and a third grounding prong. The wide blade or the third prong are provided for your safety. If the provided plug does not fit into your outlet, consult an electrician for replacement of the obsolete outlet.
10Protect the power cord from being walked on or pinched, particularly at plugs, convenience receptacles, and the point where they exit from the apparatus.
11Use only attachments/accessories specified by the manufacturer.
12Unplug this apparatus during lightning storms or when unused for long periods of time.
13Refer all servicing to qualified service personnel. Servicing is required when the apparatus has been damaged in any way, such as the power supply cord or plug is damaged, liquid has been spilled or objects have fallen into the apparatus, the apparatus has been exposed to rain or moisture, does not operate normally, or has been dropped.
Apparatus shall not be exposed to dripping or splashing and no objects filled with liquids, such as vases, shall be placed on the apparatus.
vii

Safety
Note to Satellite TV System Installer: This reminder is provided to call the satellite TV system installer’s attention to Article 820-40 of the National Electrical Code (NEC) that provides guidelines for proper grounding and, in particular, specifies that the cable ground shall be connected to the grounding system of the building as
close to the point of cable entry as practical.
Ground Clamp
Antenna Discharge
Unit
Grounding Conductors
(NEC Section 810-21)
Satellite Dish |
Coaxial Cable from Satellite Dish
Electric Service Equipment
Ground Clamps
Power Service Grounding
Electrode System
(NEC Art. 250, Part H)
•Operate the receiver using only the type of power source indicated on the marking label. Unplug the receiver power cord by gripping the power plug, not the cord. The power plug must be readily accessible so that the equipment can be easily disconnected from the AC power.
•Do not overload wall outlets or extension cords; this can result in a risk of fire or electrical shock.
•Never insert objects of any kind into the receiver through openings, as the objects may touch dangerous voltage points or short out parts. This could cause fire or electrical shock.
•Do not locate the antenna near overhead light or power circuits, or where it can fall into such power lines or circuits. When installing the antenna, take extreme care to avoid touching such power lines or circuits, as contact with them can be fatal.
•Do not attempt to service the receiver yourself, as opening or removing covers may expose you to dangerous voltage, and will void the Limited Warranty. Refer all servicing to authorized service personnel.
Proper Care of Your Equipment
•Always handle the satellite receiver carefully. Excessive shock and vibration can damage the hard drive.
•Unplug the receiver from the AC power outlet before cleaning.
•Always turn the receiver off, unplug it and let it sit for at least 30 seconds before moving it.
•The use of accessories or attachments not recommended by the receiver manufacturer will void the Limited Warranty.
•Do not place the receiver in an enclosure (such as a cabinet) without proper ventilation.
•Do not stack the receiver on top of or below other electronic devices as this can cause heat build-up and vibration.
•Do not install the receiver in any area where the temperature can be less than 40°F or more than 113°F. If the receiver is cold to the touch, do not plug it in immediately. Let it sit unplugged at room temperature for at least 45 minutes before plugging it in.
•Use an outlet that contains surge suppression or ground fault protection. During an electrical storm or when the receiver is left unattended and unused for long periods of time, unplug the power cord from the wall outlet, disconnect the lines between the receiver and the antenna, and disconnect the telephone line. This will provide additional protection against damage caused by lightning or power line surges.
On some TVs, the presence of fixed images for extended periods of time may cause them to be permanently imprinted on the screen. Consult your TV user guide for information on whether this is a problem for your TV, what operating/viewing restrictions apply to avoid this problem, and associated TV warranty coverage.
viii

Introduction
Introduction to DISH Network Services
What you’ll find in this chapter:
•WELCOME
•HOW TO USE THIS USER GUIDE
•ABOUT YOUR DISH NETWORK ACCOUNT
•WATCHING TV NOW
•ADDITIONAL SERVICES
•ABOUT SATELLITE TV RECEPTION
•WHY CONNECT TO A PHONE LINE OR BROADBAND
•MOVING ON-SCREEN LOGO
1

Chapter 1
Welcome
WELCOME
Thank you for choosing DISH Network. You are about to experience the excitement and convenience of our Direct Broadcast Satellite (DBS) service, which delivers the very best picture and sound quality. DISH Network consistently provides the latest products and satellite-delivered services—with high performance, ease of operation, and a wide variety of entertainment options.
Your new DISH Network Digital Video Recorder (DVR) receiver has two built-in satellite tuners for record and playback in standard or high definition. In addition, an optional over- the-air tuner module is also available. After installing this optional module (see “Over-the- Air Module Installation Instructions”), you can watch and record programs on channels received over the air, selecting them from the Program Guide much the same way you do with satellite channels. Additionally, the DVR features and a host of other functions make your new receiver one of the most versatile and exciting devices in home entertainment.
This satellite receiver lets you decide how you watch TV. You can record and play back audio and video with full digital quality. You can pause a live program and not miss any of the action, or you can record a program to watch later without a VCR.
HOW TO USE THIS USER GUIDE
This section explains how the user guide is divided and the conventions used throughout.
Guide Overview
The information in this guide is separated into several chapters to make it easy for you to find exactly what you’re looking for:
•Chapter 1: Introduction gives you a brief overview of DISH Network and your new receiver.
•Chapter 2: Receiver & Remote Controls explains the basic features of your system and how to use the remote controls, front panel buttons, and back panel connections.
•Chapter 3: Finding Programs to Watch describes how to change channels and look for programs.
•Chapter 4: Pay-Per-Programs shows you how to order and watch Pay-Per-View and DISH On Demand programs.
•Chapter 5: Favorites Lists explains how to create, name, and use favorites lists.
•Chapter 6: Locks explains how to set locks and passwords.
•Chapter 7: Interactive TV describes how to use the DishHOME Interactive TV features of your satellite TV system.
•Chapter 8: Digital Video Recording explains how to use the recording features of your satellite TV receiver to maximize your viewing pleasure.
•Chapter 9: Record Future Programs shows you how you can record and play back your favorite programs when you want to watch them.
•Chapter 10: Remote Control Setup contains instructions for programming your remote to control your satellite receiver and equipment like a TV or VCR.
•Chapter 11: Receiver Customization shows you how to customize your receiver.
•Chapter 12: Connections and Setup explains how to connect your satellite receiver to your TV and equipment like a VCR.
2
Introduction
How to Use this User Guide
Guide Conventions
•The names of remote control buttons are all uppercase. Example: Press SAT.
•Select means to move the highlight to an on-screen option or choice in a list and press SELECT on the remote control.
Example: Select the Locks option.
•This guide uses HD for high definition and SD for standard definition.
•Where this guide mentions nearby TV, it is referring to TV1, the TV nearest the receiver. The nearby TV receives TV1 menus and programming from the receiver’s TV1 outputs and is connected using short audio/video cables.
•Where this guide mentions remote TV, it is referring to TV2, the cable-ready TV(s) located in a room away from the receiver. The remote TV receives TV2 menus and programming from the receiver’s TV2 outputs through your in-home cable system.
•Where this guide mentions remote control, it refers to either Remote Control 1 when viewing a nearby TV or Remote Control 2 when viewing the remote TV(s). If a specific remote control must be used, this guide will refer directly to Remote Control 1 or Remote Control 2.
•The instructions in this guide are shown in two ways:
–Instructions in the form of pictures are handy if you’d like to learn something quickly. These instructions are numbered left to right as shown in the sample below.
–Instructions that are written out are helpful if you’d like to learn more details.
3
Chapter 1
About Your DISH Network Account
ABOUT YOUR DISH NETWORK ACCOUNT
This section describes how to order your packages and provides information on how to find information about your DISH Network account.
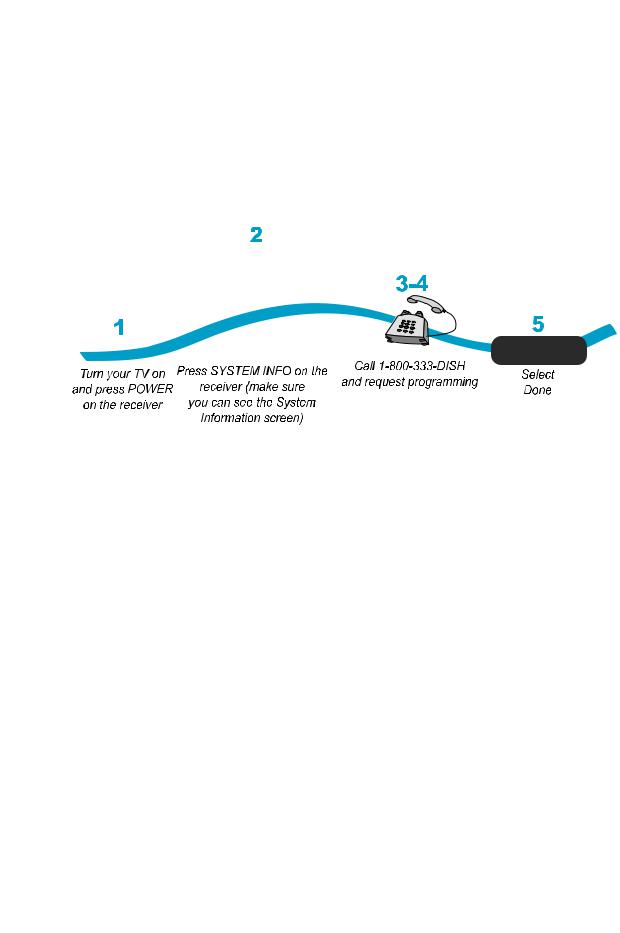
Ordering Your Programming Packages
Before you can enjoy your new receiver, order your programming packages.
1Press POWER on the front panel to turn on the receiver.
2Press SYSTEM INFO on the front panel to display the receiver’s System Information menu on the nearby TV screen.
3Call 1-800-333-DISH (3474) and tell the Customer Service Center the system has been installed and you would like to begin receiving services. A representative will explain the available program packages. Give the representative information from the System Information screen, as requested.
4Your services will be turned on via the satellite signal. This process usually takes just a few minutes.
5Select Done.
Where to Find Information on Your Account
If you want to know about charges to your DISH Network account or if you would like to make changes to your programming packages, be sure to have your account information handy and choose one of the following:
•Go to our website at www.dishnetwork.com/my account
•Press MENU on your remote control and then select Customer Support.
•Call DISH Network 1-800-333-DISH (3474).
Note: Additional authorization may be required before high-definition programming and/or over-the-air broadcasts can be viewed; additional fees may apply.
4

Introduction
Watching TV Now
WATCHING TV NOW
After you have ordered your programming package, you can begin enjoying the features of your new satellite TV receiver. When you complete these simple tours, you’ll be familiar with the remote control and be able to find a program to watch, pause live TV, and record your favorite shows.
Finding a Program to Watch
If you want to know more about watching TV, see Chapter 3: Finding Programs to Watch starting on page 25.
5
Chapter 1
Watching TV Now
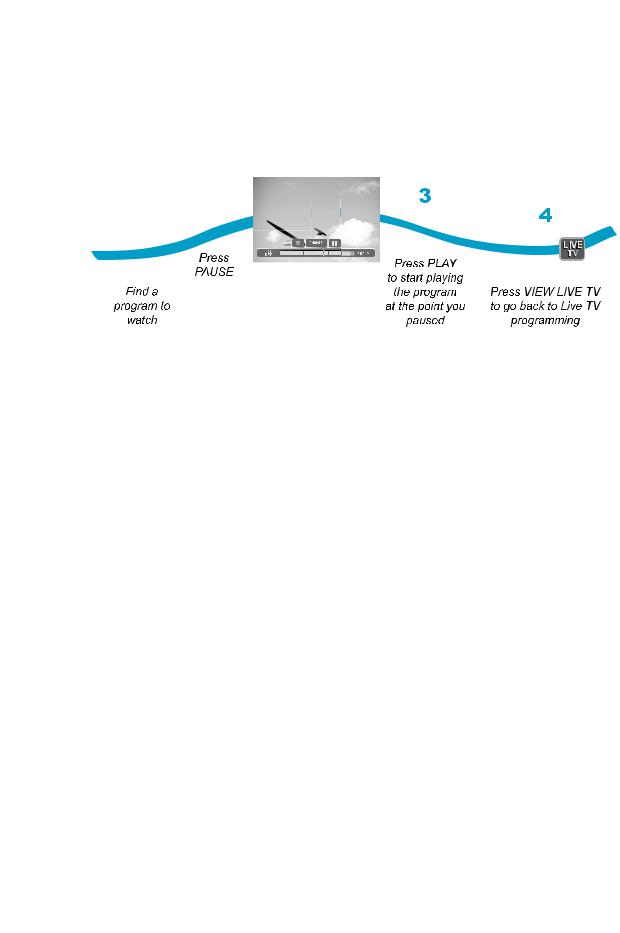
Pausing Live TV
Here’s something you can’t do with regular old TV: pause live TV because someone’s at the door or calling you on the phone or there’s something you just have to do right now. For more about the pause feature of your receiver, see Pausing a Program on page 54.
Recording and Playing Back a Program
Take this tour to learn how to make basic recordings of your favorite shows. For more about the DVR features of your receiver, see Chapter 8: Digital Video Recording starting on page 53.
|
|
|
|
|
|
|
|
2 |
1 |
|
|
|
|
|
|
|
OK |
|
Record Remainder of This Event: |
|
||||||
|
|
|
|
|
|
|
|
|
|
|
|
|
"Cliffhanger" |
|
|
||
|
|
|
300 HBO-E, End Time: 8:00 pm |
|
|
|
||
|
OK |
|
Options |
Cancel |
Select OK |
|||
|
|
|
|
|
|
|
|
|
|
|
|
|
|
|
|
|
to record |
While watching |
|
|
|
|
|
the remainder |
||
|
|
|
|
|
of the program |
|||
a program, |
|
|
|
|
|
|
|
|
press RECORD |
|
|
|
|
|
|
||
REC
3
After a few minutes,
press STOP and select
STOP
Yes to stop recording
Yes
7-8 |
6 |
|
|
5 |
DVR |
4 |
DVR Events |
5:18pm 1 |
|
||||
|
Start |
|
Today |
|
215 TRAV |
To begin watching |
|
host Jones performs. (CC) (Stereo) |
|||||
|
|
7/30 6:59am 9 |
KUSA |
3:04 |
|
|
|
|
News/Business. |
(2004) Comic/talk-show |
|
|
|
|
|
Dennis Miller ('Dennis Miller'): Norah |
|
your recorded |
||
|
|
The Brady Bunch |
0:34 |
Edit |
||
|
|
|
18hr 41min Avail |
Sort |
|
|
|
Start Over |
Today |
|
3:04 |
|
|
|
SpongeBob SquarePants |
0:34 |
Done |
program, |
||
|
|
Happy Days |
|
0:34 |
Schedule |
|
STOP |
|
SportsCenter |
|
1:04 |
Help |
|
Select Start or |
Mystic River (All Day) |
2:30 |
History |
press DVR twice |
||
Press STOP |
|
|
|
|
||
Start Over |
|
|
|
Select the |
|
|
to stop playback |
|
|
|
|
||
(the recorded |
|
SELECT |
program you |
|
||
of the recorded |
program will |
|
|
|
recorded |
|
program |
|
|
|
|
||
begin playback) |
|
|
|
|
|
|
|
|
|
|
|
|
|
6
Introduction
Additional Services
ADDITIONAL SERVICES
Pay-Per-View
Catch all the action on Pay-Per-View. Take a break from regular TV and order the latest movies, sports, and special events. For details on ordering Pay-Per-View events, see page 34. Be sure to connect an active phone line to your receiver before you order a Pay-Per-View event (see the instructions on page 112).
DISH On Demand
Enjoy movies and other programming any time without schedules, without waiting and without leaving your home.
DishONLINE
DishONLINE lets you download movies and other programs to the satellite receiver if it is connected to a broadband (high-speed) Internet connection. For steps to connect your satellite receiver to the Internet, refer to Connecting a Broadband Internet Connection on page 113. For steps to order DishONLINE programs, refer to DishONLINE on page 35. For more information, go to dishnetwork.com/dishonline.
DishHOME
At DishHOME (press DISH on your remote control), you’ll find news, sports, weather information, TV and movie buzz, customer service, games, and more.
ABOUT SATELLITE TV RECEPTION
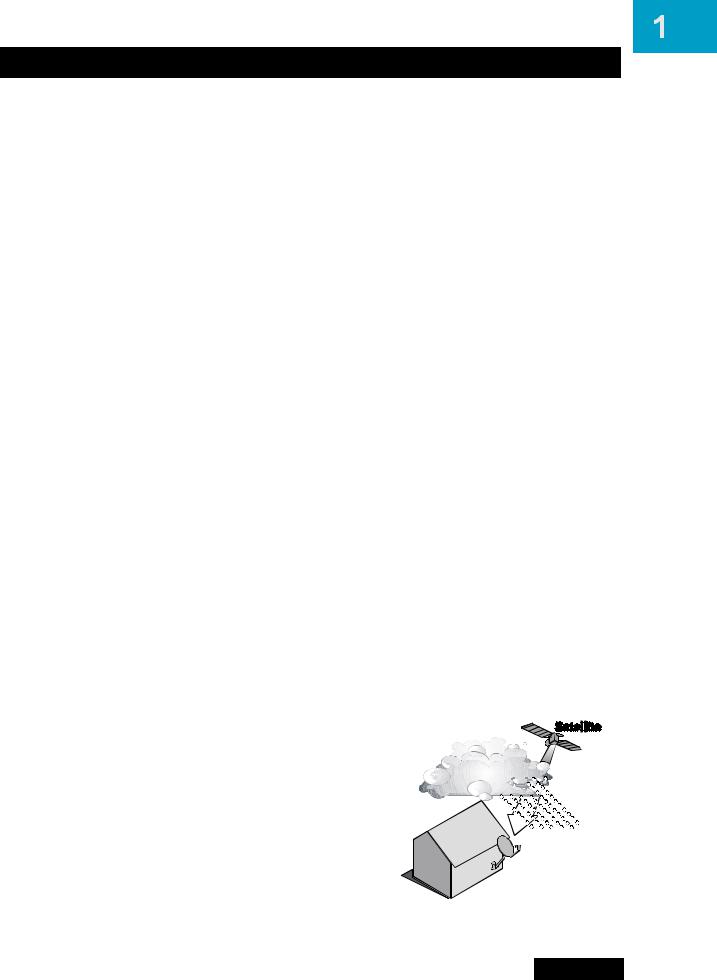
Satellite television uses satellites in a stationary orbit over the Earth to deliver television and audio programming. This type of orbit enables the satellites to stay aligned over one place on the surface of the Earth. Once the satellite dish is aimed at the satellite, the dish does not have to move to follow it.
Rain and Snow Fade
Heavy rain, snow, or dense cloud cover can reduce the satellite signal, which may interrupt your programming service. Your service will return after the weather condition has passed. Aiming the satellite dish to get the strongest signal during installation, will help prevent rain and snow from interrupting the signal.
7
Chapter 1
Why Connect to a Phone Line or Broadband
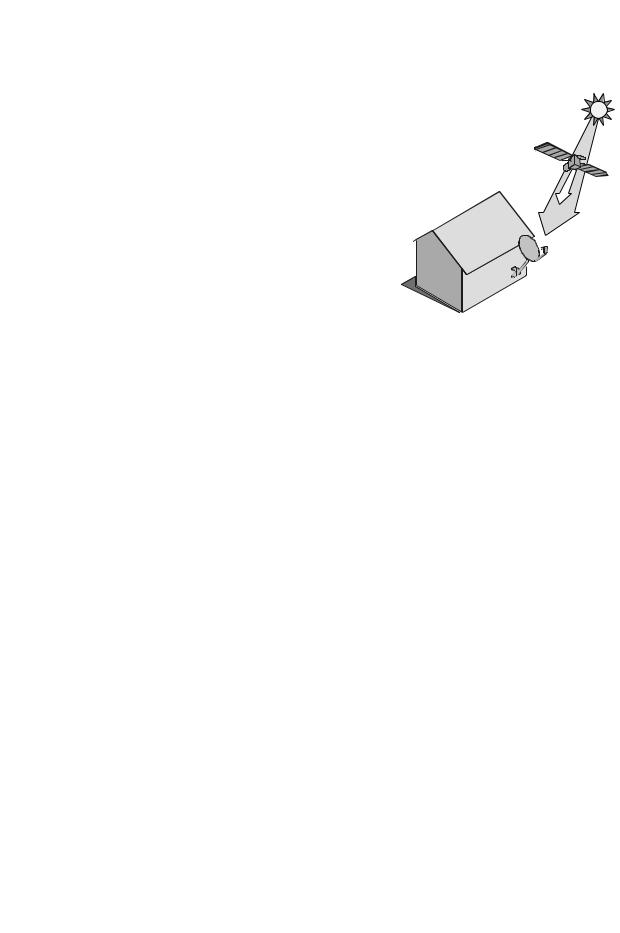
Solar Interference
Twice a year, the sun moves to a position behind the DISH Network satellites as they orbit the Earth. This event occurs during a few days at the beginning of the spring and the beginning of the autumn and lasts only a few minutes.
During these brief periods, you will not be able to see programs on DISH Network. When the sun has moved from behind the satellites, the programs will reappear. This is an unavoidable natural event and has an adverse effect on many satellite program providers.
WHY CONNECT TO A PHONE LINE OR BROADBAND
Your satellite receiver is equipped with a standard telephone jack that you use to connect to an active telephone line. Keep the receiver connected to an active telephone line so that you will be able to order pay-per-view programs using your remote control, use all of the DishHOME Interactive TV features, and other services from DISH Network (see the instructions on page 112).
Your satellite receiver can be connected to your broadband home network. Currently this connection allows you to order additional content not usually available through your satellite subscription, and you can order pay-per-view programs using your remote control (if you do not connect a phone line to your receiver). See the connection instructions on page 113, and the instructions for DishONLINE on page 35.
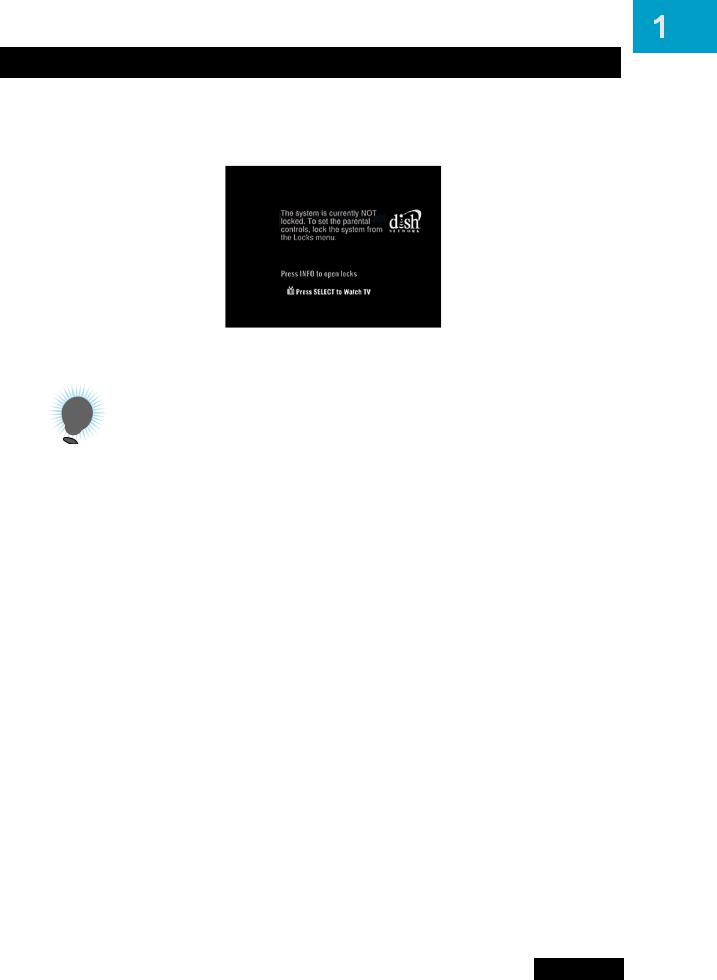
MOVING ON-SCREEN LOGO
Whenever the receiver is turned off using the remote control or front panel POWER button, you will see the DISH Network logo and helpful tips on your TV screen. This feature is included with your receiver to assure you that the connections between your receiver and TV(s) are not lost, and also provides useful information about your receiver and its features. Press POWER or SELECT on the remote control to resume watching
8
Introduction
Tips
satellite TV programming. Make sure you are using the correct remote for your TV-viewing location (see page 12 for details).
TIPS
•Always have the latest software—Turn off the receiver when you’re not using it.
•Order Pay-Per-View with your remote control—Keep an active phone line connected to the receiver. Not only will you have Pay-Per-View at your fingertips, but you’ll also avoid unnecessary charges.
QUESTIONS
•How do I find something to watch? Refer to page 5. For more information on finding something to watch, see Chapter 3: Finding Programs to Watch.
•Why are some of the channels red in the Program Guide? The channels that are red in the Program Guide are those which are not currently in your subscription. If you’d like to watch those channels, call 1-800-333-DISH (3474) or go to www.dishnetwork.com.
•I’m looking at program information in a guide I bought at the grocery store, but nothing matches what’s on my DISH Network receiver; is something wrong? No. DISH Network programming may vary from what you’ll find in a local publication. For best results, use the Program Guide on your receiver or order DISH Entertainment Magazine.
9

Chapter 1
Notes
Notes
10

Remote Control Setup
Personalizing Your Remote Controls
What you’ll find in this chapter:
•IMPROVING RECEIVER CONTROL
•CONTROLLING OTHER COMPONENTS
•SETTING UP BY LEARNING FROM ANOTHER REMOTE
•USING THE SYSTEM WIZARD
•THE RECOVER BUTTON
•SENDING DISCRETE POWER ON AND OFF
•TIPS
•QUESTIONS
71
Chapter 10
Improving Receiver Control
IMPROVING RECEIVER CONTROL
These instructions help you improve your remote control settings to best operate your satellite receiver.
Changing the Address for Remote Control 2
Because UHF signals travel long distances and go through walls, a neighbor’s remote may control your receiver by mistake. To keep this from happening, you can change the remote address. You can also use these instructions to change the address on Remote Control 1.
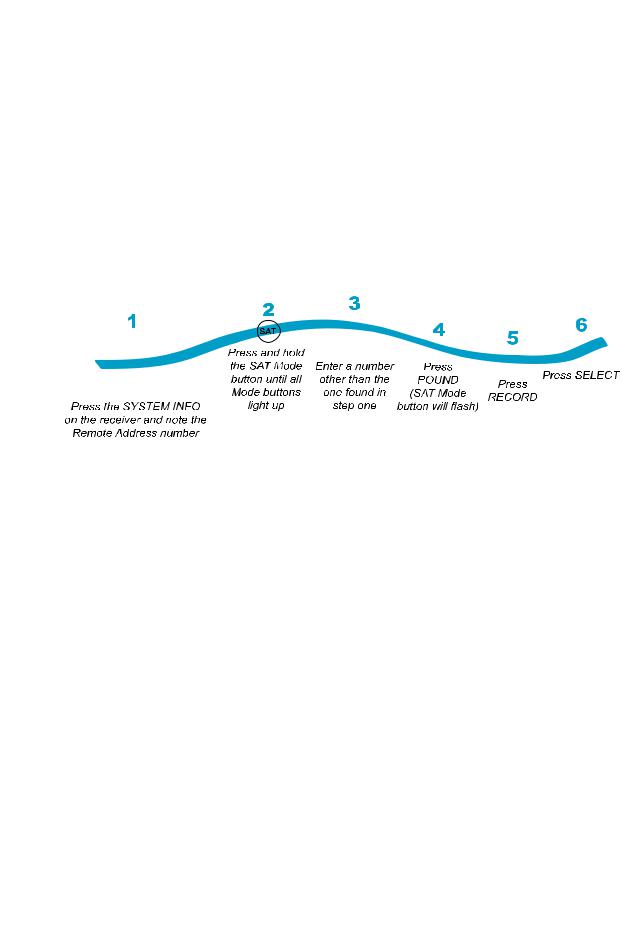
1Press SYSTEM INFO on the receiver's front panel. The System Information screen displays on the nearby TV and shows the Remote Address.
Write down the Secondary Remote Address:
If changing the address for Remote Control 1, write down the Primary Remote Address:
2Press and hold SAT on your remote control for about three seconds, until all of the mode buttons light up, and then release SAT.
3Use the NUMBER PAD to enter any number between 1 and 28, but not the one you wrote in step 1. If you wrote down an odd number in step 1, choose an even number; if you wrote down an even number, choose an odd number to enter here.
4Press POUND (#). If you entered the address correctly, SAT will flash three times. Write down the number you entered:
5Press RECORD. Make sure the Remote Address you see on the System Information screen is the same as the one you entered in step 3. If it isn't, the remote cannot control the receiver.
6Press the SELECT button on the front panel to close the System Information screen.
72
Remote Controls
Improving Receiver Control
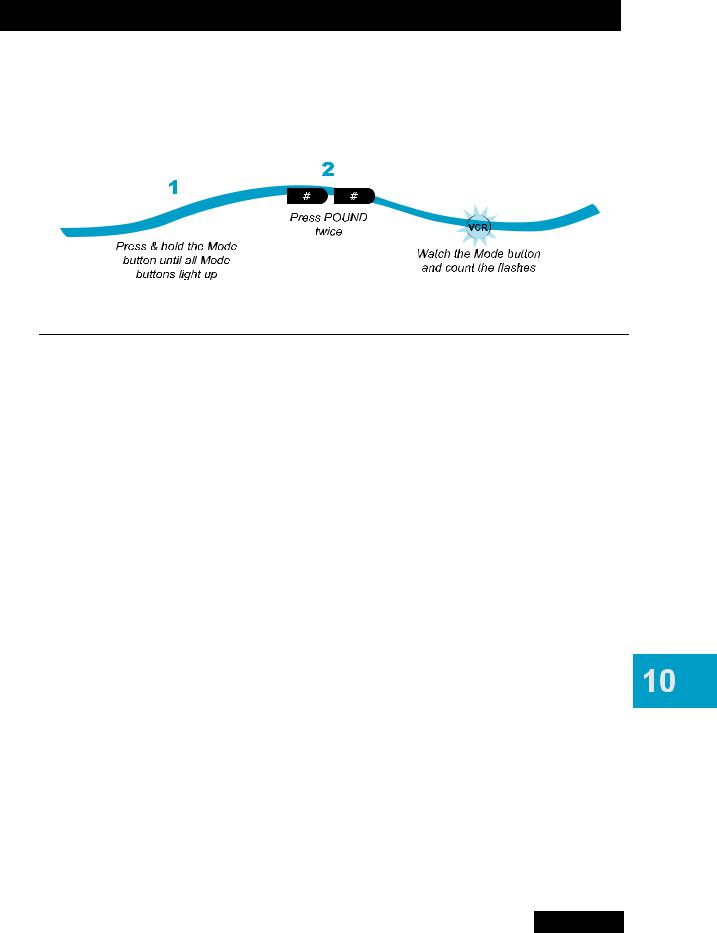
Checking the Remote Control Address
1Press and hold the SAT mode button until all of the mode buttons light up, then release it.
2Press POUND (#) twice. The SAT mode button will flash the same number of times as the address number (for example, three flashes means address 3).
Confirming Remote Control Operation
1Make sure the remote has fresh batteries and is in SAT mode.
2Press SYSTEM INFO on the receiver front panel to display the System Information screen on the nearby TV.
3Press RECORD on the remote control:
•Remote Control 1—The Primary Remote Address in the System Information screen changes to match the address preset in your remote control. Typically, the remote control for the nearby TV is IR only, unless you have received an IR/UHF Pro remote replacement.
•Remote Control 2—The Secondary Remote Address in the System Information screen changes to match the address preset in your TV2 remote control. Oddnumbered remote addresses will automatically use UHF Pro Band A, while evennumbered addresses will use UHF Pro Band B. If you have two UHF Pro remote controls in your house, ensure one uses an odd-numbered remote address and the other an even-numbered address. If you have more than two DISH Network remote controls, consult the SYSTEM INFO screen on each receiver and ensure that all the IR/UHF Pro remotes use different addresses.
4Select Done to close the System Information screen.
5Press POWER on the remote control to turn the receiver on or off.
73

Chapter 10
Improving Receiver Control
Adjusting the Remote Control Antenna
Be sure to set the remote control antenna (back of the receiver) straight up so you can use the remote control from as far away as possible. Don't let the antenna touch anything.
If your UHF Pro Remote Control 2 isn't working well from far away, you may be experiencing interference from objects near your receiver. To improve your remote control's range, try the following:
–Place the receiver higher than all of the other equipment in your entertainment center.
–Provide room above the receiver so that the remote control antenna can be installed straight up. If you cannot install the antenna straight up, tilt the antenna at about a 30° angle.
–Place the remote control antenna outside the entertainment center by using a coaxial cable to connect the antenna to the receiver.
–Try moving the receiver to other locations.
–Move any nearby over-the-air antennas away from the remote control antenna. Do not place an over-the-air antenna on top of your receiver.
–Install a UHF attenuator. See Installing a UHF Attenuator on page 75 for details.
Changing UHF/IR Using the Switch
Your TV2 remote control has a switch to change from sending both IR and UHF signals to sending only IR. The switch comes preset to the UHF position, which sends both types of signals, but if you have a clear line of sight to the satellite receiver you’re controlling with this remote, then you can change the setting to the IR position to lessen the likelihood of another UHF remote interfering with yours. This is applicable for TV2 in Dual User mode.
1 Remove the battery cover from the back of the TV2 remote control.
2 Use a small screw driver or a paper clip to carefully change the switch setting.
3 Put the battery cover back on the remote control.
4 Use the SYSTEM INFO button on the front panel to open the System Information screen.
5 Press RECORD on the remote control.
6Make sure the System Information screen shows the correct information:
•Switch position UHF—IR/UHF Pro
•Switch position IR—IR only.
74
Remote Controls
Improving Receiver Control
Installing a UHF Attenuator
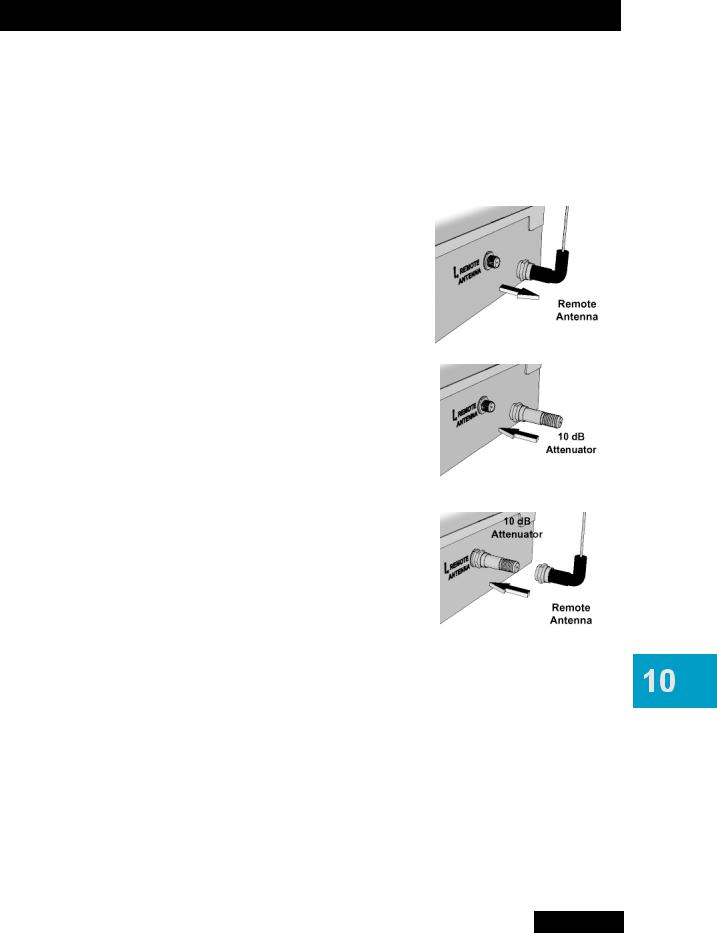
Unwanted UHF signals may interfere with signals from the remote control to the receiver. To prevent such interference, you can install a 10 dB attenuator (available from many consumer electronics parts stores). Adding this attenuator will help keep out stray UHF signals, but it will also cut down how far away you can use the remote control.
1Remove the remote control antenna from the REMOTE ANTENNA input on the receiver’s back panel.
2Attach a 10 dB attenuator to the REMOTE ANTENNA input.
3Attach the remote control antenna to the attenuator.
75

Chapter 10
Controlling Other Components
CONTROLLING OTHER COMPONENTS
To use the remote to control other devices (such as a TV, DVD player, VCR, tuner, amplifier, or other DISH Network satellite receiver), you must first program it to control these devices. You can do this by any of the following procedures:
•Setting Up Using Device Code Tables on page 77
•Setting Up Using Device Codes Scan on page 78
•Setting Up by Learning from Another Remote on page 80
•Using the System Wizard on page 82.
Remote Control Modes
Use the remote control’s mode buttons, SAT (satellite receiver), TV (for a TV), DVD (for a a DVD player or VCR), and AUX (“auxiliary,” for a second TV, DVD/VCR, tuner, audio amplifier, or a second DISH Network satellite receiver) to set the remote control to the right mode for the device. To change the mode, press the button for the device you want the remote to control. The mode button lights for two seconds to show you’ve set the remote to that mode.
Limited Mode
You can program your remote control in Limited Mode to keep from accidentally changing the channel on your TV or VCR. When you use the remote to control your TV in Limited Mode, you will only be able to use POWER, MUTE, and VOLUME. Also, when you use the remote to control your VCR (using the button for DVD and/or AUX devices) in Limited Mode, you will only be able to use POWER and the VCR function buttons.
Turning Limited Mode On and Off
1Press and hold the device mode button (for example, TV) until all of the mode buttons light. Release the mode button.
2Press:
•PAGE UP to turn Limited Mode on.
•PAGE DOWN to turn Limited Mode off.
3Press POUND.
Note: Limited Mode is not used with amplifiers programmed on the AUX button.
Combination Devices
If you are programming the remote to control a combination device, such as a TV/VCR or a TV/DVD, program the remote control in one mode, and then repeat the procedure in the other mode. For example, to program the remote to control a TV/VCR using codes
622 815, follow the instructions to program the remote to control the TV using code 622, and then repeat the instructions for programming to control the VCR using code 815.
76
Remote Controls
Controlling Other Components
Setting Up Using Device Code Tables
Set up the remote to control other devices using the device codes listed on page 137. In the instructions below, the column on the left contains the instructions and the column on the right provides additional information.
|
|
|
|
|
|
|
|
|
|
|
|
|
|
|
|
|
|
|
|
|
|
|
|
|
|
|
|
|
|
|
|
|
|
|
|
|
|
|
|
|
|
|
|
|
|
|
|
|
|
|
|
|
|
|
|
|
|
|
|
|
|
|
|
|
|
|
|
|
|
|
|
|
|
|
|
|
|
|
|
|
|
|
|
|
|
|
|
|
|
|
|
|
|
|
|
|
|
|
|
|
|
|
|
|
|
|
|
|
|
|
|
|
|
|
|
|
|
|
|
|
|
|
|
|
|
|
|
|
|
|
|
|
|
|
|
|
|
Instructions |
|
|
|
|
|
Additional Information |
|
|
||||||
|
|
|
|
|
|
|
|
|
||||||||
|
|
|
|
|
|
|
|
|
||||||||
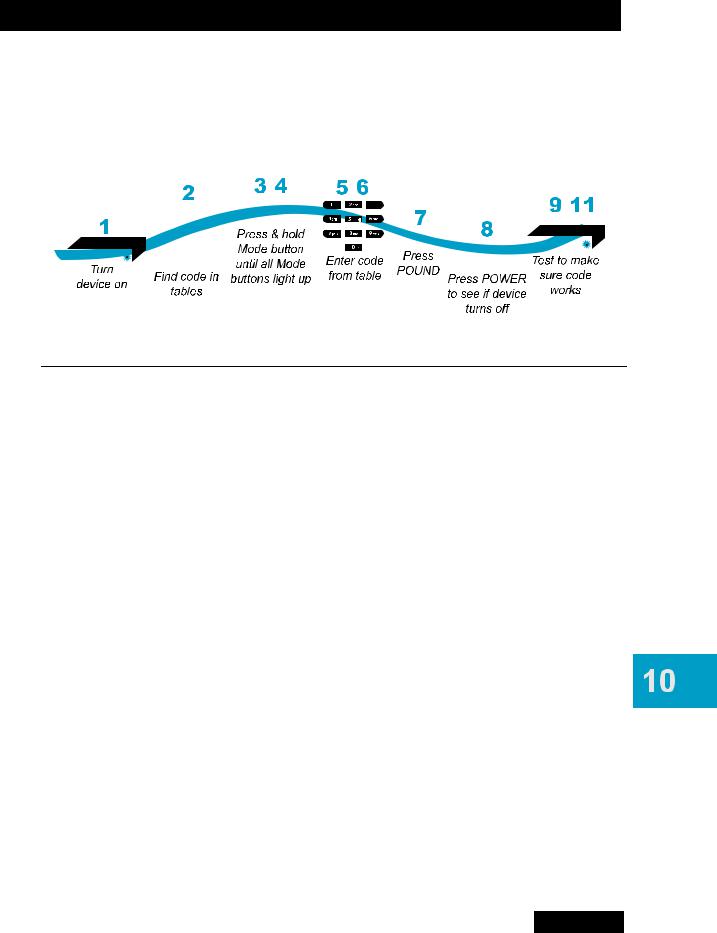
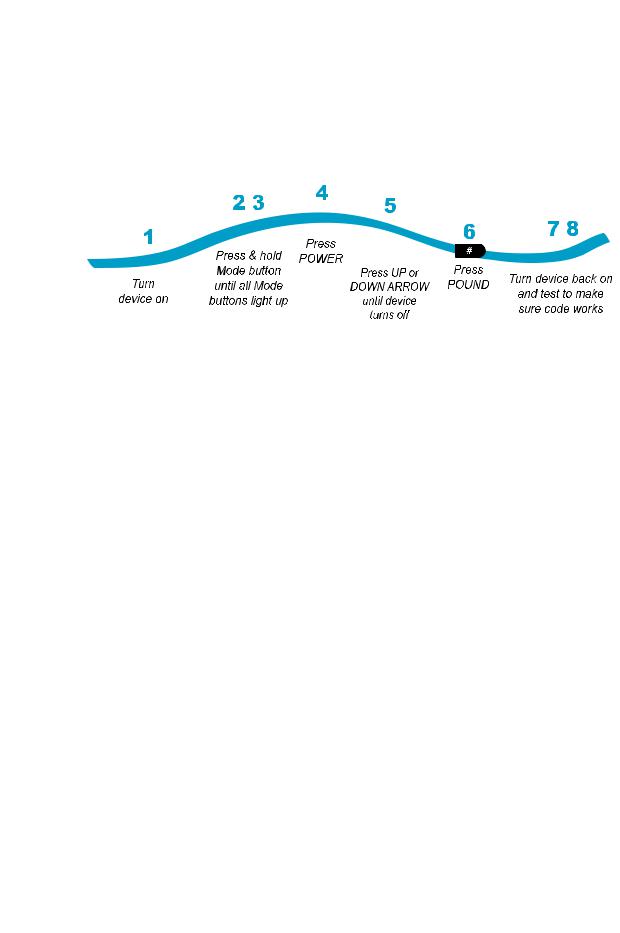
1Turn the device on.
2Find the brand name of the device in the tables starting on page 137.
3Press and hold the mode button until all the other mode buttons light up, then release the button. The mode button flashes.
4For AUX mode only. Press 0 for a TV, 1 for a VCR, or 2 for a tuner or amplifier.
5Enter one of the three-digit device codes from the table using the number buttons.
6If you want to program Limited Mode, press 1. If not, skip to step 7.
Use the device’s front panel buttons or its remote control.
If the brand isn’t listed, see Setting Up Using Device Codes Scan on page 78.
For example, for a TV, hold the TV mode button until all of the other mode buttons light. When you let go, TV will flash.
If you’re not programming in AUX mode, skip to step 5.
The three-digit device code is for the brand name of your device that you found in step 2.
See Limited Mode for more information.
7Press POUND (#).
8Press POWER to turn off the device. If the device does not turn off, go to step 10.
If you entered the code correctly, the mode button flashes three times.
If the code works, the device should turn off.
9Turn the device back on and try some other buttons to make sure they work. If the code works for other buttons, stop here.
10If the code doesn’t work, repeat steps 3 through 9 with another device code from the tables.
11If you can’t find a code that works, try
Setting Up Using Device Codes Scan that follows.
Sometimes POWER works when other buttons don’t. If in Limited Mode, try VOLUME or MUTE.
Try every code listed for your brand until one works for your device.
77
Chapter 10
Controlling Other Components
Setting Up Using Device Codes Scan
If the code for your device is not listed in the tables starting on page Codes First Left or if you could not find a code that worked for your device, use this procedure to scan the remote control’s memory for the device code. In the instructions below, the column on the left contains the instructions and the column on the right provides additional information.
|
|
|
|
|
|
|
|
|
|
|
|
|
|
|
|
|
|
|
|
|
|
|
|
|
|
|
|
|
|
|
|
|
|
|
|
|
|
|
|
|
|
|
|
|
|
|
|
|
|
|
|
|
|
|
|
|
Instructions |
|
Additional Information |
||||||
|
|
|
|
|
|
|
|
|
|
|
1 Turn the device on. |
|
Use the device’s front panel buttons or its remote |
||||||||
|
|
|
|
|
control. |
|||||
2Press and hold the mode button until all the other mode buttons light up, and then release the button. The mode button flashes.
For example, hold the TV mode button until all of the other mode buttons light. When you let go, TV will flash.
3For AUX mode only. Press 0 for TV, 1 for VCR, or 2 for a tuner, or amplifier. Then press the STAR (*) button.
4Press POWER.
5Press the UP or DOWN ARROW repeatedly until the device turns off.
6Press POUND (#).
7Turn the device back on and try some other buttons to make sure that they work also.
This step is for programming the type of device that will be programmed in AUX mode. If you’re not programming in AUX mode, skip to step 4.
This puts your remote in the scan mode.
As you press the UP or DOWN ARROW, the remote tries each code in the memory to see if it can turn off your device. When the device turns off, you have found a code that might work.
Note: The mode button for the device will flash rapidly eight times when you’ve scanned all the codes for that device.
The mode button flashes three times if you have entered the code correctly, and stores the code you found.
Sometimes POWER works when other buttons don’t. If using Limited Mode, also try VOLUME or
MUTE.
8If necessary, repeat this procedure until you’ve tried all the codes.
You may need to repeat the scan to find the best code for your device.
Note: This process could take a long time, because of this remote’s very large device-code database.
78
Remote Controls
Controlling Other Components
Checking the Device Codes
Use these steps to find the device code you’ve set for each remote control mode (TV, DVD or VCR, and AUX).
Instructions |
Additional Information |
1Press and hold the mode button until all the other mode buttons light up, and then release the button. The mode button flashes.
For example, hold TV until all of the other mode buttons light. When you let go, TV will flash.
2Press the POUND (#) button twice. Watch the mode light to determine your code. The mode button flashes the number for each digit of the device code, with a pause between the groups of flashes. A quick flash is for zero.
For example, if the code is 570, the mode button flashes five times, pauses, flashes seven times, pauses, and flashes once quickly.
For AUX mode: The first group of flashes tells you what the AUX mode controls. A quick flash (zero) before the three-digit code is for a TV, one regular flash is for a VCR, and two flashes is for a tuner, or amplifier.
For a satellite receiver programmed in AUX mode: The AUX mode button will flash the same number of times as the address number.
For Limited Mode: If you have programmed a TV or VCR in Limited Mode, the device mode button flashes once at the end of the flash sequence.
For example, if the TV code is 570, the AUX mode button flashes once quickly (indicating 0 for TV), pauses, flashes five times, pauses, flashes seven times, pauses, and flashes once quickly.
For example, if the receiver address is 3, the AUX mode button flashes three times.
For example, if the TV code is 570, the AUX mode button flashes once quickly (indicating 0 for TV), pauses, flashes five times, pauses, flashes seven times, pauses, flashes once quickly, and then flashes once (indicating it is in Limited Mode).
79
Chapter 10
Controlling Other Components
Setting Up by Learning from Another Remote
After you have programmed your DISH Network remote to control your devices (in TV, DVD or AUX modes), you may find not all of the commands used by the devices’ original remote controls function as you expect. The learning function of your DISH Network remote control can support these commands.
The remote control can learn commands in two ways:
1You can follow the instructions for using device codes to program a specific mode, and then learn commands that add new or overwrite existing functions of the remote control’s buttons in this mode. For this type of learning, any button without a learned command keeps the previous command (if any) for that device code.
2Each button on this remote learns a command from the equipment’s original remote control. For this type of learning, any button without a learned command will have no function for that device.
To “teach” your DISH Network remote control specific commands for your devices, complete the following:
Instructions |
Additional Information |
1Ensure the the desired remote address is programmed to the DISH Network remote.
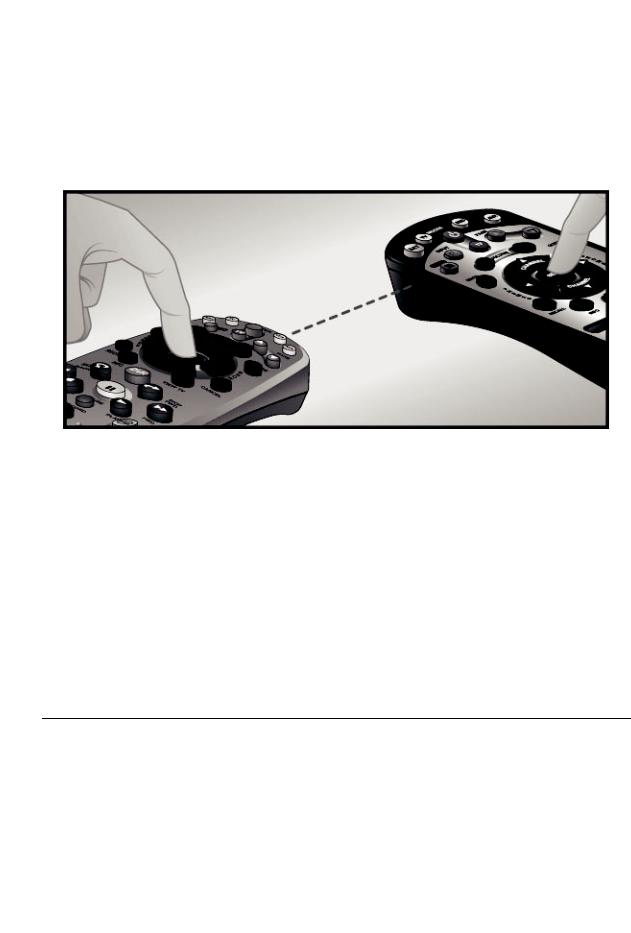
2Place both your DISH Network remote and the original equipment’s remote control on a flat, stable surface.
3On the DISH Network remote, press and hold the mode button for your equipment for about three seconds until all the mode buttons light up, and then release it.
See Checking the Remote Control Address on page 73.
Holding either remote control in your hand may cause learning to fail.
Your selected mode button will blink.
80

4To start learning commands for this mode:
•If you've found a code for that device, first program the code. Now press and release RECALL, then hold RECORD for about three seconds.
•If you have not programmed a code for that device, press and hold RECORD for three seconds.
5Point the front of the original device remote to face the small square (IR window) on the front, left-hand side of DISH Network’s remote, as shown on page 80.
6On the DISH Network remote control, press the button you want to teach.
7On the original device remote control, press and hold the button you want learned.
•If the DISH Network remote learns the command, the mode light blinks off and then back on.
•If the mode light blinks three times or remains lit, the DISH Network remote did not learn the command.
8After a button has learned a command successfully, repeat step 6 and step 7 until all commands you want have been learned.
9To end the learning sequence:
•Press one of the mode buttons on the DISH Network remote. This saves all the commands for that mode, and exits learning to return to normal remote control operation.
•To cancel learning, do not press any buttons on either remote control for at least 30 seconds. The DISH Network remote control times out and returns to normal operation.
Note that no learned commands are saved if the DISH Network remote control times out before completion.
Remote Controls
Controlling Other Components
To find and program the device code, use the instructions for Setting Up Using Device Code Tables on page 77 or Setting Up Using Device Codes Scan on page 78.
The mode button that you selected remains lit while learning.
You may need to try pressing the button on the original device’s remote several times for the DISH Network remote to learn the command.
The learning sequence also ends:
•If the remote runs out of memory for learned commands, it saves the commands you have learned for equipment in this mode, exits learning and returns to normal remote control operation. The DISH Network remote cannot learn additional commands.
•If the remote control batteries are too low for learning, all the mode buttons blink quickly eight times. Learning ends with no learned commands saved, and the DISH Network remote returns to normal operation.
Change the batteries.
81
Chapter 10
Controlling Other Components
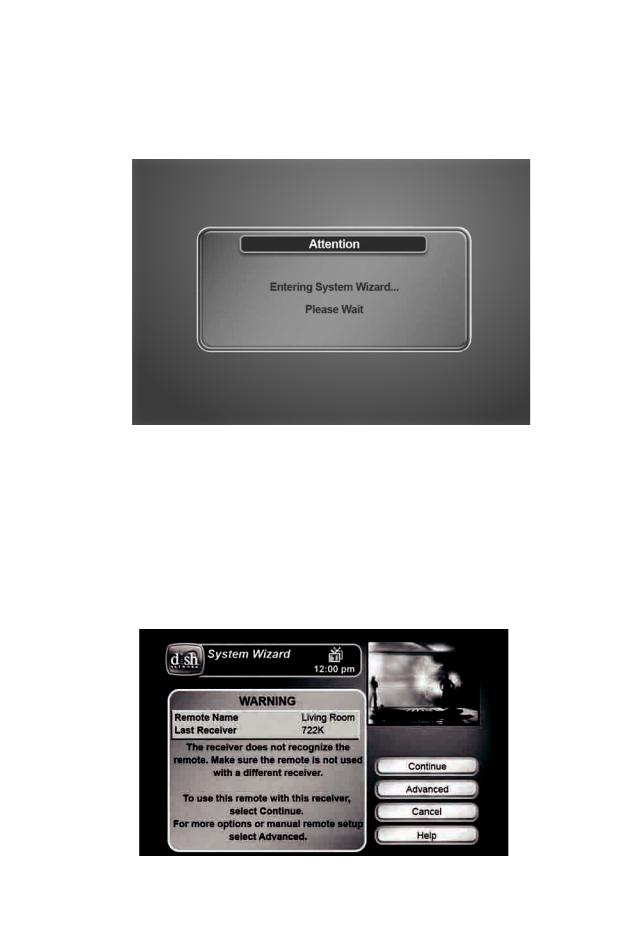
Using the System Wizard
By pressing and holding the 0 (zero) key on your DISH Network remote control, you enter the System Wizard.
The System Wizard can help you diagnose certain problems you may be having with your DISH Network remote control, including:
•Remote Is Not Recognized
•Adjust Remote Configuration
•Resolve Address Conflict
Remote Is Not Recognized
The remote control may not be immediately recognized by your receiver.
If you select Continue, the wizard tries to configure your receiver and remote control to work together.
82
 Loading...