

DICE Silverline DUO Installation Manual
for selected Audi/VW vehicles
Installation Guide/User manual
Apps | iPhone | iPod | Satellite Radio | AUX

2
Copyrights and Trademarks
Copyright 2012 DICE Electronics, LLC.
The DICE Electronics logo is trademarks of DICE Electronics, LLC.
iPod and iPhone are trademarks of Apple, Inc.
All Trademarks and Logos are the property of their respective owners.
All rights reserved.
Printed in the U.S.A.

3
Warning and safety
Product registration
Silverline DUO kit contents
Identifying your DUO kit
Dip switch conguration
Supported iPod models
Installation
Connection Diagram
DUO-100-AUD Connector
DUO-101-AVW R1 Connector
DUO-101-AVW R2 Connector
DUO-101-AVW R2 Modication
DUO-102-AVW Connector
DUO-103-AVW Connector
Attention to installers
iPod content browsing
Charging
iPod locked/unlocked settings
SAT Emulation
(DUO-103-AVW)
Basic Operation and Settings
Browsing modes
Overview of Audi Symphony radio
Overview of VW radio
Overview of Audi Concert radio
Overview of Audio Navigation Plus radio
Overview of VW Navigation radio
Sirius Connect Operation
CDC Emulation
(DUO-100-AUD, DUO-101-AVW, DUO-102-AVW)
Basic Operation and Settings
Browsing modes
Selecting the DUO as an Audio Source
Internet Radio Applications
Auxiliary audio source
Optional Remote Kit: iPod
Optional Remote Kit: SIRIUS
Troubleshooting
Firmware Update
Disclaimer
Warranty
..............................................................4
..............................................................5
....................................................6
........................................................7
........................................................8
............................................................9
............................................................................10
.............................................................11
..................................................12
.............................................13
............................................14
..........................................15
..................................................16
..................................................17
.............................................................18
...........................................................19
.............................................................................19
.............................................20
........................................................21
.............................................................................22
..................................................23
.....................................................................24
......................................................25
........................................26
...................................................27
................................................................28
.........................................................29
.............................................................................30
..........................................31
.................................................................32
.........................................................................36
...................................................................37
..............................................................38
..................................................................................39
................................................................................42
............................................................................................43
..............................................................................................44
Table of Contents

4
Please read these instructions carefully before proceeding. Failure to follow instructions may result in
improper operation or injury. Neither DICE Electronics, LLC. nor Apple Inc., its regional ofces, distributors or
resellers take any responsibility for any damage or injury as a result of using the integration kit.
- Do not open, disassemble or alter the interface in any way.
- Do not insert anything into the casing.
- Do not cut or try to alter cables in any way and always use the correct connections.
- Only operate unit when stationary or ask passengers to operate it for you.
- Do not allow the Apple iPod/iPhone to distract you from driving.
- Exercise good judgement and keep your eyes on the road at all times.
- Do not expose unit to extreme temperatures, humidity or shock.
- Keep the unit and iPod/iPhone away from uids.
- Keep away from children! - Interface components may contain small parts, can be broken or disassembled
and components may become loose from vibration and heat. Small components and packaging materials
may be a choking hazard when handled by children.
Warning and safety!

5
Thank you for purchasing this integration kit. Please review this booklet before operating the unit. This
interface was designed and manufactured to seamlessly integrate with your vehicle’s factory audio system.
We recommend registering your DICE product so you can receive news about important rmware updates
and have unlimited access to our online support system.
To register your DICE product, please complete the following steps:
1. Visit http://www.register.diceelectronics.com
2. Look up and save the serial number of the product.
3. Complete the product registration form.
4. Submit the form.
5. Save the registration/support/warranty sheet in a safe place for future reference.
If you are unable to complete the registration via internet, please call DICE Electronics at 1-888-342-3999.
Congratulations on your purchase!
Product registration
Prior to installation make sure the module’s rmware is up to date to ensure compatibility
with the latest features and enhancements. Please refer to page 42 to update rmware.
6
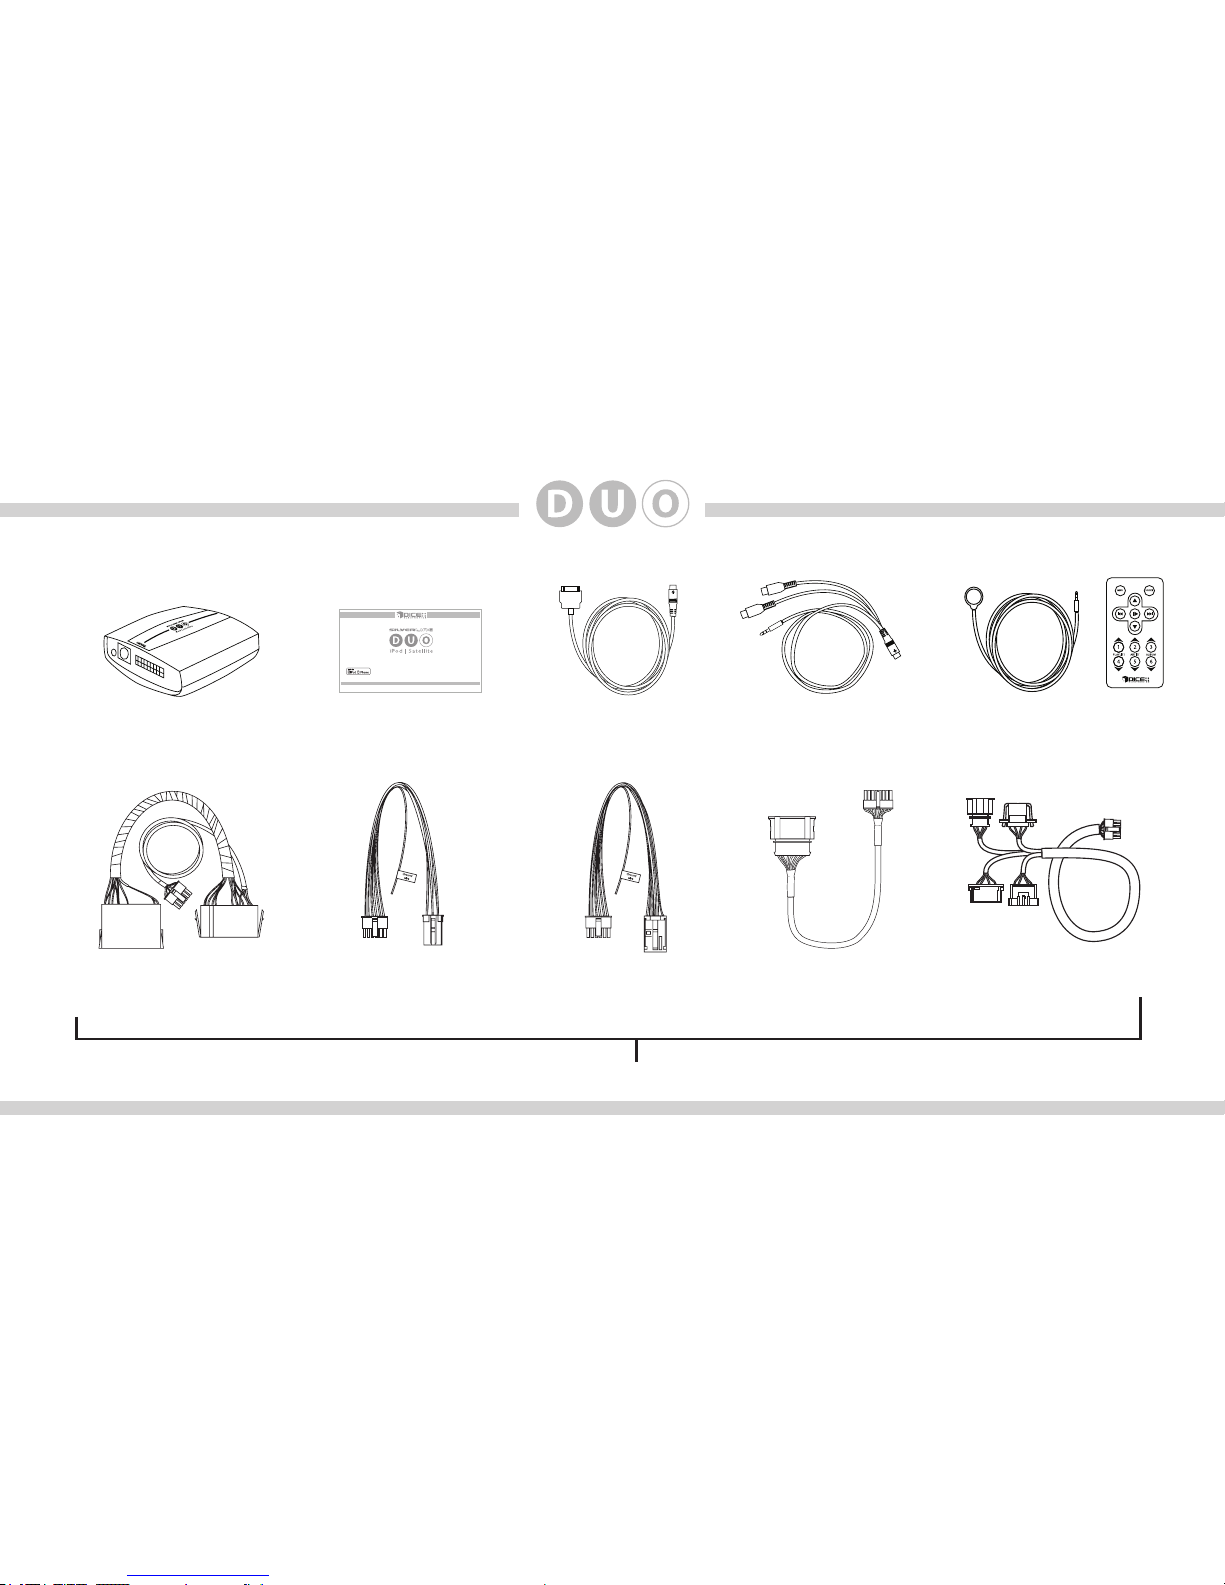
Silverline DUO kit contents
Silverline DUO module
IR Receiver &
Remote (optional)
AUX connector
(optional)
user manual
DUO-101-AVW
R1 connector
dock cable
DUO-100-AUD
connector
DUO-101-AVW
R2 connector
DUO-103-AVW
connector
DUO-102-AVW
connector
Only one of these cables is included with each kit!
for selected Audi/VW vehicles
Installation Guide/User manual

7
Identifying your DUO kit
DUO-100-AUD, DUO-101-AVW, DUO-102-AVW - These kits work in CDC Emulation mode. Please refer to the
CDC Emulation sections of this manual.
DUO-103-AVW - This kit works in SAT Emulation mode. Please refer to the SAT Emulation sections of this
manual. DIP switch settings also need to be congured for this kit (see next page).
DBM12345678
Module serial number
Product part number
DUO-103-AVW
Copyright 2012 DICE Electronics, LLC. All Rights Reserved.
The DICE Electronics logo is a
trademark of DICE Electronics, LLC. Designed, manufactured and assembled in
California using foreign and domestic components.
8
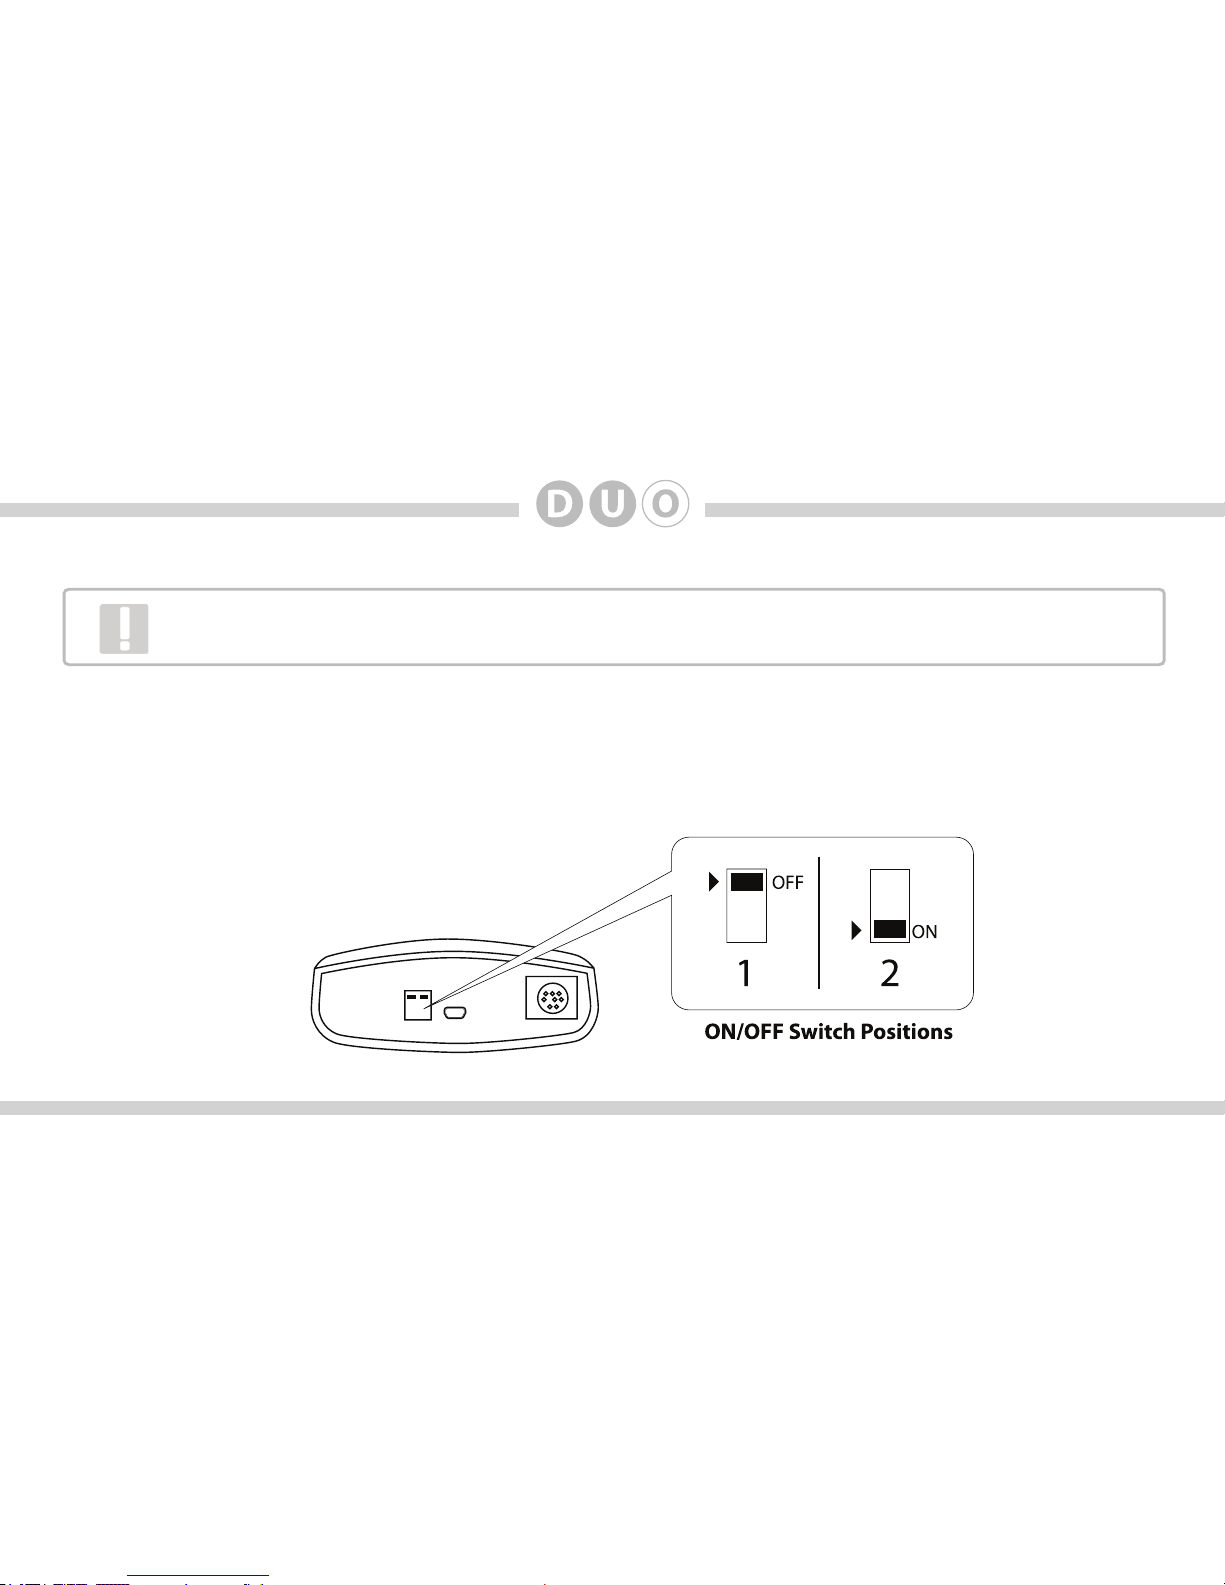
DIP switch conguration (DUO-103-AVW only)
The conguration switches located on the Silverline DUO module are used to set functionality for various radio
models. Refer to pages 23-27 for correct DIP switch settings. Incorrect dip switch settings may cause the
interface to not work properly or to not operate at all. Disconnect the vehicle harness from the module and
cycle ignition off for 60 seconds after changing the switches then reconnect the module!
Silverline DUO module
This setting must be performed for proper functionality of the DUO kit. See pages 23-27 to deter-
mine the correct DIP switch setting for your vehicle’s specic radio (DUO-103-AVW only).

9
Supported iPod models and rmware version requirements
Model Model
1G nano 160 GB classic
iPod 5G 5G nano
2G nano 3G touch
iPod classic iPhone 4
3G nano
4G touch
iPod touch
6G nano
iPhone
iPhone 3G
4G nano
120 GB classic
2G touch
iPhone 3GS
Firmware / OS Version Firmware / OS Version
1.3.1 2.0.4
1.3 1.0.2
1.1.3 iOS 5
1.1.2 iOS 5
1.1.3
iOS 5
iOS 3.1.3
1.2
iOS 3.1.3
iOS 4.2.1
1.0.4
2.0.1
iOS 4.2.1
iOS 5
iPhone 4S iOS 5

10
Attention installer! Please read the following!
DICE strongly recommends that the unit be installed in an easily accessible place!
DO NOT PLACE IT BEHIND THE RADIO AND DO NOT HIDE UNDER CARPET!
Whether the unit is professionally or self installed, put the module where you, the end user can get to it easily
in the future. (Have the installer show you where the interface module is installed.)
Installing the module behind the radio will make it difcult to:
-Add possible future upgrades, changing software, adding new features, improving operation;
-Access the AUX input on the module to attach any audio device;
-Access the DIP switches located on the module;
-Remove the unit in case of failure.
MAKE SURE THAT THE MODULE IS IN AN ACCESSIBLE PLACE!

11
Connection Diagram
*Do not connect the iPod dock cable under any circumstance to the SIRIUS module connector!
Improper connection can cause permanent damage to iPod/SIRIUS module.
IR receiver
(optional)
Silverline DUO module
(front)
Silverline DUO module
(back)
Update port
(USB to PC)
iPod dock cable*
iPod/iPhone
(not included)
Vehicle BUS
connector
SIRIUS SAT radio
(not included)
Note: works with
DUO-103-AVW only!
Auxiliary device
(not included)
AUX connector
(optional)
SIRIUS connector*
12
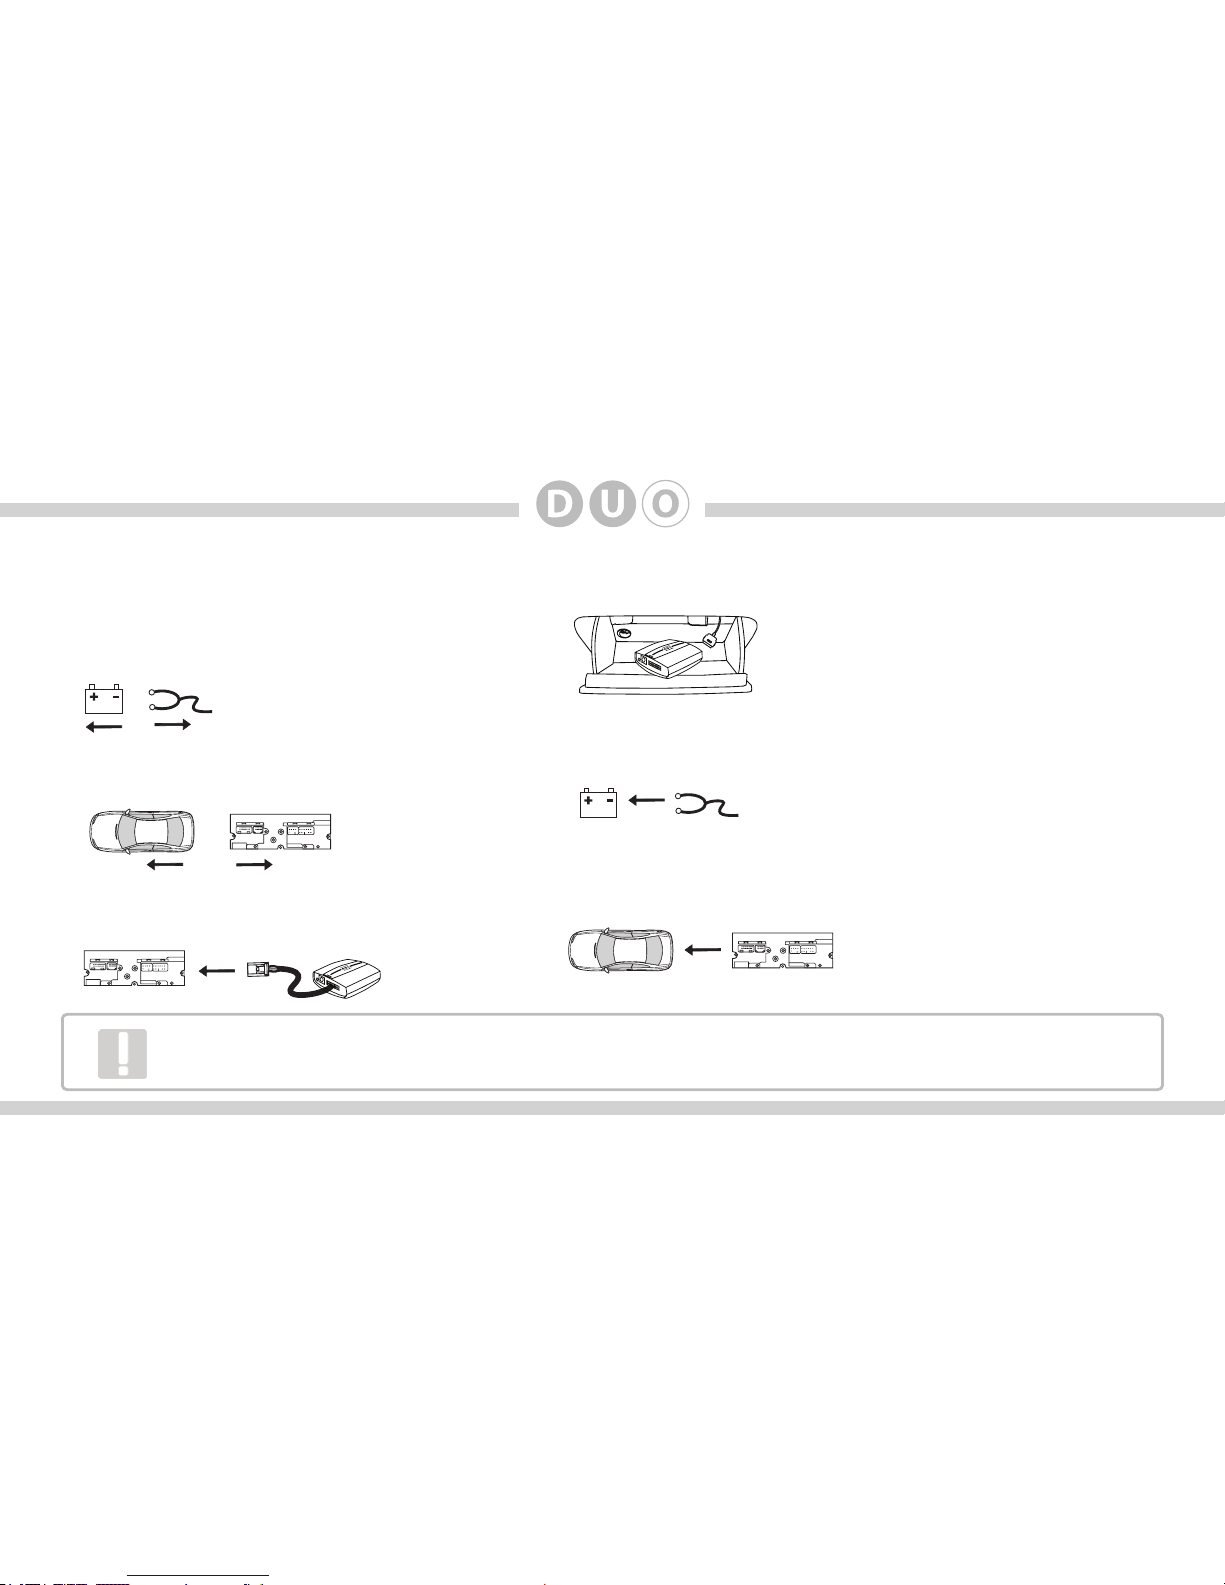
Installation
1. Verify compatibility
5. Route kit to glove box or other accessible location
6. Connect battery & test
7. Complete install by re-installing radio
2. Disconnect battery
3. Remove radio from car
4. Install Silverline DUO cable
Some radios will enter an anti-theft security mode and will lock requiring the radio’s security code
to be entered to unlock it. This code can be requested from the vehicle’s dealership.
13
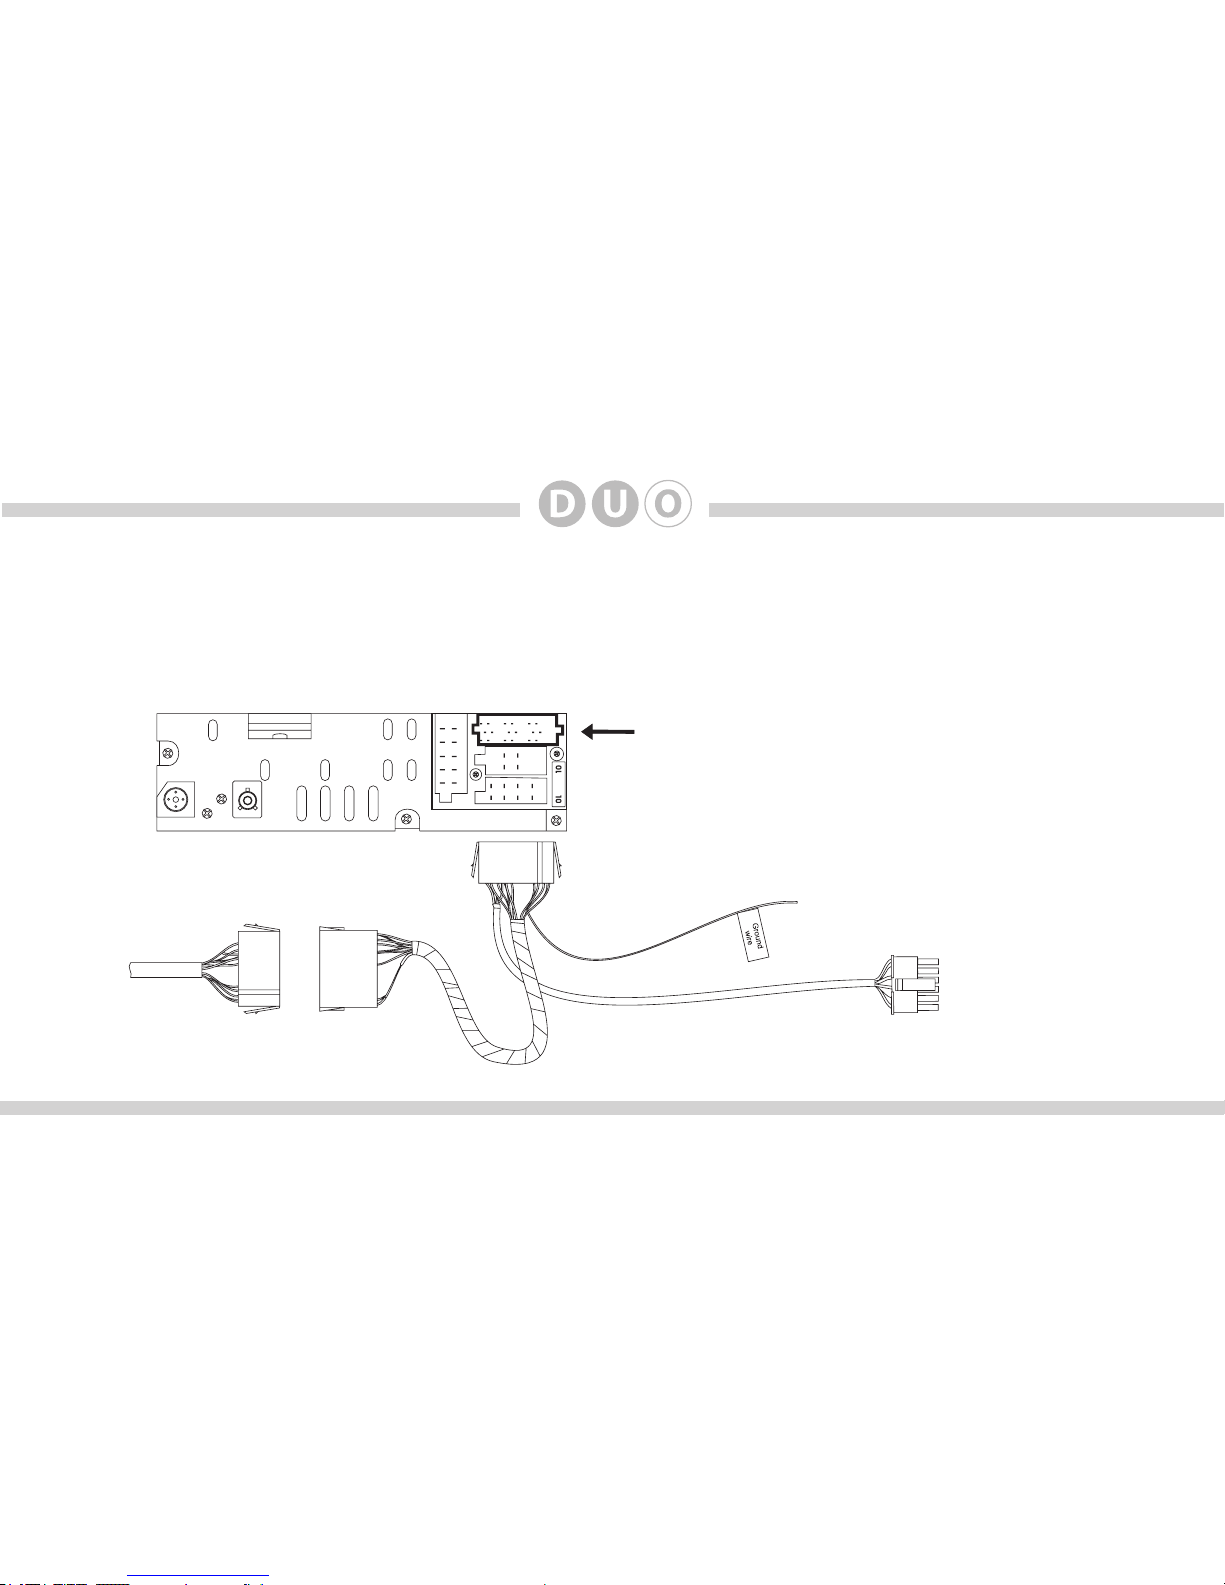
Vehicle BUS Connector - DUO-100-AUD Connector
To factory harness
in vehicle
DUO-100-AUD Connector
To Silverline DUO
Interface Module
To ground
You can access the CD changer connector located on the back of the radio. Unplug the factory connection
if present and plug the DUO-100-AUD connector into the receptacle. The connector should securely lock.
Ground wire MUST be connected to a stable grounding point.
14
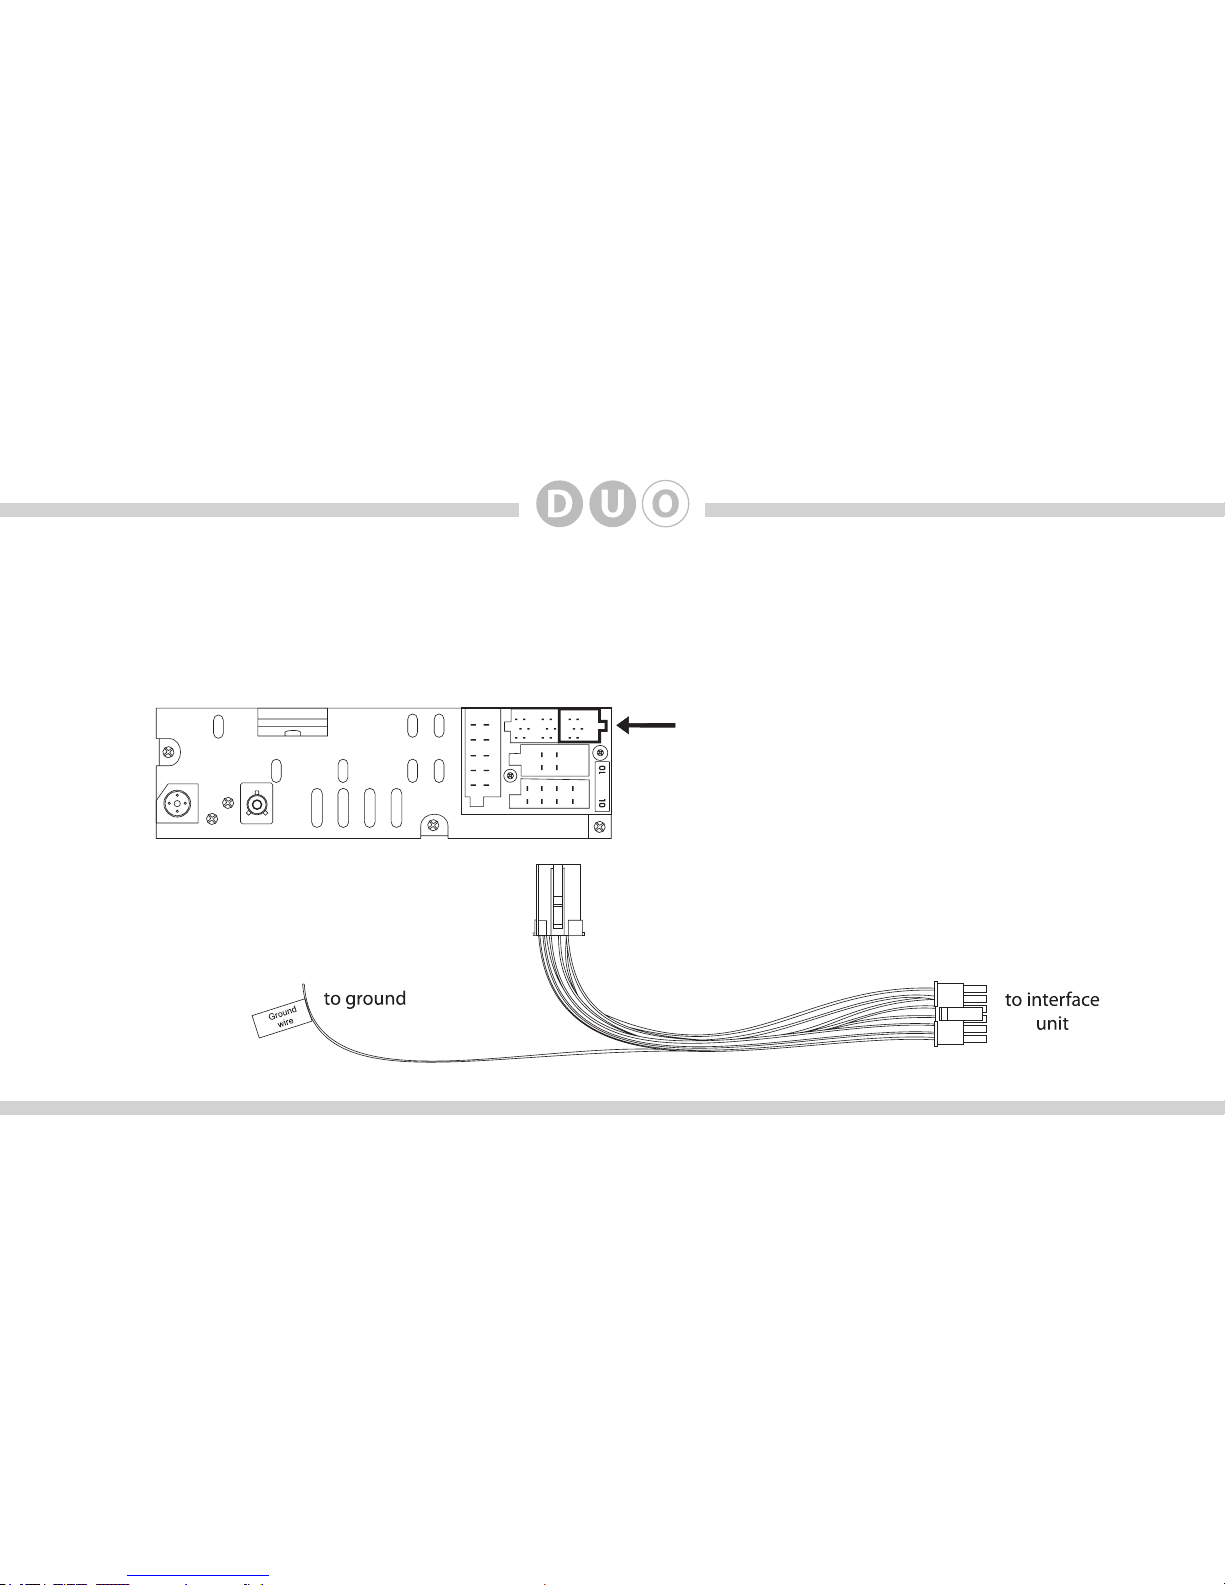
Vehicle BUS Connector - DUO-101-AVW R1 Connector
You can access the CD changer connector located on the back of the radio. Unplug the factory connection if
present and plug the DUO-101-AVW R1 connector into the receptacle. The connector should securely lock.
Ground wire MUST be connected to a stable grounding point.
DUO-101-AVW R1 connector
15
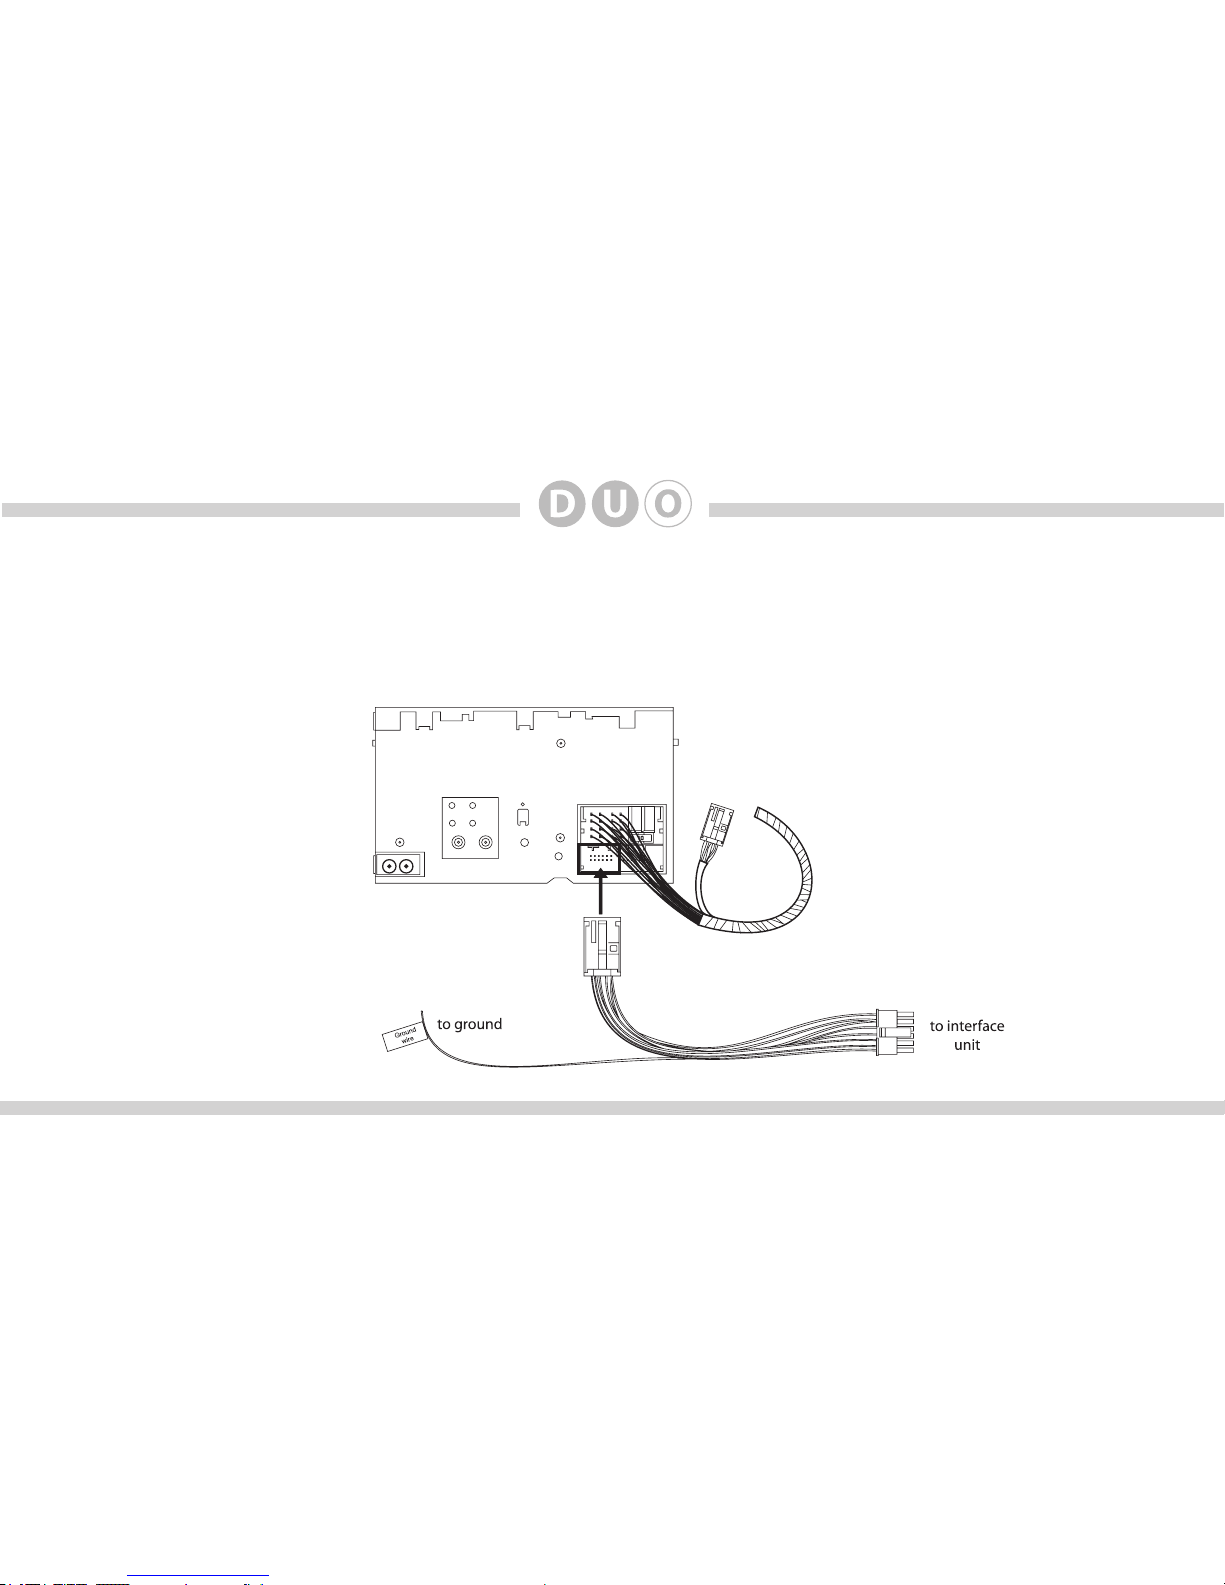
Vehicle BUS Connector - DUO-101-AVW R2 Connector
You can access the CD changer connector located on the back of the radio. Unplug the factory connection if
present and plug the DUO-101-AVW R2 connector into the receptacle. The connector should securely lock.
Ground wire MUST be connected to a stable grounding point.
DUO-101-AVW R2 connector
 Loading...