

DICE Car Integration Kit for iPod, iTPA 220, iTR 100 Integration Manual

integration guide
09
DRIVE LIVE ACCESSORIZE
www.diceelectronics.com | 888.342.3999

WELCOME
to the world of DICE
ICE Electronics has been
an industry leader in
D
OEM vehicle integration
for years. Our commitment to
quality drives us to continuously
develop cutting edge devices
that meet and push toward the
next steps in the quickly evolving vehicle technology market.
We concentrate our expertise
on engineering and design.
nvesting into new emerging technologies through
in-house engineering,
I
technology licensing, and partnerships has contributed to our
success over the years. We stand
strong and will continue to lead
the integration market by increasing resources and recruiting
talented managers and engineers.

oming to your home is our
new line of home audio
C
success, we continue to develop
and add new and unique features
to the units. The iTPA 220 and
iTR 100 both provide great sound
quality and their classic design
will accent any home or office
decor.
products. Due to their
volving into a new era of
manufacturing, we value the
concept of maintaining our
E
surroundings and pride ourselves
in using eco-friendly designs in
packaging and component selection. Our US based engineering,
design, and marketing teams
enable us to forward the same
value to our business partners.
We focus on providing professional support, incentives, and
care to all of our customers.
WWW.DICEELECTRONICS.COM

of
CONTENTS
Vehicle Specific Integration for iPod
• Acura
• Audi
• BMW / Mini Cooper
• Honda
• Lexus
• Mazda
• Mercedes
• Porsche
• Scion
• Toyota
• Volkswagen
Universal Integration for iPod
• AUX universal integration
• FM-RDS universal integration
Accessories
• Integration accessories for iPod
4
8
14
20
26
32
38
44
50
56
62
68
74
76
82
Home Audio
• iTR-100 desktop HD radio receiver
• iTPA-200 vacuum tube amplifier system for iPod
DICE Electronics, LLC. (herein “DICE”) believes that all information contained within are correct and true, however accepts no responsibility for the accuracy, completeness or
Information contained within including but not limited to compatibility guidelines are not a guarantee of suitability, performance, merchantability, or fitness. Diagrams, FAQs and tips
No warranty, express or implied, and no liability in connection with the use of the information contained in this catalogue shall be assumed by DICE. You further agree that DICE is
not liable for any direct, indirect, incidental, consequential or punitive damages arising out of the use of this catalogue or any DICE products. This catalogue does not contain any
DICE shall not be held responsible for alleged misrepresentation or other wrongful practices of its dealers, distributors, or installers. DICE’s obligations and responsibilities regarding
This catalog, as a whole or any sections of it may not be modified or copied for commercial use or distribution. All content, including but not limited to line art, illustrations, logos,
images, pictures, graphics, remarks, notes and texts in this catalogue whether printed, published on the internet or contained in electronics format are subject to copyright and other
intellectual property rights of DICE Electronics, LLC. and/or its affiliates. Copyright law governs the use of trademarks and copyrighted content; any unauthorized use without written
3
are provided for educational purposes only, not guaranteed to be error free, and are intended to assist skilled professionals with proper experience.
its products are governed solely by the agreements under which they are sold. Information contained herein does not become part of these agreements.
consent from DICE or misuse shall constitute a violation of the law, and may be subject to prosecution. All images are for illustration purpose only.
DICE, at its sole discretion, may revise the information contained herein at any time with or without notice.
The content of this catalogue is provided “as is” under the following terms and conditions.
timeliness of the information published or otherwise stated.
guarantee or agreed quality of DICE products or any warranty and non-infringement.
The use of this catalog constitutes your acceptance of these terms and conditions.
Copyright © 2008 DICE Electronics, LLC. All rights reserved.
Terms and conditions
1-888-342-3999
www.diceelectronics.com
8
4
86
88
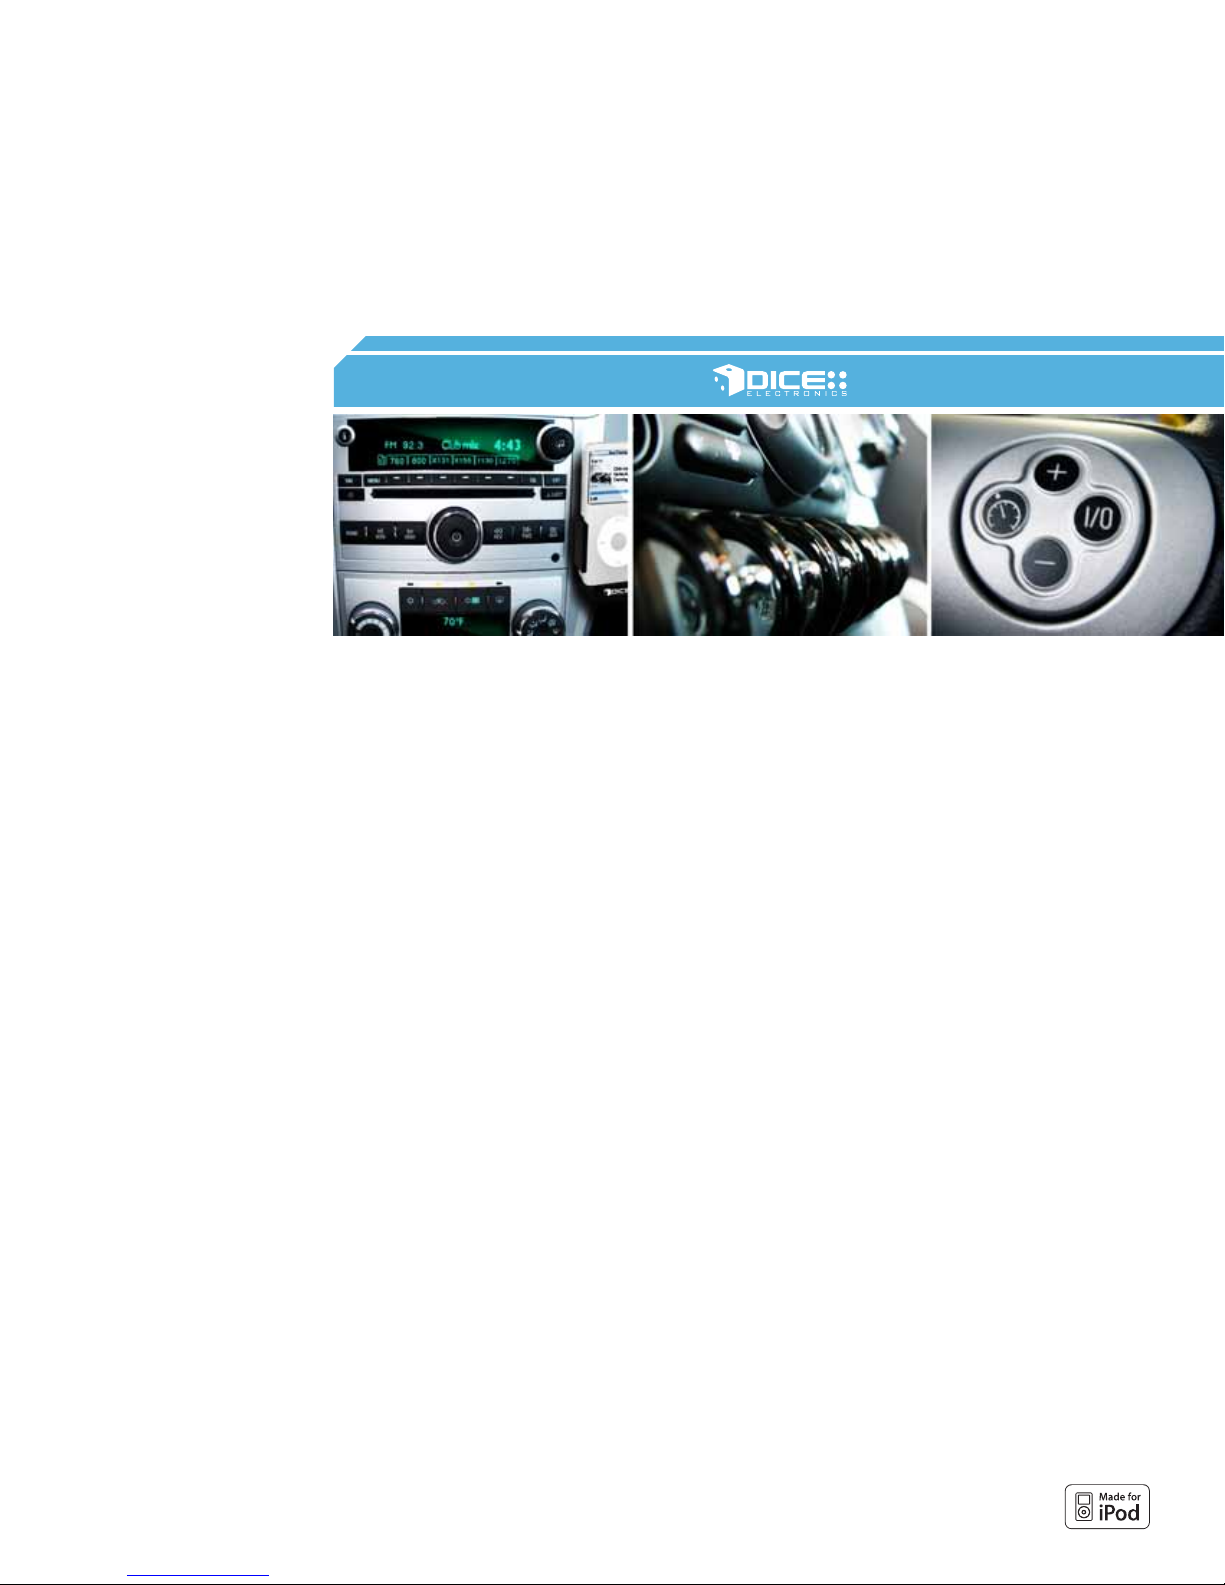
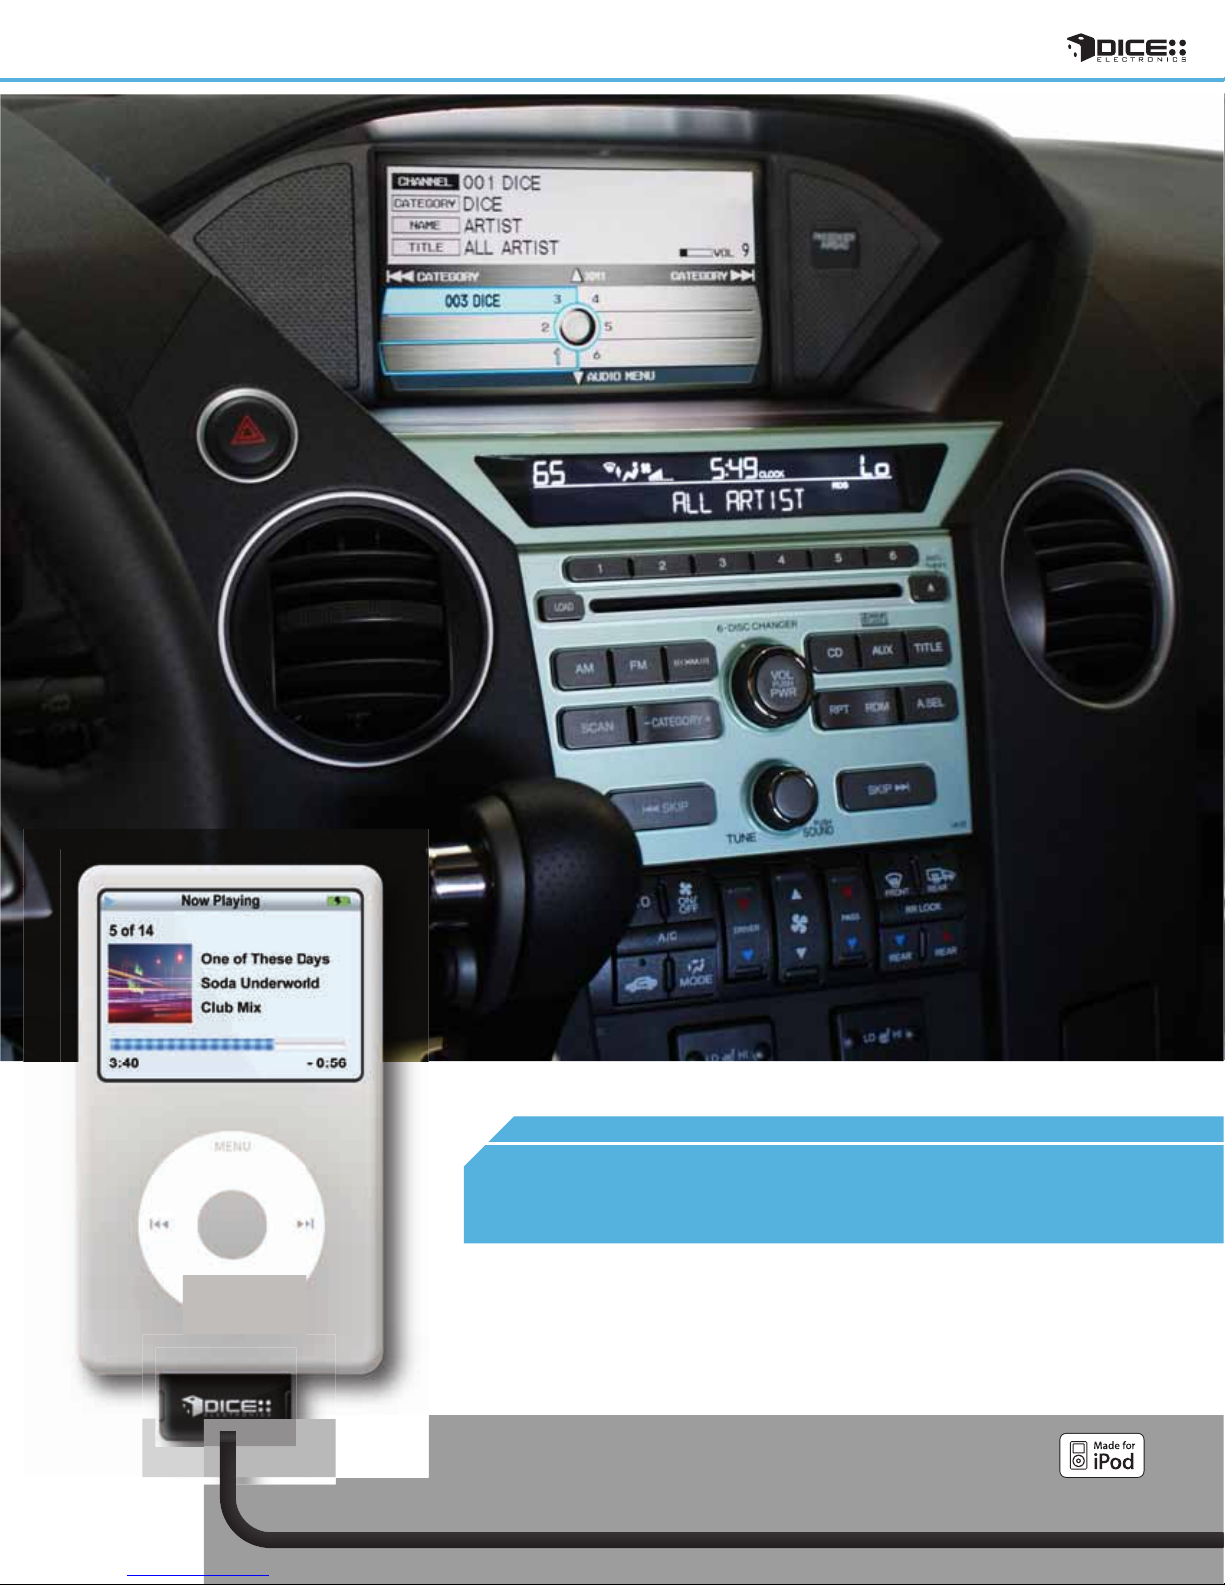
Digital In Car Entertainment
The vehicle-specific car integration kit for iPod connects the iPod to the vehicle's
factory entertainment system. The interface provides CD-quality sound and creates a
seamless interconnection between iPod and the entertainment system of the vehicle.
Text display is available on radio systems where CD or SAT text is supported. The
interface also features integrated controls from the radio, steering wheel or the iPod
and always keeps the iPod charged and ready to go.
4
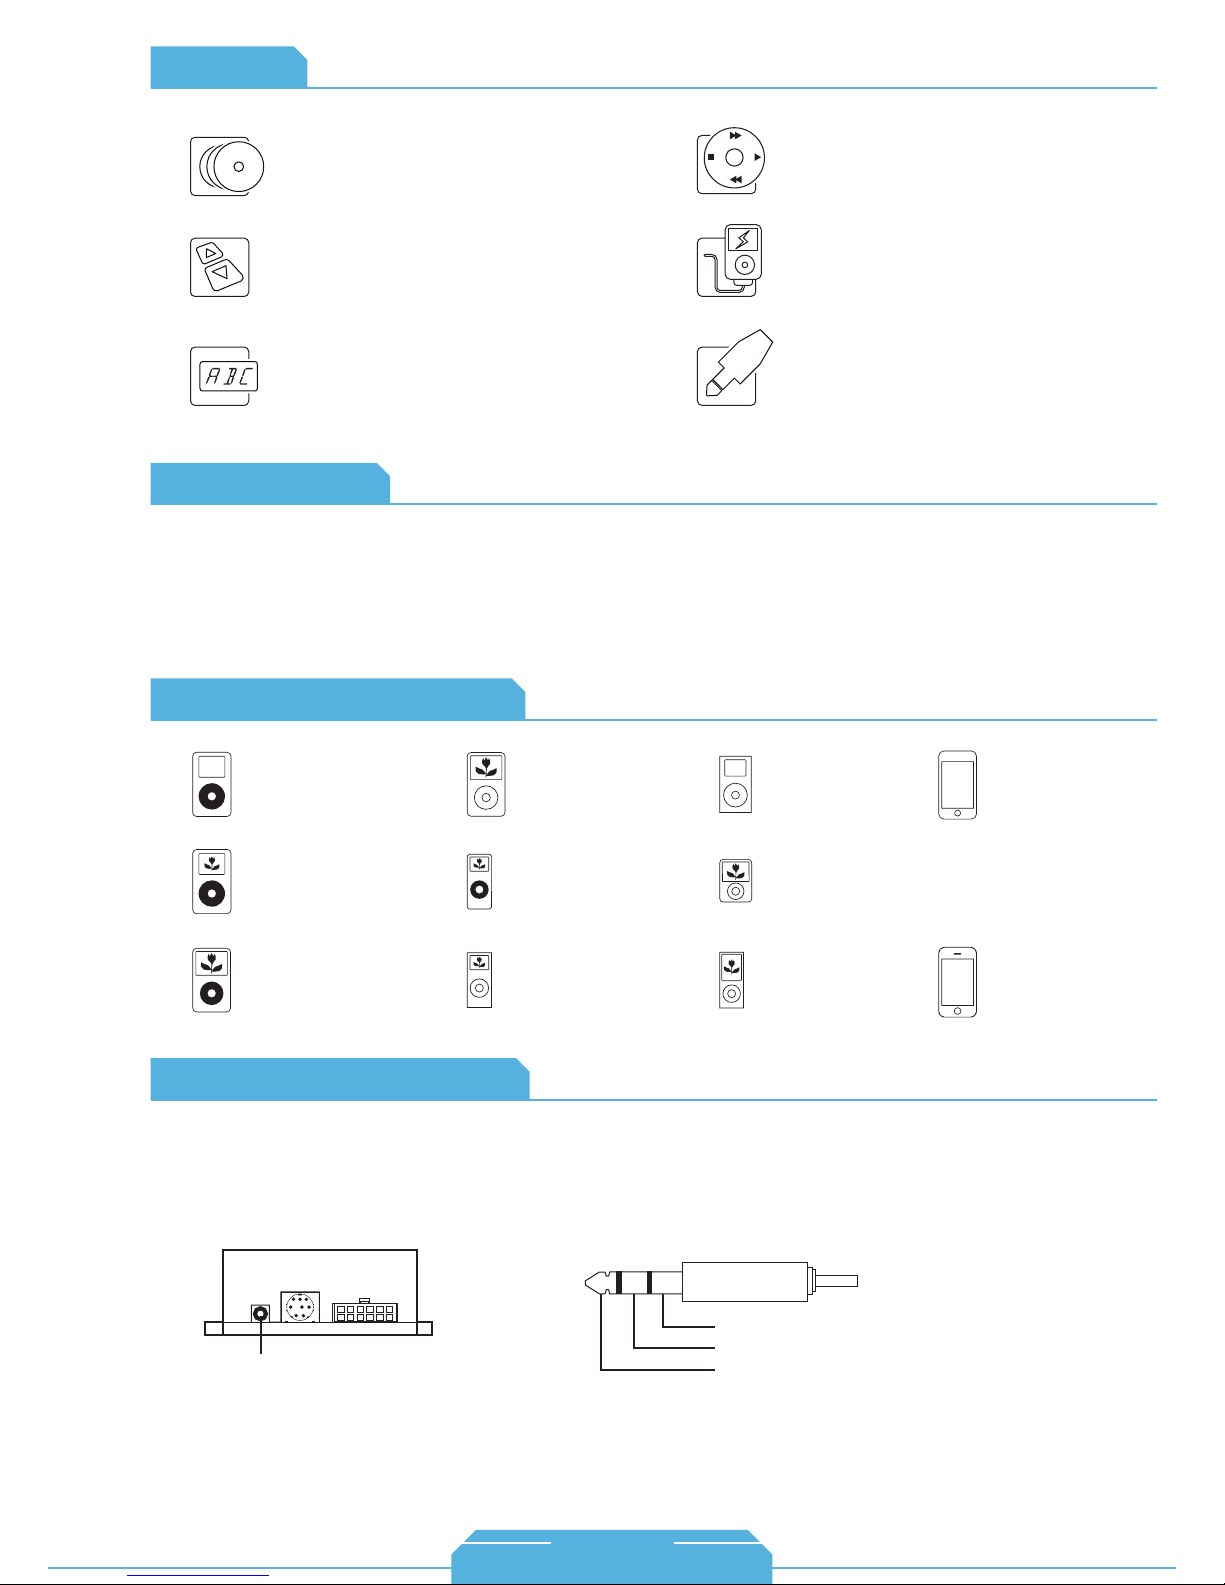
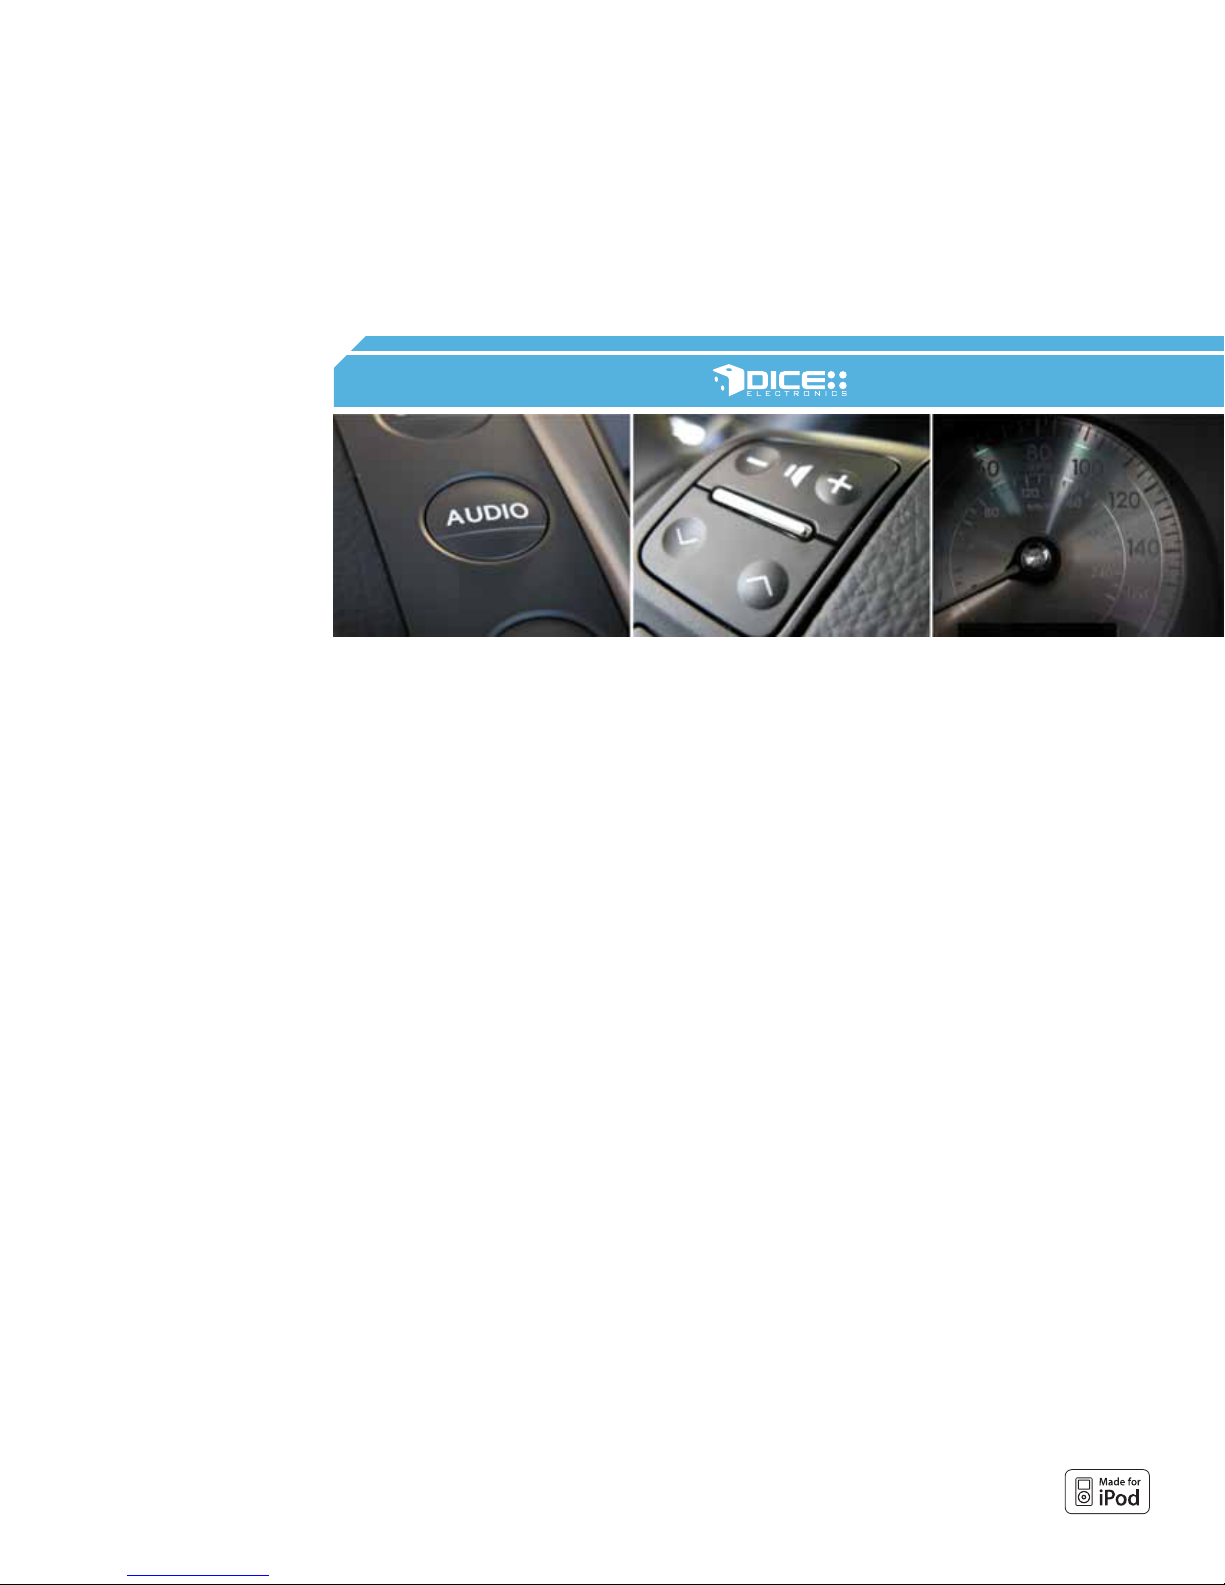
Features
CD-Quality Audio
Delivers high-fidelity CD-quality audio output from
your iPod to your factory car stereo.
Integrated Controls
Allows you to control music from your iPod, or radio
and steering wheel controls.
Text Display
Displays the song title, album and artist name right
on the screen of your radio.
Specifications
Note: It is recommended that installation leaves module accessable to end-user.
• Designed and manufactured in the USA
• Standby current consumption: ~25mA
• Maximum current consumption: ~1A
• Storage temperature: 0-150F
• Operating ambient temperature: 30-120F
iPod/iPhone Ecosystem
iPod-like Browsing
Browse through all the available content like you
would on your iPod
Charges iPod
Always keeps your iPod charged and ready to go.
AUX Input
Connect any external audio device including:
aftermarket satellite radio, CD/DVD players and
more.
iPod
4th generation
20GB 40GB
12 Volt / 5 Volt
iPod
4th generation (color display)
20GB 30GB 40GB 60GB
12 Volt / 5 Volt
iPod
Vehicle Specic
5th generation (video)
30GB 60GB 80GB
12 Volt / 5 Volt
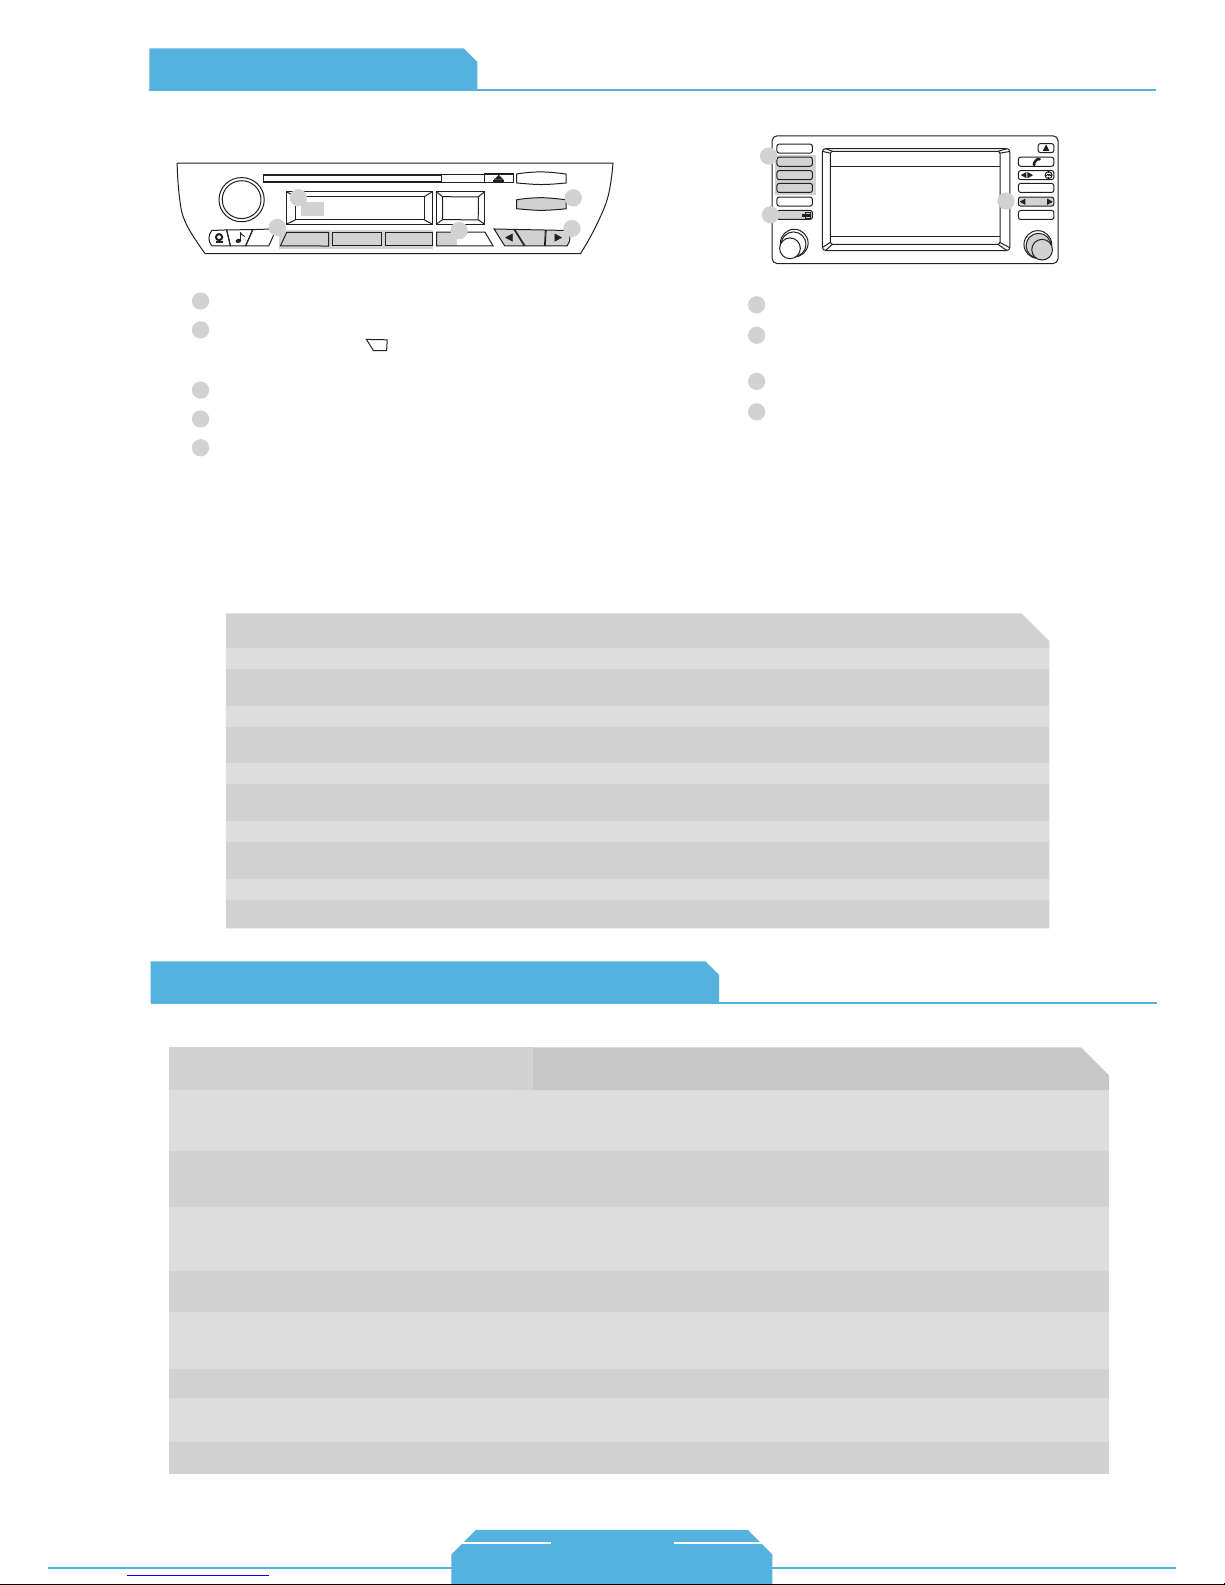
Auxiliary Audio Source
The interface is equipped with a 1/8” AUX jack to connect an auxiliary device such as an MP3 player,
DVD player or other audio sources. To access the AUX audio source, select DISC 5, Track 2 or Mode 5,
Channel 2.
Module
1/8" AUX
integration for iPod
input
iPod classic
80GB, 160GB:12 Volt / 5 Volt
120GB: 5Volt
iPod nano
1st generation
1GB 2GB 4GB
12 Volt / 5 Volt
iPod nano
2nd generation (aluminum)
2GB 4GB 8GB
12 Volt / 5 Volt
1/8" mini stereo jack (not included)
iPod mini
4GB 6GB
12 Volt / 5 Volt
iPod nano
3rd generation (video)
4GB 8GB
12 Volt / 5 Volt
iPod nano
4th generation (video)
8GB 16GB
5 Volt only
Sleeve (Ground)
Ring (Right audio)
Tip (Left audio)
iPod touch
1st gen (5 Volt/12Volt)
8GB 16GB 32GB
2nd gen (5 Volt)
8GB 16GB 32GB
iPhone & iPhone 3G
4GB 8GB 16GB
5 Volt
Making the adjustments:
While listening to the auxiliary device, adjust the volume (gain), bass, mid and treble by
turning the Tune dial or pressing the Seek button. DISC/Mode 1-4 modes select what
adjustment the Tune/Seek buttons perform. See next page for illustration.
5
1-888-342-3999
www.diceelectronics.com

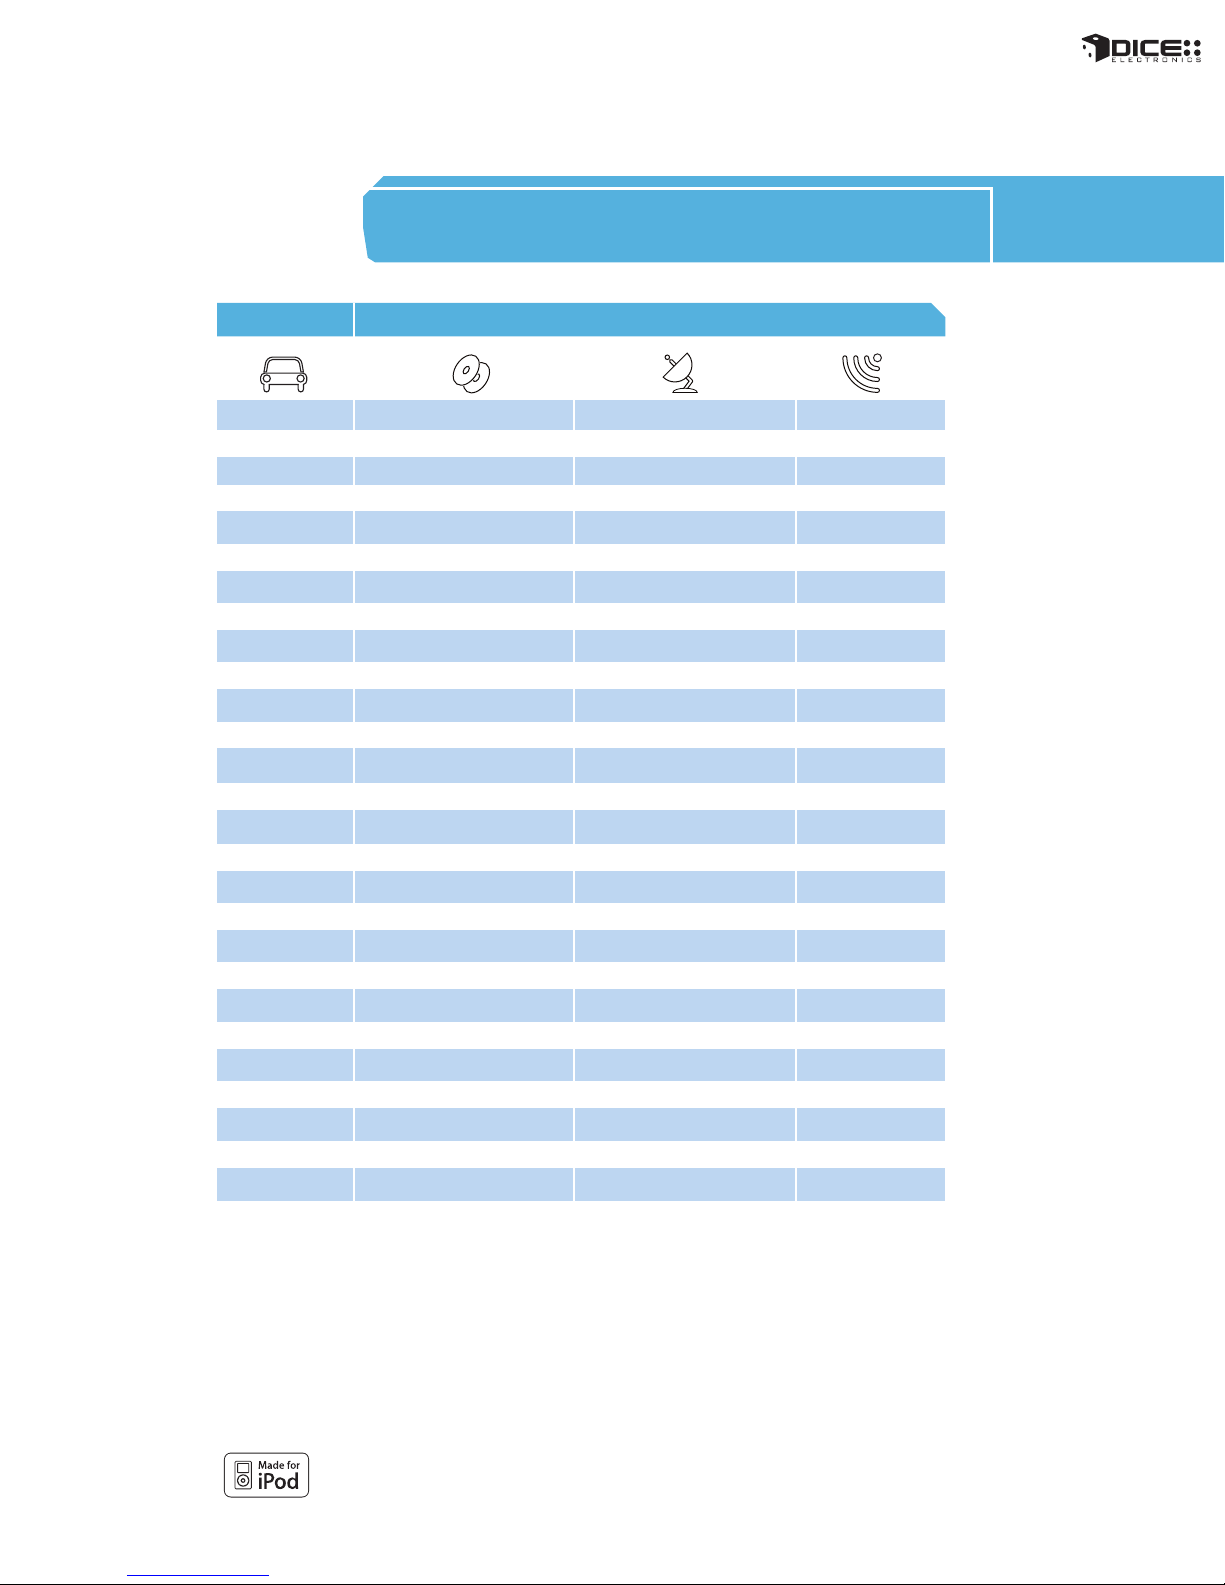
Comparison Chart
AUX Audio Source Setting
The vehicle specific, hard-wired integration kit from DICE is packed with features. Compare it to any other
product on the market and see for yourself how great it is. Our kit offers CD-quality sound, text display, integrated
controls, iPod like browsing and much more!
6
CD quality
sound
AUX input
Full text display
purchase
separately
Full control from radio,
steering wheel, or iPod.
Browsing by playlist,
artist, album, and song
Switchable, functional
iPod Screen
Vehicle-specific
Charges iPod
(both 5 volt & 12 Volt)
Optional iPod
holder/cradle
• Comparison data based on products avaiable as of Summer, 2008. Information listed is as-is. DICE Electronics is not responsible for any misprints or the accuracy of the data.
Customizable
text display
Company
1
Company
2
Company
3
Company
4
Features
integration for iPod
The auxiliary input has settings for gain, bass, mid and treble in order to optimize sound.
Volume (Gain) should be adjusted if the audio level from the auxiliary device is too low or to high. If you hear
distorted audio while playing the auxiliary device, you need to reduce (-) the gain. If you notice that the audio is
too quiet then the gain setting should be increased (+). Default settings are "50" ("68" for gain) and values may
be adjusted in increments between 01-99. Bass, Mid and Treble should be adjusted to compensate for the
acoustic presets of the radio.
Note:
If you are using an AUX device that uses the vehicle’s power source and not its own battery, you may have to
use a GROUND-LOOP isolator to avoid grounding and engine noise.
1 2
3
4
Volume
setting
Bass EQ
setting
Mid EQ
setting
Treble EQ
setting

FAQ for iPod integration
Will my factory radio support text display?
Yes, select CD-text and/or SAT capable radios
can support text display.
Do I have to disconnect the CD changer in
my vehicle?
Externally mounted CD-changers (glovebox,
trunk, etc.) need to be disconnected. In-dash CD
changers built-in to the radio however, are
retained.
Can I keep the factory satellite radio in my
vehicle?
Yes, various operating modes are supported with
the DICE integration kit to allow for the most
flexible install. See specific kits for more details.
Do I need to have a navigation radio to be
able to operate the kit?
No, non-nav and navigation head units are both
supported.
Will the DICE integration kit charge my
iPod/iPhone?
Yes, all iPod models and iPhone models are
supported for charging, including the latest 5 volt
iPod/iPhone models.
It appears that the DICE kit uses the same
mini-din connector for the iPod dock cable as
other kits. Can I use an iPod cable from
another 3rd party system?
No. While cables may appear identical, the
internal connections can be very different. Using a
non-DICE branded cable can damage both the
integration kit and the iPod.
What makes the DICE iPod integration kit
different from others available on the market?
Our kits offer multi-source integration (can
operate as CD/MP3/MD/SAT), text display on
various vehicles, user-friendly interface, and
more!
In any way can the DICE kit void my vehicle
manufacturer’s warranty?
No, when the DICE kit is properly installed and
operated, the vehicle’s warranty will not be
voided.
If my vehicle has a CD-changer connection in
the glovebox, can it be utilized for DICE
integration for iPod?
For most vehicles, the glovebox connection can
be used to integrate the DICE kit.
Can I use older iPod kits with my new iPod?
While control and music are available from older
integration kits, they will only provide 12 volt
charging which is no longer supported by new
iPod models. New iPod cables are available for
5 volt charging.
Vehicle Specic
Can I keep the iPod controls active?
Yes, the iPod can be controlled directly if the
DICE unit is set up in iPod mode. In this mode,
text display may not be supported.
Which iPod does the kit work with?
4th generation and newer models (excluding
Shuffle) are supported.
Can I install the kit myself?
Yes, the kit is end-user installable with the proper
tools. However, we do recommend professional
installation.
Will the kit direct my phone call through the
car radio?
integration for iPod
No, however the iPhone will pause the music for
the duration of the phone call and resume once
the call has ended.
What does “made for iPod” logo mean?
The MFi logo can only be used by Apple licensed
product developers who certified the product to
comply with guidelines set by Apple. Only
licensed developers have access to authentic
dock connectors that ensure the highest quality
connection and longest reliability.
What does the “works with iPhone” logo
mean?
The WWi logo is an extention of the MFi program
with even tougher certification requirements
ensuring interference-free operation with iPhone.
Will the DICE kit support video playback on
my navigation screen?
No, our iPod kit can only transfer the audio and
information for the audio through your stereo
system.
7
1-888-342-3999
www.diceelectronics.com
ACURA
Integration for iPod
8
9
ACURA
vehicle specific integration for iPod
chart
Vehicle Vehicle Specific Integration Kits Universal Kit
iPod CDC KitAcura CDC Note iPod FM Kit
Integra
1998 - 2001 FMRDS
MDX
2005 - 2009 FMRDS
2001 - 2004
RDX
RL
2005 - 2009
RSX
2002 - 2006
TL
2004 - 2008
1998 - 2003
TSX
2004 - 2008
Note:
• The DICE i-Honda-R series supports both Honda and Acura vehicles, therefore the part numbers are shared (i-Honda-R2,
i-Honda-R3/R4).
• Text display not available in CDC mode.
1. Navigation-equipped vehicles or factory satellite retention requires i-Honda-R4 kit.
2. Text available only in SAT emulation mode - Radio must have XM button and factory XM must be disconnected.
3. Not compatible with in-dash 6 CD system; external CD-changer must be disconnected.
i-Honda-R2 3 N/A
i-Honda-R3/R4 1
N/A
i-Honda-R3/R4 1 i-Honda-R3/R4 1, 2
N/A
i-Honda-R2 3
i-Honda-R3/R4 1 i-Honda-R3/R4 1, 2
N/A
i-Honda-R3/R4 1 i-Honda-R3/R4 1, 2
iPod SAT Kit SAT Note
i-Honda-R3/R4
N/A
i-Honda-R3/R4 1, 2
N/A
N/A
N/A
1, 2
FMRDS
FMRDS2007 - 2009
FMRDSi-Honda-R3/R4 1
FMRDS1996 - 2004
FMRDS
FMRDS
FMRDS
FMRDS
10
FAQs Before Purchasing the Kit
Acura
How can I tell if my factory Acura radio will
support text?
The factory radio must have an XM or SAT button.
Can the factory XM be retained?
Yes, factory XM can be retained with our
Y-harness that is included in the i-Honda-R4 kit.
Retaining XM requires the kit to be in CDC
emulation mode.
Content Identifier
DICE interface for iPod
Installation Guide/User Manual
user manual
for i-Honda-R2 kit:
Are any of the operational features different
between SAT-mode and CD-mode of the DICE
unit?
Operating the iPod through the factory radio is
nearly identical in both emulation modes.
SAT-mode has the benefit of text display.
Can the steering wheel controls operate my
iPod?
Yes, the steering wheel controls can operate the
iPod. Note: pressing and holding of the steering
wheel button triggers its secondary funtion.
for i-Honda-R3 kit: for i-Honda-R4 kit:
docking
vehicle specific
interface module
cable
Honda-R2
Bus Connector
Honda-R3
Bus Connector
(regular harness that is used
for non-nav Acura and
disables XM (if equipped))
Honda-R4
Bus Connector
(Y-harness required for
navigation-equipped Acura or to
retain factory XM)
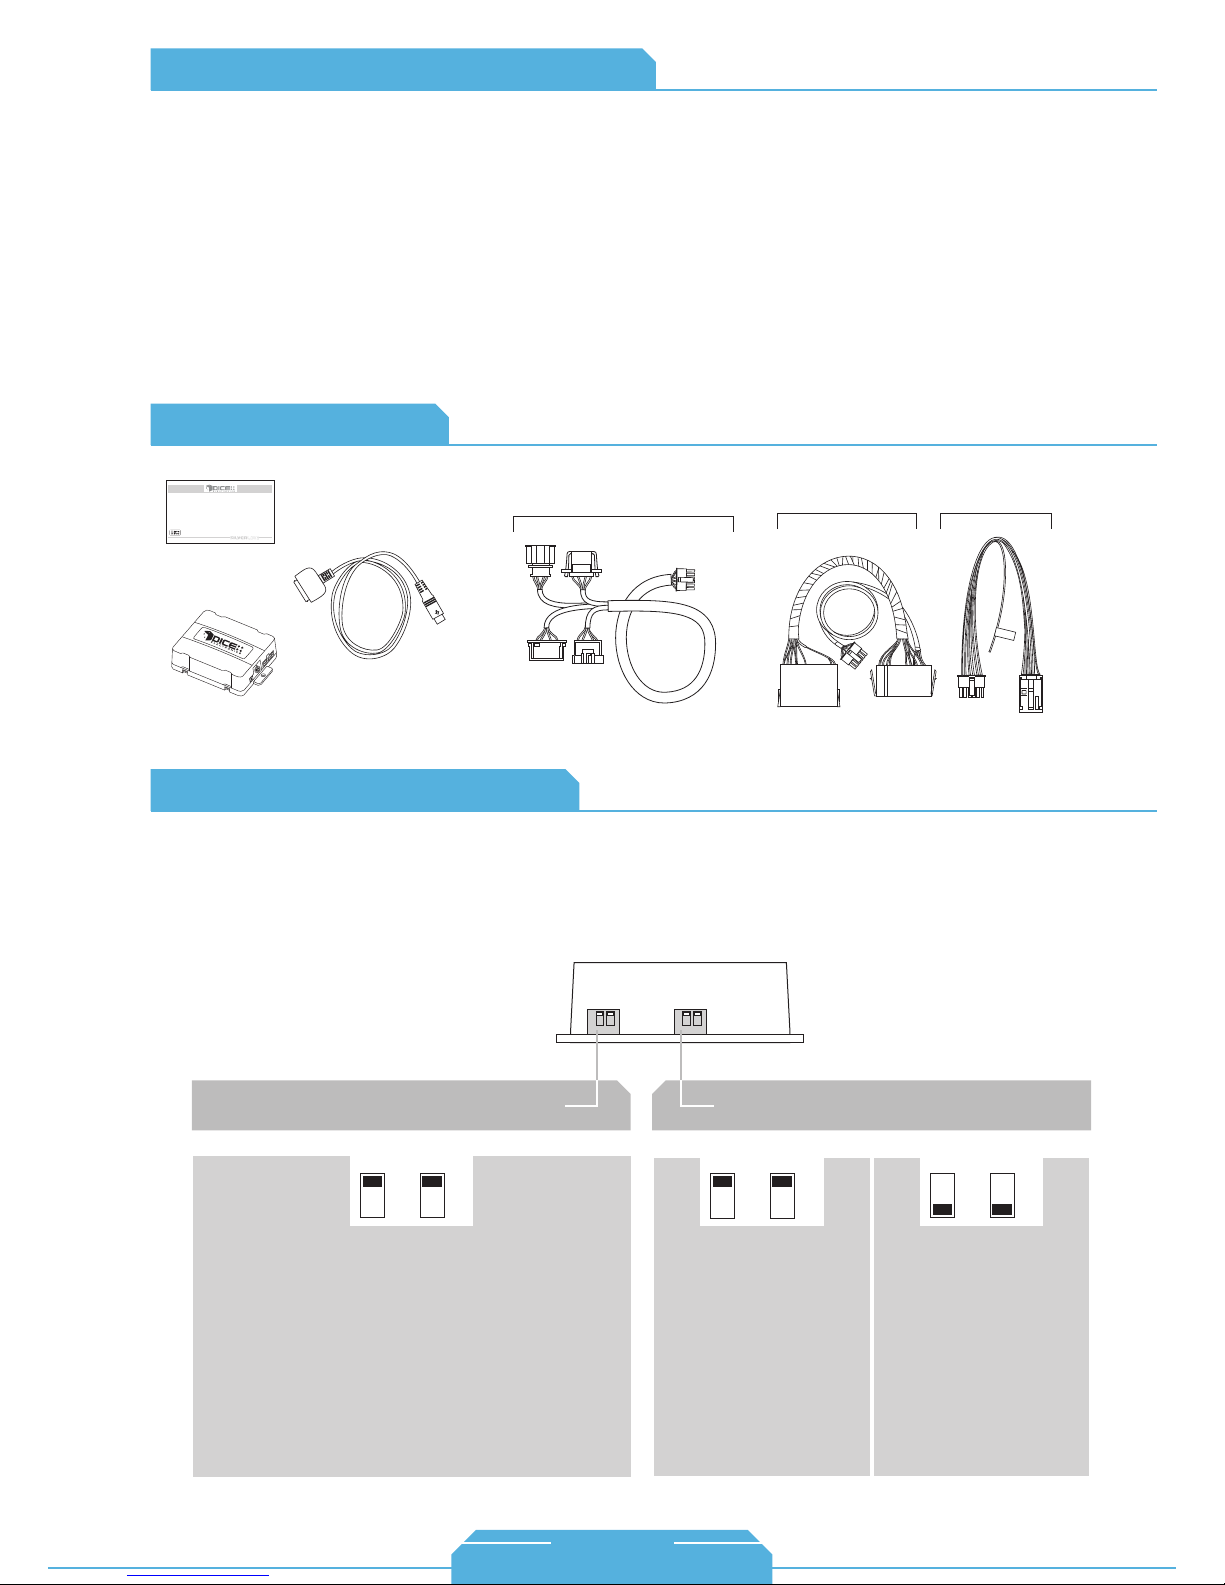
About Dip Switch Settings
The configuration switches located on the DICE module are used to set the operation of the interface by
the installer. Incorrect dip switch settings may cause the DICE interface not to work properly or not to
operate at all. Disconnect the vehicle harness from module and cycle ignition off for 50 seconds
after changing the switches!
DICE module
for i-Honda-R2 kit:
Car configuration switches
CD Changer (CDC)
OFF OFF
Default
Switches should remain in the default OFF position.
iPod configuration switches
“Locked” “iPod”
OFF OFF
Default
It is best selected when text
display is supported by the
radio. After the initialization
the iPod will be locked for
increased interface
functionality
Selected emulation
It is best selected when text
display is NOT supported
by the radio. Track
numbers and times are not
synchronized between the
iPod and radio. Because
there is less data transfer
between the iPod and radio,
this mode has the fastest
response time. Content is
selected on the iPod only.
ON ON
11
1-888-342-3999
www.diceelectronics.com
(About Dip Switch Settings continued)
for i-Honda-R3/R4 kit:
Car configuration switches
CD Changer (CDC) Satellite (SAT)
OFF OFF
Default
Recommended for radios
NOT supporting Satellite
(XM) or if factory SAT is
installed and user wishes to
retain it.
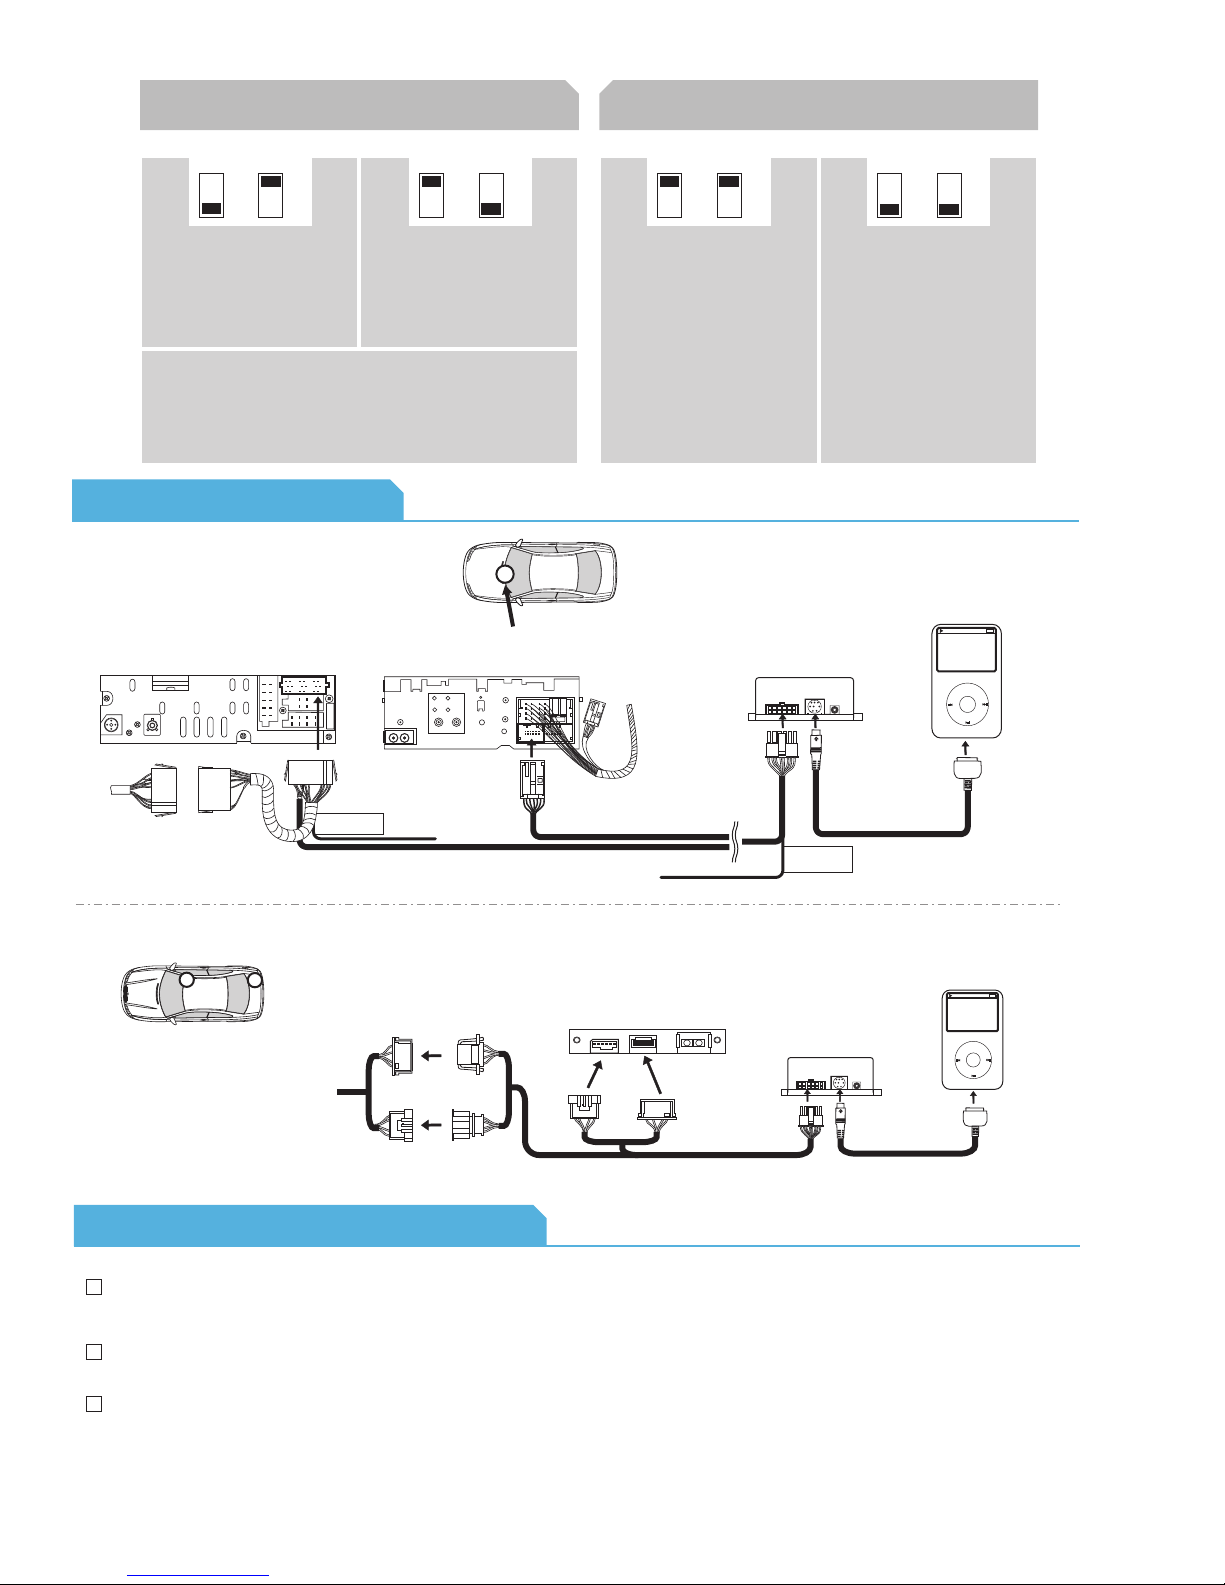
Connection Diagram
ON
ON
Recommended for Satellite
(XM) capable radios. This
type of emulation provides
full text display on the
radio. If Satellite (XM) is
equipped it must be
disconnected to operate
flawlessly in this mode.
radio location
iPod configuration switches
“Locked” “iPod”
OFF OFF
Default
recommended in SAT
emulation:
It is best selected when text
display is supported by the
radio. After connecting the
iPod you will see the DICE
logo on the screen. After the
initialization the iPod will be
locked for an increased
interface functionality.
Factory XM tuner
(if installed)
ON ON
recommended in CDC
emulation:
It is best selected when text
display is NOT supported
by the radio. Track numbers
and times are not
synchronized between the
iPod and radio. Because
there is less data transfer
between the iPod and radio,
this mode has the fastest
response time. Content is
selected on the iPod.
Old Acura BUS system New Acura BUS system
module
docking
Honda R2
BUS connector
cable receptacle
(R4 only)
Honda R3 / R4 BUS connector
•
Note that in some vehicles the physical location of
vehicle specific
connector
the CD changer / SAT connector is on the bottom
of the radio
Installation Tips / Check List
To operate in SAT mode, the XM tuner must be physically disconnected. The tuner is usually located in the
trunk area on the left or right side near the wheel-well. In the Acura RDX, it is behind the glovebox up front.
iPod
MENU
cable
Installation on the Acura TSX can be done without removing the radio. Simply press the inner sides of the
storage bin of the lower part of the dash and gently pull out. The CD/SAT connection is on the bottom of
the radio; this is where the i-Honda-R3/R4 will connect.
On the Acura TL (2004-2008), the radio normally does not need to be removed. When the driver-side
panel on the console is removed, you can get to the CD/SAT connection through the side.
12
Operation Overview
Acura
CDC emulation
1
2
Source selector
1
Press to change track, press and hold
2
to RW or FFW.
Press to change modes.
3
SAT emulation with navigation system
2
SAT emulation
3
1
2
5
4
3
Source selector
1
Use Presets to change modes.
2
Toggle between available text fields.
3
Press to change track.
4
Press to enable shuffle song.
5
Source selector
1
2
3
4
Use Presets to change modes.&
6
Press to change track.
or
Turn to change track.
1
5
3
4
6
Acura Specific Technical Notes
Problem
Cannot fit i-Honda-R2 kit into any of the ports
on the radio or cannot fit i-Honda-R3/R4 into
any of the ports on the radio
iPod does not display the DICE logo when
connected.
Cannot select CD changer or SAT source.
Radio/ steering wheel controls do not operate
iPod.
No text display.
No audio from iPod source.
iPod does not charge.
Music is distorted or sound level is too low.
Cannot find SAT mode.
Sound of factory installed satellite radio is
bleeding through when the iPod audio source
is selected.
Various vehicle trim models (EX, LX, DX, etc.) can have different radios for a specific
year. If the i-Honda-R2 connection doesn’t fit into any ports, the i-Honda-R3/R4 will be
required and vice versa.
Reset iPod and make sure most recent iPod firmware is installed. Make sure all cables
are connected properly. Note that iTouch does not display the logo.
Check DIP switch settings. With the ignition OFF disconnect vehicle harness
from module for a few seconds and reconnect. Verify that the correct button is
used to access the interface.
Reset iPod and make sure most recent iPod firmware is installed.
Make sure DIP switch settings are correctly set for text display.
Reset the iPod. Verify proper connection to the interface.
Check all connections. See if iPod charges while connected to computer or wall
charger. You may need to reset the iPod.
Check and make sure all EQ and BASS boost options are turned off on your iPod.
If the radio does not have a SAT or XM button, then it will not support SAT emulation of
the DICE module. Have the DICE module configured for CDC emulation.
The factory XM module must be disconnected. It is usually located in the trunk of the
vehicle.
5
Solution
Press to enable Shuffle Song.
13
1-888-342-3999
www.diceelectronics.com

AUDI
Integration for iPod
14
15
AUDI
vehicle specific integration for iPod
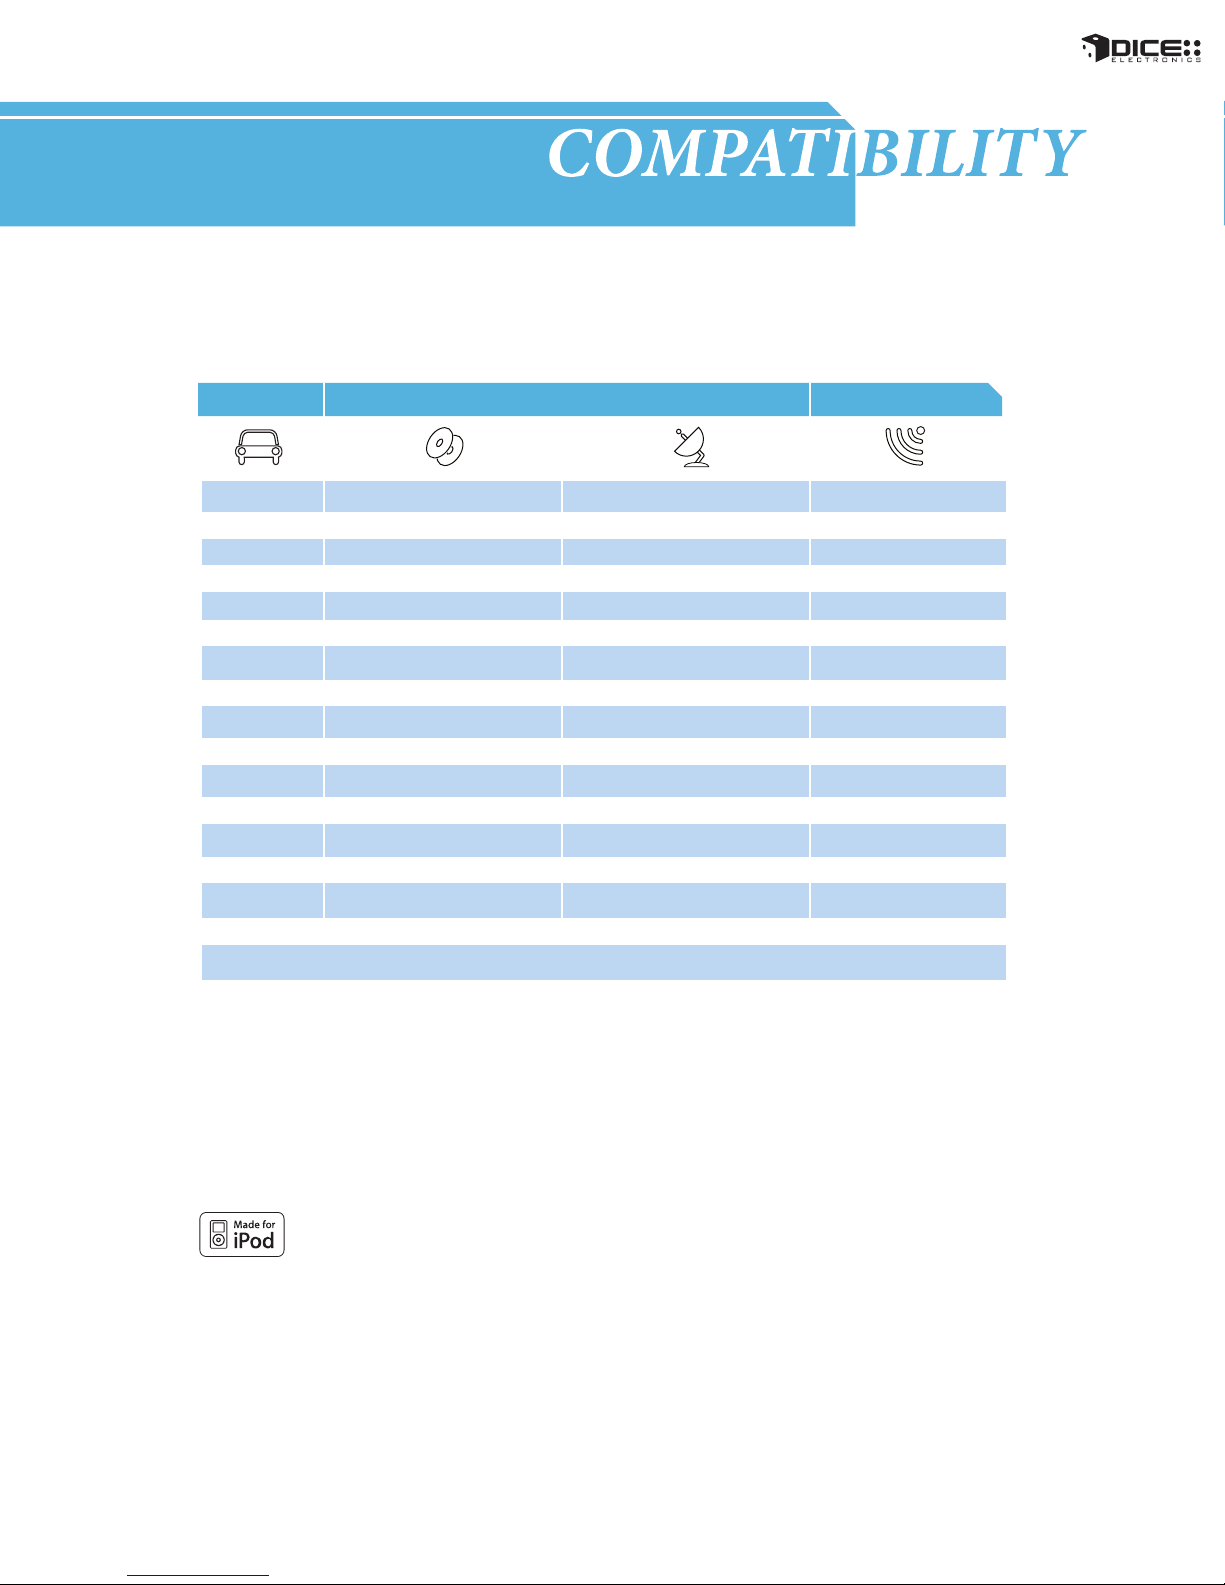
COMPATIBILITY
chart
Vehicle Vehicle Specific Integration Kits Universal Kit
iPod CDC KitAudi CDC Note iPod SAT Kit SAT Note iPod FM Kit
A3
2008 - 2009 i-VW-R 2, 3 i-Audi/VW-SAT 4, 5 FMRDS
2006 - 2007 i-Audi-R 1, 2 i-Audi/VW-SAT
A4/S4/RS4
N/A N/A
i-VW-R 2, 3 i-Audi/VW-SAT 4, 5 FMRDS2007 - 2008
i-Audi-R 1, 2 i-Audi/VW-SAT 4, 5 FMRDS2004 - 2006
i-Audi-R 1, 2 FMRDS1998 - 2004
A5/S5
please call FMRDS2008 - 2009
A6/S6/RS6
2005 - 2009
2004 i-Audi-R 1 i-Audi/VW-SAT 4 FMRDS
1998 - 2003
Q7
2007 - 2009
A8/S8
2002 - 2009
1998 - 2001
Allroad
2004 - 2005 i-Audi-R 1 i-Audi/VW-SAT 4 FMRDS
2000 - 2003 i-Audi-R 1 FMRDS
TT
2008 i-VW-R 2, 3 i-Audi/VW-SAT 4, 5 FMRDS
2004 - 2006 i-Audi-R 1, 2 i-Audi/VW-SAT 4 FMRDS
2000 - 2003 i-Audi-R 1, 2 FMRDS
N/A N/A
i-Audi-R 1 FMRDS
please call FMRDS
N/A N/A
i-Audi-R FMRDS
N/A
N/A
N/A
N/A
N/A
N/A
N/A
4, 5 FMRDS
FMRDS2009
FMRDS
FMRDS
Note:
• Text is not supported on i-Audi-R & i-VW-R kits.
1. If the vehicle is equipped with the factory navigation system (RNS-E), please choose the i-VW-R kit.
2. Optional mating connector available if glove box CDC plug connection is present. This also retains factory SAT radio.
3. If the vehicle requires i-VW-R kit, please contact us for detail on SAT retention.
4. Radio must have a SAT button.
5. i-Audi/VW-SAT kits allow for retaining factory SAT tuner, if present.
16
FAQs Before Purchasing the Kit
Audi
Does factory satellite radio need to be
disabled with the DICE kit?
No, the i-Audi/VW-SAT kit retains factory satellite
radio.
How can I tell if my Audi radio will support the
text-capable i-Audi/VW-SAT kit?
If your factory Audi radio has a SAT button , it is
compatible with our i-Audi/VW-SAT kit and will
support text display.
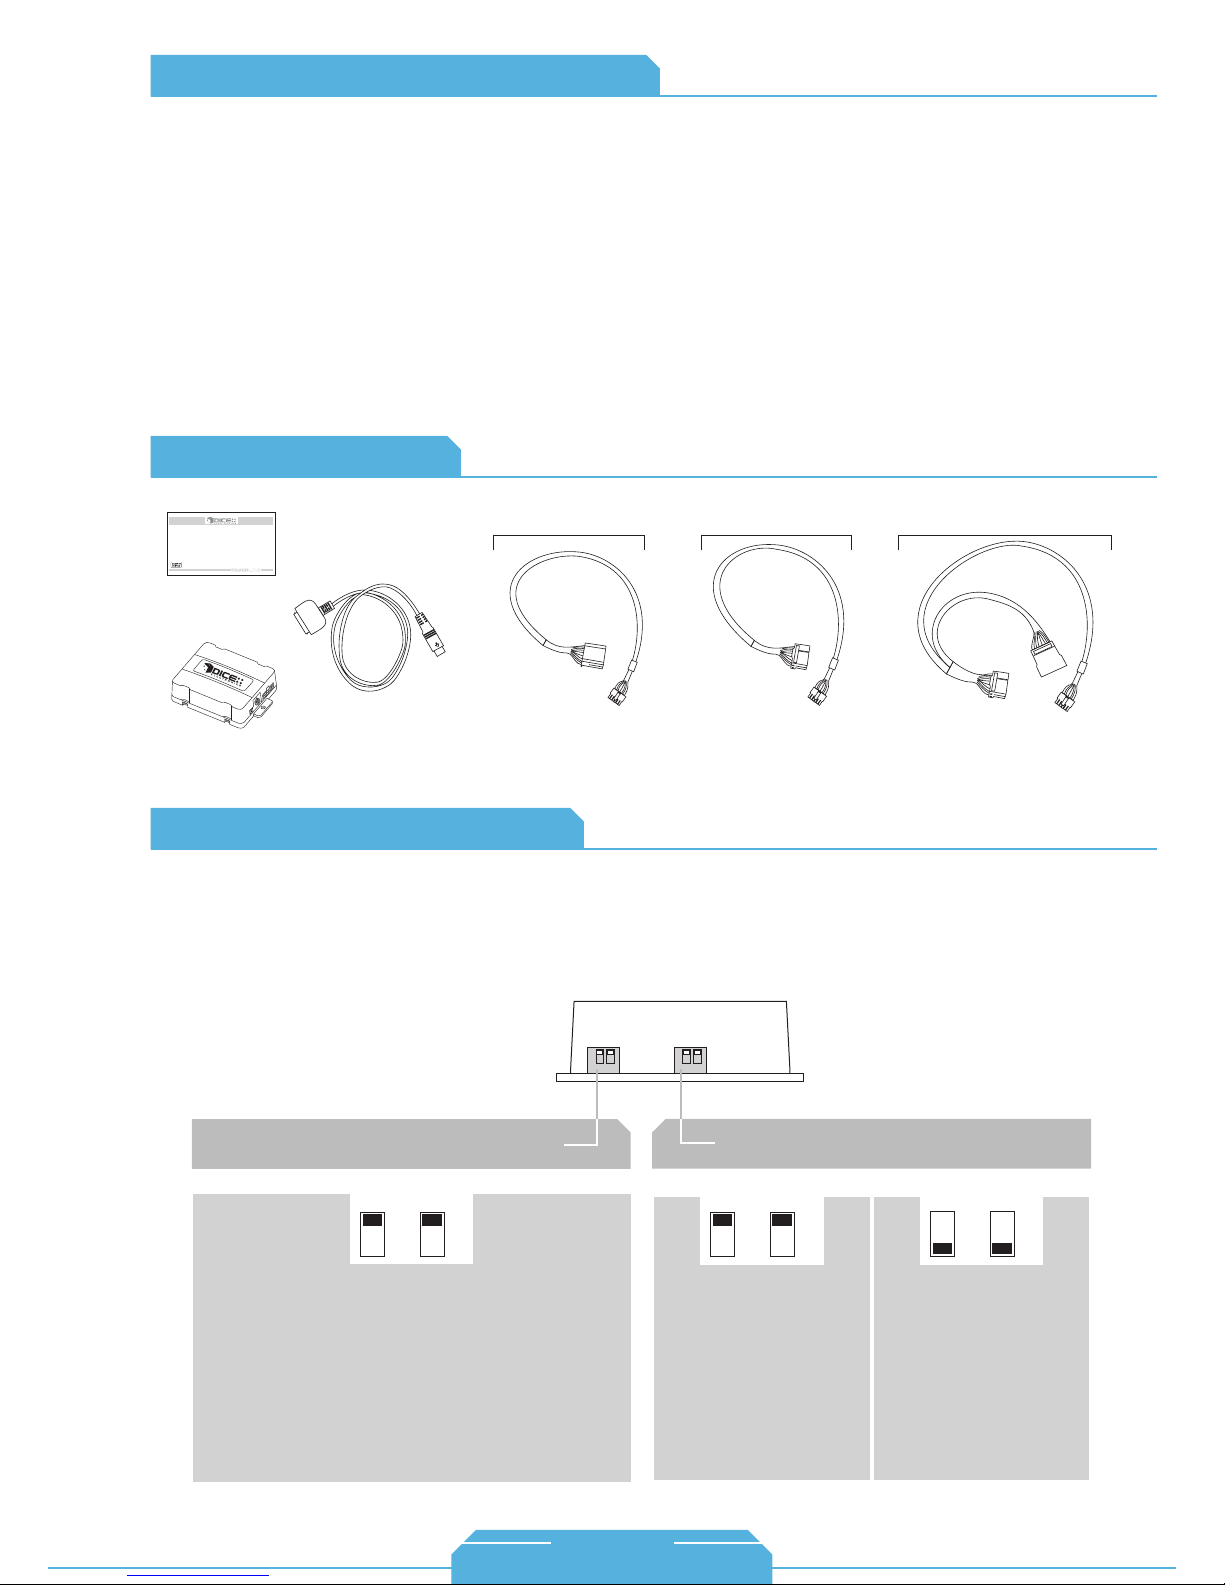
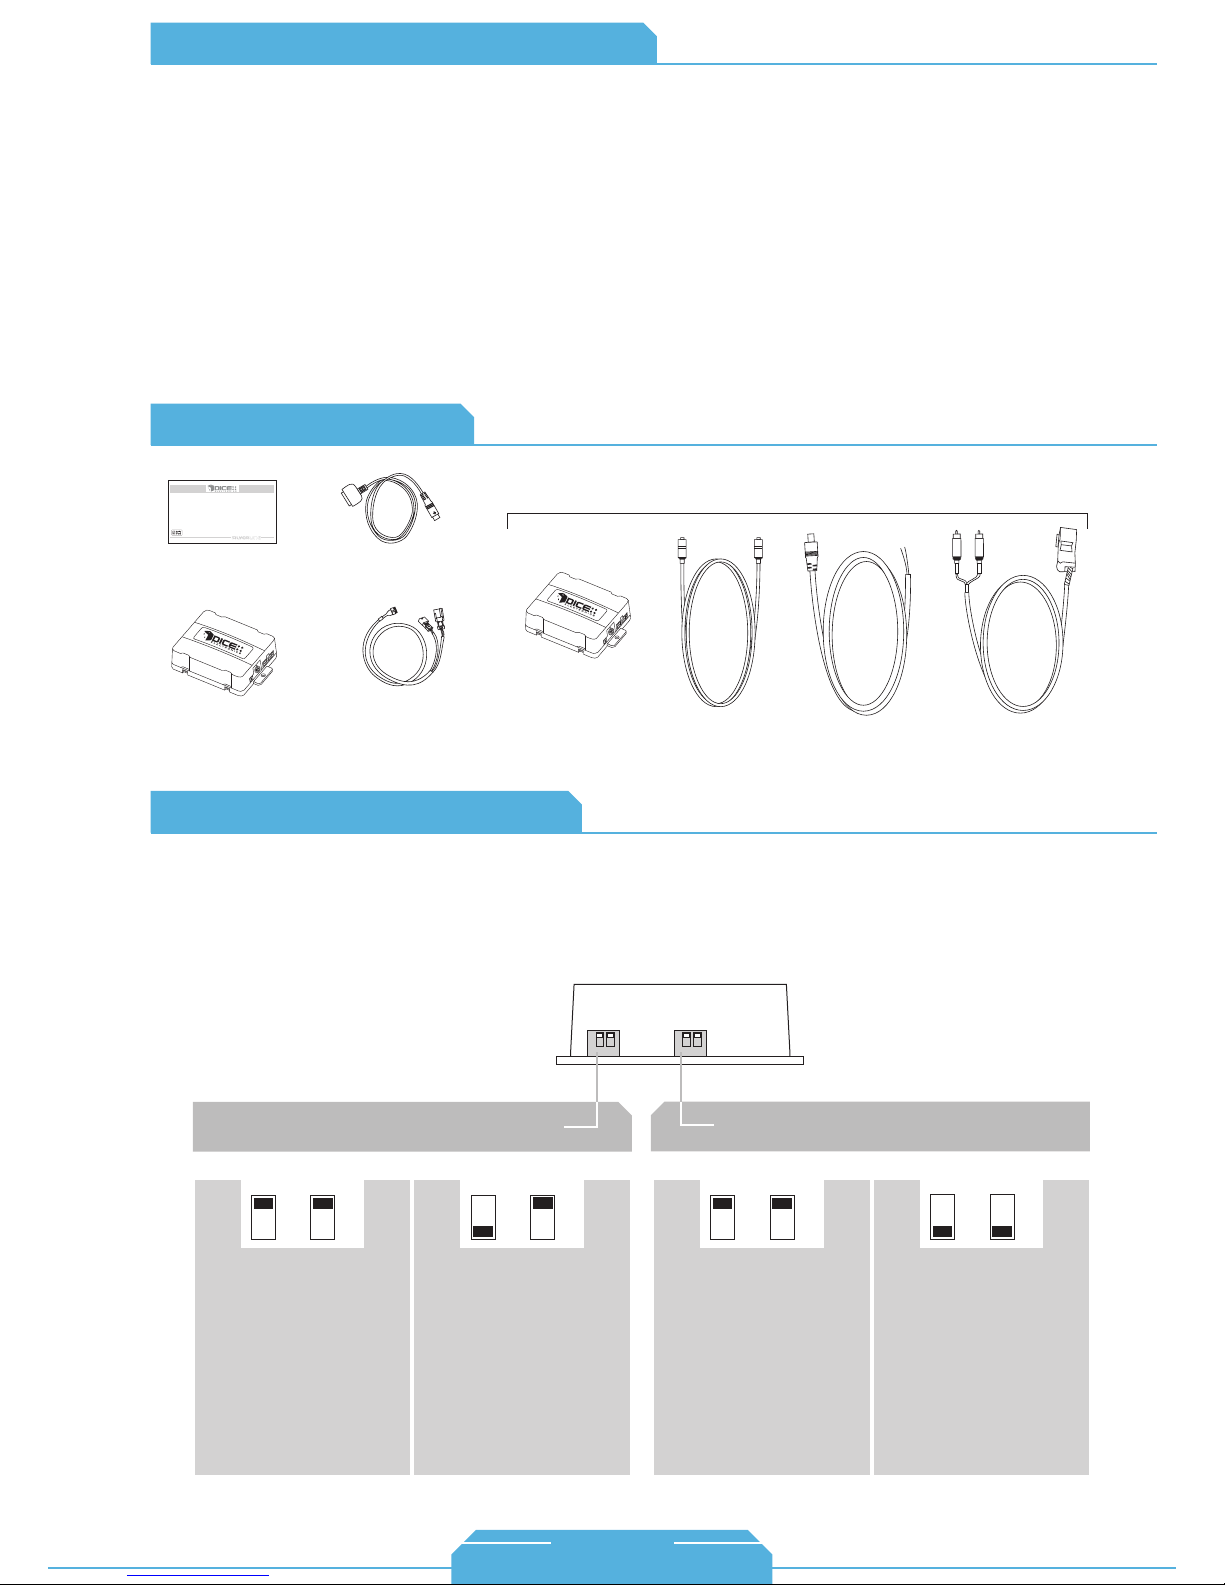
Content Identifier
DICE interface for iPod
Installation Guide/User Manual
user manual
vehicle specific
interface module
docking
cable
for i-Audi/VW-SAT kit:
i-Audi/VW-SAT harness
I upgraded my older Audi’s factory radio to a
newer factory radio/navigation. Will this still
work and how do I know which kit I need?
This will still work as long as the newer head unit
came out of a compatible Audi. Navigation
(RNS-E) radios take the i-VW-R harness. Other
radios may need to be verified for CD
Changer/SAT connection.
for i-Audi-R kit:
Audi-R harness
for i-VW-R kit:
Ground
wire
VW-R2
harness
About Dip Switch Settings
The configuration switches located on the DICE module are used to set the operation of the interface by
the installer. Incorrect dip switch settings may cause the DICE interface not to work properly or not to
operate at all. Disconnect the vehicle harness from module and cycle ignition off for 50 seconds
after changing the switches!
DICE module
for i-Audi-R/i-VW-R kit:
Car configuration switches
CD Changer (CDC)
OFF OFF
Default
Switches should remain in the default OFF position.
iPod configuration switches
Selected emulation
“Locked” “iPod”
OFF OFF
Default
It is best selected when
advanced controls on the
radio are used. After the
initialization the iPod will be
locked for increased interface
functionality.
It is best selected when text
display is not supported
by the radio and user
wishes to retain iPod
control. Track numbers
and times are not
synchronized between the
iPod and radio. Because
there is less data transfer
between the iPod and radio,
this mode has the fastest
response time. Content is
selected on the iPod only.
ON ON
17
1-888-342-3999
www.diceelectronics.com
(About Dip Switch Settings continued)
for i-Audi/VW-SAT kit:
Car configuration switches
Multi-line display Single-line display
OFF
ON
Default
This is the recommended
setting for radios that have
multiple text fields
displayed in Satellite
emulation mode.
This type of emulation provides full text display on the radio. If
Satellite (XM/Sirius) is equipped it must be disconnected to
operate integration in this emulation mode. XM/Sirius receiver is
usually located in the trunk or under the passenger seat.
Note: Please call to confirm vehicle support prior to installation.
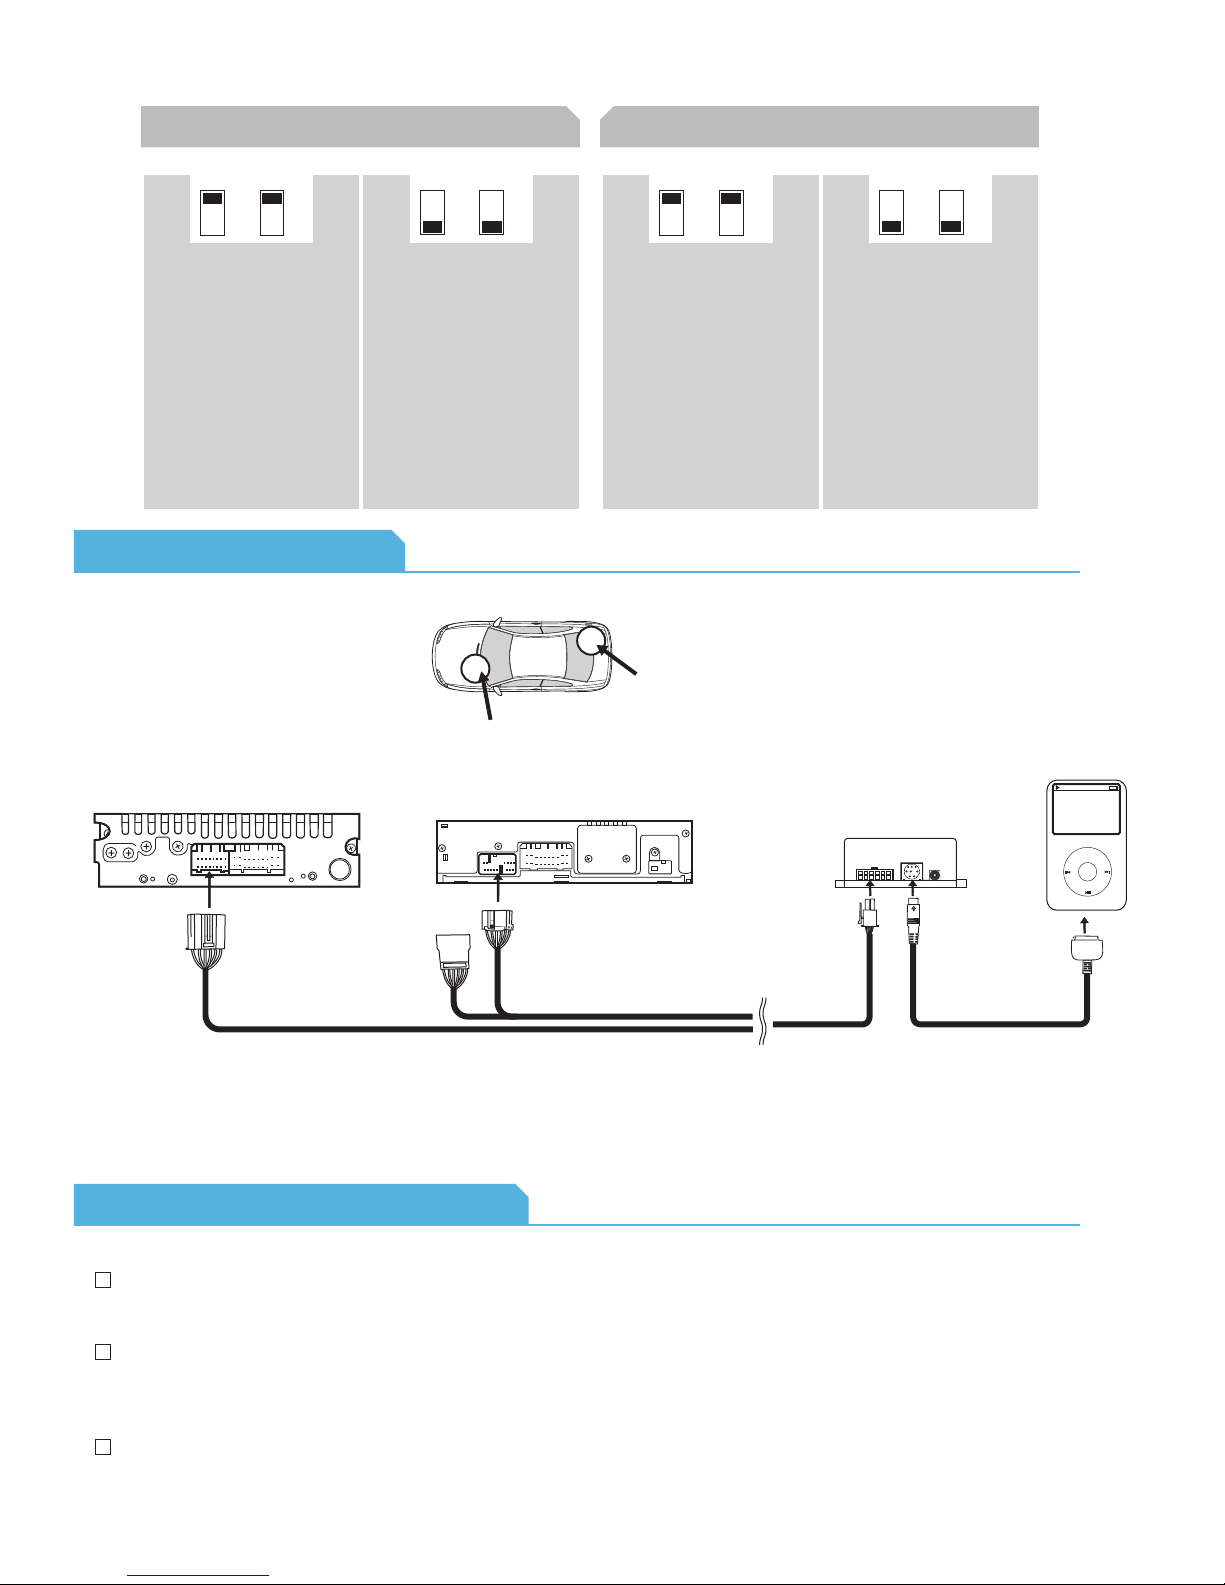
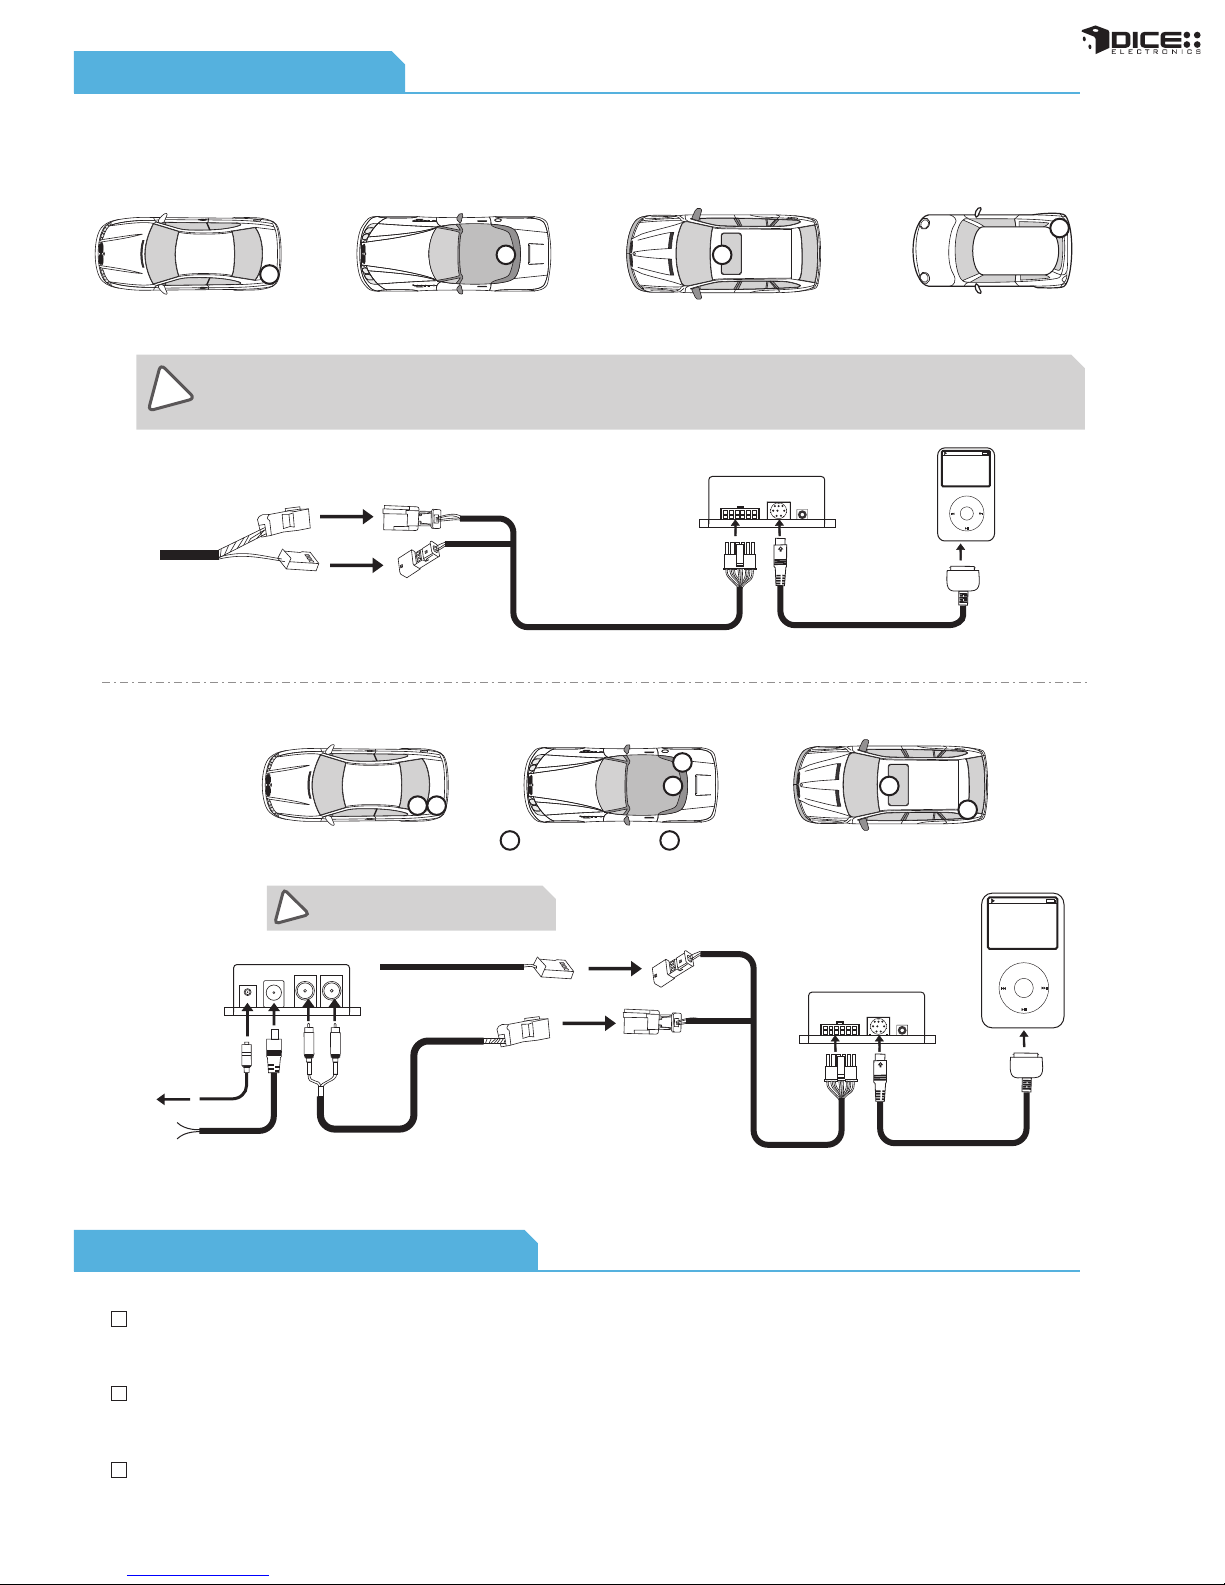
Connection Diagram
for Audi-R/i-VW-R kit:
older radio (non-satellite capable)
10
10
factory harness
in vehicle
receptacle
Audi-R connector
ground
wire
OFF
ON
This setting is
recommended for radios
where there is only one
text field displayed in
Satellite emulation mode.
radio location
to ground
This is best selected when
text display is supported by
the radio. After connecting the
iPod you will see a logo or a
checkmark indicating that the
iPod is locked. After the
initialization the iPod will be
locked for increased interface
functionality.
10
VW-R2 harness
iPod configuration switches
“Locked” “iPod”
OFF OFF
ON ON
Default
module
vehicle specific
connector
This is best selected when
text display is NOT
supported by the radio.
Track numbers and times
are not synchronized
between the iPod and radio.
Because there is less data
transfer between the iPod
and radio, this mode has
the fastest response time.
Content is selected on the
iPod.
docking
cable
Ground
wire
to ground
iPod
MENU
for i-VW-SAT2 (retains satellite radio) kit:
2
Possible Tuner Location
1
From factory radio
factory SAT
harness in vehicle
SAT Tuner
vehicle specific
connector
module
iPod
iPod docking
cable
MENU
Installation Tips & Check List
For the wiring harness(es) that plug into the back of the radio, the extra ground wire must be attached to
the chassis. The extended screw on the back of the radio is a sufficient ground point.
To remove Audi radios and/or glovebox CD changers, you must have proper radio removal keys.
To enhance the user experience, it is recommended to set the iPod configuration switches to iPod mode on
non-text capable radios as this configuration will keep the direct iPod controls unlocked.
18
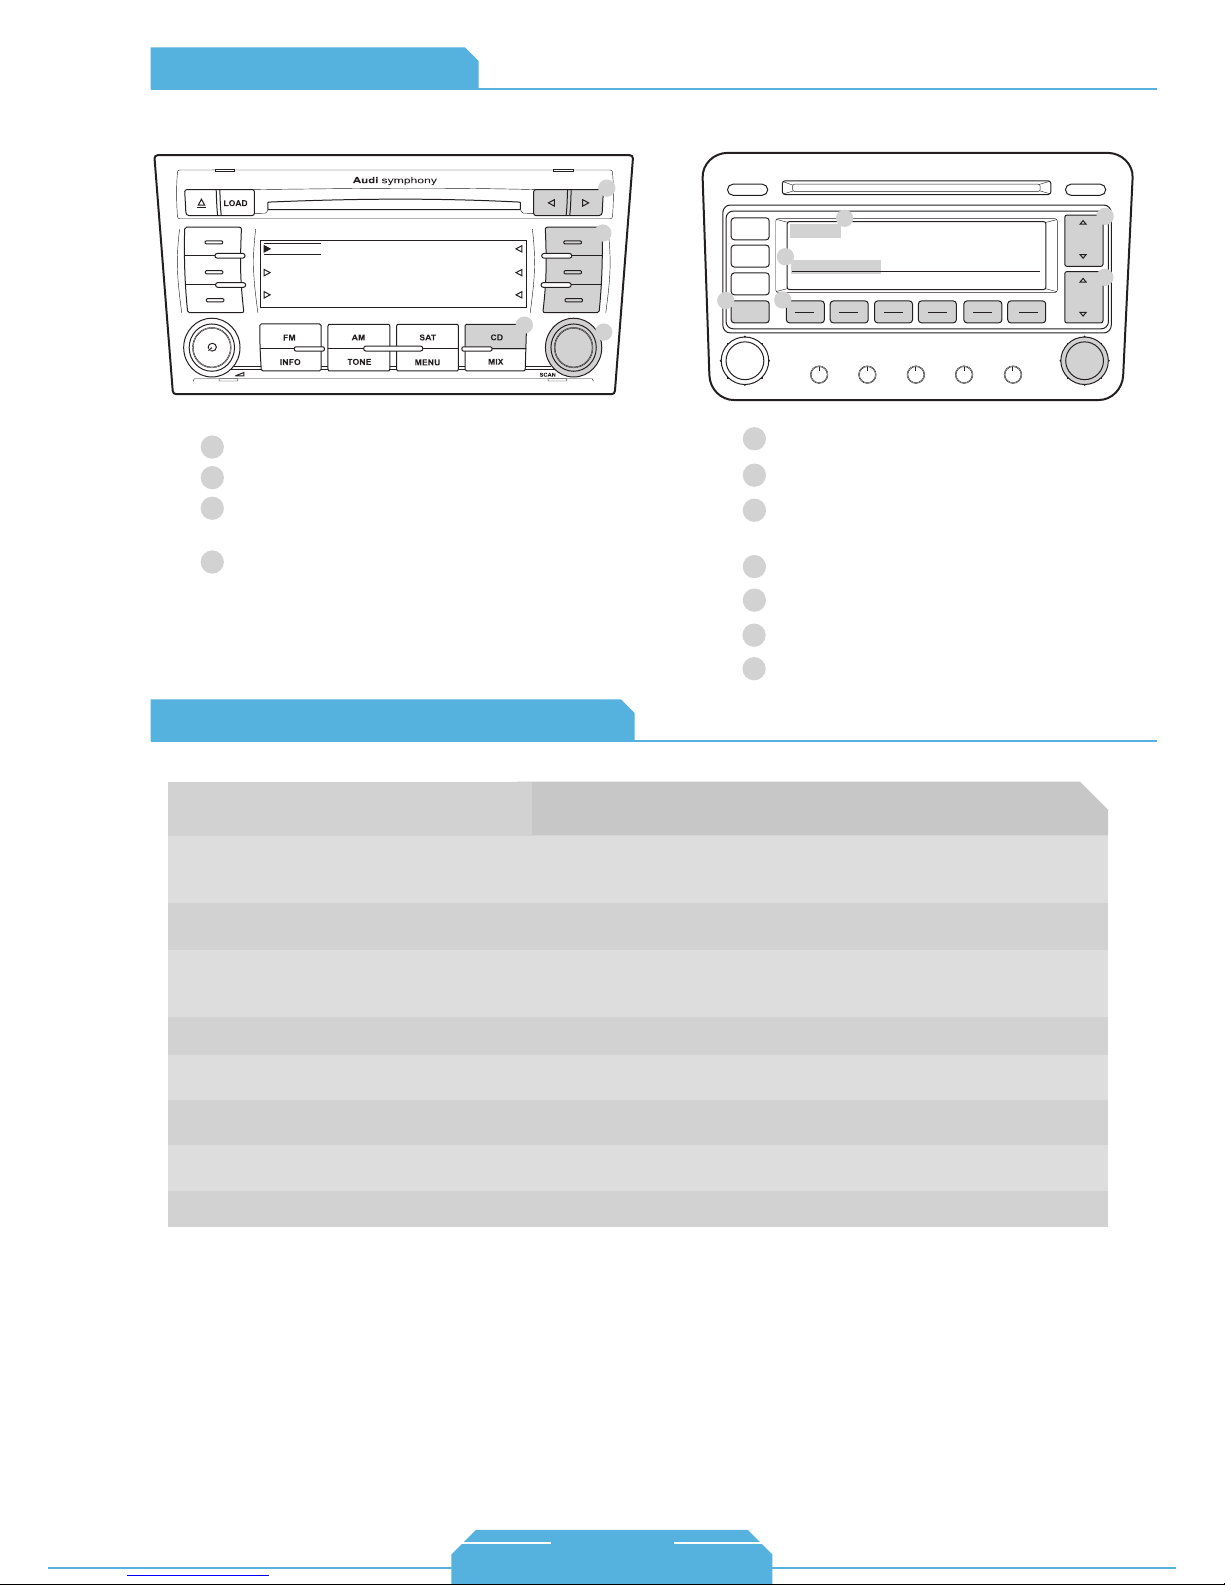
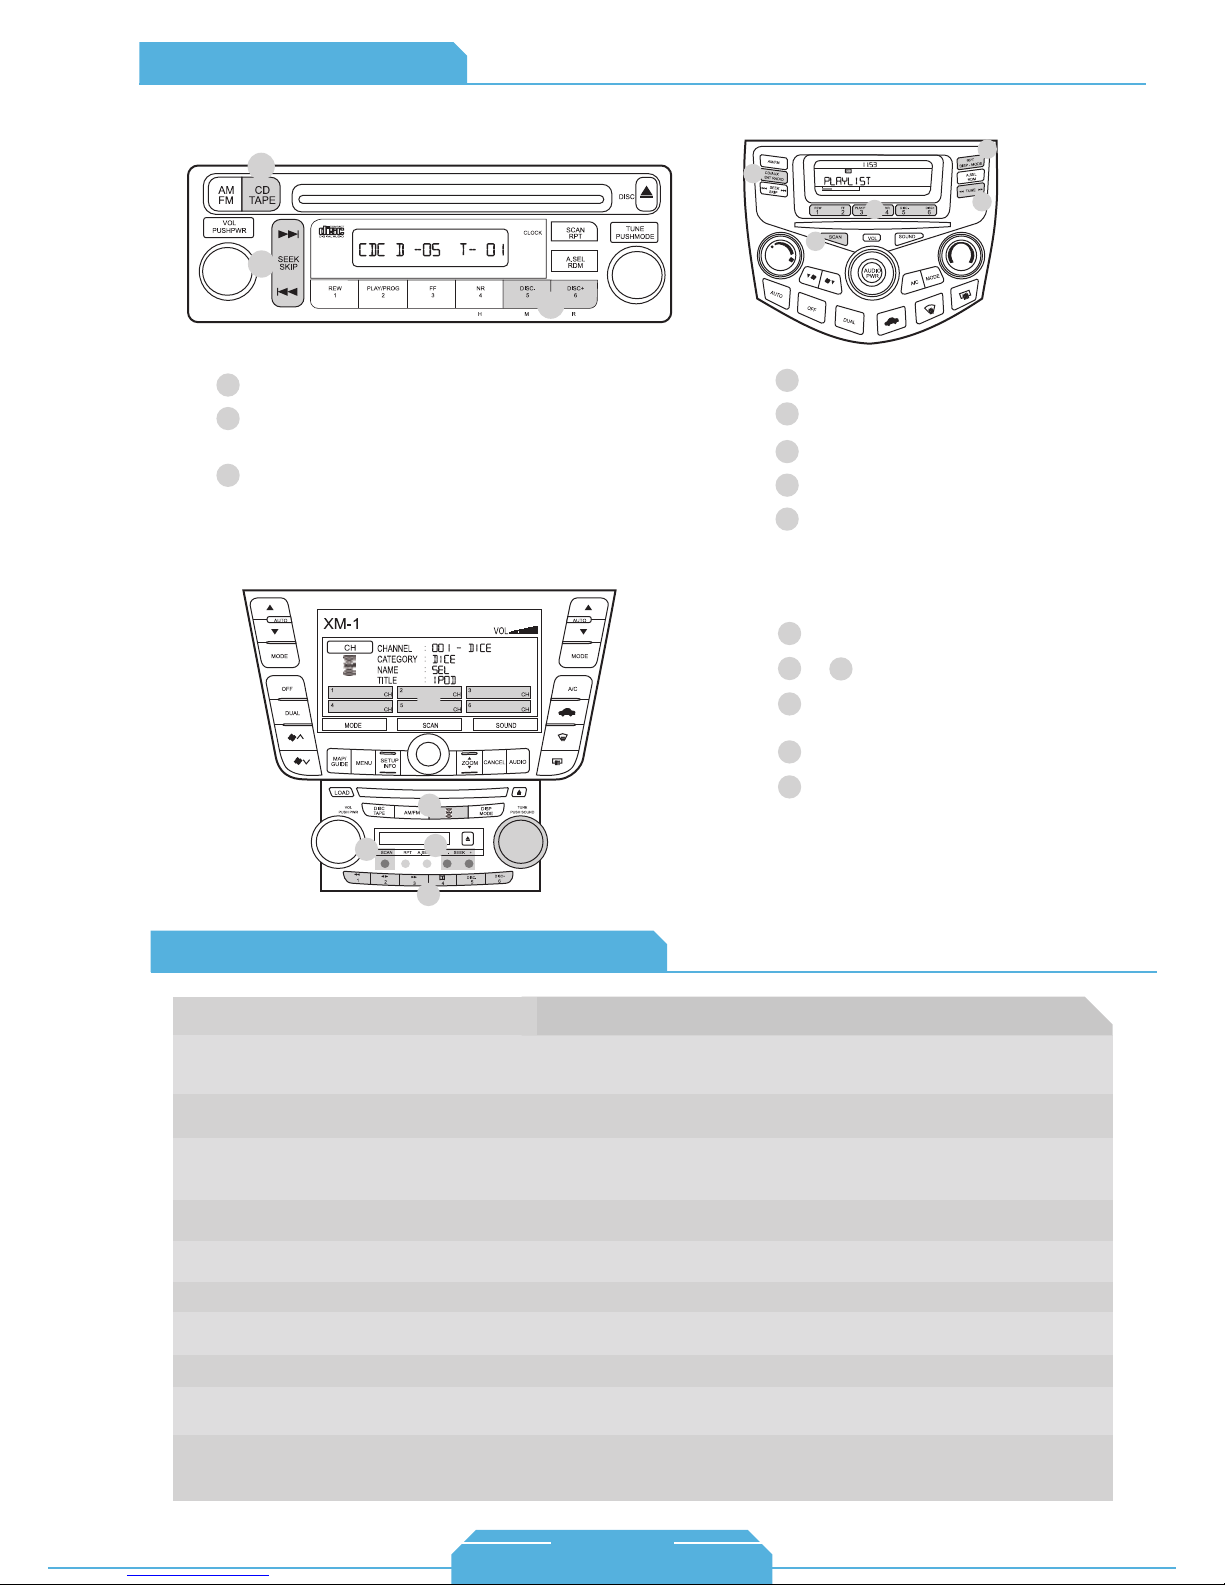
Operation Overview
SAT emulationCDC emulation
Audi
3
1 CD EXT
2 CD EXT
3 CD EXT
Source selector
1
Press to change mode.
2
Press to change Track, hold to Rewind
3
TRACK 12
CD 01:52
CD EXT 4
CD EXT 5
CD EXT 6
1
2
4
or Forward.
Turn to change track.
4
Audi Specific Technical Notes
LOAD EJECT
FM
AM
7
CD
3
1
SAT
ON
VOL
Source selector
1
Press to cycle through Modes 1-6.
2
On selected radios you may use
3
6
XM 1 001
ARTIST * ALBUM
001 002 003 004 005 006
BASS MIDDLE TREBLE BALANCE FADER
Club Mix
SCAN
TUNE
these buttons to select Modes 1-6
Press to change track.
4
Turn to change track.
5
Source indicator
6
This text field may not be shown on
7
all radios.
CAT
FLDR
SEEK
TRACK
5
2
4
Problem
Cannot select the interface.
Radio/ steering wheel controls do not operate
iPod.
Radio/ steering wheel controls do not operate
iPod, but audio is still present.
Interface has erratic recognition or none at all.
No text display.
No audio from iPod source.
iPod does not charge.
Music is distorted or sound level is too low.
Solution
Check DIP switch settings. With the ignition OFF disconnect vehicle harness
from module for a few seconds and reconnect. Verify that the correct button is
used to access the interface (CDC or SAT).
Reset iPod and make sure most recent iPod firmware is installed. Check vehicle’s user
manual on how steering wheel controls work.
Select DISC/Mode 5 and Track/Channel 1. Switch back to DISC/Mode 1 and try
changing Tracks. DISC 5 (Mode 5) Track 02 (Channel 02) is AUX mode and not correct
for the iPod.
Make sure that the ground wire harness is attached to the back of the radio.
Set iPod switches to OFF for "Locked" mode. Text display is only supported on
SAT-capable radios with the i-Audi-SAT kit.
Reset the iPod. Verify proper connection to interface.
Check all connections. Reset iPod and make sure iPod charges while connected to
computer or wall charger.
Check and make sure all EQ and BASS boost options are turned off on your iPod.
19
1-888-342-3999
www.diceelectronics.com
BMW/MINI COOPER
Integration for iPod
20

21
BMW/MINI COOPER
vehicle specific integration for iPod

Vehicle Vehicle Specific Integration Kits Universal Kit
iPod CDC KitBMW CDC Note iPod FM Kit
3-series/M3
2007 - 2009 FMRDS
2006 (coupe & convertible) i-BMW-T 1 FMRDS
1998 - 2005 i-BMW-T
5-Series/M5
1997 - 2003
7-Series
2002 - 2009
1998 - 2001
X3
2004 - 2009
X5
2007 - 2009
2000 - 2006
Z3/M-Coupe/M-Roadster
1996 - 2002 i-BMW-T 1
Z4/M-Coupe/M-Roadster
2003 - 2008
Z8
2000 - 2003 i-BMW-T 1, 2 FMRDS
please call
1 FMRDS
please call
i-BMW-T 1, 2
please call
i-BMW-T
i-BMW-T 1, 2
please call
i-BMW-T FMRDS
i-BMW-T
1, 2
1, 2
1, 2
FMRDS2004 - 2009
FMRDS
FMRDS
N/A
FMRDS
FMRDS
FMRDS
FMRDS
chart
Mini Cooper
Cooper/Cooper S
2007 - 2008 FMRDS
2002 - 2006 i-BMW-T 3 FMRDS
BMW motorcycle
K1200LT
2000-2008
Note for ALL:
• Vehicles listed above must be pre-wired for factory CD changer (most USA and Canadian models are pre-wired)
• Text is supported on all text-capable radios.
• BMW 3-series never had DSP amplifier.
1. If equipped with factory SAT module then BMW SAT cable option is required (see chart below).
2. If equipped with digital DSP amplifier then BMW DSP adapter option is required (see chart below).
3. CD text is only available on selected September 2005 and newer Cooper S.
4. Text display is limited on 05-06 models.
Optional Interfaces
Part number
i-BMW-SAT
i-BMW-DSP
please call
i-BMW-T 4
Description
BMW SAT Cable
BMW DSP Adapter
N/A
22
FAQs Before Purchasing the Kit
Do BMW/Mini radios support text display?
Yes, CD Text capable BMW radios support text display
with the DICE kit. This normally includes 1998-2007
supported BMW models and the 2006 Mini Cooper.
Does my factory CD-Changer have to be
disconnected?
Yes, the factory BMW CD-Changer connections are
utilized to integrate the DICE system.
My car is not pre-wired. What can I do?
We have radio-end kits available for selected model.
Contents Identifier
DICE interface for iPod
Installation Guide/User Manual
user manual
docking
cable
If the vehicle is equipped with factory satellite radio,
can it be retained?
Yes, the factory satellite radio can be retained with an
additional satellite harness.
My vehicle is equipped with a digital DSP amplifier,
is this supported?
Yes, digital DSP amplifiers are supported; however the
additional DSP kit (i-BMW-DSP) is required. DSP can be
verified by checking the factory CD Changer connections: if
3-pin and mini coax connectors are present, the DSP kit is
required. However, if a 3-pin and 6-pin connectors are
available, then DSP most likely will not be needed.
for DSP kit:
BMW Mini Cooper
vehicle specific
interface module
vehicle specific
connector
DSP
interface module
coax cable power adapter RCA 6-pin harness
About Dip Switch Settings
The configuration switches located on the DICE module are used to set the operation of the interface by
the installer. Incorrect dip switch settings may cause the DICE interface not to work properly or not to
operate at all. Disconnect the vehicle harness from module and cycle ignition off for 50 seconds
after changing the switches!
DICE module
Car configuration switches
CD changer 1 CD changer 2
OFF OFF
Default Default
Recommended for late model
Business CD and Navigation
radio systems.
This setting is to be used on
early model Business CD
and Business cassette
head units. This mode
provides slower text
refreshing to allow flawless
operation of these radios.
Note: The first button
press only clears the text
from the radio, the second
executes the command.
ON
OFF
iPod configuration switches
“Locked” “iPod”
OFF OFF
It is best selected when text
display is supported by the
radio. After connecting the
iPod you will see the DICE
logo on the screen. After the
initialization the iPod will be
locked for increased interface
functionality.
Selected emulation
It is best selected when text
display is not supported
by the radio. Track numbers
and times are not
synchronized between the
iPod and radio. Because
there is less data transfer
between the iPod and radio,
this mode has the fastest
response time. Content is
selected on the iPod.
ON ON
23
1-888-342-3999
www.diceelectronics.com
Connection Diagram
for i-BMW-T kit:
BMW 3, 5, 7 series,
M3, M5 & X5
2006-2008 M-Coupe & M-Roadster
BMW Z4
Note: CD Changer of BMW Z8 is located right behind the driver’s seat.
CD Changer locations:
BMW X3
BMW 1999-2002 M-Coupe & M-Roadster
Z3, and Mini Cooper
(left hand side of the trunk)
During installation, make sure that the 3 pin connector from the vehicle does not have a brown wire in the middle. The 3 pin connector of the
phone pre-wiring looks identical to the 3 pin connector of the CD changer pre-wiring! Do not use the 3pin connector that has a brown wire in
!
the middle, but locate the one that has the brown wire on the side! Incorrect connection will result in permanent damage to the unit and will
not be covered by warranty!
CD Changer cable
(3-pin and 6-pin BMW cables)
for DSP kit:
(between seats, underneath
BMW 5, 7 series, M5 & X5
subwoofer)
12
(underneath carpeting under
the center console)
module
vehicle specific
connector
BMW Z4 BMW X3
2
1
3-pin connector DSP amplifier
1 2
(right hand side of the trunk)
iPod
MENU
docking
cable
1
2
Make sure the 3-pin connector has a
!
RED middle wire!
factory CDC harness
connect to
amplifier
coax cable
+12V
ground
DSP converter
power adapter
RCA 6-pin harness
Installation Tips / Check List
When routing the vehicle specific harness to the front of the vehicle, some BMW models have a panel
below the glovebox where the DICE module can be stored for easy access.
When installing a DSP kit, you can temporarily attach it to the battery for constant power for testing
purposes, but it should NOT be installed this way.
CD changer connections are normally coiled up and hidden well when a CD changer is not present.
Please make sure to use the CDC connections and not the wiring harness of the phone system—as they
both look the same! Check Connection Diagram above for detailed information.
module
vehicle specific
connector
iPod
MENU
docking
cable
24
Operation Overview
BMW radio with Navigation
BMW business CD radio
AM FM
5
CDC 1 Song * Artist *Album
3
2
1
+
Press the MODE button to access the interface.
1
Press and hold the Track buttons to RW or FFW. On some
2
older BMW radios the button must be engaged to perform
the same function.
Use buttons 1 - 6 to change between modes.
3
Use Random to enable Shuffle Songs.
4
Source indicator
5
4
3
m
RND TP
4
6
5
- -
SC MODE
m
1
2
Text display settings
Make sure to select the appropriate text display setting during the initial setup of the DICE kit. You must configure the text option by pressing
DISC 6 then selecting a Track number that corresponds to the designated display:
INFO
3
1
1
2
3
4
CDC 2-01
1 4
2 5
3 6
FM AM
MODE
Press the MODE button to access the interface.
Press this button to change track, press and hold
it to RW or FFW
Use button 1 - 6 to change between modes.
Turn the jog dial to change track. Note that a 9
second timeout is engaged once any of the
alternate display buttons are pressed. If exiting
from any of these sub-screens without waiting for
the normal timeout, you MUST wait for 9 seconds
before being able to use the jog dial again to
navigate content.
PLAYLIST NAME
* DICE *
01/02/2008
TONE SELECT
2
MENU
4
Track #
99 No Text All ---01 Radio 3-Series/Z3/Z4/X3/'04-K1200 12
02 Navigation All with nav. 15
03 Cluster/OBD 5-Series/7-Series/X5 w/o nav. 20
04 MID Alternate for 5-Series/7-Series/X5 11
05 Alternate Location All with nav. 8
06 Alt Locat.(large font) All with nav. 8
07 Resume Text Use if text does not resume after phone call ---08 Motorcycle 05+ K1200 12
09 No Text All ----
Text Displayed On
BMW/Mini Specific Technical Notes
Problem
Why do the radio buttons need to be
double-clicked on my early model 3-Series?
Radio/Nav display only shows DISC and Track
number, but there is no iPod control.
On earlier models of 3-Series and Z3 (1999-2002) vehicles, double-clicking is required
when text is being displayed because the first button press clears the text and the
second button press performs the command.
Select DISC 5 and make sure it is set to Track 01. Here you are making sure that iPod
mode is selected, and not AUX mode (Track 02)
Application
Solution
Characters
BMW Mini Cooper
Cannot select CD changer source.
Radio/ steering wheel controls do not operate
iPod.
No text display.
No audio from iPod source.
iPod does not charge.
Music is distorted or sound level is too low.
25
Check DIP switch settings. With the ignition OFF disconnect vehicle harness
from module for a few seconds and reconnect. Verify that the correct button is
used to access the interface (CDC or DSP).
Reset iPod and make sure most recent iPod firmware is installed.
Make sure DIP switch settings are correctly set for text display. Note that early
model Mini Cooper vehicles do not support text. You must also configure the
text as described above
Reset the iPod.
Check all connections. See if iPod charges while connected to computer or wall
charger. You may need to reset the iPod.
Check and make sure all EQ and BASS boost options are turned off on your iPod.
1-888-342-3999
www.diceelectronics.com
HONDA
Integration for iPod
26
27
HONDA
vehicle specific integration for iPod
 Loading...