

DICE Interface for iPod, AudiNW-CDC, AudiNW-SAT Installation Manual & User Manual
,
~
~.
~J;1EIJ;;~I;
;
for
selected
AudiNolkswagen
vehicles
Installation
Guide/User
Manual
for model
number
AudiNW-CDC and AudiNW-SAT integration kits
~Dlce::
••
...
ELECTRC~;;CS
Copyrights
and
Trademarks
Copyright
2009
DICE
Electronics,
LLC.
The
DICE
Electronics
logoisa
trademarkofDICE
Electronics,
LLC.
iPodisa
trademarkofApple, Inc.
All rights reserved.
Printed in
the
U.S.A
28
28
29
30
31
33
35
iPod audio source
Controls in
SAT
emulation
Browsing
functioninSAT
emulation
Scrolling feature
Auxiliary audio source
Troubleshooting
Disclaimer
3
3
4
5
6
7
7
~
~E
ICC;;
~!;;
~x:mJ);:(i;M:'~tr::r~l',J~::j:;:':~~':&:':;~:;j~~~~~~1r:tf~f~;'f:f;~~:;'~
':':~:2,~F~:>:5~,,::::1j:~~~:~:1:~;s.:fin:~;;,~F2:·::.~':
'3~:::;:,'
:'~;:(::+~?t:~)j,~;;:~.;·::~
;:~~:r.:<~:~"»i:;:t~{}~~;J:~f;~~s~r·m~:3(~::d~~2~t;i;:[::
Tableofcontents
Copyrights and trademarks
Icon legends
Warranty and safety
Product registration
Supported iPod models
iPod hierarchy
Charging
Icon legends
0\
Turn
jog
dial
0\\\
Turn
jog
dial repeatedly
AudiNW-CDC integration
kit
Integration kit contents
DIP
switches
DIP
switch settings
InstalIation
iPod audio source
Controls in
CDC
emulation
Browsing
function
in CDC
emulation
AudiNW-SAT integration
kit
Integration
kit
contents
DI
Pswitches
DIP
switch settings
Installation
8-19
9
10
11
12
18
18
19
20-29
21
22
23
24
~
43;:
Press
button
Press
button
repeatedly
Scroll

\t
.
Dice::
- L~.,.
....
T
r.:
l
:1
r--:
!
("'"-
c:;
t:..
.~~w . ,'(
'-'
,"i.'-'
_
Warning and safetyl
Please
read these instructions carefully before proceeding.Failuretofollow
instructionsmayresult in improperoperation
or
injury.Neither
DICE
Electronics,
LLC.
nor
Apple Inc., its regional offices, distributorsorresellerstakeany responsibilityfor
anydamageorinjury
as
aresultofusing
the
integration kit.
-Do
not
open,disassembleoralterthe
interfaceinanyway.
-Do
not
insertanything
into
the
casing.
-Do
not
cutortrytoaltercables in anyway and always use
the
correctconnections.
-Only
operate
unitwhen
stationaryoraskpassengerstooperate
itforyou.
-Do
notallowtheApple
iPodtodistractyou
from
driving.
-Exercisegoodjudgementand
keepyoureyeson
theroad atall times.
-Do
not
expose
unittoextremetemperatures,
humidity
orshock.
-Keep
the
unit
and iPod awayfrom fluids.
-Keep awayfromchildren! -Interface
components
maycontainsmall parts, can bebrokenordisassembledand
components may become loose
from
vibrationand heat.Small componentsand packaging materials may beachocking
hazard when handledbychildren.
Congratulations on your purchase
Thank you for purchasing the
DICE
integration kit for iPod.
Please
review
our
user manual and installation guide before
operating the unit. This interface was designed and manufactured
to
seamlessly integrate
with
your vehicle's factory
entertainmentsystem.
Product registration
In ordertovalidate yourwarranty period andtoreceive telephoneoronline support, you
MUST
register your
DICE
product.
To
register your DICE product, please complete
the
following steps:
1.
Visit http://www.diceelectronics.com/register
2.
Complete the product registration form.
3.
Submit the form.
4.
Save
the registration/support/warranty sheet in a
safe
place for future reference.
If
you are unabletocomplete the registration via internet, please call
DICE
Electronics at 1-888-342-3999.
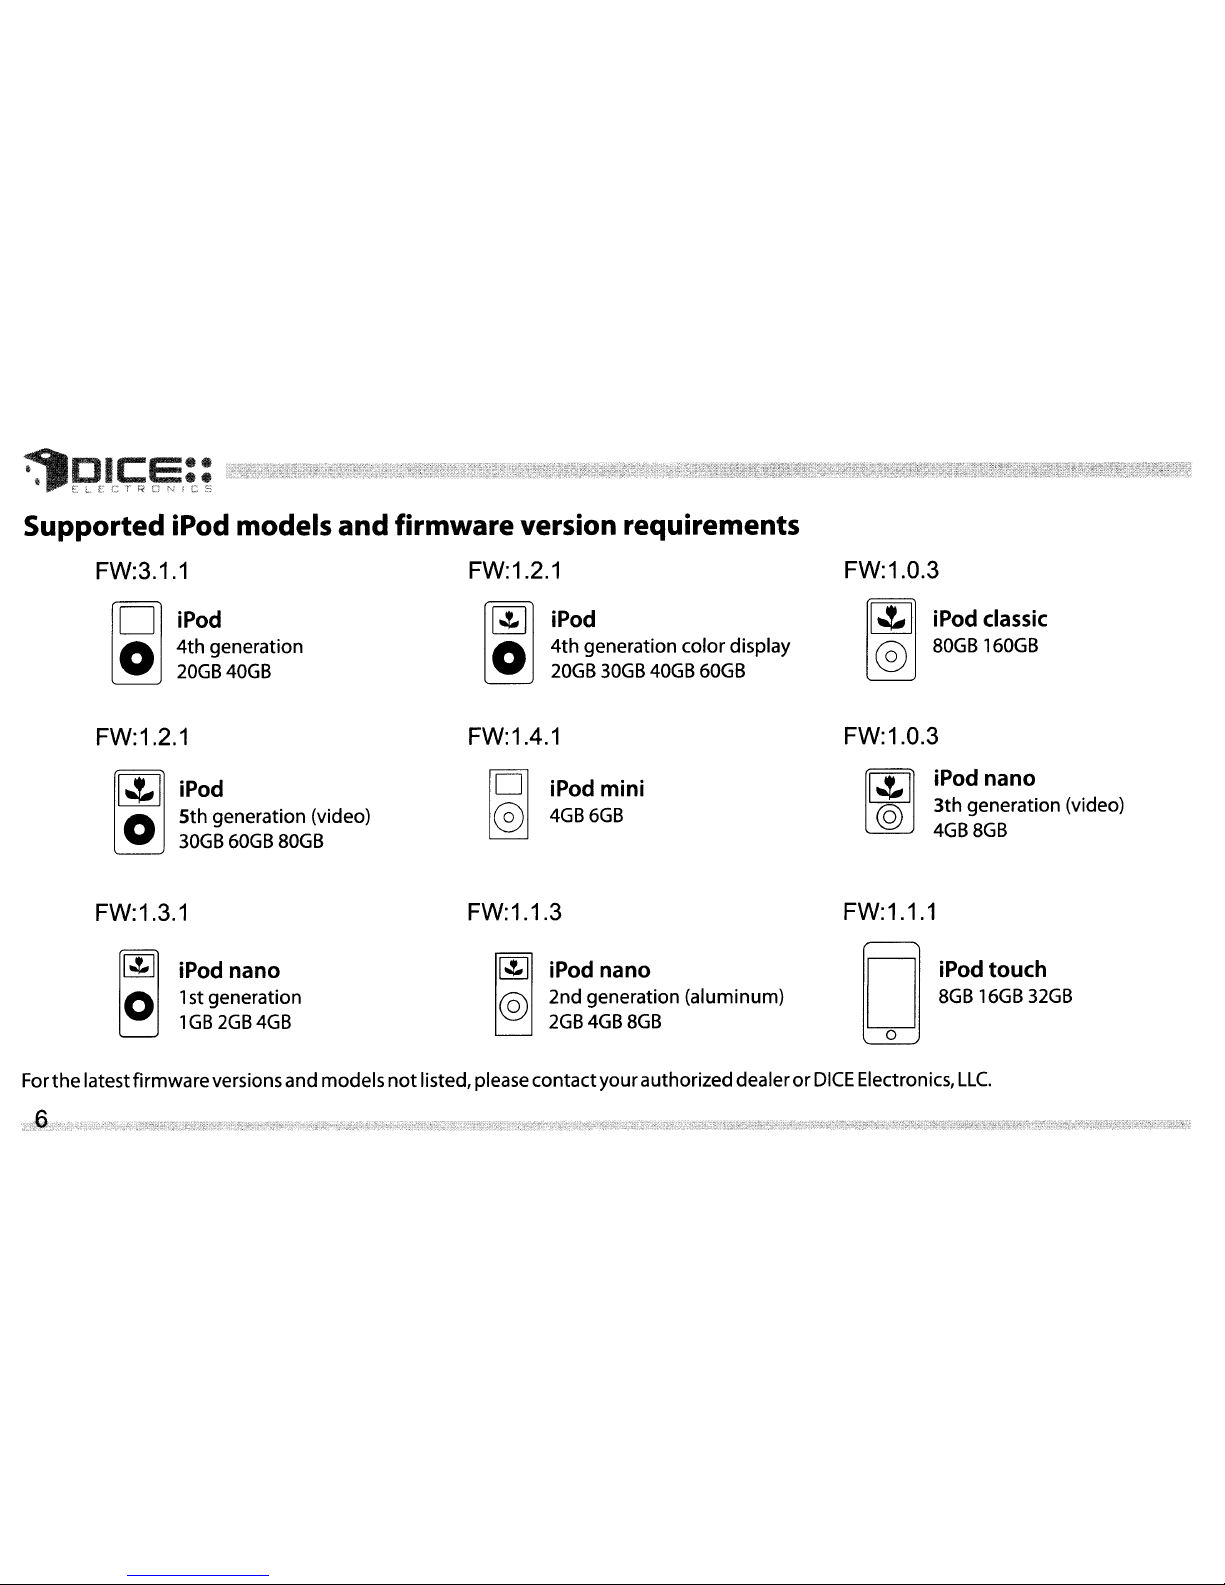
FW:1.0.3
[1"""'11
iPod classic
@
80GB
160GB
[~]
iPod
O
4th
generation color display
20GB
30GB
40GB
60GB
i
iPod
O
4th
generation
20GB
40GB
\J
J?E
leI;;
Ei;;
Ili,!~fj~:~i:~~f~~r0s:~;;ftff~~t~fu~~:f~,~jl:i~I~~~~k~~1~7+t~~fi~f~~~fl~~i'~~~t,,;;:t~~?-~U:~~~~tt~~$I!;~~~~if~f~jizlffi;fJli~¥Jt~~~R;~I~~~jg';fi~~'~~f;f~;~~~~~16~t4f~~~1J~:~~~
Supported iPod models and firmware version requirements
FW:3.1.1 FW:1.2.1
FW:1.2.1
[i
-'-
iPod
O
5th
generation (video)
30GB
60GB
80GB
FW:1.4.1
101
iPod mini
®
4GB
6GB
FW:1.0.3
[I
~
~
iPod nano
o
3th
generation (video)
4GB
8GB
FW:1.3.1
FW:1.1.3
FW:1.1.1
II"'"
i)
iPod nano
o 1st generation
1GB2GB4GB
li':'ll
iPod nano
@ 2nd generation (aluminum)
2GB
4GB
8GB
D
iPodtouch
8GB
16GB
32GB
o
For
the
latestfirmwareversions and models
not
listed,please contactyourauthorized dealerorDICE
Electronics,
LLC.
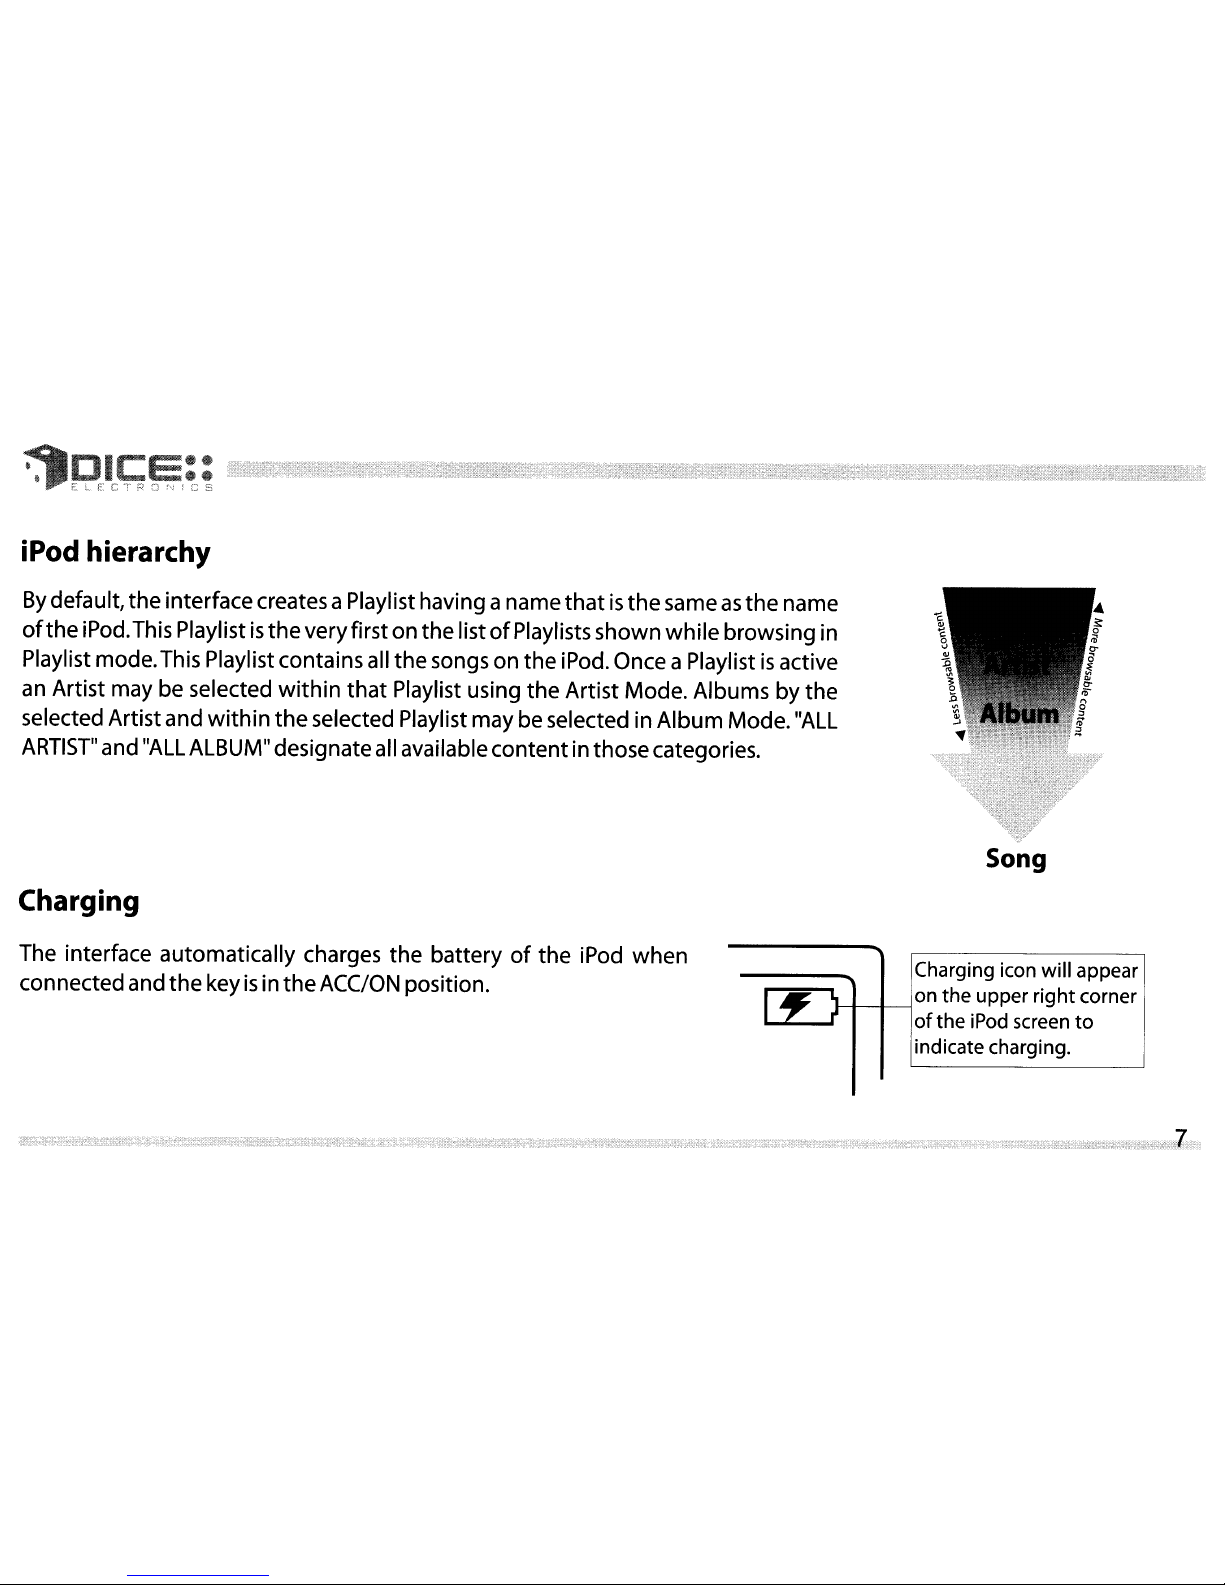
iPod hierarchy
By
default,
the
interfacecreates a Playlist having a name
thatisthe
sameasthe
name
of
the
iPod.This Playlististhe
veryfirstonthe
listofPlaylists
shown
while
browsing
in
Playlist mode.This Playlist contains all
the
songsonthe
iPod. Once a Playlistisactive
an Artist may be selected
within
that
Playlist using
the
Artist Mode. Albumsbythe
selected Artist
and
within
the
selected Playlist
may
beselected in
Album
Mode."ALL
ARTIST"
and"ALL ALBUM" designateall available
contentinthose
categories.
Song
Charging
The interface
automatically
charges
the
batteryofthe
iPod
when
connectedand
the
keyisin
the
ACC/ON position.
Charging icon will appear
I----+--f----l0n
the
upper
right
corner
of
the
iPod screen
to
indicate charging.
AudiNW-CDC
integration
kit
~
- .

~DICE::
...
-II'E
LE:C T
r~
0
i"-J
[ C S
Integration kitcontents
1Vehiclespecific interface unit
1
iPod
dockingcable
Vehicle specific
harnesses
(R,Rl
,R2)*
1
User
manual
Im;g~flt~
for
selected
AudiNolkswagen
vehicles
Audi-R
harness
*Note
that
your
kit
may
contain one ormore harnesses.
VW-Rl
harness
VW-R2
harness
~DICE::
"'·IIIELE,cTR01\.JjCS
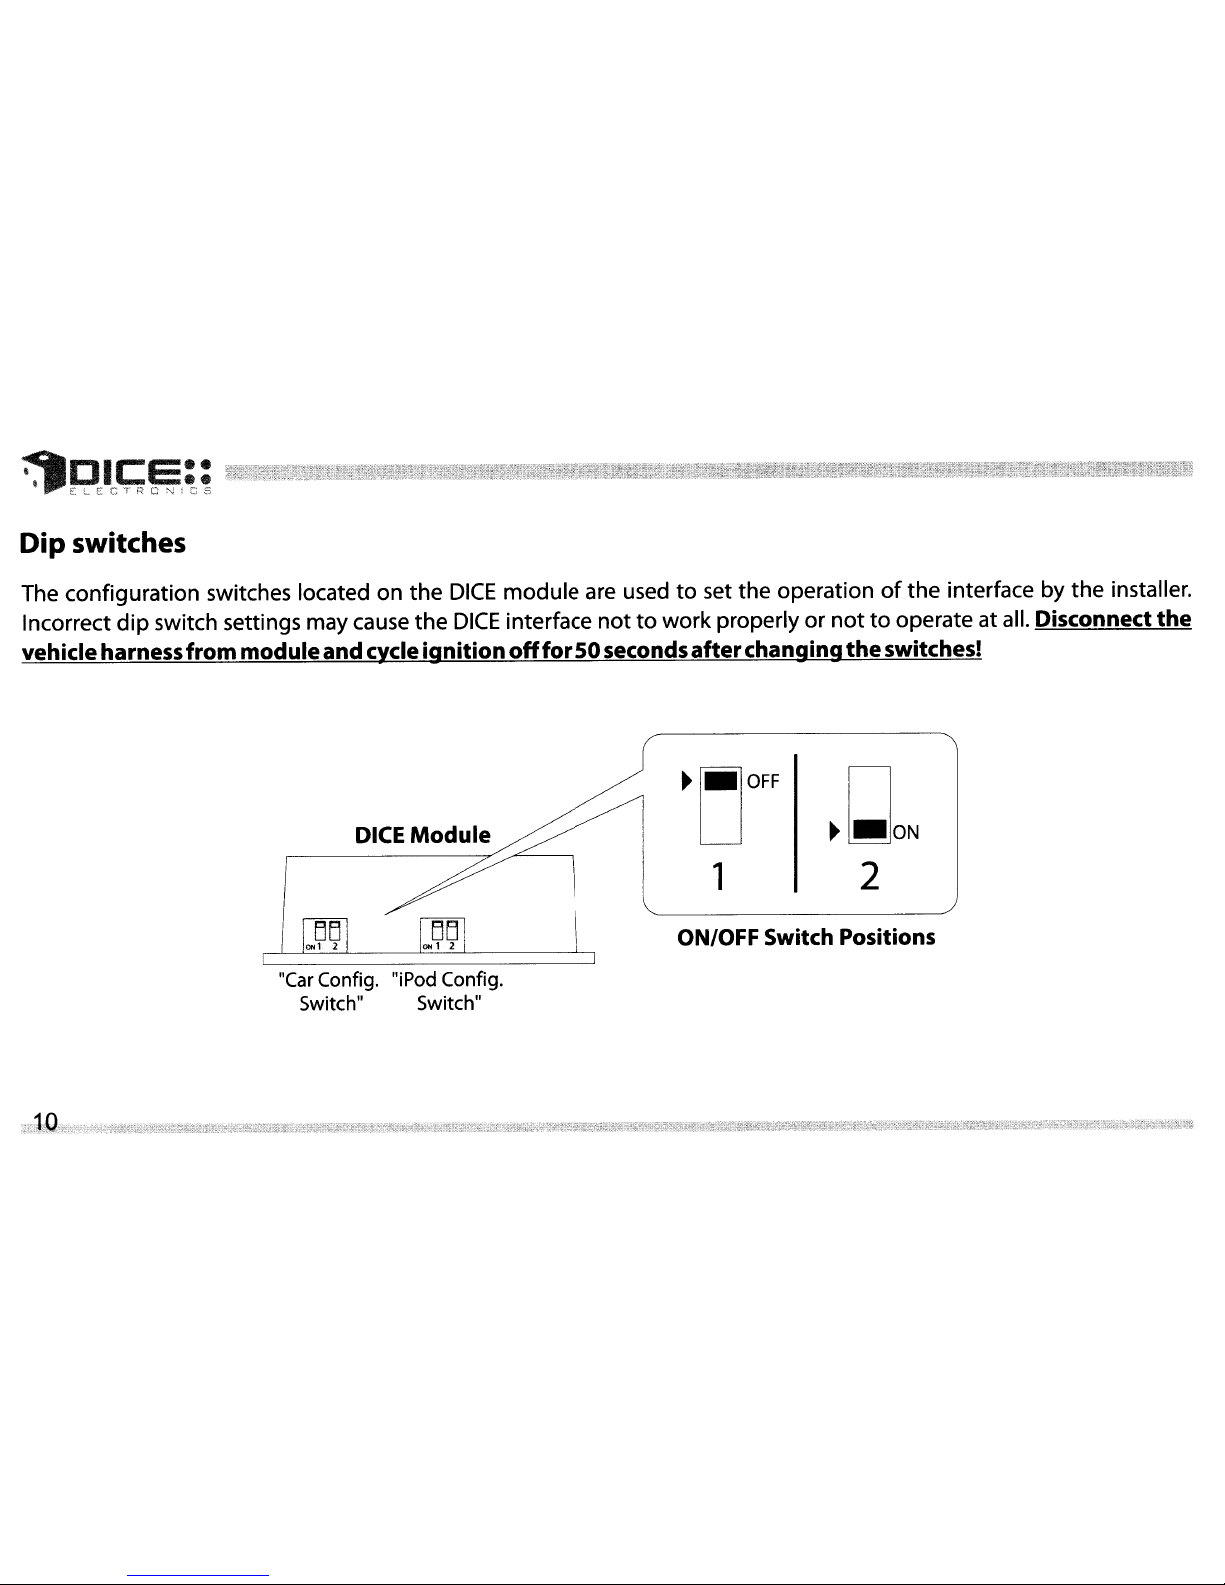
Dip switches
The configuration switches located on the
DICE
module
are
usedtoset the operationofthe interface by the installer.
Incorrect
dip
switch settings may cause the
DICE
interface
nottowork properly or
nottooperate at all. Disconnect the
vehicleharness from moduleand
cycle
ignitionoltfor50
seconds
afterchangingtheswitches!
ON/OFF
Switch
Positions
DICE
Module
"(ar
(antig. "jPod
(antig.
Switch" Switch"
~
'_'OFF
1
~1_loN
2
~
.
DI
e::
C:::-!
~'r""1""QnN'p,-~
,
:.....;...,
.__ .....< I " ,,_,
:.
:
~."
...
,.;
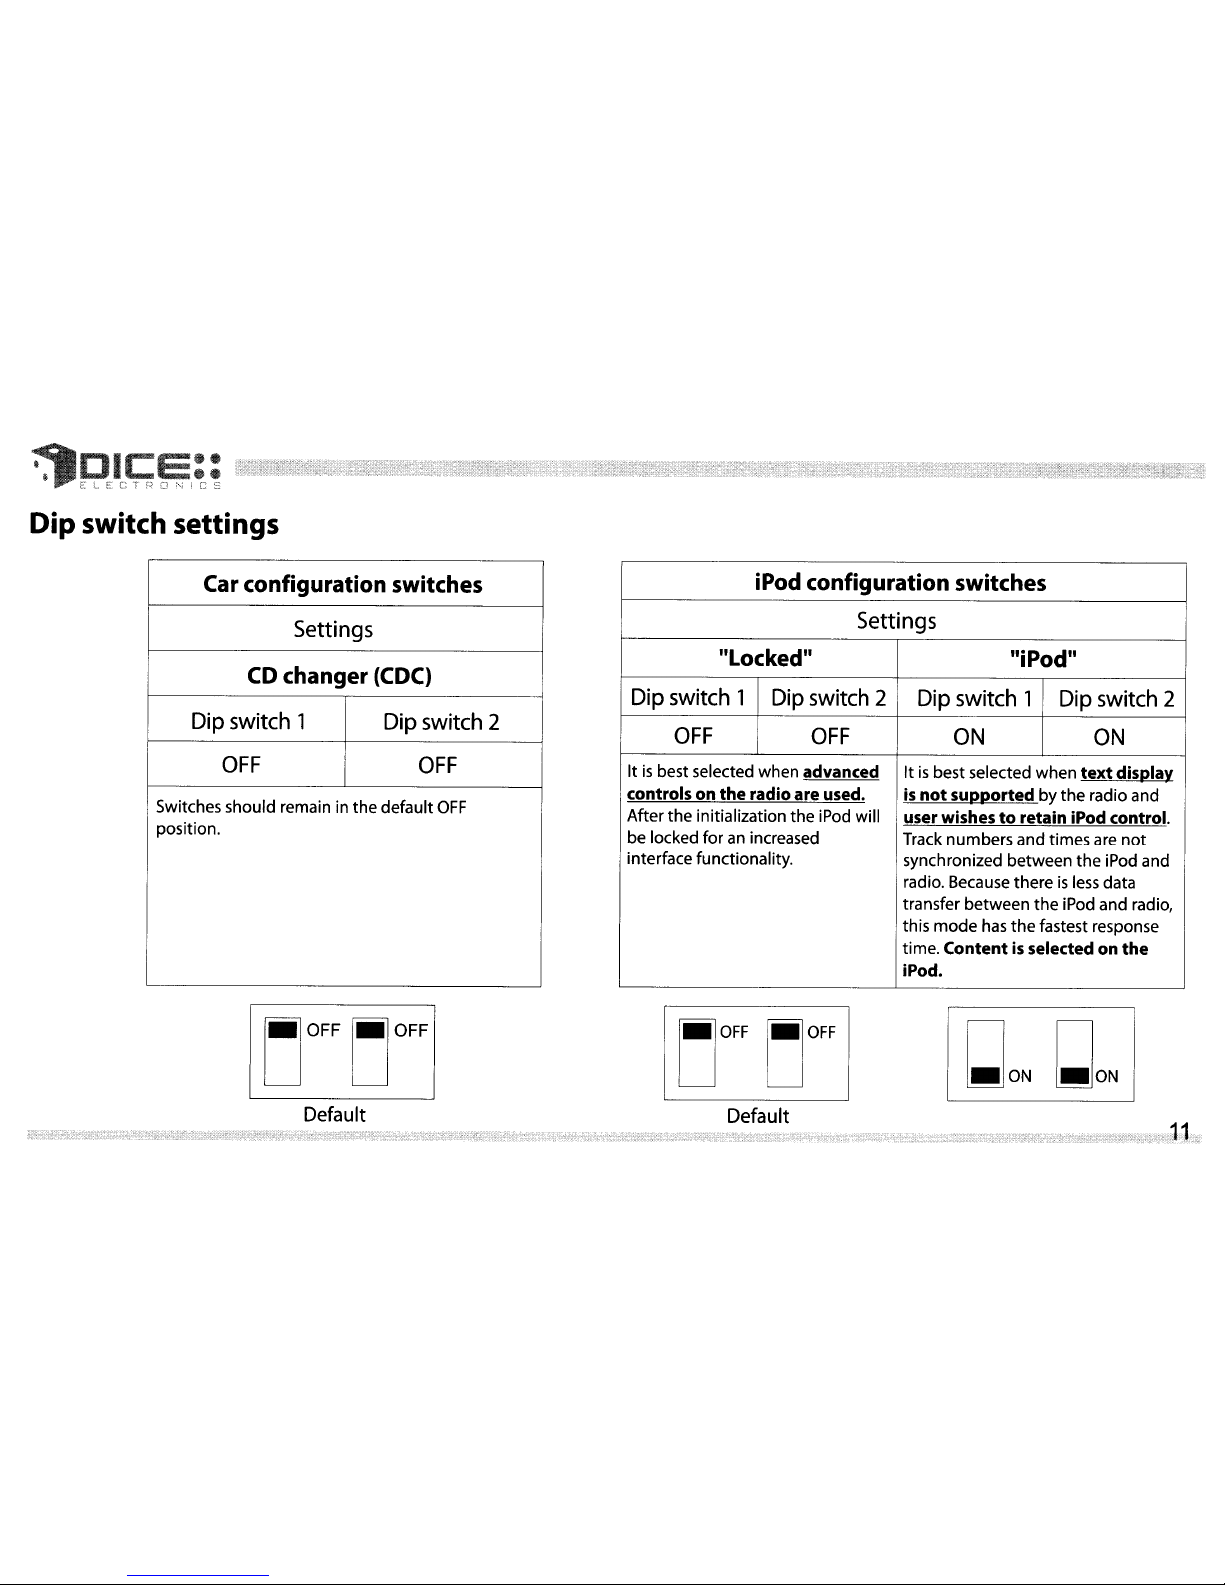
Dip switch settings
Car configuration
switches
Settings
CD
changer
(CDC)
Dip switch 1 Dip switch 2
OFF
OFF
Switches should remain in the default
OFF
position.
iPod configuration
switches
Settings
"Locked"
"iPod"
Dip switch 1 Dip switch 2 Dip switch 1 Dip switch 2
OFF OFF
ON
ON
Itisbest selected when advancedItis
best selected when
text
display
controls on
the
radio are used.
is
not
supported
by the radio and
Afterthe initialization the iPod will
user wishestoretain iPod control.
be locked foranincreased
Track numbers and times are
not
interface functionality.
synchronized between the iPod and
radio. Because there
is
less
data
transfer between the iPod and radio,
this
mode
has
the
fastest response
time.
Contentisselected on
the
iPod.
LjOFF
LjOFF
Default
LjOFF
LjOFF
Default
~ON
~ON
~DICE::
"'"'IIIELLcTRc
N~CS
Installation
Installation should
only
be performed by a qualified professional. Bewareofsharp edgestoavoid
injury
and exercise
caution
when
removingtrimsasthey
maybreak.The
module
should be placed atanaccessible locationtoallow
AUX
cable
to
beconnected,suchasin
the
glovebox,
the
centerconsoleorunder
the
front
seat.
1 Pull vehicle
into
servicebayand
access
radio/centerconsole.
2 Disconnect
both
batteryterminals.Thesecables
must
bedisconnected duringinstallationtoensure properinitialization
of
the
mod
uIe whenitis
connected.
Make
sure
that
radiocodeisavailablebeforestartinginstallation.
3 Before
pulling
out
the
radio, remove surrounding
trims
and screws. Most trims can be removed by carefully pulling on
the
pieceorusing
trim
removaltools.Trimisusuallyheld in place bysnap-in clips.
4
To
remove
the
radio you need
to
use
the
appropriate
radio removal tool. Consult
your
dealership
if
additional informationisneededon removing
the
radio.
 Loading...