


User Guide
Guía del usuario
Guide d’utilisation
Guida per l’uso
Benutzerhandbuch
Appendix
English ( 2 – 6 )
Español ( 7 – 11 )
Français ( 12 – 16 )
Italiano ( 17 – 21 )
Deutsch ( 22 – 26 )
English ( 27 )
User Guide (English)
Introduction
Box Contents
VL12 Prime |
45 RPM Adapter |
Power Cable |
Headshell |
Counterweight & Scale Ring |
User Guide |
Felt Slipmat |
Additional Counterweight |
Safety & Warranty Manual |
Target Light |
RCA Stereo Cable |
|
Support
For the latest information about this product (documentation, technical specifications, system requirements, compatibility information, etc.) and product registration, visit denondj.com.
For additional product support, visit denondj.com/support.
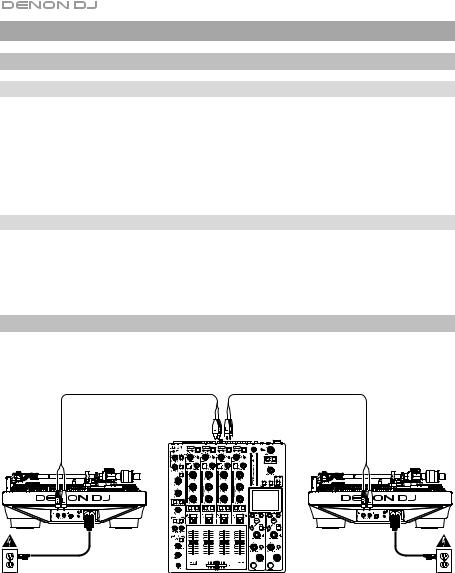
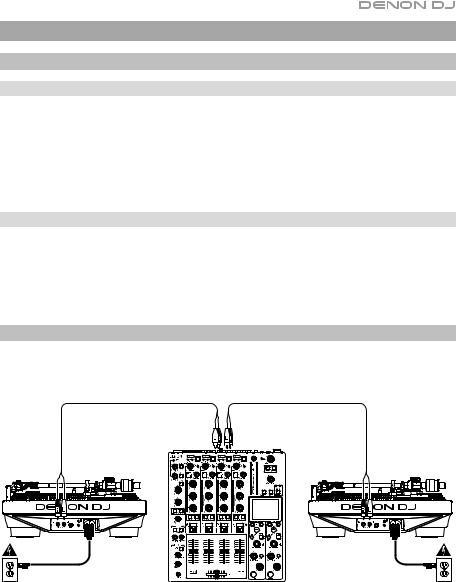
Connection Diagram
Items not listed under the Introduction > Box Contents are sold separately.
(to phono inputs)
VL12 Prime |
|
VL12 Prime |
Power outlet |
DJ mixer |
Power outlet |
2
Features
Top Panel
4 |
|
|
16 |
|
|
|
17 |
|
|
|
15 |
|
|
|
14 |
|
|
|
13 |
|
|
5 |
10 |
|
|
|
9 |
1 |
|
|
11 |
|
|
7 |
|
|
|
|
12 |
2 |
3 |
6 |
8 |
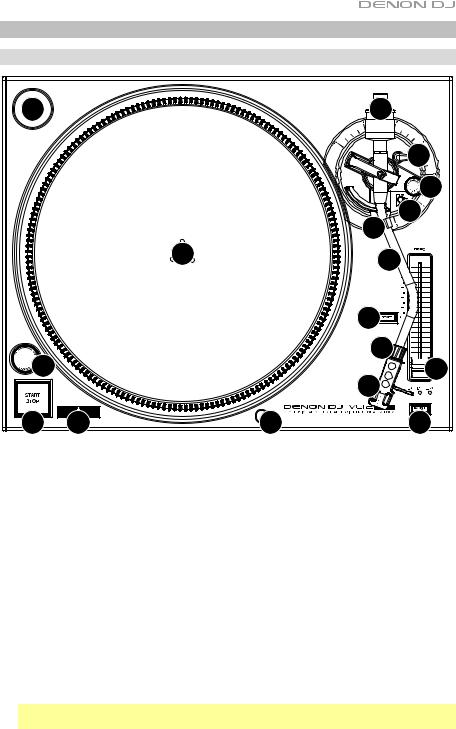
1.Power Switch & Strobe Light: Turn this dial at the top of the strobe light to power VL12 Prime on or off.
The strobe light illuminates the edge of the platter, which indicates whether or not the phase of the platter’s rotation is constant. As the platter rotates, look at the vertical lines on its edge under the light’s strobing. If the phase is constant, the lines will appear to be still. If the rotation is out of phase, the lines will appear to move or “drift”.
2.Start/Stop: Press this button to start and stop the platter’s motor. If the platter appears not to be functioning, make sure it is properly secured (see Setup > Platter).
3.33 & 45 RPM Buttons: Press one of these buttons to set the rotation speed (RPM) of the platter. The lit button indicates the current selection.
4.45 RPM Adapter Holder: Use this spindle to hold the 45 RPM adapter when not using it.
5.Platter: Place the platter onto the motor before using it. See Setup > Platter for detailed information on securing the platter.
6.Target Light: The target light (included) illuminates the grooves on your record so you can visually track the stylus in dark environments. To turn it on, secure it to this connector. To turn it off, remove it from the connector.
Note: To prevent damage, we recommend removing the target light before packing or transporting VL12 Prime.
3

7.Pitch Fader: Move this fader to increase or decrease speed of the platter (and therefore the pitch of the track). In the center position, the pitch is at 0%. Use the Pitch Range button to set the full range of the pitch fader.
8.Pitch Range: Press this button to cycle through the available ranges of the pitch fader: +8%, +16%, and +50%. The lights above the button indicate the current selection.
9.Pitch Reset: Press this button to return the speed of the platter to 0% pitch adjustment immediately, regardless of the position of the pitch fader.
10.Tonearm: With the tonearm lever in the “raised” position, gently move the tonearm so it rests over your record on the platter. To play your record, move the tonearm lever to the “lowered” position, which will lower the tonearm onto your record.
11.Tonearm Lock Nut: This nut secures the headshell and cartridge assembly to the tonearm. Turn the cartridge clockwise to loosen it or counterclockwise to tighten it. Do not over-tighten it.
12.Headshell: Mount your cartridge (not included) on this headshell, and then attach the headshell to the tonearm lock nut. (Remember to remove the plastic cover from your cartridge before using it.) The headshell is user-replaceable and compatible with many standard cartridges.
Note: To prevent damage, we recommend removing the headshell and cartridge assembly before packing or transporting VL12 Prime.
13.Tonearm Clip: While not using the tonearm, place it in this tonearm clip. The “outer” notch of the tonearm clip is for temporarily resting the tonearm (you can still move, raise, or lower it), while the “inner” notch is for securing it.
Note: To prevent damage, we recommend securing the tonearm in the “inner” notch of the tonearm clip before packing or transporting VL12 Prime.
14.Tonearm Lever: Move this lever between its two positions to raise or lower the tonearm. Raise the tonearm before moving it toward or away from the record, and lower it once it is in place.
15.Anti-Skate Dial: Turn this dial to compensate for inward tracking forces that occur with certain cartridges as the stylus nears the center of the record. In most cases, set this to 0. If you experience excessive skipping during back-cueing or scratching while nearing the center of the record, increase this dial’s setting in small increments and test its performance.
16.Counterweight & Scale Ring: The counterweight balances the headshell and cartridge assembly so the tonearm can apply the proper amount of stylus pressure to the record. See Setup > Tonearm to learn how to properly balance the tonearm.
Note: If your headshell is heavier than expected, there is an additional counterweight included, which you use with this counterweight to balance your tonearm properly.
17.Height Adjustment & Lock Lever: Turn this large dial to set the height of the tonearm. Move the small Lock lever (above the Anti-Skate Dial) counterclockwise or clockwise to unlock or lock the height adjustment, respectively. See Setup > Tonearm to learn how to set the appropriate height.
4
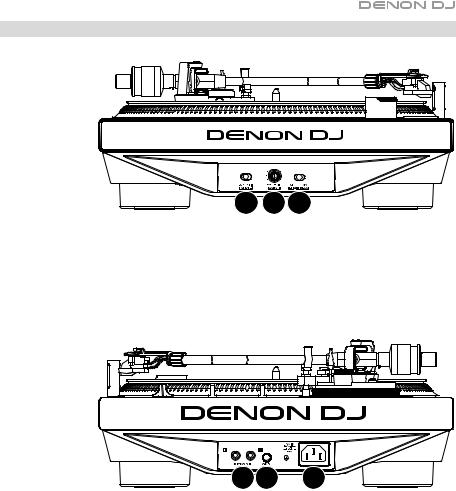
Side Panels
Left Side
1 2 3
1.Torque: Use this switch to set the torque of the platter. At the Hi setting, the platter will have a heavier, stronger feel. At the Lo setting, the platter will feel lighter and more graceful.
2.Platter Color: Turn this knob to set the color of the light around the platter.
3.Platter Brightness: Use this switch to set the brightness of the light around the platter.
Right Side
2 3 1
1.Power Input: Use the included power adapter to connect this input to a power outlet, and then power on the unit.
2.Phono Outs (RCA): Connect these outputs to the phono inputs of your mixer.
3.Grounding Terminal: If you hear a low “hum” or “buzz” in your record’s audio signal, this could mean that VL12 Prime is not grounded. In that case, use a grounding wire to connect this terminal to the grounding terminal of your mixer.
5
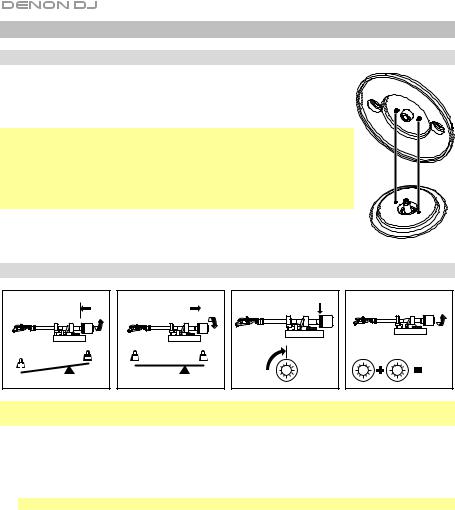
Setup
Platter
Place the platter onto the motor by aligning the pins in the bottom of the platter with the holes in the motor. Press it down firmly. Check to make sure that it rotates uniformly and does not wobble excessively, and then place the slipmat onto the platter.
Important:
• Incorrect platter setup can lead to poor turntable performance, platter instability or permanent motor damage.
•Make sure that the felt slipmat is always placed on top of the platter while
using the turntable. Failure to use the slipmat may cause damage to your media as well as damage to the turntable.
Tonearm |
|
|
|
|
2 |
3 |
4 |
5 |
|
|
|
0 |
360° |
1 |
|
|
|
|
4 g |
Important: Refer to the documentation for your cartridge to determine the proper stylus pressure/weight (in grams) and tonearm height (in millimeters).
1.Make sure the cartridge is on the tonearm. Turn it clockwise to loosen it or counterclockwise to tighten it. Do not over-tighten it! Remove the plastic cartridge cover (needle cover) before operating the turntable.
2.Attach the counterweight and scale ring to the tonearm, and then rotate the counterweight counterclockwise (while you are facing the scale ring) until it is in the complete forward position.
Note: This is also the maximum amount of pressure that can be applied to the cartridge.
3.Now there should be a feeling of weight and resistance when the headshell is raised and lowered. Begin rotating the counterweight clockwise (while you are facing the scale ring) until the weight and resistance feeling is gone. If done properly, the tonearm will pivot with very little resistance back and forth indicating that there is exactly 0 grams of stylus pressure.
4.With the counterweight in its new position further away from tonearm pivot point, grasp the scale ring only and rotate it until 0 is in the vertical position.
5.Finally, rotate the counterweight and scale ring counterclockwise until you reach the desired weight. A complete revolution of the scale ring corresponds to 3 g, so if the scale rotates 360° beyond the 0 point, add 3 to the new scale ring reading.
If you cannot achieve the desired weight during this step, remove the counterweight and scale ring from the tonearm entirely, attach the additional counterweight (included) to the end of the tonearm, and then start again from Step 2 above. This is not a common occurrence, though there may be some DJ headshells and cartridges that are heavier than normal.
6.Push the small Lock lever (above the Anti-Skate Dial) counterclockwise to unlock the height adjustment dial. Place the stylus on your record, and then move the tonearm lever to raise or lower the tonearm so it is parallel with the record. Push the Lock lever clockwise to lock the height adjustment dial.
6
Guía del usuario (Español)
Introducción
Contenido de la caja
VL12 Prime |
Adaptador para 45 rpm |
Cable de corriente |
Portacápsulas |
Contrapeso y anillo de escala |
Guía del usuario |
Almohadillas antideslizantes de fieltro |
Contrapeso adicional |
Manual sobre la seguridad y |
Luz de iluminación de cabezal |
Cable RCA estéreo |
garantía |
|
Soporte
Para obtener la información más reciente acerca de este producto (documentación, especificaciones técnicas, requisitos de sistema, información de compatibilidad, etc.) y registrarlo, visite denondj.com.
Para obtener soporte adicional del producto, visite denondj.com/support.
Diagrama de conexión
Los elementos que no se enumeran en Introducción > Contenido de la caja se venden por separado.
(a las entradas fonográficas)
|
VL12 Prime |
VL12 Prime |
Toma de |
Mezclador DJ |
Toma de |
corriente |
|
corriente |
7

Características
Panel superior
4 |
|
|
16 |
|
|
|
17 |
|
|
|
15 |
|
|
|
14 |
|
|
|
13 |
|
|
5 |
10 |
|
|
|
9 |
1 |
|
|
11 |
|
|
7 |
|
|
|
|
12 |
2 |
3 |
6 |
8 |
1.Interruptor de encendido y luz estroboscópica: Gire este cuadrante en la parte superior de la luz estroboscópica para encender o apagar el VL12 Prime.
La luz estroboscópica ilumina el borde del plato, el cual indica si la fase de la rotación del plato es o no constante. A medida que gira el plato, observe las líneas verticales en su borde bajo la luz estroboscópica. Si la fase es constante, las líneas parecerán estar quietas. Si la rotación está fuera de fase, las líneas parecerán moverse o “desplazarse”.
2.Iniciar/Parar: Pulse este botón para iniciar o detener el motor del plato. Si el plato pareciera no estar funcionando, compruebe si está sujetado correctamente (consulte
Instalación > Plato).
3.Botones 33 & 45 RPM: Pulse una de estos botones para ajustar la velocidad de rotación (RPM) del plato. El botón iluminado indica la selección actual.
4.Soporte del adaptador para 45 rpm: Use este eje para sostener el adaptador de 45 RPM cuando no esté en uso.
5.Plato: Coloque el plato sobre el motor antes de usarlo. Consulte Instalación > Plato para obtener más información sobre cómo colocar el plato.
6.Luz de iluminación de cabezal: La luz de iluminación de cabezal (incluido) ilumina los surcos en su disco para que pueda seguir la púa con la vista en ambientes oscuros. Para encenderla, adjuntar a este conector. Para apagarla, separarla de este conector.
Nota: Para evitar daños, recomendamos retirar la luz de iluminación de cabezal antes de embalar o transportar el VL12 Prime.
8

7.Fader de pitch (tono): Mueva este fader para aumentar o disminuir la velocidad del plato (y por lo tanto el pitch de la pista). En la posición central, el pitch está al 0%. Use el botón Pitch Range (rango de pitch) para ajustar el rango completo del fader de pitch.
8.Rango de pitch: Pulse este botón para alternar entre los rangos disponibles del fader de pitch: +8%, +16% y +50%. Las luces encima del botón indican la selección actual.
9.Reestablecer pitch: Pulse este botón para regresar la velocidad del plato al ajuste de 0% de pitch inmediatamente, independientemente de la posición del fader de pitch.
10.Brazo de lectura: Con la palanca del brazo de lectura en la posición “alta”, mueva con delicadeza el brazo de lectura de manera que quede suspendido por encima de su disco en el plato. Para reproducir su disco, coloque la palanca del brazo de lectura en la posición “baja”, lo cual bajará el brazo de lectura hasta su disco.
11.Tuerca de fijación del brazo: Esta tuerca asegura el conjunto del portacápsula y la cápsula al brazo de lectura. Gire la cápsula en sentido horario para aflojarla o en sentido antihorario para apretarla. No la apriete en exceso.
12.Portacápsulas: Monte su cápsula (no se incluye) en este portacápsula y luego sujete el portacápsula a la tuerca de fijación del brazo. (Recuerde retirar la cubierta de plástico de la cápsula antes de utilizarla). El portacápsula puede ser sustituido por el usuario y es compatible con una gran variedad de cápsulas estándar.
Nota: Para evitar daños, recomendamos retirar el conjunto de portacápsula y cápsula antes de embalar o transportar el VL12 Prime.
13.Clip del brazo de lectura: Cuando no use el brazo de lectura, colóquelo en este clip. La muesca “exterior” del clip del brazo de lectura sirve para apoyar el brazo temporalmente (aún será capaz de moverlo, levantarlo o bajarlo), mientras que la muesca “interior” es para sujetarlo.
Nota: Para evitar daños, recomendamos sujetar el brazo de lectura en la muesca “interior” del clip del brazo antes de embalar o transportar el VL12 Prime.
14.Palanca del brazo de lectura: Mueva esta palanca entre sus dos posiciones para subir o bajar el brazo. Levante el brazo antes de moverlo hacia o alejarlo del disco, y bájelo una vez que esté en su lugar.
15.Cuadrante antideslizamiento: Gire este cuadrante para compensar las fuerzas de tracción hacia adentro que ocurren con ciertas cápsulas cuando la aguja se acerca al centro del disco. En la mayoría de los casos, ajústelo a 0. Si experimenta demasiados saltos durante los retrocesos rápidos o rayados estando cerca del centro del disco, aumente el ajuste de este dial en pequeños incrementos y pruebe el desempeño.
16.Contrapeso y anillo de escala: El contrapeso equilibra el conjunto de portacápsula y cápsula de manera que el brazo pueda aplicar la cantidad correcta de presión de la púa sobre el disco. Consulte Instalación > Brazo de lectura para aprender a balancear el brazo de lectura correctamente.
Nota: Si su portacápsulas es más pesado que lo esperado, se incluye un contrapeso adicional, el cual puede utilizar junto con este contrapeso para equilibrar su brazo de lectura correctamente.
17.Ajuste de altura y palanca de bloqueo: Gire Este cuadrante grande para ajustar la altura del brazo de lectura. Mueva la pequeña palanca de bloqueo (encima del cuadrante antideslizamiento) en sentido antihorario u horario para bloquear o desbloquear el ajuste altura, respectivamente. Consulte Instalación > Brazo de lectura aprender a ajustar la altura apropiada.
9
 Loading...