


CD RECEIVER
RCD-M33
OPERATING INSTRUCTIONS
MODE D’EMPLOI
INSTRUCCIONES DE OPERACION
|
|
|
|
|
|
|
|
|
|
|
|
|
|
|
|
|
|
|
|
|
|
|
|
|
FOR ENGLISH READERS |
PAGE |
004 |
~ PAGE |
026 |
|
|
|
|
|
|
|
|
|
|
|
|
|
|
|
|
|
|
|
|
|
|
|
|
|
|||||
|
|
|
|
|
|
|
|
|
|
|
|
|
|
|
|
|
|
|
|
|
|
|
|
|
|||||
|
|
|
|
|
|
|
|
|
|
|
|
|
|
|
|
|
|
|
|
|
|
|
|
|
|||||
|
|
|
|
|
|
|
|
|
|
|
|
|
|
|
|
|
|
|
|
|
|
|
|
|
|||||
|
|
|
|
|
|
|
|
|
|
|
|
|
|
|
|
|
|
|
|
|
|
|
|
|
|||||
|
|
|
|
|
|
|
|
|
|
|
|
|
|
|
|
|
|
|
|
|
|
|
|
|
|||||
|
|
|
|
|
|
|
|
|
|
|
|
|
|
|
|
|
|
|
|
|
|
|
|
|
|||||
|
|
|
|
|
|
|
|
|
|
|
|
|
|
|
|
|
|
|
|
|
|
|
|
|
|||||
|
|
|
|
|
|
|
|
|
|
|
|
|
|
|
|
|
|
|
|
|
|
|
|
|
|||||
|
|
|
|
|
|
|
|
|
|
|
|
|
|
|
|
|
|
|
|
|
|
|
|
|
|||||
|
|
|
|
|
|
|
|
|
|
|
|
|
|
|
|
|
|
|
|
|
|
|
|
|
|||||
|
|
|
|
|
|
|
|
|
|
|
|
|
|
|
|
|
|
|
|
|
|
|
|
|
|||||
|
|
|
|
|
|
|
|
|
|
|
|
|
|
|
|
|
|
|
|
|
|
|
|
|
|||||
|
|
|
|
|
|
|
|
|
|
|
|
|
|
|
|
|
|
|
|
|
|
|
|
|
|||||
|
|
|
|
|
|
|
|
|
|
|
|
|
|
|
|
|
|
|
|
|
|
|
|
|
|||||
|
|
|
|
|
|
|
|
|
|
|
|
|
|
|
|
|
|
|
|
|
|
|
|
|
|||||
|
|
|
|
|
|
|
|
|
|
|
|
|
|
|
|
|
|
|
|
|
|
|
|
|
|||||
|
|
|
|
|
|
|
|
|
|
|
|
|
|
|
|
|
|
|
|
|
|
|
|
|
|||||
|
|
|
|
|
|
|
|
|
|
|
|
|
|
|
|
|
|
|
|
|
|
|
|
|
|||||
|
|
|
|
|
|
|
|
|
|
|
|
|
|
|
|
|
|
|
|
|
|
|
|
|
|||||
|
|
|
|
|
|
|
|
|
|
|
|
|
|
|
|
|
|
|
|
|
|
|
|
|
|||||
|
|
|
|
|
|
|
|
|
|
|
|
|
|
|
|
|
|
|
|
|
|
|
|
|
|||||
|
|
|
|
|
|
|
|
|
|
|
|
|
|
|
|
|
|
|
|
|
|
|
|
|
|||||
|
|
|
|
|
|
|
|
|
|
|
|
|
|
|
|
|
|
|
|
|
|
|
|
|
|||||
|
|
|
|
|
|
|
|
|
|
|
|
|
|
|
|
|
|
|
|
|
|
|
|
|
|||||
|
|
|
|
|
|
|
|
|
|
|
|
|
|
|
|
|
|
|
|
|
|
|
|
|
|||||
|
|
|
|
|
|
|
|
|
|
|
|
|
|
|
|
|
|
|
|
|
|
|
|
|
|||||
|
|
|
|
|
|
|
|
|
|
|
|
|
|
|
|
|
|
|
|
|
|
|
|
|
|||||
|
|
|
|
|
|
|
|
|
|
|
|
|
|
|
|
|
|
|
|
|
|
|
|
|
|||||
|
|
|
|
|
|
|
|
|
|
|
|
|
|
|
|
|
|
|
|
|
|
|
|
|
|||||
|
|
|
|
|
|
|
|
|
|
|
|
|
|
|
|
|
|
|
|
|
|
|
|
|
|||||
|
|
|
|
|
|
|
|
|
|
|
|
|
|
|
|
|
|
|
|
|
|
|
|
|
|||||
|
|
|
|
|
|
|
|
|
|
|
|
|
|
|
|
|
|
|
|
|
|
|
|
|
|||||
|
|
|
|
|
|
|
|
|
|
|
|
|
|
|
|
|
|
|
|
|
|
|
|
|
|||||
|
|
|
|
|
|
|
|
|
|
|
|
|
|
|
|
|
|
|
|
|
|
|
|
|
|||||
|
|
|
|
|
|
|
|
|
|
|
|
|
|
|
|
|
|
|
|
|
|
|
|
|
|||||
|
|
|
|
|
|
|
|
|
|
|
|
|
|
|
|
|
|
|
|
|
|
|
|
|
|||||
|
|
|
|
|
|
|
|
|
|
|
|
|
|
|
|
|
|
|
|
|
|
|
|
|
|||||
|
|
|
|
|
|
|
|
|
|
|
|
|
|
|
|
|
|
|
|
|
|
|
|
|
|||||
|
|
|
|
|
|
|
|
|
|
|
|
|
|
|
|
|
|
|
|
|
|
|
|
|
|||||
|
|
|
|
|
|
|
|
|
|
|
|
|
|
|
|
|
|
|
|
|
|
|
|
|
POUR LES LECTEURS FRANCAIS |
PAGE |
027 |
~ PAGE |
49 |
|
|
|
|
|
|
|
|
|
|
|
|
|
|
|
|
|
|
|
|
|
|
|
|
|
|||||
|
|
|
|
|
|
|
|
|
|
|
|
|
|
|
|
|
|
|
|
|
|
|
|
|
PARA LECTORES DE ESPAÑOL |
PAGINA |
050 |
~ PAGINA |
72 |
|
|
|
|
|
|
|
|
|
|
|
|
|
|
|
|
|
|
|
|
|
|
|
|
|
|||||
|
|
|
|
|
|
|
|
|
|
|
|
|
|
|
|
|
|
|
|
|
|
|
|
|
|
|
|
|
|
IMPORTANT TO SAFETY
WARNING:
TO PREVENT FIRE OR SHOCK HAZARD, DO NOT EXPOSE THIS APPLIANCE TO RAIN OR MOIS-TURE.
CAUTION:
USE OF CONTROLS OR ADJUSTMENTS OR REFORMANCE OF PROCEDURES OTHER THAN THOSE SPECIFIED HEREIN MAY RESULT IN HAZARDOUS RADIATION EXPOSURE.
THE COMPACT DISC PLAYER SHOULD NOT BE ADJUSTED OR REPAIRED BY ANYONE EXCEPT PROPERLY QUALIFIED SERVICE PERSONNEL.
CAUTION:
1.Handle the power supply cord carefully
Do not damage or deform the power supply cord. If it is damaged or deformed, it may cause electric shock or malfunction when used. When removing from wall outlet, be sure to remove by holding the plug attachment and not by pulling the cord.
2.Do not open the top cover
In order to prevent electric shock, do not open the top cover.
If problems occur, contact your DENON DEALER.
3.Do not place anything inside
Do not place metal objects or spill liquid inside the system.
Electric shock or malfunction may result.
Please, record and retain the Model name and serial number of your set shown on the rating label.
Model Name. RCD-M33 Serial No.
NOTE:
This system uses the semiconductor laser. To allow you to enjoy music at a stable operation, it is recommended to use this in a room of 5 °C (41 °F) ~ 35 °C (95 °F).
FCC INFORMATION (For US customers)
1. PRODUCT
This product complies with Part 15 of the FCC Rules. Operation is subject to the following two conditions: (1) this product may not cause harmful interference, and (2) this product must accept any interference received, including interference that may cause undesired operation.
2. IMPORTANT NOTICE: DO NOT MODIFY THIS PRODUCT
This product, when installed as indicated in the instructions contained in this manual, meets FCC requirements. Modification not expressly approved by DENON may void your authority, granted by the FCC, to use the product.
3. NOTE
This product has been tested and found to comply with the limits for a Class B digital device, pursuant to Part 15 of the FCC Rules. These limits are designed to provide reasonable protection against harmful interference in a residential installation.
This product generates, uses and can radiate radio frequency energy and, if not installed and used in accordance with the instructions, may cause harmful interference to radio communications. However, there is no guarantee that interference will not occur in a particular installation. If this product does cause harmful interference to radio or television reception, which can be determined by turning the product OFF and ON, the user is encouraged to try to correct the interference by one or more of the following measures:
•Reorient or relocate the receiving antenna.
•Increase the separation between the equipment and receiver.
•Connect the product into an outlet on a circuit different from that to which the receiver is connected.
•Consult the local retailer authorized to distribute this type of product or an experienced radio/TV technician for help.
CAUTION
RISK OF ELECTRIC SHOCK
DO NOT OPEN
CAUTION:
TO REDUCE THE RISK OF ELECTRIC SHOCK, DO NOT REMOVE COVER (OR BACK). NO USER SERVICEABLE PARTS INSIDE. REFER SERVICING TO QUALIFIED SERVICE PERSONNEL.
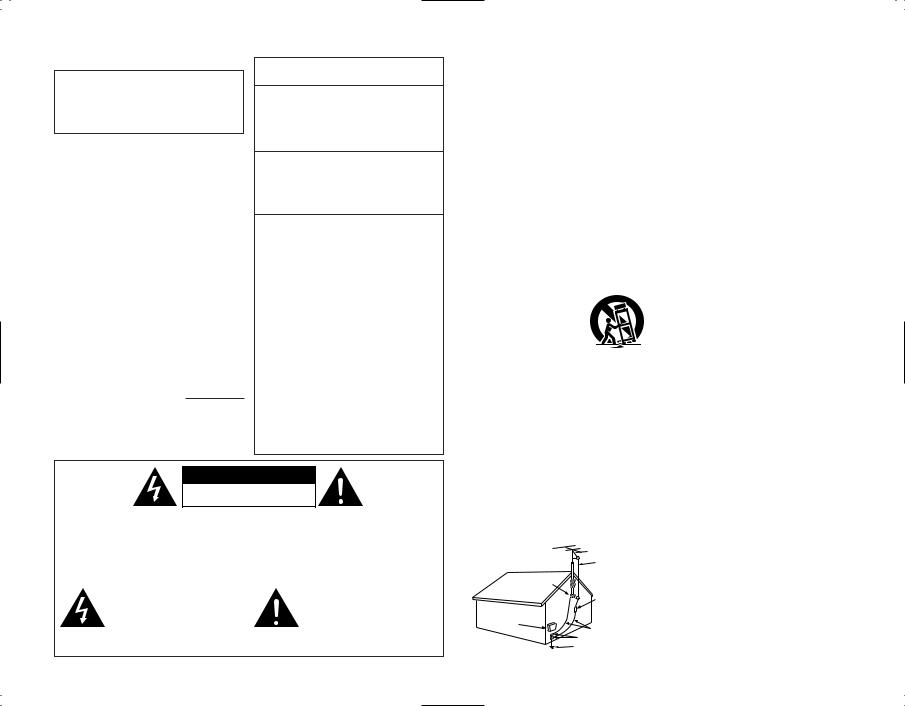
The lightning flash with arrowhead symbol, within an equilateral triangle, is intended to alert the user to the presence of uninsulated “dangerous voltage” within the product’s enclosure that may be of sufficient magnitude to constitute a risk of electric shock to persons.
The exclamation point within an equilateral triangle is intended to alert the user to the presence of important operating and maintenance (servicing) instructions in the literature accompanying the appliance.
SAFETY INSTRUCTIONS
1.Read Instructions – All the safety and operating instructions should be read before the product is operated.
2.Retain Instructions – The safety and operating instructions should be retained for future reference.
3.Heed Warnings – All warnings on the product and in the operating instructions should be adhered to.
4.Follow Instructions – All operating and use instructions should be followed.
5.Cleaning – Unplug this product from the wall outlet before cleaning. Do not use liquid cleaners or aerosol cleaners.
6.Attachments – Do not use attachments not recommended by the product manufacturer as they may cause hazards.
7.Water and Moisture – Do not use this product near water – for example, near a bath tub, wash bowl, kitchen sink, or laundry tub; in a wet basement; or near a swimming pool; and the like.
8.Accessories – Do not place this product on an unstable cart, stand, tripod, bracket, or table. The product may fall, causing serious injury to a child or adult, and serious damage to the product. Use only with a cart, stand, tripod, bracket, or table recommended by the manufacturer, or sold with the product. Any mounting of the product should follow the manufacturer’s instructions, and should use a mounting accessory recommended by the manufacturer.
9.A product and cart combination
should be moved with care. Quick stops, excessive force,
and uneven surfaces may cause the product and cart combination
to overturn.
10. Ventilation – Slots and openings in the cabinet are provided for
ventilation and to ensure reliable operation of the product and to protect it from overheating, and these openings must not be blocked or covered. The openings should never be blocked by placing the product on a bed, sofa, rug, or other similar surface. This product should not be placed in a built-in installation such as a bookcase or rack unless proper ventilation is provided or the manufacturer’s instructions have been adhered to.
11.Power Sources – This product should be operated only from the type of power source indicated on the marking label. If you are not sure of the type of power supply to your home, consult your product dealer or local power company. For products intended to operate from battery power, or other sources, refer to the operating instructions.
12.Grounding or Polarization – This product may be equipped with a polarized alternating-current line plug (a plug having one blade wider than the other). This plug will fit into the power outlet only one way. This is a safety feature. If you are unable to insert the plug fully into the outlet, try reversing the plug. If the plug should still fail to fit, contact your electrician to replace your obsolete outlet. Do not defeat the safety purpose of the polarized plug.
FIGURE A
EXAMPLE OF ANTENNA GROUNDING
AS PER NATIONAL
ELECTRICAL CODE ANTENNA
LEAD IN
WIRE
GROUND
CLAMP
ANTENNA DISCHARGE UNIT (NEC SECTION 810-20)
ELECTRIC
SERVICE
EQUIPMENT
GROUNDING CONDUCTORS (NEC SECTION 810-21)
GROUND CLAMPS
POWER SERVICE GROUNDING ELECTRODE SYSTEM
(NEC ART 250, PART H)
NEC - NATIONAL ELECTRICAL CODE
13.Power-Cord Protection – Power-supply cords should be routed so that they are not likely to be walked on or pinched by items placed upon or against them, paying particular attention to cords at plugs, convenience receptacles, and the point where they exit from the product.
15.Outdoor Antenna Grounding – If an outside antenna or cable system is connected to the product, be sure the antenna or cable system is grounded so as to provide some protection against voltage surges and built-up static charges. Article 810 of the National Electrical Code, ANSI/NFPA 70, provides information with regard to proper grounding of the mast and supporting structure, grounding of the lead-in wire to an antenna discharge unit, size of grounding conductors, location of antenna-discharge unit, connection to grounding electrodes, and requirements for the grounding electrode. See Figure A.
16.Lightning – For added protection for this product during a lightning storm, or when it is left unattended and unused for long periods of time, unplug it from the wall outlet and disconnect the antenna or cable system. This will prevent damage to the product due to lightning and power-line surges.
17.Power Lines – An outside antenna system should not be located in the vicinity of overhead power lines or other electric light or power circuits, or where it can fall into such power lines or circuits. When installing an outside antenna system, extreme care should be taken to keep from touching such power lines or circuits as contact with them might be fatal.
18.Overloading – Do not overload wall outlets, extension cords, or integral convenience receptacles as this can result in a risk of fire or electric shock.
19.Object and Liquid Entry – Never push objects of any kind into this product through openings as they may touch dangerous voltage points or short-out parts that could result in a fire or electric shock. Never spill liquid of any kind on the product.
20.Servicing – Do not attempt to service this product yourself as opening or removing covers may expose you to dangerous voltage or other hazards. Refer all servicing to qualified service personnel.
21.Damage Requiring Service – Unplug this product from the wall outlet and refer servicing to qualified service personnel under the following conditions:
a)When the power-supply cord or plug is damaged,
b)If liquid has been spilled, or objects have fallen into the product,
c)If the product has been exposed to rain or water,
d)If the product does not operate normally by following the operating instructions. Adjust only those controls that are covered by the operating instructions as an improper adjustment of other controls may result in damage and will often require extensive work by a qualified technician to restore the product to its normal operation,
e)If the product has been dropped or damaged in any way, and
f)When the product exhibits a distinct change in performance – this indicates a need for service.
22.Replacement Parts – When replacement parts are required, be sure the service technician has used replacement parts specified by the manufacturer or have the same characteristics as the original part. Unauthorized substitutions may result in fire, electric shock, or other hazards.
23.Safety Check – Upon completion of any service or repairs to this product, ask the service technician to perform safety checks to determine that the product is in proper operating condition.
24.Wall or Ceiling Mounting – The product should be mounted to a wall or ceiling only as recommended by the manufacturer.
25.Heat – The product should be situated away from heat sources such as radiators, heat registers, stoves, or other products (including amplifiers) that produce heat.
2
ENGLISH FRANCAIS ESPAÑOL
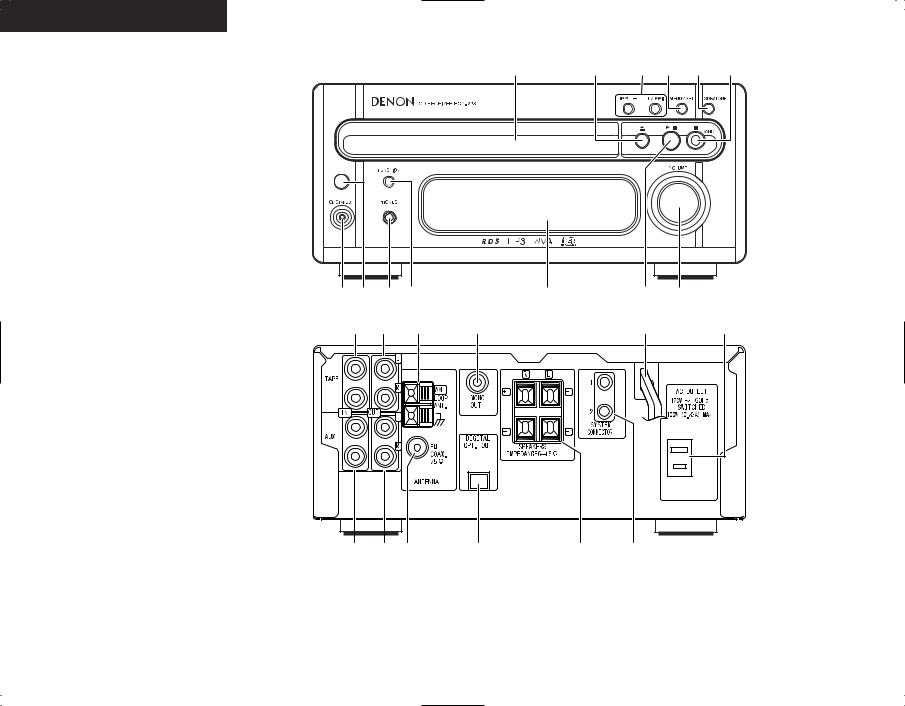
FRONT PANEL
PANNEAU AVANT
PANEL FRONTAL
REAR PANEL
PANNEAU ARRIERE
PANEL TRASERO
!3 !2 !1 !0 o i
q w e r |
|
t |
y |
u |
@5 @4 @3 |
@2 |
|
@1 |
@0 |
!4 !5!6 |
!7 |
!8 |
!9 |
3

ENGLISH
NOTE ON USE / OBSERVATIONS RELATIVES A L’UTILISATION / NOTAS SOBRE EL USO
•Avoid high temperatures. Allow for sufficient heat dispersion when installed on a rack.
•Eviter des températures élevées
Tenir compte d’une dispersion de chaleur suffisante lors de l’installation sur une étagère.
•Evite altas temperaturas. Permite la suficiente dispersión del calor cuando está instalado en la consola.
•Handle the power cord carefully.
Hold the plug when unplugging the cord.
•Manipuler le cordon d’alimenta-tion avec précaution.
Tenir la prise lors du débranchement du cordon.
•Maneje el cordón de energía con cuidado. Sostenga el enchufe cuando desconecte el cordón de energía.
•Keep the set free from moisture, water, and dust.
•Protéger l’appareil contre l’humidité, l’eau et lapoussière.
•Mantenga el equipo libre de humedad, agua y polvo.
•Unplug the power cord when not using the set for long periods of time.
•Débrancher le cordon d’alimenta-tion lorsque l’appareil n’est pas utilisé pendant de longues périodes.
•Desconecte el cordón de energía cuando no utilice el equipo por mucho tiempo.
(For sets with ventilation holes)
•Do not obstruct the ventilation holes.
•Ne pas obstruer les trous d’aération.
•No obstruya los orificios de ventilación.
•Do not let foreign objects in the set.
•Ne pas laisser des objets étrangers dans l’appareil.
•No deje objetos extraños dentro del equipo.
•Do not let insecticides, benzene, and thinner come in contact with the set.
•Ne pas mettre en contact des insecticides, du benzène et un diluant avec l’appareil.
•No permita el contacto de insecticidas, gasolina y diluyentes con el equipo.
•Never disassemble or modify the set in any way.
•Ne jamais démonter ou modifier l’appareil d’une manière ou d’une autre.
•Nunca desarme o modifique el equipo de ninguna manera.
TABLE OF CONTENTS
z Main Features ………………………………4
x Before Using ………………………………5
c Cautions on Installation ……………………5
v Connecting the Included Antennas ………5
b Connections…………………………………6 n Part Names and Functions ……………7, 8 m Remote Control Unit …………………9, 10 , Cautions on Handling Discs ……………11
. Listening to Radio Programs ………11 ~ 14 ⁄0Using the Timer ……………………15 ~ 18
⁄1Playing CDs …………………………19 ~ 22
• Normal Playback ………………………19
• Various Playback Functions ……20 ~ 22 ⁄2Playing MP3/WMA …………………23 ~ 25
•Normal Playback ……………………23, 24
•Various Playback Functions ………24, 25 ⁄3Auto On Function …………………………25
⁄4Troubleshooting …………………………26 ⁄5Specifications ……………………………26
• ACCESSORIES
Check that the following parts are included in the package aside from the main unit:
qOperating instructions ……………………1 |
rAM loop antenna |
…………………………1 |
|
wService station list …………………………1 |
tRemote control unit (RC-999) ……………1 |
||
eFM antenna…………………………………1 |
yR03/AAA batteries …………………………2 |
||
e |
r |
t |
y |
1MAIN FEATURES
1.Quality power for high quality sound
22W+22W (6 Ω/ohms, 1 kHz, T.H.D. 10%) high quality amplifier and terminals for large speakers.
2.MP3/WMA playback
Discs containing MP3 and/or WMA files can be played, and the track and artists names can be displayed during playback.
3.TONE and SDB control
TONE control is available for BASS and TREBLE separately and the SDB (Super Dynamic Bass) control enables powerful bass tones when listening at lower volume levels.
This unit has Source Direct position to turn off the SDB/TONE.
4.RDS compatible
Compatible with various RDS services, including program service name (PS) program type identification (PTY), traffic program identification (TP), clock time (CT) and radio text (RT).
4
2 BEFORE USING
Read the following before using the system.
•Before turning on the power
Check again that all connections are correct and that there are no problems with the connection cords. Be sure to unplug the power cord before connecting or disconnecting the connection cords.
Humming may be produced if this system is set near a TV or other audio equipment. If this happens, try changing the position of the equipment or the connection cords.
•Moving the system
Be sure to remove CD before moving the system. If a CD is left in the CD receiver, it may be scratched.
To prevent short-circuits or damage to the connection cords, always unplug the power cord and disconnect all connection cords to other audio equipment.
•Condensation (dew)
Condensation (water droplets) may be produced on internal optical lenses or discs in the following cases:
•Directly after a heater is turned on.
•When the system is in a steamy or humid room.
•When the system is moved abruptly from a cold place (room) to a warm room.
•Should condensation occur:
The signals on the disc cannot be read and the system will not function properly. Remove the disc then let the system set with the power on. The condensation will evaporate in one hour or less, at which time the system will function normally.
•Store this instructions in safe place
After reading, store this instructions along with the warranty in a safe place. Also fill in the items on the back paper for your convenience.
•Illustrations in this manual
Note that some of the illustrations used for explanations in this manual may differ from the actual system.
3 CAUTIONS ON INSTALLATION
Note:
For heat dispersal, do not install this equipment in a confined space such as a book case or similar unit.
|
|
|
Note |
|
|
ENGLISH
4 CONNECTING THE INCLUDED ANTENNAS
Installing the FM indoor antenna |
Installing the AM loop antenna |
Tune in FM station (see page 12), set the antenna so that distortion and noise is minimal, then secure the tip of the antenna in this position using tape or a pin.
AM loop antenna
FM antenna
Connecting an FM outdoor antenna
Tune in an AM station (see page 12) and set the antenna as far from the system as possible to keep distortion and noise is minimal. In some cases, it is best to invert the polarities. AM broadcasts cannot be received well if the loop antenna is not connected or if it is set close to metal objects.
Assembling the AM loop antenna
Connection to the AM loop antenna terminals.
1 |
2 |
3
Remove the vinyl tie and take out the
connection line.
4
a.With the antenna on top any stable
surface.
Mount
b.With the antenna attached to a wall.
Bend in the reverse direction.
If good reception cannot be achieved with the included FM antenna, use an FM outdoor antenna. Connect an PAL-type connector to the coaxial cable and connect the antenna to the FM COAX. (75 Ω/ohms) terminal.
Selecting a place for the FM outdoor antenna
•Set the antenna so that it points towards the broadcast station’s transmitting antenna. Behind buildings or mountains, set the antenna in the position at which reception is best, and also try changing the direction of the antenna.
•Do not install the antenna under power lines. Doing so is extremely dangerous, as the power line could touch the antenna.
•Install the antenna away from roads or train tracks to avoid noise from cars or trains.
•Do not install the antenna too high, as it may be hit by lightning.
Installation hole
Mount on wall, etc.
Installing an AM outdoor antenna
Connect the signal wire from the AM outdoor antenna to the antenna terminal. Be sure to connect the signal ground wire to the  terminal. Also be sure to connect the included AM loop antenna.
AM outdoor antenna
AM loop antenna
Signal ground
5
ENGLISH
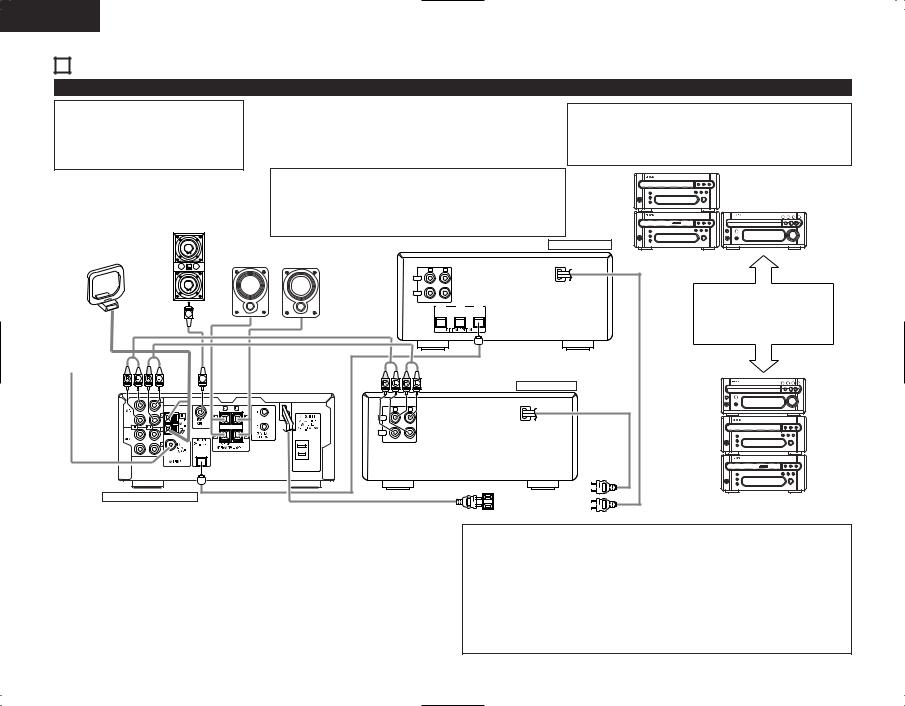
5 CONNECTIONS
(1) Connecting to Cassette deck
NOTE:
•This system includes digital circuitry which may cause interference such as color blotching or changes in the color on TVs. If this happens, move the system and the TV as far apart as possible.
Connecting the speaker systems
Connect the speaker system for the left channel (the left side as seen from the front) to the L terminals, the speaker system for the right channel to the R terminals. Refer to the instructions supplied with the speaker system for details. Be sure to use speaker systems with an impedance of 6 Ω/ohms or greater.
CAUTION:
•Whenever the power operation switch is in the STANDBY position, the unit is still connected to AC line voltage.
Please be sure to unplug the power cord when you leave home for, e.g.,a vacation, etc.
|
|
Note to CATV system installer: |
|
|
|
|
|
|
|
This reminder is provided to call the CATV system installer’s attention |
CD Recoder etc. |
|
|||
|
|
to Article 820-40 of the NEC which provides guidelines for proper |
|
||||
|
|
|
|
||||
|
|
grounding and, in particular, specifies that the cable ground shall be |
|
|
|||
|
Subwoofer |
connected to the grounding system of the building, as close to the |
|
|
|||
|
point of cable entry as practical. |
|
|
|
Cassette Deck |
RCD-M33 |
|
|
|
|
|
|
|
||
|
Speaker systems (SC-M53) |
|
|
CD Recoder etc. |
|
||
AM loop antenna |
|
|
|
|
Side by side installation |
||
Right |
Left |
|
|
|
|
||
|
|
|
|
|
|
||
|
|
R |
L |
|
|
|
|
|
|
IN |
|
|
|
|
|
|
|
OUT |
|
|
|
|
Install the sets as shown in one |
|
|
|
LINE |
|
|
|
|
|
|
|
|
|
|
of these diagrams. In either |
|
|
|
|
OUT |
IN-2 |
IN-1 |
|
|
|
|
|
|
|
|
|
case, be sure that the CD |
|
|
|
|
|
|
|
receiver’s ventilation holes are |
|
|
|
|
|
|
|
not obstructed. |
FM antenna
|
Cassette Deck |
|
|
|
RCD-M33 |
R |
L |
|
IN |
|
|
OUT |
|
CD Recoder etc. |
|
LINE |
|
|
|
|
|
|
Cassette Deck |
CD receiver (RCD-M33) |
Power plug |
Stacking installation |
|
AC 120 V, 60 Hz |
|
|
|
|
|
(Plug into a power outlet) |
|
System operations
Such system operations as the timer and the auto power on functions, as well as remote control operations cannot be performed unless all the RCA pin-plug cords are connected between the units, so be sure to make all the connections properly as shown in the diagram. Be sure to unplug the power cord before changing connections.
NOTES:
•Do not plug the power cord into the power outlet until all connections are completed. Be sure to interconnect the channels (L to L (white) and R to R (red)) properly, as shown on the diagram.
•Insert the plugs securely. Incomplete connections may result in noise.
•Be sure to connect the speaker cords between the speaker terminals and the speaker systems with the same polarities ( + to +, – to – ). If the polarities are switched, the sound at the center will be weak, the position of the different instruments will be unclear, and the stereo effect will be lost.
•After unplugging the power cord, wait about 5 seconds before plugging it back in.
•Note that setting the connection cords (pin-plug cords) next to the power cords may result in humming or other noise.
6

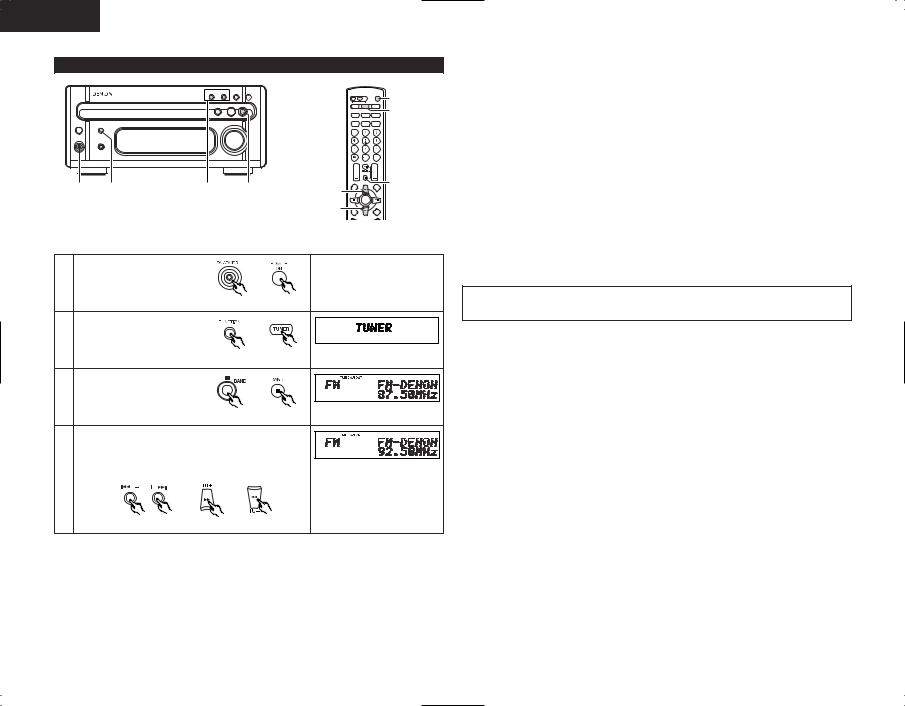
6 PART NAMES AND FUNCTIONS (See page 3.)
(1) Front Panel
qPower operation switch (ON/STANDBY)
•This turns the power for the entire system on and off.
•Press this once to turn the power on, then press again to set the power to STANDBY mode.
•The LED color changes as follows, according to the condition:
During power ON : green During STANDBY : red
During TIMER STANDBY: orange
ePHONES (headphones jack)
•Plug the headphones into this jack.
•No sound is produced from the speakers when headphones are plugged in.
rFUNCTION button
•Use this to select the input (function).
•The input changes in the following order each time this button is pressed:

 CD
CD  TUNER
TUNER  TAPE
TAPE  AUX
AUX
The muting mode is set when the main unit’s power button is pressed and when the standby mode is canceled from the remote control unit. The power indicator flashes green when in the muting mode, then stops flashing and turns green once the set is in the operational mode.
If the indicator is flashing orange (quickly):
The protective circuit is activated.
If this happens, unplug the power cord to turn the indicator off, then check the input and output terminals on the rear panel. Check in particular for shortcircuiting of the speaker cords. Once all connections have been corrected, plug the power cord. (Wait for at least 10 seconds after turning the power off before turning it back on.)
Power is supplied to the RCD-M33 even when the power is in the standby mode (The clock is displayed in the clock display mode.)
wRemote sensor
•When operating the remote control unit, point it at this sensor.
tDisplay
• Refer to page 8.
y1/ 3 (play/pause) button
•Press this button to start playing a disc. When the disc tray is closed, playback begins when this button is pressed.
•When pressed in STANDBY mode, the power automatically turns on and playback begins (Auto On function). Press this button again to stop playback temporarily.
uVOLUME control
•Use this to adjust the overall volume (Rotary Encorder System).
•The volume increases when the control is turned clockwise (,) and decreases when it is turned counterclockwise (.).
•The volume increases and decreases in 35 steps from the minimum (VOLUME 00) to the maximum (VOLUME MAX).
NOTE:
•Care must be taken when you adjust the volume as the CD receiver is equipped with an electronic volume control. Turn the VOLUME control slowly referring to the indication on the display to adjust the volume.
i 2 /BAND button
( 2 : CD stop button
BAND : TUNER band button)
•In CD function, press this button to stop playback.
•In TUNER function, each time this button is pressed, the band and FM reception mode change as follows:

 FM AUTO
  FM MONO
  AM
AM 
oSDB (Super Dynamic Bass)/TONE button
•Press this button to select the preferred sound of TONE CONTROL/SDB. Each time this button is pressed, the display changes as follows:

 SDB
SDB  BASS
BASS  TREBLE
  S.DIRECT
•You can switch the SDB on/off by using the +/– (up/down) button.
•BASS and TREBLE can be adjusted by using the +/– (up/down) button.
•When you select S.DIRECT (Source Direct), SDB/TONE is switched off, and the sound characteristic becomes flat.
•SDB can be controlled powerful bass tones when listening at lower volume levels.
NOTE:
•The SDB should be deactivated when listening at higher volume levels. Excessive bass at high volume levels will result in a distorted sound and may cause damage to your set and speaker system.
!0MENU/ SET button
•When pressed in the standby mode, the standby mode is switched (the clock display is switched on and off).
•When pressed while the clock is displayed, the manual time setting mode is set. (This cannot be set while the clock is displayed in the standby mode.)
•Switches the display of the timer setting menu on and off.
•When the function is set to FM and the CT tuning mode is set, the mode switches to the auto time setting mode.
•When the function is set to TUNER and an FM station is being received, if pressed for more than 1 second, the display switches to the AUTO PRESET menu.
ENGLISH
!18 /– , +/ 9 button
(8, 9 : CD automatic search
|
reverse/forward button |
+ , – |
: TUNER up/down button) |
•Use the 8 and 9 buttons to move to the beginning of a specific track while in CD function.
•Use the +/– button to select radio stations while in TUNER function.
•In TUNER function, press the 2 /BAND and + buttons at the same time to change the Preset mode, the 2 /BAND and – buttons at the same time to change the Tuning mode.
•Use the +/– button when you adjust tone control (BASS or TREBLE) and you select menu function (display, time, timer, or set up).
!25 (open/close) button
•Press this button to open and close the disc tray.
•When pressed once, the disc tray opens out, and when pressed again, the disc tray closes. If a disc is loaded, the total number of tracks and total playing time of the disc are displayed several seconds after the disc tray is closed.
•When pressed in STANDBY mode, the CD receiver’s power turns on.
!3Disc tray
• Load discs here.
7
ENGLISH
(2) Rear Panel
!4AUX IN (analog input) jacks
• This is an input terminal.
!5AUX OUT (analog output) jacks
• This is an output terminal for recording.
!6FM antenna terminal (ANTENNA TERMINAL FM)
• Connect the FM antenna here.
!7Digital output jack (DIGITAL OPTICAL OUT)
•Digital data is output in optical form from this jack.
!8Speaker terminals (SPEAKERS)
• Use these to connect the speakers.
!9System connectors
(SYSTEM CONNECTOR 1 and 2)
•When connecting the cassette deck, connect these connectors to system connectors on other system components.
(Use the system cords included with the other components.)
@0AC OUTLET
•When using in combination with the cassette deck, connect to the AC outlet on the CD receiver (RCD-M33) or one of the other components (100W MAX).
@1Power cord
• Plug this cord into a wall power outlet.
@2MONO OUT terminal (SUB WOOFER)
•Connector jack for subwoofer with builtin amplifier (super woofer), etc.
@3AM antenna terminal (ANTENNA TERMINAL AM)
• Connect the AM antenna here.
@4TAPE OUT (analog output) jacks
• This is an output terminal for recording.
@5TAPE IN (analog input) jacks
• This is an input terminal.
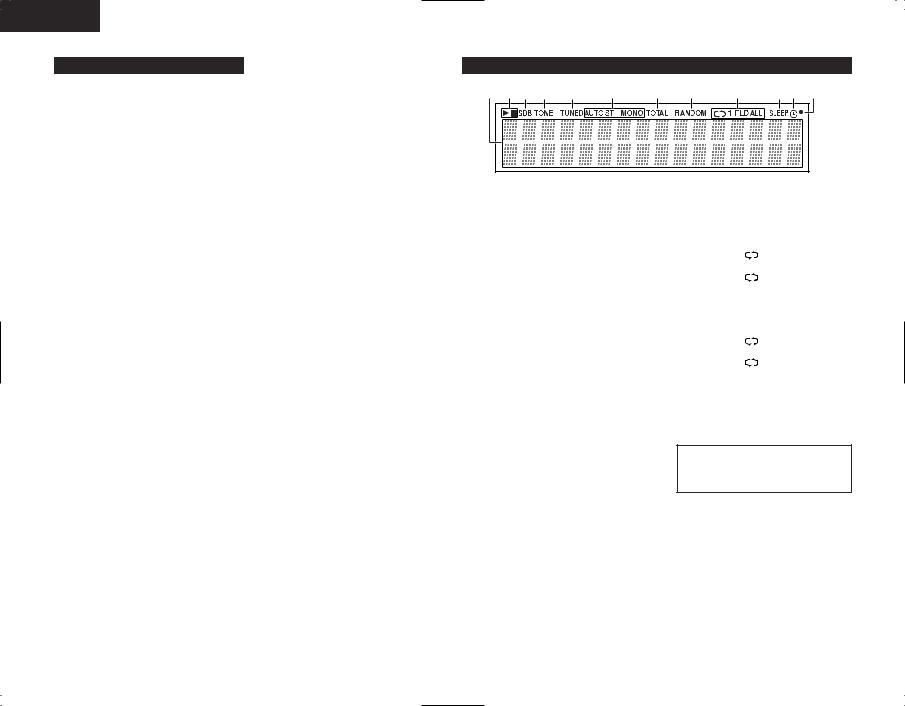
(3) Display
q w e r |
t |
y |
u |
i |
o |
!0!1 !2 |
qSegment
The selected functions, volume, reception band, reception frequency, RDS data, time, and timer settings are displayed here.
w 1/ 3
1 (the play indicator) lights when a disc is playing, and 3 (the pause indicator) lights when pause mode is set.
eSDB
This lights when SDB mode is on.
rTONE
This lights when the TONE is adjusted.
tTUNED
This lights when a station is tuned in properly.
y AUTO / ST / MONO
These display the FM reception mode.
ST |
: This lights when a stereo |
|
program is received in the FM |
|
AUTO mode. |
MONO |
: This lights when a monaural |
|
program is received in the FM |
|
AUTO mode and when the |
|
BAND button is pressed, |
|
setting the FM MONO mode. |
AUTO |
: This lights when the BAND |
|
button is pressed, setting the |
|
FM AUTO mode. |
uTOTAL
Lights when the total remaining time or the total number of tracks remaining on the disc is displayed on the segment.
iRANDOM
“RANDOM” lights during random play.
o  / 1 / FLD / ALL
This changes as follows each time the REPEAT button is pressed.
•When the function is set to CD and the mode is not the folder mode:
1st press |
: |
1 (single-track repeat) |
|
|
is displayed. |
2nd press : |
ALL (1 disc all track |
|
|
|
repeat) is displayed. |
3rd press |
: |
Nothing is displayed. |
•When the function is set to CD and the folder mode is set (only valid for discs containing MP3 and/or WMA files):
1st press |
: |
1 (single-track repeat) |
|
|
is displayed. |
2nd press : |
FLD (all track in a |
|
|
|
folder repeat) is displayed. |
3rd press |
: |
Nothing is displayed. |
!0SLEEP
This lights when the sleep timer is operating.
!1
NOTE:
•The timer standby mark (“  ”) does not light if the current time
and the timer have not been set.
The timer will operate when this is lit.
!2Remote control signal indicator
Flashes when remote control signals are received.
8
7 REMOTE CONTROL UNIT
The RCD-M33 comes with a system remote control unit (RC-999).
•The supplied remote control unit (RC-999) is for use with the RCD-M33 unit only.
•If the cassette deck is connected to the main unit, you may operate each of the above components using its respective remote control unit (refer to pages 9, 10).
(1) Inserting the batteries
qOpen the battery compartment cover of the remote control unit.
Press the knob and open the cover in the direction of the arrow.
wInsert the two R03 (AAA) batteries, following the + and – marks in the battery compartment.
e Close the cover of the battery compartment.
Cautions on Batteries
•Use R03 (AAA) batteries in this remote control unit.
•Replace the batteries with new ones after approximately 1 year, though this depends on the frequency with which the remote control unit is used.
•Replace the batteries with new ones if the unit does not operate when the remote control unit is operated from nearby, even if the batteries are less than a year old.
•Be sure to insert the batteries in the proper direction, following the “ < ” and “ > ” marks in the battery compartment.
•To avoid damage or leakage of battery fluid:
•Do not use a new battery with an old one.
•Do not use two different types of batteries.
•Do not short-circuit, take apart, heat or dispose of batteries in flames.
•Remove the batteries when you do not plan to use the remote control unit for an extended period of time.
•If the battery fluid should leak, carefully wipe off the fluid from the inside of the battery compartment, then insert new batteries.
(2) Using the Remote Control Unit
30° |
7m |
|
30°
•The remote sensor is located on the CD receiver. Point the remote control unit at the remote sensor as shown on the diagram when operating it.
•The remote control unit will operate from a direct distance of approximately 7 meters, but this distance will be shortened if obstacles are present or if operated at an angle. (The remote control unit will operate at an angle of up to 30° in either direction.)
NOTES:
•The remote control unit may not operate if the remote sensor is exposed to direct sunlight or the strong light from a lighting fixture, or if there is an obstacle between the remote control unit and the remote sensor.
•Do not press buttons on the remote control unit and on the set at the same time. Doing so could result in malfunctions.
•If the remote control unit is pointed away from the re-mote sensor during continuous operations (such as when turning the volume up or down), the operation will stop. If this happens, point the remote control unit at the remote sensor and press the button again.
ENGLISH
(3) Remote Control Unit Part Names and Functions
|
|
|
q SLEEP button |
||
|
q |
|
|
• Press this button to set the sleep timer. |
|
|
|
w OFF button |
|||
w |
|
#5 |
|||
|
|
• Use this switch to set the power to |
|||
r e |
#4 |
STANDBY mode. |
|||
|
|
#3 |
e TUNER button |
||
y |
t |
#2 |
• Press this button to set the function |
||
TUNER mode. |
|||||
|
|||||
|
u |
#1 |
r CD button |
||
|
|
|
|
• Press this button to set the function CD |
|
|
|
|
|
mode. |
|
|
|
|
t PROG/DIRECT button |
||
|
i |
|
|
• Press this button to switch between |
|
|
|
|
PROGRAM and DIRECT play. |
||
|
|
#0 |
y EDIT button |
||
|
|
|
In CD function : |
||
|
|
@9 |
• Press this button for edited recording on a |
||
|
o |
@8 |
|
tape, dividing the tracks onto sides A and |
|
|
|
B according to the length of the tape. |
|||
|
|
|
|
||
|
|
|
|
In TUNER function : |
|
|
|
@7 |
• Press this button to input the station |
||
|
|
name. |
|||
|
!0 |
@6 |
u CALL button |
||
!1 |
@5 |
• Use this button to confirm the |
|||
|
!2 |
@4 |
|
programmed song. |
|
|
i Number buttons |
||||
!3 |
|
||||
|
!4 |
@3 |
|
In CD function : |
|
|
|
• Press these buttons to specify the |
|||
!5 |
@2 |
desired track. |
|||
In TUNER function : |
|||||
|
!6 |
@1 |
|
• Press these buttons to recall preset |
|
!7 |
@0 |
station. |
|||
|
!8 |
!9 |
o FOLDER (+ / –) button |
||
For MP3/WMA discs with the function set to CD:
• Select the folder.
• In the play and pause modes, the first track in the selected folder is selected.
9

ENGLISH
!0MENU/ SET button
•When pressed in the standby mode, the standby mode is switched (the clock display is switched on and off).
•When pressed while the clock is displayed, the manual time setting mode is set. (This cannot be set while the clock is displayed in the standby mode.)
•Switches the display of the timer setting menu on and off.
•When the function is set to FM and the CT tuning mode is set, the mode switches to the auto time setting mode.
•When the function is set to TUNER and an FM station is being received, if pressed for more than 1 second, the display switches to the AUTO PRESET menu.
!1ENTER/ MEMO button
•Press this button to enter editing settings.
•Press this button to preset memory.
!28 /CH–
(automatic search) button
In CD function :
•Move to the beginning of current Track or previous Track.
In TUNER function :
•Use this button to recall preset stations on the tuner.
!36 /TU–
(manual search / rewind) button
In CD function :
•The manual search operation is performed.
In TUNER function :
•Use this button to selecting the station. In TAPE function :
•Press this button to rewind the front side of the tape. (The back side of the tape is fast-forwarded.) Also use this button to search for the beginning of the current selection when playing in the forward (1) direction, or to search for the beginning of the following selection when playing in the reverse (0) direction.
!4SDB /TONE button
•Press this button to adjust SDB (Super Dynamic Bass) and TONE.
!5DIMMER button
•Use this to adjust the brightness of the main unit‘s display. Can be switched in 4 steps, from OFF to always on.
!6DAB/ RDS button
•Use this button to automatically tune to stations using the radio data system.
 RDS
RDS  PTY
PTY  TP
TP
OFF
!70 (reverse play) button (TAPE)
• Not supported.
!81 (forward play) button (TAPE)
• Not supported.
!92 (stop) button (TAPE)
• Not supported.
@01/ 3 (play/pause) button (MD)
• Not supported.
@1PTY button
•Press this button after selecting “PTY” with the RDS button to select one of the 24 program types.
@2CLOCK button
•Press this to switch the clock display between on and off.
@3TIME/ DISPLAY button
For audio CDs with the function set to CD:
•Press this button during the play or pause mode to switch the time display.
elapsed time |
remaining time |
per track |
for the track |
total remaining time on the disc
(During programmed playback, indicate the total remaining time of the programmed tracks.)
For MP3/WMA discs containing track information with the function set to CD:
•Press this button during the play or pause mode to switch the track information.
 file name
  Title / Artist
Title / Album
With the function set to TUNER, and in the FM and RDS modes:
•Press to switch the display below.
 frequency
  (PS)
(PS)  PTY RT
  CT
CT
PS:This is displayed when the radio station currently being received is one named using the procedure described in “P13 – Presetting or naming radio stations”.
@49 /CH+
(automatic search) button
In CD function :
• Move to the beginning of Next Track.
In TUNER function :
•Use this button to recall preset stations on the tuner.
@57 /TU+
(manual search / fast-forward) button
In CD function :
•The manual search operation is performed.
In TUNER function :
• Use this button to selecting the station.
In TAPE function :
•Press this button to fast-forward the front side of the tape. (The back side of the tape is rewind.) Also use this button to search for the beginning of the following selection when playing in the forward (1) direction, or to search for the beginning of the current selection when playing in the reverse (0) direction.
@6MUTE button
•Mutes the speaker output. When operated while the output is muted, the mute mode is canceled.
@72 (stop) /BAND button
•In CD function, press this button to stop playback.
•In TUNER function, use this button to selecting the band.
 FM AUTO
  FM MONO
AM 
@8VOLUME button
•Use these buttons to adjust the volume.
•The volume increases when the • button is pressed and decreases when the ª button is pressed.
@9CD 1/ 3 (play/pause) button
•Press this button to play or pause of the CD player.
#0CLEAR/ DEL button
In CD function :
•Press this button to clear the track from the program.
In TUNER function :
•Press this button to erase the station name.
#1FOLDER MODE button
•For MP3/WMA discs with the function set to CD, switches the play mode between disc and folder.
#2REPEAT button
• Press this button for repeat playback.
#3RANDOM button
•Press this button to set the tracks in random order.
#4LINE button
• Press this button to switch the function LINE .
The input changes in the following order each time this button is pressed.
 TAPE
TAPE  AUX
AUX 
#5POWER ON button
•Use this switch to turn on the power of the entire system.
10
8 CAUTIONS ON HANDLING DISCS
About Compact Discs
COnly discs with the mark can be played on the RCD-M33.
Use compact discs that include the C mark.
CD’s with special shapes (heart-shaped CDs, octagonal CDs etc.) cannot be played on this set. Attempting to do so may damage the set. Do not use such CDs.
•Removing discs from their cases
As shown on the diagram, grasp the outer edge of the disc with your fingers, insert a finger in the center hole, press gently, then lift the disc out of the case.
•Loading discs in the disc tray
Be sure to load the disc with the labelled side facing up. (Compact discs only play on one side.) For 8 cm CDs, set the disc in the sunken section in the center of the tray.
NOTES:
•The disc tray opens when the 5 (open/close) button is pressed once and closes when it is pressed again.
•When the disc tray is closed, the disc turns automatically for several seconds, then the total number of tracks and total playing time of that disc appear on the display.
•The disc tray can also be closed by pressing the 1/ 3 (play /pause) button, in which case playback automatically starts from the first track on the disc (or if tracks are programmed, from the first programmed track).
Handling the Disc Tray:
•Do not turn off the power, stop the disc tray by hand or pull on it when it is moving. Doing so may damage it.
If the headphones’ cord or some other object accidentally gets caught in the disc tray while it is closing and the disc tray stops, press the 5 (open/close) button again to open the tray and remove the obstacle.
Do not set objects other than discs on the disc tray. Doing so may damage it.
Cleaning Discs
Dust, fingerprints or spit on the disc will result in |
|
|
noise or skipping. If the disc is dirty or if the CD |
|
|
receiver does not operate properly, use the |
|
|
following procedure to clean the disc: |
|
|
• Hold the disc with the signal surface (the side |
|
|
opposite the labelled side) facing up, as shown |
|
|
in the diagram. |
|
|
• Wipe the disc gently from the center towards |
NOTES: |
|
the edge (in the direction of the arrow) with a |
• Do not wipe discs in the direction opposite |
|
soft cloth. |
the arrow or in a circular motion as with |
|
Do not clean discs with the following: |
regular records. |
|
• The disc’s signal surface is easily damaged, |
||
• Benzene, alcohol or other solvents |
||
so do not wipe it with a hard cloth or rub it |
||
• Cleaner including an abrasive |
||
strongly. |
||
• Sprays or cleaners designed for records |
||
|
||
• Anti-static |
|
ENGLISH
9 LISTENING TO RADIO PROGRAMS (Check the connections on pages 5, 6.)
Auto tuner presets
Use this to automatically search for FM broadcasts and store up to 40 stations at preset channels 1 to 40.
NOTE:
•If an FM station cannot be preset automatically due to poor reception, use the “Manual tuning” operation to tune in the station, then preset it using the manual “Preset memory” operation.
 1
1 
 2
2
|
1 |
2 |
4, 5 |
3 |
4, 5 |
3 |
|
|
|||||
1 |
Press the power operation |
|
|
|
||
switch to turn on the power. |
|
|
|
|
||
|
|
|
Main unit |
|
Remote control unit |
|
2 |
Press |
the FUNCTION |
or |
|
|
|
TUNER button to select TUNER |
|
|
|
|||
|
mode. |
|
|
|
|
|
|
|
|
Main unit |
|
Remote control unit |
|
3 |
Press the 2 /BAND button to |
|
|
|
||
select FM AUTO or FM MONO. |
|
|
|
|||
|
|
|
Main unit |
|
Remote control unit |
|
|
Press the MENU/ SET button |
|
|
|
||
4 |
for at least 1 second. |
|
|
|
|
|
• Press the 2 /BAND button to |
|
|
|
|||
|
cancel. |
Main unit |
|
Remote control unit |
|
|
|
|
|
|
|
||
|
Use the MENU/ SET button to start |
|
|
|||
|
searching. |
|
|
|
|
|
5 |
• When auto presetting is completed, the |
Main unit |
|
|||
station set at preset position 1 |
is |
|
||||
|
|
|||||
|
displayed. |
|
|
|
|
|
|
• If you want to stop searching, press the |
|
|
|||
|
2 /BAND button. |
|
|
|
|
|
|
|
|
|
|
Remote control unit |
|
11
ENGLISH |
|
|
|
|
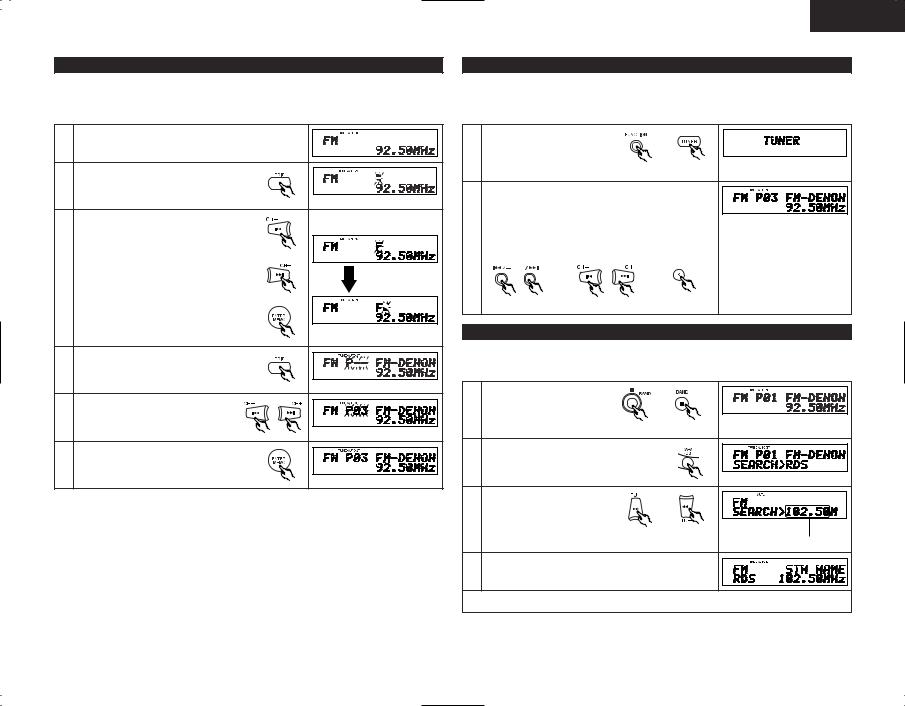
Manual tuning |
|
|
|
|
|
|
|
|
1 |
|
|
|
|
2 |
1 |
2 |
4 |
3 |
3 |
4 |
||||
|
|
|
|
4 |
Example: Tuning in FM 92.50 MHz |
|
|
|
|
(AM stations are tuned in using the same procedure.) |
|
|||
1 |
Press the power operation |
|
switch to turn on the power. |
|
|
|
Main unit |
Remote control unit |
2 |
Press the FUNCTION or |
|
TUNER button to select TUNER |
|
|
|
mode. |
|
|
Main unit |
Remote control unit |
3 |
Press the 2 /BAND button on |
|
the tuner to select the FM |
|
|
|
AUTO. |
|
|
Main unit |
Remote control unit |
Use the Tuning +/– (TU+/ TU–) button to tune the frequency to 92.50. Once the frequency is tuned in, adjust the volume to the desired level using the VOLUME control.
4
Main unit |
Remote control unit |
The function of the +/– button on the main unit may toggle between Tuning +/– and Preset +/– functions.
•Pressing the – button while holding down the BAND button at the same time changes function of the +/– button to Tuning +/–. (“TUNING” flashes for 5 seconds.)
•Pressing the + button while holding down the BAND button at the same time changes the function of the +/– button to Preset +/–. (“PRESET” flashes for 5 seconds.)
•The +/– button is factory preset to function as a Tuning +/– button.
However, be sure that the +/- buttons function as the Tuning +/– button before proceeding with step 4.
Auto Tuning
•When a program being broadcast in stereo is received, the “ST” indicator lights and the program is received in stereo.
•If reception is poor and there is much noise in the stereo signals, press the BAND button to set the FM MONO mode.
•When one of the Tuning +/– (TU+/ TU–) button is pressed, the frequency changes in steps of 200 kHz in the FM band, 10 kHz in the AM band.
•If one of the Tuning +/– (TU+/ TU–) button is held for over 1 second, the frequency continues to change when the button is released (auto tuning) and stops when a station is tuned in. Tuning will not stop at stations whose reception is poor.
•To stop the auto tuning function, press the Tuning +/– (TU+/ TU–) button once.
NOTE:
•A humming sound may be heard when using a TV nearby while receiving AM programs. If this happens, move the system as far from the TV as possible.
12
Presetting or naming radio stations
(This operation is only possible from the remote control unit.)
You can preset up to 40 FM/AM stations.
You can name the preset stations (up to 8 characters each).
1 |
Tune in the desired preset station. |
|
2 |
Press the EDIT button on the remote |
|
control unit. |
|
|
|
• You can now begin character input. |
|
|
Press the 9 /8 button until the |
|
|
desired character appears on the display. |
Flashes |
|
Press the ENTER/ MEMO button on the |
|
|
remote control unit to store the input |
|
|
character. |
|
3 |
• Press the 7 button or the ENTER/ |
|
MEMO button to store the input |
ENTER/MEMO |
|
|
character. The cursor will move to the |
|
|
next character space. Repeat step 3 until |
|
|
all the characters have been stored. |
|
|
• You can move the cursor backward by |
|
|
pressing the 6 button to make |
Next Flashes |
|
corrections. |
|
4 |
Press the EDIT button to confirm the |
|
names of the preset stations.. |
|
|
5 |
Press the 9 /8 button on the |
|
remote control unit to tune in the |
|
|
|
desired preset number. |
|
6 |
Press the ENTER/ MEMO button to confirm |
|
the preset station number. |
|
•To change a preset station name, press the CH+(9)/ CH–(8) to display the preset station you want to change, then press EDIT and use the same procedure as in step 3 above to change.
•To preset only the frequency of the radio station, start over from step 1. Then press the ENTER/ MEMO button and proceed to steps 5 through 6. The display shows the preset number, band and frequency.
ENGLISH
Listening to Preset Stations
If the following operation is performed when the system power is off, the power automatically turns on and the radio is played. (Auto on function)
Example: Listening to the station preset at number 3
Press |
the FUNCTION or |
1 TUNER button to select TUNER |
|
mode. |
|
Main unit |
Remote control unit |
Use the “9” and “8” buttons to select preset number “3” or press the “3” button on the numeric keypad to display preset number “P03”.
•The “9” and “8” buttons on the main unit can be selected when the preset mode has been set.
(Press the 2 /BAND and + buttons at the same time to 2 change the Preset mode.)
Main unit |
Remote control unit |
Remote control unit |
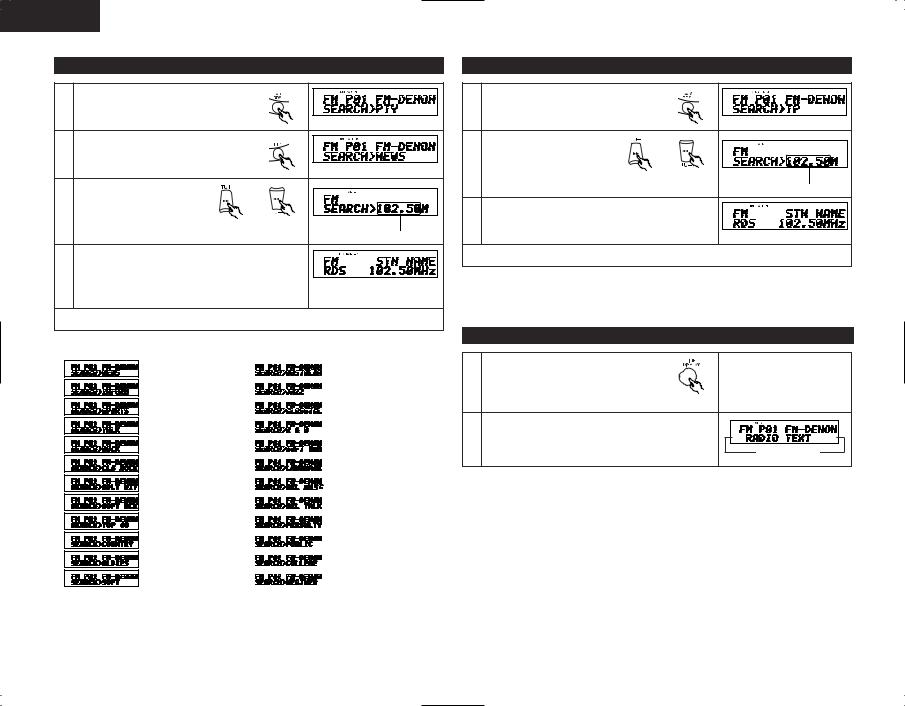
Using the RDS functions
(This operation is only possible from the remote control unit.) Receiving RDS broadcasts (FM only)
1 |
Press the BAND button and set |
the FM AUTO. |
|
|
Main unit Remote control unit |
2 |
Press the RDS button. |
3 |
Press the TU+(7 ) or |
TU–(6) button. (auto tuning) |
|
|
Reception frequency |
4 |
The station is tuned in. |
NOTE: If no RDS station is found, “ NO PROGRAM ” is displayed.
13
ENGLISH
PTY Search
1 |
Press the RDS button twice. |
|
Press the PTY button to select the type of |
2 |
program. |
(One of the 24 types listed below can be |
|
|
selected.) |
3 |
Press the TU+(7 ) or |
TU–(6) button. (auto tuning) |
|
|
Reception frequency |
4 |
The station is tuned in. |
NOTE: If no program of the specified type is found, “ NO PROGRAM ” is displayed.
Program Types
(News) |
|
(Nostalgia) |
(Information) |
|
(Jazz) |
|
||
|
||
(Sports) |
|
(Classical) |
|
||
|
||
(Talk) |
|
(R&B) |
|
||
|
||
(Rock) |
|
(Soft R&B) |
|
||
|
||
(Classic Rock) |
|
(Language) |
|
||
|
||
(Adult Hits) |
|
(Religious Music) |
|
||
|
||
(Soft Rock) |
|
(Religious Talk) |
|
||
|
||
(Top 40) |
|
(Personality) |
|
||
|
||
(Country) |
|
(Public) |
|
||
|
||
(Oldies) |
|
(College) |
|
||
|
||
(Soft) |
|
(Weather) |
|
||
|
||
|
|
|
TP Search
1 |
Press the RDS button 3 times. |
2 |
Press the TU+(7 ) or |
TU–(6) button. (auto tuning) |
|
|
Reception frequency |
3 |
The station is tuned in. |
NOTE: “ NO PROGRAM ” is displayed when there is no traffic information broadcast station.
Radio Text
To set the RT mode, press the TIME/ 1 DISPLAY button on the remote control unit
until “Radio Text” scrolls on the display.
When the station currently tuned in is |
|
2 offering a radio text message service, the |
|
message scrolls on the display. |
Scrolling display |
|
•When the RT mode is turned on while an RDS radio station not offering an RT service is tuned in, “NO TEXT” is displayed on the display, then the mode automatically switches to the PS mode.
•In the same way, the mode automatically switches to the PS mode when the RT service is finished. In this case, the mode automatically switches from the PS mode back to the RT mode when an RT broadcast is resumed.
•The RT mode cannot be set in the AM band or for FM stations not offering RDS broadcasts.
•To turn the RT mode off, press the TIME/ DISPLAY button and switch to the desired display mode.
14
10 USING THE TIMER
The time and timer functions are incorporated in the CD receiver.
Timer Settings
Types of timer operations
EVERYDAY TIMER |
: Use this to turn the power on and standby at the same time every day. |
ONCE TIMER |
: Use this to turn the power on and standby once. |
SLEEP TIMER |
: Use this to set the power to turn standby after 10 to 90 minutes, in steps |
|
of 10 minutes (operated from the remote control unit). |
Notes on timer settings
•Be sure to set the current time beforehand.
•To listen to or record a radio program (“air check”) using the timer, be sure to preset the station beforehand. (Refer to “Presetting or naming radio station” on page 13.)
Power Failures
If the power cord is unplugged or there is a power failure, the settings of the current time and once timer are erased and the time display will flash. If this happens, reset the current time and the once timer.
Also check the timer and tuner presettings, and reset them if they have been cleared.
Checking the Settings
To check the timer settings, press the MENU/ SET button to select TIMER.
Next, press the 9 or 8 button to select EVERYDAY or ONCE TIMER, then press the MENU/ SET and 9/ 8 button repeatedly to display in order: Timer Setting mode, Function selection, (when in TUNER mode) the reception band and preset channel number, Timer On time, Timer Off time and Timer ON/OFF. Press the MENU/ SET button again to return to the current mode display.
Changing the Settings
Repeat the timer setting operation to erase the previous settings and set the new settings.
Clearing the Settings
Press the MENU/ SET button to select TIMER. Next, press the 9/ 8 button to select EVERYDAY, then press the 2 (stop) button for at least 2 seconds while EVERYDAY is displayed to clear the everyday timer settings.
Press the MENU/ SET button to select TIMER. Next, press the 9/ 8 button to select ONCE, then press the 2 (stop) button for at least 2 seconds while ONCE is displayed to clear the everyday timer settings.
Note on Setting the Timer
If the time set with the timer is reached while the system power is on, the operation switches to the operation set by the timer.
Turning the Timer Off
Follow the steps for “to turn on or turn off EVERYDAY/ONCE timer feature” to turn off the EVERYDAY/ONCE timer mode.
NOTE:
• Be sure to set the power to the standby mode when using the timer.
ENGLISH
Setting the Current Time
The time is displayed in the 12-hour mode.
3, 5 |
2, 4, 6 |
2, 4, 6

 3, 5
3, 5


 3, 5
3, 5

 1
1
Example: Setting to 9:30 p.m.
1 |
Press the CLOCK button and select the |
|
||||
clock display mode. |
|
|
|
|
||
|
|
|
|
|
Remote control unit |
|
|
Press the MENU/ SET button |
|
|
|
||
|
for at least 1 second |
to select |
|
|
|
|
2 |
the manual time setting mode. |
|
|
|
||
(This cannot be set while the |
|
|
The hours place flashes. (If the |
|||
|
clock is |
displayed |
in the |
Main unit |
|
|
|
Remote control unit |
hours have already been set, that |
||||
|
standby mode.) |
|
|
|
number flashes.) |
|
3 |
Use the 9 or 8 |
|
|
|
||
button to set the hours. |
|
|
The hours place flashes. |
|||
|
|
|
Main unit |
|
Remote control unit |
|
|
|
|
|
|
||
4 |
Press the MENU/ SET button. |
|
|
The minutes place flashes. (If |
||
|
|
|
|
Main unit |
Remote control unit |
|
|
|
|
|
the minutes have already been |
||
|
|
|
|
|
|
|
|
|
|
|
|
|
set, that number flashes.) |
5 |
Use the 9 or 8 |
|
|
|
||
button |
to set the |
|
|
|
||
|
minutes. |
|
|
|
|
The minutes place flashes. |
|
|
|
Main unit |
|
Remote control unit |
|
|
|
|
|
|
||
|
Press the MENU/ SET button at the cue of a separate |
|
||||
6 |
clock or time service to start the clock. |
|
|
|||
• The time display stops flashing and the clock starts |
The display stops flashing and |
|||||
|
running. |
|
|
|
|
the clock starts running from 00 |
|
|
|
|
|
|
seconds. |
•If an RDS station offers a time service the time can be set by pressing the TIME/ DISPLAY and MENU/ SET buttons on the remote control unit while that station is tuned in.
15

ENGLISH
Setting the Timer
The power can be set to turn on and off at a specific time or at the same time everyday.
NOTE:
•Please do not change the setup function of this unit after performing the timer setup. In the event the setup function is changed, the timer start mode may not start properly.
1, 19 |
3, 5, 7, 9, 11, 13, 15, 17 |
|
19 |
1 |
|
2, |
4, |
6, |
|
|
8, 10, |
12, |
|
|
|
14, 16, |
18 |
3, 5, 7, |
|
|
|
|
|
9, 11, 13, |
|
|
|
|
15, 17 |
|
2, 4, 6, 8, 10, 12, 14, 16, 18 |
|
|
|
Example: Setting the tuner to turn on at 1:35 p.m., off at 1:56 (with FM 92.50 MHz preset at channel 3) with everyday timer.
1 |
Press the power operation |
|
switch to turn on the power. |
Say that FM 87.5 MHz is tuned |
|
|
|
|
|
Main unit |
Remote control unit in preset channel number “ 1 ”. |
2 |
Press the MENU/ SET button to |
|
set the timer setting mode. |
Flashes |
|
|
Main unit |
|
|
Remote control unit |
|
|
Press either the 9 or |
|
|
8 button as desired. |
|
3 |
|
Flashes |
|
Main unit |
Remote control unit |
•The everyday timer is selected and “EVERYDAY” appears in the display.
4 |
Press the MENU/ SET button. |
|
|
Main unit |
Remote control unit |
5 |
Use the 9 or 8 |
|
button to set the |
|
|
|
“TUNER” mode. |
Flashes |
|
Main unit |
Remote control unit |
6 |
Press the MENU/ SET button. |
|
|
|
|
|
Main unit |
Remote control unit |
|
|
Use the 9/ 8 button to set the preset channel |
|
||
|
number. |
|
|
|
7 |
|
|
|
Flashes |
|
|
|
|
|
|
|
Main unit |
Remote control unit |
|
8 |
Press the MENU/ SET button. |
|
|
Flashes |
|
|
|
|
|
|
|
Main unit |
Remote control unit |
(If the timer has already been |
|
|
|
|
set, that number flashes.) |
9 |
Use the 9 or 8 |
|
|
|
button to set the hours |
|
|
|
|
|
for the timer on time. |
|
|
Flashes |
|
|
Main unit |
Remote control unit |
|
|
|
|
||
10 |
Press the MENU/ SET button. |
|
|
Flashes |
|
|
|
|
|
|
|
Main unit |
Remote control unit |
(If the timer has already been |
|
|
|
|
set, that number flashes.) |
|
Use the 9 or 8 |
|
|
|
11 |
button to set the |
|
|
|
minutes for the timer on |
|
|
Flashes |
|
|
time. |
Main unit |
Remote control unit |
|
|
|
|
||
12 |
Press the MENU/ SET button. |
|
|
Flashes |
|
|
|
|
|
|
|
Main unit |
Remote control unit |
(If the timer has already been |
|
|
|
|
set, that number flashes.) |
13 |
Use the 9 or 8 |
|
|
|
button to set the hours |
|
|
|
|
|
for the timer off time. |
Main unit |
Remote control unit |
Flashes |
|
|
|
||
14 |
Press the MENU/ SET button. |
|
|
Flashes |
|
|
|
|
|
|
|
Main unit |
Remote control unit |
(If the timer has already been |
|
|
|
|
set, that number flashes.) |
16
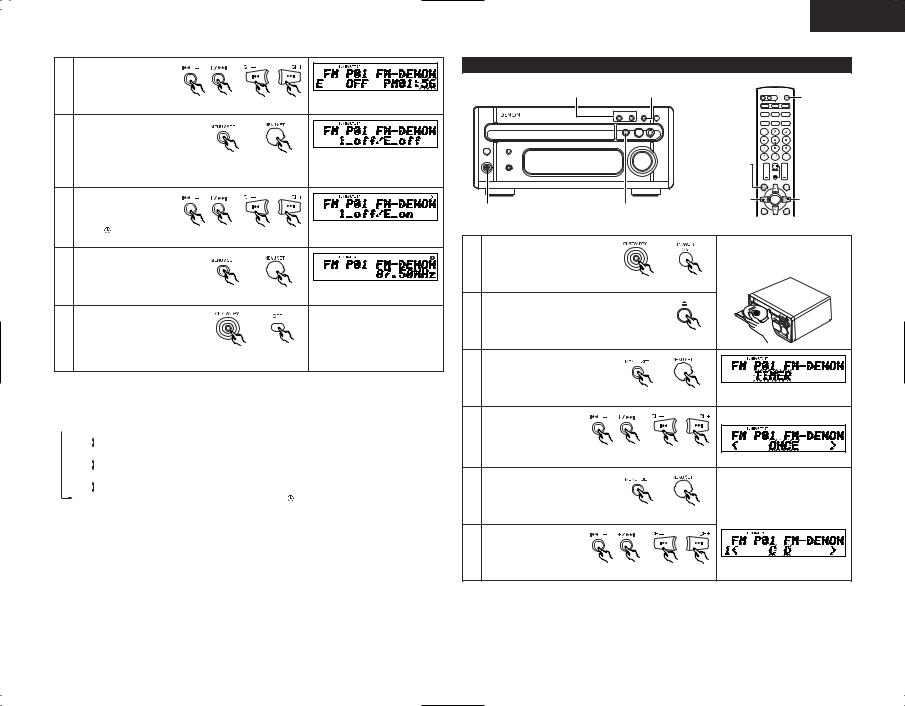
|
|
Use the 9 or 8 |
|
|
||
15 |
button |
to |
set the |
|
|
|
minutes for the timer |
|
Flashes |
||||
|
|
off time. |
|
|
Main unit |
|
|
|
|
|
|
Remote control unit |
|
16 |
Press the MENU/ SET button. |
Remote control unit Displays the currently set |
||||
|
|
|
|
|
Main unit |
|
|
|
|
|
|
|
timer ON or OFF mode. |
|
|
Use the 9 or 8 |
|
|
||
17 |
|
button |
to |
select |
|
|
|
“1_off/E_on”. |
|
|
|
||
|
|
• The |
mark lights. |
Main unit |
Remote control unit |
|
18 |
Press the MENU/ SET button. |
|
||||
|
|
|
|
|
Main unit |
Remote control unit |
|
|
Press the power operation |
|
|||
|
|
switch to turn standby the |
|
|||
19 |
system’s power. |
|
|
|||
• The power switch indicator |
|
|||||
|
|
turns orange and display turns Main unit |
Remote control unit |
|||
|
|
off. |
|
|
|
|
Turning on and off the timer standby ON/OFF
•In TIMER STANDBY mode, each time the 9 or 8 button is pressed, the setting changes as follows;
 1 _ off / E _ off : Both timers are canceled. (The
  mark turns off.)
1 _ on / E _ on : Both once and everyday timers are activated. (The  mark lights.)
1 _ off / E _ on : Only the everyday timer is activated. (The  mark lights.)
1 _ on / E _ off : Only the once timer is activated. (The |
mark lights.) |
•When you complete the setting, the display automatically returns to the former state after 5 seconds.
•To change the settings of TIMER STANDBY, press MENU/ SET button to set the unit in TIMER STANDBY mode first, then use 9 or 8 button to make changes.
ENGLISH
Various Timer Operations
|
4, 6, 8 |
|
3, 5, 7, 8 |
1 |
|
|
|
|
|
|
|
|
|
|
|
3, 5, 7, |
|
|
|
|
|
8 |
|
|
1 |
|
2 |
4, 6, 8 |
4, 6, 8 |
|
|
|
|
||
Example: Playing a compact disc with the once timer |
|
||||
1 |
Press the power operation |
|
|
|
|
switch to turn on the power. |
|
|
|
|
|
|
|
|
Main unit |
Remote control unit |
|
2 |
Press the 5 (open/close) button and place a |
|
|||
disc on the disc tray. Close the disc tray. |
|
|
|||
|
|
|
|
Main unit |
|
3 |
Press the MENU/ SET button to |
|
|
|
|
set the timer setting mode. |
|
|
|
Flashes |
|
|
|
|
Main unit |
|
|
|
|
|
Remote control unit |
|
|
|
Press the 9 or 8 |
|
|
|
|
4 |
button. The once timer |
|
|
|
|
is selected and |
|
|
|
|
|
|
“ONCE” appears in the |
|
|
|
|
|
display. |
Main unit |
Remote control unit |
Flashes |
|
|
|
|
|
||
|
|
|
|
|
|
5 |
Press the MENU/ SET button. |
|
|
|
|
|
|
|
Main unit |
Remote control unit |
|
6 |
Use the 9 or 8 |
|
|
|
|
button to set the “CD” |
|
|
|
|
|
|
mode. |
Main unit |
Remote control unit |
Flashes |
|
|
|
|
|||
17
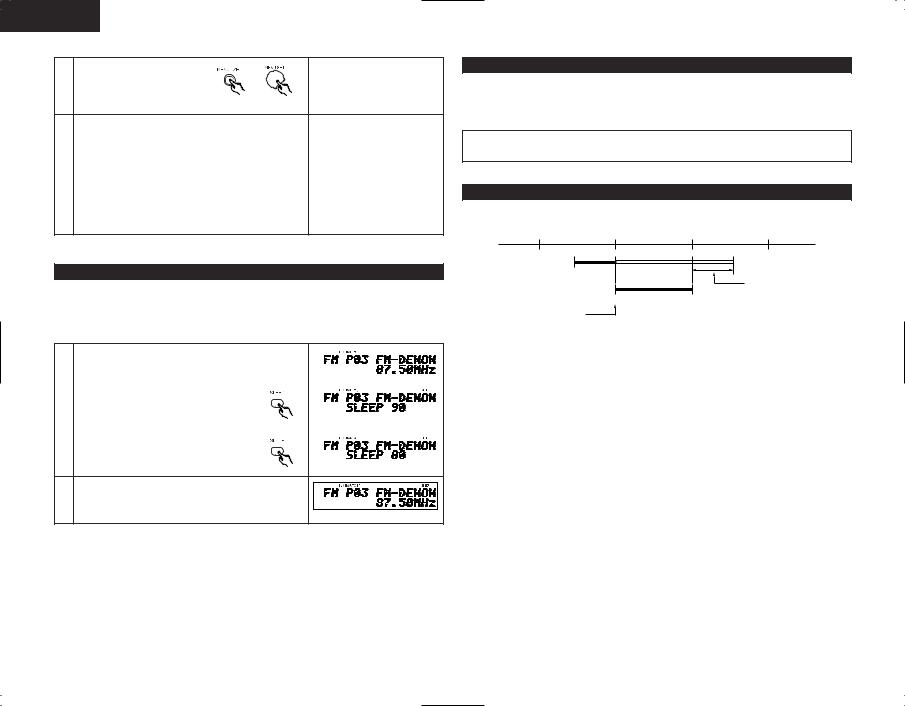
ENGLISH
7 Press the MENU/ SET button.
Main unit |
Remote control unit |
Now follow steps 8 to 18 under “Setting the Timer” on page 16.
• “The “E” indicating “EVERYDAY” switches to “1”
8indicating “ONCE”.
•Press the MENU/ SET and 9 or 8 button to select “1_on/E_off” and the  mark lights in the step 17.
Setting the Sleep Timer
(This operation is only possible from the remote control unit.)
With this function, the power can be set to turn off after 10 to 90 minutes, in steps of 10 minutes, using the remote control unit.
Example: To turn the power off after 80 minutes when listening to FM 87.50 MHz
1 |
Tuner currently set to FM 87.50 MHz. |
|
|
|
|
|
|
|
|
|
|
2 |
|
||
Press the SLEEP button. |
|
|
|
|
|
|
|
|
|
|
|
3 |
Press the SLEEP button again while the |
|
|
|
|
||
“SLEEP” indicator lights. |
|
|
|
The previous display reappears after 5 seconds.
4 • The “SLEEP” indicator remains lit, indicating that the sleep timer is functioning.
•The time is reset to “OFF” if the SLEEP button is pressed again while the sleep timer is functioning.
Cancelling the Sleep Timer
Select OFF using the SLEEP button.
The sleep timer is also canceled if the CD receiver‘s power operation switch or the power operation switch on the remote control unit is pressed, turning the system power off.
NOTE:
• If a several timer operations are set at once, the sleep timer has priority.
Order of priority of the sleep, everyday and once timers
The sleep timer has priority for the off time. (The system operates as indicated by the bold lines.)
20:00 |
21:00 |
22:00 |
ON |
OFF |
Everyday or once timer set |
|
SLEEP |
|
ON |
OFF |
Sleep timer set to 60 minutes |
|
The unit remains in the standby mode.
Even when the power was turned on with the timer, the power turns off if the remaining time of the sleep timer reaches “00” before the off time set with the everyday or once timer is reached. If the everyday or once timer’s on time is reached while the sleep timer is functioning, the everyday or once timer does not function.
When the setting times of the everyday and once timer overlap, the once timer has priority over the everyday timer and the everyday timer will be canceled.
18
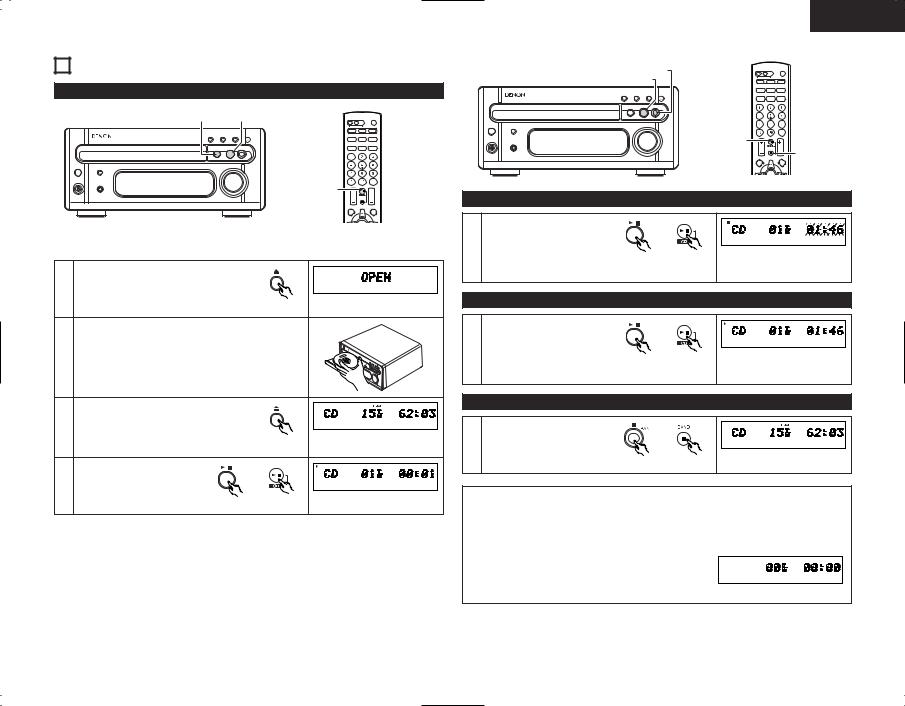
11 PLAYING CDs
Normal Playback
1, 3 |
4 |
4
Example: Playing a disc containing 15 tracks and with a playing time of 62 minutes, 3 seconds, starting from the first track.
Press the 5 (open/close) button to open the 1 disc tray.
Main unit
2 Load the CD in the disc tray.
Press the 5 (open/close) button. The disc tray closes. 3 • After several seconds, the disc
information is displayed.
Main unit
Press the 1/ 3 (play/pause) 4 button.
Main unit |
Remote control unit |
ENGLISH
2 (stop) button
1/ 3 (play/pause) button
1/ 3 |
|
(play/pause) |
|
button |
2 (stop) button |
|
Interrupting playback temporarily
|
Press the 1/ 3 (play/pause) |
|
|
|
button. |
|
|
1 |
The “ 3 ” mark appears on the |
|
|
display, and playback stops at |
|
|
|
|
the point where the button was |
Main unit |
Remote control unit |
|
|
|
|
|
pressed. |
|
|
Resuming playback |
|
|
|
|
Press the 1/ 3 (play/pause) |
|
|
|
button. |
|
|
1 |
The “ 3 ” mark turns off on the |
|
|
display, and playback resumes |
|
|
|
|
from the point where the pause |
Main unit |
Remote control unit |
|
|
|
|
|
button was pressed. |
|
|
Stopping playback |
|
|
|
1 |
Press the 2 (stop) button. |
|
|
|
|
Main unit |
Remote control unit |
NOTES:
•When a disc is loaded, “LOADING” is displayed on the display for several seconds while the data on the number of tracks and total playing time is being read from the innermost side of the disc, after which the number of tracks and total playing time appear.
•The CD SRS button of the cassette deck will not function if pressed while the disc is being read. Please press this button after the total playing time
has been displayed.
• If no disc is loaded, if the disc is upside down, or if the data cannot be read properly due to scratches or dirt, the display reads as shown below and the disc will not play.
19
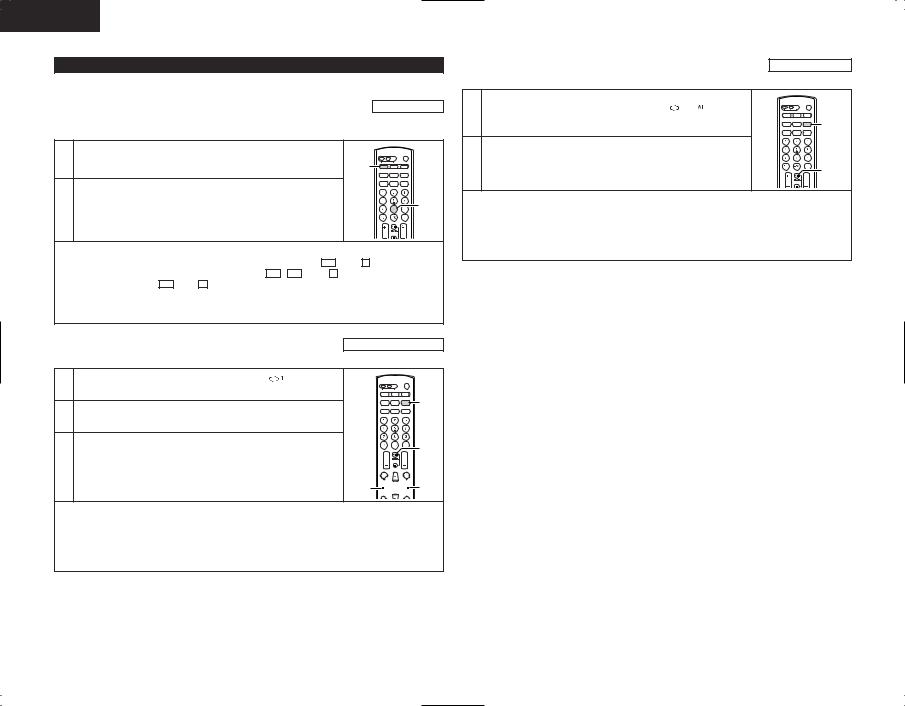
ENGLISH
Various Playback Functions
In addition to the regular playback, the RCD-M33 also offers the following playback functions:
(1) Playing a specific track ………………………………………………………………………………
Direct Search
(Using the remote control unit) Example: Playing the 8th track
1 |
Press the CD button on the remote control unit. |
1 |
|
|
|
2 |
Press the button corresponding to the number of the track 8. |
2 |
• “8” appears on the track number display and playback of track |
||
|
number 8 begins. |
|
•When the end of the track is reached, playback continues on the next track.
•To specify a track number of 11 or greater, say track 15, press +10 then 5 , and to specify a track number of 20 or greater, say track 23, press +10 , +10 , then 3 .
To play track 20, press +10 then 10 .
•The system is in program play mode if “Pxx (xx:program number)” lights in the display. To cancel the program play mode, press PROG/DIRECT button before you input the desired track number.
(2) Playing a single track repeatedly …………………………………………………………………
Singletrack Repeat
(Using the remote control unit)
1 |
When the REPEAT button is pressed once, “ |
” appears on |
the display and the single track repeat mode is set. |
1 |
|
2 |
|
|
Use the 8 and 9 buttons to select the track to be repeated. |
||
|
|
3 |
3 |
Press the 1/ 3 (play/pause) button to start playback. |
|
2 

 2
2
•When the end of the specified track is reached, playback starts over from the beginning of that track.
•The single-track repeat mode can also be set by pressing the REPEAT button once during playback.
•To cancel the single-track repeat mode, press the REPEAT button repeatedly until the “  ” indicator turns off.
(3) Playing all the tracks repeatedly ……………………………………………………………………
All-track Repeat
(Using the remote control unit)
1 |
When the REPEAT button is pressed twice, “ |
” appears |
on the display and the all-track repeat mode is set. |
1 |
|
|
|
|
2 |
Press the 1/ 3 (play/pause) button to start playback. |
2 |
|
|
•The all-track repeat mode can also be set by pressing the REPEAT button twice during playback.
•To cancel the all-track repeat mode, press the REPEAT button to turn the “
 ” indicator off.
•If the REPEAT button is pressed during programmed playback, the tracks are played repeatedly in the programmed order.
20
(4) Playing the tracks in a certain order ………………………………………………………………
Programmed Playback
(Using the remote control unit)
1
|
2 |
|
3 |
1 Press the PROG/ DIRECT button. |
|
|
Displays when the 3rd track is set at the |
|
first place. |
|
after 5 seconds |
Press the number and +10 buttons to select |
Displays the total number of programmed |
the track to be programmed. |
tracks and total playing time. |
2• For example, to program the 3rd track and the 12th track, press 3 , +10 , and 2 .
Displays when the 12th track is set at the second place.
after 5 seconds
Displays the total number of programmed tracks and total playing time.
|
Press the 1/ 3 (play/pause) button to start |
3 |
playback. |
• The tracks are played in the programmed |
|
|
order. |
• Press the PROG/DIRECT button again to resume normal playback during the stop mode.
• To cancel the entire program, press the PROG/DIRECT button or cancel the program one by one using the CLEAR button.
• If you program the wrong track, press the CLEAR button then program the right track. (The last track in the program is erased each time the CLEAR button is pressed.)
• To confirm the programmed playing order, press the CALL button. The programmed playing order appears in the display. Pressing the CLEAR button with a track number appearing in the display automatically erases that specific track from Program Play.
ENGLISH
Other operations possible during programmed playback:
Such operations as quick search, pause and skip monitor are also possible during programmed playback.
For the quick search function, press the automatic search reverse button ( 8 ) to move back to the beginning of the track, then press it again while the time display reads “00:00” to move back to the beginning of the preceding track.
To move ahead to the beginning of the next track, press the automatic search forward button ( 9 ) regardless of the time display.
NOTES:
•With this CD receiver, you can program up to 25 tracks.
•The entire program is canceled when the 5 (open/close) button is pressed.
•Set the stop mode when cancelling tracks from the program. To cancel the program mode, press the PROG/DIRECT button.
Automatic search forward button ( 9 )
Automatic search reverse button ( 8 )
Automatic |
Automatic |
search reverse |
search forward |
button ( 8 ) |
button ( 9 ) |
(5) Moving ahead to the next track during playback ………………………………………………
Quick Search
Press the automatic search forward button ( 9 ).
(6) Moving back to the beginning of the track during playback …………………………………
Quick Search
Press the automatic search reverse button ( 8 ).
21
ENGLISH
(7) Finding a certain spot on the disc while listening to the sound ……………………………
Skip Monitor
(Using the remote control unit)
•Use this function to skip through the disc while listening to the sound.
•When the desired spot is reached using the skip monitor function, release the manual search forward button ( 7 ) or manual search reverse button ( 6 ) to resume normal playback from that point.

 Manual search forward button ( 7 )
Manual search reverse button ( 6 )
qForward skip monitor
(Using the remote control unit)
During playback, press and hold in the manual search forward button ( 7 ) to skip through the disc in the forward direction while listening to the sound.
•The track currently being monitored and the elapsed time for that track are indicated on the display.
•If the manual search forward button is held in until the end of the disc is reached, the stop mode is set.
wReverse skip monitor
(Using the remote control unit)
During playback, press and hold in the manual search reverse button ( 6 ) to skip through the disc in the reverse direction while listening to the sound.
•The track currently being monitored and the elapsed time for that track are indicated on the display.
•If the manual search reverse button ( 6 ) is pressed continuously, it will reach the beginning of the first track on the disc. Release the manual search reverse button ( 6 ) to resume normal playback.
(8) Playing the tracks in random order ………………………………………………………………
Random Playback
(Using the remote control unit)
RANDOM button 
•Use this function to play all the tracks on the disc once in random order.
•In the stop mode, simply press the RANDOM button to set random playback.
•“RANDOM” appears on the display.
•If the RANDOM button is pressed while the repeat mode is set, the tracks are each played once in random order, then played again in another order, and so on.
•The repeat mode is set to the all-track repeat mode when the RANDOM button is pressed during single-track repeat mode.
NOTES:
•The total remaining time cannot be displayed during the random playback mode.
•The random playback mode cannot be set during editing.
22
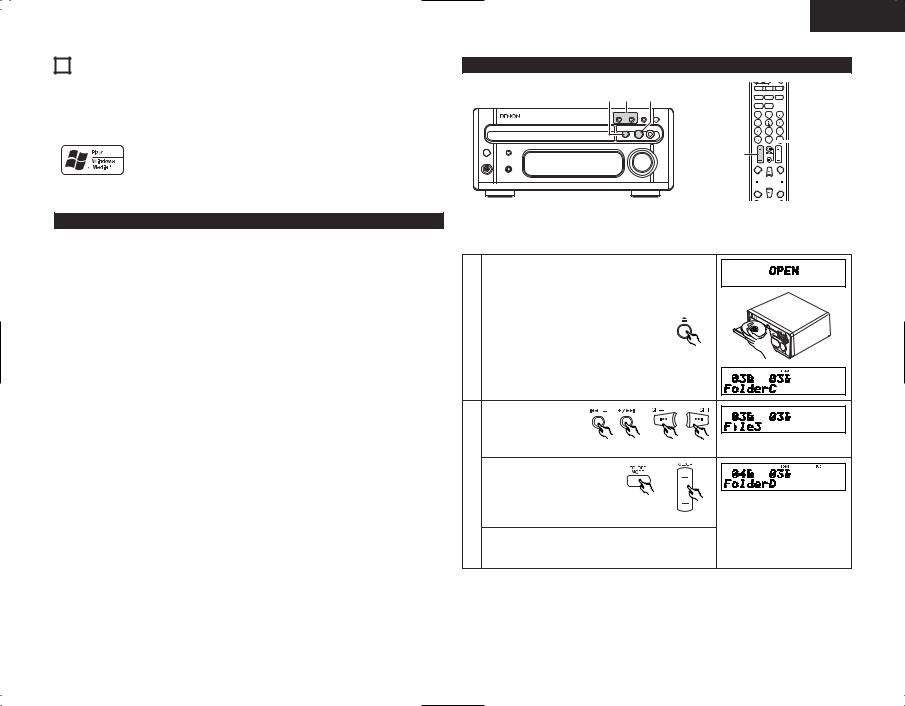
12 PLAYING MP3/WMA
Listening to Recorded MP3/WMA (Windows Media Audio) CD/CD-R/CD-RW
There are many music distribution sites on the internet from which music files in MP3/WMA (Windows Media Audio) audio compression format can be downloaded. Music downloaded as instructed on the site and written onto a CD-R/RW disc can be played on the RCD-M33.
Windows Media, and the Windows logo are trademarks, or registered trademarks of Microsoft Corporation in the United States and/or other countries.
•Uses of recordings you have made other than for your personal enjoyment are not permitted under the Copyright Law without permission of the copyright holder.
About the folder playing order
If files in MP3 and/or WMA format are stored in multiple folders, the folder numbers are set automatically when the disc is loaded. When the FOLDER +/ – buttons are pressed, the folders switch according to the numbers set at this time. Folders not including any playback files are skipped, and the next folder is selected.
Example :
How the folder numbers are set for a disc containing MP3/WMA files in the folder structure shown below
q The ROOT folder is set as Folder1.
wFor the folders in the ROOT folder (FolderA and FolderB), the folder that comes first in the sequence information* stored on the disc is set as Folder2.
eFor the folders in the FolderA (FolderC and FolderD), the folder that comes first in the sequence information* stored on the disc is set as Folder3.
r FolderC does not contain any other folders, so FolderD is set as Folder4. t FolderE in FolderD is set as Folder5.
y FolderB in the ROOT folder is set as Folder6.
*The folder and file sequence information stored on the disc depends on the writing application used. For this reason the actual playback order may not be as expected.
The folder mode can be turned on (folder mode) and off (disc mode) using the FOLDER MODE button. The files that are played differ according to whether the folder or disc mode is set.
When the disc mode is set:
All the files in all the folders after the selected folder and file are played.
When File3 in FolderC is selected, all the files after File3 are played.
When the folder mode is set:
All the files in the selected folder are played.
When FolderD is selected, File4, File5 and File6 are played. FolderE inside FolderD is treated as a different folder, so File7 and File8 are not played.
ROOT |
|
|
FolderA |
|
|
FolderC |
|
|
|
|
|
|
File1 |
|
|
|
|
||
(Folder1) |
|
|
(Folder2) |
|
|
(Folder3) |
|
|
|
|
File2 |
|
|
|
|
||||
|
|
|
|
|
|
|
|
|
|||||||||||
|
|
|
|
|
|
|
|
|
|
|
|
|
File3 |
|
|
|
|
||
|
|
|
|
|
|
|
|
|
|
|
|
|
|
|
|||||
|
|
|
|
|
|
FolderD |
|
|
|
|
|
File4 |
|
|
|
|
|||
|
|
|
|
|
|
(Folder4) |
|
|
|
|
File5 |
|
|
|
|
||||
|
|
|
|
|
|
|
|
|
|
|
|
|
|
||||||
|
|
|
|
|
|
|
|
|
|
|
|
|
File6 |
|
|
|
|
||
|
|
|
|
|
|
|
|
|
|
|
|
|
|
|
|
|
|||
|
|
|
|
|
|
|
|
|
|
|
|
|
FolderE |
|
|
|
File7 |
||
|
|
|
FolderB |
|
|
File9 |
|
|
|
|
(Folder5) |
|
|
|
File8 |
||||
|
|
|
|
|
|
|
|
|
|
||||||||||
|
|
|
|
|
|
|
|
|
|
|
|
|
|
|
|
||||
|
|
|
|
|
|
|
|
|
|
|
|
|
|
|
|
||||
|
|
|
(Folder6) |
|
|
File10 |
|
|
|
|
|
Fig,12-1 |
|
|
|
|
|
||
|
|
|
|
|
|
|
|
|
|
||||||||||
|
|
|
|
|
|
|
|
|
|
|
|
|
|
|
|
|
|
|
|
ENGLISH
Normal Playback
1 2-q 3

 2-w
2-w

 3
3
2-w
 2-q
2-q
Example: For a CD containing MP3/WMA files with the structure shown in Fig. 12-1, (1) playback from File3 in FolderC in the disc mode, (2) playback of FolderD in the folder mode.
Press the 5 (open/close) button to open the disc tray. Load the CD in the disc tray.
Press the 5 (open/close) button to close the disc tray .
• After several seconds, the disc information is displayed.
1 |
|
|
|
|
|
|
Main unit |
|
q Disc mode |
|
|
|
Use the CH+(9) |
|
|
|
and |
CH–(8 ) |
|
|
buttons |
to select |
|
|
File3. |
Main unit |
Remote control unit |
|
w Folder mode |
|
|
2 |
Use the FOLDER MODE |
|
|
button to select the folder |
|
||
|
mode, than use the FOLDER |
|
|
|
+/ – buttons to select |
|
|
|
FolderD. |
|
Remote control unit |
•The FOLDER +/ – buttons can also be used in the play or pause modes to select the folder. The first track in the selected folder is played or paused.
23
 Loading...