

DeLonghi Gelatiera 692 Ariete User Manual
Controllare che la tensione di rete corrisponda a
quella indicata sulla targhetta dati tecnici della
macchina.
2) Preparazione della salamoia
La miscela ghiacciata di acqua e sale è da sempre il miglior strumento per la preparazione del
gelato!
Questa miscela ha infatti nella preparazione del
gelato un duplice scopo:
A) Assicurare una perfetta trasmissione del freddo
tra cestello fisso e cestello estraibile e quindi
ridurre i tempi di preparazione.
B) Permettere una più facile estrazione del cestello
a gelato ultimato.
La miscela si prepara nel seguente modo:
- Porre in un bicchiere 1/3 di sale e riempire con
2/3 di acqua calda.
- Mescolare per una trentina di secondi in modo
da sciogliere il sale nell’acqua.
- Lasciar depositare il sale non sciolto sul fondo
del bicchiere e far raffreddare un poco il composto.
- Versare solo il liquido nel misurino (7) fino alla
tacca di livello indicata.
LA MISCELA È ORA PRONTA PER ESSERE
VERSATA NEL CESTELLO FISSO DELLA MACCHINA
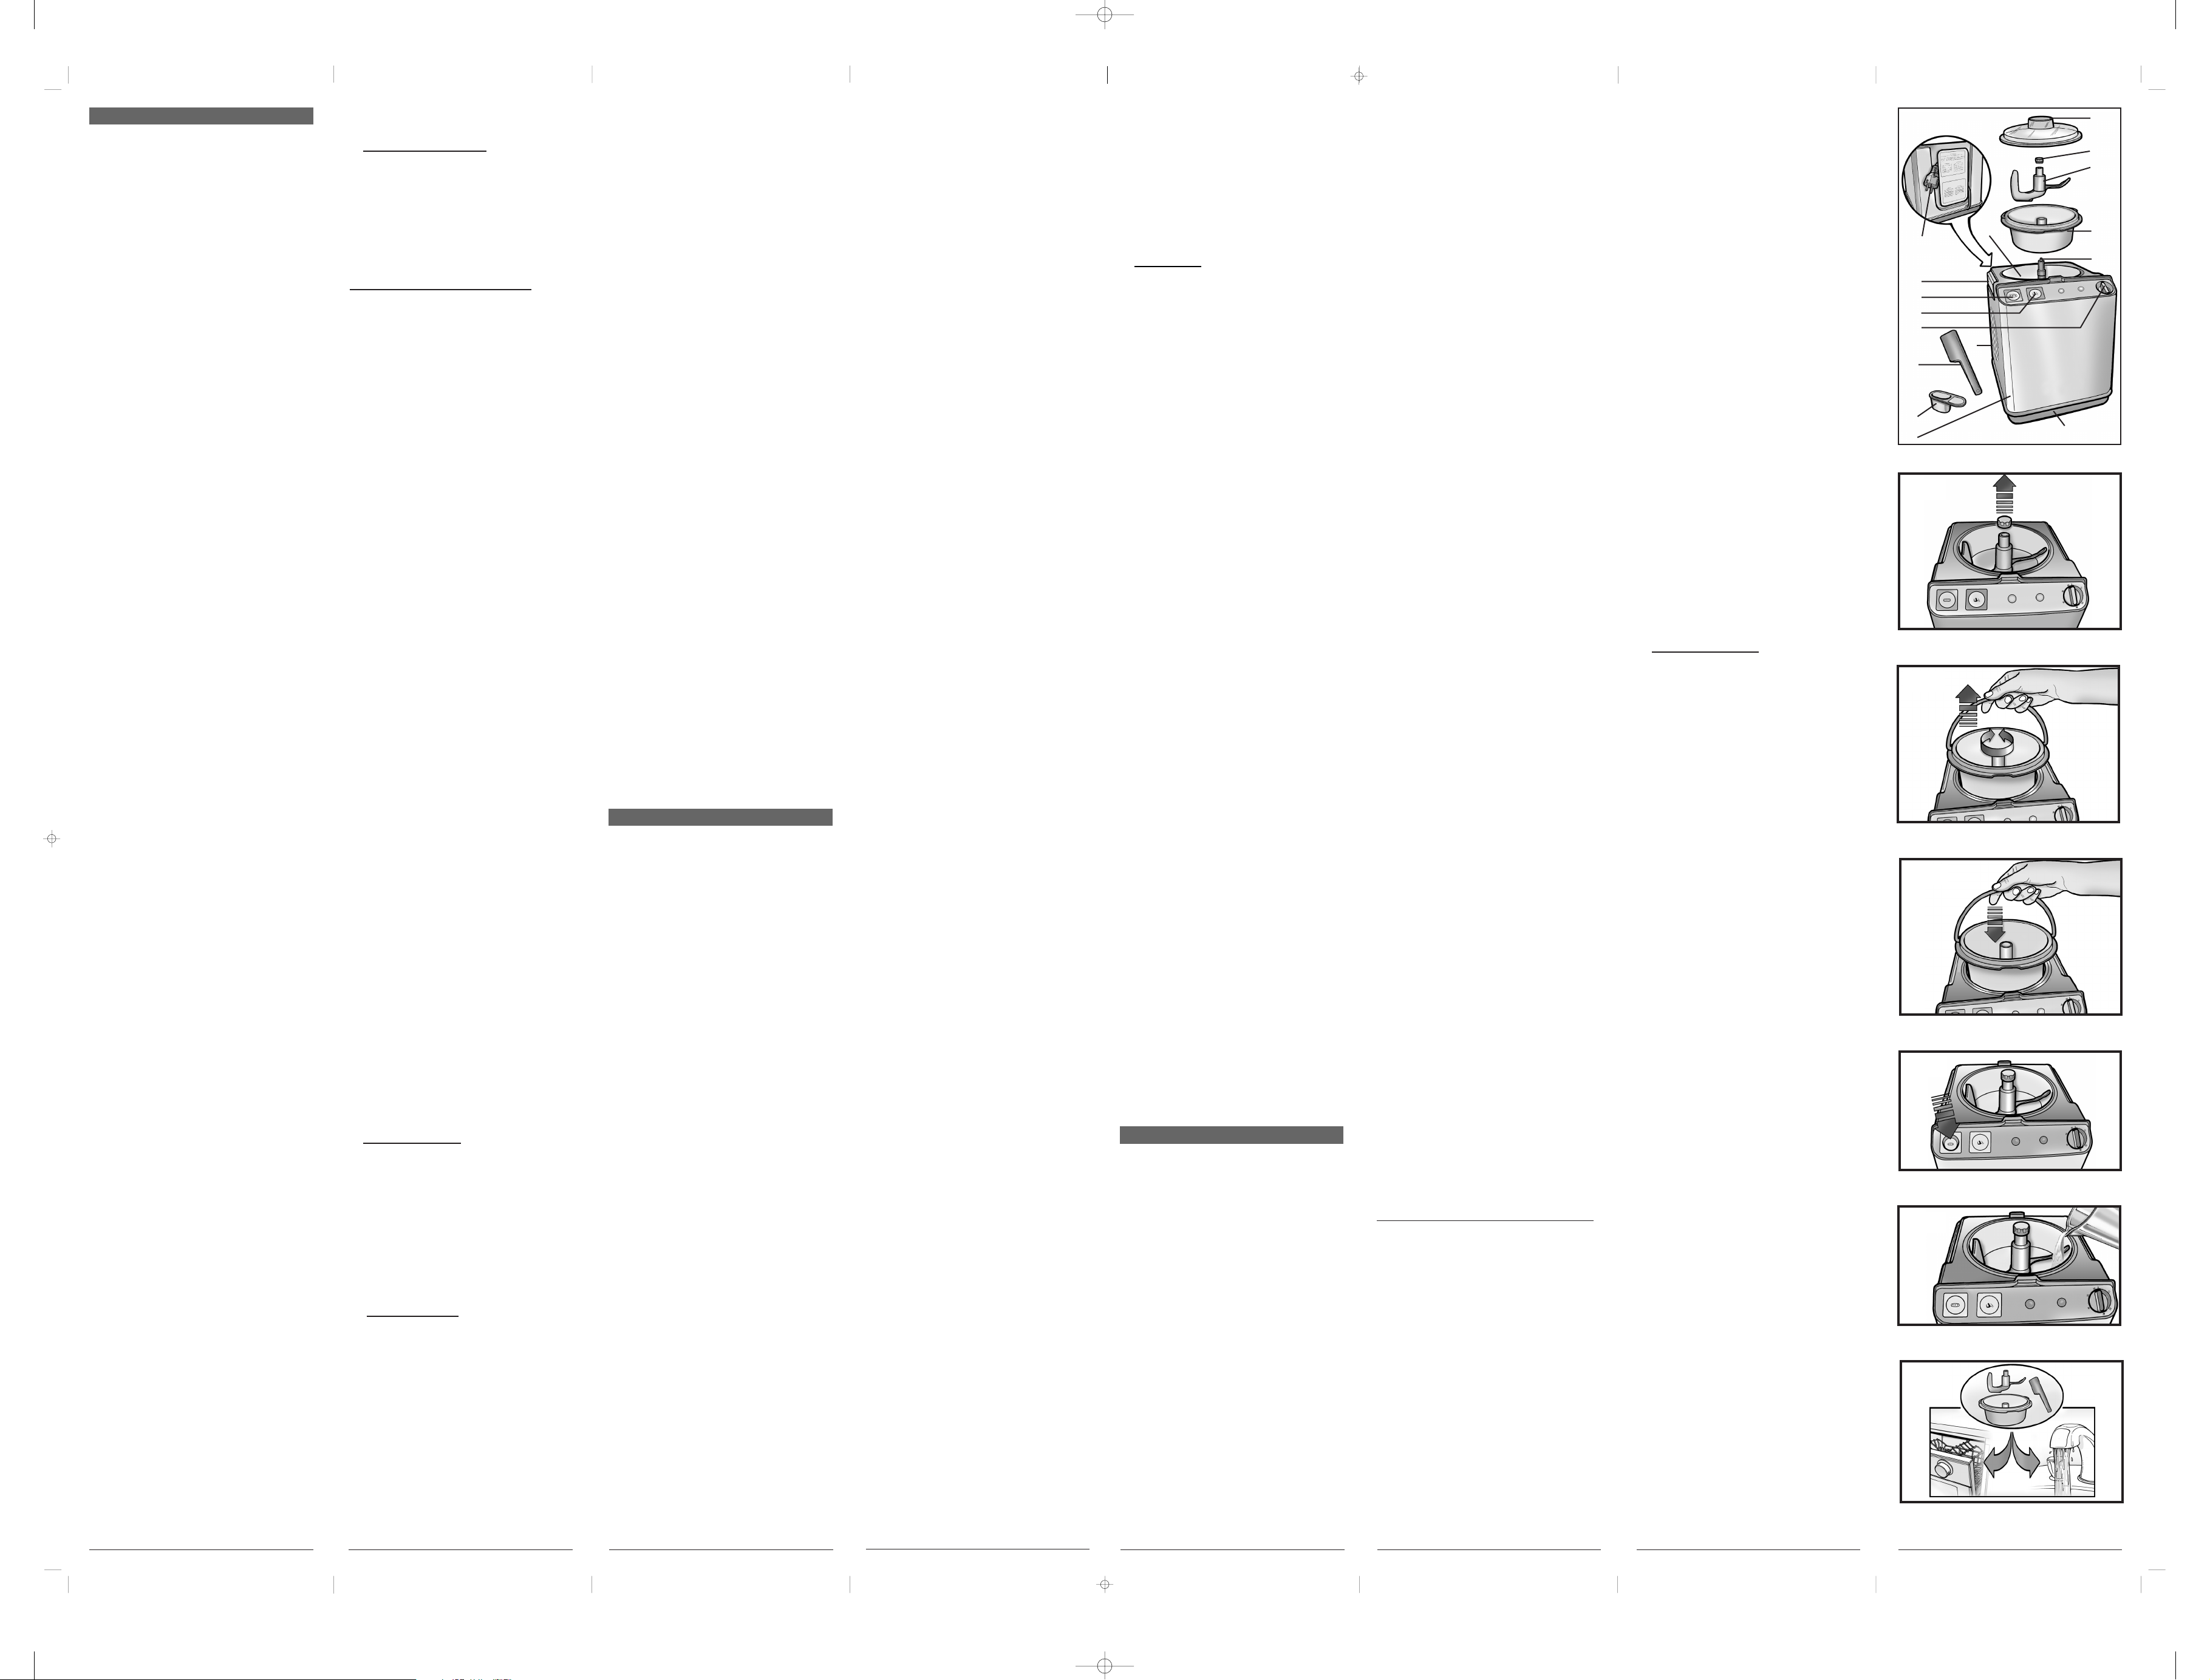
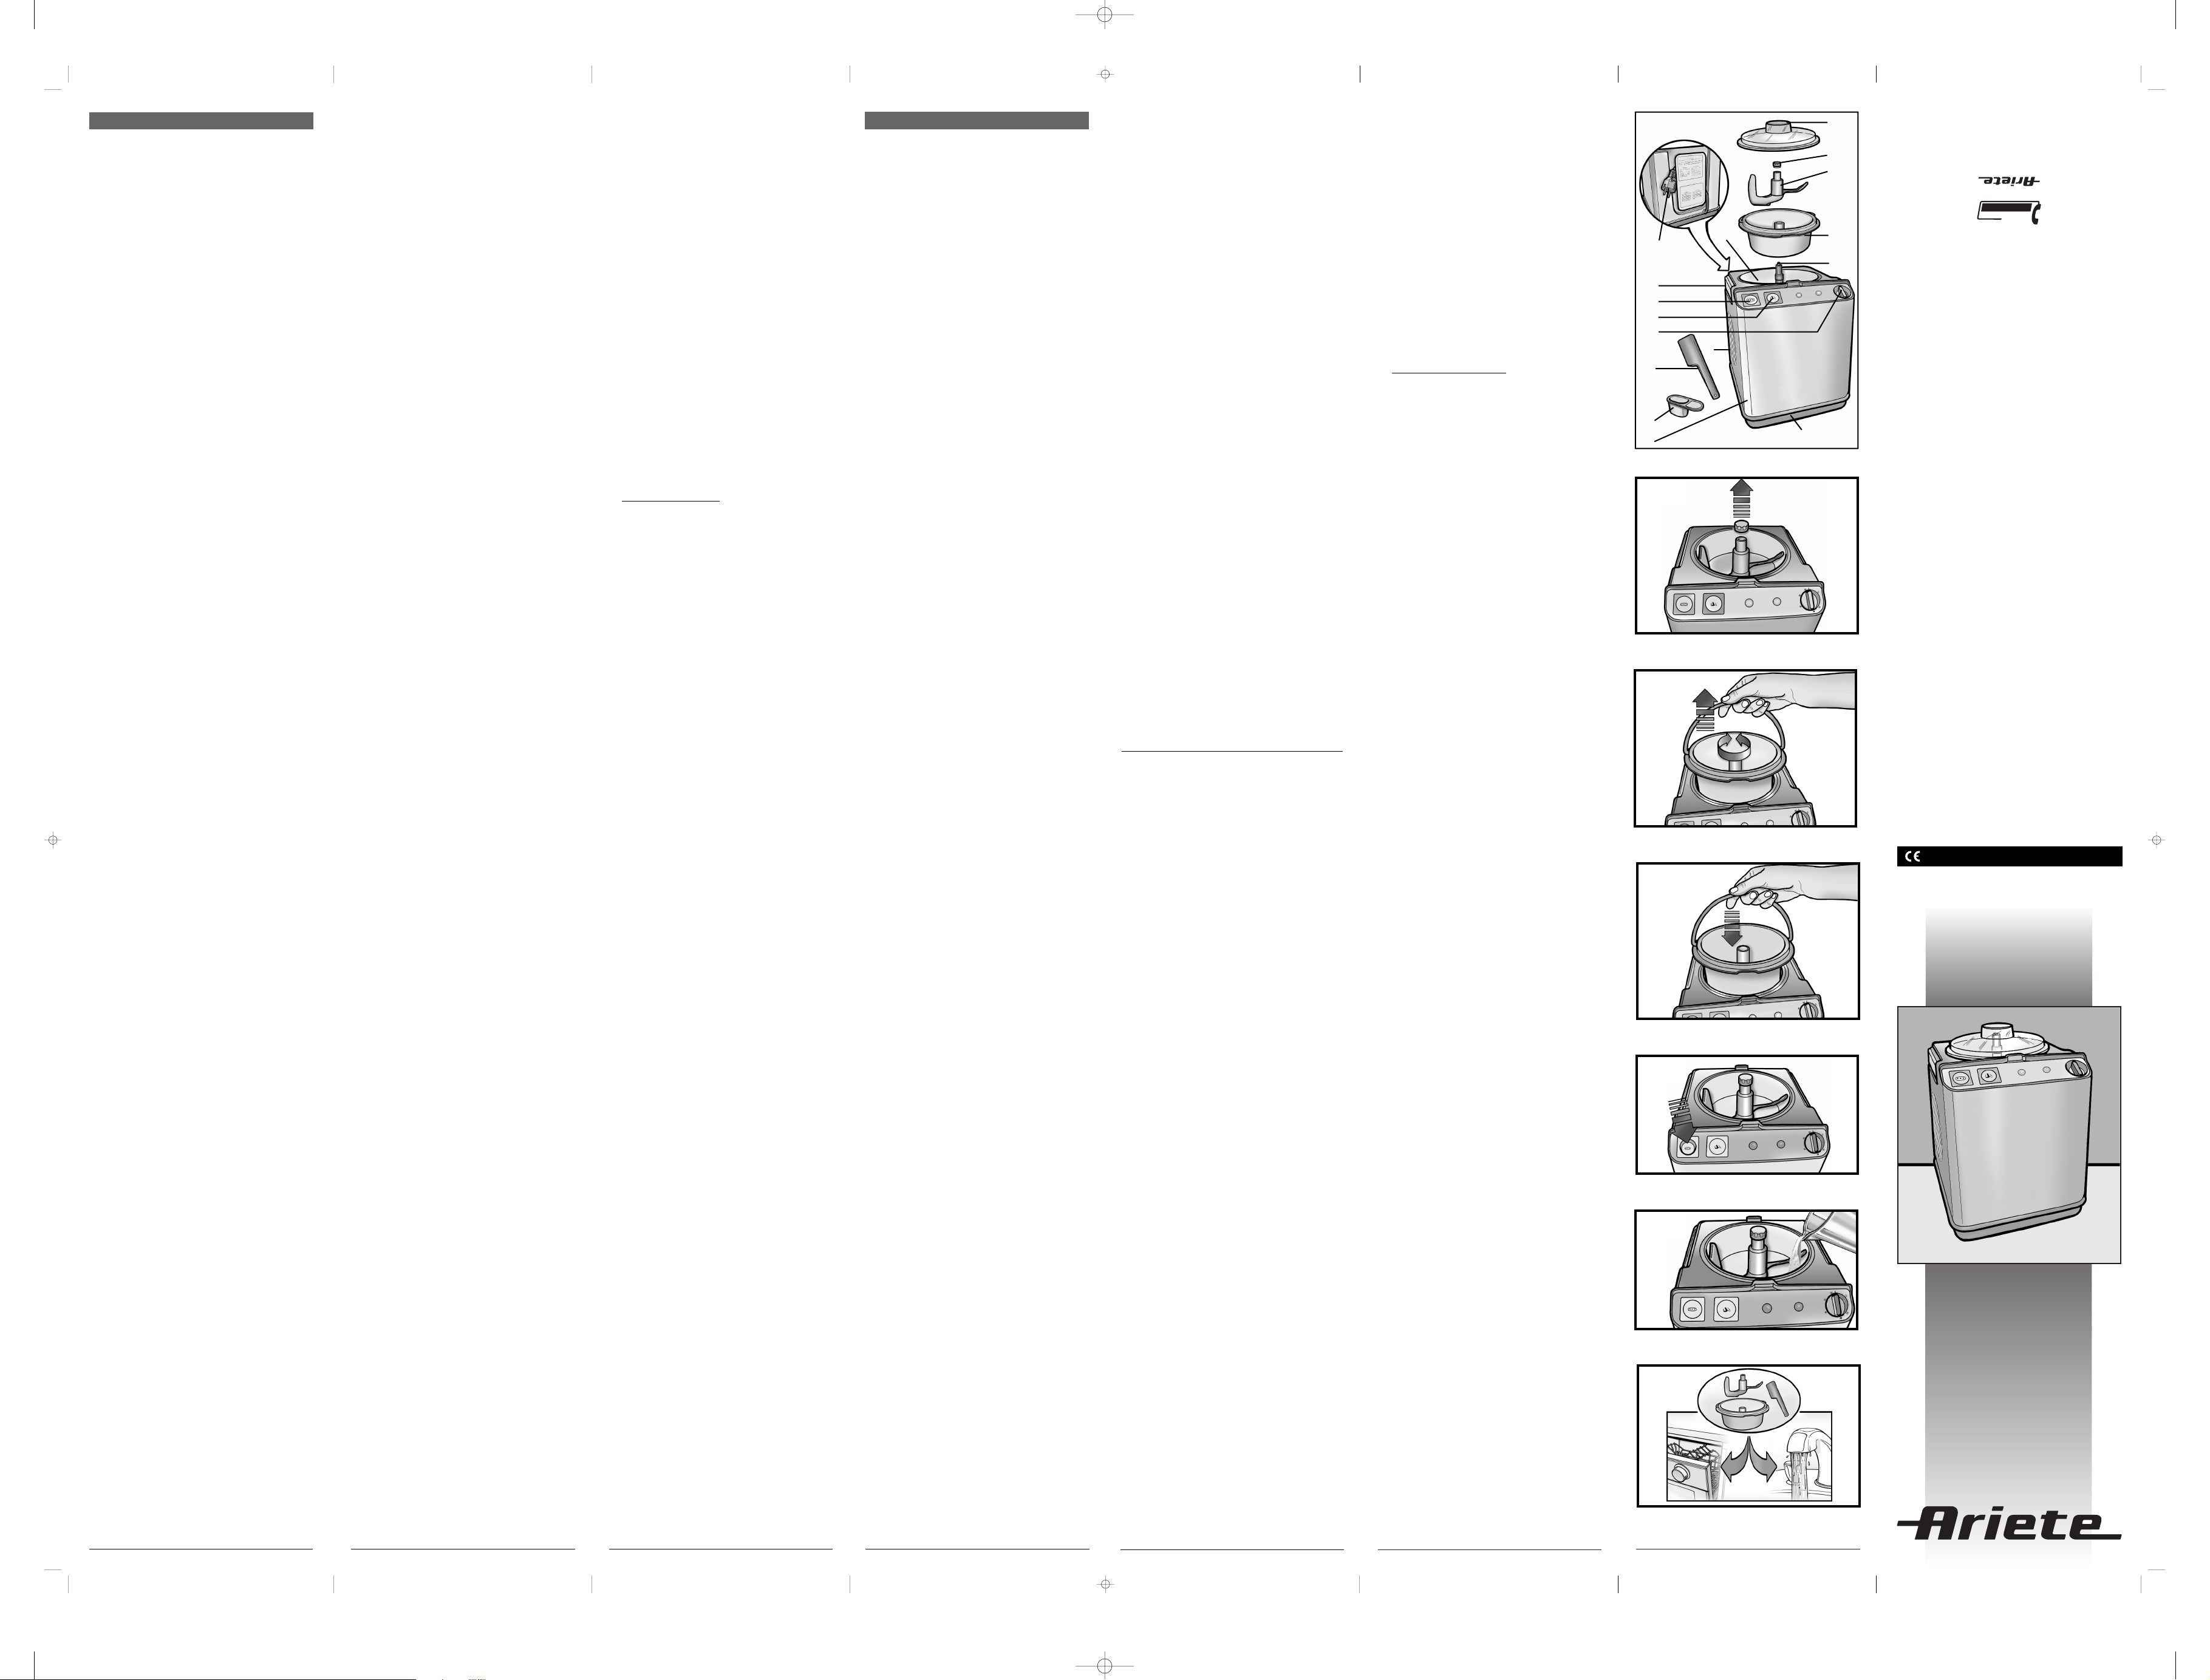
3) Togliere il coperchio (14), svitare il pomello (12),
estrarre la pala (11) (fig. 1) ed infine estrarre il
cestello prendendolo per il manico in metallo
(fig. 2).
4) Versare la miscela acqua-sale (salamoia) sul
fondo del cestello fisso (16).
5) Pulire il cestello estraibile (13) all’interno e porlo
di nuovo nel cestello fisso facendo combaciare le
tacche di riferimento ed esercitando una leggera
pressione fino al suo arresto sul fondo (fig. 3).
6) Accendere il gruppo refrigerante della Gelatiera
premendo il pulsante (2) (fig. 4) e aspettare 5-10
minuti.
7) Versare il composto (precedentemente preparato
seguendo le istruzioni riportate nel ricettario) nel
cestello (fig. 5) e coprire con il coperchio (14).
IMPORTANTE: Prima di versare il composto nel
cestello è opportuno provvedere a farlo raffreddare
bene in quanto questo procedimento accelera e
migliora la preparazione del gelato.
UN COMPOSTO ANCORA CALDO NON DEVE
MAI ESSERE VERSATO NEL CESTELLO DELLA
GELATIERA.
- NON FAR FUNZIONARE LA MACCHINA SENZA
COPERCHIO ALTRIMENTI LA MANTECAZIONE
POTREBBE RISULTARE ECCESSIVA.
- NON RIBALTARE MAI LA MACCHINA NÉ AL
MOMENTO DI RIPORLA, NÉ TANTOMENO
DURANTE IL SUO FUNZIONAMENTO; QUESTA RACCOMANDAZIONE, EVITA IL DANNEGGIAMENTO DEL COMPRESSORE.
8) Ruotare la manopola del temporizzatore (4) fino
al massimo e premere l’interruttore (3) dando
così inizio alla mantecazione del composto.
Quando il gelato avrà raggiunto la consistenza
ottimale, una frizione provvederà ad arrestare la
pala mentre il motore continuerà a girare .
L’esperienza in ogni caso Vi suggerirà successivamente quali sono i tempi ottimali per il Vostro
gusto personale.
IMPORTANTE
Come avrete notato il circuito refrigerante è separato ed indipendente dal meccanismo di mantecazione e dalla pala.
Questo permette una perfetta conservazione del
gelato anche nel caso Vi dimenticaste di togliere il
cestello una volta che la macchina si sia arrestata o
che la frizione sia intervenuta.
NEL CASO CHE IL GRUPPO REFRIGERANTE
RESTI ACCESO OLTRE IL TEMPO RICHIESTO
PER LA MANTECAZIONE, PUÒ SUCCEDERE
CHE LA MISCELAACQUA E SALE GELI E RENDA
PIÙ DIFFICOLTOSA L’ESTRAZIONE DEL
CESTELLO.
IN QUESTO CASO SPEGNERE IL GRUPPO
REFRIGERANTE PREMENDO IL PULSANTE (2) E
ATTENDERE 2 O 3 MINUTI PRIMA DI PROCEDERE ALL’ESTRAZIONE DEL CESTELLO.
9) Estrazione del cestello
Per estrarre il cestello procedere come segue:
A) Spegnere l’interruttore.
B) Spegnere il gruppo refrigerante ed attendere un
paio di minuti.
C) Togliere il coperchio e svitare il pomello (12).
D) Impugnare il manico del cestello estraibile (13) e
sollevarlo agendo con un movimento a rotazione
alternando (come indicato nella fig. 2) fino a
quando lo stesso non si blocca.
Sollevare poi verticalmente il cestello.
IL GELATO PUÒ ESSERE RIMOSSO DAL
CESTELLO USANDO L’APPOSITA PALETTA
ANTIGRAFFIO (6) IN DOTAZIONE.
10) Uso del cestello fisso
Il cestello fisso (16) non è solo l’alloggio per il
cestello estraibile (13), ma è a sua volta ideale
per la preparazione del gelato che addirittura si
ottiene con tempi inferiori e senza l’utilizzo della
miscela Acqua-Sale
- IL SUO USO È UTILISSIMO QUANDO AD
ESEMPIO SI DESIDERI PREPARARE PIÙ
GELATI DI GUSTO DIVERSO IN RAPIDA SUCCESSIONE. (A QUESTO SCOPO SI POSSONO ACQUISTARE DAL PROPRIO RIVENDITORE DI FIDUCIA ALTRI CESTELLI ESTRAIBILI IN
ACCIAIO INOX 18/10.)
- PER FARE QUESTO SI PROCEDERÀ AD UNA
PRIMA PREPARAZIONE NEL CESTELLO
ESTRAIBILE, ALLA RIMOZIONE DELLO STESSO ED AD UNA ACCURATA PULIZIA DEL
CESTELLO FISSO DAI RESIDUI DI SALAMOIA. (PER RIMUOVERE DAL CESTELLO
1 2 3 4 5 6
7
8
AVVERTENZE
IMPORTANTI
• LEGGERE SEMPRE LE ISTRUZIONI PRIMA
DELL’USO.
• Prima di collegare la gelatiera verificate che il voltaggio del vostro impianto elettrico corrisponda a
quello indicato sulla targhetta dati tecnici dell’apparecchio.
• Tenere l’apparecchio lontano dalla portata dei
bambini. Non lasciare mai penzolare il cavo per
evitare che un bambino possa afferrarlo.
• Non immergete mai il blocco motore nell’acqua.
Non bagnate il cavo o la spina: pericolo di scosse elettriche.
• Non utilizzate mai un accessorio non autorizzato.
• Evitate il contatto con le parti in movimento.
Durante il funzionamento, tenete lontano le mani,
i capelli, gli indumenti, le spatole o altri utensili
per ridurre il rischio di lesioni a persone e/o danni
all’apparecchio.
• Non utilizzate l’apparecchio all’aperto.
• Non lasciate mai l’apparecchio incustodito se in
funzione.
• Non lasciate utilizzare l’apparecchio a persone
invalide se non sorvegliate.
• Non lasciate giocare i bambini con l’apparecchio.
• Utilizzate l’apparecchio solo per uso domestico.
• Assicurarsi che tutte le parti dell’apparecchio
siano perfettamente pulite prima di fare il gelato o
il sorbetto.
• Non surgelate mai il gelato se è stato decongelato.
• Se il gelato o il sorbetto contengono ingredienti
freschi, devono essere consumati entro una settimana. Il gelato è più gustoso quando è fresco.
• Se il gelato o il sorbetto contengono uova crude,
evitate il consumo da parte di bambini, donne
gravide o anziani.
• Non usare l’apparecchio se risulta danneggiato.
Tutte le riparazioni, compresa la sostituzione del
cavo di alimentazione, devono essere eseguite
solamente dal Centro Assistenza autorizzato o da
persona con qualifica similare, al fine di prevenire ogni rischio.
• Non appoggiare l’apparecchio su superfici calde,
come ad esempio stufe, piatti caldi o in prossimità
di fiamme libere a gas.
• Se dovesse verificarsi una interruzione di cor-
rente o se, inavvertitamente si dovesse urtare
e spegnere l’interruttore (2) durante il funzionamento, è necessario attendere 4 - 5 minuti
prima di provvedere a riattivarlo.
Riattivandolo subito infatti può succedere
che il compressore non riparta oppure “batta in
testa”. In questo caso un dispositivo posto nel
compressore interviene e si riattiva automaticamente dopo 4-5 min.
• DURANTE L’USO LA MACCHINA NON DEVE
ASSOLUTAMENTE ESSERE INCLINATA NÉ
TANTOMENO ROVESCIATA.
QUALORA SI PROCEDESSE A FARE GELATI
IN RAPIDA SUCCESSIONE, USANDO IL
CESTELLO ESTRAIBILE, È NECESSARIO
OGNI VOLTA PROVVEDERE A CAMBIARE LA
SALAMOIA NEL CESTELLO FISSO.
• Per rimuovere la gelatiera servirsi esclusivamente della maniglia (1).
• Le dosi indicate sono studiate per un gelato di
gusto medio. È naturalmente possibile in seguito
variare le dosi a piacimento seguendo il proprio
gusto personale.
• L’apparecchio è conforme alla Direttiva Europea
89/336/CEE
• Togliere la spina dalla presa di corrente prima di
effettuare le operazioni di pulizia o montare e
smontare eventuali componenti.
CONSERVARE
SEMPRE QUESTE
ISTRUZIONI
Gentile cliente,
Ci permetta prima di tutto di congratularci con Lei
per l’acquisto della più perfezionata gelatiera per
uso domestico presente sul mercato.
La sua Gelatiera ha il cestello estraibile in acciaio
inox 18/10 a garanzia di igiene assoluta e di grande
facilità di pulizia.
Con questa macchina Lei potrà preparare 1,2 litri di
gelato per volta; un gelato sano e dal gusto inimitabile.
DESCRIZIONE DELL’APPARECCHIO
1) Maniglia
2) Pulsante freezer
3) Pulsante pala
4) Temporizzatore
5) Apertura per fuoriuscita aria
6) Paletta
7) Misurino
8) Corpo dell’apparecchio
9) Base
10) Perno
11) Pala mantecatrice
12) Pomello di serraggio pala
13) Cestello estraibile
14) Coperchio
15) Cavo di alimentazione + spina
16) Cestello fisso
ISTRUZIONI PER L’USO
1) Installare la macchina in un posto lontano da
fonti di calore avendo cura di tenerla distante
dalle pareti di almeno 5 cm.
Questo accorgimento ha lo scopo di permettere
una agevole fuoriuscita dell’aria dall’apertura
laterale (5).
I
D
This permits the ice-cream to be perfectly conserved even in case you should forget to take the
basket out once the machine has stopped or that
the friction has intervened.
IN CASE THE REFRIGERATING GROUP
SHOULD STAY ON BEYOND THE REQUIRED
WHIPPING TIME, THE WATER AND SALT MIXTURE COULD FREEZE THUS RENDERING THE
BASKET REMOVAL DIFFICULT.
IN SUCH CASE, TURN OFFF THE REFRIGERATING GROUP BY PUSHING THE BUTTON (2) AND
WAIT 2 OR 3 MINUTES BEFORE EXTRACTING
THE BASKET.
9) Basket removal
In order to remove the basket, proceed as follows:
A) Turn off the switch.
B) Turn off the refrigerating group and wait a few
minutes.
C) Take off the lid and unscrew the knob (12).
D) Grab the extractable basket’s handle (13) and
raise it with an alternating rotation movement (as
indicated in fig. 2) until it blocks itself. Then vertically raise the basket
10)Use of the fixed basket the fixed basket 16) is
not just the seat of the extractable basket 13), but at
the same time ideal for making ice-cream which is,
none the less obtained with less time and without
the water - salt mixture.
- IT IS VERY USEFUL TO EMPOLY IT WHEN
FOR EXAMPLE, YOU DIFFERENT TASTES OF
ICE-CREAMS IN QUICK SUCCESSION. (FOR
THIS USE, IT IS POSSIBLE TO BUY OTHER
18/10 STAINLESS STEEL EXTRACTABLE
BASKETS FROM A RELIABLE RETAILER).
- IN ORDER TO DO THIS, YOU WILL BEGIN
WITH THE FIRST PREPATATION IN THE
EXTRACTABLE BASKET, THE REMOVAL OF
IT AND CAREFULLY CLEANING THE FIXED
BASKET FROM BRINE DEPOSISTS. (FOR
REMOVING FROZEN DEPOSITS FROM THE
FIXED BASKET, WE SUGGEST YOU TURN
OFF THE SWITCH (2) AND WAIT A FEW MINUTES).
Instructions
- Place the whip (11) and tighten it with the tightening knob.
- Turn on the refrigerating group by pushing the
button (2) and wait 5-10 minutes.
- Pour in the mixture prepared by having followed
the instructions in the recipe book and cover with
lid (14).
- Rotate the timer knob (4) and push the switch (3).
- Follow all of the previously described instructions for using the extractable basket.
CLEANING
- The extractable basket, whip and spatula may
be washed with hot water or in the dish-washer.
- The fixed basket must be cleaned as follows:
A) Disconnect the plug from the electrical socket.
B) Wait for the basket to defrost.
C) First clean with an absorbing sponge and then
with a damp cloth, remove salt residues which
could be damaging if left in the basket.
D) Lastly dry it with a dry cloth.
ATTENTION
This machine is equipped with a thermic limiting
device, which intervenes in case of over-working by
turning off the whip motor.
In case of prolonged working time, we suggest
you let the machine rest between one ice-cream
and the other. Once the whip stops, it means that
the ice-cream is ready and the friction has intervened. At this point we suggest you push the whip
button (3) to avoid useless over heating of the friction itself.
GB
FISSO RESIDUI GHIACCIATI, SI CONSIGLIA
DI SPEGNERE L’INTERRUTTORE (2) ED
ATTENDERE QUALCHE MINUTO.)
Istruzioni
- Montare la pala (11) e fissarla con il pomello di
serraggio (12).
- Accendere il gruppo refrigerante premendo il
pulsante (2) e attendere 5 - 10 minuti.
- Versare il composto preparato seguendo le istruzioni del ricettario e coprire col coperchio (14).
- Ruotare la manopola del temporizzatore (4) e
premere l’interruttore (3).
- Seguire tutte le istruzioni descritte precedentemente per l’uso del cestello estraibile.
PULIZIA
- Il cestello estraibile, la pala e la paletta possono
essere lavati in acqua calda o in lavastoviglie.
- Il cestello fisso deve essere pulito seguendo
queste avvertenze:
A) Staccare la spina dalla presa di alimentazione.
B) Attendere lo sbrinamento del cestello.
C) Passare prima con una spugnetta assorbente e quindi con un panno umido togliere i residui
di sale che sarebbero dannosi se restassero nel
cestello stesso.
D) Asciugare infine con un panno asciutto.
ATTENZIONE
Questa macchina è provvista di un limitatore termico che in caso di superlavoro interviene spegnendo
il motore della pala.
Pertanto, in caso di uso prolungato è consigliabile
far riposare la macchina tra un gelato e l’altro.
Quando la pala di mantecazione si ferma significa
che il gelato è pronto e la frizione è intervenuta.
A questo punto si raccomanda di premere il pulsante della pala (3) per evitare un inutile surriscaldamento della frizione stessa.
WICHTIGE
HINWEISE
• DIE BEDIENUNGSANLEITUNG VOR
GEBRAUCH AUFMERKSAM LESEN.
• Bevor die Eismaschine angeschlossen wird,
muss kontrolliert werden, ob die Netzspannung
den Angaben auf dem Typenschild des Geräts
entspricht.
• Das Gerät von Kindern fernhalten. Das
Anschlusskabel nie herabhängen lassen, um zu
vermeiden, dass Kinder es greifen können.
• Den Motorblock nie in Wasser tauchen. Das
Anschlusskabel und den Stecker nie nass
machen: Stromschlaggefahr.
• Kein nicht genehmigtes Zubehör verwenden.
• Sich bewegende Teile dürfen nicht berührt werden. Beim Betrieb des Gerätes Hände, Haare,
Kleidung, Spachtel oder anderes Zubehör fernhalten, um Verletzungsgefahr bei Personen oder
Schäden am Gerät zu vermeiden.
• Das Gerät darf nicht im Freien benutzt werden.
• Das Gerät nie unbeaufsichtigt lassen, solange es
in Betrieb ist.
• Das Gerät darf von Behinderten nur unter
Aufsicht benutzt werden.
• Niemals Kinder mit dem Gerät spielen lassen.
• Das Gerät nur für den Hausgebrauch verwenden.
• Vor der Zubereitung von Speiseeis oder Sorbett
sicherstellen, dass alle Geräteteile perfekt sauber
sind.
• Einmal aufgetautes Speiseeis nicht wieder einfrieren.
• Sind für das Speiseeis oder das Sorbett frische
compressor which will intervene and it will automatically start up again after 4-5 minutes.
THE MACHINE MUST NEVER BE TILTED OR
EVEN TURNED UPSIDE DOWN WHILE FUNCTIONING.
IF YOU SHOULD MAKE ICE-CREAM IN RAPID
SUCCESSION, USING THE REMOVABLE BASKET, IT IS NECESSAARY THAT YOU CHANGE
THE BRINE IN THE FIZED BASKET EACH
TIME.
• Exclusively use the handle (1) for taking out the
ice-cream maker
• The indicated doses have been studied for
medium tasting ice-cream. It is of course possible
to vary the doses according to personal taste.
• The machine is in conformity with the European
Directives 89/336/CEE.
• Remove the plug from the socket before cleaning
it or assembling and disassembling various parts.
ALWAYS KEEP THESE
INSTRUCTIONS
Dear client,
First of all, please allow us to congratulate you for
having chosen the most perfect ice-cream machine
on the market for domestic use.
Your ice-cream machine has a removable basket in
18/10 stainless steel, guaranteeing maximum
hygiene and easy cleaning. With this machine, you
can prepare 1.2 litres of ice-cream each time;
healthy ice-cream having an inimitable taste.
DESCRIPTIONS OF THE MACHINE
1) Handle
2) Freezer switch
3) Blade switch
4) Timer
5) Air-outlet opening
6) Spatula
7) Measuring cup
8) Machine-body
9) Base
10) Pivot
11) Whipping blade
12) Blade tightening knob
13) Removable basket
14) Lid
15) Electrical cable and plug
16) Fixed basket
USING INSTRUCTIONS
1) Install the machine far from heat being careful to
keep it at least 5 cm. Away from walls.
This precaution is to permit air-flow out of the lateral (5) opening.
Verify that your electrical system voltage corresponds with the one indicated on the machine’s
technical data label.
2) Preparing the brine
The frozen mixture of water and salt has always
been the best way for preparing ice-cream!
This mixture has, in fact, two purposes in preparing ice-cream:
A) It assures a perfect cold diffusion between the
fixed basket and the removable basket and thus
reduces preparing time.
B) Allowing easy removal of the basket once the
ice-cream is ready.
The mixture is prepared as follows
- Put 1/3 of salt into a glass and 2/3 of hot water.
- Mix for about 30 seconds so as to melt the salt.
- Let the unmelted salt settle at the bottom of the
glass and allow the mixture to cool for a while.
- Only pour the liquid mixture into the measuring
cup (7) up to the indicated level line.
THE MIXTURE IS NOW READY TO BE POURED
INTO THE FIXED BASKET OF THE MACHINE
3) Remove the lid (14), unscrew the blade tighten-
ing knob (12), remove the blade (11) (fig 1) and
lastly remove the basket using the metal handle
(fig 2).
4) Pour the water-salt mixture (brine) into the bot-
tom of the fixed basket (16).
5) Clean the inside of the removable basket (14)
and replace it into the fixed basket, letting the
referral notches correspond and placing light
pressure on it until it is positioned at the bottom
(fig 3).
6) Turn on the ice-cream machine’s refrigerator
group by pushing the button (2) (fig 4) and wait
5- 10 minutes
7) Pour the mixture (previously prepared following
the instructions in the recipe book) into the basket (fig5) and cover with lid (14).
IMPORTANT: We suggest you to let the mixture
cool off before pouring it into the basket
because, this procedure accelerates the icecream preparation time.
A HOT MIXTURE MUST NEVER BE POURED
INTO THE ICE –CREAM BASKET.
- DO NOT PUT THE MACHINE INTO FUNCTION
WITHOUT THE LID OR ELSE, WHIPPING
COULD TURN OUT TO BE EXCESSIVE.
- NEVER TURN THE MACHINE UPSIDE DOWN,
NEITHER WHEN PUTTING IT AWAY NOR
WHILE IT IS FUNCTIONING; THIS ADVICE IS
TO AVOID DAMAGING THE COMPRESSOR.
8) Rotate the timer (4) to maximum and push the
switch (3) thus starting the whipping procedure.
Once the ice-cream has reached optimal consistency, a friction will stop the whipping while the
motor will continue working.
In any case, experience will teach you which is
the optimal time for your personal taste.
IMPORTANT
As you may have noticed, the refrigerating circuit is
separate and independent from the whipping system and whip.
Zutaten verwendet worden, müssen sie innerhalb
einer Woche verzehrt werden. Das Speiseeis ist
schmackhafter wenn es frisch ist.
• Enthalten das Speiseeis und das Sorbett frische
Eier, sollten Kinder, schwangere Frauen und Alte
es nicht essen.
• Beschädigte Geräte nicht benutzen.
Um Gefahren zu vermeiden, müssen alle Reparaturen, einschließlich Austausch des Anschlusskabels, vom Kundendienst oder einem Fachelektriker ausgeführt werden.
• Das Gerät nie auf heiße Oberflächen, wie Öfen,
heiße Platten oder in der Nähe von offenen
Gasflammen aufstellen.
• Bei Stromausfall oder unbeabsichtigter
Betätigung des Schalters (2) während des
Gerätebetriebs muss 4 – 5 Minuten abgewartet werden, bevor das Gerät wieder
eingeschaltet werden kann.
Bei sofortigem Wiedereinschalten kann es
passieren, dass der Kompressor nicht startet
oder "klopft". n diesem Fall wird eine Vorrichtung
im Kompressor ausgelöst, die sich nach 4 – 5
Minuten automatisch wieder einschaltet.
• DAS GERÄT WÄHREND DES BETRIEBS AUF
KEINEN FALL NEIGEN ODER KIPPEN.
SOLLEN SCHNELL HINTEREINANDER SPEISEEISE MIT DEM ENTFERNBAREN BEHÄLTER ZUBEREITET WERDEN, MUSS JEDES
MAL DIE SALZLAKE IM FESTEN BEHÄLTER
GEWECHSELT WERDEN.
• Zum Umstellen der Eismaschine ausschließlich
den Griff (1) verwenden.
• Die angegebenen Mengen sind für die
Zubereitung eines Speiseeises mit durchschnittlichem Geschmack entwickelt worden. Die
Mengen können natürlich nach Belieben und
entsprechend des individuellen Geschmacks
geändert werden.
• Das Gerät entspricht der Europäischen Direktive
89/336/CEE.
• Vorm Reinigen des Geräts bzw. dem eventuellen
Ein- oder Ausbau von Geräteteilen muss der
Netzstecker aus der Steckdose gezogen werden.
GEBRAUCHSANLEITUNG GUT AUFHEBEN
Sehr geehrter Kunde,
gestatten Sie uns Ihnen als erstes für den Kauf der perfektioniertesten Eismaschine für den Hausgebrauch zu
gratulieren, die es derzeit auf dem Markt gibt.
Ihre Eismaschine hat einen entfernbaren Behälter
aus rostfreiem Edelstahl Inox 18/10, der absolute
Hygiene und eine leichte Reinigung garantiert.
Mit diesem Gerät können Sie jeweils 1,2 Liter Speiseeis herstellen; ein gesundes Eis mit unvergleichbarem Geschmack.
GERÄTEBESCHREIBUNG
1) Griff
2) Ein-/Ausschalter Kühlaggregat
3) Ein-/Ausschalter Rührarm
4) Zeitschalter
5) Belüftungsschlitz
6) Spatel
7) Messbecher
8) Gehäuse
9) Basis
10) Welle
11) Rührarm
12) Befestigungsknauf für Rührarm
13) Entfernbarer Behälter
14) Deckel
15) Anschlusskabel + Stecker
16) Fester Behälter
BEDIENUNGSANLEITUNG
1) Das Gerät fern von Hitzequellen aufstellen und
darauf achten, dass sie einen Wandabstand von
mindestens 5 cm hat.
Nur bei diesem Wandabstand kann die Luft
leicht durch den seitlichen Belüftungsschlitz (5)
austreten.
Überprüfen ob die Netzspannung den Angaben
auf dem Typenschild am Gerät entspricht.
2) Vorbereitung der Salzlake
Eine gefrorene Mischung aus Wasser und Salz
ist seit jeher das beste Instrument für die Zubereitung von Speiseeis!
Bei der Zubereitung von Speiseeis hat diese
Mischung einen doppelten Zweck.
A) Sie stellt eine perfekte Kälteübertragung vom fest-
en Behälter zum ausziehbaren Behälter sicher
und reduziert dadurch die Zubereitungszeiten.
B) Sie ermöglicht ein leichteres Herausnehmen des
Behälters, wenn das Eis fertig ist.
Die Salzlake muss wie folgt zubereitet werden:
- Ein Wasserglas zu 1/3 mit Salz und 2/3 mit war-
mem Wasser füllen.
- Dreißig Sekunden umrühren, so dass sich das
Salz im Wasser auflöst.
- Das nicht gelöste Salz auf dem Glasboden
absetzen lassen und die Mischung etwas
abkühlen lassen.
- Den Messbecher (7) bis zur angegebenen Mar-
kierung ausschließlich mit der Flüssigkeit füllen.
DAS SALZLAKENGEMISCH KANN JETZT IN DEN
FESTEN BEHÄLTER IM GERÄT GEFÜLLT WERDEN.
3) Den Deckel (14) abnehmen, den Befestigungs-
knauf (12) abschrauben und dann zuerst den
Rührarm (11) (Fig. 1) und danach den Behälter
am Metallbügel (Fig. 2) herausziehen.
4) Das Wasser-Salz-Gemisch (Salzlake) auf den
Boden des festen Behälters (16) füllen.
5) Das Innere des entfernbaren Behälters (13) rei-
nigen und anschließend wieder in den festen
Behälter einsetzen. Die Aussparung am Behälterrand muss auf die Markierung ausgerichtet
sein. Den Behälter mit leichtem Druck bis zum
Anschlag auf dem Boden einsetzen (Fig. 3).
6) Durch Betätigung des Schalters (2) (Fig. 4) das
Kühlaggregat der Eismaschine einschalten und
5 – 10 Minuten warten.
7) Die Eismasse (die vorher entsprechend der Anleitungen aus der Rezeptsammlung vorbereitet
wurde) in den Behälter (Fig. 5) füllen und den
Deckel (14) aufsetzen.
WICHTIG: Bevor die Eismasse in den Behälter
gefüllt wird, sollte dieser gut gekühlt sein. Diese
Vorkehrung beschleunigt und verbessert die
Zubereitung des Speiseeises.
NIEMALS EINE NOCH WARME EISMASSE IN
DEN BEHÄLTER DER EISMASCHINE FÜLLEN.
- DAS GERÄT NIE OHNE DECKEL BETREIBEN, DA
SONST DAS EIS ZU LANGE UMGERÜHRT WIRD.
- DAS GERÄT WEDER BEIM WEGSTELLEN
NOCH WÄHREND DES BETRIEBS KIPPEN;
DIE BEACHTUNG DIESER ANLEITUNG VERMEIDET EINE BESCHÄDIGUNG DES KOMPRESSORS.
8) Den Griff des Zeitschalters (4) bis zum Anschlag
drehen und den Schalter (3) drücken, damit wird
der Rührarm für die Eismasse gestartet.
Hat das Eis eine optimale Konsistenz erreicht,
sorgt eine Kupplung dafür, dass der Rührarm
angehalten wird, während der Motor weiter dreht.
Auf jeden Fall wird Ihnen Ihre Erfahrung später
zeigen, welches die besten Zeiten sind, um für
Ihren individuellen Geschmack das beste Speiseeis herzustellen.
WICHTIG
Wie Sie bemerkt haben werden, ist der Kühlkreislauf am Rührmechanismus und vom Rührarm
getrennt.
Das ermöglicht eine perfekte Konservierung des
Speiseeises auch in dem Fall, dass Sie vergessen
den Behälter herauszunehmen nachdem sich das
Gerät abgeschaltet hat oder die Kupplung ausgelöst wurde.
BLEIBT DAS KÜHLAGGREGAT LÄNGER EINGESCHALTET ALS DIE FÜR DAS RÜHREN
BENÖTIGTE ZEIT, KANN ES VORKOMMEN,
DASS DAS WASSER-SALZ-GEMISCH FRIERT
UND DER BEHÄLTER SCHWIERIGER HERAUSGENOMMEN WERDEN KANN.
IN DIESEM FALL MUSS DAS KÜHLAGGREGAT
DURCH BETÄTIGUNG DES SCHALTERS (2)
AUSGESCHALTET UND 2 – 3 MINUTEN GEWARTET WERDEN, BEVOR DER BEHÄLTER HERAUSGENOMMEN WERDEN KANN.
9) Entnahme des Behälters
Zum Herausnehmen des Behälters wie folgt vorgehen:
A) Den Schalter ausschalten.
B) Das Kühlaggregat ausschalten und ein paar
Minuten warten.
C) Den Deckel abnehmen und den Befestigungs-
knauf (12) abschrauben.
D) Den Bügelgriff des entfernbaren Behälters (13)
nehmen und den Behälter durch leichtes,
abwechselndes Drehen in beide Richtungen
anheben (siehe Fig. 2) bis er sich löst.
Anschließend den Behälter senkrecht nach oben
anheben.
DAS EIS KANN MIT DEM NICHT KRATZENDEN SPATEL (6) AUS DEM BEHÄLTER ENTNOMMEN WERDEN.
10)Einsatz des festen Behälters
Der feste Behälter (16) ist nicht nur Sitz für den
entfernbarer Behälter (13) sondern kann auch
gut für die Zubereitung von Speiseeis benutzt
werden. Die Zubereitungszeiten sind sogar kürzer und es muss keine Salzlake benutzt werden.
- DER EINSATZ DES FESTEN BEHÄLTERS IST
BESONDERS DANN NÜTZLICH, WENN
SCHNELL NACHEINANDER SPEISEEIS MIT
UNTERSCHIEDLICHEM GESCHMACK ZUBEREITET WERDEN SOLL. (ZUM GLEICHEN
ZWECK KÖNNEN BEIM HÄNDLER IHRES
VERTRAUENS AUCH WEITERE ENTFERNBARE EDELSTAHLBEHÄLTER INOX 18/10
GEKAUFT WERDEN.
- DAFÜR MUSS DIE ERSTE SPEISEEISZUBEREITUNG IM ENTFERNBAREN BEHÄLTER
ERFOLGEN. NACHDEM DIESER ENTNOMMEN WURDE, MUSS DER FESTE BEHÄLTER
GRÜNDLICH VON SALZLAKERESTEN GEREINIGT WERDEN. UM ANGEFRORENE SALZLAKERESTE AUS DEM FESTEN BEHÄLTER
ZU ENTFERNEN, EMPFEHLEN WIR DEN
SCHALTER (2) AUSZUSCHALTEN UND EINIGE MINUTEN ZU WARTEN.
Anleitungen
- Den Rührarm (11) anbringen und mit dem Befe-
stigungsknauf (12) befestigen.
- Durch Betätigung des Schalters (2) das Kühlag-
gregat einschalten und 5 – 10 Minuten warten.
- Die entsprechend der Anleitungen aus der
Rezeptsammlung vorbereitete Eismasse in den
Behälter füllen und den Deckel (14) aufsetzen.
- Den Zeitschalter (4) drehen und den Schalter (3)
drücken.
- Alle vorher für den Einsatz des entfernbaren
Behälters gegebenen Anleitungen befolgen.
PFLEGE
- Der entfernbare Behälter, der Spatel und der
Rührarm können mit heißem Wasser oder in der
Geschirrspülmaschine gereinigt werden.
- Bei der Reinigung des festen Behälters muss
folgendes beachtet werden:
A) Den Stecker aus der Steckdose ziehen.
B) Abwarten, dass der Behälter abtaut.
C) Zuerst mit einem saugkräftigen Schwamm und
dann mit einem feuchten Tuch die Salzreste aus
dem Behälter entfernen, die diesen anderenfalls
beschädigen könnten.
D) Zum Schluss mit einem trockenen Tuch trocknen.
ACHTUNG
Dieses Gerät ist mit einem thermischen Begrenzer
ausgestattet der bei Überlastung ausgelöst wird
und den Rührmotor ausschaltet.
Aus diesem Grund sollte bei längerem Einsatz die
Maschine zwischen der Zubereitung von einem Eis
und dem nächsten ruhen. Wenn der Rührarm
anhält ist das Speiseeis fertig und die Kupplung
ausgelöst. An diesem Punkt sollte der Schalter des
Rührarms (3) gedrückt werden, um ein Überhitzen
der Kupplung zu vermeiden.
IMPORTANT
WARNINGS
• ALWAYS READ THE INSTRUCTIONS BEFORE
USE.
• Before connecting the ice-cream machine, verify
that your electrical system voltage corresponds
with the one indicated on the machine’s technical
data label.
• Keep the machine away from reach of children.
Never leave the cable hanging to avoid children
from grabbing it.
• To protect against risk of electrical shock do not
put ice cream maker in water or other liquid. Do
not wet neither the cable nor the plug: danger of
electrical shock.
• The use of attachments not recommended or
sold by the appliance manufacturer may cause
fire, electric shock ol injury.
• Avoid contact with parts in motion. Keep hands,
hair, clothes, spatulas and other utensils away
from the machine while it is functioning, in order
to reduce the risk of getting hurt and/or damaging
the machine.
• Do not use the machine out in the open.
• Never leave the machine unattended while it is
functioning.
• Do not permit a disabled person to use the
machine unless surveyed.
• Close superviosion is necessary when any appliance is used by or near children.
• Only use the machine for domestic use.
• Make sure that all parts of the machine are perfectly clean prior to making ice-cream or sherbets.
• Never freeze ice-cream once it has been defrosted.
• If the ice-cream or sherbet contains fresh ingredients, they must be consumed within a week. Icecream is tastier when it is fresh.
• If the ice-cream or sherbet contain raw eggs,
avoid them being eaten by children, expecting
mothers and the elderly.
• Do not use the machine if it appears damaged.
All repair work on the machine, including substituting the electrical cable must only be carried out
by an authorised assistance centre or by a similarly qualified person, so as to avid any risks.
• Do not place the machine on hot surfaces such
as, for example, stoves, hot plates or close to gas
flames.
If there should be a power failure or if by mistake one should bumb into the switch (2) and
turn it off while the machine is functioning, it
is necessary to wait 4-5 minutes before turning it on again. By quickly turning it on again,
the compressor might not start up again or it
might “strike on head”.
If this should happen, there is a device in the
8
9
4
3
6
7
2
10
11
12
13
14
15
1
5
16
Fig. 1
Fig. 2
Fig. 3
Fig. 4
Fig. 5
Fig. 6
Gelatiera_Compact_Mod_692 18-07-2003 12:11 Pagina 1
MOD. 692
Grafica C.L.D. - Fornacette (PI) COD. 5142900100 Rev. 1 del 18/07/2003
9 10 11 12 13
Cher client,
Permettez-nous avant tout de vous remercier
et de vous féliciter pour l’achat de la sorbetière à usage domestique la plus perfectionnée présente sur le marché.
Votre Gelatiera (Sorbetière) a un panier
extractible en acier inox 18/10 comme
garantie d’une hygiène absolue ainsi qu’une
grande facilité de nettoyage .
Avec cet appareil vous pourrez préparer 1,2
litres de glace à la fois : une glace saine et au
goût inimitable.
DESCRIPTION DE L’APPAREIL
1) Poignée
2) Touche du Freezer
3) Touche de la pale
4) Timer
5) Ouverture pour l’échappement de l’air
6) Spatule anti- éraflures
7) Doseur
8) Corps de l’appareil
9) Base
10) Axe
11) Pale de malaxage
12) Pommeau de serrage de la pale
13) Panier extractible
14) Couvercle
15) Câble d’alimentation + fiche secteur
16) Panier fixe
INSTRUCTION POUR L’USAGE
1) Installer l’appareil loin des sources de
chaleur et en prenant soin de l’éloigner de
5 cm. Au moins des parois , ceci afin de
permettre une plus facile sortie de l’air par
l’ouverture latérale (5).
Contrôler que la tension du réseau soit la
même que celle indiquée sur la plaquette
de données techniques de l’appareil .
2) Préparation de la saumure.
Le mélange glacé d’eau et de sel est
depuis toujours le meilleur instrument pour
la préparation de la glace.
Cee mélange a en effet deux objectifs :
A) Assurer une parfaite transmission du froid
entre le panier fixe et le panier extractible
et ainsi réduire les temps de préparation.
B) Permettre une plus facile extraction du
panier à glace terminée.
Le mélange se prépare ainsi:
- Remplir un verre de 1/3 de sel et de 2/3
d’eau chaude.
- Mélanger 30 secondes environ de manière
à dissoudre le sel dans l’eau.
- Laisser se déposer le sel non fondu sur le
fond du verre et laisser refroidir un peu ce
mélange.
- Verser le seul liquide dans le doseur ( 7) .
LE MELANGE EST MAINTENANT PRET
POUR ETRE VERSE DANS LE PANIER
FIXE DE L’APPAREIL.
3) Retirer le couvercle (14), dévisser le pommeau (12) , extraire la pale (11), (fig. 1 ) et
enfin extraire le panier en le tenant par le
manche en métal (fig. 2).
4) Versez le mélange eau-sel (saumure) au
fond du panier fixe (16).
5) Nettoyer le panier extractible (13) à l’intérieur et le remettre dans le panier fixe en
faisant coïncider les crans de référence et
en exerçant une légère pression jusqu’à
son arrêt sur le fond.
6) Allumer le groupe réfrigérant de la
Gelateria (Sorbetière) en appuyant sur la
touche 2 (fig.4) et attendre 5-10 minutes.
7) Verser la préparation (précédemment réalisé suivant les instructions trouvées dans le
recueil de recettes) dans le panier (fig. 5) et
couvrir avec le couvercle (14).
IMPORTANT: Avant de verser la préparation
dans le panier il est nécessaire de le faire
refroidir correctement car ceci améliore et
accélère la réalisation de la glace.
- NE JAMAIS FAIRE FONCTIONNER L’APPAREIL SANS COUVERCLE CAR
AUTREMENT LE MALAXAGE POURRAIT
ETRE EXCESSIF .
- NE JAMAIS RENVERSER L’APPAREIL NI
POUR LE RANGER NI SURTOUT
DURANT LE FONCTIONNEMENT :
CETTE PRECAUTION EVITE DE DETERIORER LE COMPRESSEUR .
8) Tourner la poignée du timer (4) jusqu’au
maximum et appuyer sur l’interrupteur (3 )
faisant ainsi débuter le malaxage de la préparation .
14
15
AVERTISSEMENTS
IMPORTANTS
• LIRE TOUJOURS LES INSTRUCTIONS
AVANT L’USAGE.
• Avant de brancher la sorbetière vérifiez que
la tension de votre réseau électrique corresponde à celle indiquée sur la plaquette de
données techniques de l’appareil.
• Placez toujours l’appareil hors de la portée
des enfants. Ne laissez jamais pendre le
câble pour éviter qu’un enfant ne puisse
l’attraper.
• Pour prévenir tout risque d'électrocution,
ne pas immerger la sorbetière dans l'eau
ou dans un autre liquide. Ne mouillez pas
le câble ou la fiche secteur : danger de
secousses électriques.
• L’utilisation d'accessoires non préconisés
ou distribués par le fabricant de l'appareil
peut provoquer des incendies, des électrocutions ou d'autres accidents.
• Evitez tout contact avec les parties en mouvement. Pendant le fonctionnement, pour
réduire les risques de lésions personnelles
et/ou de dégâts à la sorbetière éloignez les
mains, les cheveux, les vêtements, les spatules ou tout autre ustensile de l’appareil.
• N’utilisez pas l’appareil à l’extérieur.
• Ne laissez jamais l’appareil en fonction
sans surveillance.
• Ne laissez pas de personnes invalides utiliser l’appareil sans surveillance.
• Quand l’appareil est utilisé par des enfants
ou à proximité de ceux-ci, une surveillance
stricte est nécessaire.
• Utilisez l’appareil uniquement pour usage
domestique.
• Assurez vous que toutes les parties de l’appareil soient parfaitement propres avant de
préparer de la crème glacée ou du sorbet.
• Ne surgelez jamais la crème glacée si elle
a déjà été décongelée.
• Les crèmes glacées et les sorbets contenant des ingrédients frais doivent être consommés au cours de la semaine de préparation. Les glaces sont plus savoureuses
quand elles sont fraîches.
• Si la crème glacée ou le sorbet contiennent
des œufs crus évitez de les faire consommer à des enfants, aux femmes enceintes
ou aux personnes âgées.
• N’utilisez pas l’appareil s’il vous semble
endommagé. Toutes les réparations – y
compris la substitution du câble d’alimentation – doivent être effectuées seulement
par le Centre Assistance autorisé ou par un
technicien de qualification similaire, ceci
afin de prévenir tout risque.
• N’appuyez pas l’appareil sur des superficies chaudes telles que poêles, radiateurs,
plats chauds ou en proximité de flammes
libres ou de brûleurs à gaz.
• S’il devait se vérifier une interruption de
courant, ou si par erreur vous deviez
appuyer sur l’interrupteur (2) pendant le
fonctionnement, il est nécessaire d’attendre
4/5 minutes avant de tenter de le rallumer.
Si l’on cherche à le rallumer immédiatement
il peut arriver que le compresseur ne reparte pas ou bien qu’il se mette à ‘’ cogner en
tête ‘’ .Dans ce cas un dispositif situé dans
le compresseur intervient et se réactive
automatiquement après 4/5 minutes.
• PENDANT L’USAGE L’APPAREIL NE
DOIT ABSOLUMENT PAS ETRE INCLINE
NI A PLUS FORTE RAISON RENVERSE.
• POUR PREPARER PLUSIEURES GLACES DE SUITE AVEC LE PANIER
EXTRACTIBLE IL FAUT CHANGER A
CHAQUE FOIS LA SAUMURE DU
PANIER FIXE.
• Pour retirer la sorbetière se servir exclusivement de la poignée (1).
• L’appareil est conforme à la Directive
Européenne 89/336/CEE.
• Retirez la fiche de secteur de la prise de
courant avant d’effectuer les opérations de
nettoyage ou de démontage d’éventuels
éléments.
CONSERVEZ TOUJOURS CES INSTRUCTIONS.
Via Toscana, 57 a-b - Località Macrolotto
59100 Prato PO - Italy
E-Mail: info@ariete.net
Internet: www.ariete.net
NUMEROVERDE
800-215834
SERVIZIO CONSUMATORI
F
ADVERTENCIAS
IMPORTANTES
• LEER SIEMPRE LAS INSTRUCCIONES
ANTES DEL USO.
• Antes de conectar la máquina de helados
comprobar si el voltaje de la instalación
eléctrica corresponde al indicado en la
placa de datos técnicos del aparato.
• Tener el aparato lejos del alcance de los
niños. No dejar nunca el cable colgando
para evitar que los niños lo puedan agarrar.
• No sumergir nunca el bloque del motor en
el agua. No mojen el cable o el enchufe:
peligro de descargas eléctricas.
• No utilizar nunca accesorios no autorizados.
• Evitar el contacto con las partes en movimiento. Durante el funcionamiento, tengan
alejadas las manos, los cabellos, la ropa,
las espátulas u otros útiles para disminuir
el riesgo de lesiones y/o daños al aparato.
• No usar el aparato abierto.
• No dejar usar el aparato a personas incapacitadas sin ser vigiladas.
• No dejar que los niños jueguen con el aparato.
• Utilizar el aparato únicamente para uso
particular.
• Asegúrense que todas las partes del aparato se encuentren perfectamente limpias
antes de preparar el helado o el sorbete.
• No congelar nunca el helado si ha sido
descongelado antes.
• Si el helado o el sorbete contienen ingredientes frescos, deben ser consumidos
dentro de una semana. El helado es más
sabroso cuando es fresco.
• Si el helado o el sorbete contiene huevos
crudos, eviten el consumo por parte de
niños, mujeres embarazadas o ancianos.
• No usar el aparato si el mismo está dañado.
Todas las reparaciones, incluso la sustitución del cable de alimentación, deben ser
realizadas exclusivamente por el Centro de
Asistencia autorizado o por personas con
cualifica similar, para evitar cualquier tipo
de riesgo.
• No apoyar el aparato sobre superficies
calientes, tal como estufas, platos calientes o cerca de llamas libres de gas.
• Si se produjese una interrupción de la
corriente eléctrica o si, accidentalmente
se apagara el interruptor (2) debido a un
golpe durante el funcionamiento, es
necesario esperar 4 – 5 minutos antes
de prenderlo nuevamente.
Puede ocurrir que prendiéndolo enseguida, el compresor no arranca o “pro-
duzca golpes en la cabeza”. En este caso
un dispositivo ubicado en el compresor
interviene y se prende automáticamente
después de 4 – 5 minutos.
• DURANTE EL USO LA MAQUINA NO SE
DEBE ABSOLUTAMENTE INCLINAR Y
OBVIAMENTE TAMPOCO VOLCAR.
EN EL CASO QUE SE PREPARAREN
HELADOS EN CONTINUACION USANDO
LA CUBETA DESMONTABLE, ES NECESARIO CAMBIAR TODAS LAS VECES LA
SALMUERA EN LA CUBETA FIJA.
• Para sacar la heladera usar exclusivamente la manija (1).
• Las dosis indicadas han sido seleccionadas para un helado gusto medio.
Naturalmente es posible modificar la dosis
a su propio gusto.
• El aparato es conforme a la Directiva
Europea 89/336/CEE
• Quitar el enchufe de la toma de corriente
antes de realizar las operaciones de limpieza o montar y desmontar eventuales
componentes.
CONSERVAR SIEMPRE ESTAS INSTRUCCIONES
Estimado cliente,
Permítanos antes que nada felicitarlo por
haber adquirido la máquina para helados más
perfeccionada, para uso particular, que exista
en el comercio.
La Heladera tiene una cubeta de acero inoxidable 18/10 la cual se puede extraer para
garantizar una higiene impecable y gran facilidad para la limpieza.
Con esta máquina Usted podrá preparar 1,2
litros de helado por vez; un helado sano y del
sabor inimitable.
DESCRIPCION DEL APARATO
1) Manija
2) Interruptor congelador
3) Interruptor cuchilla
4) Temporizador
5) Abertura para salida aire
6) Paleta
7) Dosificador
8) Cuerpo del aparato
9) Base
10) Perno
11) Cuchilla mantecadora
12) Tuerca para sujetar cuchillas
13) Cubeta desmontable
14) Cable de alimentación + enchufe
15) Cubeta fija
16) Cubeta
INSTRUCCIONES PARA EL USO
1) Colocar la máquina en un lugar lejos de
fuentes de calor y alejada de las paredes
por lo menos 5 cm.
Esta precaución es para permitir la salida
de aire por la abertura lateral (5) con facilidad.
Comprobar que la tensión de la red corresponda a la indicada en la placa de datos
técnicos de la máquina.
2) Preparación de la salmuera
La mezcla helada de agua y sal es desde
siempre el mejor instrumento para la preparación del helado!
Esta mezcla tiene en efecto en la preparación del helado un doble objetivo:
A) Garantizar una perfecta transmisión del
frío entre la cubeta fija y la cubeta desmontable y por lo tanto reducir el tiempo de
la preparación.
B) Permitir con mayor facilidad la extracción
de la cubeta una vez acabado el helado.
La mezcla se prepara de la siguiente manera:
- Colocar en un vaso 1/3 de sal y llenar con
2/3 de agua caliente.
- Mezclar por unos 30 segundos para que la
sal se disuelva en el agua.
- Dejar depositar la sal no disuelta en el
fondo del vaso y dejar que el preparado se
enfríe un poco.
- Colocar únicamente el líquido en el dosificador (7) hasta la marca del nivel indicado.
LA MEZCLA ESTA LISTA PARA COLOCARLA EN LA CUBETA FIJA DE LA MAQUINA
3) Quitar la tapa (14), desenroscar la tuerca
(12), extraer la cuchilla (11) (fig. 1) y extraer la cubeta tomándola por la manija de
metal (fig. 2).
4) Colocar la mezcla de agua-sal (salmuera)
en el fondo de la cubeta fija (16).
5) Limpiar la cubeta desmontable (13) en su
interior y colocarla nuevamente en la cubeta fija de manera que coincidan las referencias y ejerciendo una ligera presión
hasta que se detenga en el fondo (fig. 3).
6) Acceder al grupo refrigerante de la
Heladera presionando el pulsador (2) (fig.
4) y esperar 5 -10 minutos.
7) Colocar la substancia (preparada anteriormente siguiendo las instrucciones del recetario) en la cubeta (fig. 5) y comprimirla con
la tapa (14).
IMPORTANTE: Antes de colocar el preparado
en la cubeta es conveniente dejarlo enfriar
bien puesto que este procedimiento acelera y
mejora la preparación del helado.
NO DEBE SER COLOCADO NUNCA UN
PREPARADO AUN CALIENTE.
EN LA CUBETA DE LA HELADERA.
- NO DEJAR FUNCIONAR LA MAQUINA
SIN LA TAPA, EN CASO CONTRARIO EL
MANTECADO PODRIA RESULTAR
EXCESIVO.
- NO VOLCAR NUNCA LA MAQUINA, NI AL
MOMENTO DE GUARDARNA NI NATURALMENTE DURANTE SU FUNCIONAMIENTO; ESTA PRECAUCION EVITA
DAÑOS AL COMPRESOR.
8) Girar el interruptor del temporizador (4)
hasta el máximo y presionar el interruptor (3)
para iniciar el mantecado del preparado.
Cuando el helado haya alcanzado su mejor
consistencia, un embrague detendrá la
cuchilla mientras el motor continuará a
girar.
De todas maneras en futuro, la experiencia
les sugerirá los tiempos necesarios para
Vuestros gustos.
IMPORTANTE
Como habrán podido notar el circuito refrigerante está separado y es independiente del
mecanismo de mantecado y de la cuchilla.
Esto permite una perfecta conservación del
helado en el caso se olvidaran de quitar la
cubeta una vez que la máquina se haya parado o que haya intervenido el embrague.
EN EL CASO QUE EL GRUPO REFRIGERANTE QUEDE PRENDIDO MAS DEL TIEMPO NECESARIO PARA EL MANTECADO,
PUEDE OCURRIR QUE LA MEZCLA DE
AGUA Y SAL SE CONGELE Y SEA MAS
DIFICIL EXTRAER LA CUBETA.
EN ESTE CASO APAGAR EL GRUPO
REFRIGERANTE APRETANDO EL INTERRUPTOR (2) Y ESPERAR 2 O 3 MINUTOS
ANTES DE EXTAER LA CUBETA.
9) Extracción de la cubeta
Para extraer la cubeta proceder de la
siguiente manera:
A) Colocar el interruptor en la posición apa-
gado.
B) Apagar el grupo refrigerante y esperar un
par de minutos.
C) Quitar la tapa y desenroscar la tuerca (12).
D) Agarrar la manija de la cubeta desmonta-
ble (13) y levantarlo ejerciendo un movimiento de rotación alternado (como indicado en la fig. 2) hasta que el mismo no se
bloquee.
Luego levantar verticalmente la cubeta.
SE PUEDE QUITAR EL HELADO DE LA
CUBETA UTILIZANDO LA PALETA (6) DEL
EQUIPAMIENTO QUE EVITA RAYONES A
LA MISMA.
10) Utilización de la cubeta fija
La cubeta fija (16) no es únicamente el alojamiento de la cubeta desmontable (13),
pero es a su vez ideal para la preparación
del helado que se obtiene en menos tiempo y sin usar la mezcla de Agua-Sal.
- SU USO ES MUY UTIL CUANDO POR
EJEMPLO SE DESEA PREPARAR
VARIOS HELADOS DE DISTINTOS
SABORES EN RAPIDA SECUENCIA.
(PARA ESTO SE PUEDEN ADQUIRIR EN
SU PROPIO REVENDEDOR DE CONFIANZA OTRAS CUBETAS DESMONTABLES DE ACERO INOX 18/19.)
- PARA REALIZAR ESTO SE DEBERA
PROCEDER A LA PREPARACION DE LA
CUBA DESMONTABLE PRIMERO, A LA
EXTRACCION DE LA MISMA Y A UNA
MINUCIOSA LIMPIEZA DE LA CUBETA
FIJA DE LOS RESTOS DE SALMUERA.
(PARA DESMONTAR DE LA CUBETA
FIJA RESTOS CONGELADOS, SE RECOMIENDA APAGAR EL INTERRUPTOR (2)
Y ESPERAR ALGUNOS MINUTOS.)
Instrucciones
- Montar la cuchilla (11) y fijarla con la tuerca de fijación (12).
- Prender el grupo refrigerante apretando el
interruptor (2) y esperar 5-10 minutos.
- Colocar la preparación realizada siguiendo
las instrucciones del recetario y tapar con
la tapa (14).
- Girar el interruptor del temporizador (4) y
apretar el interruptor (3).
- Seguir todas las indicaciones descritas
anteriormente para el uso de la cubeta
desmontable.
LIMPIEZA
- La cubeta desmontable, la cuchilla y la
paleta se pueden lavar con agua caliente o
en lavavajillas.
- La cubeta fija se debe limpiar respetando
estas advertencias:
A) Quitar el enchufe de la toma de corriente.
B) Esperar que la cubeta se descongele.
C) Pasar antes una esponja absorbente y
luego con un paño húmedo quitar los restos de sal los cuales, provocarían daños si
quedaran en la cubeta.
D) Para acabar secar con un paño seco.
ATENCION
Esta máquina está equipada con un limitador
térmico que en el caso de super actividad
interviene apagando el motor de la cuchilla.
Por lo tanto, en el caso de uso prolongado
es recomendable dejar descansar la máqui-
na entre uno y otro helado.
Cuando la cuchilla de mantecado se detiene,
esto significa que el helado está listo y que ha
intervenido el embrague.
A este punto se recomienda apretar el interruptor de la cuchilla (3) para evitar un inútil
recalentamiento del mismo embrague.
Quand la glace aura atteint la consistance
optimale , un système d’embrayage se
chargera d’arrêter la pale laissant le
moteur tourner .
L’expérience finira en tous cas par vous
suggérer quels sont les temps optimaux
pour votre goût personnel .
IMPORTANT
Comme vous l’aurez noté le circuit réfrigérant
est séparé et indépendant du mécanisme de
malaxage et de la pale.
Ceci permet une parfaite conservation de la
glace même dans le cas ou vous oublieriez de
retirer le panier une fois l’appareil éteint ou
que le système d’embrayage soit intervenu.
AU CAS OU LE GROUPE REFRIGERANT
RESTE ALLUME AU-DELÀ DU TEMPS NECESSAIRE AU MALAXAGE , IL PEUT ARRIVER QUE LE MELANGE EAU-SEL GELE ET
RENDE DIFFICILE L’EXTRACTION DU
PANIER.
DANS CE CAS ETEINDRE LE GROUPE
REFRIGERANT EN APPUYANT SUR LA
TOUCHE ( 2) ET ATTENDRE 2 OU 3 MINUTES AVANT DE PROCEDER A L’EXTRACTION DU PANIER .
9) Extraction du panier
:
Pour extraire le panier procéder comme
suit:
A) Eteindre l ‘interrupteur .
B) Eteindre le groupe réfrigérant et attendre
quelques minutes.
C) Oter le couvercle et dévisser le pommeau
(12).
D) Empoigner le manche du panier extractible
(13) et le soulever avec un mouvement
rotatif alterné (comme indiqué dans la fig.
2) jusqu’à ce qu’il ne se bloque.
LA GLACE PEUT ETRE RETIREE DU
PANIER UTILISANT LA SPATULE ANTIERAFLURES FOURNIE (6) AVEC L’APPAREIL.
10) Utilisation du panier fixe:
Le panier fixe n’est pas seulement le
récepteur pour le panier extractible (13),
mais il est à son tour idéal pour la préparation de glaces qui d’ailleurs s’obtiennent
ainsi plus rapidement et sans nécessiter du
mélange eau-sel.
- SON USAGE EST TRES UTILE QUAND
PAR EXEMPLE L’ON DESIRE PREPARER PLUSIEURES GLACES DE GOUTS
DIVERS EN SUCCESSION RAPIDE.
(POUR CE FAIRE IL EST POSSIBLE D’ACHETER CHEZ VOTRE MARCHAND DE
CONFIANCE D’AUTRES PANIERS
EXTRACTIBLES EN ACIER INOX 18/10).
- IL FAUT POUR CELA PROCEDER A UNE
PREMIERE PREPARATION DANS LE
PANIER EXTRACTIBLE, A L’EXTRACTION DE CELUI-CI PUIS A UN NETTOYAGE TRES POUSSE DU PANIER FIXE
DES RESIDUS DE SAUMURE. (POUR
RETIRER DU PANIER FIXE LES RESIDUS GLACES, IL EST CONSEILLE D’ETEINDRE L’INTERRUPTEUR (2) ET D’ATTENDRE QUELQUES MINUTES).
NETTOYAGE
Le panier extractible, la pale et la spatule
peuvent être lavés en eau chaude ou au
lave-vaisselle. Le panier fixe doit être lavé
comme suit:
A) Débrancher la fiche secteur de la prise d’a-
limentation.
B) Attendre le dégivrage du panier.
C) Passer d’abord avec une éponge absor-
bante et ensuite avec un linge humide
enlever les résidus de sel qui seraient dangereux pour l’appareil s’ils restaient dans le
panier.
D) Sécher enfin avec un linge sec.
ATTENTION
Cet appareil est pourvu d’un limiteur thermique qui en cas surchauffe intervient en éteignant le moteur de la pale.
Donc, dans le cas d’usage prolongé il est conseillé de faire reposer l’appareil entre une
glace et l’autre.
Quand la pale de malaxage s’arrête cela
signifie que la glace est prête et que l’embrayage est intervenu.
Il est alors recommandé d’appuyer sur la touche de la pale (3) pour éviter un réchauffement inutile de l’embrayage.
E
8
9
4
3
6
7
2
10
11
12
13
14
15
1
5
16
Fig. 1
Fig. 2
Fig. 3
Fig. 4
Fig. 5
Fig. 6
GELATIERA
COMPACT
Gelatiera_Compact_Mod_692 18-07-2003 12:11 Pagina 2
 Loading...