


BAR8
COFFEE MACHINE
MACHINE A CAFE
CAFETERA ELÉCTRICA
Owner’s instructions
Mode d’emploi
Instrucciones para el uso
READ AND SAVE THESE INSTRUCTIONS
BAR 8


IMPORTANT SAFEGUARDS
When using electrical appliances, basic safety precautions should always be followed, including the following:
• Read all instructions.
• Do not touch hot surfaces. Use handles and knobs.
• To protect against fire, electrical shock and personal injury, do not immerse cord, plug or appliance in
water or other liquid.
• Close supervision is necessary when any appliance is used by or near children.
• Unplug from the outlet when not in use and before cleaning. Allow to cool before fitting or taking off
parts, and before cleaning the appliance.
• Do not operate with a damaged cord or plug, or after the appliance malfunctions, or has been damaged in any manner. Return the appliance to the nearest authorized service facility for examination, repair
or adjustment.
• The use of accessory attachments or spare parts not recommended by the appliance manufacturer may
result in fire, electrical shock or personal injury.
• Do not use outdoors.
• Do not let the cord hang over the edge of the table or counter, or touch hot surfaces.
• Do not place on or near a hot gas or electrical burner, or in a heated oven.
• To disconnect the appliance, turn any control to “off”, then remove plug from wall outlet.
• Do not use the appliance for other than the intended use.
• This appliance is for household use only.
SAVE THESE INSTRUCTIONS
SHORT CORD INSTRUCTIONS
- A short power cord is provided to reduce risks resulting from becoming entangled in or tripping over a longer cord.
- Longer, detachable power supply cords or extension cords are available and may be used if care is exercised in their use.
- If an extension cord is used, the marked electrical rating should be at least as great as the electrical rating of
the appliance. The longer cord should be arranged so that it will not drape over the counter-top or table top
where it can be pulled on by children or tripped over.
- Your product is equipped with a polarized alternating current line plug (a plug having one blade wider than
the other). This plug will fit into the power outlet only one way. This is a safety feature. If you are unable to
i n s e rt the plug fully into the outlet, try reversing the plug. If the plug should still fail to fit, contact your electrician to replace your obsolete outlet. Do not defeat the safety purpose of the polarized plug.
6

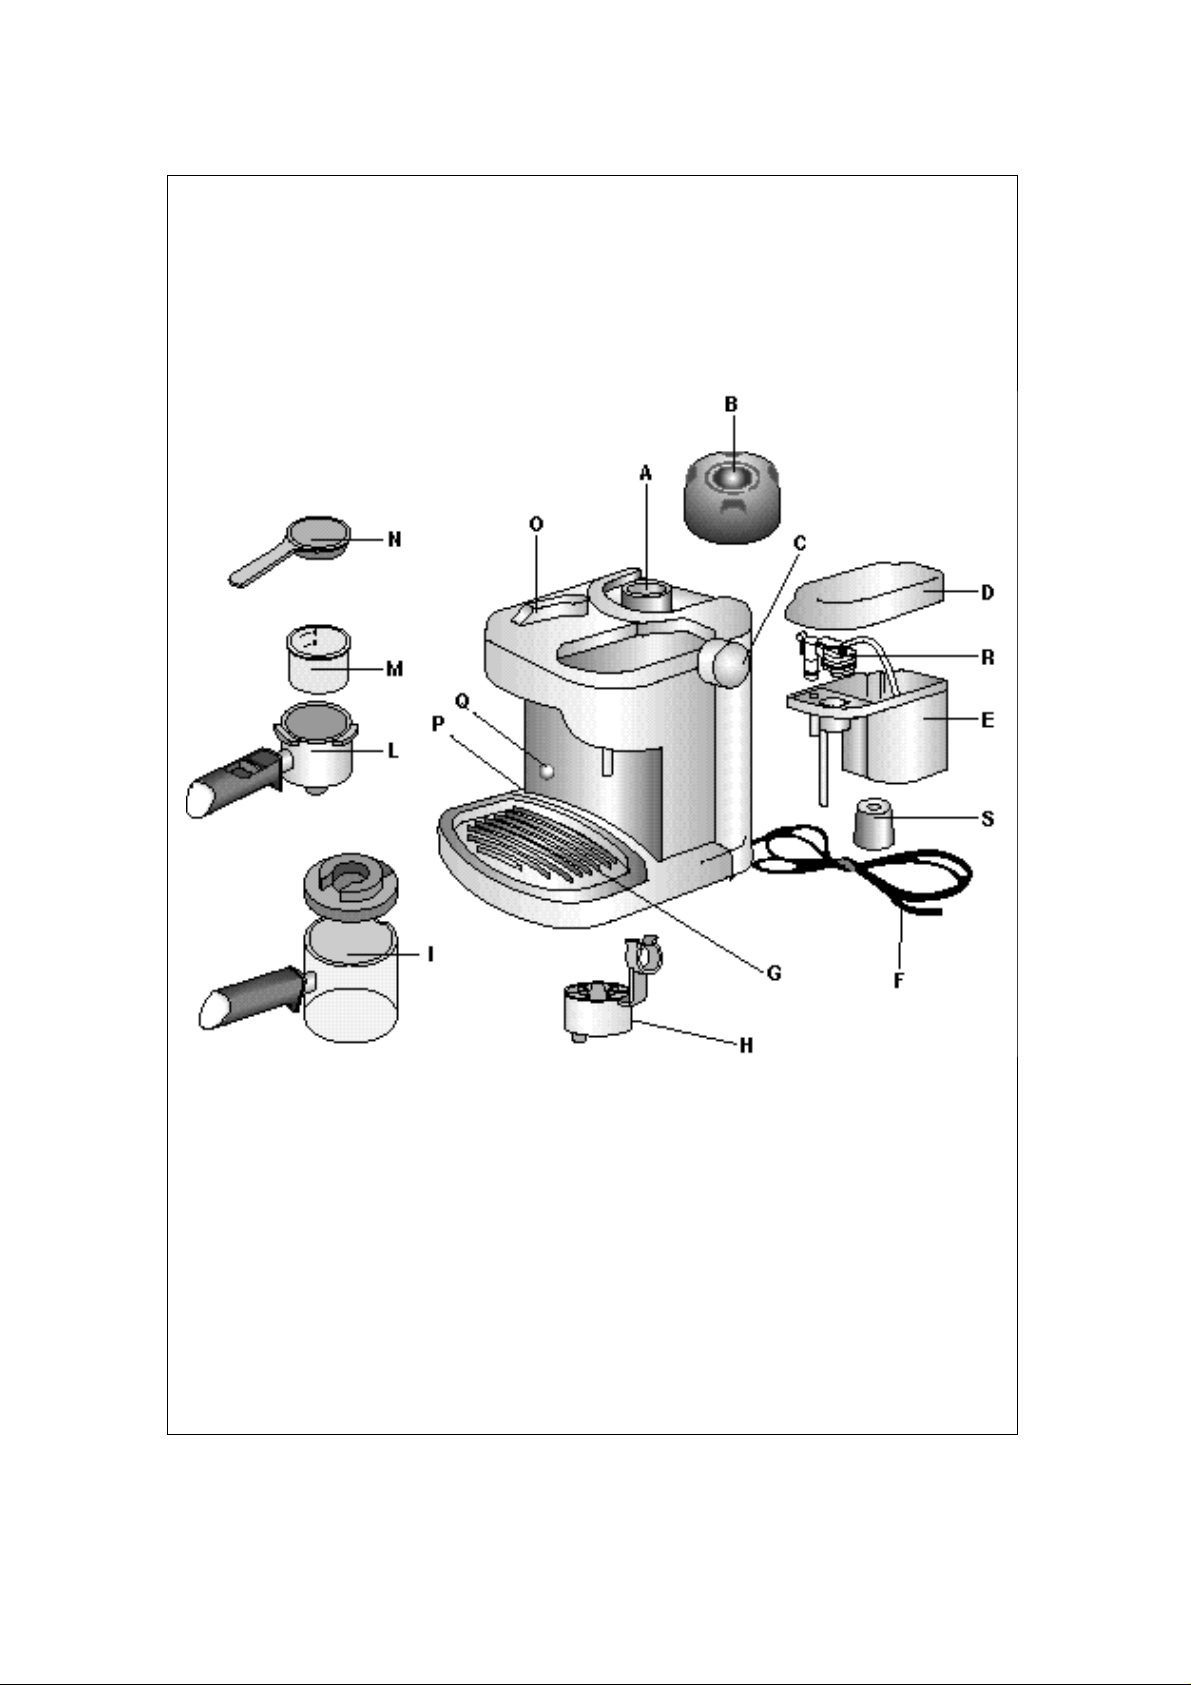
APPLIANCE DESCRIPTION
(See drawing on page 3)
The following terminology and letters of reference will
be used continuously in the following pages:
A. Boiler
B. Cap
C. Steam knob
D. Milk tank lid
E. Milk tank
F. Supply cable
G. Drip tank
H. Cup adaptor
I. Carafe with lid
L. Filter holder
M. Filter
N. Measuring spoon
O. Selector for STRONG, MEDIUM or LIGHT coffee
and CAPPUCCINO
P. Switch light
Q. "OK steam ready" pilot light
R. Emulsifier
S. Antisplash hood.
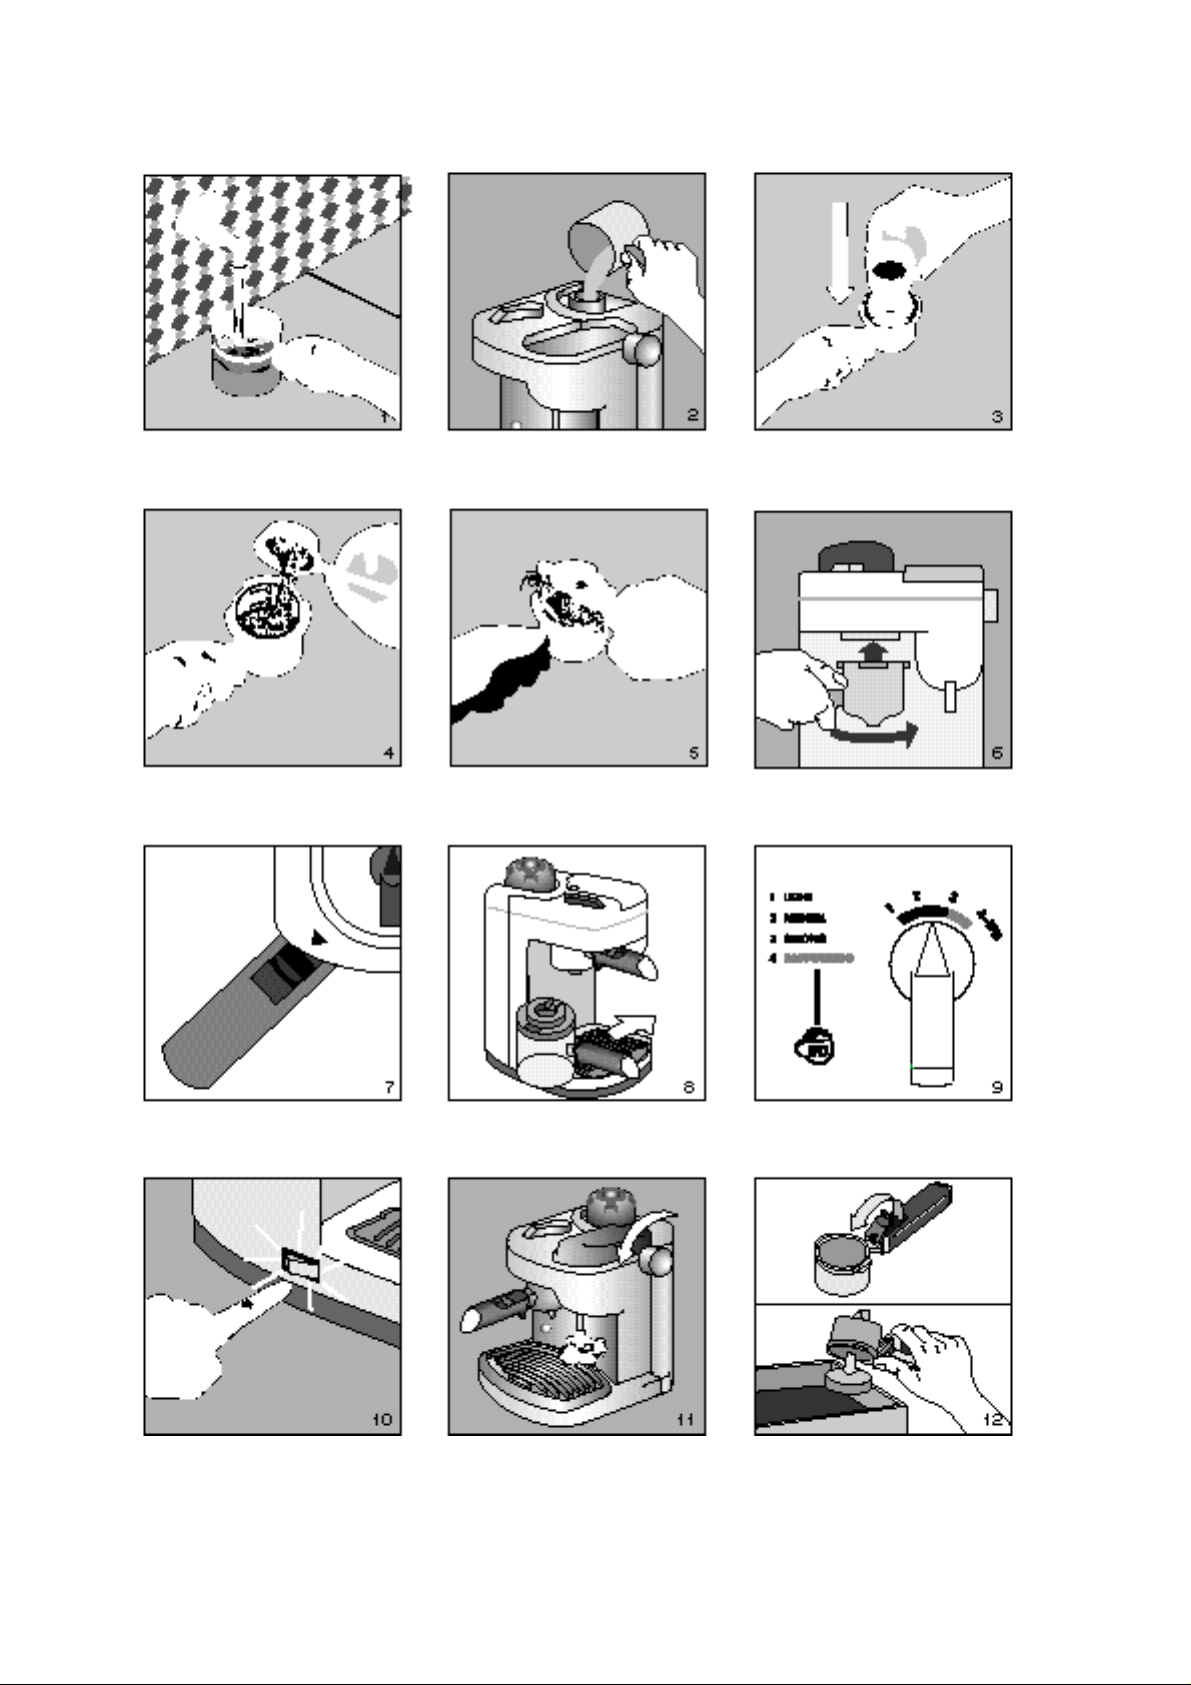
PREPARING THE COFFEE
1. Unscrew the boiler cap (B), turning it in an anticlockwise direction.
2. Using the carafe (l) supplied (fig. 1), pour the
water in the boiler (fig. 2) respecting the quantities shown in the table at the end of the text. Do
not exceed the quantities shown or the appliance will cease to work properly. The filling of the
boiler must be carried out with the switch light (P)
off.
3. Close the boiler cap carefully by turning it in a
clockwise direction.
4. Insert the filter in the filter holder (fig. 3).
5. Using the measuring spoon (N), pour the coffee
into the filter, respecting the amounts shown in the
table at the end of the text, and spread it evenly
(fig. 4). Use medium-ground coffee because coffee which is too finely-ground can cause the filter
to become blocked (MOKA coffee is suitable).
6. Remove any excess coffee from the edge of the filter (fig. 5).
7. To attach the filter holder to the machine, bring the
filter holder under the boiler shower (fig. 6), aligning its handle with the arrow marked on the lid
of the machine (fig. 7). Next, push the filter holder
up and at the same time turn it completely to the
right. It is of no importance if the handle of the filter holder is not centred in relation to the machine; it is, however, important for the filter holder to
be situated firmly in its housing.
8. The carafe with lid must be positioned under the
filter holder in such a way that the spout of the filter holder is inside the opening contained on the
lid (fig. 8).
9. Set the selector (O) to the type of coffee required:
"1 LIGHT" for a weak coffee, "2 MEDIUM" for a
normal coffee, "3 STRONG" for a strong coffee
(fig. 9).
10.Check that the steam knob (C) is turned off firmly
and press the switch light. The pilot light will come
on (fig. 10).
11. It takes approx. 3 minutes for the coffee to start
to come out. After it has been emitted, turn off the
switch light.
WARNING: In order to avoid puffs of steam, you
must always eliminate the residual steam inside
the boiler by turning the steam knob to let out all
the steam before removing the filter holder (fig.
11).
NOTE: For safety reasons, it is not possible to
open the boiler cap when the boiler is hot as the
cap turns without unscrewing. If it has to be removed for any reason, it is always necessary to let off
steam from the boiler using the steam knob as
described immediately above.
12.In order to eliminate the coffee grounds from the
filter holder, turn it upside down and beat it
repeatedly so that the grounds come out (fig. 12).
Alternatively, rinse the filter holder and the filter
itself under running water.
WARNING: To eliminate the "new" smell the first
time the appliance is used, complete the coffee
cycle a few times without using the coffee powder.
ADAPTOR ASSEMBLY
The adaptor (H) must be used every time the coffee is
required to be made directly in the cup. For it to be
assembled, it only needs to be inserted in the lower
part of the filter holder (fig. 13).
PREPARING CUPPUCCINOS
1. Pour the amount of milk shown in the table at the
end of the text into the carafe before pouring it
into the milk tank (E). Never exceed the MAX level
marked on the tank (fig. 15), otherwise the machine could continue to drip milk from the tank pipe
7
 Loading...