


 Loading...
Dell™ Ink-Free Printer PZ310
With ZINK™ Zero Ink™ Printing Technology
User’s Guide
Model PZ310
w w w . d e l l . c o m | s u p p o r t . d e l l . c o m

Notes, Notices, and Cautions
NOTE: A NOTE indicates important information that helps you make better use of your printer.
NOTICE: A NOTICE indicates either potential damage to hardware or loss of data and tells you how to avoid the problem.
CAUTION: A CAUTION indicates a potential for property damage, personal injury, or death.
____________________
Information in this document is subject to change without notice. © 2008 Dell Inc. All rights reserved.
Reproduction of these materials in any manner whatsoever without the written permission of Dell Inc. is strictly forbidden.
Trademarks used in this text: Dell and the DELL logo are trademarks of Dell Inc.;
Microsoft and Windows are registered trademarks of Microsoft Corporation; Bluetooth is a registered trademark owned by Bluetooth SIG, Inc. and used by Dell Inc. under license; ZINK and Zero Ink are trademarks of Zink Imaging, LLC.
Other trademarks and trade names may be used in this document to refer to either the entities claiming the marks and names or their products. Dell Inc. disclaims any proprietary interest in trademarks and trade names other than its own.
Model PZ310
September 2008 Rev. A00

Contents
1 |
Your Dell™ Mobile Printer . . . . . . . . . . . . |
5 |
|
About Your Mobile Printer . . . . . . . . . . . . . . . . |
6 |
2 |
Installing and Charging the Battery . . . . . |
7 |
|
Installing the Battery . . . . . . . . . . . . . . . . . . . |
7 |
|
Charging the Battery . . . . . . . . . . . . . . . . . . . |
8 |
3 |
Loading the ZINK™ Photo Paper . . . . . . . |
9 |
|
Important Information: ZINK Photo Paper . . . . . . . |
10 |
4 |
Printing Photos . . . . . . . . . . . . . . . . . . . . |
11 |
|
Turning On Your Printer . . . . . . . . . . . . . . . . . |
11 |
|
Sending and Printing Photos |
|
|
Using Bluetooth® Technology . . . . . . . . . . . . . |
12 |
|
Sending and Printing Photos Using PictBridge . . . . |
15 |
|
Reprinting a Photo . . . . . . . . . . . . . . . . . . . . |
16 |
5Status Indicator Information, Troubleshooting, and Specifications . . . 17
Status Indicator Information . . . . . . . . . . . . . . |
17 |
Power Status . . . . . . . . . . . . . . . . . . . . |
17 |
Battery Status . . . . . . . . . . . . . . . . . . . |
17 |
Contents 3

Print Status . . . . . . . . . . . . . . . . . . . . . |
18 |
Error Status . . . . . . . . . . . . . . . . . . . . . |
18 |
Page Count Status . . . . . . . . . . . . . . . . . |
19 |
Troubleshooting . . . . . . . . . . . . . . . . . . . . . |
20 |
Specifications . . . . . . . . . . . . . . . . . . . . . . |
21 |
6 Contacting Dell . . . . . . . . . . . . . . . . . . . . 22
4 Contents

1
Your Dell™ Mobile Printer
Unpack your printer and verify the contents of the package. If any of the items shown below are missing, contact Dell (see "Contacting Dell" on page 22).
Package Contents
Dell Ink-Free Printer PZ310 AC adapter and power cord
Battery
NOTE: The power cord that shipped with your printer may be different depending on your country/region.
Quick Setup Guide and CD |
Media Pack |
Dell™ Ink-Free Mobile Printer
w w w . d e l l . c o m
| s u p p o
r t . d e ll.c o m
Dell™ Ink-Free Mobile Printer PZ310
Information Disc
©
2008
DellIn c.
All
rig
hts
reserve
d.
D
e
ll
Contains 12 ZINK™ Photo Papers and 1 ZINK™ Smart Sheet
NOTE: It is recommended that you use original Dell-branded ZINK Photo Paper for optimal print quality.
Your Dell™ Mobile Printer |
|
5 |
|
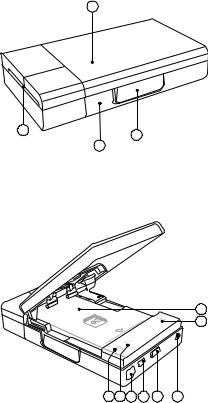
About Your Mobile Printer
1
4 |
2 |
|
|
|
3 |
1
2
8 |
7 |
6 |
5 |
4 |
3 |
1Media cover
2PictBridge & power connector cover
3Battery cover
4Paper exit
1Media tray
2Battery indicator
3Lanyard hook
4Media cover latch
5Reprint button
6Power button
7Error indicator
8Ready indicator
6 |
|
Your Dell™ Mobile Printer |
|
2
Installing and Charging the Battery
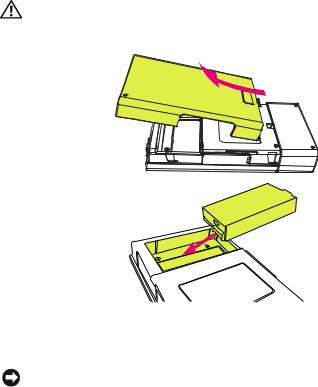
Installing the Battery
CAUTION: Use only the battery that shipped with your printer. Using any other batteries may result in product damage or malfunction.
1Remove the battery cover.
2Insert the battery. Ensure that the battery is inserted in the correct orientation as shown above.
NOTICE: Inserting the battery incorrectly can result in potential loss of data or damage to hardware.
3Replace the battery cover.
Installing and Charging the Battery |
|
7 |
|
Loading...