


 Loading...
Dell™ OptiPlex™ FX160
Setup and Quick Reference Guide
This guide provides an overview of features, specifications, quick setup, software, and troubleshooting information for your computer. For more information about your operating system, devices, and technologies, see the Dell Technology Guide at support.dell.com.
Model DC01T
w w w . d e l l . c o m | s u p p o r t . d e l l . c o m

Notes, Notices, and Cautions
NOTE: A NOTE indicates important information that helps you make better use of your computer.
NOTICE: A NOTICE indicates either potential damage to hardware or loss of data and tells you how to avoid the problem.
CAUTION: A CAUTION indicates a potential for property damage, personal injury, or death.
If you purchased a Dell™ n Series computer, any references in this document to Microsoft® Windows® operating systems are not applicable.
Macrovision Product Notice
This product incorporates copyright protection technology that is protected by method claims of certain U.S. patents and other intellectual property rights owned by Macrovision Corporation and other rights owners. Use of this copyright protection technology must be authorized by Macrovision Corporation, and is intended for home and other limited viewing uses only unless otherwise authorized by Macrovision Corporation. Reverse engineering or disassembly is prohibited.
____________________
Information in this document is subject to change without notice. © 2008 Dell Inc. All rights reserved.
Reproduction of these materials in any manner whatsoever without the written permission of Dell Inc. is strictly forbidden.
Trademarks used in this text: Dell, the DELL logo, OptiPlex, and DellConnect are trademarks of Dell Inc.; Bluetooth is a registered trademark owned by Bluetooth SIG, Inc., and is used by Dell under license; Intel and Atom are registered trademarks of Intel Corporation in the U.S. and other countries; Microsoft, Windows, Windows Vista, and the Windows Vista start button are either trademarks or registered trademarks of Microsoft Corporation in the United States and/or other countries.
Other trademarks and trade names may be used in this document to refer to either the entities claiming the marks and names or their products. Dell Inc. disclaims any proprietary interest in trademarks and trade names other than its own.
Model DC01T
August 2008 |
P/N C742D |
Rev. A00 |

Contents
1 |
About Your Computer. . . . . . . . . . . . . . . . . |
5 |
|
Front View . . . . . . . . . . . . . . . . . . . . . . . . . |
5 |
|
Back View . . . . . . . . . . . . . . . . . . . . . . . . . |
6 |
2 |
Setting Up Your Computer . . . . . . . . . . . . . |
7 |
|
Before Setting Up Your Computer . . . . . . . . . . . . . |
7 |
|
Quick Setup . . . . . . . . . . . . . . . . . . . . . . . . |
7 |
3Specifications . . . . . . . . . . . . . . . . . . . . . 11
4Troubleshooting Tips . . . . . . . . . . . . . . . . 17
Using the Hardware Troubleshooter . . . . . . . . . . |
17 |
Tips . . . . . . . . . . . . . . . . . . . . . . . . . . . . |
17 |
Power Problems . . . . . . . . . . . . . . . . . . |
17 |
Memory Problems . . . . . . . . . . . . . . . . . |
18 |
Lockups and Software Problems . . . . . . . . . . |
19 |
Dell Technical Update Service . . . . . . . . . . . |
20 |
Dell Support Utility . . . . . . . . . . . . . . . . . |
20 |
Dell Diagnostics . . . . . . . . . . . . . . . . . . |
21 |
Contents 3

5 Reinstalling Software . . . . . . . . . . . . . . |
23 |
Drivers . . . . . . . . . . . . . . . . . . . . . . . . . . |
23 |
Identifying Drivers . . . . . . . . . . . . . . . . . |
23 |
Reinstalling Drivers and Utilities . . . . . . . . . . |
24 |
Restoring Your Operating System . . . . . . . . . . . . |
26 |
Using Microsoft Windows System Restore |
|
(Windows Vista hard drive operating |
|
systems only) . . . . . . . . . . . . . . . . . . . . |
26 |
6Finding Information . . . . . . . . . . . . . . . . 29
7Getting Help . . . . . . . . . . . . . . . . . . . . . . 31
Obtaining Assistance . . . . . . . . . . . . . . . . . . |
31 |
Technical Support and Customer Service . . . . . |
32 |
DellConnect™ . . . . . . . . . . . . . . . . . . . . |
32 |
Online Services . . . . . . . . . . . . . . . . . . . |
32 |
AutoTech Service . . . . . . . . . . . . . . . . . . |
33 |
Automated Order-Status Service . . . . . . . . . . |
33 |
Problems With Your Order . . . . . . . . . . . . . . . . |
33 |
Product Information . . . . . . . . . . . . . . . . . . . |
34 |
Returning Items for Warranty Repair or Credit . . . . . |
34 |
Before You Call. . . . . . . . . . . . . . . . . . . . . . |
35 |
Contacting Dell. . . . . . . . . . . . . . . . . . . . . . |
37 |
Index . . . . . . . . . . . . . . . . . . . . . . . . . . . . . . . |
39 |
4 Contents
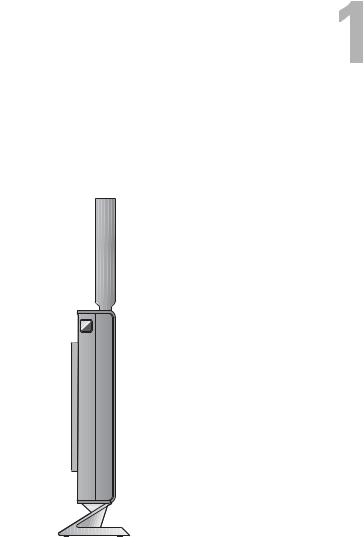
About Your Computer
Front View
|
1 |
|
|
2 |
|
|
3 |
|
|
4 |
|
1 |
power button |
2 |
3 |
USB 2.0 connectors (2) |
4 |
5 |
headphone connector |
6 |
10
9 |
8 |
 7
7

 6
6
 5
5
side cover stand
microphone connector
About Your Computer |
5 |
7 |
diagnostic lights (see your |
8 |
Wi-Fi indicator |
|
Service Manual for information |
|
|
|
about light codes) |
|
|
9 |
hard drive indicator |
10 |
network activity indicator |
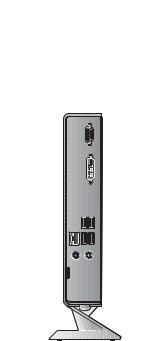
Back View
1
|
2 |
|
3 |
|
4 |
|
5 |
9 |
6 |
|
|
8 |
|
|
7 |
1 |
wireless antenna (optional) |
2 |
serial connector |
3 |
DVI connector |
4 |
VGA connector |
5 |
USB 2.0 connectors (4) |
6 |
PS/2 keyboard connector |
7 |
power connector |
8 |
PS/2 mouse connector |
9 |
network connector (RJ-45) |
|
|
6 |
About Your Computer |

Setting Up Your Computer
Before Setting Up Your Computer
When positioning your computer, ensure that you allow easy access to a power source, adequate ventilation, and a level surface on which to place your computer.
NOTICE: Keep the computer on the stand and in the vertical position. Setting up the computer horizontally (on its side) restricts airflow and can impact performance.
Restricting airflow around the computer may cause it to overheat. To prevent overheating ensure that you leave at least 10.2 cm (4 in) at the back of the computer and a minimum of 5.1 cm (2 in) on all other sides. You should never put your computer in an enclosed space, such as a cabinet or drawer when it is powered on.
Quick Setup
CAUTION: Before you begin any of the procedures in this section, follow the safety instructions that shipped with your computer.
NOTE: Some devices may not be included if you did not order them.
Setting Up Your Computer |
7 |

1Connect the monitor using either the white DVI cable or the blue VGA cable.
2 Connect a USB device, such as a keyboard or mouse.
8 |
|
Setting Up Your Computer |
|
|
|
|
|
|
|
|
|
|
|
||
|
|
|
|
|
|
||
|
|
|
|
|
|
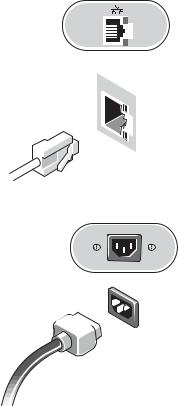
3 Connect the network cable.
4 Connect the power cable.
Setting Up Your Computer |
9 |
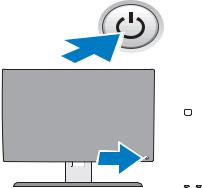
5 Press the power buttons on the monitor and the computer.
10 |
|
|
|
|
|
|
|
|
|
|
|
|
|
|
|
|
|
|
Setting Up Your Computer |
|
|||
|
|
||||
Specifications
NOTE: Offerings may vary by region. For more information regarding the configuration of your computer, click Start→Help and Support and select the option to view information about your computer.
Processor
Processor type |
Intel® Atom™ 200 Series Single-Core processor or |
|
Intel Atom 300 Series Dual-Core processor |
Level 2 (L2) cache |
at least 512 KB pipelined-burst per core, eight-way set |
|
associative, writeback SRAM |
|
|
System Information |
|
|
|
Chipset |
SiS M671 and SiS 968 |
DMA channels |
seven |
Interrupt levels |
24 |
BIOS chip (ROM) |
8 Mb |
NIC |
integrated network interface capable of |
|
10/100/1000 Mbps communication |
|
|
Memory |
|
|
|
Type |
667-MHz or 800-MHz DDR2 SDRAM |
|
NOTE: When 800 MHz memory is installed, the |
|
computer still operates at 667 MHz. |
Memory connectors |
two DIMMs |
Memory capacities |
512 MB, 1 GB, and 2 GB modules (512 MB modules |
|
supported on Linux) |
Specifications 11

Memory (continued)
Minimum memory |
1 GB (512 MB for Linux) |
Maximum memory |
4 GB |
|
|
Video |
|
|
|
Type: |
|
SiS Mirage integrated |
default 128 MB shared video memory (can be changed |
video |
in BIOS system setup) |
|
|
Audio |
|
|
|
Type: |
|
ADI 1984A Integrated |
|
HD Audio |
|
|
|
Drives |
|
|
|
Internally accessible |
one 2.5-in drive bay |
Available devices |
one 2.5-in SATA hard drive |
|
NOTE: A hard drive is optional and requires a hard drive |
|
kit. |
|
one NVRAM Flash module (for embedded operating |
|
system) |
|
|
Connectors |
|
|
|
External connectors: |
|
Video |
15-pin VGA connector and 24-pin DVI connector |
Network adapter |
RJ-45 connector |
USB |
two front-panel, and four back-panel USB 2.0- |
|
compliant connectors |
Audio |
two jacks (headphone and microphone) |
Serial |
one 9-pin connector |
PS/2 |
two 6-pin mini-DINs |
12 Specifications

Connectors (continued)
System board connectors:
Serial ATA (hard drive) |
one 7-pin connector |
Serial ATA (NVRAM |
one 22-pin connector |
module) |
|
Fan |
one 5-pin connector |
Mini-PCI Express X1 |
one 52-pin connector |
Front panel LED |
one 14-pin connector |
Front panel USB |
two 10-pin connectors |
Front panel audio |
one 12-pin connector |
Memory |
two 240-pin connectors |
Power 12 V |
one 4-pin connector |
BIOS ROM |
one 8-pin socket |
Serial ATA hard drive |
one 4-pin connector |
power |
|
|
|
Controls and Lights |
|
|
|
Front of computer: |
|
Power button |
push button |
Power light (within the |
blue light — Blinking blue in sleep state; solid blue |
power button) |
for power on state. |
|
amber light — A solid amber light when the |
|
computer does not start indicates that the system |
|
board cannot start initialization. This could be a |
|
system board or a power supply problem (see "Power |
|
Problems" on page 17). |
Network link light |
blue light - A solid blue light indicates network |
|
connectivity. |
Wireless light |
blue light - A solid blue light indicates the wireless |
|
network is powered on. |
Diagnostic lights (1–4) |
See your Service Manual for information about |
|
diagnostic light codes. |
Specifications 13
Loading...