


 Loading...
Dell™ M209X Projector
User’s Guide
w w w . d e l l . c o m | s u p p o r t . d e l l . c o m

Notes, Notices, and Cautions
NOTE: A NOTE indicates important information that helps you make better use of your projector.
NOTICE: A NOTICE indicates either potential damage to hardware or loss of data and tells you how to avoid the problem.
CAUTION: A CAUTION indicates a potential for property damage, personal injury, or death.
____________________
Information in this document is subject to change without notice. © 2008 Dell Inc. All rights reserved.
Reproduction in any manner whatsoever without the written permission of Dell Inc. is strictly forbidden.
Trademarks used in this text: Dell, the DELL logo, Dimension, OptiPlex, Dell Precision, Latitude, Inspiron, DellNet, PowerApp, PowerEdge, PowerConnect, and PowerVault are trademarks of Dell Inc.; DLP and DLP® logo are trademarks of TEXAS INSTRUMENTS INCORPORATED ; Microsoft and Windows are registered trademarks of Microsoft Corporation.
Other trademarks and trade names may be used in this document to refer to either the entities claiming the marks and names or their products. Dell Inc. disclaims any proprietary interest in trademarks and trade names other than its own.
Model M209X
May 2008 Rev. A01

Contents
1 |
Your Dell Projector . . . . . . . . . . . . . . . . . |
. |
|
5 |
|
About Your Projector . . . . . . . . . . . . . . . |
. |
. |
6 |
2 |
Connecting Your Projector . . . . . . . . . . . |
. |
|
7 |
|
Connecting to a Computer . . . . . . . . . . . . . . . |
. |
. |
8 |
|
Connecting to a DVD Player . . . . . . . . . . . . . . |
. |
. |
9 |
|
Connecting a DVD Player with an S-video Cable . |
. |
. |
9 |
|
Connecting a DVD Player with a |
|
|
|
|
Composite Cable . . . . . . . . . . . . . . . . . |
. |
|
10 |
|
Connecting a DVD Player with a |
|
|
|
|
Component Cable . . . . . . . . . . . . . . . . . |
. |
|
11 |
|
Connecting a DVD Player with an HDMI Cable . . |
. |
|
12 |
3 |
Using Your Projector . . . . . . . . . . . . . . . |
. |
13 |
|
Turning Your Projector On
Turning Your Projector Off
. . . . . . . . . . . . . . . . 13
. . . . . . . . . . . . . . . . 13
Adjusting the Projected Image . . . . . . . . . . . . . |
14 |
Raising the Projector Height . . . . . . . . . . . . |
14 |
Lowering the Projector Height . . . . . . . . . . . |
14 |
Adjusting the Projector Zoom and Focus . . . . . . . . |
15 |
Adjusting Projection Image Size . . . . . . . . . . . . |
16 |
Contents 3

|
Using the Control Panel . . . . . . . . . . . . . . . . . |
17 |
|
Using the Remote Control . . . . . . . . . . . . . . . . |
19 |
|
Using the On-Screen Display . . . . . . . . . . . . . . |
20 |
|
Main Menu . . . . . . . . . . . . . . . . . . . . . |
21 |
|
Input Select . . . . . . . . . . . . . . . . . . . . . |
21 |
|
Auto-Adjust . . . . . . . . . . . . . . . . . . . . . |
21 |
|
Set Up . . . . . . . . . . . . . . . . . . . . . . . . |
22 |
|
PICTURE (in PC Mode) . . . . . . . . . . . . . . . |
22 |
|
PICTURE (in Video Mode) . . . . . . . . . . . . . |
23 |
|
DISPLAY (in PC Mode) . . . . . . . . . . . . . . . |
24 |
|
DISPLAY (in Video Mode) . . . . . . . . . . . . . |
25 |
|
LAMP . . . . . . . . . . . . . . . . . . . . . . . . |
25 |
|
OTHERS . . . . . . . . . . . . . . . . . . . . . . . |
27 |
4 |
Troubleshooting Your Projector . . . . . . . |
30 |
|
Guiding Signals . . . . . . . . . . . . . . . . . . . . . |
33 |
|
Changing the Lamp . . . . . . . . . . . . . . . . . . . |
34 |
5 Specifications . . . . . . . . . . . . . . . . . . . . . |
36 |
|
|
Contacting Dell . . . . . . . . . . . . . . . . . . . . . |
39 |
6 |
Appendix: Glossary . . . . . . . . . . . . . . . . . |
40 |
4 Contents
1
Your Dell Projector
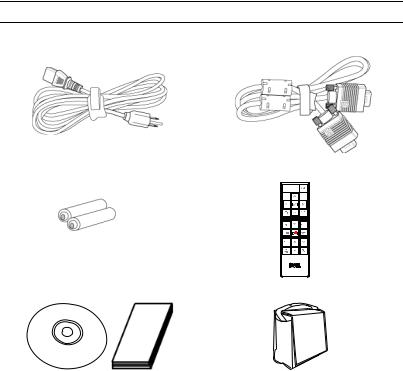
Your projector comes with all the items shown below. Ensure that you have all the items, and contact Dell if anything is missing.
Package Contents
Power cord 1.8m VGA cable (VGA to VGA)
AAA Batteries (2) |
Remote control |
CD User’s Guide& Documentation |
Carrying case |
||
|
|
|
|
|
|
|
|
Your Dell Projector |
|
5 |
|
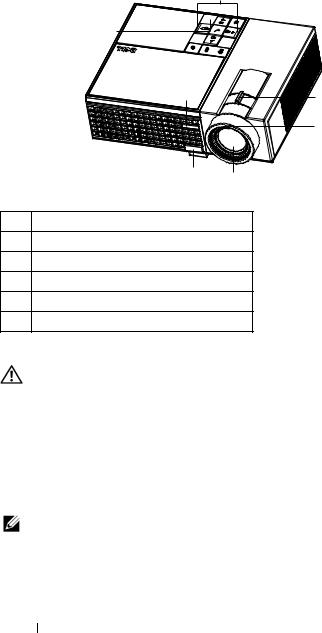
About Your Projector
1
6
6 |
|
2 |
|
|
|
|
|
3 |
|
5 |
4 |
|
|
1Control panel
2Zoom tab
3Focus ring
4Lens
5Elevator button
6IR receiver
CAUTION: Safety Instructions
1 Do not use the projector near appliances that generate a lot of heat.
2 Do not use the projector in areas where there is an excessive amount of dust. The dust may cause the system to fail and projector will automatically shutdown.
3 Ensure that the projector is mounted in a well-ventilated area.
4 Do not block the ventilation slots and openings on the projector.
5 Ensure the projector operates between ambient temperatures (5ºC to 35ºC).
NOTE: For more information, see the Product Information Guide that ships with your projector.
6 Your Dell Projector
2
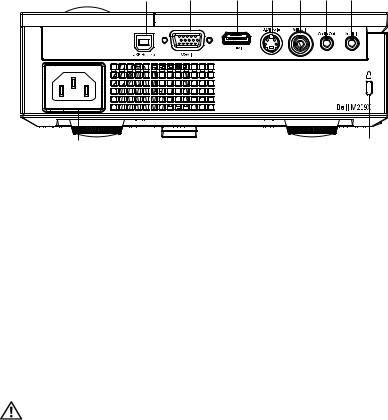
Connecting Your Projector
1 |
2 |
3 |
4 |
5 |
6 |
7 |
9 |
8 |
1 |
USB remote connector |
|
|
2 |
VGA input connector |
|
|
3 |
HDMI input connector |
|
|
4 |
S-video input connector |
|
|
5 |
Video input connector |
|
|
6 |
Audio output connector |
|
|
7 |
Audio input connector |
|
|
8 |
Security cable slot |
|
|
9 |
Power cord connector |
|
|
CAUTION: Before you begin any of the procedures in this section, follow the Safety Instructions as described on page 6.
Connecting Your Projector |
|
7 |
|
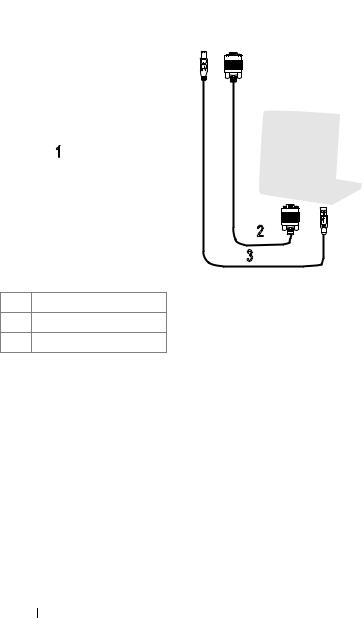
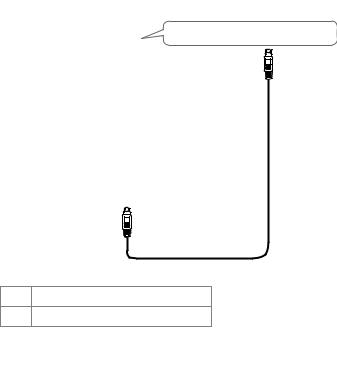
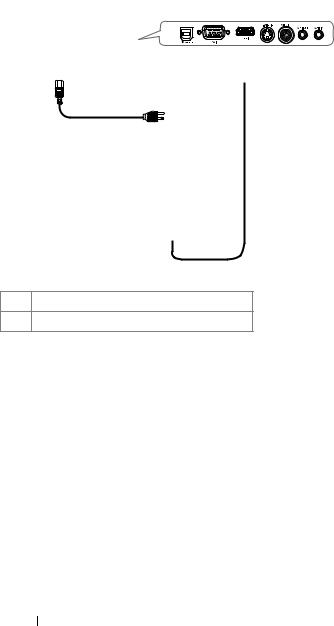
Connecting to a Computer
1
2
3
1 Power cord
2 VGA to VGA cable
3 USB to USB cable
NOTE: The USB cable is not provided by Dell.
8 Connecting Your Projector
Connecting to a DVD Player
Connecting a DVD Player with an S-video Cable
1
2
1Power cord
2S-video cable
NOTE: The S-Video cable is not provided by Dell.
Connecting Your Projector |
|
9 |
|

Connecting a DVD Player with a Composite Cable
1
2
1Power cord
2Composite video cable
NOTE: The Composite video cable is not provided by Dell.
10 Connecting Your Projector
Connecting a DVD Player with a Component Cable
1
2
1Power cord
2D-sub to YPbPr cable
NOTE: The D-sub to YPbPr cable is not provided by Dell.
Connecting Your Projector |
|
11 |
|
Connecting a DVD Player with an HDMI Cable
1
2
1Power cord
2HDMI cable
NOTE: The HDMI cable is not provided by Dell.
12 Connecting Your Projector

3
Using Your Projector
Turning Your Projector On
NOTE: Turn on the projector before you turn on the source. The Power button light blinks blue until pressed.
1 Remove the lens cap.
2 Connect the power cord and appropriate signal cables. For information about connecting the projector, see "Connecting Your Projector" on page 7.
3Press the Power button  (see "Using the Control Panel" on page 17 to locate the Power button
  ).
).
4Turn on your source (computer, DVD player, etc.). The projector automatically detects your source.
5The Dell logo will be displayed if no signal detected.
If the "Searching for signal..." message appears on the screen, ensure that the appropriate cables are securely connected.
If you have multiple sources connected to the projector, press the Source button on the remote control or control panel to select the desired source.
Turning Your Projector Off
NOTICE: Unplug the projector after properly shutting down as explained in the following procedure.
To turn off the projector:
1Press the Power button  .
.
2Press the Power button  again to turn off the projector.
The projectors cooling fans are on for 90 seconds before the projector switches off completely.
3To power off the projector quickly, press the Power button  while the projectors cooling fans are still running.
NOTE: Before you turn on the projector again, wait for 60 seconds to allow the internal temperature to stabilize.
Using Your Projector |
|
13 |
|

4 Disconnect the power cord from the electrical outlet and the projector.
NOTE: If you press the Power button 


 while the projector is running, the "Press Power Button To Turn Off Projector" message appears on the screen. To clear the message, press a button on the control panel. The message disappears after 5 seconds.
Adjusting the Projected Image
Raising the Projector Height
1 Press the elevator button.
2 Raise the projector to the desired display angle, and then release the button to lock the elevator foot into position.
3 Use the tilt adjustment wheel to fine-tune the display angle.
Lowering the Projector Height
1 Press the elevator button.
2 Lower the projector, and then release the button to lock the elevator foot into position.
1
2
3 |
3 |
1Elevator button
2Elevator foot
14 Using Your Projector
Loading...