Dell AXIM X50 User Manual
Dell™ Axim™ X50
System Information Guide
Průvodce systémovými informacemi
Systeminformationsguide
Systeeminformatie-handleiding
Järjestelmätieto-opas
Οδηγός Πληροφοριών Συστήµατος
Rendszerinformációs útmutató
Veiledning for systeminformasjon
Guia de informações do sistema
Информационное руководство по системе
Priročnik z informacijami o sistemu
Systeminformationshandbok
תכרעמ עדימ ךירדמ
Models HC03U, HC03UL, HD04U
w w w . d e l l . c o m | s u p p o r t . d e l l . c o m
Dell™ Axim™ X50
System Information Guide
Models HC03U, HC03UL, HD04U
w w w . d e l l . c o m | s u p p o r t . d e l l . c o m

Notes, Notices, and Cautions
NOTE: A NOTE indicates important information that helps you make better use of your computer.
NOTICE: A NOTICE indicates either potential damage to hardware or loss of data and tells you how to avoid the problem.
 CAUTION: A CAUTION indicates a potential for property damage, personal injury, or death.
Information in this document is subject to change without notice. © 2004 Dell Inc. All rights reserved.
Reproduction in any manner whatsoever without the written permission of Dell Inc. is strictly forbidden.
Trademarks used in this text: Dell, the DELL logo, TrueMobile, and Axim are trademarks of Dell Inc.; Microsoft, Windows Media, and ActiveSync are registered trademarks of Microsoft Corporation; Intel, Pentium, and Celeron are registered trademarks of Intel Corporation; Bluetooth is a registered trademark owned by Bluetooth SIG, Inc. and is used by Dell Inc. under license.
Other trademarks and trade names may be used in this document to refer to either the entities claiming the marks and names or their products. Dell Inc. disclaims any proprietary interest in trademarks and trade names other than its own.
Models HC03U, HC03UL, HD04U
August 2004 |
P/N R6116 |
Rev. A00 |

Contents
CAUTION: Safety Instructions . . . . . . . . . . . . . . . |
5 |
SAFETY: General . . . . . . . . . . . . . . . . . . . . . . . . |
5 |
SAFETY: Power . . . . . . . . . . . . . . . . . . . . . . . . . |
6 |
SAFETY: Battery . . . . . . . . . . . . . . . . . . . . . . . . |
6 |
SAFETY: Air Travel . . . . . . . . . . . . . . . . . . . . . . . |
7 |
SAFETY: Electromagnetic Compatibility Instructions . . . . . . . |
7 |
When Using Your Device . . . . . . . . . . . . . . . . . . |
7 |
SAFETY: Ergonomic Computing Habits . . . . . . . . . . . . . . |
8 |
SAFETY: Protecting Against Electrostatic Discharge . . . . . . . |
8 |
SAFETY: Battery Disposal . . . . . . . . . . . . . . . . . . . . |
9 |
Finding Information . . . . . . . . . . . . . . . . . . . . . . |
9 |
Setting Up Your Device. . . . . . . . . . . . . . . . . . . |
10 |
Front, Side, and Back Views . . . . . . . . . . . . . . . |
11 |
Front and Side Views . . . . . . . . . . . . . . . . . . . . . |
11 |
Back View . . . . . . . . . . . . . . . . . . . . . . . . . . |
12 |
Using the Battery . . . . . . . . . . . . . . . . . . . . . . |
13 |
Installing and Removing the Battery . . . . . . . . . . . . . . |
13 |
Charging the Battery . . . . . . . . . . . . . . . . . . . . . |
15 |
Connecting to a Computer . . . . . . . . . . . . . . . . . |
16 |
Using the Cradle . . . . . . . . . . . . . . . . . . . . . . . |
16 |
USB Charging . . . . . . . . . . . . . . . . . . . . . . . . |
19 |
Using the Sync Cable . . . . . . . . . . . . . . . . . . . . . |
20 |
Connecting to a Projector . . . . . . . . . . . . . . . . . |
21 |
Contents 3

Checking Built-In Storage . . . . . . . . . . . . . . . . . |
22 |
Using Cards . . . . . . . . . . . . . . . . . . . . . . . . . . |
22 |
CompactFlash Cards . . . . . . . . . . . . . . . . . . . . . . |
22 |
Secure Digital Memory Cards . . . . . . . . . . . . . . . . . |
23 |
Performing a Reset. . . . . . . . . . . . . . . . . . . . . . |
24 |
Soft Reset . . . . . . . . . . . . . . . . . . . . . . . . . . . |
24 |
Hard Reset . . . . . . . . . . . . . . . . . . . . . . . . . . |
25 |
Regulatory Notices. . . . . . . . . . . . . . . . . . . . . . |
26 |
CE Notice (European Union) . . . . . . . . . . . . . . . . . . |
27 |
CE Mark Notice . . . . . . . . . . . . . . . . . . . . . . . . |
27 |
Polish Center for Testing and Certification Notice . . . . . . . . |
29 |
Wireless Regulatory Information . . . . . . . . . . . . . |
30 |
Europe—CE Declaration of Conformity . . . . . . . . . . . . . |
31 |
Radio Approvals . . . . . . . . . . . . . . . . . . . . . . . . |
33 |
Dell™ Software License Agreement. . . . . . . . . . . |
34 |
4 Contents
 CAUTION: Safety Instructions
Use the following safety guidelines to help ensure your own personal safety and to help protect your device and working environment from potential damage.
SAFETY: General
•Do not attempt to service the device yourself unless you are a trained service technician. Always follow installation instructions closely.
•If you use an extension power cable with your AC adapter, ensure that the total ampere rating of the products plugged in to the extension power cable does not exceed the ampere rating of the extension cable.
•Do not push objects into air vents or openings of your device. Doing so can cause fire or electric shock by shorting out interior components.
•Keep your device away from radiators and heat sources. Also, do not block cooling vents. Avoid placing loose papers underneath your device; do not place your device in a closed-in wall unit or on a bed, sofa, or rug.
•Place the AC adapter in a ventilated area, such as a desk top or on the floor, when you use it to run the device or to charge the battery. Do not cover the AC adapter with papers or other items that will reduce cooling; also, do not use the AC adapter inside a carrying case.
•The AC adapter may become hot during normal operation of your device. Use care when handling the adapter during or immediately after operation.
•Do not use your device in a wet environment, for example, near a bath tub, sink, or swimming pool or in a wet basement.
•If your device includes an integrated or optional (PC Card) modem, disconnect the modem cable if an electrical storm is approaching to avoid the remote risk of electric shock from lightning via the telephone line.
•To help avoid the potential hazard of electric shock, do not connect or disconnect any cables or perform maintenance or reconfiguration of this product during an electrical storm. Do not use your device during an electrical storm unless all cables have been disconnected and the device is operating on battery power.
•If your device includes a modem, the cable used with the modem should be manufactured with a minimum wire size of 26 American wire gauge (AWG) and an FCC-compliant RJ-11 modular plug.
•PC Cards may become very warm during normal operation. Use care when removing PC Cards after their continuous operation.
•Before you clean your device, disconnect the device from the electrical outlet. Clean your device with a soft cloth dampened with water. Do not use liquid or aerosol cleaners, which may contain flammable substances.
System Information Guide |
|
5 |
|

w w w . d e l l . c o m | s u p p o r t . d e l l . c o m
SAFETY: Power
•Use only the Dell-provided AC adapter approved for use with this device. Use of another AC adapter may cause a fire or explosion.
•Before you connect the device to an electrical outlet, check the AC adapter
voltage rating to ensure that the required voltage and frequency match the available power source.
•To remove the device from all power sources, turn the device off, disconnect the AC adapter from the electrical outlet, and remove the battery installed in the battery bay.
•To help prevent electric shock, plug the AC adapter and device power cables into properly grounded power sources. These power cables may be equipped with 3-prong plugs to provide an earth grounding connection. Do not use adapter plugs or remove the grounding prong from the power cable plug. If you use a power extension cable, use the appropriate type, 2-prong or 3-prong, to mate with the AC adapter power cable.
•Be sure that nothing rests on your AC adapter’s power cable and that the cable is not located where it can be tripped over or stepped on.
•If you are using a multiple-outlet power strip, use caution when plugging the
AC adapter’s power cable into the power strip. Some power strips may allow you to insert the plug incorrectly. Incorrect insertion of the power plug could result in permanent damage to your device, as well as risk of electric shock and/or fire. Ensure that the ground prong of the power plug is inserted into the mating ground contact of the power strip.
SAFETY: Battery
•Use only Dell™ battery modules that are approved for use with this device. Use of other types may increase the risk of fire or explosion.
•Do not carry a battery pack in your pocket, purse, or other container where metal objects (such as car keys or paper clips) could short-circuit the battery terminals. The resulting excessive current flow can cause extremely high temperatures and may result in damage to the battery pack or cause fire or burns.
•The battery poses a burn hazard if you handle it improperly. Do not disassemble it. Handle a damaged or leaking battery pack with extreme care. If the battery is damaged, electrolyte may leak from the cells and may cause personal injury.
•Keep the battery away from children.
•Do not store or leave your device or battery pack near a heat source such as a radiator, fireplace, stove, electric heater, or other heat-generating appliance or otherwise expose it to temperatures in excess of 60ºC (140ºF). When heated to excessive temperatures, battery cells could explode or vent, posing a risk of fire.
•Do not dispose of your device’s battery in a fire or with normal household waste. Battery cells may explode. Discard a used battery according to the manufacturer’s instructions or contact your local waste disposal agency for disposal instructions.
Dispose of a spent or damaged battery promptly.
6 System Information Guide
SAFETY: Air Travel
•Certain Federal Aviation Administration regulations and/or airline-specific restrictions may apply to the operation of your Dell device while you are on board an aircraft. For example, such regulations/restrictions may prohibit the use of any personal electronic device (PED) that has the capacity for intentional transmission of radio frequency or other electromagnetic signals while on an aircraft.
–In order to best comply with all such restrictions, if your Dell portable device is equipped with Dell TrueMobile™ or some other wireless communication device, please disable this device before you board the aircraft and follow all instructions provided by airline personnel with regard to such device.
–Additionally, the use of any PED, such as a portable device, may be prohibited in aircraft during certain critical phases of flight, for example, takeoff and landing. Some airlines may further define the critical flight phase as any time the aircraft is below 3050 m (10,000 ft). Please follow the airline’s specific instructions as to when the use of a PED is allowed.
SAFETY: Electromagnetic Compatibility Instructions
Use shielded signal cables to ensure that you maintain the appropriate electromagnetic compatibility classification for the intended environment. For parallel printers, a cable is available from Dell. If you prefer, you can order a cable from Dell at its worldwide website at www.dell.com.
Static electricity can harm electronic components inside your device. To prevent static damage, discharge static electricity from your body before you touch any of your device’s electronic components, such as a memory module. You can do so by touching an unpainted metal surface.
WARNING: Handling the cord on this product, or cords associated with accessories sold with this product, will expose you to lead, a chemical known to the State of California to cause birth defects or other reproductive harm. Wash your hands after handling the cord.
When Using Your Device
Observe the following safe-handling guidelines to prevent damage to your device:
•When setting up the device for work, place it on a level surface.
•When traveling, do not check the device as baggage. You can put your device through an X-ray security machine, but never put your device through a metal detector. If you have the device checked by hand, be sure to have a charged battery available in case you are asked to turn on the device.
•When traveling, do not place the device in overhead storage compartments where it could slide around. Do not drop your device or subject it to other mechanical shocks.
•Protect your device and battery from environmental hazards such as dirt, dust, food, liquids, temperature extremes, and overexposure to sunlight.
System Information Guide |
|
7 |
|

w w w . d e l l . c o m | s u p p o r t . d e l l . c o m
•When you move your device between environments with very different temperature and/or humidity ranges, condensation may form on or within the device. To avoid damaging the device, allow sufficient time for the moisture to evaporate before using the device.
NOTICE: When taking the device from low-temperature conditions into a warmer environment or from high-temperature conditions into a cooler environment, allow the device to acclimate to room temperature before turning on power.
•When you disconnect a cable, pull on its connector or on its strain-relief loop, not on the cable itself. As you pull out the connector, keep it evenly aligned to avoid bending any connector pins. Also, before you connect a cable make sure both connectors are correctly oriented and aligned.
•Handle components with care. Hold a component such as a memory module by its edges, not its pins.
•Clean the display with a soft, clean cloth and water. Apply the water to the cloth; then stroke the cloth across the display in one direction, moving from the top of the display to the bottom. Remove moisture from the display quickly and keep the display dry.
Long-term exposure to moisture can damage the display. Do not use a commercial window cleaner to clean your display.
SAFETY: Ergonomic Computing Habits
CAUTION: Improper or prolonged keyboard use may result in injury.
CAUTION: Viewing the display or external monitor screen for extended periods of time may result in eye strain.
SAFETY: Protecting Against Electrostatic Discharge
Static electricity can harm electronic components inside your device. To prevent static damage, discharge static electricity from your body before you touch any of your device’s electronic components, such as a memory module. You can do so by touching an unpainted metal surface.
You can also take the following steps to prevent damage from electrostatic discharge (ESD):
•When unpacking a static-sensitive component from its shipping carton, do not remove the component from the antistatic packing material until you are ready to install the component. Just before unwrapping the antistatic packaging, be sure to discharge static electricity from your body.
•When transporting a sensitive component, first place it in an antistatic container or packaging.
•Handle all sensitive components in a static-safe area. If possible, use antistatic floor pads and workbench pads.
8 System Information Guide

SAFETY: Battery Disposal
Your device uses a lithium-ion battery and a rechargeable NiMH battery. For instructions about replacing the batteries in your device, see "Using the Battery" on page 13.
Do not dispose of the battery along with household waste. Contact your local waste disposal agency for the address of the nearest battery deposit site.
Finding Information
What Are You Looking For? |
Find It Here: |
|
|
How to set up my device and |
The setup diagram and the |
information on the connectors and |
Dell™ Owner’s Manual |
buttons on my device |
|
|
|
Information on using my device |
Dell Owner’s Manual and Pocket |
|
PC Help |
|
To view Help, tap the Start button and |
|
tap Help. |
|
|
Additional programs that can be |
Dell Companion CD |
installed on my device |
|
|
|
Information on using programs on my |
Pocket PC Help and, if available, tap |
device |
Help within a specific program |
Connecting to and synchronizing with a computer
Dell Owner’s Manual and Microsoft® ActiveSync® Help on your computer
To view Help, click Help and click Microsoft ActiveSync Help.
Last-minute updates and detailed |
The readme files, located in the |
technical information |
ActiveSync folder on the computer and |
|
on the Dell Companion CD |
|
|
Up-to-date information on your |
www.microsoft.com/windowsmobile |
Pocket PC |
|
|
|
My Service Tag |
Label located in the battery slot |
|
(remove the battery) |
|
|
System Information Guide |
|
9 |
|

w w w . d e l l . c o m | s u p p o r t . d e l l . c o m
Setting Up Your Device
CAUTION: Before performing any of the procedures in this section, read and follow the safety instructions on page 5.
NOTICE: Do not use your device until you have charged the main battery for at least 8 hours for the first charge.
1Ensure that the device is turned off.
2Align the battery contacts with the contacts in the battery slot, insert the battery, and lower the battery into the slot until you feel a click.
NOTE: The device starts immediately once you insert the battery and lock the battery latch. Press the power button to turn off the device, before charging the battery.
3Charge the battery (see page 15).
4After the battery has charged for at least 8 hours, press the power button to turn on the device.
5Follow the instructions on the screen to set up the device.
10 System Information Guide
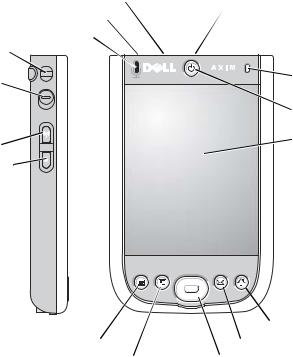
Front, Side, and Back Views
Front and Side Views
infrared sensor (top)  audio connector (top)
microphone 
 CompactFlash card and Secure Digital memory card slots (top)
lanyard hook |
|
|
lock button |
wireless light |
|
|
||
on/off button for |
power button |
|
WLAN/Bluetooth |
||
|
||
wireless |
touch screen |
|
technology |
||
|
||
record button |
|
|
Home button |
Calendar button |
Inbox button |
Contacts button |
navigator button |
System Information Guide |
|
11 |
|
w w w . d e l l . c o m | s u p p o r t . d e l l . c o m
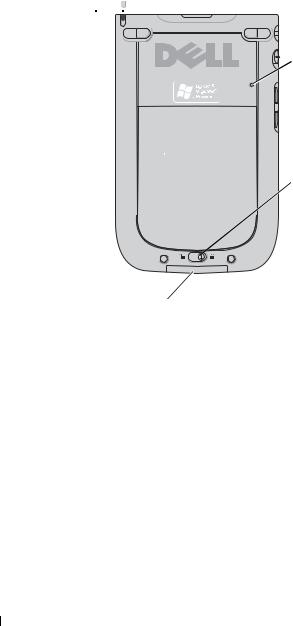
Back View
reset stylus (extended)
 reset button
battery 
 battery lock
cradle/sync cable connector (bottom) 
12 System Information Guide
Using the Battery
CAUTION: Before performing any of the procedures in this section, read and follow the safety instructions on page 5.
NOTICE: Do not use your device until you have charged the main battery for at least 8 hours for the first charge.
Before you use your device for the first time, you must install and charge the battery. Once the battery is charged, use the power properties to monitor the battery charge. See Pocket PC Help on the device for more information.
Installing and Removing the Battery
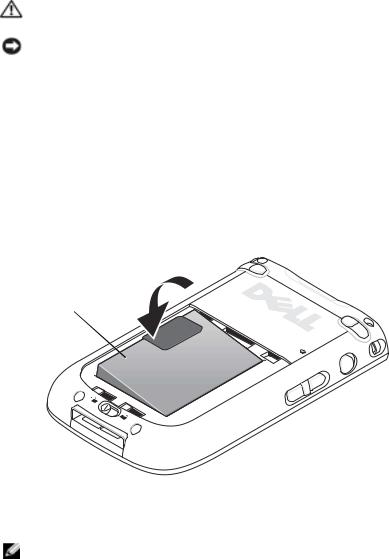
To install the battery:
1Ensure that the device is turned off.
2Align the battery contacts with the contacts in the battery slot, insert the battery, and lower the battery into the slot until you feel a click.
battery
3Close the battery cover.
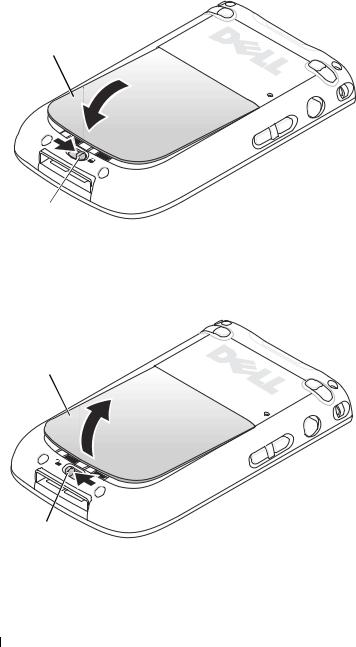
4Lock the battery cover by sliding the battery latch to the right.
NOTE: The device starts immediately once you insert the battery for the first time and lock the battery latch.
System Information Guide |
|
13 |
|
w w w . d e l l . c o m | s u p p o r t . d e l l . c o m
battery cover 
battery latch
To remove the battery:
1Slide the battery latch to the left to unlock the battery cover.
2Lift the battery cover.
battery cover
battery latch
14 System Information Guide
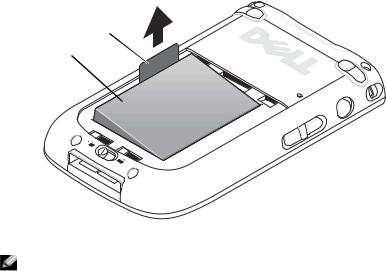
3 Pull the tab to lift the battery out of the slot.
pull-tab
battery
NOTE: Your Service Tag is located underneath the battery. You need your Service Tag if you access Dell Support at support.dell.com or if you call Dell for customer service or technical support.
Charging the Battery
Use one of the following options to charge the main battery:
•Connect the AC adapter directly to the charger adapter and then to the device and to an electrical outlet.
•Connect the AC adapter directly to the sync cable and then to the device and to an electrical outlet.
•Connect the AC adapter to the cradle, and insert the device into the cradle. See "Using the Cradle" on page 16 for more information.
•Connect the cradle with the device to a computer, which is connected to an electrical outlet. See "USB Charging" on page 19.
The standard battery pack (1100mAh) completely charges within 5 hours; the optional battery pack (2200mAh) completely charges within 10 hours.
If the main battery is critically low, the device enters "deep sleep" mode and turns itself off.
System Information Guide |
|
15 |
|

w w w . d e l l . c o m | s u p p o r t . d e l l . c o m
To recover from a critically low battery:
1Plug in the AC adapter or replace the main battery with a charged battery.
2Press the power button to power on.
If you remove the main battery, the internal backup battery can last for up to 30 minutes in "deep sleep" mode. Do not remove the main battery if the backup battery power is low.
By default, the device turns itself off if it is not used for a set period of time. See your device Owner’s Manual for more information about setting the amount of time for which the device can remain idle before it turns itself off.
Connecting to a Computer
CAUTION: Before performing any of the procedures in this section, read and follow the safety instructions on page 5.
You can connect your device to a computer either directly with a cradle or with a sync cable. When you connect your device to a computer, you can perform the following tasks:
•Add programs to your device. See your Owner’s Manual for more information.
•Synchronize data on your device with data on your computer.
For information about synchronizing your data, see the following resources:
•"Using Microsoft® ActiveSync®" in your Owner’s Manual
•ActiveSync Help on your computer
•ActiveSync Help on your device
Using the Cradle
NOTE: Depending on the configuration of your device, the cradle is optional.
You can use the cradle to:
•Synchronize the data on your device with the data on your computer.
•Power the device with AC power to conserve battery power.
16 System Information Guide
•Charge the main battery. See "Using the Battery" on page 13 for more information.
•Charge a spare battery.
NOTE: Before you connect your device to a computer for the first time, ensure that you install ActiveSync on the computer from the Dell™ Companion CD.
NOTE: After the battery is fully charged, complete the initial setup process on your device. Then use Microsoft® ActiveSync® to synchronize the data on your device with the data on your computer.
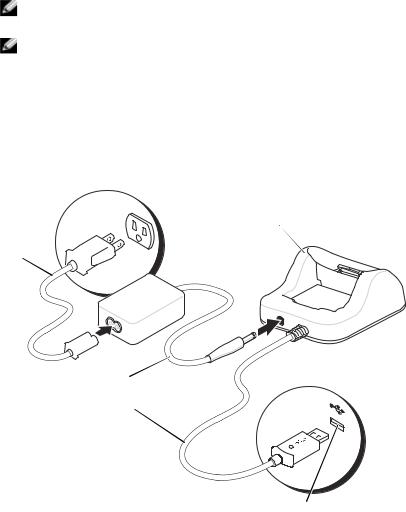
To connect your device to the cradle:
1Place the cradle on a flat, level surface near your computer.
2Connect the cradle cable to the USB connector on your computer.
3Connect the AC adapter to the cradle and to an electrical outlet.
cradle
power cord
AC adapter
cradle cable
USB connector on the computer
System Information Guide |
|
17 |
|
w w w . d e l l . c o m | s u p p o r t . d e l l . c o m
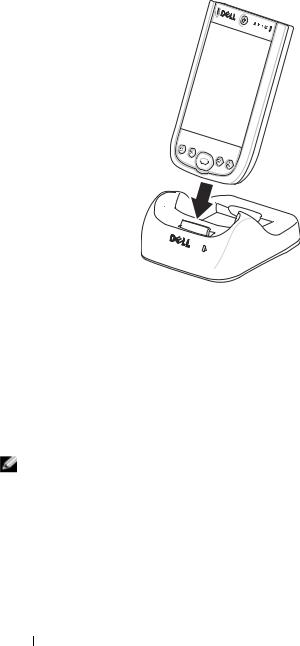
cradle
4Align the connector on the bottom of the device with the connector on the cradle, and, keeping the front of the device flush with the front of the cradle, lower the device onto the cradle.
When the device is docked in the cradle, the connection status icon appears on the command bar.
The spare battery status light on the cradle operates as follows:
•Green — The spare battery is fully charged.
•Amber — The spare battery is charging.
NOTE: The power button on the device indicates the charge status of the main battery. See "Power Button" in your Owner’s Manual for more information.
To remove the device from the cradle, pull the device straight up and out of the cradle.
18 System Information Guide

USB Charging
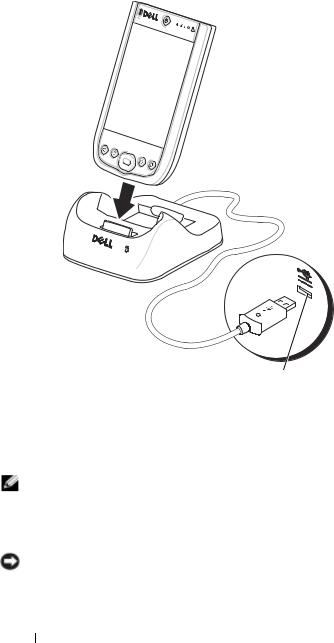
You can charge your device battery when the cradle with the device is connected to a computer by a USB cable, and the computer is plugged into an electrical outlet and turned on.
NOTE: USB charging will not take place if the device is turned on.
You can charge the battery using a 5V/500mA USB port when the device is turned off.
NOTE: Using an external USB hub with 5V/100mA ports to charge the device battery may cause a temporary voltage drop in the hub, and other USB devices connected to the ports on the hub may not work normally until the device is removed.
NOTE: Charging the battery through a USB port takes more time than direct AC adapter charging.
The device charger stops the charging process after 7 hours. If you need more than 7 hours to charge the device battery, disconnect and reconnect the USB cable to restart the charging process.
System Information Guide |
|
19 |
|
w w w . d e l l . c o m | s u p p o r t . d e l l . c o m
USB connector on the computer
Using the Sync Cable
Use the sync cable to connect your device directly to the computer without using the cradle.
NOTE: Depending on the configuration of your device, the sync cable is optional.
1 Connect one end of the cable to the USB connector on your computer.
2 Connect the other end of the cable to your device.
NOTICE: To avoid damaging the sync cable connector, press the two buttons on the sides of the sync cable connector to release the self-lock structure before you pull the connector out of the device.
20 System Information Guide
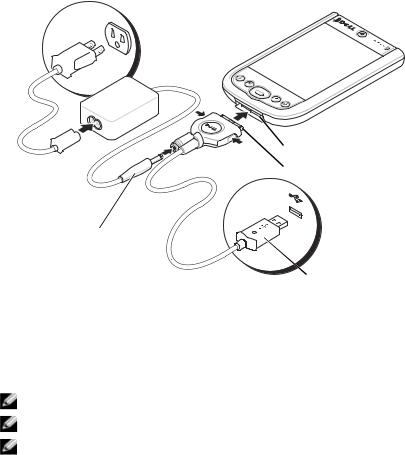
power cord
AC adapter 
sync cable
 device connector
 sync cable connector
 USB connector on the computer
 use this cable end to connect to a computer or a projector
Connecting to a Projector
You can connect the device to a projector using a VGA cable.
NOTE: The VGA option is available only with the VGA model of the device.
NOTE: The VGA cable will not ship with your device unless you ordered it.
NOTE: You need to install the Viewer program for the device to detect the projector. To configure the program, see the Help section in the program.
To connect the device to the projector, connect the sync connector on the VGA cable to the device, and then connect the other connector of the VGA cable to the projector cable. Run the Viewer program for the device to detect the projector.
System Information Guide |
|
21 |
|

w w w . d e l l . c o m | s u p p o r t . d e l l . c o m
Checking Built-In Storage
The amount of on-board flash memory in your device is dependent on the device configuration and the operating-system image size. The memory is non-volatile, so the data saved here is not lost even if the device is out of power.
To check the available non-volatile memory space on your device:
1Tap the Start button and tap Settings.
2Tap the System tab and tap Memory.
3Tap the Storage Card tab, and then select Built-in Storage from the drop-down menu to display the available space.
Using Cards
CompactFlash Cards
Your device supports CompactFlash Type II cards. Some common types of cards include:
•Modem — Connect a telephone line for modem data communications.
•Wireless communication — Perform data communications without
the use of cable connections. You can use cards, such as internal cards with Bluetooth® wireless technology and cards with 802.11b wireless LAN.
•Storage — Save data or install programs on a storage card.
When you do not have a CompactFlash card installed, insert the plastic blank to protect the CompactFlash card slot.
22 System Information Guide
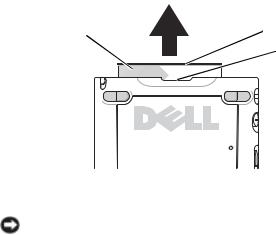
To install a CompactFlash card:
1 If a blank is installed, remove it.
blank |
tab |
|
notch in CompactFlash card slot
2Align the tab on the back of the CompactFlash card with the notch in the CompactFlash card slot, and slide the card into the slot.
NOTICE: Do not force the card. If you feel resistance, remove the card, check the orientation, and reinsert it.
See the documentation that came with the card for information on using the card.
Secure Digital Memory Cards
Use Secure Digital memory cards to save or back up data.
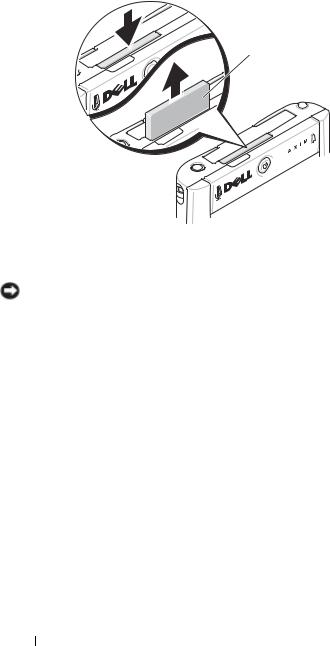
To install a Secure Digital memory card:
1If a card or a blank is already installed, press in the card or blank to release it, and then remove it.
System Information Guide |
|
23 |
|
w w w . d e l l . c o m | s u p p o r t . d e l l . c o m
blank
2Ensure that the card is oriented correctly, and slide it into the slot until you feel a click.
NOTICE: Do not force the card. If you feel resistance, remove the card, check the orientation, and reinsert it.
See the documentation that came with the card for information on using the card.
Performing a Reset
Soft Reset
When you perform a soft reset, the device deletes any data that has not been saved but saves any data that has been stored in memory. Try performing a soft reset if the device does not respond when you tap the display or press a button.
To perform a soft reset, use the reset stylus to press the reset button.
24 System Information Guide
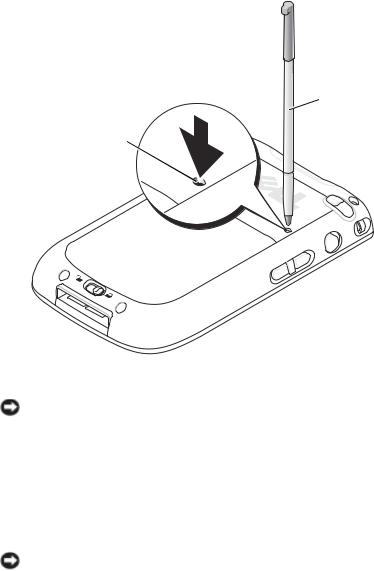
 stylus
reset button
Hard Reset
NOTICE: When you perform a hard reset, you lose all the data stored on your device memory (RAM), and any programs that you have installed on your device.
Perform a hard reset if:
•You want to delete all the data stored in your device memory (RAM).
•You forget your password and need to clear it.
•Your device is experiencing severe operational problems and you have already attempted a soft reset.
NOTICE: It is strongly recommended that you back up your data before you perform a hard reset. See ActiveSync Help on your computer for more information.
System Information Guide |
|
25 |
|

w w w . d e l l . c o m | s u p p o r t . d e l l . c o m
To perform a hard reset:
1Press and hold the power button.
2Using the reset stylus, hold the reset button for about 2 seconds.
3Follow the instructions on the screen.
Regulatory Notices
Electromagnetic Interference (EMI) is any signal or emission, radiated in free space or conducted along power or signal leads, that endangers the functioning of a radio navigation or other safety service or seriously degrades, obstructs, or repeatedly interrupts a licensed radio communications service. Radio communications services include but are not limited to AM/FM commercial broadcast, television, cellular services, radar, air-traffic control, pager, and Personal Communication Services (PCS). These licensed services, along with unintentional radiators such as digital devices, including computers, contribute to the electromagnetic environment.
Electromagnetic Compatibility is the ability of items of electronic equipment to function properly together in the electronic environment. While this computer has been designed and determined to be compliant with regulatory agency limits for EMI, there is no guarantee that interference will not occur in a particular installation. If this equipment does cause interference with radio communications services, which can be determined by turning the equipment off and on, you are encouraged to try to correct the interference by one or more of the following measures:
•Reorient the receiving antenna.
•Relocate the computer with respect to the receiver.
•Move the computer away from the receiver.
•Plug the computer into a different outlet so that the computer and the receiver are on different branch circuits.
If necessary, consult a Dell Technical Support representative or an experienced radio/television technician for additional suggestions.
Dell™ computers are designed, tested, and classified for their intended electromagnetic environment. These electromagnetic environment classifications generally refer to the following harmonized definitions:
•Class A is typically for business or industrial environments.
•Class B is typically for residential environments.
Information Technology Equipment (ITE), including devices, expansion cards, printers, input/output (I/O) devices, monitors, and so on, that are integrated into or connected to the computer should match the electromagnetic environment classification of the computer.
26 System Information Guide

A Notice About Shielded Signal Cables: Use only shielded cables for connecting devices to any Dell device to reduce the possibility of interference with radio communications services. Using shielded cables ensures that you maintain the appropriate Electromagnetic Compatibility classification for the intended environment. For parallel printers, a cable is available from Dell. If you prefer, you can order a cable from Dell on the World Wide Web at accessories.us.dell.com/sna/category.asp?category_id=4117.
Most Dell computers are classified for Class B environments. However, the inclusion of certain options can change the rating of some configurations to Class A. To determine the electromagnetic classification for your computer or device, see the following sections specific for each regulatory agency. Each section provides country-specific Electromagnetic Compatibility/EMI or product safety information.
CE Notice (European Union)
Marking by the symbol 
 indicates compliance of this Dell computer to the Electromagnetic Compatibility Directive and the Low Voltage Directive of the European Union. Such marking is indicative that this Dell system meets the following technical standards:
•EN 55022 — "Information Technology Equipment — Radio Disturbance Characteristics — Limits and Methods of Measurement."
•EN 55024 — "Information Technology Equipment - Immunity Characteristics - Limits and Methods of Measurement."
•EN 61000-3-2 — "Electromagnetic Compatibility - Part 3: Limits - Section 2: Limits for Harmonic Current Emissions (Equipment Input Current Up to and Including 16 A Per Phase)."
•EN 61000-3-3 — "Electromagnetic Compatibility - Part 3: Limits - Section 3: Limitation of Voltage Fluctuations and Flicker in Low-Voltage Supply Systems for Equipment With Rated Current Up to and Including 16 A."
•EN 60950 — "Safety of Information Technology Equipment."
NOTE: EN 55022 emissions requirements provide for two classifications:
•Class A is for typical commercial areas.
•Class B is for typical domestic areas.
This Dell device is classified for use in a typical Class B domestic environment.
A "Declaration of Conformity" in accordance with the preceding directives and standards has been made and is on file at Dell Inc. Products Europe BV, Limerick, Ireland.
CE Mark Notice
This equipment complies with the essential requirements of the European Union Directive 1999/5/EC.
System Information Guide |
|
27 |
|

w w w . d e l l . c o m | s u p p o r t . d e l l . c o m
Guide Information System 28
 Loading...