


User Manual
Renaissance® Wall Oven
Models: HWO127, HWO130, HWO227, HWO230
Ta b l e o f C o n t e n t s |
|
Important Safety Instructions............................................ |
1 |
Parts of the Oven........................................................... |
2 |
Operating the Oven....................................................... |
4 |
Care and Cleaning...................................................... |
12 |
Troubleshooting........................................................... |
15 |
Warranty & Service..................................................... |
16 |
Français..................................................................... |
17 |
Part No. 113606 Rev A
THINGS TO KNOW BEFORE YOU BEGIN…
Installer: Leave these instructions with the oven.
Customer: Read this manual completely before using oven. Save the manual in a convenient place for future reference.
For service and warranty information, see Pg. 20.
If you have any questions, call:
Dacor Customer Assurance
833-35-ELITE (833-353-5483) USA, Canada
Mon – Fri 5:00 a.m. to 5:00 p.m. Pacific Time
Website: www.dacor.com/customer-care/contact-us
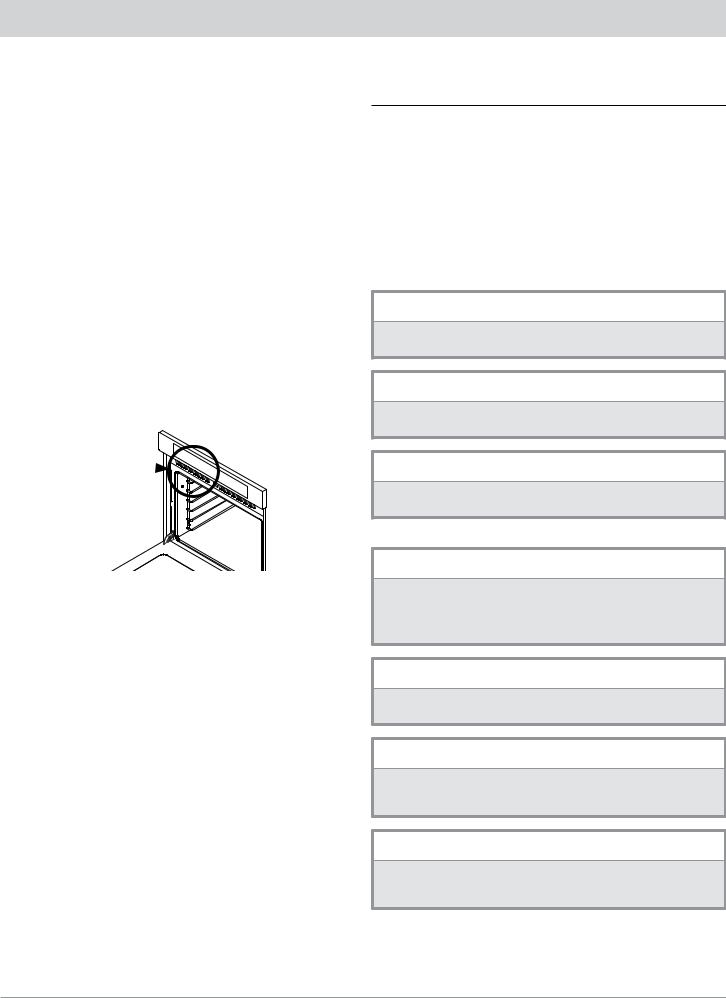
Have the complete model and serial number for your appliance available. The numbers are found on the appliance data label, located inside the grill, below the control panel. Open the door to expose the grill. On double ovens, the label is located behind the top grill. Write these numbers below for future reference.
Model number __________________________________
Serial number __________________________________
Date of purchase ________________________________
View data plate through grate 
Since Dacor continuously improves the quality and performance of our products, we may need to make changes to the appliance without updating this manual.
Visit www.dacor.com to download the latest version of this manual.
Important Information About
Safety Instructions
The Important Safety Instructions and warnings in this manual cannot cover all possible problems and conditions that can occur. Use common sense and caution when maintaining and operating the oven.
Always contact the Dacor Customer Service Team with questions and issues you cannot resolve.
Safety Symbols and Labels
Three types of labels appear in this manual. This section explains what each means:
 DANGER
Immediate hazards that WILL result in severe personal injury or death.
 WARNING
Hazards or unsafe actions that COULD result in severe personal injury or death.
 CAUTION
Hazards or unsafe actions that COULD result in minor personal injury or property damage.
 DANGER
To avoid possible explosion or fire, do not keep/use explosive or combustible liquids (e.g., gasoline, alcohol, thinner) in/on/ near the oven. Keep items that could explode (e.g., aerosol cans, sealed containers) away from the oven.
 WARNING
NEVER use this appliance as a space heater to heat or warm the room. Doing so may result in overheating of the appliance.
 WARNING
NEVER cover any slots, holes or passages in the oven bottom or cover an entire rack with materials such as aluminum foil. Doing so blocks air flow through the oven causing a fire hazard.
 WARNING—CALIFORNIA PROP. 65
This product contains one or more chemicals known to the State of California to cause cancer, and birth defects or other reproductive harm.
READ AND SAVE THESE INSTRUCTIONS
II

IMPORTANT SAFETY INSTRUCTIONS
General Safety Precautions
To reduce the risk of fire, electric shock, serious injury or death when using your oven, follow basic safety precautions, including the following:
 WARNING
•If you receive a damaged product, immediately contact your dealer/builder. Do not install or use a damaged appliance.
•The oven must be installed by a qualified installer per these installation instructions. The installer must show the owner the circuit-breaker panel or fuse box so power to the oven can be turned off if needed. The owner shall ensure the oven’s proper installation and is financially responsible for service required to correct a faulty installation.
•Do not install/repair/replace any part of the oven unless specified in the provided literature. A qualified service technician must perform all other service.
•Before any service/installation, shut off power to the oven at the circuit breaker or fuse box.
•The RNWO is intended for tasks and work loads consistent with residential cooking. It is not designed for commercial use.
•Do not climb anywhere on the oven.
•Do not leave children alone near the oven or let them play with the controls or touch other parts of the oven.
•Do not store items of interest to children above the oven, thus encouraging them to climb on the oven and possibly injure themselves.
•Do not tamper with the controls, or adjust or alter any part of the oven unless as instructed by this manual.
•To prevent the oven from tipping forward and to provide a stable installation, make sure the oven is secured to the cabinet according to the accompanying installation instructions.
•Do not heat unopened food containers such as baby food jars and cans. Pressure build up may cause the container to burst and cause injury.
•Do not use water on grease fires. A violent steam explosion may result. Smother any flames with a lid, cookie sheet or flat tray. Use baking soda or a foam extinguisher to extinguish flaming grease. Be careful to avoid getting burned.
•Keep flammable items, such as paper, cardboard, plastic and cloth away from and out of the oven. Do not allow pot holders to touch hot surfaces.
•Do not heat unopened food containers such as baby food jars and cans. Pressure build up may cause the container to burst and cause injury.
•Do not use towels or bulky cloth as pot holders.
 WARNING
•Do not use the oven for storage.
•Do not use water on grease fires. A violent steam explosion may result. Smother any flames with a lid, cookie sheet or flat tray. Use baking soda or a foam extinguisher to extinguish flaming grease. Be careful to avoid getting burned.
•Keep flammable items, such as paper, cardboard, plastic and cloth away from and out of the oven. Do not allow pot holders to touch hot surfaces.
•Do not wear loose or hanging apparel while using the oven. Do not let clothing contact the interior of the oven and surrounding areas during and immediately after use.
•Clean and maintain the oven regularly as instructed in this manual. Keep the entire oven free of grease that could catch fire.
•Do not touch the outside surfaces of the oven during the self-clean cycle. They will be hot.
•Use cookware only for its intended purpose. Check the manufacturer’s recommendations before use to determine if a utensil is suitable for oven use. Certain types of glass, ceramic, and earthenware are unsuitable for oven use.
•Exercise caution when opening the oven door. Let hot air or steam escape before looking or reaching inside.
•Use extreme caution if adding water to food in the oven. The steam can cause serious burns or scalds.
•Use only dry pot holders when removing food and cookware from the oven. Wet pot holders can cause steam burns.
•For your safety, do not use the oven to cook without the convection filter(s) installed. When the filter is not installed, the spinning fan blades at the back of the oven are exposed.
•Do not allow food to sit in the oven for more than one hour before or after cooking. Eating spoiled food can result in food poisoning.
•Do not leave objects, such as aluminum foil, the meat probe or cookie sheets on the bottom of the oven. Do not allow the broil elements on the ceiling of the oven chamber to be covered up. Do not line the oven with aluminum foil or other materials. Doing so may cause the oven or the items in it to overheat, creating a fire hazard or causing property damage.
•Non-stick coatings, when heated, can be harmful to birds. Remove birds to a separate, well-ventilated room during cooking.
1

|
|
|
|
|
|
|
|
|
PARTS OF THE OVEN |
|
|
|
|
|
|
|
|
|
|
|
|
|
|
|
|
|
|
Control panel |
This has touch keys and a display, and controls all oven features (modes). |
|
A |
||||||||
|
|
|
|
|
|
|
|
|
|
|
|
|
|
|
|
|
|
Air intake/Exhaust slots |
The oven draws air through the grill to cool internal parts; air exits through the slot at the oven’s bottom; keep these areas clear. |
|
B |
|
|||||||
|
|
|
|
|
|
|
|
|
|
|
|
|
|
|
|
|
|
Meat probe connector |
Insert the meat probe plug here (see Using the Meat Probe, pg. 9); on double ovens, only the upper oven has this connector. |
|
C |
|
|
||||||
|
|
|
|
|
|
|
|
|
|
|
|
|
|
|
|
|
|
Oven lights |
Two 12V, 20W halogen bulbs illuminate the oven chamber; touch the Light key on the control panel to turn them on. |
|
D |
|
|
||||||
|
|
|
|
|
|
|
|
|
|
|
|
|
|
|
|
|
|
Rack supports |
There are seven rack levels in each oven chamber; the supports are numbered from the bottom up. |
|
E |
|
|
||||||
|
|
|
|
|
|
|
|
|
|
|
|
|
|
|
|
|
|
Door gasket |
This prevents heat from escaping when the door is closed. |
|
F |
|
|
||||||
|
|
|
|
|
|
|
|
|
|
|
|
|
|
|
|
|
|
Self-clean latch |
This automatice safety feature locks the oven door during the high-temperature self-clean cycle. |
|
G |
|
|
|
|||||
|
|
|
|
|
|
|
|
|
|
|
|
|
|
|
|
|
|
Broil elements |
These are on the ceiling of the oven chamber behind a glass panel. |
|
H |
|
|
|
|||||
|
|
|
|
|
|
|
|
|
|
|
|
|
|
|
|
|
|
Convection fan |
This blows heated air into the oven chamber through the convection filter during convection cooking. |
|
I |
|
|
|
|||||
|
|
|
|
|
|
|
|
|
|
|
|
|
|
|
|
|
|
Convection element |
The convection element heats the air that is blown into the oven chamber by the convection fan during the convection cook- |
|
J |
|
|
|
|
|
|||
|
|
|
|
|
|
ing process. The convection filter covers it. |
|||
|
|
|
|
|
|
|
|
|
|
|
|
|
|
|
|
|
|
|
|
|
|
|
|
|
|
|
|
Convection filter |
The convection filter covers the convection fan. It helps prevent the transfer of taste from one food to another when you are |
|
K |
|
|
|
|
||||
|
|
|
|
|
cooking a whole meal. It also keeps the oven cleaner and covers the moving fan blades for safety purposes. |
||||
|
|
|
|
|
|
|
|
|
|
|
|
|
|
|
|
|
|
|
|
|
|
|
|
|
|
|
Oven rack |
The oven has a set of GlideRack™ oven racks and 1 standard rack per chamber; the number of racks depends on the model. |
|
|
L |
|
|
|
|||||
|
|
|
|
|
|
|
|
|
|
|
|
|
|
|
|
Bake element |
This is below the oven-chamber floor, and is the source of bottom heat. |
||
|
M |
|
|
|
|
||||
|
|
|
|
|
|
|
|
|
|
|
|
|
|
|
|
Recessed Oven Cell Bottom |
The recessed oven bottom is designed to allow a 30-minute oven steam clean. (See Pg 13 for details.) |
||
|
N |
|
|
|
|
||||
|
|
|
|
|
|
|
|
|
|
A |
|
|
|
|
B |
|
G |
|
|
|
7 |
H |
|
|
C |
|
|
|
|
6 |
|
|
|
|
D |
|
|
|
|
5 |
L |
|
|
|
|
|
|
||
E |
4 |
I |
J |
K |
3 |
2 |
|
|
|
|
|
|
||
F |
|
D |
|
|
1 |
|
|
|
|
|
|
|
|
|
|
|
M N |
|
|
B |
|
|
|
Skewer |
|
|
|
|
|
Plug 
B |
|
|
|
Meat Probe |
|
||||
|
|
|||
|
||||
|
|
|
|
|
2
PARTS OF THE OVEN
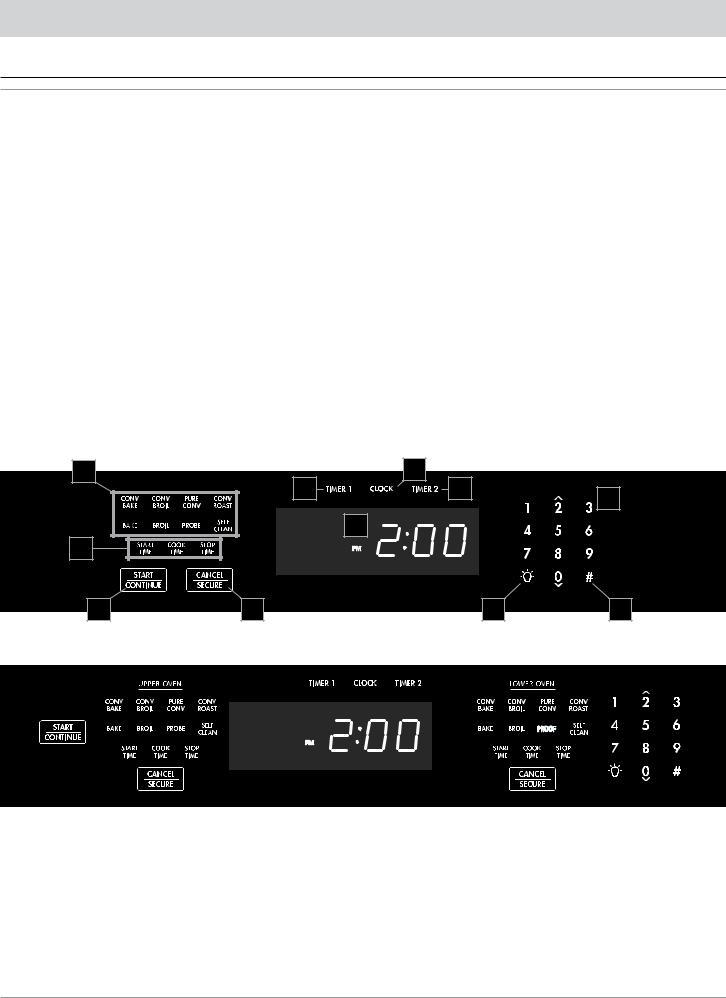
Control Panel
|
|
|
|
|
START/CONTINUE |
After selecting a cooking mode (B), touch this key to start cooking; this key starts the timers after you set a cook time and |
|
A |
|
|
|||
|
|
|
resumes the cook time after a pause. |
|||
|
|
|
|
|
|
|
|
|
|
|
|
|
|
|
|
|
|
|
Operating Mode keypad |
Select a mode for oven operation by touching one of these keys; operations include cooking, self-cleaning, temperature probe |
|
B |
|
|
|||
|
|
|
use, and on double ovens, a proof mode for breads; double ovens have one of these keypads for each oven (see below). |
|||
|
|
|
|
|
|
|
|
|
|
|
|
|
|
|
|
|
|
|
CANCEL/SECURE |
This key turns off the oven, returns all temperature settings to 0, turns off currently active features (except the timer), and |
|
C |
|
|
|||
|
|
|
activates the lock-out feature; double ovens have one of these keys for each oven. |
|||
|
|
|
|
|
|
|
|
|
|
|
|
|
|
|
|
|
|
|
Display |
This shows the time of day and information about oven operations, including cooking temperature, and remaining cook time. |
|
D |
|
||||
|
|
|
|
|
|
|
|
|
|
|
|
Number keypad |
Use this keypad to set the cooking temperature and time, and time of day. |
|
E |
|
||||
|
|
|
|
|
|
|
|
|
|
|
|
Time-Delay Cooking keys |
Use these keys to set the oven to turn on/off automatically at a later time; double ovens have a set of time-delay keys for each |
|
F |
|
|
|||
|
|
|
oven (see pg. 8 for details). |
|||
|
|
|
|
|
|
|
|
|
|
|
|
|
|
|
|
|
|
|
TIMER 1, TIMER 2 |
Use these keys to time an event; these timers operate independently and can be used even if the oven is not on; the timer |
|
G |
|
|
|||
|
|
|
keys do not turn the oven on/off (see pg. 8 for details). |
|||
|
|
|
|
|
|
|
|
|
|
|
|
|
|
|
|
|
|
|
CLOCK |
This key sets the clock (see pg. 5 for details). |
|
H |
|
|
|||
|
|
|
|
|
|
|
|
|
|
|
|
Light key |
This key turns the interior oven light on/off. |
|
I |
|
|
|||
|
|
|
|
|
|
|
|
|
|
|
Sabbath key (#) |
This key activates Sabbath mode (see pg. 13 for details). |
|
|
J |
|
|
|||
|
|
|
|
|
|
|
|
|
Single Oven |
|
B |
|
H |
|
|
G |
G |
E |
|
|
|
|
|
|
D |
|
F |
|
|
|
A |
C |
I |
J |
|
Double Oven |
|
|
3
OPERATING THE OVEN
Control Panel Settings
Setting the Clock
1.Touch the CLOCK key. The colon between the minutes and seconds on the time display blink.
2.Enter the current time on the number keypad (e.g., if the time is 12:08, touch 1-2-0-8 on the keypad).
3.Touch the # key to set AM or PM.
4.Touch START. The colon
Before Cooking
•Before its first use, you should turn the oven on for 1 hour at 500°F to burn off residual oils used in manufacturing. This removes undesirable odors that the oven may otherwise emit the first few times it is used.
•PREHEATING: When baking/roasting, the oven preheats automatically. Preheating time varies depending on the temperature setting and your community’s type of electrical supply. Preheating cannot be used for broiling.
 IMPORTANT
•The clock cannot be set during time-delay cooking if one of the timers is in use or if self-clean or Sabbath mode is active.
•When power resumes after an outage, the time display flashes, reminding you to reset the time.
•After touching the clock key, you must enter the time, and touch START within 6 seconds, or the previously set time reappears.
Switching to Military Time (24-Hr Clock)
The clock is factory-set to standard 12-hr time. Military time runs on a 24-hr system (e.g., 1:36 pm = 13:36 military time.)
1.Touch-hold CLOCK for 6 seconds. The display shows the current time mode.
2.On the number pad, touch # to change to 24-Hr mode.
3.Touch CANCEL/SECURE to return to the main display, and set the military time via the clock-setting procedure.
Setting the Temperature Scale
You can select Fahrenheit (factory default) or Celsius as the cooking temperature scale.
1.Touch-hold BROIL (under UPPER OVEN on double ovens) for 6 seconds. The display indicates the current temp scale (“F” or “C”).
2.Touch the # key to change the scale.
3.Touch CANCEL/SECURE. The control panel is set to the selected temperature scale.
About the Control Panel “Beep”
The control panel beeps when you touch a key, when a timer reaches zero (pg. 8), when there is an error, or when the oven performs certain set functions. You can silence/activate this tone as desired.
1.Touch-hold START TIME for 6 seconds until “beep” appears on the display.
2.Touch the # key to switch off/on the beep.
3.Touch CANCEL/SECURE to set your action.
 CAUTION
To avoid staining/pitting the oven’s porcelain surfaces, immediately wipe up food acids (e.g., citrus juices, tomato sauces).
Positioning the Oven Racks
You may use either rack type on any level inside the oven.
 WARNING
To reduce the risk of burns, position the racks when the oven is cool. If you must reposition a rack when the oven is hot, use potholders.
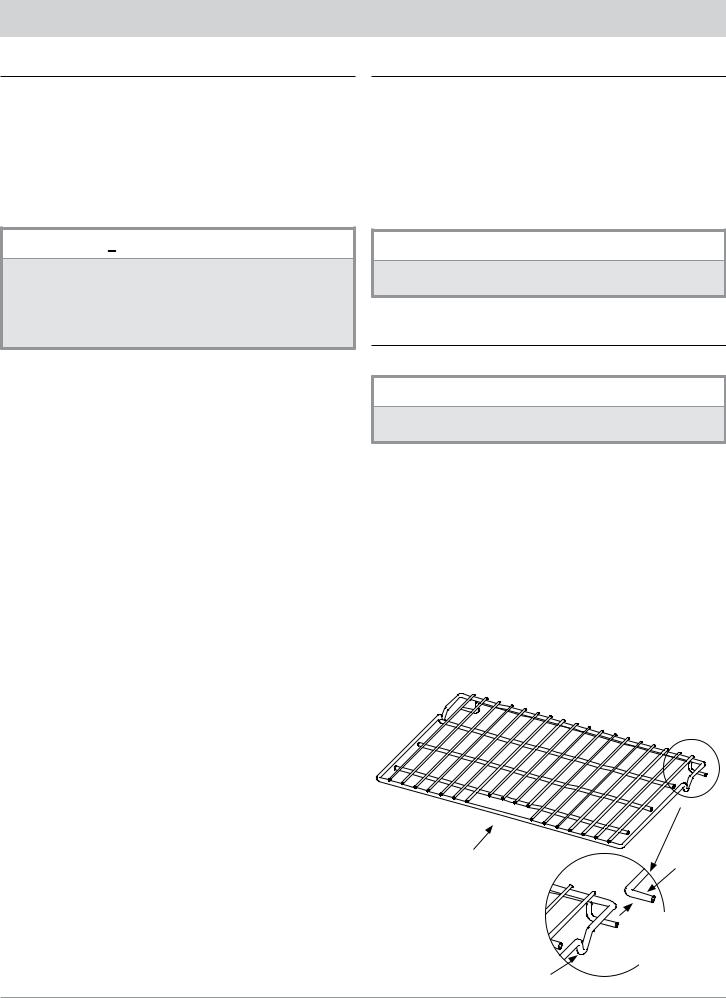
Inserting a Standard Oven Rack
1.Grasping the front of the rack, slide the rack onto the leftand right-side supports as shown in the graphic.
2.Begin to slide the rack in, and then, lift up so that the safety notches clear the ends of the rack supports.
3.Push the rack all the way in with both hands.
Removing a Standard Oven Rack
1.Grasp the front of the rack with both hands, and pull gently outward until the rack stops.
2.Lift the front of the rack 6 inches to clear the safety guides, and pull the rack completely out.
Front of rack |
Rack |
support |
Slide rack onto supports through rack bars
Safety notch
4
OPERATING THE OVEN
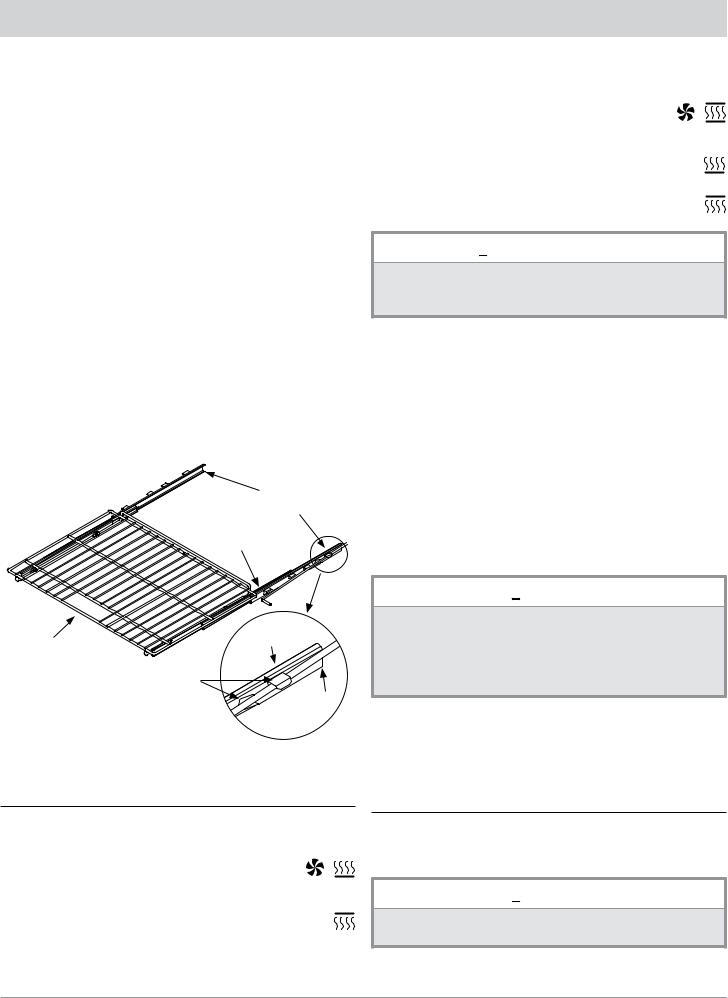
Inserting a GlideRack™ Oven Rack
The oven comes with a set of Dacor GlideRack oven racks. These racks can be pulled out further than a standard rack and still support pots and pans full of food or an optional Dacor baking stone.
1.Align the left and right safety clips on the back of the rack guides with the rack supports as shown below.
NOTE: The graphic shows installation with the rack guides extended, but the rack may be installed with the guides retracted.
2.Begin sliding the rack in, lifting the front safety clips over the front of the oven rack supports.
3.Push the rack all the way in.
4.Grasp the rack by the center-front hand-hold, and pull. The rack slides forward; the guides remain in place.
Removing a GlideRack™ Oven Rack
1.Grasp the front of the rack with both hands, and pull it gently outward you until it stops.
2.Lift until the front safety clips just clear the front of the rack supports, and continue pulling.
NOTE: Jiggling the rack side to side slightly as you pull makes it easier to remove.
|
Rack |
Lift front safety |
guides |
|
|
clips over rack |
|
supports |
|
Front |
Rack |
support |
|
Slide rack supports between |
|
back safety clips |
Back of |
|
guide |
Turning On the Oven
After adjusting the racks as needed for the cooking task, select the best cooking mode.
• CONVECTION BAKE - Uses the convection fan
and a bottom heat source (for single-rack items in a deep pan).
• CONVECTION BROIL - Uses the convection  fan and a top heat source (for items that do not
  need turning: e.g., fish, garlic bread, thinner cuts
of meat).
• PURE CONVECTION™ - Uses only convection cook-  ing for even heat (for baked goods, multi-rack cook-
  ing).
ing).
• CONVECTION ROAST - Uses top and bottom heat sources with the convection fan (for rib roasts, turkeys, chickens, etc).
•BAKE - Uses a bottom heat source (common for basic recipes).
•BROIL - Uses a top heat source (for grilling smaller cuts of meat or toasting bread).
 IMPORTANT
•Keep the oven door closed as much as possible when cooking.
•The oven door must stay closed, and the meat probe must be disconnected for all broiling modes.
See Pg. 6 for detailed about the various cooking modes.
1.Touch the key for the desired cooking mode.
The preset temperature appears on the display with the icon(s) for the selected cooking mode (see above). Double ovens: Select the desired oven by touching the cooking mode key under UPPER OVEN or LOWER OVEN on the control panel.
2.To cook at the preset temperature, touch START; otherwise, enter the temperature (ex. 4-2-5) on the number pad, then touch START.
You can enter any temperature from 100°F (37°C) to 555°F (291°C). The suggested broil temperature is 555°F. Double ovens have one START key (control panel, left side) that starts both ovens.
 NOTE
NOTE
When using Pure Convection or a bake or roast mode: “PRE-” (preheating) and the current oven temperature appear on the display until the oven reaches the set temperature (usually 15-20 min), then it beeps, and “PRE-” disappears.
3.When the preheat chime sounds, carefully place your food in the oven.
Placing the food in the oven during preheating will overcook the food.
Turning Off the Oven
To turn the oven off, touch CANCEL/SECURE. Double ovens: Touch CANCEL/SECURE under UPPER OVEN or
LOWER OVEN, whichever is in use.
 NOTE
NOTE
After you turn off the oven, the cooling fans may continue to run until the oven’s internal parts have cooled down.
5
OPERATING THE OVEN
Changing the Oven Temperature
To change the cooking temperature while the oven is on:
1.Touch the key of the selected cooking mode. The symbol for that cooking mode appears on the display.
2.Enter the temperature on the keypad (ex: 3-7-5), and touch CONTINUE.
 IMPORTANT
•If you increase the temp by 50°F (28°C) or more, the oven enters Preheat mode to raise the temperature rapidly to the new setting. (PRE- appears on the display.) To prevent excessive browning, you should take the food from the oven while “PRE-” is on the display.
•If you lower the temp, it is best to place the food in the oven after the new, lower temp appears.
About Cook Mode Preset Temperatures
The oven has a factory-preset temperature for each cooking mode to reduce the need to always enter the temperature. See Turning On the Oven for directions on how to cook at the preset temperature.
Cooking Mode |
Preset Temp |
|
|
|
|
Convection Bake |
325°F (163°C) |
|
|
||
Pure Convection |
||
|
||
|
|
|
Bake |
350°F (177°C) |
|
|
|
|
Convection Roast |
375°F (191°C) |
|
|
|
|
Broil |
555°F (291°C) |
|
|
||
Convection Broil |
||
|
||
|
|
 NOTE
NOTE
Activating Lock-out turns off all active timers.
About the 12-Hr Timer
The oven has a factory-programmed timer that automatically turns the oven off after 12 hours of continuous use. This timer resets if you change the cooking temperature or mode.
 NOTE
NOTE
The 12-hr timer is automatically disabled when the Sabbath feature is active.
To disable/enable the 12-hour timer:
1.With the oven off, touch-hold TIMER 1 until the control panel beeps and “12Hr” appears on the display (about 10 sec’s), then “ON” appears on the display when the 12-hr timer is enabled.
2.Push the # key to enable/disable the 12-hr timer.
3.Push CANCEL/SECURE to save the changes and return to the clock display.
About the Cooking Modes
There are three basic styles of oven cooking:
Baking–Gentle cooking of dry foods (e.g., cookies, cakes, soufflés).
Roasting–Cooking of meats/vegetables for a longer time (perhaps hours).
Broiling–Cooking with intense heat for a short time.
Changing the Cooking Mode
To change the cooking mode while the oven is on (ex: to change from Convection Bake to Bake):
•Touch the key for the new cooking mode, then touch
CONTINUE.
About the Lock-Out Feature
To disable the control-panel keys:
•Touch-hold CANCEL/SECURE for 6 seconds.
The control-panel keys stop working, and OFF appears on the display. Only CANCEL/SECURE and the oven light keys are functional.
Double ovens: Touching the upper or lower CANCEL/ SECURE key locks the control panel for both ovens.
To enable the control-panel keys:
• Touch-hold CANCEL/SECURE for 3 seconds.
Baking 

In this conventional baking mode, heat is applied to the food from below. Most baking times are established in this mode.
Baking Tips
•For best results, use a single rack in Baking mode. Any multi-rack baking should be done in a convection mode.
•Follow the recipe’s original cooking time and temperature, and use the oven timers to set the cooking time.
•Avoid repeated opening of the oven door to check progress. Look instead, through the window when possible.
•Check the food at the shortest recommended baking time. (For cakes, a wooden toothpick poked through the center will come out clean when the food is done.)
6
OPERATING THE OVEN
Convection
Generally, cooking times are about 25% shorter in the convection modes. Set the timer 15 minutes before the shortest stated time, and make adjustments as needed.
In Pure Convection and Convection Bake modes, some recipes, especially homemade foods, may require adjustment and testing when converting from standard baking. If you are unsure how to convert a recipe, begin by preparing the recipe using the standard bake settings.
If the food does not cook satisfactorily in this first trial, adjust one variable (e.g., cooking time, rack position, temperature), and repeat the convection test. If needed, keep adjusting one variable at a time until you perfect the process.
There are three types of convection baking:
•Pure Convection
•Convection Bake
•Convection Roast
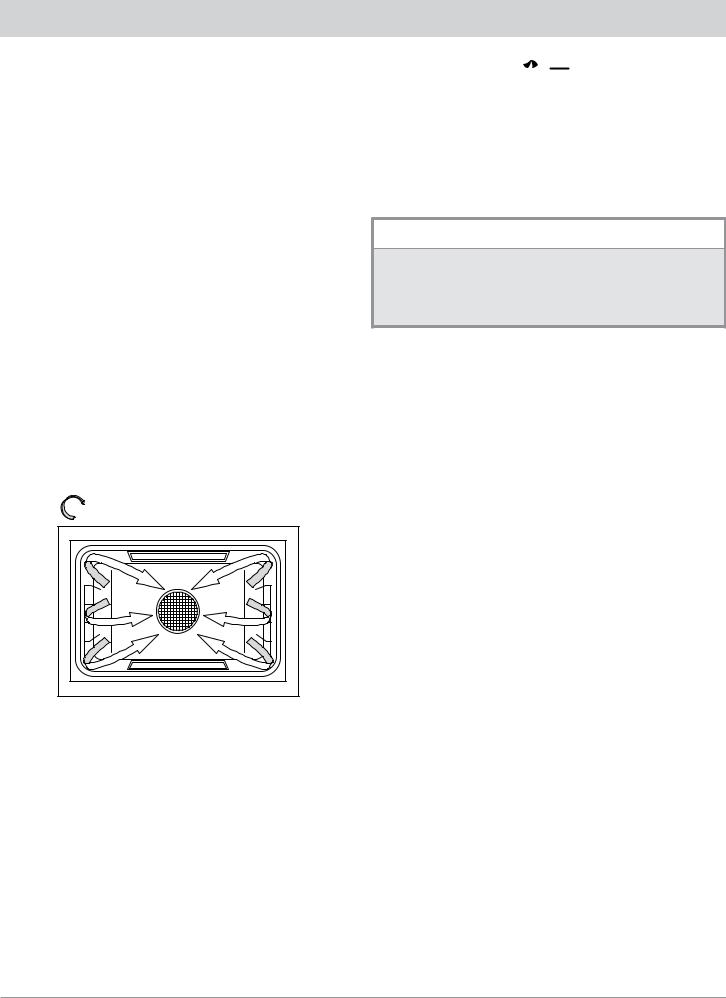
Pure Convection 
The uniform air circulation of this mode lets you expand your use of oven space. Use this mode for singleand multirack baking, roasting, and preparation of complete meals. Many foods (e.g., pizza, cake, cookies, rolls, and prepared frozen foods can be prepared on two or three racks at a time. Pure Convection is also good for whole roasted duck, lamb shoulder, and short leg of lamb.
AIR FLOW
For multi-rack baking:
•Typically, when baking on two racks with your oven, use rack Levels 3 and 5 (counting from the bottom up). When baking on three racks, use Levels 2, 4, and 6.
•When adapting a single-rack recipe to multi-rack baking, you may need to lengthen the baking time due to the greater mass of food in the oven.
Convection Bake 


Use this mode for single-rack baking. This combination of the convection fan and bottom heat is best for fruit crisps, custard pies, double-crusted fruit pies, quiches, yeast-bread loaves, and popovers. Items baked in a deep ceramic dish or clay pots are best in this mode. Most of these items cook in a deep pan and require browning on the top and bottom.
Convection Roast 


The oven’s Convection Roast mode combines the convection fan, and top and bottom heat. This mode is best for bulky meats (e.g., rib roasts, poultry, pork shoulder).
Broiling
There are two types of broiling:
•Broil
•Convection Broil
 WARNING
•The oven door must be completely closed when broiling.
•To avoid damaging the meat probe, remove it from the oven when broiling. If the meat probe is plugged in, the broil modes will not start, and the meat probe symbol will flash if you try to start the oven in a broil mode.
Broiling is a quick, flavorful way to prepare such foods as steak, chicken, chops, hamburgers, and fish.
Broil 

This mode uses top heat and is best for cooking smaller amounts of food.
Convection Broil 


This mode combines the convection fan with top heat. It is best for items that do not need to be flipped such as, thinner cuts of meat, fish, and garlic bread.
Broiling Tips
•To reduce the chance of overcooking, use rack Levels 1 – 4. Results depend on the rack level and type of food being broiled.
•It is normal and necessary for some smoke to be present to give the food a broiled flavor.
•You should set the timer when broiling.
•Always use a grill over a broiler pan so fat and grease can drain. This reduces, spatter, excess smoke, and flare-ups.
•Start with a room-temp broiler pan for even cooking.
•Use tongs or a spatula to turn/remove meats. Never pierce the meat or the natural juices will escape.
•Broil food on the first side for a little more than half of the recommended time, then season and turn. Season the second side just before removing the food from the oven.
•To prevent sticking, lightly grease the broiler grill. Excess grease will result in heavy smoke. For easier cleaning, remove the broiler pan and grill when removing the food.
7

OPERATING THE OVEN
Using the Oven Timers
The oven’s two built-in timers can be used simultaneously and set for 1 minute to 99 hrs 59 min.
The timer symbol appears on the display when one or both of the timers is in use.
 WARNING
The timers only count down time; they do not turn the oven off. To learn how to turn the oven off automatically, see Time-Delay Cooking Features.
 NOTE
NOTE
Touching CANCEL/SECURE does NOT reset or stop the timers.
1.Touch the TIMER 1 or TIMER 2 key.
2.On the keypad, enter the desired cook time in hours and minutes.
To enter 11 hours, 30 minutes, touch 1-1-3-0.
For 25 minutes, touch 2-5. When you touch START, the time will appear on the display and begin to count down.
3.Touch START.
The cook time appears on the display and begins counting down.
When the countdown ends, 0:00 appears on the display. The Timer number (1 or 2) blinks on the display, and a beep sounds. The alarms for Timer 1 and Timer 2 have different cadence.
Timer |
Alarm Cadence |
1 |
1 sec on, 1 sec off, repeat |
|
|
2 |
1 sec. on, 1 sec. off, 2 sec. on, 1 sec. off, repeat |
|
|
When the alarm sounds, touch TIMER to silence the alarm, then touch CLOCK to return to the main display.
Using Time-Delay Cooking
This feature lets you set the oven to turn itself on/off at a later time.
About Time-Delay Cooking
•Time-delay can be used for all but the Broil modes.
•You may use the timers while using time-delay cooking.
•You can cancel the time-delay cycle any time by pushing
CANCEL/SECURE.
 WARNING
Food safety is an important consideration in time-delay cooking. To avoid sickness and spoilage, take these steps:
•Avoid using foods that will spoil before the oven turns on (e.g., foods containing eggs, dairy products, cream soups, meat).
•Do not leave food in the oven after it turns off. When the temperature drops below 140°F (60°C), bacteria can develop.
•Place only very cold or frozen food in the oven. Most unfrozen foods should rest in the oven no more than two hours before cooking begins.
Three Ways to Use Time-Delay Cooking
The keys are used for time-delay cooking.
•START TIME: The time when the oven starts cooking.
•COOK TIME: The amount of time the oven cooks before entering Hold mode.
•STOP TIME: The time when the oven turns off and enters Hold mode.
When you set 2 of the 3 above, the oven automatically calculates the third.
•Set the time the oven turns on (START TIME), and set it to turn off later using either COOK TIME or STOP TIME.
•Set START TIME only, then turn the oven off manually when you are done cooking.
•Turn the oven on manually, and set it to turn off later using either COOK TIME or STOP TIME.
Viewing Settings As the Timer Counts
While a timer (or timers) runs, you can check the clock or the other timer without interrupting any of these settings:
•Touch CLOCK to view the current time.
•Touch TIMER 1 to view the time left on (or set) Timer 1.
•Touch TIMER 2 to view the time left on (or set) Timer 2.
Changing the Time On a Timer
1.Touch the TIMER 1 or TIMER 2 key.
2.Enter the new time on the keypad and touch START.
Stopping a Timer Before Time Runs Out
1.Touch the desired Timer key twice.
The timer stops; the zeroes out.
2.Touch CLOCK to return to the main display.
About Hold Mode
•When you use COOK TIME or STOP TIME to set the oven to stop cooking, it enters Hold mode (HLd appears on the display) when it reaches the end of the set cook time. The oven keeps the temperature at 150°F (66°C) for 2 hours.
•Touch CANCEL/SECURE to turn the oven completely off.
•To avoid sickness, do not leave foods in the oven after hold mode turns off.
Using Time-Delay Cooking
 NOTE
NOTE
Delay-timed cooking cannot be used in Sabbath mode.
1.Adjust the racks as needed, and put the food in the oven.
2.Select the cooking mode (except the Broil modes).
8
OPERATING THE OVEN
3. Enter a cooking temperature.
If you want to turn the oven on immediately and turn off automatically at a later time, go to step 5.
4.Touch START TIME, and enter the time you want the oven to start. (For 12:35, touch 1-2-3-5. You may enter a time up to 22 hours and 59 minutes ahead of the present time. Touch the # key to change “AM“ or “PM.”)
5.(To set the stop time or cooking duration) Touch either STOP TIME or COOK TIME (otherwise go to Step 6).
COOK TIME lets you determine when the oven will stop cooking by entering the amount of time the oven is on. STOP TIME lets you determine when the oven will stop cooking by entering the clock time. Either key achieves the same result.
6.Touch START.
If you set a START TIME, the oven starts at that time.
If you entered a COOK TIME or STOP TIME, the oven cooks until the set time, and enters Hold mode.
 IMPORTANT
The regular pre-heat feature (see Before Cooking, Pg 4) is unavailable for time-delay cooking. The time needed to reach the cooking temperature must be added to the cook time, which increases with the cooking temperature and amount of food.
More About Time-Delay Cooking
When the oven is in Time-Delay mode, push:
•CLOCK to view the time
•START TIME to view the set start time
•STOP TIME to view the set stop time
•COOK TIME to view the set cook time.
Using the Meat Probe
When you cook foods like roasts and poultry, taking the internal temperature is the best way to verify that the food is fully cooked. The oven comes with a meat probe that lets you cook food to the exact temperature required. The probe measures temperatures of 100°F (38°C) to 200°F (93°C).
 NOTE
NOTE
•The meat probe does not work in Broil and Sabbath modes. If you plug in the probe when in Broil and Sabbath modes, the probe symbol blinks, indicating an error.
•If you detach the meat probe after touching PROBE, the probe symbol blinks, and the OPn error appears on the display.
1.Insert the probe skewer in the thickest part of the prepared meat.
(The point should be at the center of the meat away from fatty areas and bone. With fowl, hold the skewer parallel to the pan, and insert it into the deepest part of the breast until the tip is 3/4 in. from the internal cavity.)
2.With the oven door closed, set a cooking mode.
The mode’s preset temperature appears on the display. If you want to change the temperature, enter it via the number pad.
3.Touch START.
4.Let the oven preheat.
The meat could over-brown if you put it in the oven during preheat mode (when PRE- appears on the display). When the oven is preheated, PRE- disappears.
5.With oven mitts, put the meat in the oven. Plug the meat probe plug in the connector inside the oven chamber.
6.Touch PROBE.
The preset probe temp (160°F/71°C) and the probe symbol appear on the display. If you want to change the probe temp, enter it via the number pad. Use the USDA Minimum Safe Cooking Temperature Chart as a guide for the meat you are cooking.
7.Touch START.
If you do not touch START, Probe mode will not activate.
 IMPORTANT
When you use the meat probe, the oven controls the cook time and shows the meat temperature on the display. When the meat reaches the set temp, the oven enters Hold mode, in which the temp lowers to 150°F (66°C) for two hours to keep
the meat warm and safe for serving. To prevent sickness, do not leave food in the oven after it has turned off. Touch CANCEL/ SECURE to cancel hold mode and turn the oven completely off.
 WARNING
•To avoid burn injuries, use hot pads or oven mitts to handle, connect, and detach the meat probe when the oven is hot.
•Use the handle to insert/remove the probe’s skewer and to connect it to the oven. Pulling on the cable could damage the probe. To avoid breaking the probe, ensure the food is completely defrosted before inserting the skewer.
•Never leave the probe in the oven when you are not cooking anything, especially during the self-clean cycle.
•Using a 3rd-party probe may damage the probe and/or oven.
Changing the Probe Temp While Cooking
1.Touch PROBE.
The current probe temperature appears on the display.
2.Enter the new temperature.
The oven automatically changes to the new probe temp; if no temp is entered, the oven keeps cooking at the original setting.
9

OPERATING THE OVEN
Changing Cooking Modes While Using the
Meat Probe
1.Touch CANCEL/SECURE.
2.Touch the desired bake-mode key.
To change the cook temp, enter the new temp on the number pad.
3.Touch CONTINUE.
Dehydrating/Defrosting
You can dehydrate or defrost foods at low heat settings in Pure Convection mode.
 WARNING
To avoid food poisoning, cook meats immediately after defrosting them.
Canceling the Meat Probe While Cooking
•Touch PROBE twice, and unplug the meat probe.
The oven returns to its original settings.
Important Meat Probe Details
•You must select a cooking mode before touching PROBE.
•When using the meat probe, the preheat cycle is disabled. For best results, select the cooking mode, and let the oven preheat before engaging the probe.
•The meat probe function cancels itself after 30 seconds, and the probe symbol blinks on the display if the probe is not plugged in.
•The meat probe feature takes precedence over time-delay cooking. The oven keeps cooking the meat until it reaches the selected probe temp regardless of the set STOP TIME or COOK TIME, then enters Hold mode.
Dehydrating/Defrosting Foods
1.Position the racks, and center the food on the rack. (If dehydrating) Prepare food as recommended, then place it on a drying rack.
2.Touch PURE CONV.
3.(If defrosting) Enter a temperature up to 150°F (66°C). (If dehydrating) Use the table below to set the temperature, and raise the temp as needed.
Food Type |
Dehydrating Temperature |
|
|
Fruit |
100°F (38°C) |
|
|
Vegetables |
125°F (52°C) |
|
|
Meat |
150°F (66°C) |
|
|
4. Touch START.
USDA Minimum Safe Internal Temp’s
Ground Meat and Meat Mixtures
Beef, pork, veal, lamb |
160°F (71°C) |
|
|
Turkey, chicken |
165°F (74°C) |
|
|
Fresh Beef, Veal and Lamb |
|
|
|
Steaks, roasts, chops |
145°F (63°C) |
|
|
Poultry |
|
|
|
Chicken and turkey, whole (temperature taken in thigh) |
|
|
|
Poultry breasts, roast |
|
|
|
Poultry thighs, legs, wings |
165°F (74°C) |
|
|
Duck and goose |
|
|
|
Stuffing (cooked alone or in bird) |
|
|
|
Fresh Pork |
|
|
|
Fresh pork |
160°F (71°C) |
|
|
Ham |
|
|
|
Fresh (raw) |
160°F (71°C) |
|
|
Pre-cooked (reheat) |
140°F (60°C) |
|
|
NOTE: Min. safe internal cooking temp’s are subject to change. If bacteria change, so do the temp’s needed to eliminate them. For current info, contact the USDA Meat and Poultry Hot Line: (800) 535-4355 or visit www.fsis.usdagov
Using the Bread-Proofing Feature
You can use the oven to proof yeasted dough at a low, draft-free temperature using Bake mode. This procedure assumes the dough is in a greased bowl covered the bowl with a damp cloth or with plastic wrap sprayed with a nonstick substance.
1.Touch BAKE.
(Double ovens have a PROOF key on the lower oven. You may touch this key instead of BAKE. When using the PROOF key, the oven presets the temperature.)
2.Enter 100°F (38°C) on the number pad, and touch START.
3.Put the dough in the oven, and turn on the oven lights.
4.Set the timer for the recipe’s rise time.
Using Sabbath Mode
The oven’s Sabbath mode complies with Jewish law for Sabbath and Holy Day use. When this feature is active, only Bake and Pure Convection modes are active, and the oven lights are disabled as well as all keys except CANCEL/ SECURE, START, and the 0 and 2 keys on the number pad.
10

OPERATING THE OVEN
 NOTE–SABBATH MODE
•“SAb” appears on the display.
•When setting this mode, touch all keys within 6 seconds of each other, or the control panel automatically clears.
•Double ovens: You cannot use one oven in normal mode if the other is in Sabbath mode.
•This mode will not work if the meat probe is plugged in; the probe symbol blinks.
•Time-delay cooking cannot be used.
•When power is restored after an outage, the oven returns to Sabbath mode at the previous temperature setting.
•Active ove timers are automatically canceled when Sabbath mode is selected.
•Suggestion: Use a rack thermometer to track the oven temp.
Adjusting the Oven Temperature
Your oven was factory-calibrated to cook at the displayed temperature, but cook times may vary from your old oven.
 WARNING
To ensure proper, safe operation, do not adjust the probe or self-clean offset temperatures.
IMPORTANT: Do not measure interior oven temperature with a thermometer. Opening the door compromises the reading. Also, the interior temperature varies as the elements cycle on and off.
If you are unsatisfied with the results from your oven, you can adjust the temperature offset.
Activating Sabbath Mode
Double ovens: perform this procedure for one oven, then use Steps 2 – 4 to activate Sabbath mode on the other oven.
1.Touch # key.
2.Touch BAKE or PURE CONV.
Double ovens: Touch the key for the appropriate oven.
3.Touch the 0 or 2 keys repeatedly to change the preselected cooking temperature shown on the display.
4.Touch START.
The oven enters Sabbath mode and cooks in the mode you selected in Step 2.
Important Sabbath Mode Details
•CANCEL/SECURE is active so you can turn off the Sabbath feature and the oven. Double ovens: both CANCEL/ SECURE keys are active.
•When the oven is cooking, touching 2 > START tells the oven to raise the temperature by 25°F (15°C). Touching 0 > START tells the oven to lower the temperature by 25°F (15°C). In compliance with Jewish law, the bake elements are adjusted randomly when these keys are touched and no changes appear on the display. Double ovens: you must touch BAKE or PURE CONV for the oven on which you want the temperature changed before touching 0 or 2.
1.With the oven off, simultaneously touch-hold 0 and # on the number pad.
In about 3 seconds, PASS appears on the display.
2.Immediately enter 6428 on the number pad, then touch
START.
SLCt (select) appears on the display.
3.Select the cooking mode you want to change the offset for (CONV BAKE, CONV BROIL, PURE CONV, CONV ROAST, BAKE or BROIL).
The current offset temperature appear on the display (e.g., 00, if you have never adjusted the temperature.)
4.On the number pad, enter the desired increase/decrease in temperature.
To enter a minus sign, touch # after entering the number(s). A minus sign means the oven will be cooler by the amount shown. If you do not touch #, the oven will be hotter by
the amount shown. You may enter a number from 35°F to -35°F (18°C to -18°C).
Edit appears on the display as you start entering the offset value.
5.Touch START to save the setting.
6.Repeat Steps 3 – 5 for any other cooking-mode temperatures you want to offset.
7.Touch CANCEL to exit Offset mode.
11
CARE AND CLEANING
 WARNING
•Clean as instructed only the oven parts listed in this manual.
•To avoid dangerous fumes and surface/accessory damage, use only the cleaning solutions specified in this manual.
•Before cleaning, ensure the oven is off and all parts are cool.
•Do not use abrasive/corrosive cleaners or applicators (e.g., steel wool, scouring pads) anywhere on the oven except as instructed. Use only a sponge, soft cloth, fibrous or plastic brush, or nylon cleaning pad on the oven surfaces.
•Do not use steam-clean the oven. Steam could penetrate the electrical components and short the circuit.
•Do not use sharp objects (e.g., knife, metal spatula) to remove heavy spills.
About Self-Clean Mode
•For best function and results, the oven chambers should be cleaned regularly. The self-cleaning feature heats the oven to very high temperatures to burn off surfaces deposits on the oven interiors. The self-clean process takes about 2 1/2 hours.
•Smoke emission is normal during the first few self-clean cycles. The oven also emits popping sounds during selfcleaning due to metal expanding/contracting as the oven heats and cools.
•Self-clean mode will not function if the meat probe is connected.
 WARNING
•For less smoke and better efficiency, wipe up grease and other food spills with a damp cloth before self-cleaning. (See the cleaning instructions on this page.)
•Exterior oven surfaces willl be HOT during self-cleaning.
•To avoid product damage/ruin, remove the racks and any foreign object from the oven during self-cleaning.
3.Clean the door gasket by dabbing it with a water-mild soap solution.
 CAUTION
•Carefully clean the door gasket to avoid compromising the tight seal needed for best results and function.
•Trying to open the door after it has locked may damage the door and latch.
4.Turn on kitchen fans or vents to help remove odors during the self-clean cycle.
5.Shut the oven door, and touch Self-Clean.
6.Touch START.
The oven door locks automatically during self-cleaning to prevent personal injury from the high temperature generated during self-cleaning. If the door is ajar, an error message appears on the display. To clear the error, touch CANCEL/SECURE, and wait one minute, then close the door. When the error clears, restart the self-clean process.
The display shows the self-clean cycle status:
• The clean symbol indicates that self-clean is in process.
• The lock symbol indicates that the door is latched.
• “ON” indicates that the heating elements are on.
To stop self-cleaning, touch CANCEL/SECURE. The oven door remains locked until has cooled sufficiently. (The lock symbol disappear from the display). The oven may still be hot, so be cautious.
When self-cleaning is complete:
•The door latch releases when the inside has cooled down. The clean icon, lock icon, and ON indicator disappear from the display. The oven, however, is still HOT.
•Reinstall the convection filter before using the oven.
•A powdery residue may coat the oven floor after self- cleaning—this is normal. When the oven is cool, wipe the resideu with a damp cloth or sponge.
Using the Self-Clean Feature
 IMPORTANT
•Double ovens: The control panel only allow one oven chamber to be self-cleaned at a time due to the amount of power consumed. You cannot cook in one oven when the other is in self-clean mode.
•The oven lights do not operate while the oven is in self-clean mode to protect them from damage.
•Self-clean will not work with the meat probe connected (the meat probe symbol blinks to alert you to remove the probe).
1.Remove the racks, convection filter, all cookware, the meat probe, foil, and all other loose objects from the oven chamber. (See Pg. 13 for filter cleaning instructions.
2.Wipe the interior door surfaces outside the door gasket with a vinegar-water solution, then wipe dry. Clean heavily soiled areas with a plastic scouring pad.
Self-Cleaning Tips
•If soil remains after self-cleaning, you may repeat the cycle.
•Self-clean the oven regularly to prevent soil buildup.
Setting Delayed Self-Cleaning
1.Prepare the oven for self-cleaning as instructed in the previous procedure, and close the oven door.
2.Touch Self-Clean > START TIME.
3.Enter the desired start time (e.g., touch 1-2-3-0 for 12:30). Maximum delay is 22 hr, 59 min.
4.Touch START.
DELAY appears on the display; the oven door locks. The oven will start self-cleaning at the input time.
12
 Loading...