


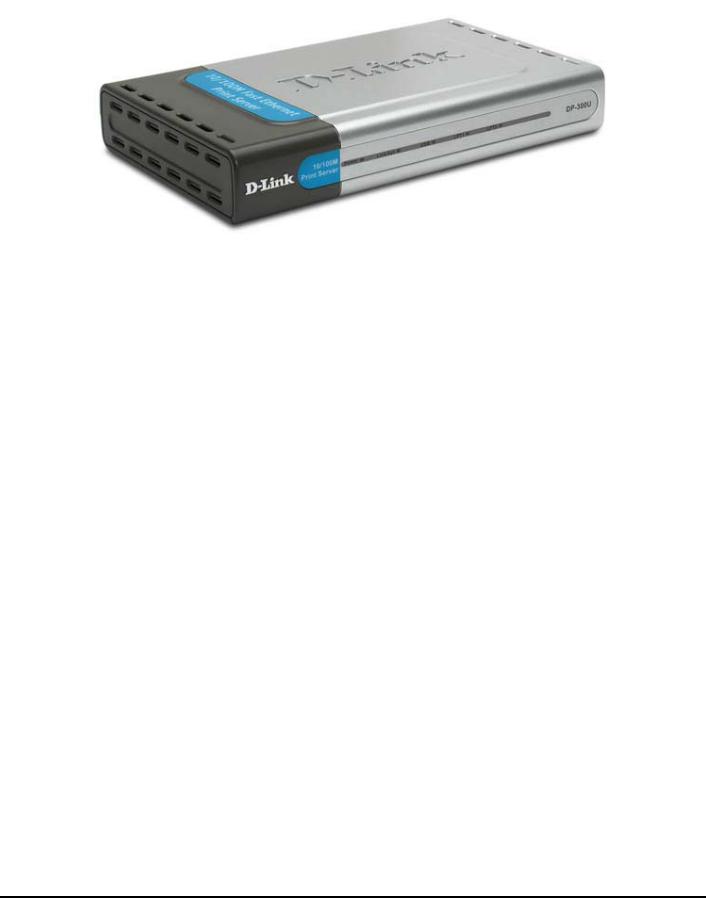
D-Link DP-300U
Fast Ethernet Print Server
Manual
Rev. 01 (November, 2007)

|
Contents |
Package Contents......................................................................................... |
iv |
Contents of Package: ............................................................................. |
iv |
System Requirements: ........................................................................... |
iv |
Introduction................................................................................................... |
1 |
External Features.......................................................................................... |
3 |
Port Connectors....................................................................................... |
3 |
Rear Panel...................................................................................................... |
4 |
Network Cable Connector ...................................................................... |
4 |
USB Port Connector ............................................................................... |
4 |
Parallel Port Connector........................................................................... |
4 |
DC Power Connector .............................................................................. |
4 |
Front Panel .................................................................................................... |
5 |
LED Indicators........................................................................................ |
5 |
Setting up the DP-300U ................................................................................ |
6 |
Installing the Print Server ....................................................................... |
6 |
Power ON Self-Test ................................................................................ |
6 |
Getting Started .............................................................................................. |
8 |
Using PS-Wizard........................................................................................... |
9 |
Auto-Run Installation ............................................................................. |
9 |
PS-Wizard ............................................................................................. |
10 |
Installing PS-Wizard............................................................................. |
10 |
Using PS-Wizard................................................................................... |
14 |
Using the Web Configuration .................................................................... |
20 |
Home..................................................................................................... |
20 |
SETUP > Print Server Setup................................................................. |
22 |
i

SETUP > LAN Setup............................................................................ |
24 |
SETUP > Printer Setup ......................................................................... |
25 |
ADVANCED > Advanced LAN ........................................................... |
33 |
ADVANCED > User Access................................................................. |
35 |
ADVANCED > E-Mail Notification..................................................... |
36 |
ADVANCED > SNMP ......................................................................... |
38 |
MAINTENANCE > Password.............................................................. |
39 |
MAINTENANCE > Save/Restore Settings.......................................... |
40 |
MAINTENANCE > Firmware Upgrade............................................... |
41 |
MAINTENANCE > Diagnostics .......................................................... |
42 |
STATUS > Device Info......................................................................... |
43 |
STATUS > Network.............................................................................. |
45 |
STATUS >Print Log.............................................................................. |
47 |
HELP .................................................................................................... |
48 |
Reboot................................................................................................... |
49 |
Refresh Printer Status ........................................................................... |
50 |
TCP/IP Printing for Windows Vista.......................................................... |
51 |
TCP/IP Printing for Windows XP ............................................................. |
63 |
TCP/IP Printing for Windows 2000 .......................................................... |
76 |
TCP/IP Printing for Windows 98SE/ME .................................................. |
94 |
Unix/Linux Printing.................................................................................. |
107 |
Printing Text Files form Unix ............................................................. |
107 |
Printing form BSD Unix Versions ...................................................... |
108 |
Printing from SCO Unix System V/386 ............................................. |
111 |
Printing from Solaris........................................................................... |
113 |
Printing from Red Hat Linux .............................................................. |
114 |
Setting up Printing in Mac OS X Tiger (10.4)........................................ |
121 |
ii

Adding a Printer.................................................................................. |
123 |
AppleTalk-enabled or Bonjour-enabled Printers ................................ |
125 |
Setting up AppleTalk or LPR Printing in Mac OS X ............................ |
135 |
Setting up AppleTalk Printing in Mac OS 9........................................... |
140 |
Technical Specifications............................................................................ |
145 |
Appendix: DP-300U Printer Compatibility List .................................... |
146 |
iii
Package Contents
Contents of Package:
D-Link DP-300U Print Server
Manual and Warranty on CD
Printed Quick Installation Guide
If any of the above items are missing, please contact your reseller.
System Requirements:
A computer with an installed Ethernet adapter
Windows Vista/XP/2000/NT4/ME/98SE/95
Apple Mac OS 9.x to MAC OS X 10.4.x
Linux, Solaris, SCO Unix, AIX
Internet Explorer 6.0 or above; Netscape Navigator version 6.0 or above, with JavaScript enabled
Printer must support required operating system
iv

Introduction
The D-Link DP-300U Print Server is print server that connects to your Ethernet/Fast Ethernet network anywhere you wish to locate printer services. The DP-300U manages the flow of print files from workstations or file servers to connected printers, delivering print jobs to printers much faster than a file server or a PC acting as a print server can.
The DP-300U includes easy-to-use software to install on most Windows-based networks. Protocol support for TCP/IP, NetBEUI, and AppleTalk are provided to ensure seamless connection to major networking Operating Systems.
The DP-300U has a built in Web-Based management feature that allows users to easily configure and manage multiple print queues through TCP/IP. The DP-300U also supports Telnet as an alternative method to configure the unit.
The DP-300U improves network printing services in the following ways:
The DP-300U picks up the workload of managing print file traffic to its connected printers. This provides workload relief to your file servers, and allows the file servers full capacity to be used for file access or other direct services to network users. On peer-to-peer networks, workstations can print directly to the Print Server without increasing the load of another workstation or server.
The DP-300U’s two parallel printer ports are IEEE1284-compliant high-speed
bi-directional port and its USB printer port is USB 2.0 port, which can transmit to high-speed laser printer much faster than a PC’s parallel/USB printer port. High-speed laser printer connected to the Print Server’s parallel/USB port can be operated at their full capacity.
1

Because the DP-300U is very portable and inexpensive compared to a PC-based print server, and Print Server connects to your file servers through the network, printers can be deployed to locations of maximum convenience to users.
The DP-300U offers extraordinary flexibility, operating with all major network operating systems and protocols:
TCP/IP
UNIX lpr/lpd (HP-UX, SunOS, Solaris, SCO, UnixWare, IBM AIX) Windows NT/2000, Windows 95/98SE/ME, Windows XP/Vista, NetWare 5.x NDPS LPR Remote Printing
NetBEUI
Windows NT/2000/XP, Windows 95/98SE/ME, Windows for Workgroups, Microsoft LAN Manager, IBM LAN Server
AppleTalk
MacOS EtherTalk
Furthermore, the print server features a useful software: PS-Wizard. PS-Wizard is a user-friendly program used to complete further settings for the print server, and assists you to easily add a printer on your computer. See also the “Using The PS-Wizard” chapter in this manual for the details. The print server also supports configuration and management via the Telnet protocol for networks without Windows-compatible machines.
2

External Features Port Connectors
The DP-300U has two parallel ports and one USB port located on its back panel. The ports are configurable using the Web Configuration Interface or the print server’s Telnet interface. The Print Server’s Web configuration permits users to configure settings through the web browser.
Default IP Address of DP-300U is set as automatically getting from DHCP server or Router which build-in DHCP server.
NOTE: The PC’s IP Address must be in the same subnet as the print server’s IP Address for the two devices to communicate. (For example, if print server’s IP Address is 192.168.0.10, with a subnet mask of 255.255.255.0, then your computer’s IP Address should be 192.168.0.x, where x is a value between 1-254, excluding 10.)
3
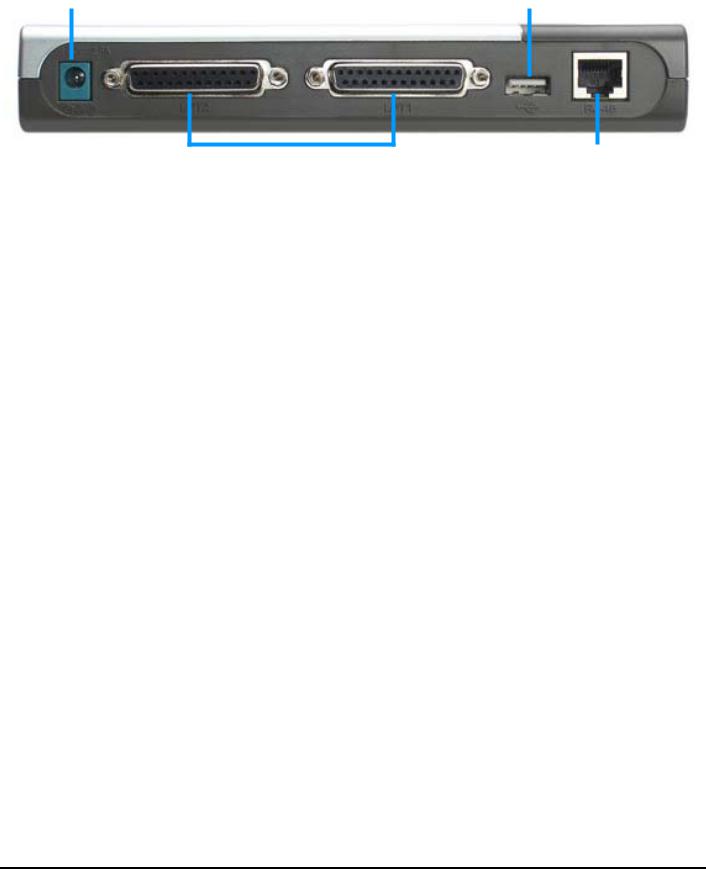
Rear Panel
DC Power |
USB Port |
Connector |
Connector |
Network Cable
Parallel Port Connector
Connector
Network Cable Connector
The Print Server’s rear panel features an RJ-45 connector for connection to 10Base-T Ethernet cabling or 100Base-TX Fast Ethernet cabling (which should be Category 5 twisted-pair cable). The port supports the NWay protocol, allowing the Print Server to automatically detect or negotiate the transmission speed of the network.
USB Port Connector
The rear panel of the print server features the USB port connector. Plug this connector directly into the USB port on your network printer via a USB cable.
Parallel Port Connector
The rear panel of the print server features two parallel port connectors. Connect this port to the parallel port on your network printer with a parallel cable.
DC Power Connector
The DC power input connector is located on the Print Server’s rear panel and is labeled DC 5V.
4
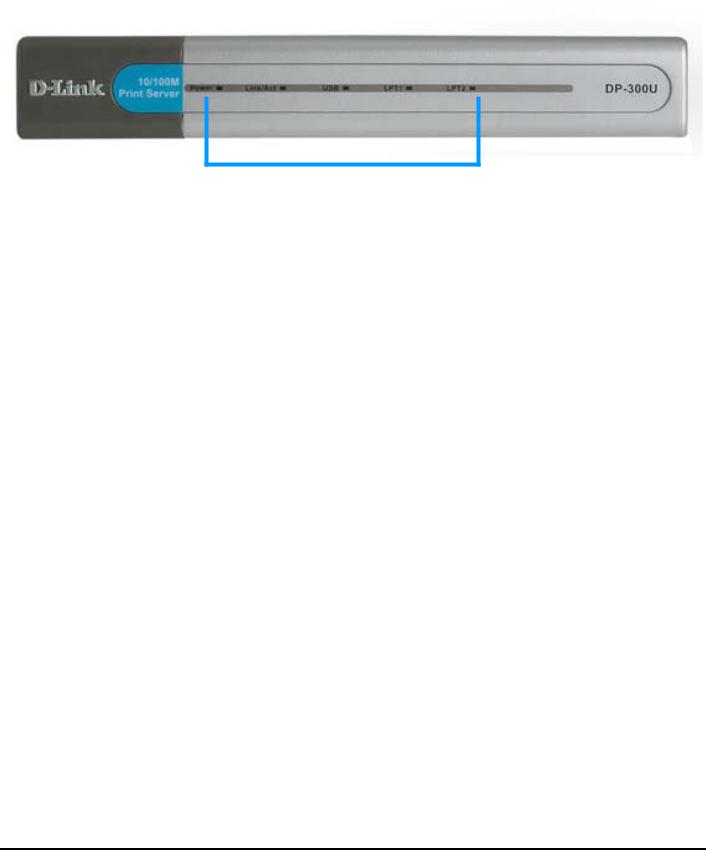
Front Panel
LED Indicators
The front panel of the print server features five LED indicators:
LED Indictors
Power
Steady green confirms that the Print Server is powered ON.
Link/Act
Steady green confirms that the Print Server has a good connection to the Ethernet or Fast Ethernet network. The indicator blinks off briefly to indicate that the Print Server is receiving or transmitting from the network.
USB
Lights up to indicate printing activity.
LPT1/LPT2
Lights up to indicate printing activity.
These five indicators are also used by the Print Server’s Power-ON Self Test (POST) to indicate any hardware failures.
5
Setting up the DP-300U
Installing the Print Server
WARNING: Configuration problems may result if the Print Server is powered up without first establishing its network connection.
Follow this procedure to avoid complications at the configuration stage.
1.Confirm proper operation of the printers to be connected to the DP-300U.
2.When you have confirmed proper operation of the printer, switch its power OFF.
3.Confirm that your network is operating normally.
4.Connect the DP-300U RJ-45 Connector to the network, using an Ethernet CAT5 cable.
5.While the printer is powered OFF, install the corresponding parallel or USB printer cable to connect the printer’s parallel port or USB port to the printer port of the Print Server
6.Switch on the connected printer.
7.Plug the AC power adapter’s DC output plug into the DC 5V power socket on the rear panel of the Print Server.
8.Plug the power adapter into a power outlet. This will supply power to the Print Server, as it has no external power switch. The green Power LED on the Print Server’s front panel should illuminate steadily, and the Print Server’s Self-Test will proceed.
Power ON Self-Test
Every DP-300U has been factory-tested to operate properly.
When the DP-300U is powered ON, it also automatically performs a Self-Test on each of its major components. The final result of the Self-Test is signaled by the state of the LPT/USB LED indicator following the Self-Test. Preliminary to the actual component tests, the five LED indicators are tested to confirm their steady
6

and flashing operation.
Immediately after power-up, all five of the green LEDs should illuminate steadily for several seconds. Then the LPT1, LPT2 and USB LED indicators should light OFF. Irregularity of any of the three LEDs during these LED tests may mean there is a problem with the LEDs themselves.
The actual component tests immediately follow the LED tests. A normal (no fault) result is signaled by a simultaneous flashing of the LPT/USB LED three times, followed by a quiescent state with the LPT/USB LED dark.
If the Self-Test routine traps any component error, then following the LED tests the Self-Test will halt and the LPT/USB LED will continuously signal the error according to the following table. In the event of any such error signal, contact your dealer for correction of the faulty unit.
LPT/USB LED |
Faulty Component |
|
|
|
|
On |
DRAM error |
|
|
1 long 3 short |
Flash Protected |
|
|
1 long 5 short |
Flash Erase/Program error |
|
|
1 long 6 short |
LAN Controller error |
|
|
1 long 8 short |
LPT Controller error |
|
|
1 long 9 short |
LPT error |
|
|
1 long 14 short |
LAN MII error |
|
|
1 long 18 short |
USB error |
|
|
1 long 19 short |
PCI error |
|
|
7

Getting Started
Below is a sample network using the DP-300U. The DP-300U has a builtin Web-based management feature that allows users to easily configure and manage multiple print queues through TCP/IP.
For a list of printers that are compatible with the DP-300U, please see the Appendix in this manual. The compatibility list is not comprehensive. Even if it is not included in the list, your printer may be compatible with the DP-300U.
8

Using PS-Wizard
This chapter will introduce you the installation and operation of a useful software program – PS-Wizard.
Auto-Run Installation
Insert the Installation CD-ROM into your computer’s CD-ROM drive to initiate the Auto-Run program. The content of the Installation CD-ROM includes:
y View Quick Installation Guide - click to preview the Quick Installation Guide in PDF format for step-by-step instructions of the print server Installation.
•View Manual – click to preview the User's Guide in PDF format for detailed information of the print server.
•Install Acrobat Reader – click to launch Acrobat Reader for the viewing and printing of PDF files in the Installation CD-ROM.
•Install PS-Wizard – click to install PS-Wizard to complete further settings for the print server, such as:
-Changing IP address
-Adding a printer on your computer in the easiest way.
•Close – click to close the Auto-Run program.
9
PS-Wizard
To avoid the conflict in your network, you can use PS-Wizard to change the related settings of your print server (such as the IP address) after finishing the installation of
PS-Wizard on your PC.
Installing PS-Wizard
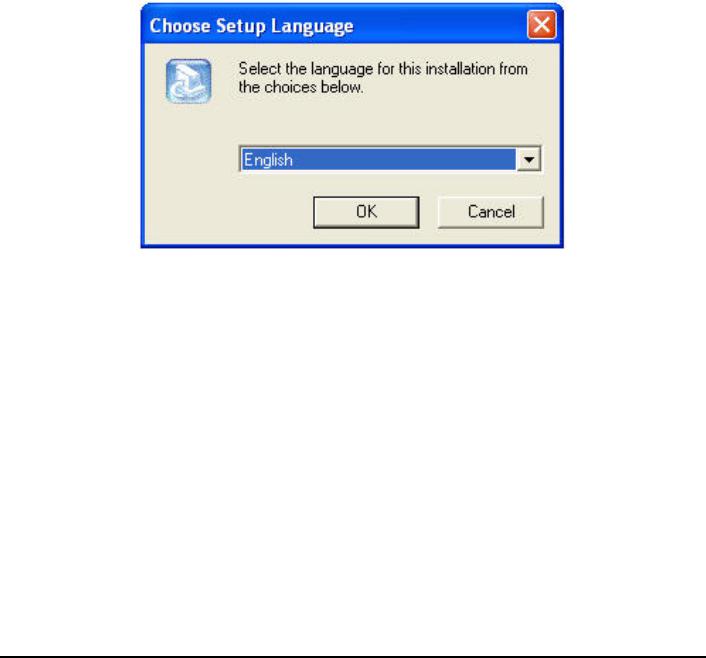
1.Click the PSWizardSetup icon of the Installation CD-ROM, and then the system will prompt a window for you to select a desired setup language from its pull-down list. After done the selection of language, click OK to continue.
10
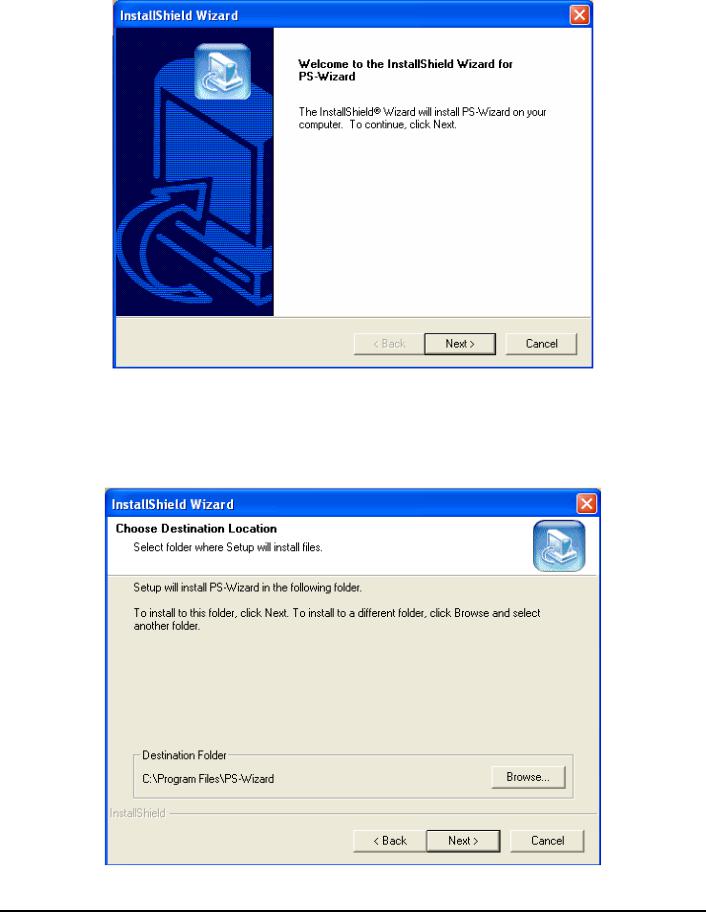
2. Click Next> in the welcome window of InstallShield Wizard.
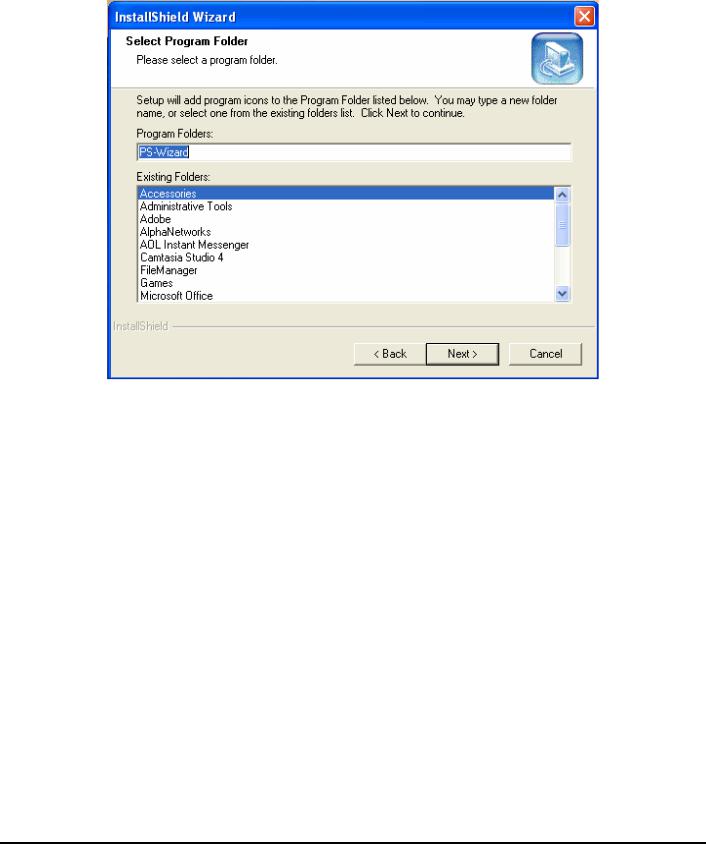
3.Specify the destination location by clicking the Browse… button. Otherwise, leave the default setting and click Next> to continue.
11
4.You may enter a new folder name in the Program Folder field if you want to change the default name. Otherwise, you may leave the default setting and click
Next> to go on the installation.
12
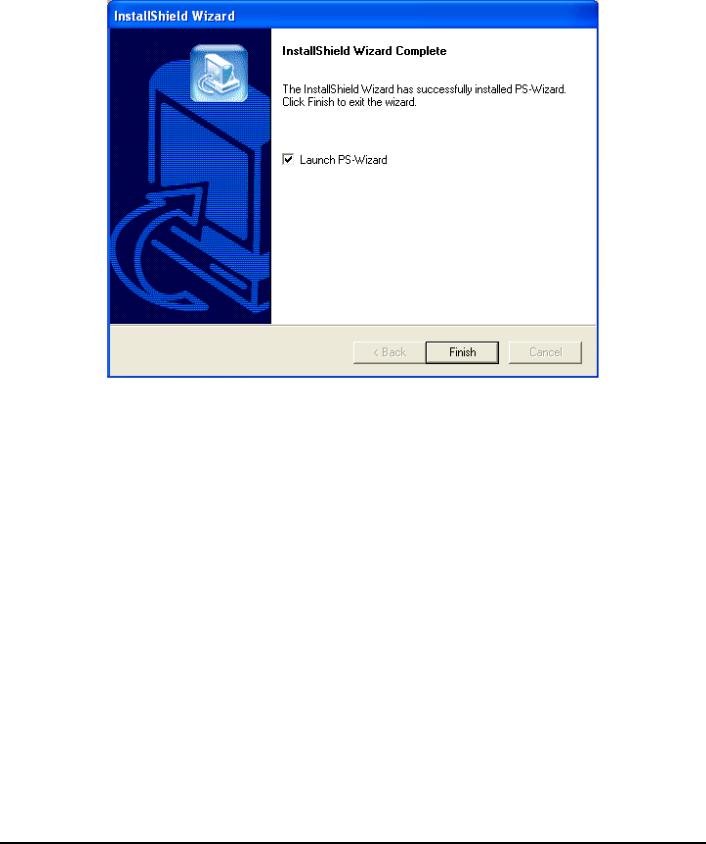
5.The InstallShield Wizard starts to install the software, and the Progress bar indicates the installation is proceeding until the following window shows up. Click
Finish to complete the installation.
After installing the program, the application program for the print server is
automatically installed to your computer, and creates a folder in StartÎ ProgramsÎ PS-Wizard.
13
Using PS-Wizard
PS-Wizard, supports for Windows 2000/XP/2003/Vista, is a simple and useful tool for you easily adding a printer on your computer in order to quickly start your printing task without any complicated configuration. That is, the main goal and advantage of the PS-Wizard is to let you add a printer on your PC in the easiest way.
Furthermore, the PS-Wizard also allows you to set up IP addresses of print server, such as IP address, Subnet Mask address, and default Gateway address.
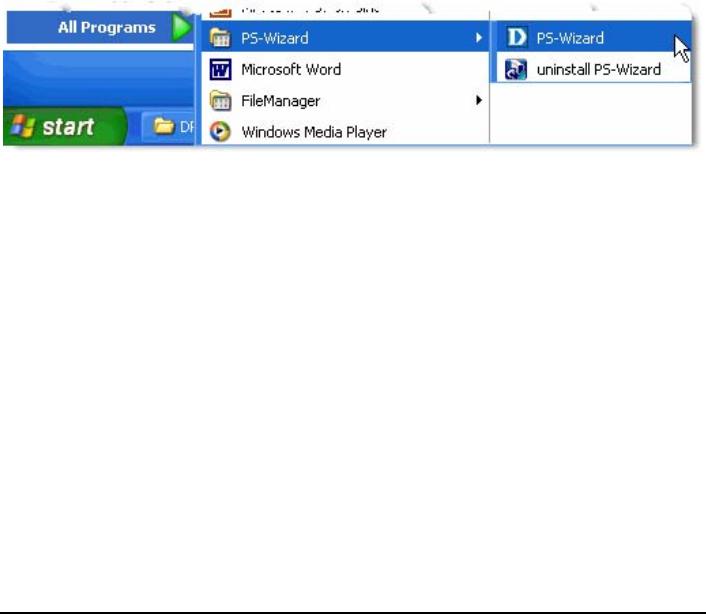
Go to StartÎ ProgramsÎ PS-Wizard, and select PS-Wizard.
14

 Print Server: This field allows you to manually discover the connected print
server and to do further configuration of the print server that is selected from the list.
15
 LAN: You may also to specify dynamic or static IP address for your print server. Then click Apply button to implement the new setting.
 Port Information: This is the main function of the PS-Wizard for you to easily add a printer on your computer.
To add a printer, click  , then the following window will display.
16
The wizard provides three ways for you to select printer driver:
1. Show current installed drivers:
You may select this option, “Show currently installed drivers”, to check if the same printer driver already existed for use. If not, you may try the next method. After done the selection of printer driver, click Next> button to continue.
2. Select from manufacturer list:
Check this option, “Select from manufacturer list”, to manually select your printer from drop-down menus by brand and model. Click Next> to continue when you find a desired driver. If not, try the last way (Have Disk). After done the selection of printer driver, click Next> to continue.
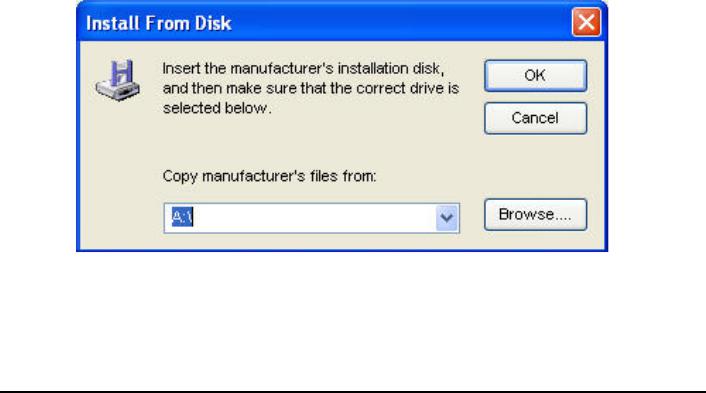
3. Have Disk:
Click Have Disk to bring up the following window. Insert the manufacture’s installation CD-ROM to install the printer driver. After the correct driver is selected, click OK to continue.
After selecting the printer driver, the wizard will ask you to confirm your selection again in the following window. Beside, you are allowed to edit the name of the
17
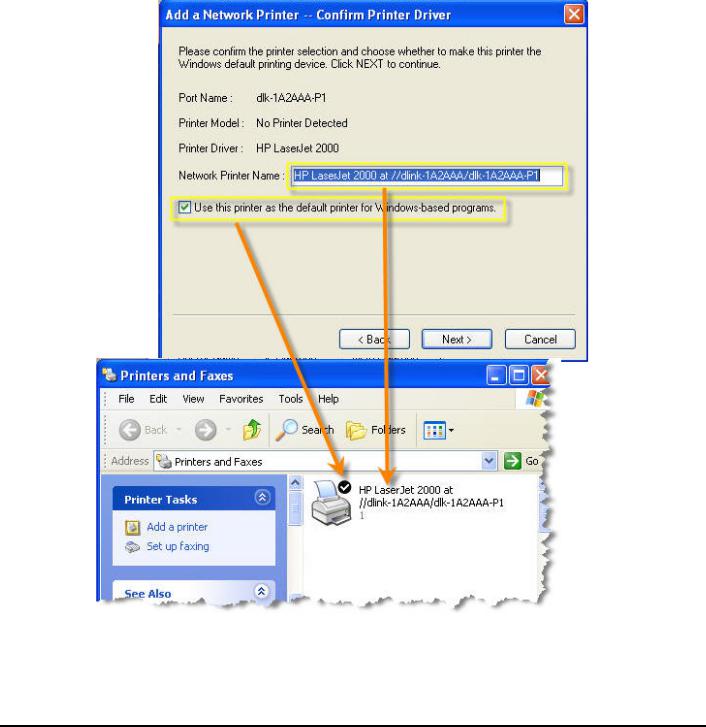
printer in the Network Printer Name box and enable this printer as the default printer by checking the Use this printer as the default printer for Windows-based programs box.
After you did the verification and configuration in the following window, click Next> to continue. Then the printer (e.g. HP Laser 2000 used in this manual) will be auto-created in Printers and Faxes as the following illustration.
18

When the following window shows up, you may do print test by clicking the Print Test Page to check if you can do printing normally. If yes, click Finish to exit the installation window and now you may start your printing tasks.
19
Using the Web Configuration
Home
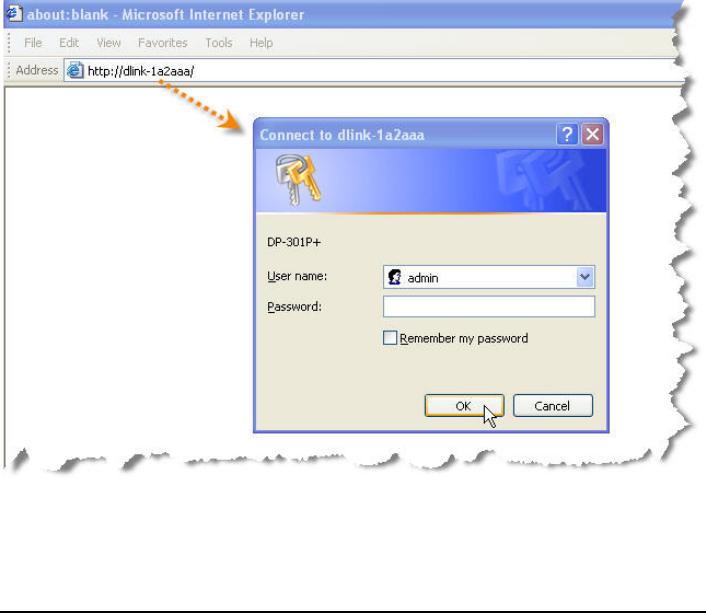
To begin managing the DP-300U, simply launch the browser (e.g. Internet Explorer 6.0 used in this manual) you have installed on your computer and direct it to the URL address: dlink-xxxxxx, where xxxxxx are the last six digits of DP-300U’s MAC address. The MAC address can be found on the bottom side of the DP-300U device.
When you enter the correct URL, a password input dialog will pop up the following screen. Type “admin” in the User name box, leave the Password box as blank, and then click OK.
Then the main screen of the print server’s configuration will appear (see below). In addition to the product information, you can access and control the print server’s
20
configuration through five links on the top of this main screen: Setup, Advanced, Maintenance, Status, and Help. You may click a desired link from the bar, to display its submenu and select a desired option listed in the left column, and then the corresponding content will show up in the center column.
21
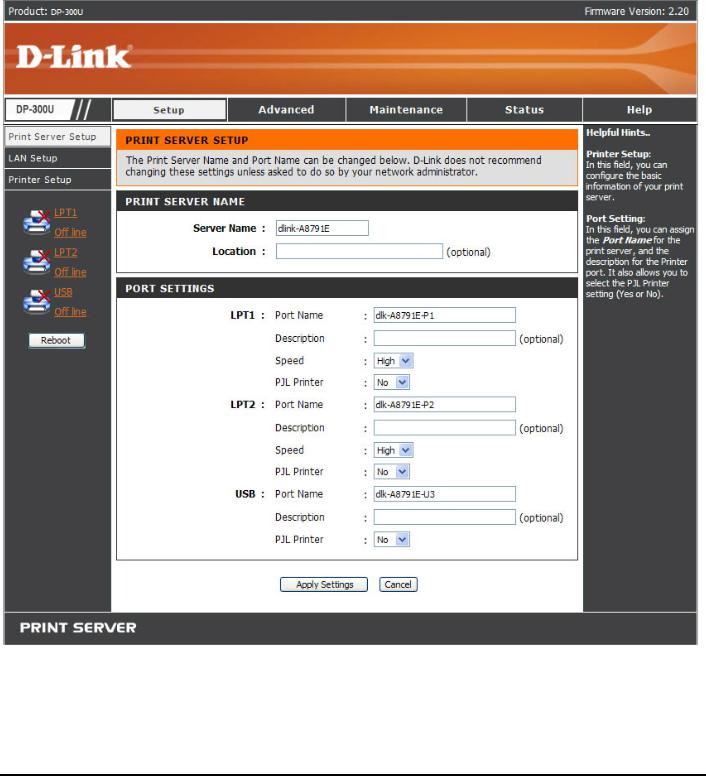
SETUP > Print Server Setup
The Print Server Setup screen allows you to modify the Print Server Name and Port Settings, as below shows. D-Link does not recommend changing these settings unless asked by your network administrator.
22

Print Server Name
In this field, you can configure the basic information of print server. The basic information contains a name of the print server, assigned in Server Name box, and a location for the print server, assigned in Location (optional) box.
Port Settings
In this field, you can assign the Port Name for the print server, and the description for the Printer port. It also allows you to select the PJL Printer setting (Yes or No).
NOTE: PJL (Printer Job Language) has certain job requirements that must be met to work correctly. For more information, please refer to your printer's manual.
Once you have changed the settings in each option, click Apply Settings to store the settings, or Cancel to abandon.
23
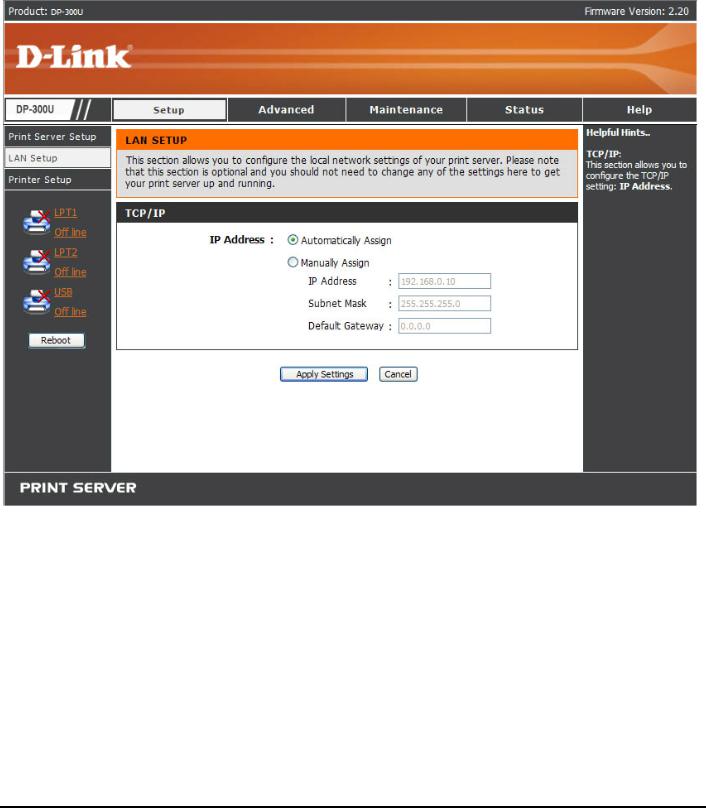
SETUP > LAN Setup
The LAN Setup screen allows you configure the local network settings of print server. Please note that this section is optional and you should not need to change any of the settings here to get print server up and running.
TCP/IP
This field allows you to assign IP address in manual or automatic method. When you choose Manually Assign, you should enter the related information in the following boxes, including IP Address, Subnet Mask, and Default Gateway. Once you have changed the settings in each option, click Apply Settings to store the settings, or Cancel to abandon.
24
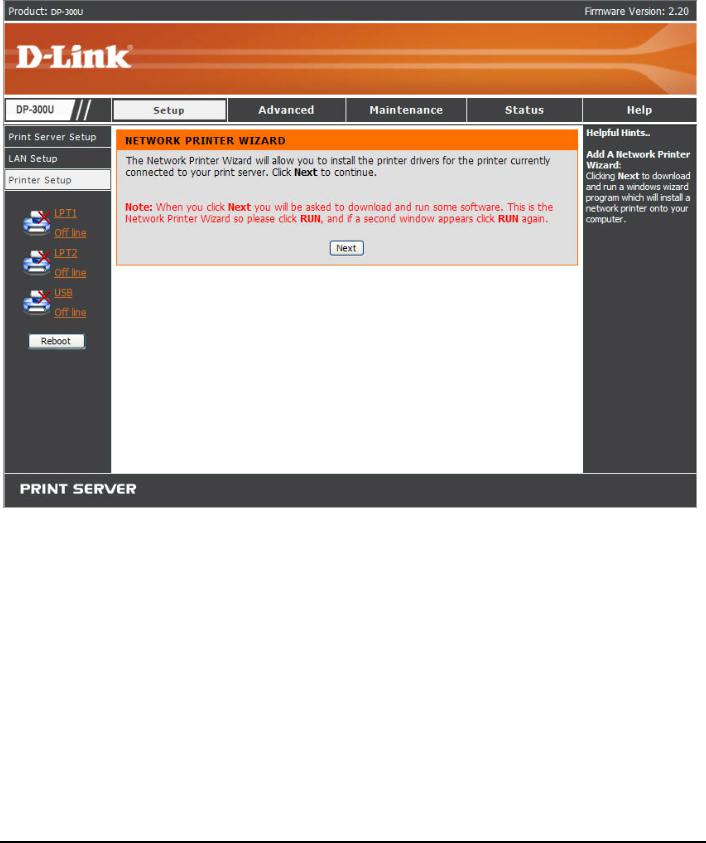
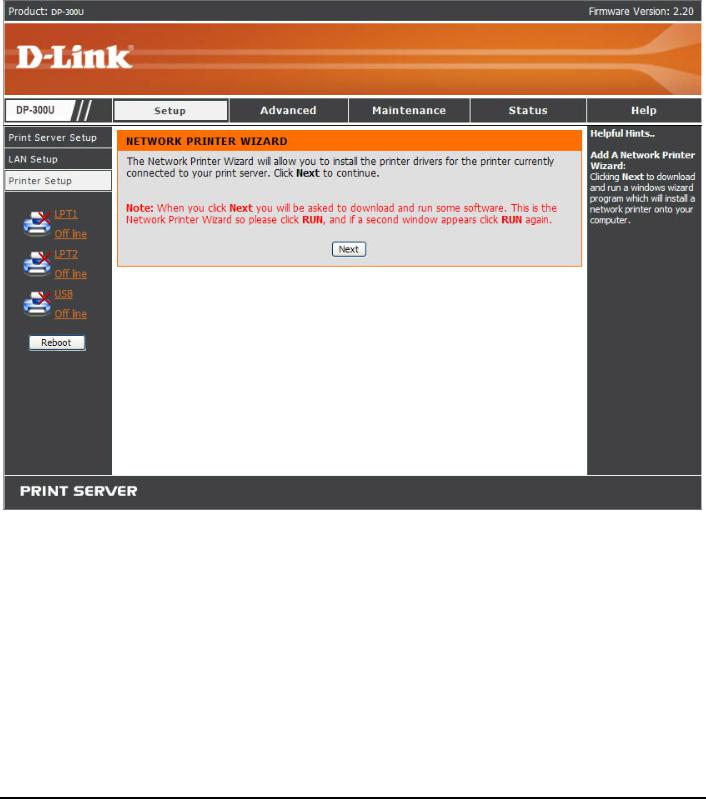
SETUP > Printer Setup
The Printer Setup screen allows you install the printer drivers for the printer currently connected to your print server.
Network Printer Wizard
Click Next to download and run a windows wizard program to install a network printer onto your computer. When you click Next, you will be asked to download and run some software.
25
 Loading...