


Recipe
Booklet
Reverse Side
INSTRUCTION BOOKLET
THE CUISINART® COMMERCIAL QUALITY ICE CREAM & GELATO MAKER |
ICE-100 |
For your safety and continued enjoyment of this product, always read the instruction book carefully before using.

IMPORTANT SAFEGUARDS
When using an electrical appliance, basic safety precautions should always be followed to reduce the risk of fire, electric shock, and/or injury, including the following:
1.READ ALL INSTRUCTIONS BEFORE USING.
2.Always unplug from outlet when not in use, before putting on or taking off parts, and before cleaning.
3.To protect against risk of electric shock, do not place cord, plug, or base of appliance in water or any other liquid.
4.Close supervision is necessary when any appliance is used by or near children.
5.Avoid contact with moving parts. Keep hands, hair, clothing, as well as spatulas and other utensils away from unit during operation to reduce the risk of injury and/or damage to the appliance.
6.Do not operate any appliance with a damaged cord or plug, or after the appliance malfunctions, or is dropped or damaged in any manner. Return the appliance to the nearest Cuisinart Repair Center for examination, repair, electrical or mechanical adjustment.
7.The use of attachments not recommended by Cuisinart may cause fire, electric shock or risk of injuries.
8.Do not use outdoors.
9.Do not let cord hang over edge of table or counter, or touch hot surfaces.
10.Keep hands and utensils out of mixing bowl while in use to reduce the risk of injury to persons or to the appliance itself.
DO NOT USE SHARP OBJECTS OR UTENSILS INSIDE THE MIXING BOWL! Sharp objects will scratch and damage the inside of the bowl. A rubber spatula or wooden spoon may be used when the appliance is in the off position.
11.This appliance is for household use. Any servicing other than cleaning and user maintenance should be done only
by authorized Cuisinart® Repair Personnel.
12.Do not use appliance for other than intended use.
13.Do not operate your appliance in an appliance garage or under a wall cabinet. When storing in an appliance garage always unplug the unit from the electrical outlet. Not doing so
could create a risk of fire, especially if the appliance touches the walls of the garage or the door touches the unit as it closes.
14.Keep the appliance 8cm from other objects to ensure motor ventilation.
15.Do not upend this product or incline it over a 45˚ angle.
16.Do not use the appliance close by flame, hot plate or stove.
17.Do not remove the paddle when the appliance is mixing.
SAVE THESE INSTRUCTIONS FOR HOUSEHOLD USE ONLY
SPECIAL CORD SET INSTRUCTIONS
A short power-supply cord is provided to reduce the risks resulting from becoming entangled in or tripping over a longer cord. Longer extension cords may be used if care is exercised in their use.
If a long, grounded 3-prong extension cord is used, the marked electrical rating of the extension cord should be at least as great as the electrical rating of the appliance, and the longer cord should be arranged so that it will not drape over the countertop or tabletop, where it can be pulled on by children or animals, or tripped over.
CAUTION
This appliance is for household use. Any servicing other than cleaning and user maintenance should be performed by an authorized service representative.
•Do not immerse base in water.
•To reduce the risk of fire or electric shock, do not disassemble the base. Note: The base does not contain any user-serviceable parts.
•Repairs should be made only by authorized personnel.
•Check voltage to be sure that the voltage indicated on the name plate agrees with your voltage.
•Never clean with scouring powders or hard implements.
•Unit should remain upright at all times. If unit is turned on its side or upside down, you will need to put it in upright position and wait 24 hours before using.
2
CONTENTS |
|
|
|
|
|
|
|
|
|
|
|
|
|
|
|
|
|
6. Touchpad Control Panel with LCD Readout |
|||
|
|
|
|
|
|
|
|
|
|
|
|
|
|
|
|
|
|
||||
Important Safeguards . . . . . . . . . . |
. . |
. |
. . |
. |
. |
|
2 |
a. Power Button |
|||||||||||||
|
Turns the unit on and off. Red LED light will be |
||||||||||||||||||||
Parts and Features . . . . . . . . . . . |
. . |
. |
. . |
. |
|
|
3 |
illuminated when unit is on. |
|||||||||||||
Before First Use . . . . . . . . . . . . |
. . |
. |
. . |
3 |
If red LED is flashing, unit is in Standby mode, ready for use. |
||||||||||||||||
Operating Instructions . . . . . . . . . . |
. . |
. |
. . |
. |
. |
|
3 |
b. Timer Button |
|||||||||||||
Safety Feature . . . . . . . . . . . . . |
. . |
. |
. 4 |
Allows you to set from 10 minutes to 60 minutes. |
|||||||||||||||||
Cleaning, Storage and Maintenance . . . . |
. . |
. |
|
. . |
|
. |
. . |
4 |
c. Start/Stop Button |
||||||||||||
Troubleshooting . . . . . . . . . . . . |
. . |
. |
|
. . |
|
5 |
Allows you to start and stop the mixing process and timer. |
||||||||||||||
Warranty . . . . . . . . . . . . . . . |
. . |
5 |
The mixing/cooling blue LED will illuminate when mixing. |
||||||||||||||||||
Blue LED will flash when paused (stopped). |
|||||||||||||||||||||
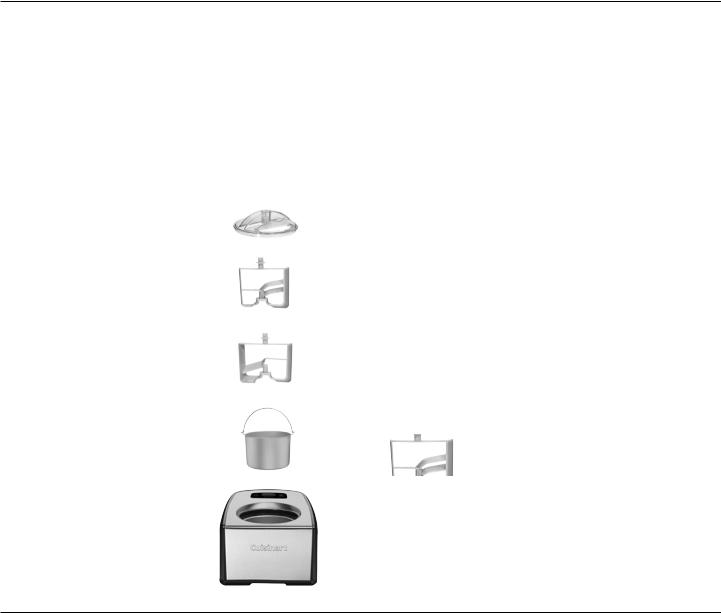
PARTS AND FEATURES |
|
|
|
|
|
|
|
|
|
|
|
|
|
|
|
|
|
||||
|
|
|
|
|
|
|
|
|
|
|
|
|
|
|
|
|
BEFORE FIRST USE |
||||
1. Transparent Lid |
|
|
|
|
|
|
|
|
|
|
|
|
|
|
|
|
|
||||
Easily comes off to allow recipe |
|
|
|
|
|
|
|
|
|
|
|
|
|
1. |
DO NOT immerse the compressor/motor base in water. Wipe it with |
||||||
|
|
|
|
|
|
|
|
|
|
|
|
|
|||||||||
ingredients to be added to the bowl. |
|
|
|
|
|
|
|
|
|
|
|
|
2. |
a moist cloth. Wash the lid, mixing bowl and mixing paddles in warm, |
|||||||
2. Mix-in Opening |
|
|
|
|
|
|
|
|
|
|
|
|
soapy water to remove any dust or residue from the manufacturing |
||||||||
|
|
|
|
|
|
|
|
|
|
|
|
||||||||||
|
|
|
|
|
|
|
|
|
|
|
|
|
|
|
|
|
|||||
|
|
|
|
|
|
|
|
|
|
|
|
|
|
|
|
|
and shipping process. Only the mixing paddles and lid are top-shelf |
||||
Use to add toppings and mix-ins like |
|
|
|
|
|
|
|
|
|
|
|
|
|
|
|
|
|
||||
|
|
|
|
|
|
|
|
|
|
|
|
|
|
|
|
|
dishwasher safe. DO NOT place mixing bowl in dishwasher. DO NOT |
||||
chips or nuts, without interrupting |
|
|
|
|
|
|
|
|
|
|
|
|
|
|
|
|
|
||||
|
|
|
|
|
|
|
|
|
|
|
|
|
|
|
|
|
clean any of the parts with abrasive cleaners or hard implements. |
||||
the freezing cycle. |
|
|
|
|
|
|
|
|
|
|
|
3a. |
|||||||||
|
|
|
|
|
|
|
|
|
|
|
Place in upright position and let it rest for 24 hours. |
||||||||||
3. Mixing Paddles |
|
|
|
|
|
|
|
|
|
|
|
||||||||||
|
|
|
|
|
|
|
|
|
|
|
|
|
|
|
|
|
OPERATING INSTRUCTIONS |
||||
Mix and aerate ingredients |
|
|
|
|
|
|
|
|
|
|
|
|
|
|
|
|
|
||||
|
|
|
|
|
|
|
|
|
|
|
|
|
|
|
|
|
|
|
|
||
in mixing bowl to create |
|
|
|
|
|
|
|
|
|
|
|
|
|
|
|
|
|
1. Plug the unit into the power outlet. Red LED light will flash |
|||
frozen dessert. |
|
|
|
|
|
|
|
|
|
|
|
|
|
|
|
|
|
||||
a. Patent-Pending Gelato and |
|
|
|
|
|
|
|
|
|
|
|
3b. |
to indicate unit is in standby. |
||||||||
|
|
|
|
|
|
|
|
|
|
|
Note: The unit will go back to standby mode if user does not |
||||||||||
|
|
|
|
|
|
|
|
|
|
|
|||||||||||
Sorbet Paddle |
|
|
|
|
|
|
|
|
|
|
|
|
|
|
|
|
|
||||
|
|
|
|
|
|
|
|
|
|
|
|
|
|
|
|
|
press Start/Stop in 10 minutes during time adjustment operation. |
||||
Perfectly incorporates less air |
|
|
|
|
|
|
|
|
|
|
|
|
|
|
|
|
|
||||
|
|
|
|
|
|
|
|
|
|
|
|
|
|
|
|
|
2. Prepare ingredients (see reverse side of this instruction booklet |
||||
into the ingredients and creates |
|
|
|
|
|
|
|
|
|
|
|
|
|
|
|
|
|
||||
|
|
|
|
|
|
|
|
|
|
|
|
|
|
|
|
|
for recipes and tips). |
||||
richly textured results with |
|
|
|
|
|
|
|
|
|
|
|
|
|
|
|
|
|
||||
|
|
|
|
|
|
|
|
|
|
|
|
|
|
|
|
|
Note: If using your own recipe, be sure bases do not go over |
||||
intense flavor. |
|
|
|
|
|
|
|
|
|
|
|
|
|
|
|
|
|
||||
|
|
|
|
|
|
|
|
|
|
|
|
|
|
|
|
|
top dasher on mixing paddle. See below for image. |
||||
b. Patent-Pending |
|
|
|
|
|
|
|
|
|
|
|
|
|
|
|
|
|
||||
|
|
|
|
|
|
|
|
|
|
|
|
|
|
|
4. |
|
|
|
|||
Ice Cream Paddle |
|
|
|
|
|
|
|
|
|
|
|
|
|
|
|
|
top dasher |
||||
|
|
|
|
|
|
|
|
|
|
|
|
|
|
|
|
||||||
|
|
|
|
|
|
|
|
|
|
|
|
|
|
|
|
|
|
|
|||
Churns ingredients perfectly |
|
|
|
|
|
|
|
|
|
|
|
|
|
|
|
|
|
|
|
||
|
|
|
|
|
|
|
|
|
|
|
|
|
|
|
|
|
|
|
|
||
and creates smooth and |
|
|
|
|
|
|
|
|
|
|
|
|
|
|
|
|
|
|
|
|
|
creamy results. |
|
|
|
|
|
|
|
|
|
|
|
|
|
|
6. |
3. Place mixing bowl into the base. Be sure bowl is properly |
|||||
4. Mixing Bowl with Lift-Out Handle |
|
|
|
|
|
|
|
|
|
|
|
|
|
aligned in base. |
|||||||
|
|
|
|
|
|
|
|
|
|
|
|
|
|||||||||
|
|
|
|
|
|
|
|
|
|
|
|
|
|
|
|
|
|||||
|
|
|
|
|
|
|
|
|
|
|
|
|
|
|
|
|
4. Place ice cream or gelato/sorbet paddle in mixing bowl so that |
||||
Anodized aluminum mixing |
|
|
|
|
|
|
|
|
|
|
|
|
|
5. |
|||||||
bowl. No need to pre-chill or |
|
|
|
|
|
|
|
|
|
|
|
|
it rests in the center of the bowl. |
||||||||
|
|
|
|
|
|
|
|
|
|
|
|
||||||||||
freeze bowl. |
|
|
|
|
|
|
|
|
|
|
|
|
|
|
|
|
|
5. Pour ingredients into the mixing bowl. Position lid by lining up arrow on |
|||
5. Base |
|
|
|
|
|
|
|
|
|
|
|
|
|
|
|
|
|
lid with the unlock icon on base. Lock into place by turning it |
|||
Contains heavy-duty compressor |
counterclockwise. Be sure the arrow on lid is lined up with the lock |
|
icon on the base. The mix-in opening is centered in the front when in |
||
and mixing motor. |
||
the lock position. |
||
|
3

6.Press the Power button to turn the unit on. The red LED light will be on and the LCD screen will display “00”.
7.Press the Timer button to set time from 60 to 10 minutes. The timer will default to 60 minutes. Press and release timer button to decrease time in 1-minute increments. Press and hold to scroll down more quickly.
Note: If you added too much time, continue to press Timer and it will bring you back to ten minutes.
8.Press the Start/Stop button to begin the Mixing/Cooling cycle.
•Ingredients such as chips and nuts can be added towards the end of mixing time. Once the dessert has begun to thicken
(usually about 5 minutes from end time), add the ingredients through the mix-in opening.
Note: To turn the unit off at any time, press the Power button.
9.The timer will count down to zero and the unit will beep three times to indicate the frozen dessert is ready.
Note: The red LED will flash and the timer will be blinking “00”.
10.Turn the unit off by pressing the Power button. Remove the lid by turning it clockwise to unlock. Lift mixing bowl out of the base with handle. Remove paddle from mixing bowl.
Note: If the unit is not powered off, it will go into the Keep Cool function. Details follow on this page.
To pause time and mixing:
•Press the Start/Stop button at any point in the Mixing/Cooling cycle to pause the time and mixing. To restart, press the Start/Stop button again to continue.
To add time:
If ice cream isn’t done or you would like to add time, press the Start/Stop button to pause unit. Add time in 5-minute increments. Press and hold to scroll through more quickly. If you added too much time, continue to press timer and it will bring you back to ten minutes.
Note: When making consecutive batches of ice cream or gelato, be sure to allow extra time for the compressor to adjust to cooling.
Tip: Unplug unit and let it rest for 10 minutes to allow it to cool before making a second batch.
Keep Cool
This function does exactly what it says….keeps cool! After the set time ends the unit will go to Keep Cool.
The timer will blink “00” and the unit is now in the Keep Cool mode and enters a 10-minute wait period. After 10 minutes elapse, the compressor will come on and the display will flash “COOL”. The Keep Cool is a 10-minute cycle. When done, the unit will beep 5 times to note the cycle is finished. The unit will shut off and go into Standby mode.
Note: The mixing is not activated during the Keep Cool function. If you would like to mix as well, turn off the unit to reset the functions.
Note: You can turn the unit off at any time during Keep Cool.
SAFETY FEATURE
The Cuisinart® Commercial Quality Ice Cream & Gelato Maker is equipped with a safety feature that automatically stops the unit if the motor overheats. This safety system may activate under heavy loads, if the unit has been running for an excessively long period of time, or if added ingredients (nuts, etc.) are added in extremely large pieces.
To reset the unit, press the Power button and unplug the unit. Let the unit rest. After a few minutes, you may turn the unit on again and continue
making the dessert.
CLEANING, STORAGE AND MAINTENANCE
Cleaning
Clean the mixing bowl, mixing paddles and lid in warm soapy water. Mixing paddles and lid are top-shelf dishwasher safe. DO NOT PUT MIXING BOWL IN THE DISHWASHER. DO NOT CLEAN WITH ABRASIVE CLEANSERS OR IMPLEMENTS. Wipe motor base clean with damp cloth. Dry all parts thoroughly.
Storage
Be sure to store your unit in an upright position. Do not store frozen desserts in the mixing bowl in the freezer for more than 30 minutes at a time. Transfer frozen desserts to a freezer-safe, airtight container for longer storage in the freezer.
Maintenance
Any other servicing should be performed by an authorized service representative.
4

TROUBLESHOOTING
PROBLEM |
SOLUTION |
|
|
|
|
Screen displays “EEEE”, |
Power off and unplug the unit. |
|
continuous beeping and |
|
|
the unit is stopped. |
Contact Customer Service at 1-800-726-0190. |
|
|
|
|
Unit turns off sooner than |
The ice cream could be done. The overload |
|
the time set. |
protection feature will turn the unit off. |
|
|
|
|
|
If not the reason above, unplug the unit. Let it rest for |
|
|
2 hours. Power unit on and being making your ice |
|
|
cream or gelato. |
|
|
|
|
At any time during the |
Power off and unplug the unit. Let it rest for 2 hours. |
|
mixing/cooling cycle, the |
Power unit on and being making your ice cream or |
|
unit beeps continuously |
gelato. If this happens again, let the unit rest for 24 |
|
for 30 seconds. |
hours. If unit continues to beep after you have tried |
|
|
the above procedure, contact Customer Service at |
|
|
1-800-726-0190. |
|
|
|
|
Mixing bowl is difficult |
Wait 2 minutes and lift the mixing bowl. |
|
to lift. |
|
|
Make sure mixing bowl and the base are dry before |
||
|
||
|
making ice cream. |
|
|
|
|
Paddle slippage after |
Watch for condensation on base of bowl. Clear off |
|
several batches of ice |
water or ice from mixing bowl and base. |
|
cream. |
|
|
Make sure mixing bowl and base are dry and clean |
||
|
||
|
before making next batch of ice cream. |
|
|
|
WARRANTY
LIMITED THREE-YEAR WARRANTY
This warranty supersedes all previous warranties on the Cuisinart® Commercial Quality Ice Cream & Gelato Maker. This warranty is available to consumers only. You are a consumer if you own a Cuisinart® Commercial Quality Ice Cream & Gelato Maker that was purchased at retail for personal, family or household use. Except as otherwise required under applicable state law, this warranty is not available to retailers or other commercial purchasers or owners. We warrant that your Cuisinart® Commercial Quality Ice Cream & Gelato Maker will be free of defects in material or workmanship under normal home use for three years from the date of original purchase.
We recommend that you visit our website, www.cuisinart.com for a fast, efficient way to complete your product registration. However, product registration does not eliminate the need for the consumer to maintain the original proof of purchase in order to obtain the warranty benefits. In the event that you do not have proof of purchase date, the purchase date for purposes of this warranty will be the date of manufacture.
However, return of the product registration is not a condition of these warranties. If your Cuisinart® Commercial Quality Ice Cream & Gelato Maker should prove to be defective within the warranty period, we will repair it, or if we think necessary,
replace it. To obtain warranty service, please call our Consumer Service Center toll-free at 1-800-726-0190 or write to: Cuisinart, 7811 NORTH GLEN HARBOR BLVD. GLENDALE, AZ 85307.
To facilitate the speed and accuracy of your return, please also enclose $10.00 for shipping and handling of the product (California residents need only supply proof of purchase and should call 1-800-726-0190 for shipping instructions).
Please also be sure to include a return address, description of the product defect, product serial number, and any other information pertinent to the product’s return. Please pay by check or money order.
5

CALIFORNIA RESIDENTS ONLY
California law provides that for In-Warranty Service, California residents have the option of returning a nonconforming product
(A) to the store where it was purchased or (B) to another retail store which sells Cuisinart® products of the same type. The retail store shall then, according to its preference, either repair the product, refer the consumer to an independent repair facility, replace the product, or refund the purchase price less the amount directly attributable to the consumer’s prior usage of the product. If the above two options do not result in the appropriate relief to the consumer, the consumer may then take the product to an independent repair facility if service or repair can be economically accomplished. Cuisinart® and not the consumer will be responsible for the reasonable cost of such service, repair, replacement, or refund for nonconforming products under warranty.
California residents may also, according to their preference, return nonconforming products directly to Cuisinart for repair or, if necessary, replacement by calling our Consumer Service Center toll-free at 800-726-0190.
Cuisinart® will be responsible for the cost of the repair, replacement, and shipping and handling for such nonconforming products under warranty.
BEFORE RETURNING YOUR CUISINART® PRODUCT
If your Cuisinart® Commercial Quality Ice Cream & Gelato Maker should prove to be defective within the warranty period, we will repair or, if we think necessary, replace it. To obtain warranty service, please call our Customer Service Center toll-free at 1-800-726-0190 or write to: Cuisinart, 7811 North Glen Harbor Blvd. Glendale, AZ 85307. To facilitate the speed and accuracy of your return, enclose $10.00 for shipping and handling. (California residents need only supply a proof of purchase and should call 1-800-726-0190 for shipping instructions.) Please be sure to include your return address, description of the product’s defect, product serial number, and any other information pertinent to the return. Please pay by check or money order. NOTE: For added protection and secure handling of any Cuisinart® product that is being returned, we recommend you use a traceable, insured delivery service. Cuisinart cannot be held responsible for in-transit damage or for packages that are not delivered to us. Lost and/or damaged products are not covered under warranty.
Your Cuisinart® Commercial Quality Ice Cream & Gelato Maker has been manufactured to the strictest specifications and has been designed for use only in 120 volt outlets and only with authorized accessories and replacement parts. This warranty expressly excludes any defects or damages caused by attempted use of this unit with a converter, as well as use with accessories, replacement parts or repair service other than those authorized by Cuisinart. This warranty does not cover any damage caused by accident, misuse, shipment or other than ordinary household use. This warranty excludes all incidental or consequential damages. Some states do not allow the exclusion or limitation of these damages, so these exclusions may not apply to you. You may also have other rights, which vary from state to state.
Important: If the nonconforming product is to be serviced by someone other than Cuisinart’s Authorized Service Center, please remind the servicer to call our Consumer Service Center at 1-800-726-0190 to ensure that the problem is properly diagnosed, the product is serviced with the correct parts, and to ensure that the product is still under warranty.
Trademarks or service marks of third parties referred to herein are the trademarks or service marks of their respective owners.
©2012 Cuisinart
150 Milford Road
East Windsor, NJ 08520
Printed in China www.cuisinart.com 12CE128654
F IB-10609A
6

Instruction
Booklet
Reverse Side
THE CUISINART® COMMERCIAL QUALITY ICE CREAM & GELATO MAKER

RECIPE TIPS
The recipes that follow offer you a variety of options for delicious frozen desserts. You may create or use recipes of your own, as long as the bases do not go over the top dasher on mixing paddle.
(refer to image of dasher on page 3)
Recipe Tips
•Gelato and Sorbet bases should be no more than 1 quart (should not go above the highest dasher on the paddle).
•Ice Cream bases should be no more than 5 cups (should not go above the highest dasher on the paddle).
•For optimum consistency, chill all mixtures for a minimum of 2 hours, or up to 3 days. Always re-whisk the mixture after chilling to be sure all ingredients are well combined. While chilling the mixture is not required, this step will prevent any “ice” or “fat” crystals from forming during the freezing process for resting it in a chilled environment helps bind the ingredients together.
•Frozen desserts from the Cuisinart® Ice Cream & Gelato Maker use pure, fresh ingredients. Because of this, the desserts do not have the same characteristics as commercially prepared frozen desserts. Most store-bought versions use gums and preservatives to make them firmer. If you desire a firmer consistency, transfer the dessert to an airtight container and store in the freezer until desired consistency is reached, usually two or more hours.
•Some recipes use precooked ingredients. For best results, the mixture should be chilled overnight before using. Or, chill the recipe over an ice bath, until it is completely cooled, before using. To make an ice bath, fill a large container with ice and water. Place saucepan or other container into the ice bath. Cool precooked ingredients completely.
•You may substitute lower fat creams (e.g., half and half) and/or milk (reduced fat or low fat) for heavy cream and whole milk used in many recipes. However, keep in mind that the higher the fat content, the richer and creamier the result. Using lower fat substitutes may change the taste, consistency and texture of the dessert. When substituting, be sure to use the same volume of the substitute as you would have used of the original item. For example, if the recipe calls for two cups of cream, use a total of two cups of the substitute (such as 1 cup cream, 1 cup whole milk). See our recipes starting on page 9 for more tips.
•You may substitute artificial sweeteners for sugar. Stir the mixture thoroughly to dissolve the sweetener. See our recipe using Splenda on page 15 for a guide.
•If a firmer consistency is desired, transfer to an airtight container
and place in freezer for about 2 hours. Remove from freezer about 15 minutes before serving.
•When making sorbet, be sure to test the ripeness and sweetness of the fruit before you use it. The freezing process reduces the sweetness of the fruit so that it will taste less sweet than the recipe mixture. If the fruit tastes tart, add additional sugar to the recipe. If the fruit is very ripe or sweet, reduce the amount of sugar in the recipe. Use our sorbet recipes on page 23 as a guide.
•Make sure the mixing paddle and lid are in place before turning on machine.
ADDING INGREDIENTS
•Ingredients such as chips and nuts should be added about 5 minutes before the freezing process is complete. You want it to still be soft enough to be able to fully incorporate into the frozen mixture.
•To add a chocolate swirl to ice cream, gelato or frozen yogurt, drizzle in hot fudge or melted chocolate. The melted chocolate will harden once it makes contact with the freezing ingredients so add it in a slow drizzle to ensure that it does not clump.
* Our basic gelato recipe uses both cornstarch and liquid pectin for the creamiest consistency. Pectin is found in most grocery stores commonly near the gelatin and pudding section.
2
 Loading...