


INSTRUCTION
BOOKLET
Programmable Espresso Maker |
EM-200 |
|
|
For your safety and continued enjoyment of this product, always read the instruction book carefully before using.

IMPORTANT
SAFEGUARDS
We at Cuisinart are very safety conscious. We design and manufacture consumer products with the safety of you, our valued customer, foremost in mind. In addition we ask that you exercise a degree of care when using electrical appliances and adhere to the following precautions.
When using electrical appliances, basic safety precautions should always be followed, including the following:
1.CAREFULLY READ ALL INSTRUCTIONS BEFORE OPERATING APPLIANCE AND SAVE FOR FUTURE REFERENCE.
2.To protect against fire, electrical shock and injury to persons do not immerse the appliance, cord or plug in water or any other liquid.
3.This appliance is for household use only.
4.Do not use this appliance for anything other than its intended use.
5.This appliance should not be used by or near children or individuals with certain disabilities.
6.Do not leave the appliance unattended when in use.
7.Do not touch hot surfaces. Use handles.
8.Always use the appliance on a dry, level surface.
9.To disconnect, turn all controls off, then remove plug from power outlet.
10.Do not place this appliance on or near a hot gas or electric burner, or where it could touch a heated oven.
11.Do not let the cord hang over the edge of a table or counter, touch hot surfaces or become knotted.
12.The use of accessory attachments not recommended by Cuisinart may cause a risk of injury to persons, fire or electrical shock.
13.Strictly follow cleaning and care instructions.
14.Do not use this appliance for anything other than its intended use. Do not use in moving vehicles or boats.
15.Do not use outdoors.
16.Always switch the appliance off, and then remove plug from the power outlet when the appliance is not being used and before cleaning.
17.An extension cord is not recommended. However, if one is needed, the extension cord should be a grounded type and its electrical rating must be the same or higher wattage as the appliance. Regularly inspect the supply cord, plug and actual appliance for any damage. If found damaged in any way, immediately cease use of the appliance and call Cuisinart Customer Service at 1-800-726-0190.
18.For any maintenance other than cleaning, call Cuisinart Customer Service at 1-800- 726-0190.
19.Refer servicing to qualified personnel.
20.Do not operate any appliance with a damaged cord or plug or after the appliance malfunctions, or has been damaged in any manner. Return appliance to the nearest authorized service facility for examination, repair or adjustment.
21.Unplug from outlet when not in use and before cleaning. Allow to cool before putting on or taking off parts, and before cleaning the appliance.
2

SAVE THESE INSTRUCTIONS
FOR HOUSEHOLD USE ONLY
WARNING: RISK OF FIRE OR ELECTRIC SHOCK
The lightning flash with arrowhead symbol within an equilateral triangle is intended to alert the user to the presence of uninsulated dangerous voltage within the product’s enclosure that may be of sufficient magnitude to constitute a risk of fire or electric shock to persons.
The exclamation point within an equilateral triangle is intended to alert the user to the presence of important operating and maintenance (servicing) instructions in the literature accompanying the appliance.
SPECIAL SAFETY
INSTRUCTIONS
1.Use only cold water in the water reservoir. Do not use any other liquid.
2.Never use the machine without water in it.
3.Ensure the portafilter holder is firmly secured when using the machine.
4.Never remove the portafilter holder during the brewing operation as the machine is under pressure.
NOTE: For safety reasons it is recommended you plug your Cuisinart appliance directly into the power outlet. Use in conjunction with a power strip or extension cord is not recommended.
SPECIAL CORD SET INSTRUCTIONS
A short power-supply cord is provided to reduce the risks resulting from becoming entangled in or tripping over a longer cord.
Longer extension cords are available and may be used if care is exercised in their use.
If a long extension cord is used, the marked electrical rating of the extension cord must be at least as great as the electrical rating of the appliance, and the longer cord should be arranged so that it will not drape over the countertop or tabletop where it can be pulled on by children or tripped over.
NOTICE
This appliance has a polarized plug (one blade is wider than the other). To reduce the risk of electric shock, this plug will fit in a polarized outlet only one way. If the plug does not fit fully in the outlet, reverse the plug. If it still does not fit, contact a qualified electrician. Do not modify the plug in any way.
IMPORTANT UNPACKING INSTRUCTIONS
1.Open the gift box.
2.Remove the top corrugated cardboard.
3.Remove the entire unit from the box.
4.Remove the three filter baskets, scoop/ tamping tool and portafilter holder from the side polyfoam.
5.Remove the frothing pitcher from the middle of the espresso maker and then remove the polyfoam from the espresso maker.
We suggest you save all packing materials in the event that future shipping of the machine is needed. Keep all plastic bags away from children.
3

CONTENTS
Important Safeguards. . . . . . . . . . . . . . . . . . . 2 Unpacking Instructions . . . . . . . . . . . . . . . . . 3 The Quest for the
Perfect Cup of Espresso . . . . . . . . . . . . . . . . 4 Features and Benefits, Diagram. . . . . . . . . . . 5 Preparing Your Espresso Machine
Before Use . . . . . . . . . . . . . . . . . . . . . . . . . . . 6 Programming Your Espresso Machine . . . . . 6 Guide to the Perfect Espresso . . . . . . . . . . . 7 Guide to Milk Texturing . . . . . . . . . . . . . . . . . 8 Using the Hot Water Function . . . . . . . . . . . . 9 Cleaning and Maintenance . . . . . . . . . . . . . . 9
Recipes . . . . . . . . . . . . . . . . . . . . . . . . . . . . |
11 |
Warranty . . . . . . . . . . . . . . . . . . . . . . . . . . . . 19
THE QUEST FOR THE PERFECT CUP OF ESPRESSO
It is generally agreed that there are four basic elements critical to the perfect cup:
Element 1: Water
When brewing espresso, make sure the water flows through the filter at the correct pace. The water flow can be adjusted by varying the pressure with which the coffee is tamped (pressed down) in the filter or by altering the grind of the coffee. If the speed of the water flow is too slow, the coffee will be overextracted and will be very dark and bitter, with a spotted and uneven crema (froth) on the top. If the speed of the water flow is too fast, the
coffee will be under-extracted and the supreme flavor will not develop. The coffee will be diluted and there will be an inadequate amount of crema on the top.
Element 2: Coffee
While the bulk of the liquid is water, all of the flavor should be from the coffee. To achieve the same great quality of coffee you receive at a café, you need to use the same quality beans. If you choose to grind your own beans, buy the beans fresh and whole, only about a two-week supply at a time for maximum freshness. Once the coffee bean is broken, its flavor degrades
very quickly. If it is not practical to buy smaller supplies, we recommend you separate larger amounts of beans and store them in airtight containers in a cool, dry area. They should not be kept for longer than 1 month as flavor will diminish. Do not refrigerate or freeze coffee beans.
Element 3: Grind
The grind of the coffee is critical for proper flavor extraction. If using a pre-ground coffee, be sure to purchase an espresso grind that is specifically for espresso/cappuccino machines. If the grind is too fine, over extraction and bitterness will occur with a spotted and uneven crema on the top. If the grind is too coarse, the water will pass through too rapidly and
there will be an inadequate amount of crema on the top of the espresso.
Element 4: Tamping the Coffee Grounds
If you choose to use ground espresso instead of pods, tamping the coffee is a very important part of the coffee making process. Use the scoop supplied to fill the filter basket, then using the tamping tool (flat end of the measuring scoop), tamp (press down) down the grounds with moderate pressure. Add more coffee and tamp again if necessary to bring coffee to level. Do not overfill the filter basket. The ground coffee should be tamped with moderate pressure. If the coffee is not tamped securely, there is a chance that the water will flow through the coffee too rapidly and the coffee will be under-extracted. Note: If the coffee is tamped too firmly, the water will flow through the coffee too slowly and the coffee will be over-extracted and may overflow through the portafilter.
4
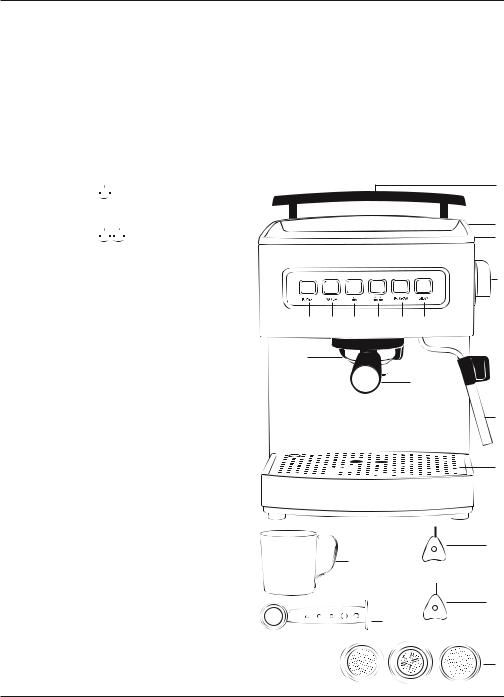
FEATURES AND BENEFITS
1.Water Reservoir Lid
2.Removable 64-ounce Water Reservoir
3.Cup-Warming Plate
Used to warm the espresso cups.
4.15 Bar Pump (not shown)
5.Power Button
Used to turn the espresso maker on and off. This button illuminates when pressed.
6.Manual Button
Used for a continuous pour of espresso.
7.1-cup Button 
Used for a single serving of espresso –
1.5ounces.
8.2-cup Button 

Used for a double serving of espresso –
3.0ounces
9.Program Button
Used to set the number of ounces desired.
10.Steam Button
Used when making cappuccinos and lattes. Will flash until ready for use.
11.Portafilter Holder
Can be used with ground or pod espresso. Has two positions, lock and unlock, for ease of cleaning.
12.Brew Head
For easy fit of the portafilter holder.
13.Steam or Hot Water Control Dial
Used to activate steam or hot water.
14.Commercial Steam Wand
Use to steam milk for cappuccinos and lattes.
15.Removable Drip Tray
Removable drip tray with grate.
16.Cleaning Pins
A. Use the black pin (larger pin) to clean any excess milk that gets stuck inside the steam wand.
B.Use the gray pin (smaller pin) to clean any coffee particles that get stuck inside the filter basket.
17.Stainless Frothing Pitcher
Used for steaming milk for cappuccinos and lattes.
18.Measuring Scoop/Tamping Tool
Use one side as a coffee scoop and the other to tamp the coffee grinds in the filter basket prior to brewing.
19.Filter Baskets
Use the one-cup filter basket for a single espresso and the two-cup filter basket for a double espresso, and pod filter basket for espresso pods.
20.BPA Free (not shown)
All materials that come in contact with liquid are BPA Free.
1
2
3
13
5 |
6 |
7 |
8 |
9 |
10 |
12
11
14
15
16 A
17
Black Pin
16 B
18
Grey Pin
19
5
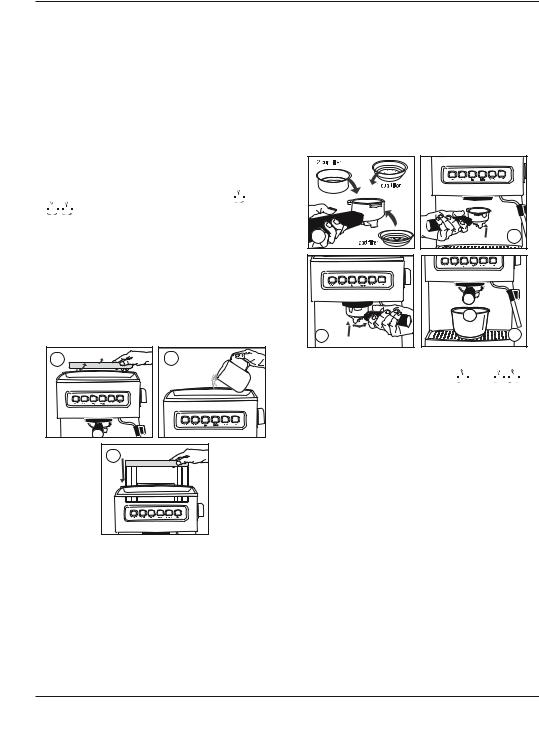
PREPARING YOUR ESPRESSO MACHINE
1.Place the espresso machine on a dry, stable countertop or other surface where you will be using the machine.
IMPORTANT: For first time use or if the machine has not been used for some time, it is important that the machine is rinsed as follows:
2.Insert the plug into a power outlet. Press the power button once to turn the espresso machine on. The light around the power button is solid; this is to indicate that your
espresso machine is on. The manual  and
and 
 buttons will flash to indicate that your espresso maker is heating up.
NOTE: Before turning on the espresso machine ensure that the steam and hot water control dial is in the O position.
If not, the manual and steam buttons will flash until the dial is returned back to the O position.
3.Make sure the drip tray and grate are in place.
1 |
2 |
3
5.Fit the portafilter holder with either the one cup, two cup or pod filter basket (4). Secure the portafilter handle to the brew head (5) (6).
6.Place a sufficiently large container under both pouring spouts. (7).
7.Press the manual button and allow the water to run through for approximately 5 to 10 seconds.
8.Place cups on the warming plate.
4 |
5 |
6 |
7 |
NOTE: If the water reservoir is empty, the unit will not function and the manual  and
and 
 buttons will flash until the reservoir is filled.
4.To fill the espresso machine with water, simply lift the lid of the water reservoir at the top of the espresso machine, (1) and fill with fresh cold water or filtered water (2) or remove the reservoir and place the water reservoir down firmly until the reservoir cover is flush with the top of the espresso machine (3).
Important: The unit will not function unless the water reservoir is properly in place.
6

PROGRAMMING YOUR ESPRESSO MACHINE
The Cuisinart® Programmable Espresso Maker has programming capabilities. Based on café settings, the  single and
 double espresso functions are set at 1.5 and 3.0 oz. However, by following a few simple steps, you can pre-program your perfect serving size down to the ounce.
Programming  Single Espresso
1.Prepare the portafilter holder with the one cup filter basket (8) and fill with finely ground espresso (9). Using the tamping tool, tamp the coffee grinds (10), or use a single pod of espresso coffee with the pod filter holder. Secure the portafilter holder to the brew head (11-12).
8 |
9 |
10 11 
12 |
13 |
2.Place a cup under both pouring spouts.
3.To begin programming press the program button. The light around the program button will show a constant blue light.
4.Press the  single espresso button once to start the espresso pour (13).The light around the
  single espresso button will flash.
5.Allow the espresso to pour until it reaches the desired level. Once that is reached, stop the
espresso pour by pressing the single |
|
espresso button. A beep will signify that the |
|
new setting for the |
|
single espresso |
|
operation has been |
|
programmed and |
|
stored in the machine’s |
|
memory. |
|
6. The espresso machine |
14 |
will then return to |
|
normal operation mode and is ready to make another espresso at the push of a button.
Programming 
 Double Espresso
1.Prepare the portafilter holder. Fit it with the two-cup filter basket (8) and fill with finely ground coffee (9). Using the tamping tool, tamp the coffee grinds (10). Secure the portafilter holder to the brew head (11-12).
2.Place two cups under both pouring spouts.
3.To begin programming press the program button. The light around the program button will show a steady blue light.
4.Press the 
 double espresso button once to start the espresso pour (14). The light around the
 button will flash.
5.Allow the espresso to pour until it reaches the desired level. Once that level is reached, stop
the espresso pour by pressing the 
 double espresso button. A beep will signify
that the new setting for the 
 double espresso operation has been programmed and stored into the machine’s memory.
6.The espresso machine will then return to normal operation mode and is ready to make another espresso at the push of a button
Resetting the Factory Settings
To revert to the original factory settings:
1.Press the program button once.
2.Press and hold down the manual button and program.
3.Continue holding down manual and program buttons for approximately 3 seconds or until you hear 2 beeps. When you hear the 2
beeps, the light around the  and
and 
 buttons will flash, and after that, the program light becomes solid. The espresso machine
7
 Loading...