


Hydrostatic Zero-Turn
Residential Riding Mower
Turf Equipment
MODEL
20HP Z-Force 44
23HP Z-Force 50
OPERATOR’S AND SERVICE MANUAL

TABLE OF CONTENTS
Foreword. . . . . . . . . . . . . . . . . . . . . . . . . . . . . . . . . . . . . . . . . . . . . . . . . . . . . . . . . . . . . . . 3
General Safety Operations . . . . . . . . . . . . . . . . . . . . . . . . . . . . . . . . . . . . . . . . . . . . . . . . . 4 A. General Operation . . . . . . . . . . . . . . . . . . . . . . . . . . . . . . . . . . . . . . . . . . . . . . . . . 4
B. Slope Operation . . . . . . . . . . . . . . . . . . . . . . . . . . . . . . . . . . . . . . . . . . . . . . . . . . . 5
C. Children . . . . . . . . . . . . . . . . . . . . . . . . . . . . . . . . . . . . . . . . . . . . . . . . . . . . . . . . . 5 D. Service . . . . . . . . . . . . . . . . . . . . . . . . . . . . . . . . . . . . . . . . . . . . . . . . . . . . . . . . . . 6
Safety Decals . . . . . . . . . . . . . . . . . . . . . . . . . . . . . . . . . . . . . . . . . . . . . . . . . . . . . . . . . . . 7
Specifications . . . . . . . . . . . . . . . . . . . . . . . . . . . . . . . . . . . . . . . . . . . . . . . . . . . . . . . . . . . 8 Operating Instructions . . . . . . . . . . . . . . . . . . . . . . . . . . . . . . . . . . . . . . . . . . . . . . . . . . . . 9
A. General . . . . . . . . . . . . . . . . . . . . . . . . . . . . . . . . . . . . . . . . . . . . . . . . . . . . . . . . . . 9
B. Controls . . . . . . . . . . . . . . . . . . . . . . . . . . . . . . . . . . . . . . . . . . . . . . . . . . . . . . . . 10 C. Initial Adjustments . . . . . . . . . . . . . . . . . . . . . . . . . . . . . . . . . . . . . . . . . . . . . . . . 12
D. Zero Turn Break-In and Operating Procedures. . . . . . . . . . . . . . . . . . . . . . . . . . . 13
Maintenance and Service . . . . . . . . . . . . . . . . . . . . . . . . . . . . . . . . . . . . . . . . . . . . . . . . . 15 A. Cleaning your Deck . . . . . . . . . . . . . . . . . . . . . . . . . . . . . . . . . . . . . . . . . . . . . . . 15 B. Mower Deck . . . . . . . . . . . . . . . . . . . . . . . . . . . . . . . . . . . . . . . . . . . . . . . . . . . . . 16 C. Hydrostatic Drive System . . . . . . . . . . . . . . . . . . . . . . . . . . . . . . . . . . . . . . . . . . . 17 D. Electrical Circuit . . . . . . . . . . . . . . . . . . . . . . . . . . . . . . . . . . . . . . . . . . . . . . . . . . 18 E. Tires . . . . . . . . . . . . . . . . . . . . . . . . . . . . . . . . . . . . . . . . . . . . . . . . . . . . . . . . . . . 20 F. Brakes. . . . . . . . . . . . . . . . . . . . . . . . . . . . . . . . . . . . . . . . . . . . . . . . . . . . . . . . . . 20 G.Hydraulic System. . . . . . . . . . . . . . . . . . . . . . . . . . . . . . . . . . . . . . . . . . . . . . . . . 21 H. Storage . . . . . . . . . . . . . . . . . . . . . . . . . . . . . . . . . . . . . . . . . . . . . . . . . . . . . . . . . 21
Maintenance Schedule . . . . . . . . . . . . . . . . . . . . . . . . . . . . . . . . . . . . . . . . . . . . . . . . . . . 22 Performance Adjustments . . . . . . . . . . . . . . . . . . . . . . . . . . . . . . . . . . . . . . . . . . . . . . . . 24 A. High Speed Tracking Adjustment . . . . . . . . . . . . . . . . . . . . . . . . . . . . . . . . . . . . . 24 B. Engine RPM Check and Adjustment . . . . . . . . . . . . . . . . . . . . . . . . . . . . . . . . . . 24 C. Deck Corner Ball Wheel Roller Settings. . . . . . . . . . . . . . . . . . . . . . . . . . . . . . . . 25 D. Deck Center Anti-Scalp Roller Settings . . . . . . . . . . . . . . . . . . . . . . . . . . . . . . . . 25 E. Lap Bar Adjustment . . . . . . . . . . . . . . . . . . . . . . . . . . . . . . . . . . . . . . . . . . . . . . . 25 F. Deck Leveling Procedure . . . . . . . . . . . . . . . . . . . . . . . . . . . . . . . . . . . . . . . . . . . 25
Wiring Diagram. . . . . . . . . . . . . . . . . . . . . . . . . . . . . . . . . . . . . . . . . . . . . . . . . . . . . . . . . 27
Slope Gauge. . . . . . . . . . . . . . . . . . . . . . . . . . . . . . . . . . . . . . . . . . . . . . . . . . . . . . . . . . . 28 Warranty . . . . . . . . . . . . . . . . . . . . . . . . . . . . . . . . . . . . . . . . . . . . . . . . . . . . . . . Back cover
This product may be covered by one or more of the following patents:
D409,208; 5,946,894; 6,070,690; Pending
2

FORWARD
The Hydrostatic Zero-Turn Riding Mower provides superb maneuverability and mid-mount cutting. The machine incorporates many safety features that should be studied by all operators before use. The list of safety precautions should receive particular attention.
This manual presents all of the operating and maintenance instructions necessary to keep your mower at peak efficiency. If operated and maintained properly, your mower will give dependable service.
 CAUTION:
Only thoroughly trained persons should operate and maintain this mower. This machine can cause serious injury to anyone who misuses it and does not understand its operation. For their personal safety, all operators are required to read this entire manual before operating the mower.
Hazard control and accident prevention are partially dependent upon the design and configuration of the equipment. Awareness, concern, prudence and proper training of the personnel involved in the operation, transport, maintenance and storage of the equipment, are essential for hazard control and accident prevention.
NOTE: The engine manufacturer is responsible for all engine-related issues with regards to performance, power-rating, specifications, warranty and service. Please refer to the engine manufacturer’s owner’s/operator’s manual, packed seperately with your unit, for more information.
3

WARNING
•The engine exhaust, some of its constituents, and certain vehicle components contain or emit chemicals known to the State of California to cause cancer, birth defects or other reproductive harm.
•This unit is equipped with an internal combustion engine and should not be used on or near any unimproved forest-covered, brush-covered, or grass-covered land unless the engine’s exhaust system is equipped with a spark arrester meeting applicable local or state laws (if any). If a spark arrester is used, it should be maintained in effective working order by the operator.
•In the State of California, the above is required by law (Section 4442 of the California Public Resources Code). Other States may have similar laws. Federal laws apply to federal lands. A spark arrester muffler may be available.
IMPORTANT |
SAFE OPERATION PRACTICES |
THIS SYMBOL POINTS OUT IMPORTANT SAFETY INSTRUCTIO NS WHICH, IF NOT FOLLOWED, COULD ENDANGER THE PERSONAL SAFETY AND/OR PROPERTY OF YOURSELF AND OTHERS. R EAD AN D FO LLOW ALL INSTRUCTIONS IN THIS MANUAL BEFORE ATTEM PTING TO OPER ATE YOUR UNIT. FAILURE TO COM PLY WITH THESE INSTRUCTIONS MAY RESULT IN
PERSONAL INJURY. WHEN YOU SEE THIS SYMBOL- |
HEED ITS WARNING. |
Your lawn mower was built to be operated according to the rules for safe operation
in this manual. As with any type of power equipment, carelessness or error on the DANGER part of the operator can result in injury. This lawn mower is capable of amputating
hands and feet or throwing objects. Failure to observe the following safety instructions could result in serious injury or death.
GENERAL SAFETY
OPERATIONS
A. GENERAL OPERATION
1.Read, understand and follow all instructions in the manual and on the machine before starting. Keep this manual in a safe place for future and regular reference and for ordering replacement parts.
2.Only allow responsible individuals familiar with the instructions to operate the machine. Know the controls and how to stop the machine quickly.
3.Do not put hands or feet under the cutting deck or near rotating parts.
4.Clear the area of objects such as rocks, toys, wire, etc. which could be picked up and thrown by the blades. A small object may have been overlooked and could be accidentally thrown by the mower in any direction and cause injury to you or a bystander. To help avoid a thrown objects injury, keep children, animals, bystanders and helpers at least 75 feet from the mower while it is in operation. Always wear safety glasses with side shields or safety goggles during operation or while performing and adjustment or repair, to protect eyes from foreign objects. Stop the blades when crossing gravel drives, walks or roads.
4
5.Be sure the area is clear of other people before mowing. Stop machine if anyone enters the area.
6.Never carry passengers.
7.Disengage the blades before shifting into reverse and backing up. Always look down and behind before and while backing.
8.Be aware of the mower and attachment discharge direction and do not point it at anyone. Do not operate the mower without either the entire grass catcher or the chute guard in place.
9.Slow down before turning. Operate the machine smoothly. Avoid erratic operation and excessive speed.
10.Never leave a running machine unattended. Always turn off the blades, place the transmission in neutral, set the parking brake, stop the engine and remove key before dismounting.
11.Turn off blades when not mowing.
12.Stop the engine and wait until the blades come to a complete stop before (a) removing the grass catcher or unclogging chute, or (b) making any repairs, adjusting or removing any grass or debris.
13.Mow only in daylight or good artificial light.
14.Do not operate the machine while under the influence of alcohol or drugs.
15.Watch for traffic when operating near or crossing roadways.
16.Use extra care when loading or unloading the machine into a trailer or truck. This unit

should not be driven up or down a ramp onto a trailer or truck under power, because the unit could tip over causing serious personal injury. The unit must be pushed manually on a ramp to load or unload properly.
17.Never make a cutting height adjustment while the engine is running if the operator must dismount to do so.
18.Wear sturdy, rough-soled work shoes and closefitting slacks and shirts. Do not wear loose fitting clothes or jewelry. They can be caught in moving parts. Never operate a unit in bare feet, sandals or sneakers.
19.Check overhead clearance carefully before driving under power lines, wires, bridges or low hanging tree branches, before entering or leaving buildings, or in any other situation where the operator may be struck or pulled from the unit, which could result in serious injury.
20.Disengage all attachment clutches, set the parking brake to the on position and put the lap bars to the neutral or out position, before attempting to start the engine.
21.Your mower is designed to cut normal residential grass of a height no more than 10”. Do not attempt to mow through unusually tall, dry grass (e.g. pasture) or piles of dry leaves. Debris may build up on the mower deck or contact the engine exhaust presenting a potential fire hazard.
22.Use only accessories approved for this machine by Cub Cadet. Read, understand and follow all instructions provided with the approved accessory.
B.SLOPE OPERATION
Slopes are a major factor related to loss of control and tip-over accidents, which can result in severe injury or death. All slopes require extra
caution. If you cannot back up the slope or if you feel uneasy on it, do not mow it.
For your safety, use the slope gauge included as a part of this manual (see pg. 27) to measure slopes before operating this unit on a sloped or hilly area. If the slope is greater than 15 degrees as shown on the slope gauge, do not operate this unit on that area or serious injury could result.
DO:
•Mow across slopes, not up and down.
•Remove obstacles such as rocks, limbs, etc.
•Watch for holes, ruts or bumps. Uneven terrain could overturn the machine. Tall grass can hide obstacles.
•Use slow speed. Choose a low enough speed so that you will not have to stop while on the slope.
•Follow the manufacture’s recommendations for counterweights with attachments to improve stability.
•Use extra care with grass catchers or other attachments. These can change the stability of the machine.
•Keep all movement on the slopes slow and gradual. Do not make sudden changes in speed or direction. Rapid acceleration or deceleration could cause the front of the machine to lift and rapidly flip over backwards, which could cause serious injury.
•Avoid starting or stopping on a slope. If the tires lose traction, disengage the blades and proceed slowly straight down the slope.
DO NOT:
•Do not turn on slopes unless necessary; then, turn slowly and use extra care.
•Do not mow near drop-offs, ditches or embankments. The mower could suddenly turn over if a wheel is over the edge of a cliff or ditch, or if an edge caves in.
•Do not mow on wet grass. Reduced traction could cause sliding.
•Do not try to stabilize the machine by putting your foot on the ground.
•Do not use the grass catcher on steep slopes.
C.CHILDREN
Tragic accidents can occur if the operator is not alert to the presence of children. Children are often attracted to the machine and the mowing activity. Never assume that children will
remain where you last saw them.
1. Keep children out of the mowing area and in watchful care of an adult other than the operator.
2.Be alert and turn the machine off if children enter the area.
3.Before and when backing up, look behind and down for small children.
4.Never carry children, even with the blades off. They may fall off and be seriously injured or may interfere with safe machine operation.
5.Never allow children under 14 years old to operate the machine. Children 14 years and over should only operate the machine under close parental supervision and proper instruction.
6.Use extra care when approaching blind corners, shrubs, trees or other objects that may obscure your vision of a child or other hazard.
5

7. Remove the key when the machine is left |
|
Repair the damage before restarting and |
|||
unattended to prevent unauthorized opera- |
|
operating the machine. |
|||
tion. |
|
|
9. |
Grass catcher components are subject to |
|
D. SERVICE |
|
|
wear, damage and deterioration, which could |
||
|
|
expose moving parts or allow objects to be |
|||
1. Use extreme care in handling gasoline and |
|
thrown. For your safety protection, frequently |
|||
other fuels. They are extremely flammable |
|
check the components and replace with man- |
|||
|
and the vapors are explosive. |
|
ufacturers recommended parts when neces- |
||
|
a. |
Use only an approved con- |
|
sary. |
|
|
|
tainer. |
10. |
Mower blades are sharp and can cut. Wrap |
|
b. |
Never remove fuel cap or add fuel with |
|
the blades or wear gloves, and use extra cau- |
||
|
the engine running. Allow the engine |
|
tion when servicing blades. |
||
|
to cool at least two minutes before |
11. |
Check park brake operation frequently. Adjust |
||
|
refueling. |
|
and service as required. |
||
c. |
Replace the fuel cap securely and |
12. |
Muffler, engine and belt guards become hot |
||
|
wipe off any spilled fuel before starting |
|
during operation and can cause a burn. Allow |
||
|
the engine as it may cause a fire or |
|
to cool down before touching. |
||
|
explosion. |
13. |
Do not change the engine governor settings |
||
d. |
Extinguish all cigarettes, cigars, pipes |
|
or overspeed the engine. Excessive engine |
||
|
and other sources of ignition. |
|
speeds are dangerous. |
||
e. |
Never refuel the machine indoors |
14. |
Observe proper disposal laws and regula- |
||
|
because fuel vapors will accumulate in |
|
tions. Improper disposal of fluids and materi- |
||
|
the area. |
|
als can harm the environment and the |
||
f. |
Never store the fuel container or |
|
ecology. |
||
|
machine inside where there is an open |
|
a. |
Prior to disposal, contact your local |
|
|
flame or spark, such as a gas hot |
|
|
Environmental Protection Agency to |
|
|
water heater, space heater or furnace. |
|
|
determine the proper method for dis- |
|
2. Never run a machine inside a closed area. |
|
|
posing of the waste. Recycling cen- |
||
3. To reduce fire hazard, keep the machine free |
|
|
ters are established to properly |
||
of grass, leaves or other debris build-up. |
|
|
dispose of materials in an environmen- |
||
Clean up oil or fuel spillage. Allow the |
|
|
tally safe fashion. |
||
machine to cool at least 5 minutes before stor- |
|
b. |
Use proper containers when draining |
||
ing. |
|
|
|
|
fluids. Do not use food or beverage |
4. Before cleaning, repairing or inspecting, make |
|
|
containers that may mislead someone |
||
certain the blade and all moving parts have |
|
|
into drinking from them. Properly dis- |
||
stopped. Disconnect the spark plug wire, and |
|
|
pose of the containers immediately fol- |
||
keep the wire away from the spark plug to pre- |
|
|
lowing the draining of fluids. |
||
vent accidental starting. |
|
c. |
DO NOT pour oil or other fluids into the |
||
5. Check the blade and engine mounting bolts at |
|
|
ground, down drain or into a stream, |
||
frequent intervals for proper tightness. Also |
|
|
pond, lake or other body of water. |
||
visually inspect blades for damage (e.g., |
|
|
Observe Environmental Protection |
||
excessive wear, bent, cracked). Replace with |
|
|
Agency regulations when disposing of |
||
blades which meet original equipment specifi- |
|
|
oil, fuel, coolant, brake fluid, filters, bat- |
||
cations. |
|
|
|
teries, tires and other harmful waste. |
|
6. Keep all nuts, bolts and screws tight to be |
15. |
We do not recommend the use of high pres- |
|||
sure the equipment is in safe working condi- |
|
sure washers to clean your unit. They may |
|||
tion. |
|
|
|
cause damage to electrical components; spin- |
|
7. Never tamper with safety devices. Check their |
|
dles; pulleys; bearings; or the engine. |
|||
proper operation regularly. Use all guards as instructed in this manual.
8.After striking a foreign object, stop the engine, remove the wire from the spark plug and thoroughly inspect the mower for any damage.
WARNING-YOUR RESPONSIBILITY: Restrict the use of this power machine to persons who read, understand and follow the warnings and instructions in this manual and on the machine.
6
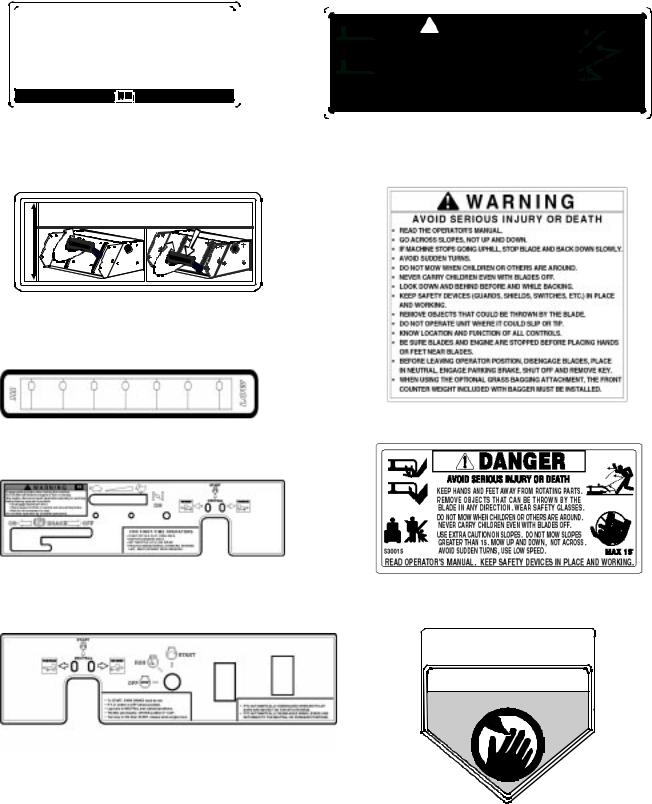
SAFETY DECALS AND LABELS
|
|
|
|
|
|
|
|
|
|
|
|
|
|
|
|
|
|
|
|
|
|
|
Belt |
|
|
|
|
|
|
|
|
|
DANGER |
|
|
|
|
|
|||
|
|
|
|
|
|
|
|
|
|
|
|
|
|
|
|
|||||
|
|
|
|
|
|
|
|
|
|
|
KEEP HANDS AND FEET AWAY. |
|
|
|
|
|||||
|
|
|
|
|
|
|
|
|
|
|
|
|||||||||
|
|
Routing |
|
|
|
|
|
|
|
|
|
DO NOT OPERATE MOWER |
|
|
|
|
||||
|
|
|
|
|
|
|
|
|
|
|
UNLESS CHUTE DEFLECTOR |
|
|
|
|
|||||
|
|
|
|
|
|
|
|
|
|
|
|
|
|
|
|
|
|
|
||
|
|
|
|
|
|
|
|
|
|
|
|
|
|
|
OR ENTIRE GRASS CATCHER IS |
|
|
|
|
|
|
|
|
|
|
|
|
|
|
|
|
|
|
|
|
IN ITS PROPER PLACE. |
|
|
|
S30503 |
|
|
|
|
|
|
|
|
|
|
|
|
|
|
|
|
|
|
|
|||
|
|
|
|
|
|
|
|
|
|
|
|
|
|
|
|
|
|
|
||
|
|
|
|
|
|
|
|
|
|
ASSEMBLE CHUTE DEFLECTOR TO THIS UNIT BEFORE OPERATING. |
||||||||||
|
|
|
|
|
|
|
|
|
|
|||||||||||
|
|
|
|
|
|
|
|
|
|
|||||||||||
|
|
|
|
|
|
|
|
|
|
|||||||||||
|
|
|
|
|
|
|
|
|
|
|
|
|
|
|
|
|
|
|
|
|
|
|
Part Number: 777I22421 (for 44” Deck) |
|
|
|
|
|
|
|
|
|
|
|
|||||||
|
|
|
|
|
|
|
|
|
|
|
|
|
||||||||
|
|
|
|
|
|
|
|
|
|
|
|
|
|
|
Part Number: 777S30503 |
|
|
|
|
|
DECKHIGHERLOWERCUTTING |
To unlock, pull part of handle inward. |
|
|
|
Lift unlocked handle to increase cutting height. |
|
To lock, release upper part of handle to move outward. |
I22093
Part Number: 777I22093
Part Number: 777S32161
Part Number: 777I22094
Part Number: 777I22290
Part Number: 777S30015
T O RE D UC E T H E RI SK O F I N J U RY,
D O N O T O P E R AT E M O W E R U N L E S S
DISCHARGE CHUTE COVER OR GRASS
C AT C H E R I S I N I T S P RO P E R P L AC E .
DANGER
KEEP HANDS and FEET AWAY
Part Number: 777I22291
Part Number: 777S30145
7
SPECIFICATIONS
Engine: |
20HP & 23HP Kohler |
Type: |
Vertical air cooled V-Twin |
|
|
Air Cleaner: |
Paper element |
|
|
Lube System: |
Pressurized with oil filter, drain valve with hose |
Starter: |
12-volt electric |
|
|
Traction Drive: |
Engine to two variable-speed integrated hydraulic pump and |
|
wheel motors on each drive wheel |
|
|
Cutter Deck;Drive: |
44" & 50” belt driven |
|
|
Clutch: |
Electric |
Deck Lift: |
Hand lever w/ lock for height adjustment |
|
|
Cutting Height: |
1-1/2" to 4" |
|
|
No. of Blades |
3, belt-driven, power take-off from engine |
Controls: |
Engine ignition and start switch; throttle & choke; left and right |
|
steering levers; electric blade clutch switch; parking brake; mower |
|
deck lift |
|
|
Parking Brake: |
Mechanical linkage attached to the brake handle |
Front Caster Wheels: |
11 x 5.00 - 5 |
|
|
Tire Pressure: |
8-10 psi rear, 20-25 psi front caster |
|
|
Drive Wheels: |
18 x 8.50 - 8 for 44” & 18 x 9.50-8 for 50” |
Frame: |
Structural steel, all welded construction |
|
|
Seat: |
Adjustable seat. 4" Adjustment, w/ arm rests |
|
|
Fuel Tank: |
One 5 gallon with shut off valve |
Ground Speed: |
0-7 MPH forward. 0-3 MPH reverse |
|
|
Instrumentation: |
Hour meter |
|
|
Net Weight: |
598 lbs w/44" & 618 lbs w/50” |
8
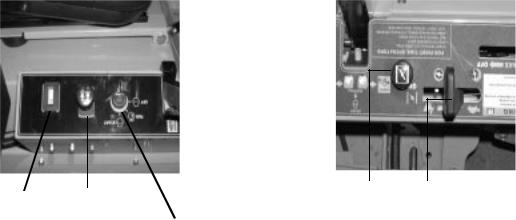
OPERATING INSTRUCTIONS
Figure. 1
Hour Meter |
Electric Blade |
|
Clutch Switch |
||
|
||
|
Ignition Switch |
A.General
1.When Mowing:
a.Keep adults, children, and pets away from the area to be mowed.
b.When operating this mower, in the forward direction, do not allow the steering levers to return to neutral on their own. Always maintain a firm grip on the levers, operate them smoothly and avoid any sudden movements of the levers when starting and stopping.
c.If the mower is equipped for side discharge, never use the mower without the discharge chute installed and placed in the down position.
d.Always remove debris and other objects from the area to be mowed (Note: debris and loose grass will reduce traction).
e.Mow only in daylight or good artificial light.
f.Watch for holes, sprinkler heads, and other hidden hazards.
g.Avoid driving too close to trees, creeks, ditches, sand traps, and other obstacles.
h.Before backing up, check behind and watch where you are going.
i.Always reduce speed when making a turn, and when grass is wet.
j.Always mow across slopes, never up and down the slope. Do not operate on steep slopes and slow down before turning.
Avoid turning downhill if possible, start at the bottom and work up to the top. Use extra care and go slowly when turning downhill. Control the speed and direction of the zero turn machine “primarily” with the speed/directional control (lap bar) of the downhill side of the machine...I.E.,
Figure. 2
Choke |
Engine throttle |
maintain the uphill side lap bar “essentially” in a fixed position.
k.Be careful when crossing gravel paths or roadways. Always turn off the blade clutch switch and wait until the blades stop rotating and raise the cutting deck to the transport position. Always allow other vehicles to have the right of way.
l.If you hit a solid object while mowing, turn off the blade clutch switch, place the steering levers in the neutral, opened-out position, move the throttle to slow, set the parking brake, shut off the engine, and take the key from the ignition switch. Inspect for damage. Repair the damage. Make sure the blades are in good condition and that the blade bolts are tight before restarting the engine.
m.Never leave the mower unattended without performing the following: turn off the blade clutch switch, placing the steering levers in the neutral open-out position, moving the throttle to slow, setting the parking brake, shutting off the engine and taking the key from the ignition switch.
n.Never walk or stand on the discharge side of the mower when the engine is running. Turn off the blade clutch switch if another person approaches while you are operating the mower.
o.Never attempt to operate the traction unit without having the mowing deck attached.
p.Keep the mower and especially the engine and hydraulic components clean and free of grease, grass, and leaves to reduce the chance of fire and permit proper cooling.
9
2.Safety Awareness when Mowing
a.Do not operate on steep slopes, those above 15 degrees (27% slope).
b.Avoid turning downhill if possible, use extra care and go slowly.
c.Avoid turning when going downhill, traction is at a minimum going downhill.
d.Do not operate with discharge side of the mower toward streets, buildings, playgrounds, parking lots, other machines, animals, and other people.
e.Avoid operation or use extreme care if the traction surface is wet, unstable, or slippery.
f.Use extra care when grass clippings, leaves, pine needles, or debris are present as traction can be reduced.
g.Slow-down before turning and come to a complete stop before any zero turn maneuver.
h.Do not stop machine or park machine over combustible materials such as dry grass, leaves, debris, etc.
3.To Mow Grass and Produce a Striped Pattern
a.Pick a point on the opposite side of the area to be mowed (post, tree, shrub, etc.).
b.If on a hillside, start at the bottom so that the turns are uphill rather than downhill.
c.Align the mower so as to head directly toward the object on the far side.
d.Slowly increase the speed of the machine to match cutting conditions, terrain, and operator familiarity with the controls and keep the machine headed directly toward the alignment object. Do not go fast as to reduce cut quality or to be uncomfortable in controlling the speed and direction of the machine.
e.When approaching the other end of a strip, slow down or stop before turning. A U-turn is recommended unless a zero turn is required. The speed of a U-turn that will allow for machine controllability and minimal turf defacement will be dependent on several factors including: the speed during turning, the radius of the turn, the tire tread pattern, the traction coefficient of the tire to the traction surface, the slope of the traction surface.
f.Remember, a zero turn requires that the forward or reverse travel of the machine be stopped prior to the initiation of the turn or severe turf defacement can occur.
g.To prevent rutting or grooving of the turf, change the direction that the strips are mowed by approximately 45 degrees the
next and each subsequent time that the area is mowed.
B.Controls
1.Engine Ignition and Start Switch: (See Figure 1.) Located on the instrument housing below the right side of the operator’s seat. When the key is inserted and turned clockwise, 45 degrees, the ignition circuit is closed. Turning the switch further against spring pressure starts the engine. The engine will only start if the blade clutch switch is in the “off” position, the parking brake is engaged and the left and right steering levers are in the neutral, opened-out position. The key should always be removed from the switch if the operator leaves the mower’s seat.
2.Engine Throttle Control: (See Figure 2.) Located on the left side of the mower next to the operator’s seat. Moving the throttle control from the rear to the front will increase the engine speed from slow to fast. Stop at the detent, or the choke will be activated.
3.Left and Right Steering Levers: (See Figure 3.) These hinged levers open out to the side in the neutral position to permit the operator to be seated or to leave the mower’s seat. The operator, when seated, can pull the levers up to the operating position, a comfortable forearm’s length away. These levers control all of the movements of the mower. Pushing both levers forward causes the mower to move forward. Pulling both levers back causes the mower to move backward. Pushing one lever ahead of the other lever causes the traction wheel on the side where the lever is ahead to rotate faster than the other traction wheel, making the mower turn toward the side where the lever is behind. When one lever is pushed forward and the other lever pulled back the same amount, one traction wheel will turn in reverse and the mower will turn within its own length.
In order to start the engine, both steering levers must be opened out to the side in the neutral position; the parking brake must be engaged; and the blade clutch switch must be “off”. However, once the engine starts, the parking brake must be released before the operator places the steering levers into the operating position or the engine will automatically shut off.
Note: The Steering Lever will return toward neutral when released, but they should be placed in neutral by the driver. If the Drive Handles are not placed in neutral, the tractor may creep.
10
 Loading...